HONDA CIVIC 2002 7.G Workshop Manual
CIVIC 2002 7.G
HONDA
HONDA
https://www.carmanualsonline.info/img/13/5744/w960_5744-0.png
HONDA CIVIC 2002 7.G Workshop Manual
Trending: rear view mirror, maintenance, oil level, oil type, heating, headlight, hood open
Page 931 of 1139
Audio System
Audio Unit Removal/lnstallation
NOTE:. Put on gloves to protect your hands.. Take care not to scratch the dashboard and relatedpa rts.
1. Make sure you have the anti-theft code for the radio,
then write down the frequencies for the radio's
preset buttons.
2. Remove the driver's dashboard lower cover (see
page 20-59).
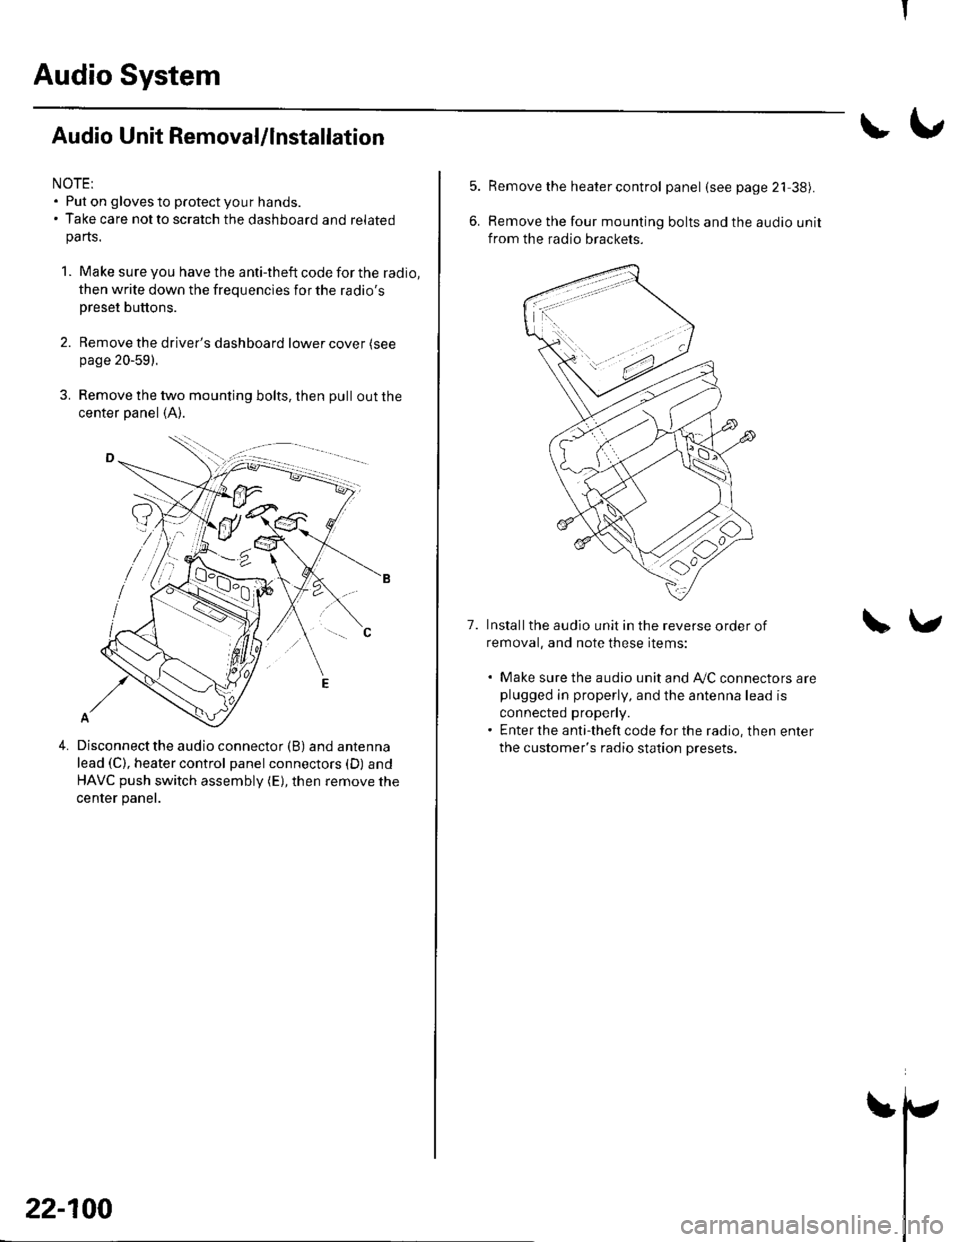
3. Remove the two mounting bolts, then pull out the
center panel (A).
4.Disconnect the audio connector (B) and antenna
lead (C), heater control panel connectors (D) and
HAVC push switch assembly (E), then remove the
center panel.
22-100
!\,
7.
Remove the heater control panel (see page 21 38).
Remove the four mounting bolts and the audio unit
from the radio brackets.
Installthe audio unit in the reverse order of
removal, and note these items:
. Make sure the audio unit and A/C connectors areplugged in properly, and the antenna lead is
connected properly.. Enter the anti-theft code for the radio, then enter
the customer's radio station presets.
\v
I
Page 932 of 1139
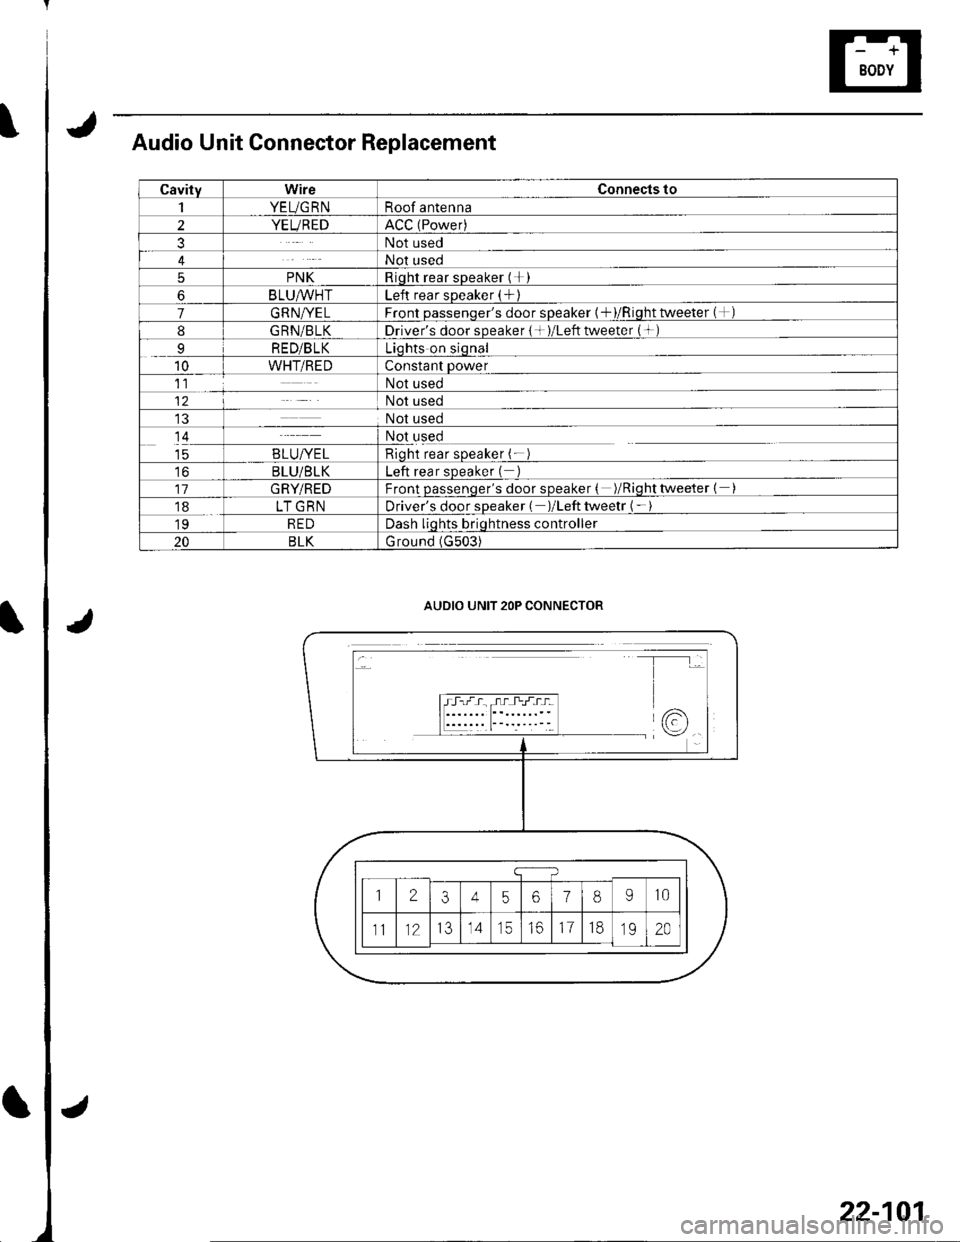
Audio Unit Connector Replacement
CavityWireConnects to
1YEUG RNRoof antenna
2YEUREDACC (Power)
3Not used
4Not used
5PNKRioht rear sDeaker (+I
6BLU^/vHTLeft rear sDeaker (+)
7GRN/YELFront oassenqer's door sDeaker {+)/Riqht tweeter (+)
8G RN/BLKDriver's door speaker { + )/Left tweeter (+ )
9RED/BLKLiqhts on siqnal
10WHT/REDConstant power
11Not used
12Not used
Not used
14Not used
taB LU/YE LRioht rear soeaker (-
toBLU/BLKLeft rear sDeaker (
11GRY/REDFront passenqer's door speaker ( )/Riqhttweeter {
18LT GRNDriver's door sDeaker ( )/Left tweetr ( -
19REDDash liqhts briqhtness controller
20BLKG round (G503)
AUDIO UNIT 2OP CONNECTOR
22-101
Page 933 of 1139
Audio System
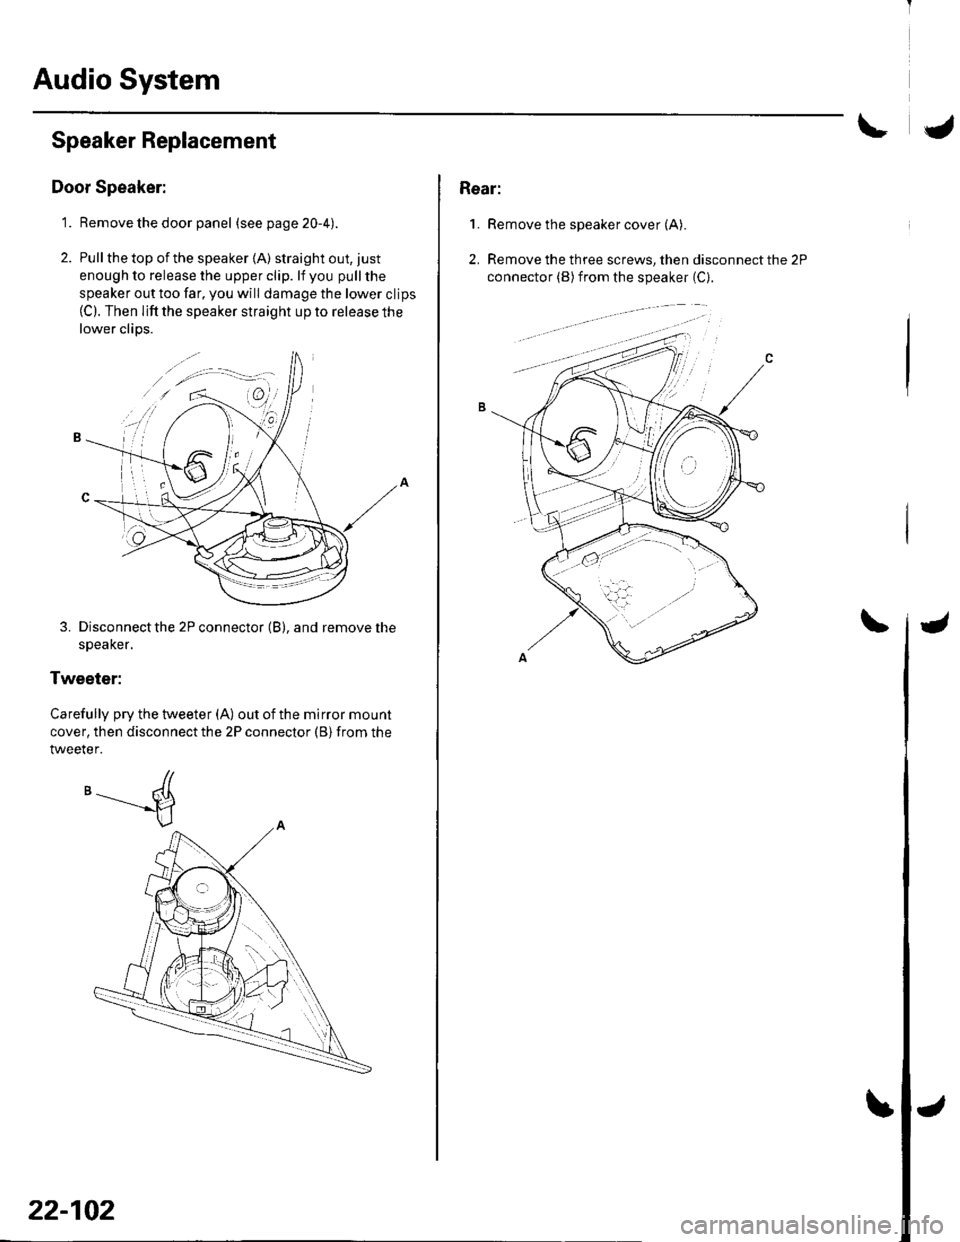
Speaker Replacement
Door Speaker:
1. Remove the door panel (seepage20-4).
2. Pull the top of the speaker {A) straight out, just
enough to release the upper clip. lf you pull the
speaker out too far, you will damage the lower clips(C). Then lifi the speaker straight up to release the
lower clips.
3. Disconnect the 2P connector (B), and remove the
speaKer.
Tweeter:
Carefully pry the tweeter (A) out of the mirror mount
cover, then disconnect the 2P connector (B) from the
tweeter.
'-----d
22-102
Rear:
1.Remove the speaker cover (A).
Remove the three screws, then disconnect the 2P
connector (B) from the speaker (C).
2.
Page 934 of 1139
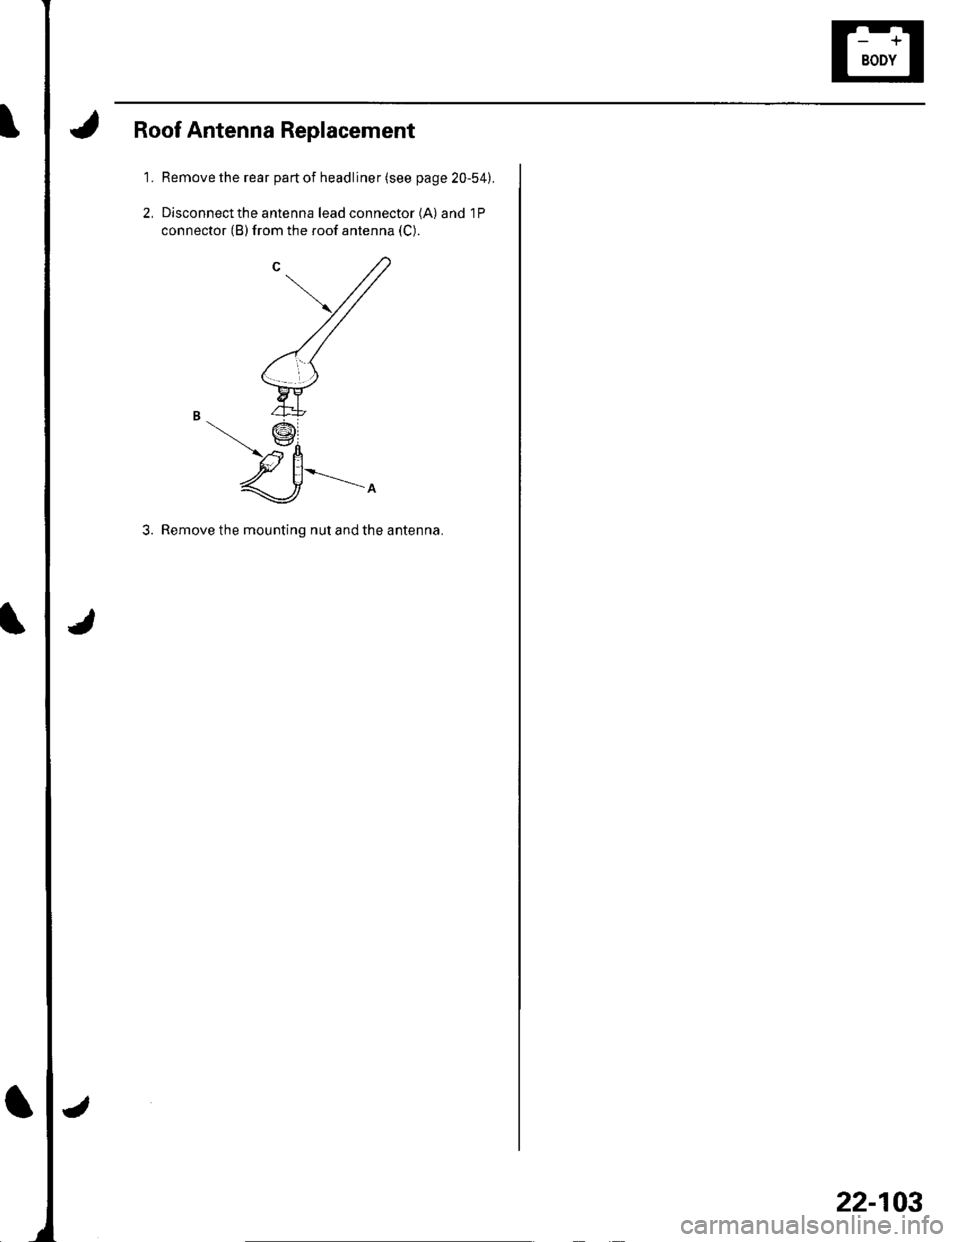
Roof Antenna Replacement
1. Remove the rear part of headliner (see page 20-54).
2, Disconnect the antenna lead connector (A) and 1P
connector (B) from the roof antenna (C).
3. Remove the mounting nut and the antenna.
22-103
Page 935 of 1139
Rear Window Defogger
J
I
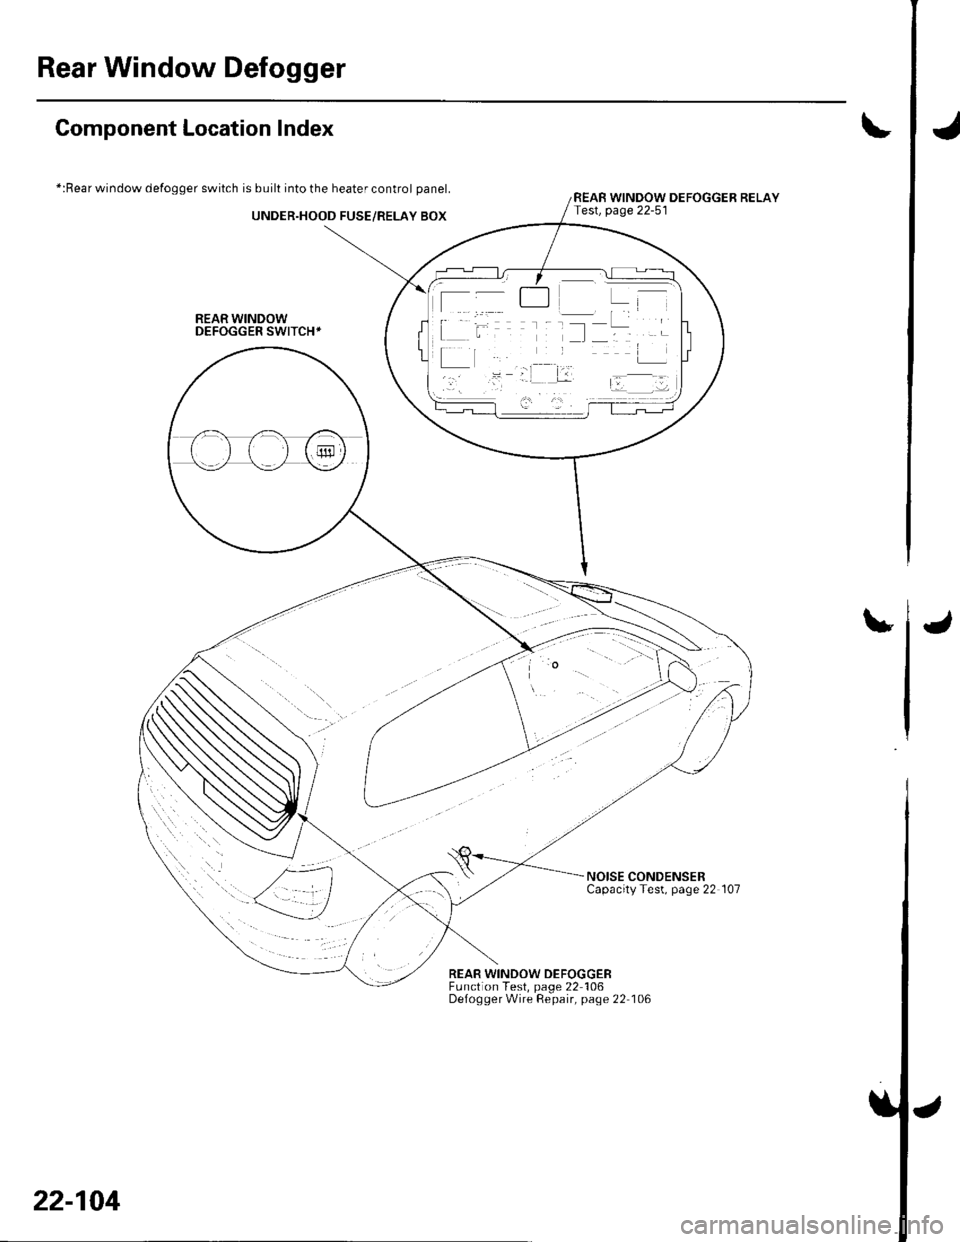
Component Location Index
*:Rear window defogger switch is built into the heater control panel.
UNDER.HOOD FUSE/RELAY BOX
REAR WINDOWDEFOGGER SWITCH+
t
REAR WINDOW DEFOGGER RELAYTest, page 22-51
u
NOISE CONDENSERCapacityTest, page 22 107
REAR WINDOW DEFOGGEBFunction Test, page 22 106Defogger Wire Repair, page 22 106
22-104
J
Page 936 of 1139
t
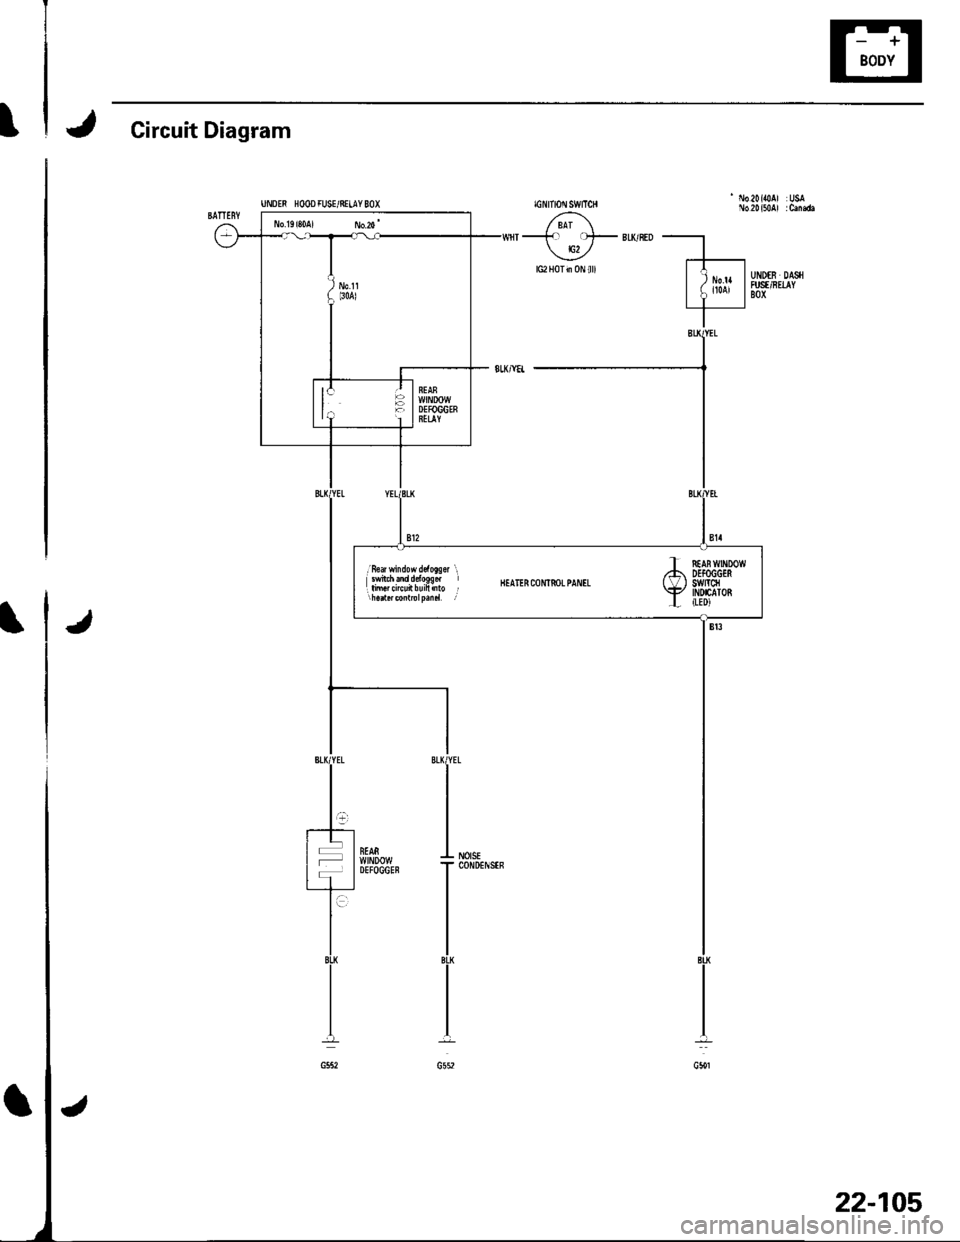
J Circuit Diagram
J
;Hl}lj.'fl,1fl1fi" BEATERcoNrf,oLpANrL
T f,rAi wrxDow,74 DEfOGGES( \/ I SWrcfl\iP INDIATORL ILEDI
22-105
Page 937 of 1139
Rear Window Defogger
Function Test
NOTE:. Be careful not to scratch or damage the defogger
wires with the tester probe.
. Before testing, check the No. 11 (30A) fuse in the
under-hood fuse/relay box and No. '14 ('10A) fuse in
the under-dash fuse/relay box.
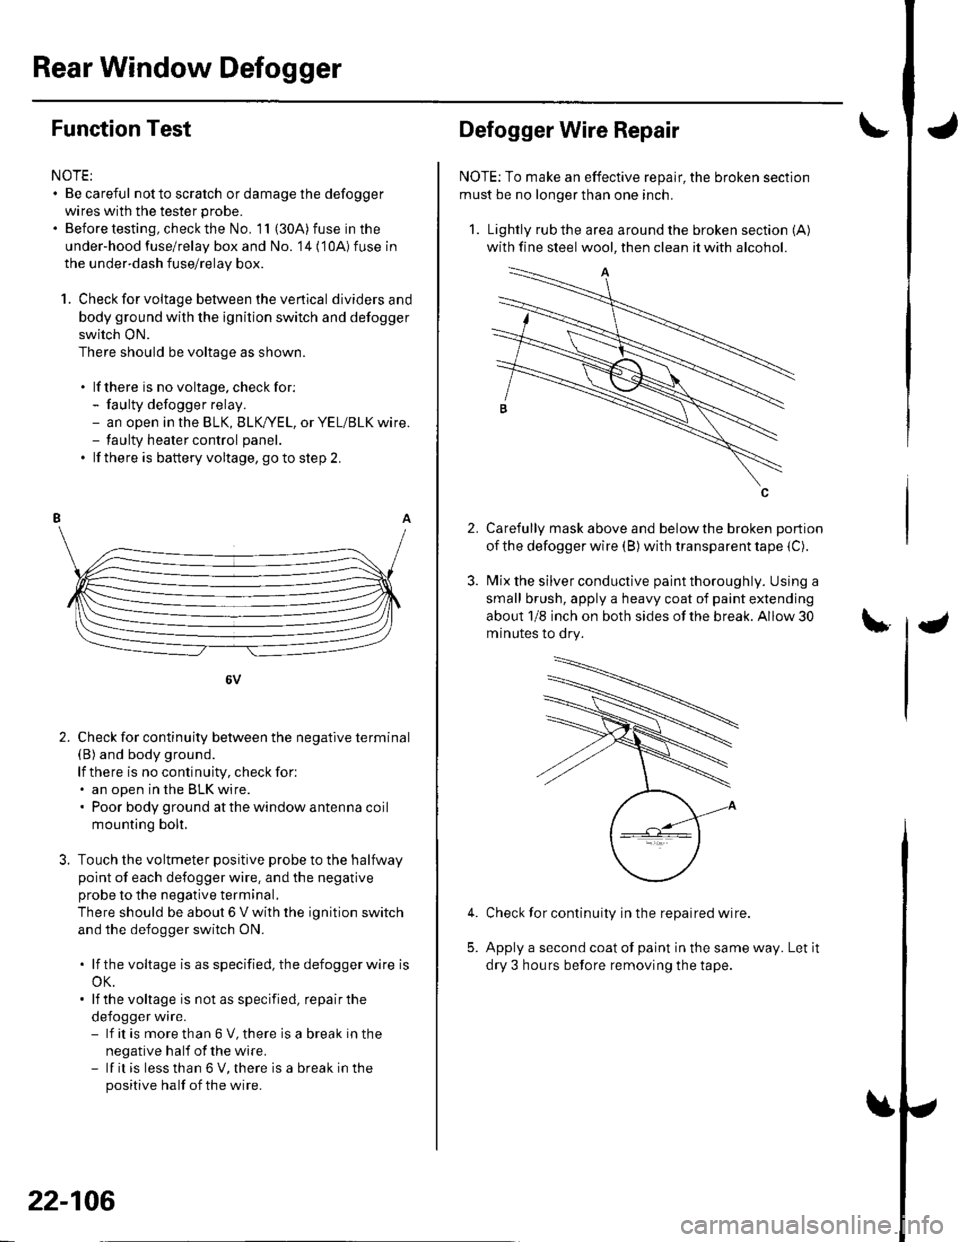
1. Check for voltage between the ve rtica I dividersand
body ground with the ignition switch and defogger
switch ON.
There should be voltage as shown.
. lf there is no voltage. checkfor:- faulty defogger relay.- an open in the BLK, BLK,/YEL, or YEL/BLK wire.- taulty heater control panel.
. lf there is battery voltage, goto step 2.
6V
Check for continuity between the negative terminal(B) and body ground.
lf there is no continuity, check for:. an open in the BLK wire.. Poor body ground at the window antenna coil
mounting bolt.
Touch the voltmeter positive probe to the halfway
point of each defogger wire. and the negative
probe to the negative terminal,
There should be about 6 V with the ignition switch
and the defogger switch ON.
. lf thevoltage is asspecified, the defoggerwlre is
oK.. lf the voltage is not as specified, repair the
defogger wire.- lf it is more than 6 V, there is a break in the
negative half of the wire.- lf it is less than 6 V, there is a break in the
positive half of the wire.
2.
22-106
2.
Defogger Wire Repair
NOTE: To make an effective repair, the broken section
must be no longer than one inch.
1. Lightly rub the area around the broken section (A)
with fine steel wool, then clean it with alcohol.
Carefully mask above and below the broken portion
of the defogger wire (B) with transparent tape {C).
Mix the silver conductive paint thoroughly. Using a
small brush, apply a heavy coat of paint extending
about 1/8 inch on both sides of the break. Allow 30
minutes to dry.
Check for continuity in the repaired wire.
Apply a second coat of paint in the same way. Let it
dry 3 hours before removing the tape.
5.
Page 938 of 1139
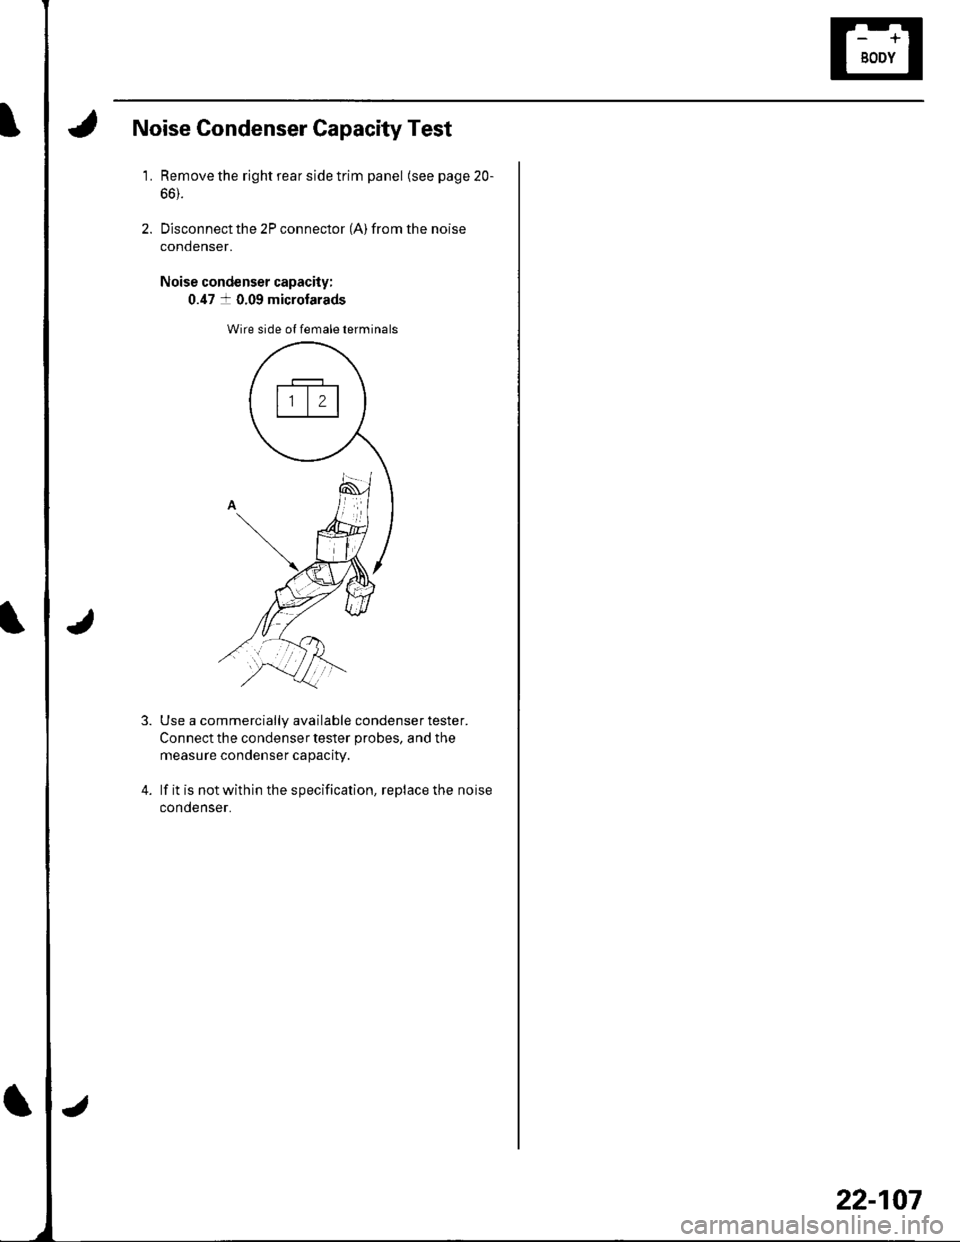
Noise Gondenser Capacity Test
1.Remove the right rear side trim panel (see page 20-
66).
Disconnect the 2P connector (A) from the noise
condenser.
Noise condenser capacity:
0.47 a 0.09 microfarads
Wire side ol female terminals
4.
Use a commercially available condenser tester.
Connect the condenser tester probes, and the
measure condenser capacity.
lf it is not within the specification, replace the noise
condenser.
22-107
Page 939 of 1139
Moonroof
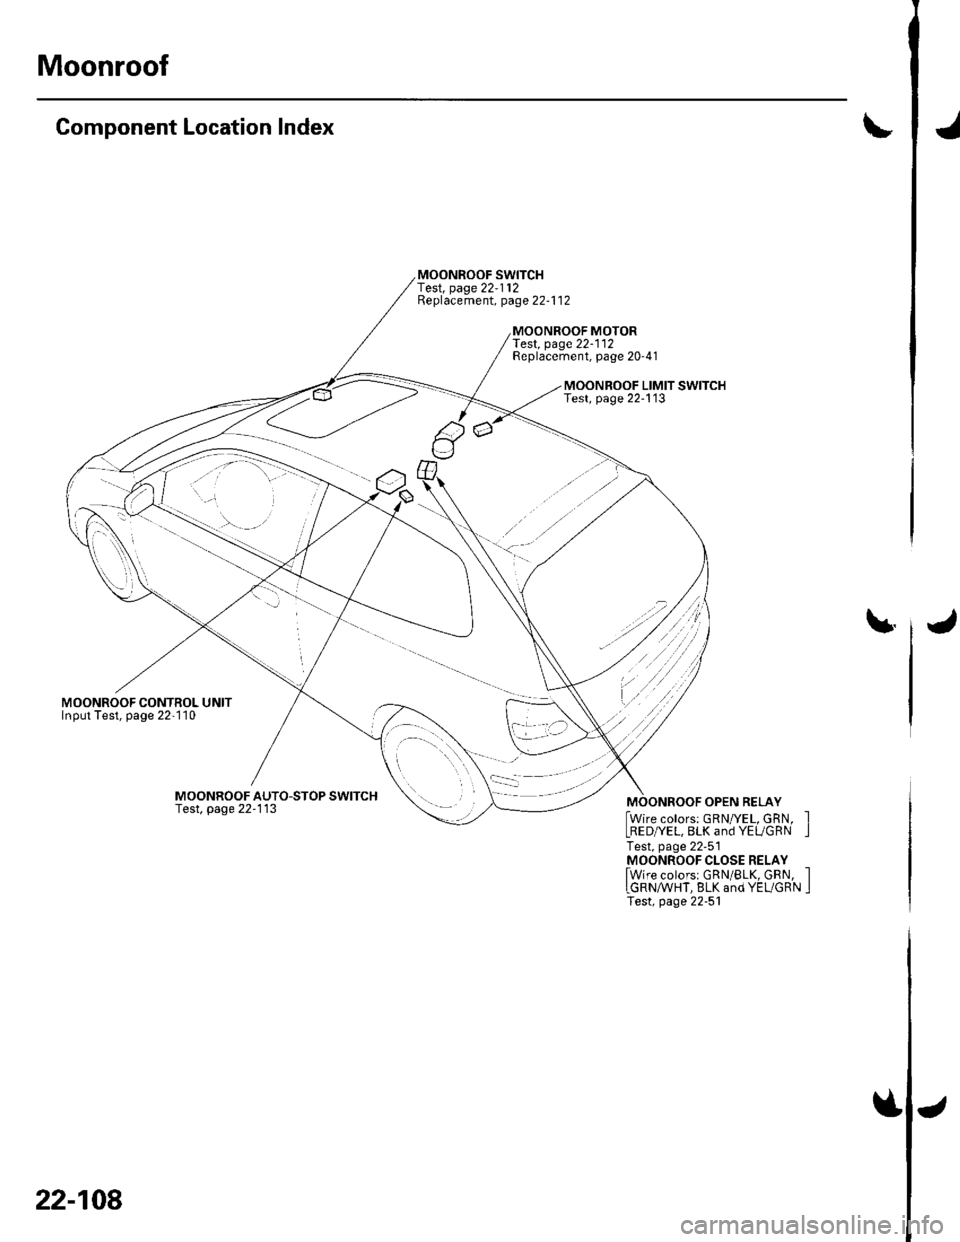
Component Location Index
MOONROOF CONTROL UNITInput Test, page 22-'l10
MOONROOF SWITCHf e$, page 22-112Replacement, page 22-1 12
Test. page22-112Replacement, page 20-41
MOONROOF LIMIT SWITCHTest, page 22-113
\|.
MOONROOF AUTO-STOP SWITCHTest, page 22'113MOONROOF OPEN RELAY
lwire colors: GRN/YEL, GRN, ILRED/YEL, BLK and YEUGRN ITest, page 22-51MOONROOF CLOSE RELAY
lwire colorsr GRN/BLK, GRN, ILGRN/WHT, BLK and YEL/GRN ITest, page 22-51
22-108
Page 940 of 1139
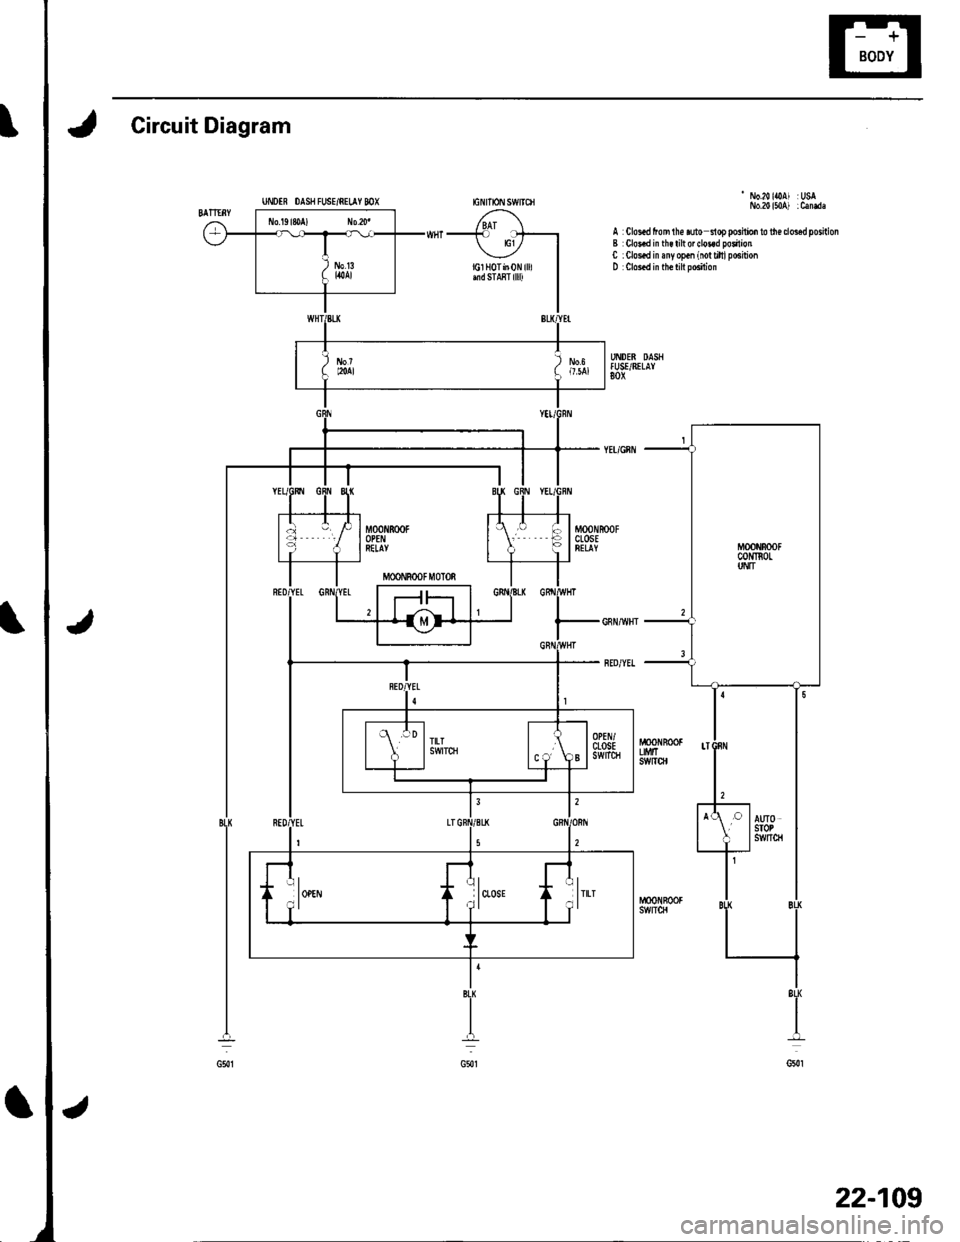
Circuit Diagram
- No.20lOAl :USNo.20150 ) :Canda
A Clos.d fom lh€ ruto nop poshio. to lh€ doed porhionB Clo!.d in th€ lilt or do3.d poilionC : Clo!.d in any op.n (io! riltl posirionD Clos.d in th€ tilt po6iiion
UNDIR OAS8 FUSE/NILAY MX
BL|(
+
G50t
8LI
I
G5{1
22-109
Trending: oil type, dashboard, key fob battery, manual transmission, seat adjustment, Multiplex, key battery

