relay HONDA CIVIC 2003 7.G User Guide
[x] Cancel search | Manufacturer: HONDA, Model Year: 2003, Model line: CIVIC, Model: HONDA CIVIC 2003 7.GPages: 1139, PDF Size: 28.19 MB
Page 201 of 1139
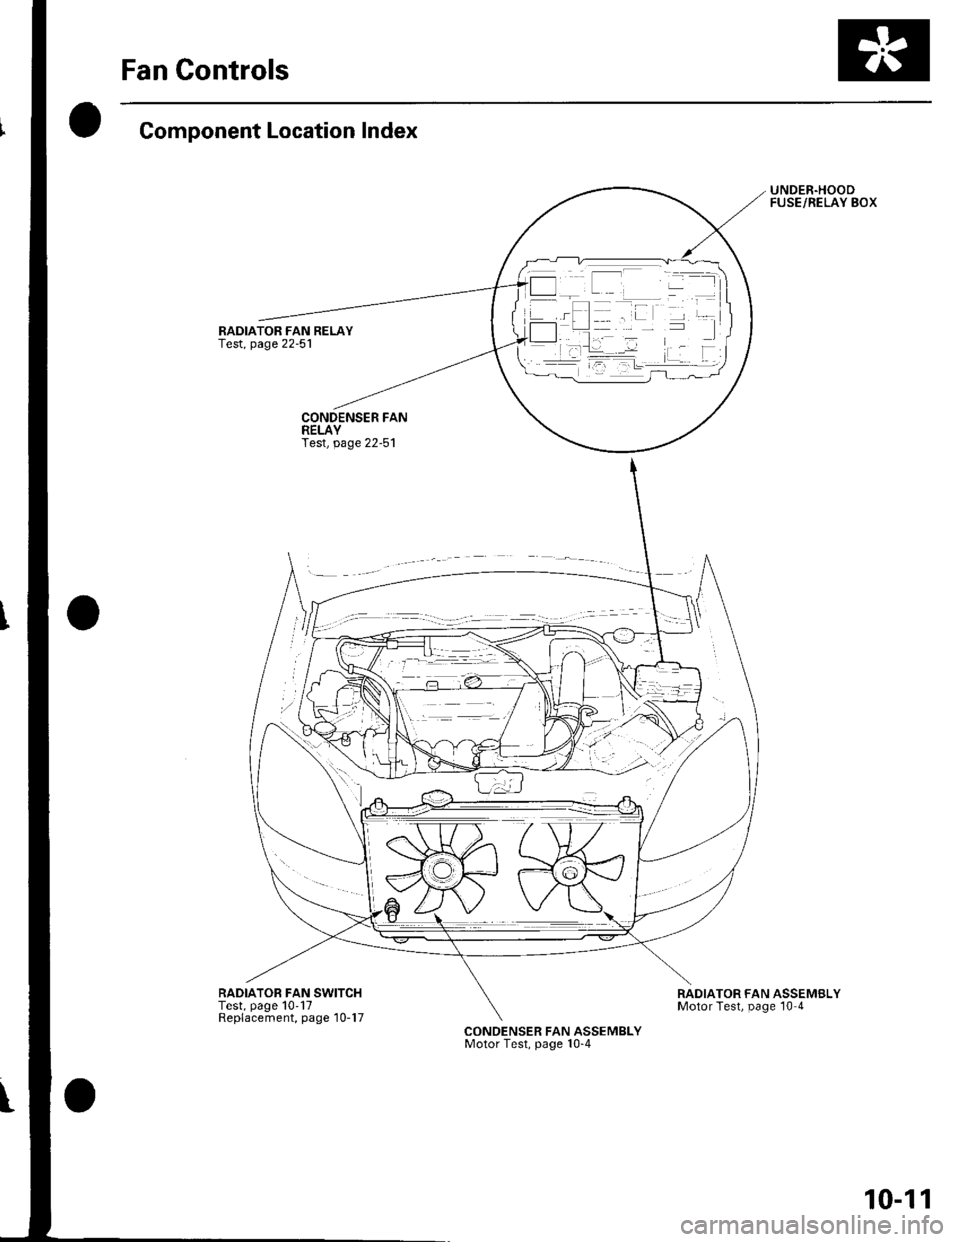
Fan Controls
Component Location Index
RADIATOR FAN RELAY
RADIATOB FAN SWITCHTest, page 10'17Replacement, page'10-17
UNDER.HOODFUSE/RELAY BOX
RADIATOR FAN ASSEMBLYMotor Test, page 10 4
CONDENSER FAN ASSEMBLYMotor Test, page 10-4
10-11
Page 203 of 1139
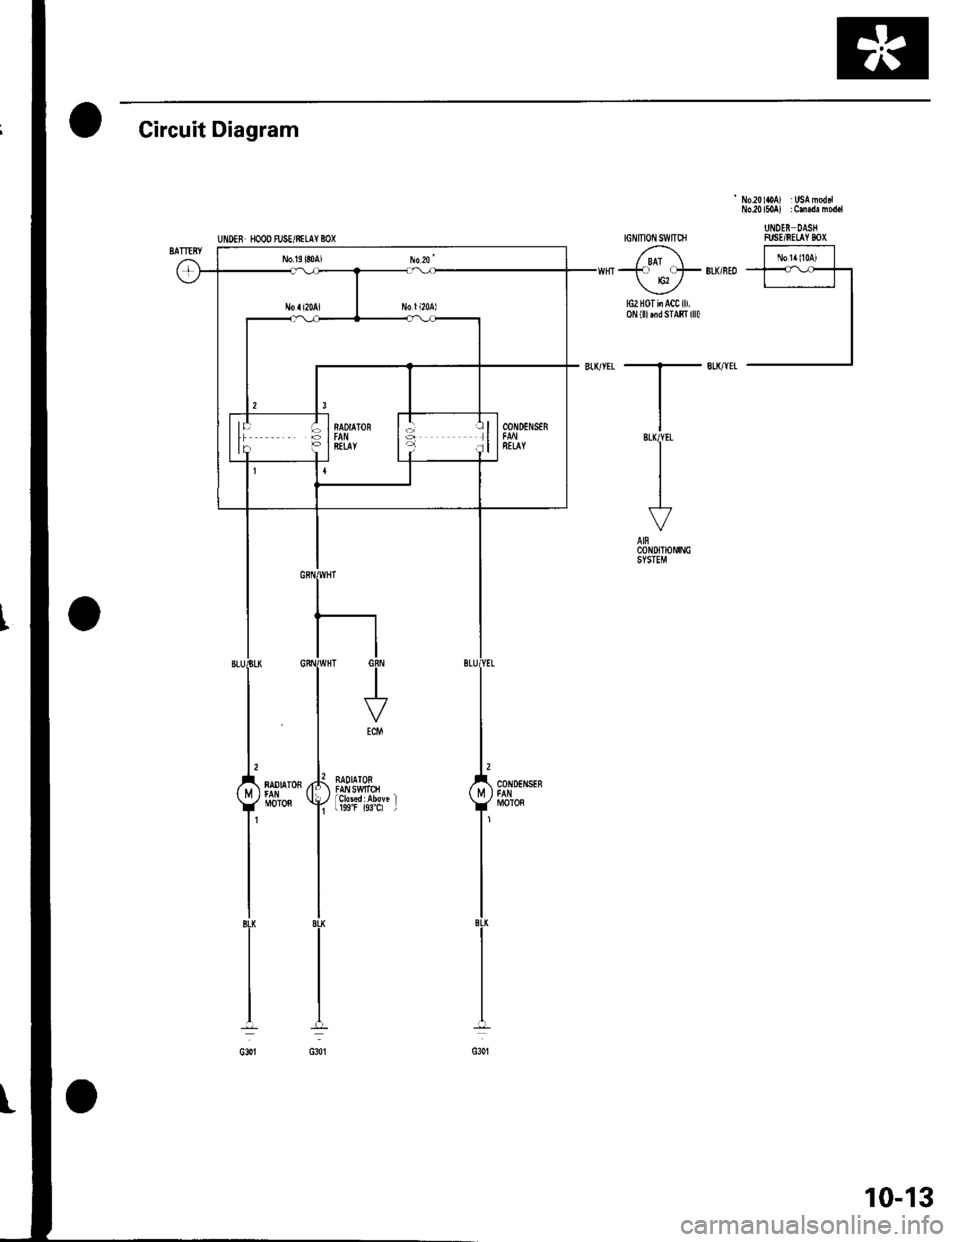
oCircuit Diagram
UIIDEF HOOD FJSE/NILAY BOX
' No.20loA) : USA moddNo.20l50A) : Cm.de mod.l
UNDEN DASXFUSE/RELAY BOX
lG2H0TiiAClill,0N{lllrndSTABI llll)
10-13
Page 204 of 1139
Fan Gontrols
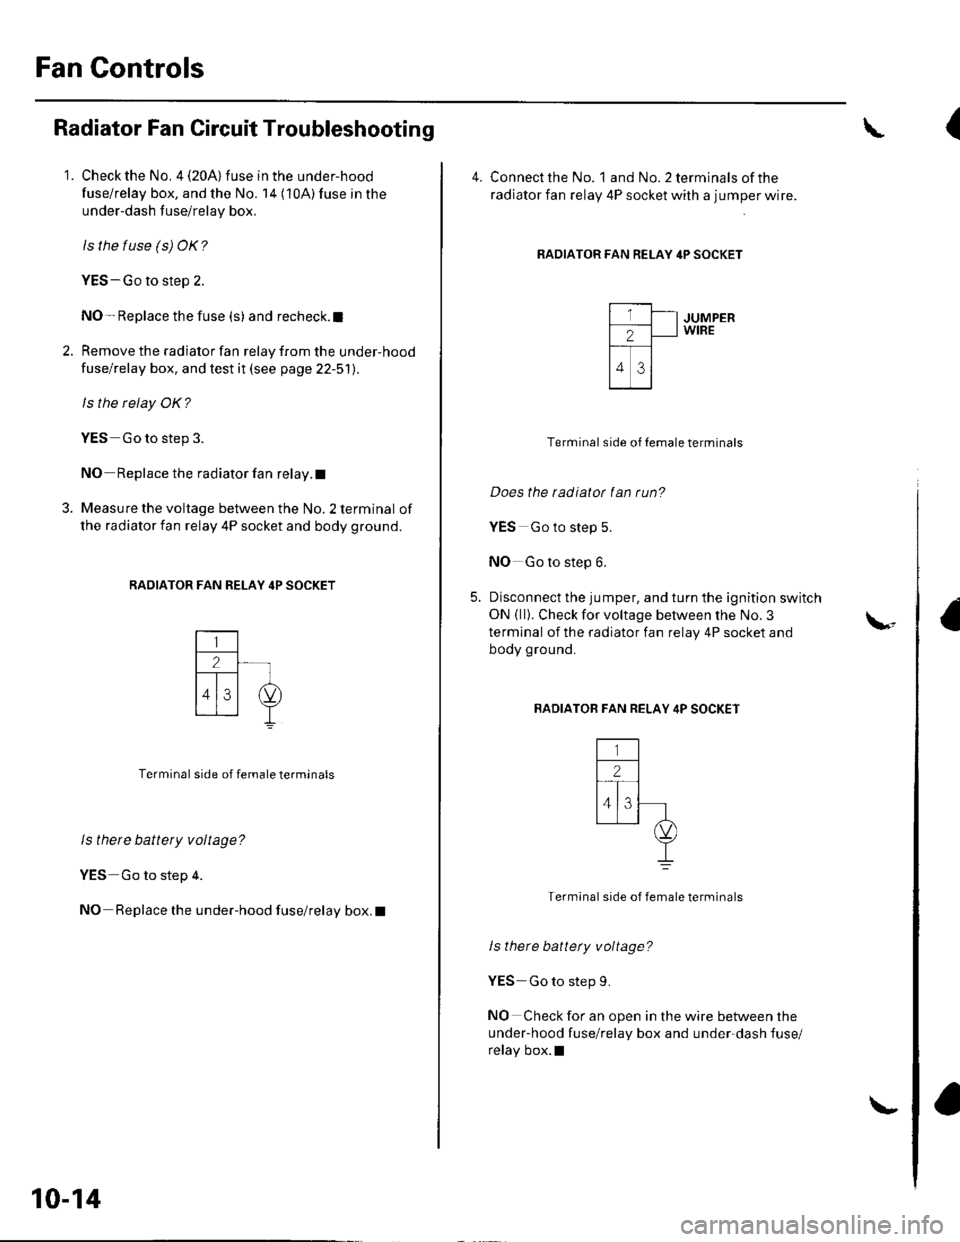
Radiator Fan Circuit Troubleshooting
1. Check the No. 4 (20A) fuse in the under-hood
fuse/relay box, and the No. 14 (10A) fuse in the
under-dash fuse/relay box.
ls the tuse (s) OK?
YES-Go to step 2.
NO- Replace the fuse (s) and recheck.l
2. Remove the radiator fan relay from the under-hood
fuse/relay box, and test it (see page 22-51).
ls the relay OK?
YES Go to step 3.
NO Replace the radiator fan relay. t
3. Measure the voltage between the No. 2 terminal of
the radiator fan relay 4P socket and body ground.
RADIATOR FAN RELAY 4P SOCKET
Terminal side of female terminals
ls there battery voltage?
YES Go to step 4.
NO Replace the under-hood fuse/relay box. I
10-14
\-
(
4. Connect the No. landNo.2terminalsofthe
radiator fan relay 4P socket with a jumper wire.
RADIATOR FAN RELAY 4P SOCKET
JUMPERWIRE
Terminal side of Iemale terminals
Does the radiatot fan run?
YES Go to step 5.
NO Go to step 6.
Disconnect the jumper, and turn the ignition switch
ON { ll}. Check for voltage between the No. 3
terminal of the radiator fan relay 4P socket and
body ground.
BADIATOB FAN RELAY 4P SOCKET
Termlnal side of female terminals
ls there battety voltage?
YES-Go to step 9.
NO Check for an open in the wire between the
under-hood fuse/relay box and under-dash fuse/
relay box.l
\-
Page 205 of 1139
7.
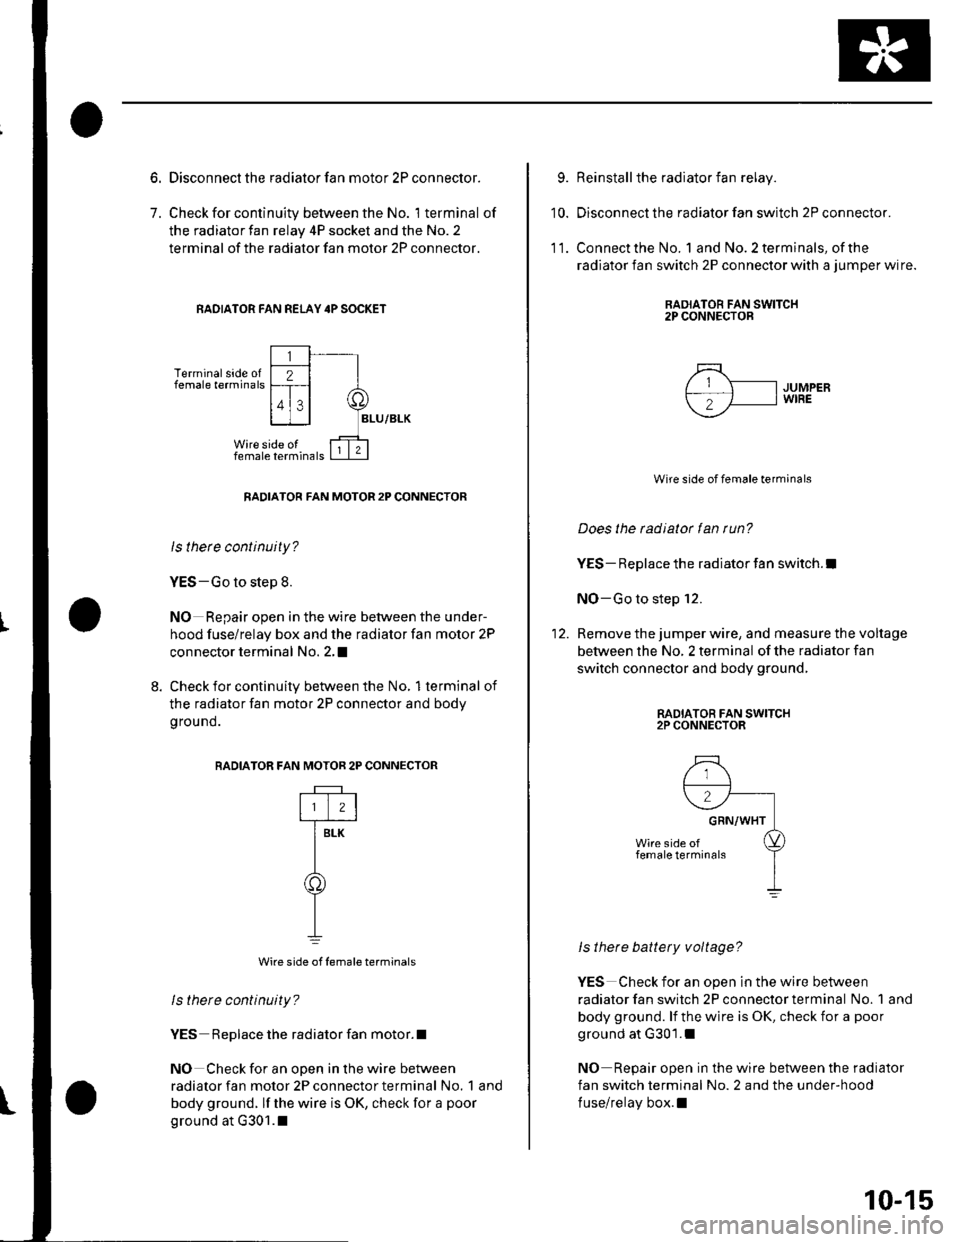
Disconnect the radiator fan motor 2P connector.
Check for continuity between the No. 1 terminal of
the radiator fan relay 4P socket and the No. 2
terminal of the radiator fan motor 2P connector.
RAOIATOR FAN REI-AY 4P SOCKET
Terminal side offemale terminals
RADIATOR FAN MOTOR 2P CONNECTOR
ls thete continuity?
YES-Go to step 8.
NO Repair open in the wire between the under-
hood fuse/relay box and the radiator fan motor 2P
connector terminal No. 2,I
8. Check for continuity between the No, 1terminal of
the radiator fan motor 2P connector and bodv
g rou nd.
RADIATOR F
Wire side of female terminals
ls there continuity?
YES Replace the radiator fan motor.l
NO Check for an open in the wire between
radiator fan motor 2P connector terminal No. 1 and
body ground. lf the wire is OK, check for a poor
ground at G301.1
AN MOTOR 2P CONNECTOR
rftr
T-
Y
9.
10.
Reinstall the radiator fan relay.
Disconnect the radiator fan switch 2P connector.
Connect the No. 1 and No. 2 terminals, of the
radiator fan switch 2P connector with a jumper wire.
RAOIATOR FAN SWITCH2P CONNECTOR
11.
5\- IJUMPERf-; 'fl I wrRE
--
Wire side of female terminals
Does the radiator fan run?
YES- Replace the radiator fan switch.l
NO-Go to step 12.
Remove the jumper wire, and measure the voltage
between the No, 2 terminal of the radiator fan
switch connector and body ground,
RADIATOR FAN SWITCH2P CONNECTOR
ls there battery voltage?
YES Check for an open in the wire between
radiator fan switch 2P connector terminal No. 1 and
body ground. lf the wire is OK, check for a poor
ground at G301.1
NO Repair open in the wire between the radiator
fan switch terminal No. 2 and the under-hood
fuse/relay box.l
10-15
Page 206 of 1139
Fan Controls
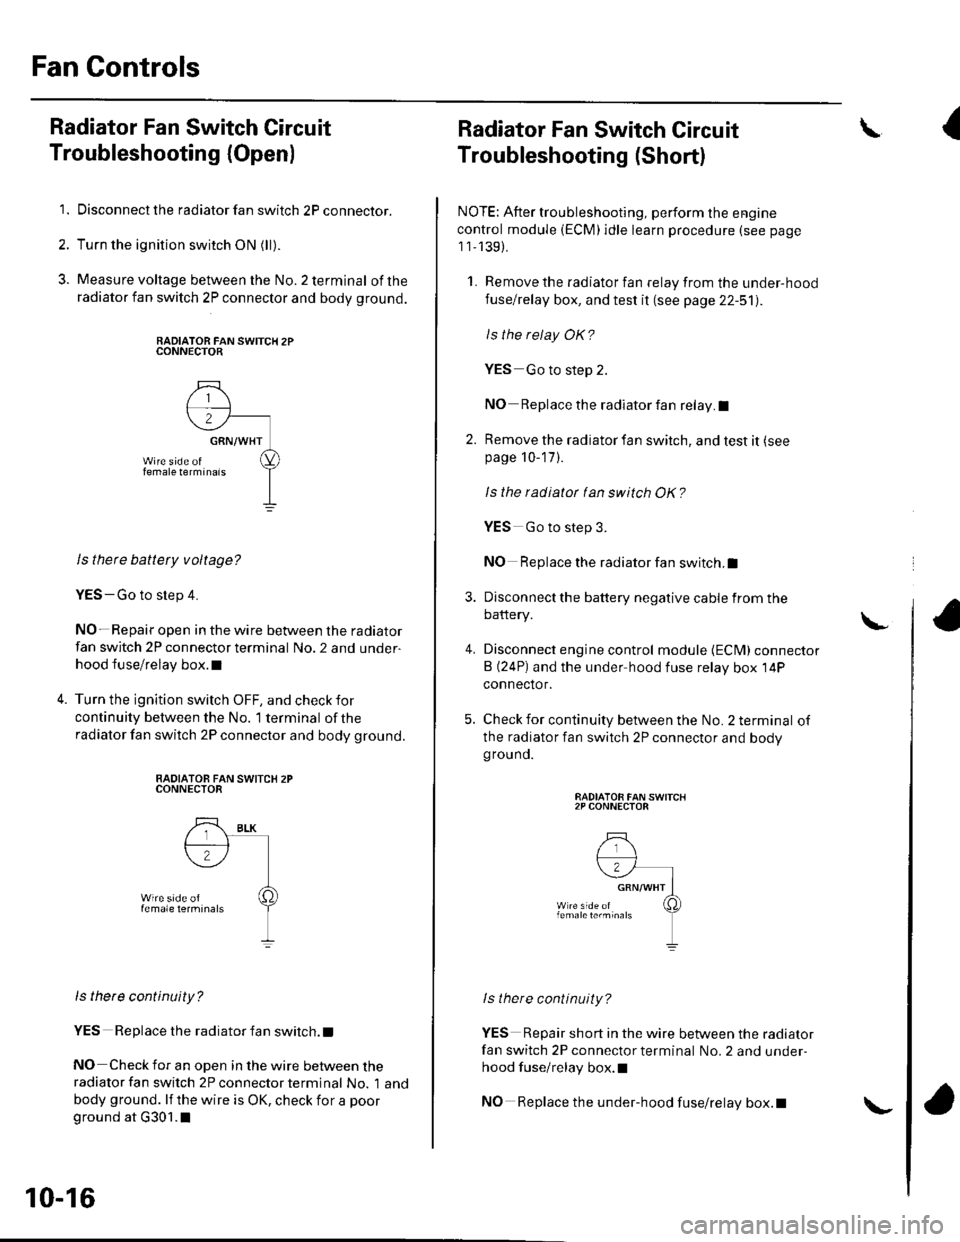
Radiator Fan Switch Circuit
Troubleshooting (Openl
1. Disconnect the radiator fan switch 2P connector.
2. Turn the ignition switch ON (ll).
3. Measure voltage between the No.2 terminal ofthe
radiator fan switch 2P connector and body ground.
RADIATOR FAN SWITCH 2PCONNECTOR
ls there battety voltage?
YES-Go to step 4.
NO- Repair open in the wire between the radiator
fan switch 2P connector terminal No. 2 and under-
hood fuse/relay box.l
Turn the ignition switch OFF, and check for
continuity between the No. '1 terminal of the
radiator fan switch 2P connector and body ground.
RADIATOB FAN SWITCX 2PCONNECTOR
ls there continuity?
YES Replace the radiator fan switch. t
NO Check for an open in the wire between theradiator fan switch 2P connector terminal No. 1 and
body ground. lf the wire is OK, check for a poor
ground at G301.1
10-16
\-
Radiator Fan Switch Circuit
Troubleshooting (Short)
NOTE: After troubleshooting, perform the engine
control module (ECM)idle learn procedure (see page
1 1,139).
1. Remove the radiator fan relay from the under-hood
fuse/relay box, and test it (see page 22-51).
ls the relay OK?
YES Go to step 2.
NO Replace the radiator fan relay.I
2. Remove the radiator fan switch, and test it (see
page 10-17 ).
Is the radiatot tan switch OK?
4.
YES Go to step 3.
NO Replace the radiator fan switch.I
Disconnect the battery negative cable from the
battery.
Disconnect engine control module {ECM) connector
B (24P) and the under hood fuse relay box 14P
connector.
Check for continuity between the No. 2 terminal of
the radiator fan switch 2P connector and bodygrouno.
RADIATOR FAN SWITCH2P CONNECTOR
lstnere continuity?
YES Repair short in the wire between the radiator
fan switch 2P connector terminal No. 2 and under-
hood fuse/relay box.l
NO Replace the under-hood fuse/relay box.t
\I
\
Page 222 of 1139
J/-\-1\_/
BEIAY2
A/C CLUTCH RELAY
RAOIATOR
I
)
T
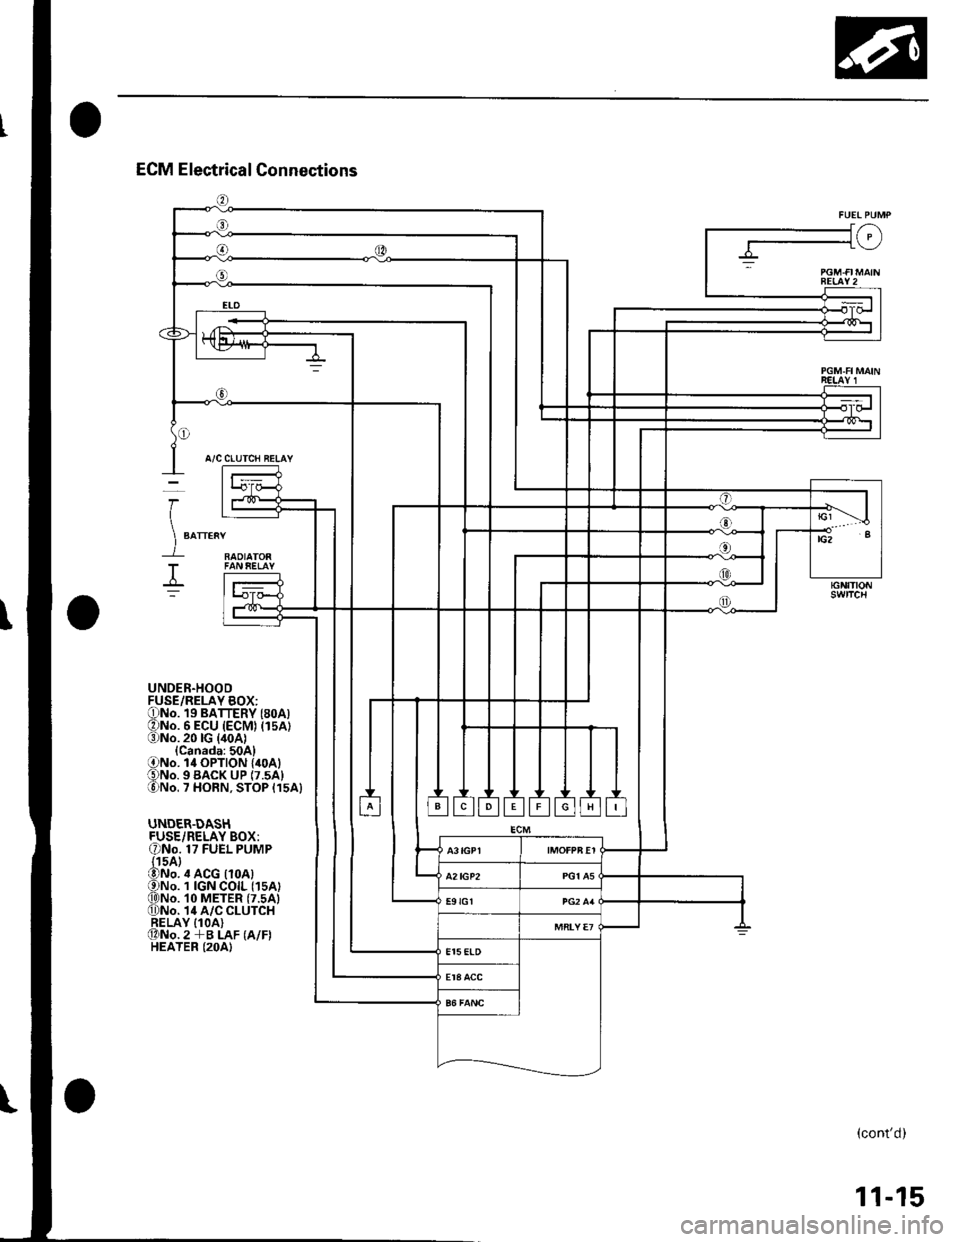
UNDER.HOODFUSE/RELAY BOX:ONo. 19 BATTERY (8oA)ONo. 6 ECU (ECM) (15A1(3)No.20lG {40A1{Canada:50A}ONo. l4 OPTION {40A1€)No. 9 BACK uP (7.5A1lo)No. 7 HORN, STOP {15A}
UNDER.DASHFUSE/RELAY BOX:ONo. 17 FUEL PUMP{15A}@No. ,t ACG {10A)ONo. 1 IGN COIL (1sA)q)No. 10 METER (7.5A)0)No. 14 A/C CLUTCHRELAY IlOA)@No.2 +B LAF (A/F)HEATER (2OA)
(cont'd)
11-15
Page 228 of 1139
Wire side o{ female terminals
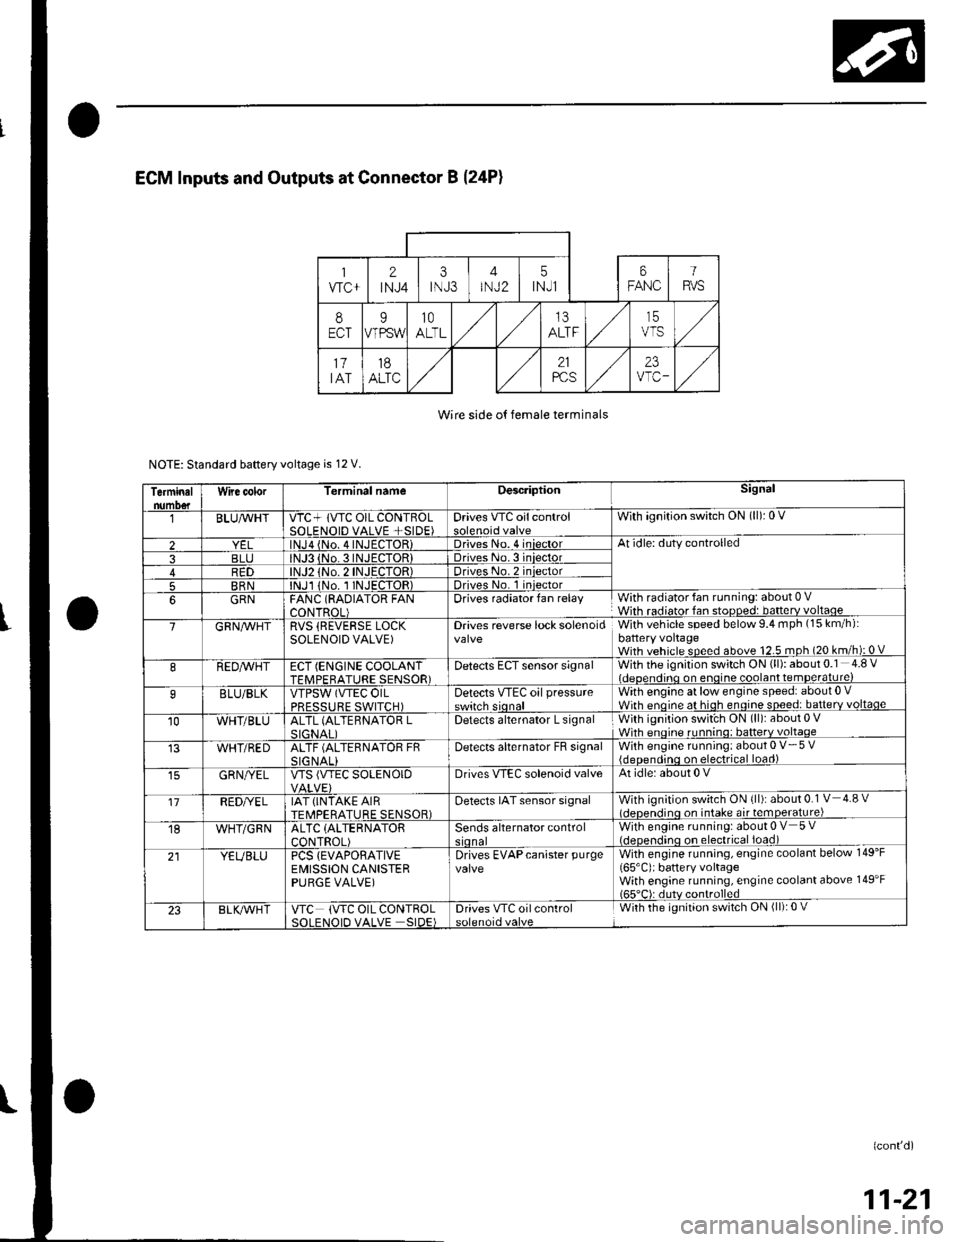
NOTE: Standard baftery voltage is 12 V.
Terminalnumo€tWire color[erminal nameDescriptionSignal
BLUAvHTVTC+ lVTC OIL CONTBOLSOLENOID VALVE +SIDE)Drives VTC oilcontrolWith ignition switch ON (ll): 0 V
2lNJa {No. 4INJECTOR)Driveso. 4 iniectorAt idle: duty controlled
3BLJo.3INJECTORIDriveso.3 iniector4R1)TOR)Driveso.2 iniector
5BRNlNJl 1No. I INJECTOR)Drives No. 1 iniector
6GRNFANC (RAOIATOR FANCONTROL)Drives radiator fan relayWith radiator fan running: about 0 VWith radiator fan stopped: batterv voltaoe
7GRN/vVHTRVS (REVERSE LOCKSOLENOID VALVE)Drives reverse lock solenoidWith vehicle speed below 9.4 mph (15 km/h):battery voltageWith vehicle speed above 12.5 mph (20 km/h): 0 V
8REDAVHTECT (ENGINE COOLANTTFMPFRATURE SENSOR)Detects ECT sensor signalWith the ignition switch ON (ll): about 0.1 4.8 Videoendino on enoine coolant temDerature)
9BLU/BLKVTPSW (VTEC OILPRFSSTIRF SWITCH)Detects VTEc oil pressureswitch sionalWith engine at low engine speed: about 0 .Wirh enoine at hioh enoine soeed: batterv voltaqe
10WHT/BLUALTL (ALTEBNATOR LSIGNAI IDetects alternator L signalWith ignition swit'ch ON (ll): about 0 VWhh enoine runnino: batterv voltaqe
WHT/REDALTF (ALTERNATOR FRSIG NALIDetecls alternator FB signalWith engine running: about 0 V- 5 V{deoendinq on electrical load)
GRN/YELVTS {VTEC SOLENOIDDrives VIEC solenoid valveAt idle: about 0 V
'17REDI/ELIAT (INTAKE AIRTEMPERATURE SENSOR)Detects IAT sensor signalWith ignition switch ON {ll): about 0.1 V 4.8 vl.lcnen.iino on intake air temoerature)
18WHT/GRNALTC (ALTERNATOR
CONTROL)Sends alternator controlWith engine running: about 0 V 5 V(.lcocn.lino on electrical ioad)
21YEUBLUPCS {EVAPORATIVEEMISSION CANISTERPURGE VALVE)
Drives EVAPcanister purgevalveWith engine running, engine coolant below 149'F
165'C): battery voltageWith engine running, engine coolant above 149'F165"C): dutv controlled
23BLK/Vr'HTVTC (VTC OIL CONTROLSOI FNOID VALVE SIDE)Drives VTC oilcontrolWith the ignition switch ON (ll): 0 V
(confd)
11-21
Page 229 of 1139
![HONDA CIVIC 2003 7.G User Guide Fuel and Emissions Systems
System Descriptions (contdl
ECM lnputs and Outputs at Connector E (31P}
L
u
1iMoFPR
2sr-{]zs3LG34SG3
6$1025HTC
1M RLY
8AFSHTCR
I
14FTP15ELD
16EPSLD
18ACC20Z/VBS21VSV
22BKSW HONDA CIVIC 2003 7.G User Guide Fuel and Emissions Systems
System Descriptions (contdl
ECM lnputs and Outputs at Connector E (31P}
L
u
1iMoFPR
2sr-{]zs3LG34SG3
6$1025HTC
1M RLY
8AFSHTCR
I
14FTP15ELD
16EPSLD
18ACC20Z/VBS21VSV
22BKSW](/img/13/5744/w960_5744-228.png)
Fuel and Emissions Systems
System Descriptions (cont'dl
ECM lnputs and Outputs at Connector E (31P}
L
u
1iMoFPR
2sr-{]zs3LG34SG3
6$1025HTC
1M RLY
8AFSHTCR
I
14FTP15ELD
16EPSLD
18ACC20Z/VBS21VSV
22BKSW23K-LINE24SEFMJ26NEP
21rMoCD
29scs30WEN31MIL
Wire side of female terminals
NOTE: Standard battery voltage is '12 V.
TerminalnumberWire colorferminal nameDescription Signal
GRNI/ELIMO FPR (IMMOBILIZERFLJEL PUMP RELAYIDrives PGM Fl main relay 20Vfor2 seconds after turning ignition switch ON{ll). then batterv voltaoe2WHT/REDSHO2S (SECONDARYHEATED OXYGEN SENSOR(SECONDARY HO2S),SENSOR 2r
Detects secondary HO2S{sensor 2) signalWith throttle Jully opened from idle with fullywarmed up engine: above 0.6VWith throttle quickly closed: below 0.4 V
3BRN/YELLG3 (LOGIC GROUND)cround forthe ECM/PCMcontrolcircuitLess than 1.0 V at all times
4PNKSG3 {SENSOR GBOUND)Sensor oroundLess than 1.0 V at all times5YEUELUVCC3 {SENSOR VOLTAGE)Provides sensor voltageWith ignition switch ON (ll): about 5 VWith ionition switch OFF: about 0 V6BLKATr'HTSO25HTC (SECONDARYHEATED OXYGEN SENSOR(SECONDARY H02S)HEATER CONTROL)
Drives secondary HO2SheaterWith ignition switch ON (ll): baftery voltageWilh fullv warmed up engine running: dul,controlled
1REDA/ELMRLY (PGM.FI MAINRELAY}Drives PGM-Flmain relay 1Power source forthe DTCWith ignition switch ON (ll): about 0 VWith ignition switch OFF: battery voltage
IORNAFSHTCR {AIR FUEL BATIO(Iy'F)SENSOR HEATERCONTROL RELAY)
Drives air fuel ratio sensorheater relayWith ignition swirch ON {ll): 0 V
IYEUBLKIGl (IGNITION SIGNAL)Detecrs ignition signalWith ignition switch ON (ll): battery voltageWith iqnition switch OFF: about 0 V't4LT GRNFIP lFUEL TANKPRESSURE (FTP) SENSOR)Detects FTP sensor signalWith ignition switch ON (ll) and fuel fill cap open:about 2.5 VGRN/REDELD (ELECTRICAL LOADDETECTOF)Detects ELD signalWith ignition swjtch ON itt):aOoutO.t V l-gV(deDendino on electrical load)LT GRN/8LKEPSLD (ELECIRICALPOWEB STEEBING LOADDETECT)
Detects Power steering loadsrgnalAt idle with steering wheel in straight aheadposition: about 0 VAt idle with steering wheelatfull lock: momentary
'18REDACC (Ay'C CLUTCH RELAY)Drives P,/C clutch relayWith compressor ON: about 0 VWith comoressor OFF: batterv voltaoe
11-22
\-
Page 233 of 1139
Fuel and Emissions Systems
System Descriptions (cont'd)
PGM-FI System
The Programmed Fuel Injection (PGM-Fl) system is a
sequential multiport fuel injection system.
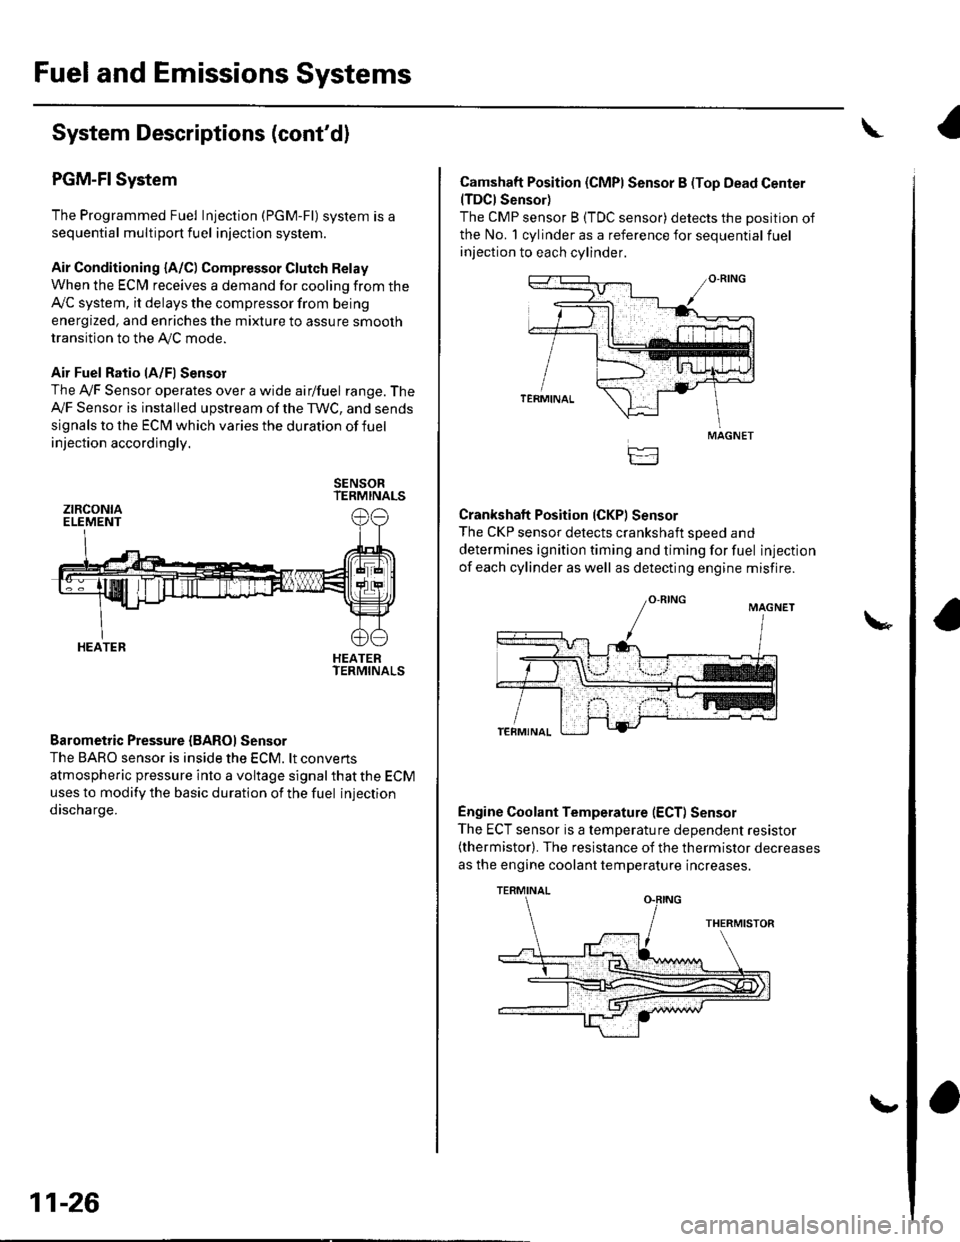
Air Conditioning {A/C) Compressor Glutch Relay
When the ECfM receives a demand for cooling from the
Ay'C system, it delays the compressor from being
energized, and enriches the mixture to assure smooth
transition to the AVC mode.
Air Fuel Ratio lA/Fl Sensor
The Ay'F Sensor operates over a wide airlfuel range. The
Ay'F Sensor is installed upstream of the TWC, and sends
signals to the ECM which varies the duration of fuel
injection accordingly.
SENSORTERMINALS
HEATERTERMINALS
Barometric Pressure {BAROI Sensor
The BARO sensor is inside the ECM. lt convens
atmospheric pressure into a voltage signal that the ECM
uses to modify the basic duration of the fuel injection
discharge.
ztRcoNtaELEMENT
HEATER
11-26
\,
Camshaft Position (CMPI Sensor B (Top Dead Center(TDCI Sensor)
The CMP sensor B (TDC sensor) detects the position of
the No. 1 cylinder as a reference for sequential fuel
injection to each cylinder.
Crankshaft Position (CKPI Sensor
The CKP sensor detects crankshaft soeed and
determines ignition timing and timing for fuel injection
of each cylinder as well as detecting engine misfire.
Engine Coolant Temperature (ECT) Sensor
The ECT sensor is a temperature dependent resistor(thermistor). The resistance of the thermistor decreases
as the engine coolant temperature increases.
MAGNET
TERMINAL
Page 239 of 1139
Fuel and Emissions Systems
(
{
System Descriptions (cont'd)
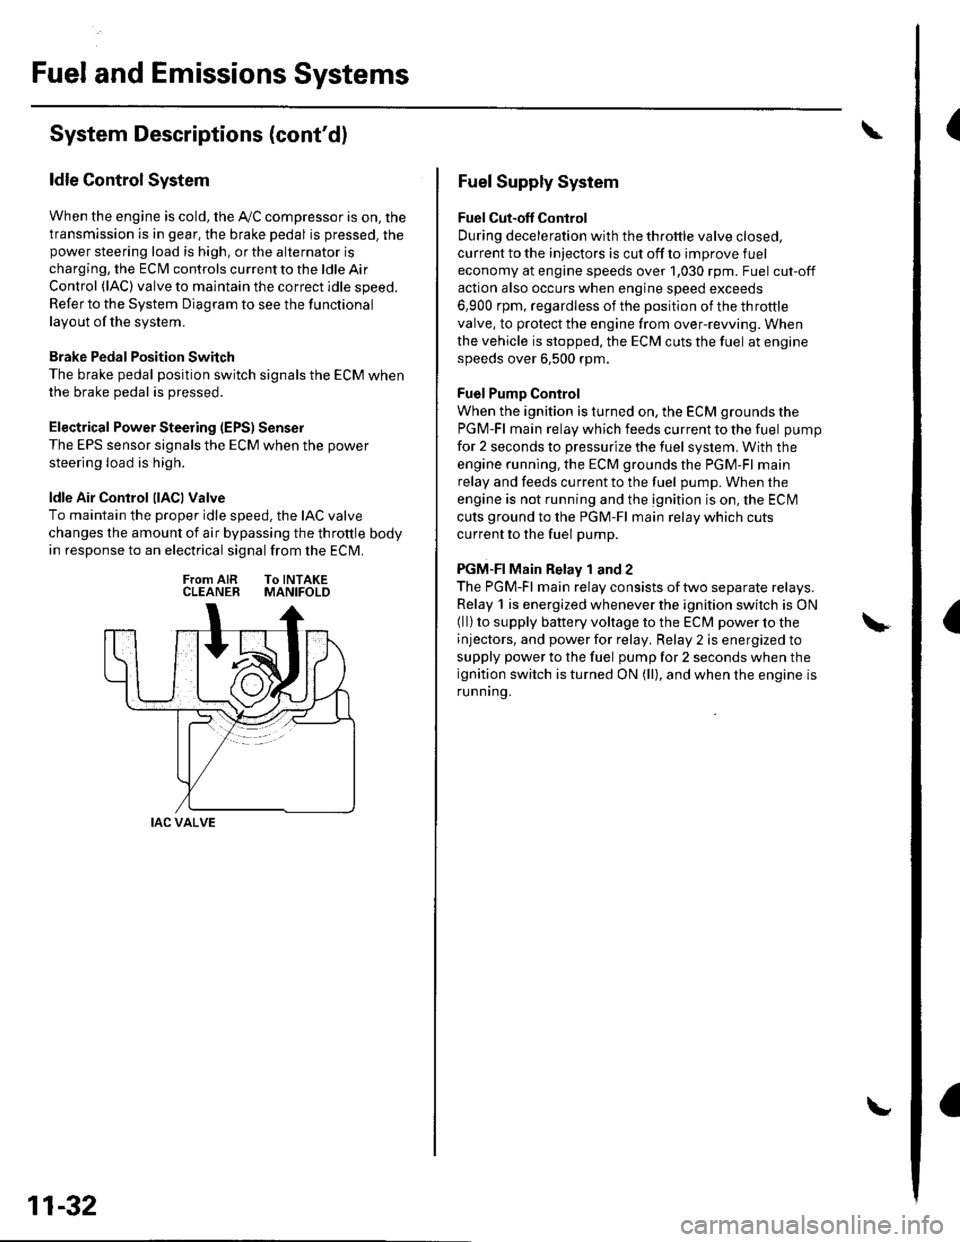
ldle Control System
When the engine is cold, the Ay'C compressor is on, the
transmission is in gear, the brake pedal is pressed. thepower steering load is high, or the alternator is
charging, the ECIM controls current to the ldle Air
Control (lAC) valve to maintain the correct idle speed.
Refer to the System Diagram to see the functional
layout of the system.
Brake Pedal Position Switch
The brake pedal position switch signals the ECM when
the brake pedal is oressed.
Electrical Power Steering (EPS) Senser
The EPS sensor signals the ECM when the power
steering load is high.
ldle Air Control llACl Valve
To maintain the proper idle speed, the IAC valve
changes the amount of air bypassing the throttle body
in response to an electrical signal from the ECM.
From AIR To INTAKECLEANER MANIFOLD
IAC VALVE
11-32
Fuel Supply System
Fuel Cut-off Control
During deceleration with the throttle valve closed,
current to the injectors is cut off to improve fuel
economy at engine speeds over 1,030 rpm. Fuel cut-off
action also occurs when engine speed exceeds
6,900 rpm, regardless of the position of the throttle
valve, to protect the engine from over-rewing. When
the vehicle is stopped. the ECM cuts the fuel at engine
speeds over 6,500 rpm.
Fuel Pump Control
When the ignition is turned on, the ECM grounds the
PGM-Fl main relay which feeds current to the fuel pump
for 2 seconds to pressurize the fuel system, With the
engine running. the ECM grounds the PGM-Fl main
relay and feeds current to the fuel pump. When the
engine is not running and the ignition is on, the ECI\4
cuts ground to the PGM-Fl main relay which cuts
current to the fuel pump.
PGM-FI Main Relay 1 and 2
The PGM-Fl main relay consists of two separate relays.
Relay 1 is energized whenever the ignition switch is ON(ll) to supply battery voltage to the ECM power to the
injectors, and power for relay, Relay 2 is energized to
supply power to the fuel pump for 2 seconds when the
ignition switch is turned ON (ll), and when the engine is
runnrng.