relay HONDA CIVIC 2003 7.G Owner's Guide
[x] Cancel search | Manufacturer: HONDA, Model Year: 2003, Model line: CIVIC, Model: HONDA CIVIC 2003 7.GPages: 1139, PDF Size: 28.19 MB
Page 296 of 1139
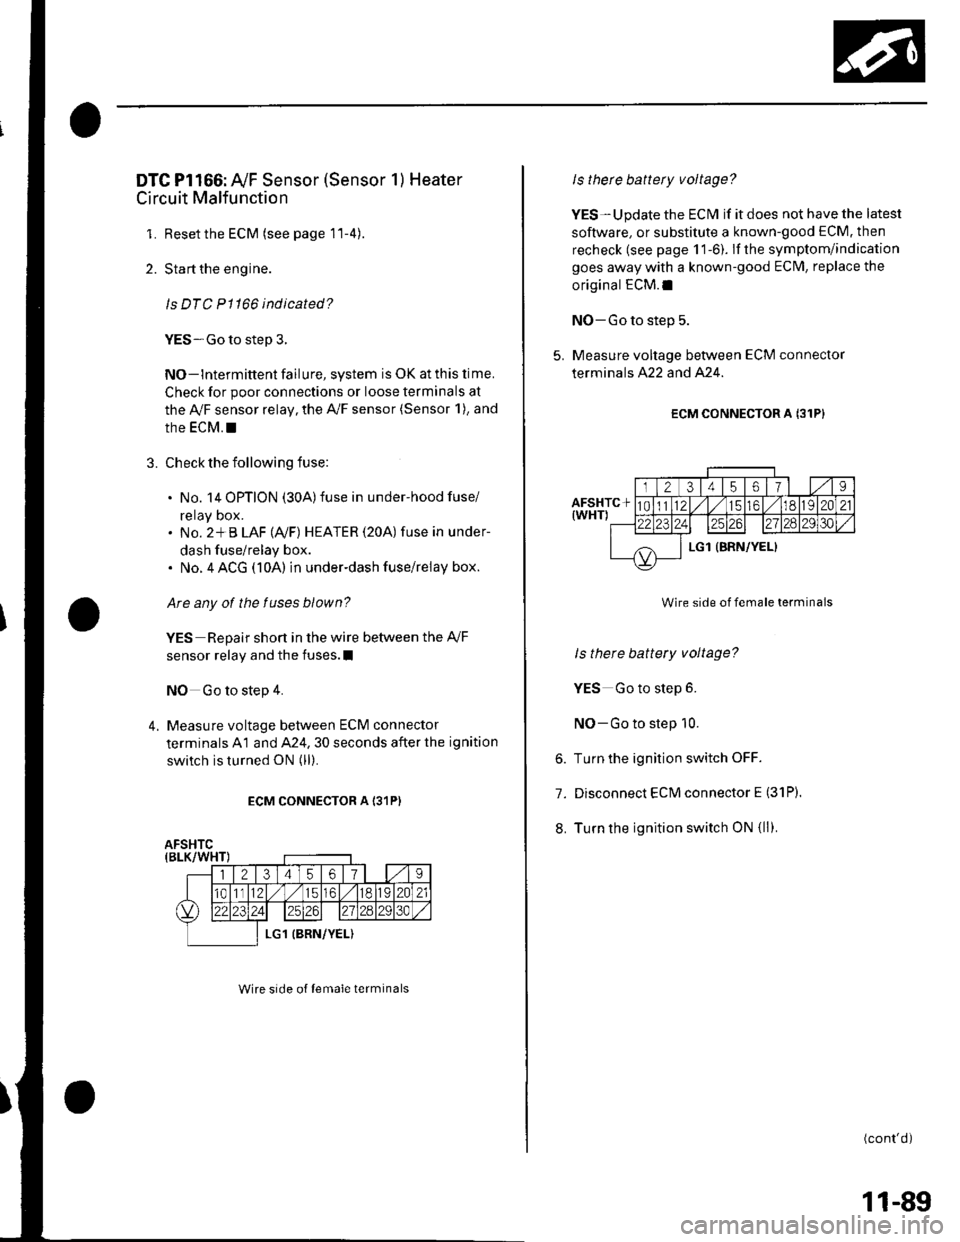
DTC Pl166: Ay'F Sensor (Sensor 1) Heater
Circuit Malfunction
1. Resetthe ECM (see page 11-4).
2. Start the engine.
ls DTC P1166 indicated?
YES-Go to step 3.
NO-lntermittent failure, system is OK at this lime.
Check for poor connections or loose terminals at
the Ay'F sensor relay, the A,/F sensor (Sensor 1), and
the EcM. !
3. Check the following fuse:
. No. 14 OPTION (30A)fuse in under-hood fuse/
reray Dox.. No. 2*B LAF (Ay'F) HEATER (20A) fuse in under-
dash fuse/relay box.. No. 4 ACG (10A) in underdash fuse/relay box.
Are any of the fuses blown?
YES Repair short in the wire between the Ay'F
sensor relay and the fuses.I
NO Go to step 4.
4. Measure voltage between ECM connector
terminals A1 and A24. 30 seconds after the ignition
switch is turned ON (ll).
ECM CONNECTOR A I31P)
Wire srde of lemale terminals
Is therc battery voltage?
YES-Update the ECM if it does not have the latest
soflware, or substitute a known-good ECM. then
recheck (see page 1 1-6). lf the symptom/indication
goes away with a known-good ECM, replace the
original ECM.I
NO-Go to step 5.
5. Measure voltage between ECM connector
terminals A22 and A24.
ECM CONNECTOR A {31P}
Wire side of female terminals
ls there battery voltage?
YES Go to step 6.
NO-Go to step 10.
6. Turn the ignition switch OFF.
7. Disconnect ECM connector E (31P).
8. Turn the ignition switch ON {ll).
(cont'd)
11-89
Page 297 of 1139
PGM-FI System
DTC Troubleshooting (cont'dl
9. Connect ECM connector terminal EStobodyground with a jumper wire, then measure voltage
between ECM connector terminals A1 and 424.
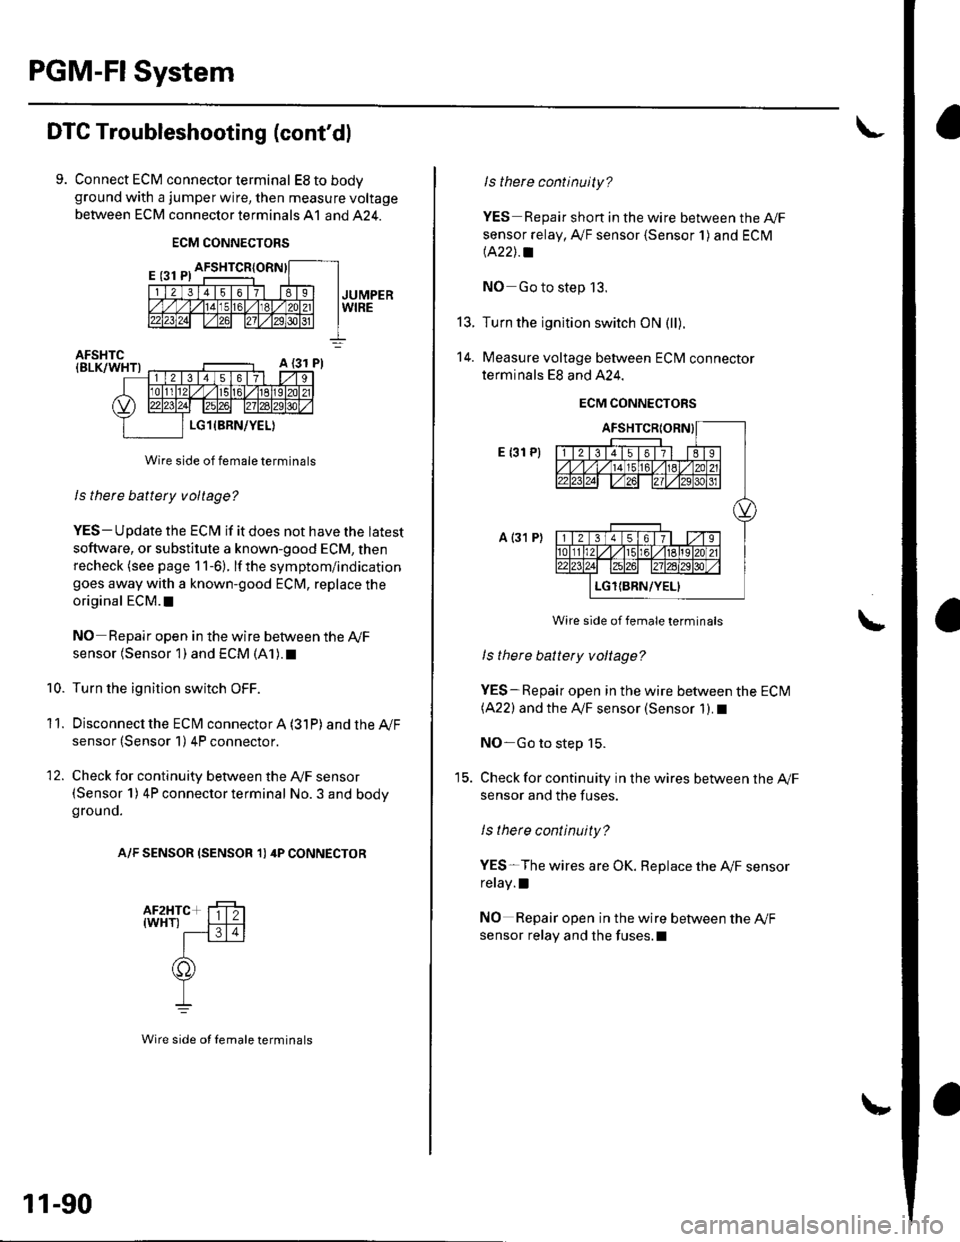
ECM CONNECTORS
Wire side of female terminals
ls there battery voltage?
YES- Update the ECM if it does not have the latest
soflware, or substitute a known-good ECM, then
recheck (see page 1 1-6). lf the symptom/indication
goes away with a known-good ECM, replace the
original ECM. t
NO Repair open in the wire between the Ay'F
sensor (Sensor 1) and ECM (A1). t
Turn the ignition switch OFF.
Disconnecl the ECfM connector A (31P) and the Ay'F
sensor (Sensor 1) 4P connector.
Check for continuity between the Ay'F sensor(Sensor 1) 4P connector terminal No. 3 and bodyground.
A/F SENSOR (SENSOR 1) 4P CONNECTOR
10.
11.
12.
11-90
Wire side ot Iemale terminals
t5.
14.
ls there continuity?
YES Repair short in the wire between the A|/F
sensor relay, A,/F sensor {Sensor 1) and ECM
lA22J.a
NO Go to step 13.
Turn the ignition switch ON (ll).
Measure voltage between ECM connector
terminals E8 and A24.
ECM CONNECTORS
E {31 P)
a {31 P)
Wire side of female terminals
ls there battety voltage?
YES-Repair open in the wire between the ECM(A22) and the IVF sensor (Sensor 1). I
NO-Go to step 15.
Check for continuity in the wires between the Ay'F
sensor and the fuses.
ls there continuity?
YES-The wires are OK. Replace the A,/F sensor
relay.l
NO Repair open in the wire between the Ay'F
sensor relay and the fuses.l
Page 298 of 1139
DTC Pl167: Ay'F Sensor (Sensor 1) Heater
Circuit Malfunction
NOTE: lf DTC P1162 is stored at the same time as DTC
P1167, troubleshoot DTC P1162 first, then troubleshoot
DTC P1167.
1. Resetthe ECI\4 (see page 11-4)
2. Start the engine. Wait for at least 80 seconds.
ls DTC P01167 ind icated?
YES Go to step 3.
NO-lntermittent failure, system is OK at this time.
Check for poor connections or loose terminals at
the Ay'F sensor relay, at the Ay'F sensor (Sensor 1),
and at the ECM.I
Turn the ignition switch OFF.
Disconnect the A,/F sensor 4P connector and ECM
connector A (31P).
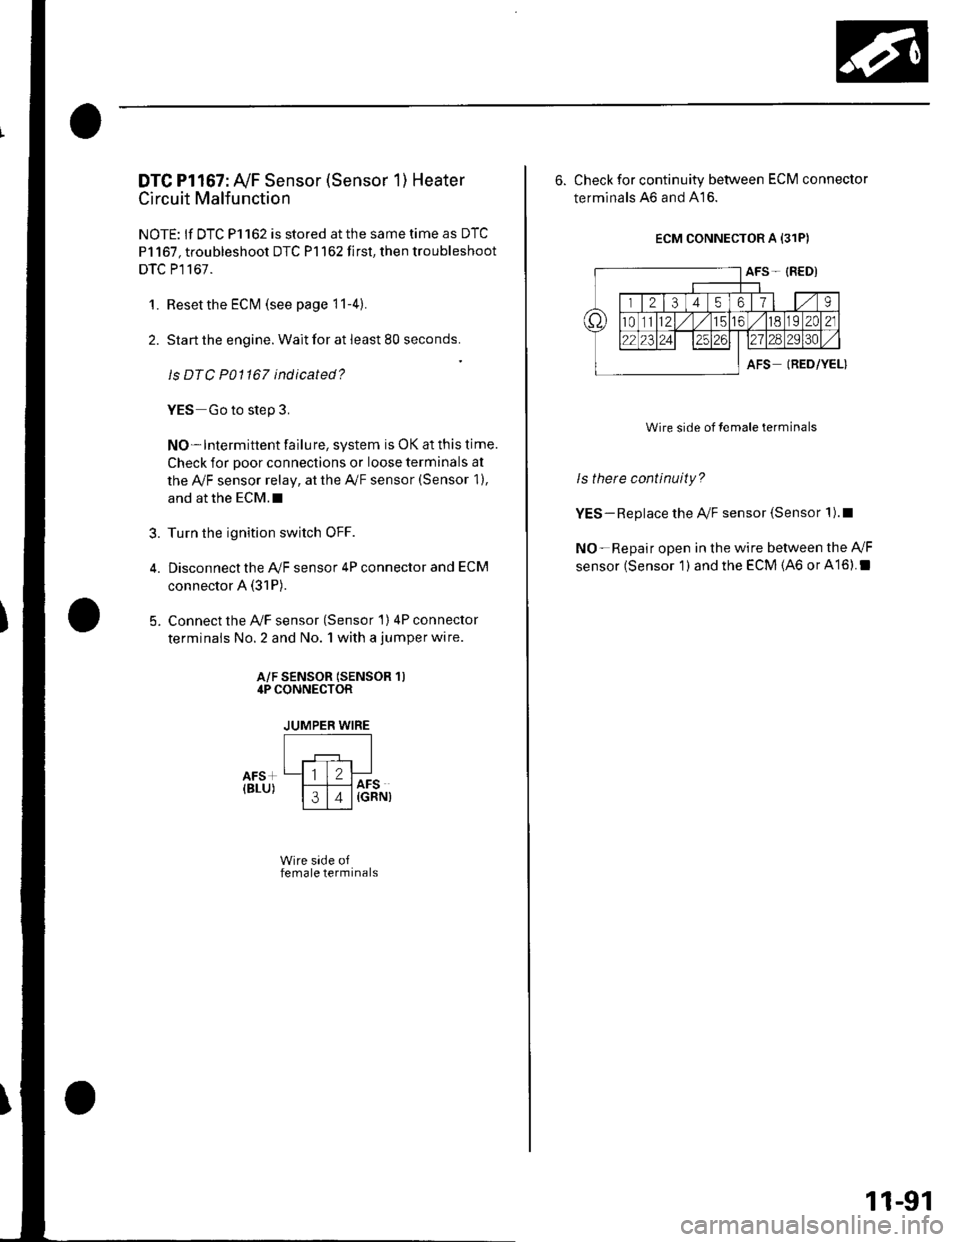
Connect the Ay'F sensor (Sensor 1) 4P connector
terminals No. 2 and No. 1 with a jumper wire.
?
5.
A/F SENSOR (SENSOR 1)4P CONNECTOR
JUMPER WIRE
Wire side offemale terminals
6. Check for continuity between ECM connector
terminals ,46 and 416.
ECM CONNECTOR A {31P)
AFS- {RED)
trTzTil,ils llt9
t82C21
l?rlzsIels
AFSIRED/YEL)
Wire side of lemale terminals
ls thete continuity?
YES-Replace the A/F sensor (Sensor 1).1
NO-Repair open in the wire between the Ay'F
sensor (Sensor 1 ) and the ECM (46 or A16).I
11-91
Page 300 of 1139
DTC Pl298: ELD Circuit High Voltage
1. Resetthe ECM (see page 11-4)
2. Stan the engine.
3. Turn on the headlights.
ls DTC P1298 indicated?
YES-Go to step 4.
NO- Intermittent failure. system is OK at this time.
Check for poor connections or loose terminals at
the ELD and at the ECM.I
4. Turn the ignition switch and headlights OFF.
5. Disconnectthe ELD 3P connector.
6. Turn the ignition switch ON (ll).
7. Measure voltage between body ground and ELD 3P
connector terminal No. 1.
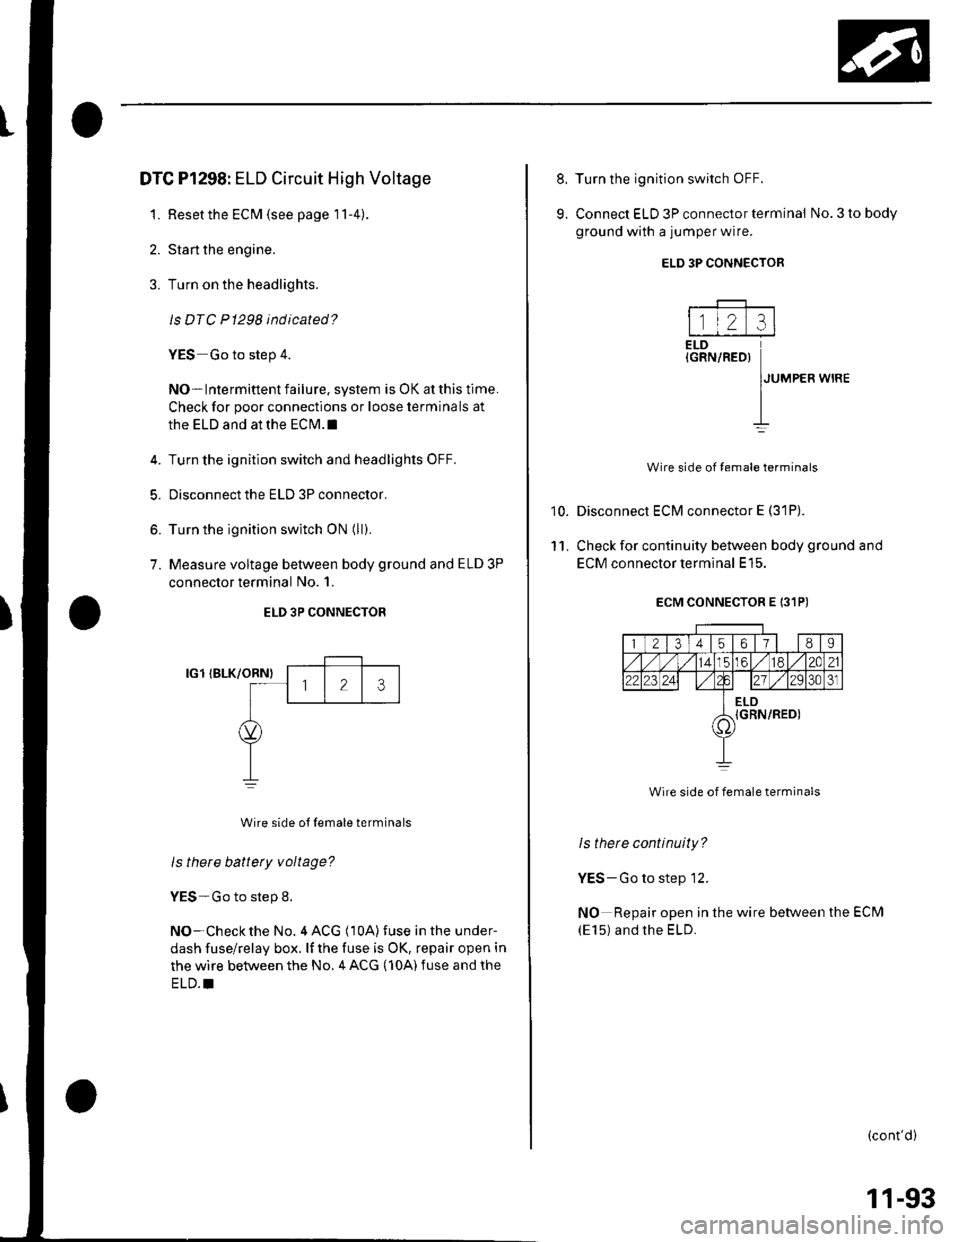
ELD 3P CONNECTOR
IG1 IBLK/ORNI
Wire side ot {emale terminals
ls there battery voltage?
YES-Go to step 8.
NO-Checkthe No. 4 ACG (10A)fuse in the under-
dash fuse/relay box. lf the fuse is OK, repair open in
the wire between the No. 4 ACG (10A) fuse and the
ELD.I
8.
9.
10.
11.
Turn the ignition switch OFF.
Connect ELD 3P connector terminal No. 3 to body
ground with a jumper wire.
Disconnect ECM connector E (31P).
Check for continuity between body ground and
ECM connector terminal E15.
ECM CONNECTOR E 131PI
1 21345ot/II
14LC6l/ 182C21
22123 2421 ./2Q30J
ELDIGRN/RED)i1'
Wire side of female terminals
Is thete continuity?
YES-Go to step 12.
NO Repair open in the wire between the ECM
(E15) and the ELD.
(cont'd)
ELD 3P CONNECTOR
---F-------
l1l2 :rlELD(GRN/RED)
IJUMPER wrRE
II
Wire side of temale terminals
11-93
Page 302 of 1139
3.
4.
5.
6.
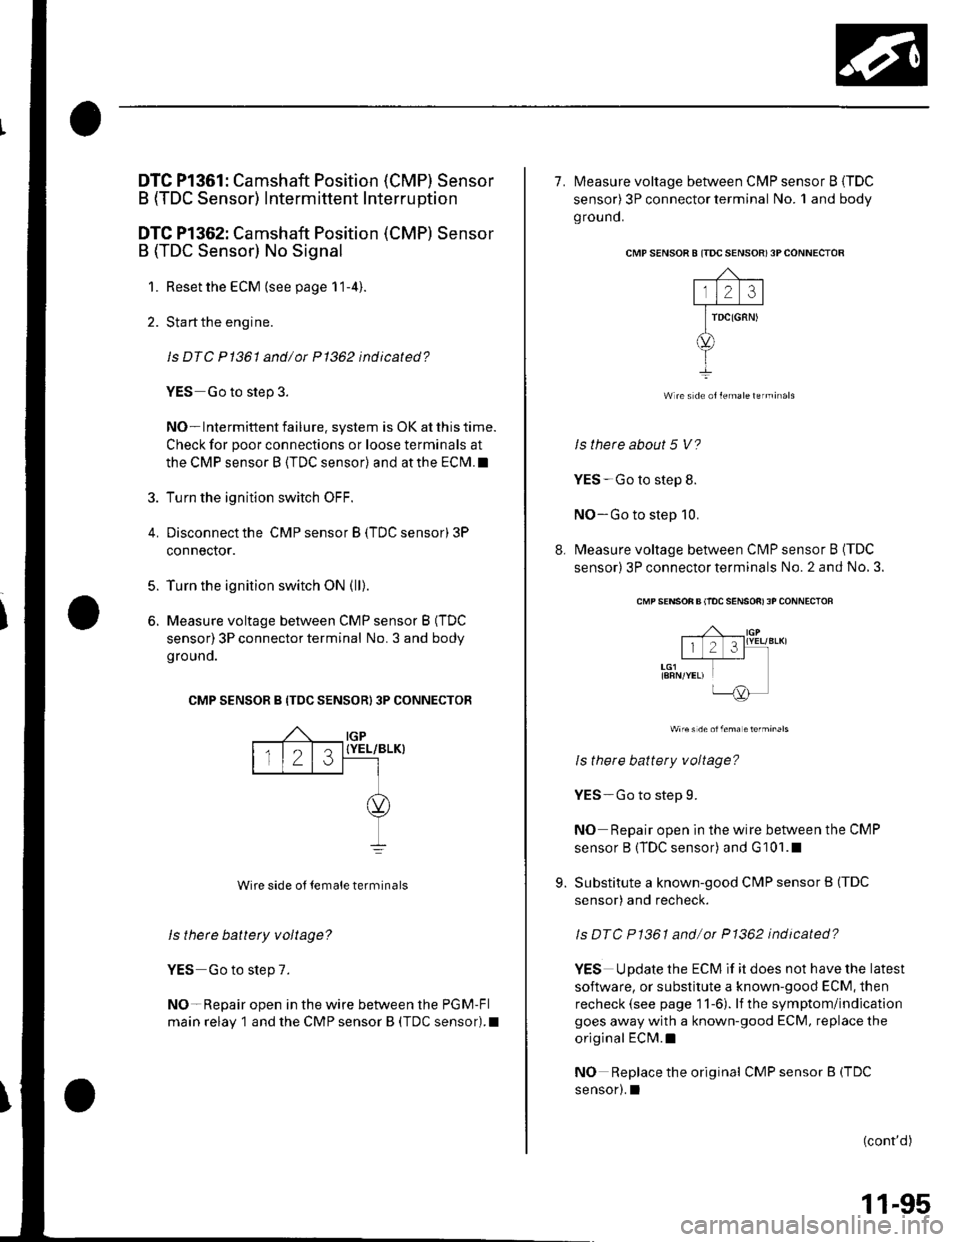
DTC Pl361: Camshaft Position (CMP) Sensor
B (TDC Sensor) Intermittent Interruption
DTC Pl362: Camshaft Position (CMP) Sensor
B (TDC Sensor) No Signal
1. Reset the ECM (see page 11-4).
2. Start the engine.
ls DTC P1361 and/or P1362 indicated?
YES Go to step 3.
NO- Intermittent failure. system is OK at this time.
Check for poor connections or loose terminals at
the CMP sensor B (TDC sensor) and at the ECM.I
Turn the ignition switch OFF.
Disconnectthe CMP sensor B (TDC sensor) 3P
connector.
Turn the ignition switch ON (ll).
Measure voltage between CMP sensor B (TDC
sensor) 3P connector terminal No. 3 and body
grouno.
CMP SENSOR B {TDC SENSOR) 3P CONNECTOR
{YEL/BLK}
Wire side ol temale terminals
ls there battety voltage?
YES Go to step 7.
NO-Repair open in the wire between the PGM-Fl
main relay 1 and the CMP sensor I (TDC sensor).I
IGP
123
7. l\4easure voltage between CMP sensor B {TDC
sensor) 3P connector terminal No. 1 and body
ground.
CMP S€NSOR 8 ITDC SENSOR) 3P CONNECTOR
Wlre s de ollemaleterminals
ls there about 5 V?
YES-Go to step 8.
NO-Go to step 10.
8. Measure voltage between Cl\ilP sensor B (TDC
sensor) 3P connector terminals No. 2 and No, 3.
CMP SENSON B llOC SENSOfi) 3P CONNECTOF
Wire s de olfema etefminals
ls there battery voltage?
YES-Go to step 9.
NO Repair open in the wire between the CMP
sensor B (TDC sensor) and G101.1
9. Substitute a known-good CMP sensor B (TDC
sensor) and recheck.
ls DTC P1361 and/or P1362 indicated?
YES Update the ECM if it does not have the latest
software, or substitute a known-good ECM, then
recheck (see page 11-6). lf the symptom/indication
goes away with a known-good ECM, replace the
original ECM.I
NO Replace the original CMPsensorB(TDC
sensor).1
(cont'd)
11-95
Page 304 of 1139
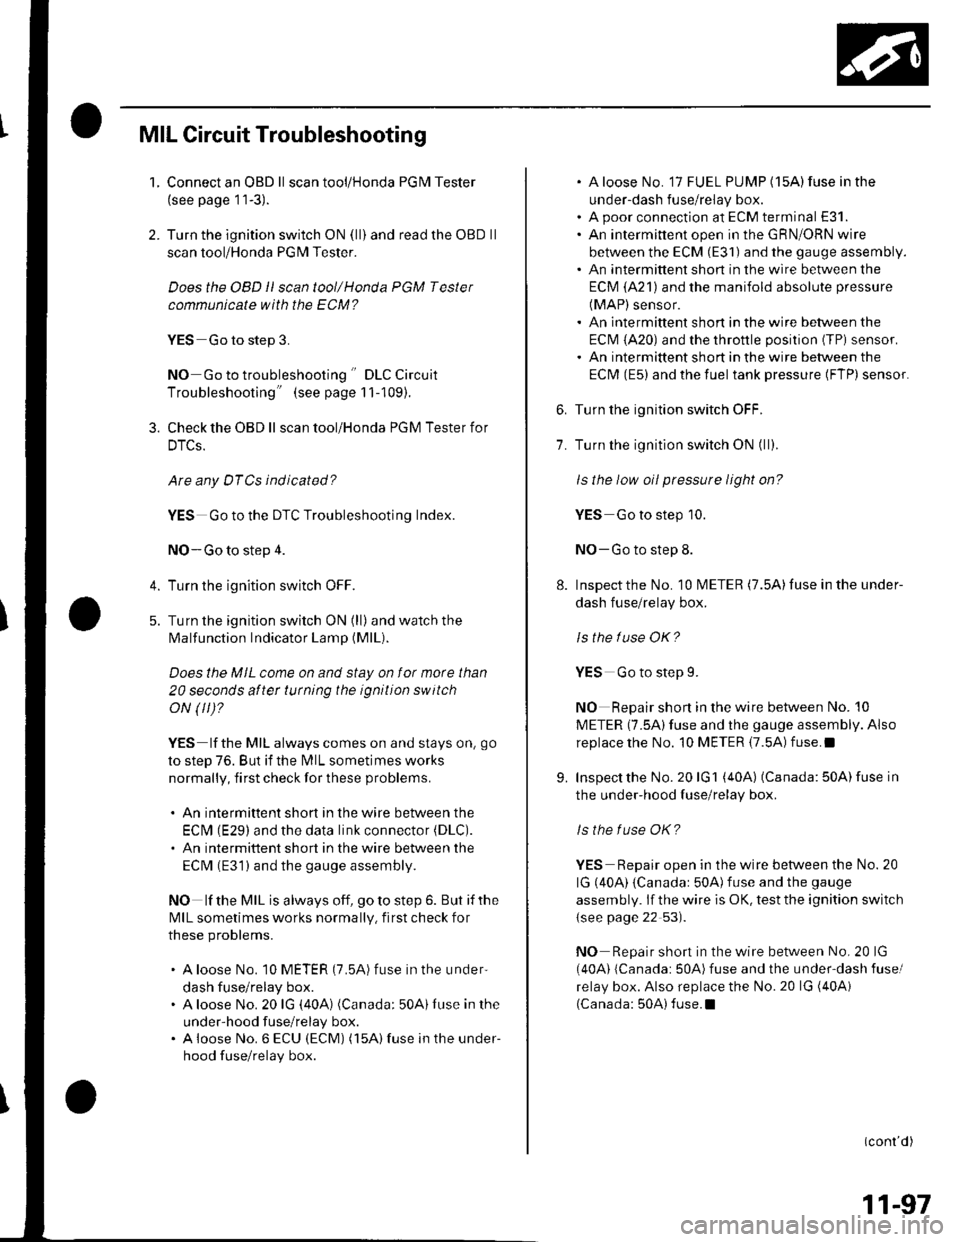
MIL Circuit Troubleshooting
1. Connect an OBD ll scan tool/Honda PGM Tester
(see page 11-3).
2. Turn the ignition switch ON (ll) and read the OBD ll
scan tool/Honda PGM Tester.
Does the OBD ll scan tool/Honda PGM Tester
communicate with the ECM?
YES Go to step 3.
NO Go to troubleshooting " DLC Circuit
Troubleshooting" (see page 11-109).
3. Check the OBD ll scan tool/Honda PGM Testerfor
DTCs.
Are any DTCs ind icated?
YES Go to the DTC Troubleshooting Index.
NO-Go to step 4.
4. Turn the ignition switch OFF.
5. Turn the ignition switch ON (ll)and watch the
lMalfunction Indicator Lamp (MlL).
Does the MIL come on and stay on for more than
20 seconds aftet turning the ignition switch
oN (tr)?
YES lf the MIL always comes on and stays on, go
to step 76. But if the lMlL sometimes works
normally, first check for these problems.
. An intermittent short in the wire between the
ECIM (E29) and the data link connector (DLC).
. An intermittent short in the wire between the
ECM (E31) and the gauge assembly.
NO lf the MIL is always off, go to step 6. But if the
lvllL sometimes works normally, first check for
these problems.
. A loose No. 10 METER (7.5A) fuse in the under
dash fuse/relay box.. A loose No. 20 lG (40A) (Canada: 50A)Iuse in the
under-hood fuse/relay box.. A ioose No. 6 ECU (ECM) (15A) fuse in the under-
hood fuse/relay box.
. A loose No. 17 FUEL PUMP (15A)fuse in the
under-dash fuse/relay box.. A poor connection at ECM terminal E31.. An intermittent open in the GRN/ORN wire
between the ECM (E31) and the gauge assembly.. An intermittent short in the wire between the
ECM (A21) and the manifold absolute pressure
(MAP) sensor.. An intermittent short in the wire between the
ECI\4 (A20) and the throttle posilion (TPi sensor.. An intermittent short in the wire between the
ECM (E5) and the fuel tank pressure (FTP) sensor.
6. Turn the ignition switch OFF.
7. Turn the ignition switch ON (ll).
ls the low oil pressure light on?
YES Go to step 10.
NO-Go to step 8.
8. Inspectthe No. 10 l\4ETER (7.5A)fuse inthe under-
dash fuse/relay box.
ls the luse OK?
YES Go to step L
NO Repair shon in the wire between No. 10
METER (7.5A)fuse and the gauge assembly. Also
replacethe No. 10 METER {7.5A) fuse.l
9. Inspect the No. 20 lG1 (40A) (Canada: 50A) fuse in
the under-hood fuse/relay box.
ls the f use OK?
YES Repair open in the wire between the No. 20
lG (40A) {Canadar 50A)fuse and the gauge
assembly. lf the wire is OK, test the ignition switch
{see page 22 53).
NO Repair short in the wire between No. 20 lG
(40A) lCanada: 50A)fuse and the under'dash fusel
relay box. Also replace the No.20 lG (40Ai
(Canada: 50A) fuse.I
(conr'd)
11-97
Page 305 of 1139
PGM-FI System
MIL Circuit Troubleshooting (cont'dl
11.
Try to start the engine.
Does the engine start?
YES-Go to step 11.
NO-Go to step 14.
Turn the ignition switch OFF.
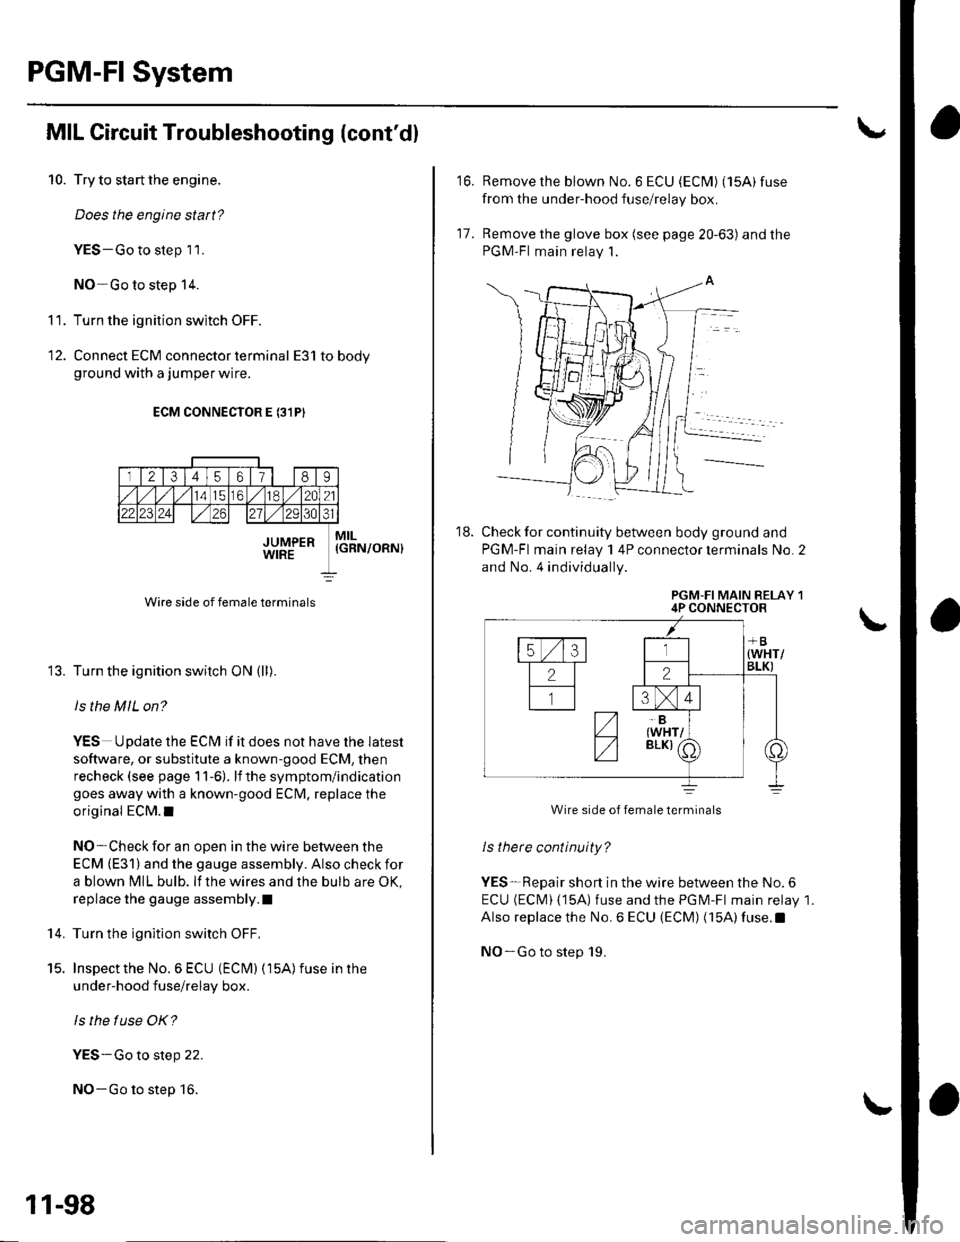
Connect ECM connector terminal E31 to bodyground with a jumper wire.
10.
12.
ECM CONNECTOR E 13lPI
MIL(GRN/ORN}
Wire side of female terminals
Turn the ignition switch ON (ll).
ls the M lL on?
YES Update the ECM if it does not have the latest
software, or substitute a known-good ECM, then
recheck (see page 1 1-6). lf the symptom/indication
goes away with a known-good ECIM, replace the
original ECM.I
NO-Check for an open in the wire between the
ECM (E31) and the gauge assembly. Also check for
a blown MIL bulb. lf the wires and the bulb are OK,
replace the gauge assembly.l
Turn the ignltion switch OFF,
Inspect the No. 6 ECU (ECIM) (15A) fuse in the
under-hood fuse/relay box.
ls the f use OK?
YES-Go to step 22.
NO-Go to step 16.
't 4.
15.
ll2l345617l 18I
415161,/ 1182(2t2'23 24z7l/ 12931
JUMPERWIRE
11-98
to.Remove the blown No. 6 ECU {ECfU) (154) fuse
from the under-hood fuse/relay box.
Remove the glove box (see page 20-63) and the
PGM'FI main relay 1.
Check for continuity between body ground and
PGM-Fl main relay 1 4P connector terminals No. 2
and No. 4 individuallv.
PGM-FI MAIN RELAY 14P CONNECTOR
Wrre srde ol lemale termrnals
ls there continuity?
YES-Repair short in the wire between the No.6
ECU (ECl\4) (15A) fuse and the PGM-Fl main relay 1.
Also replace the No.6 ECU (ECM) (15A) fuse.l
NO-Go to step 19.
17.
18.
fVBv) (wHr/
IA BLK)(
Page 306 of 1139
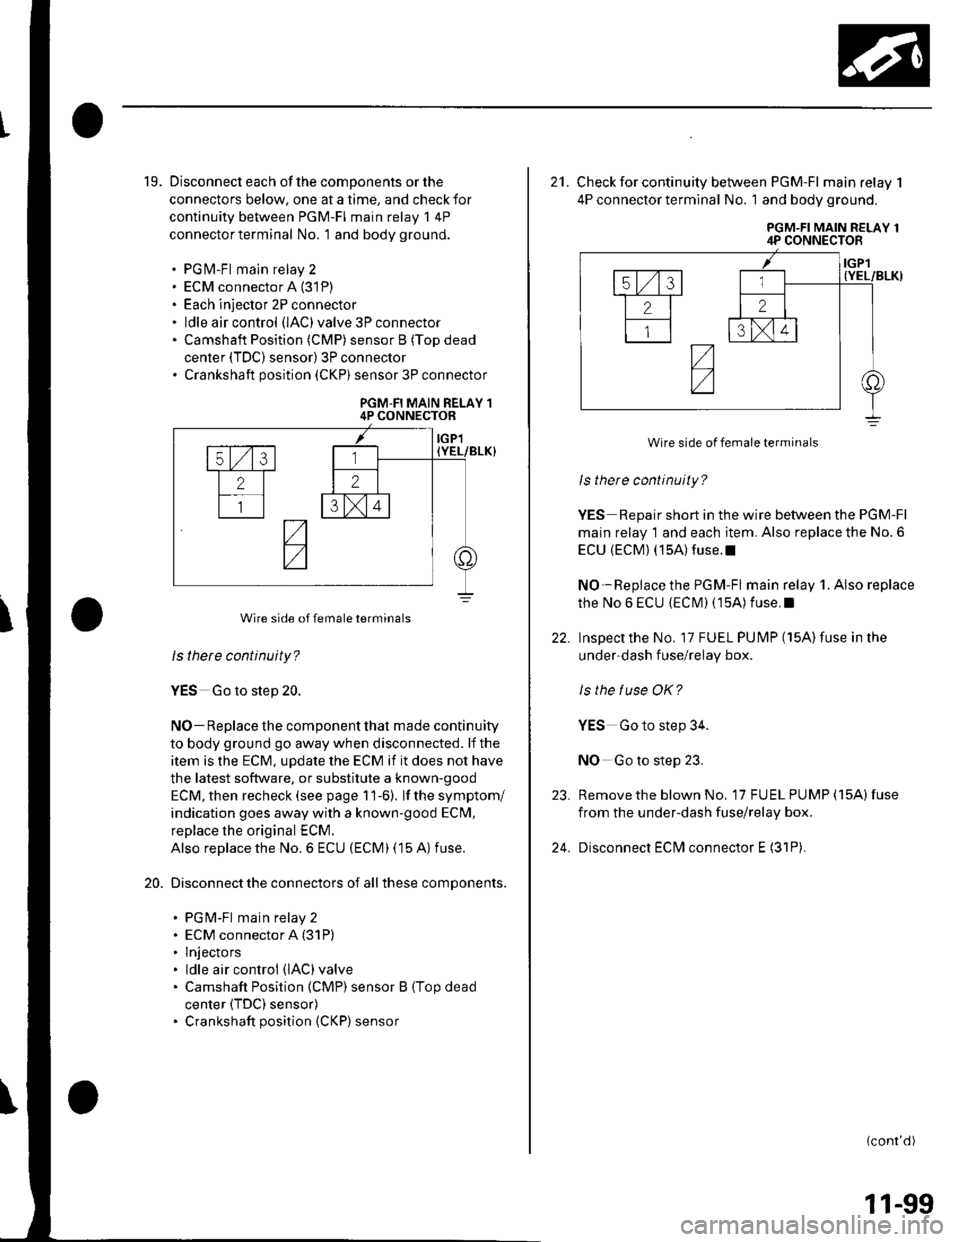
19. Disconnect each of the components or the
connectors below, one at a time, and check for
continuity between PGM-FI main relay 1 4P
connector terminal No. 1 and body ground.
. PGfvl-Fl main relay 2. ECM connector A (31P)
. Each injector 2P connector. ldle air control (lAC)valve 3P connector. Camshaft Position (CMP) sensor B (Top dead
center (TDC) sensor) 3P connector. Crankshaft position (CKP) sensor 3P connector
PGM-FI MAIN RELAY 14P CONNECTOR
ls thete continuity?
YES Go to step 20.
NO- Replace the component that made continuity
to body ground go away when disconnected. lf the
item is the ECM, update the ECM if it does not have
the latest software. or substitute a known-good
ECM, then recheck (see page 11-6). lf the symptom/
indication goes away with a known'good ECM,
replace the original ECM.
Also replace the No. 6 ECU (ECM) (15 A) fuse,
Disconnect the connectors of all these components.
. PGM-Fl main relay 2. ECM connector A (31P)
. lnjectors. ldle air control (lAC)valve
. Camshaft Position {CMP) sensor B (Top dead
center (TDC) sensor). Crankshaft position (CKP) sensor
20.
Wire side of female terminals
22.
21. Check for continuity between PGM-FI main relay 1
4P connector termlnal No. 1 and body ground.
PGM-FI MAIN RELAY 14P CONNECTOR
ls there continuity?
YES Repair short in the wire between the PGM-Fl
main relay 1 and each item. Also replace the No. 6
ECU {ECM) (15A) fuse.l
NO-Replace the PGM-Fl main relay 1. Also replace
the No 6 ECU {ECIM) (15A) f use. I
Inspectthe No. 17 FUEL PUI\4P (15A)fuse in the
under-dash f use/relay box.
ls the tuse OK?
YES Go to step 34.
NO Go to step 23.
Remove the blown No, 17 FU EL PUMP (15A) fuse
from the under-dash fuse/relay box.
Disconnect ECfvl connector E (31P).
(conr'd)
23.
24.
Wire side of female terminals
11-99
Page 307 of 1139
PGM-FI System
25.
MIL Circuit Troubleshooting (cont'dl
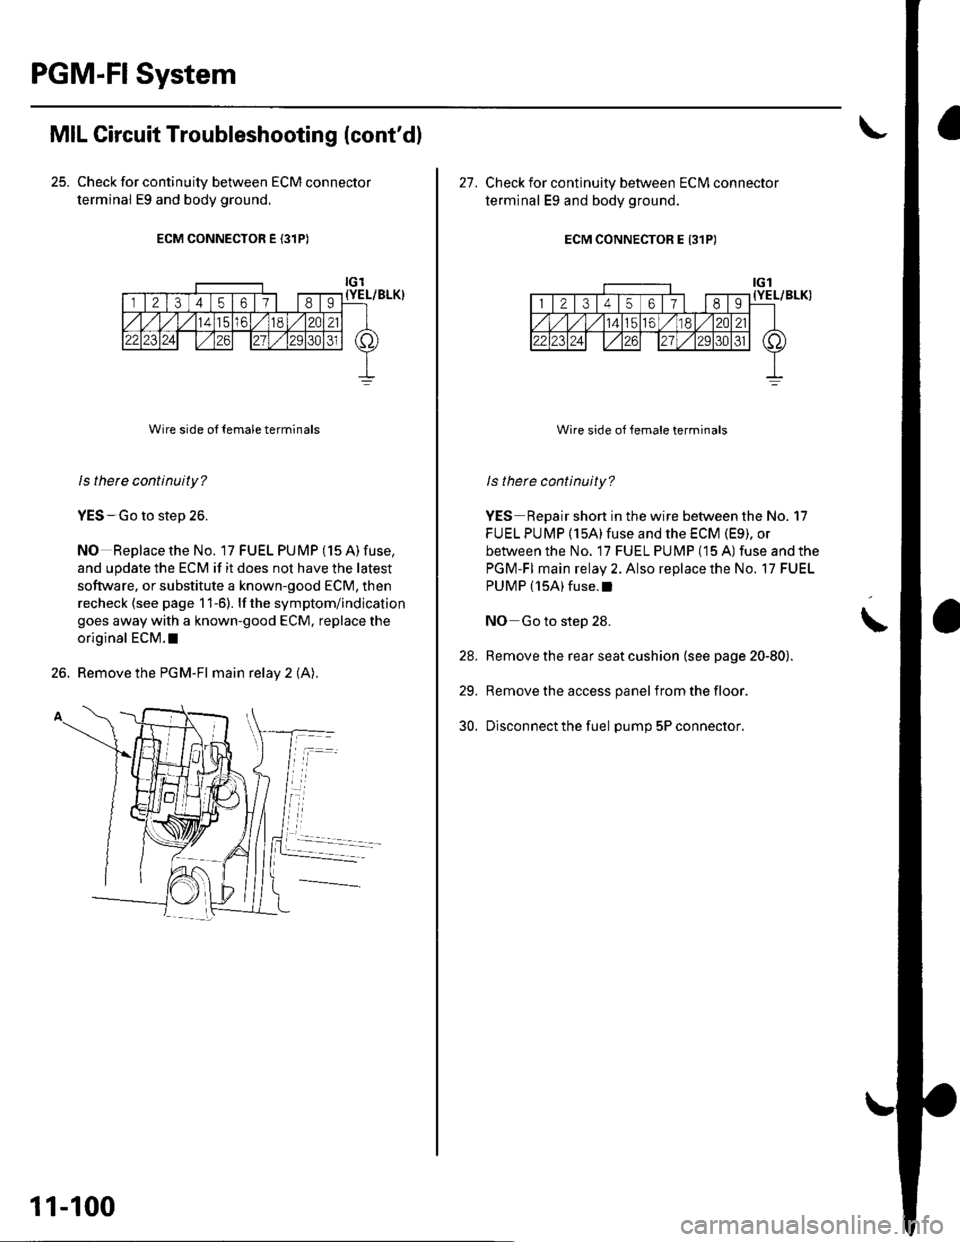
Check for continuity between ECM connector
terminal E9 and body ground.
ECM CONNECTOR E (31P)
Wire side o{ {emale terminals
ls therc continuity?
YES-Go to step 26.
NO Replace the No. lTFUELPUMP(15A)fuse,
and update the ECM if it does not have the latest
software. or substitute a known-good ECM, then
recheck (see page 1 1-6). lf the symptom/indication
goes away with a known-good ECM. replace the
original ECM.I
26. Remove the PGM-Fl main relay 2 (A).
11-100
27. Check for continuity between ECIVI connector
terminal Eg and body ground.
ECM CONNECTOR E 131P)
Wire side oI Jemale terminals
ls there continuity?
YES Repair short in the wire between the No. 17
FU EL PUMP (15A)fuse and the ECM (E9), or
between the No. 17 FUEL PU MP (15 A) fuse and the
PGM-FI main relay 2. Also replace the No. 17 FUEL
PUMP (15A)fuse.l
NO Go to step 28.
Remove the rear seat cushion (see page 20-80).
Remove the access panel from the floor.
Disconnect the fuel pump 5P connector.
\
28.
29.
30.
Page 308 of 1139
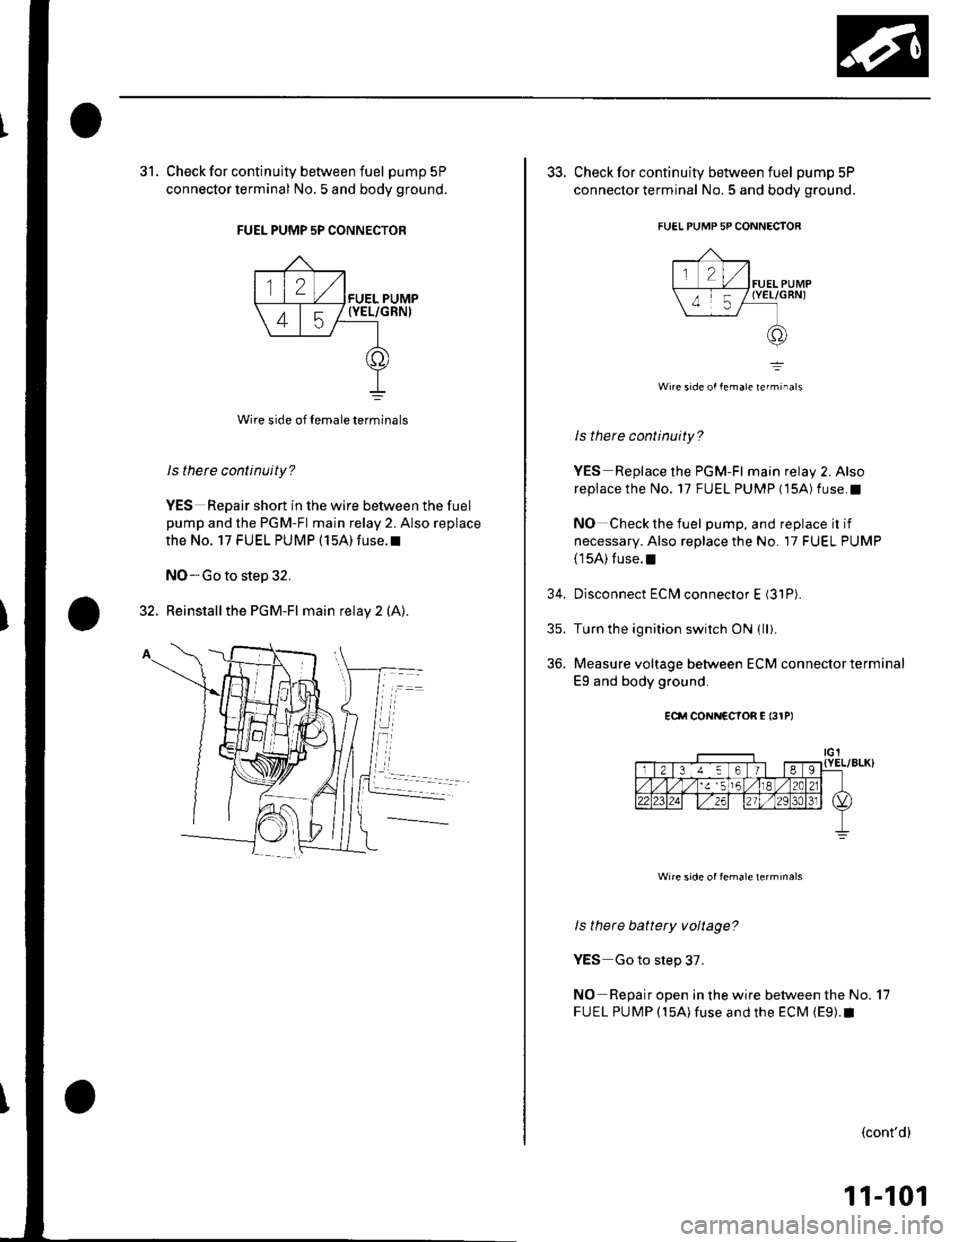
31. Check for continuity between fuel pump 5P
connector terminal No. 5 and body ground.
FUEL PUMP 5P CONNECTOR
Wire side of temale terminals
ls therc continuity?
YES Repair short in the wire between the fuel
pump and the PGM-Fl main relay 2. Also replace
thE NO. 17 FUEL PUMP (15A) fUSE.T
NO-Go to step 32.
32. Reinstallthe PGM-Fl main relay 2 (A).
33. Check for continuity between fuel pump5P
connector terminal No. 5 and body ground.
FUEL PUMP 5P CONNECTOR
=
Wire side ol lemal€ rerminals
ls there continuity?
YES Replace the PGM-Fl main relay 2. Also
replace the No. 17 FUEL PUMP (15A) fuse.l
NO Check the iuel pump, and replace il if
necessary. Also replace the No. 17 FUEL PUMP(15A) fuse.!
34. Disconnect ECM connector E (31P).
35. Turn the ignition swirch ON {111.
36. Measure voltage between ECM connectorterminal
E9 and body ground.
ECfl CON|{CCIOR E (3rPt
Wire side ol female lerminals
ls there battery voltage?
YES Go to step 37.
NO Repair open in the wire between the No. 17
FUEL PUMP (15A)fuse and the ECM (E9).1
(cont'd)
11-101