relay HONDA CIVIC 2003 7.G Owner's Manual
[x] Cancel search | Manufacturer: HONDA, Model Year: 2003, Model line: CIVIC, Model: HONDA CIVIC 2003 7.GPages: 1139, PDF Size: 28.19 MB
Page 243 of 1139
Fuel and Emissions Systems
System Descriptions (cont'dl
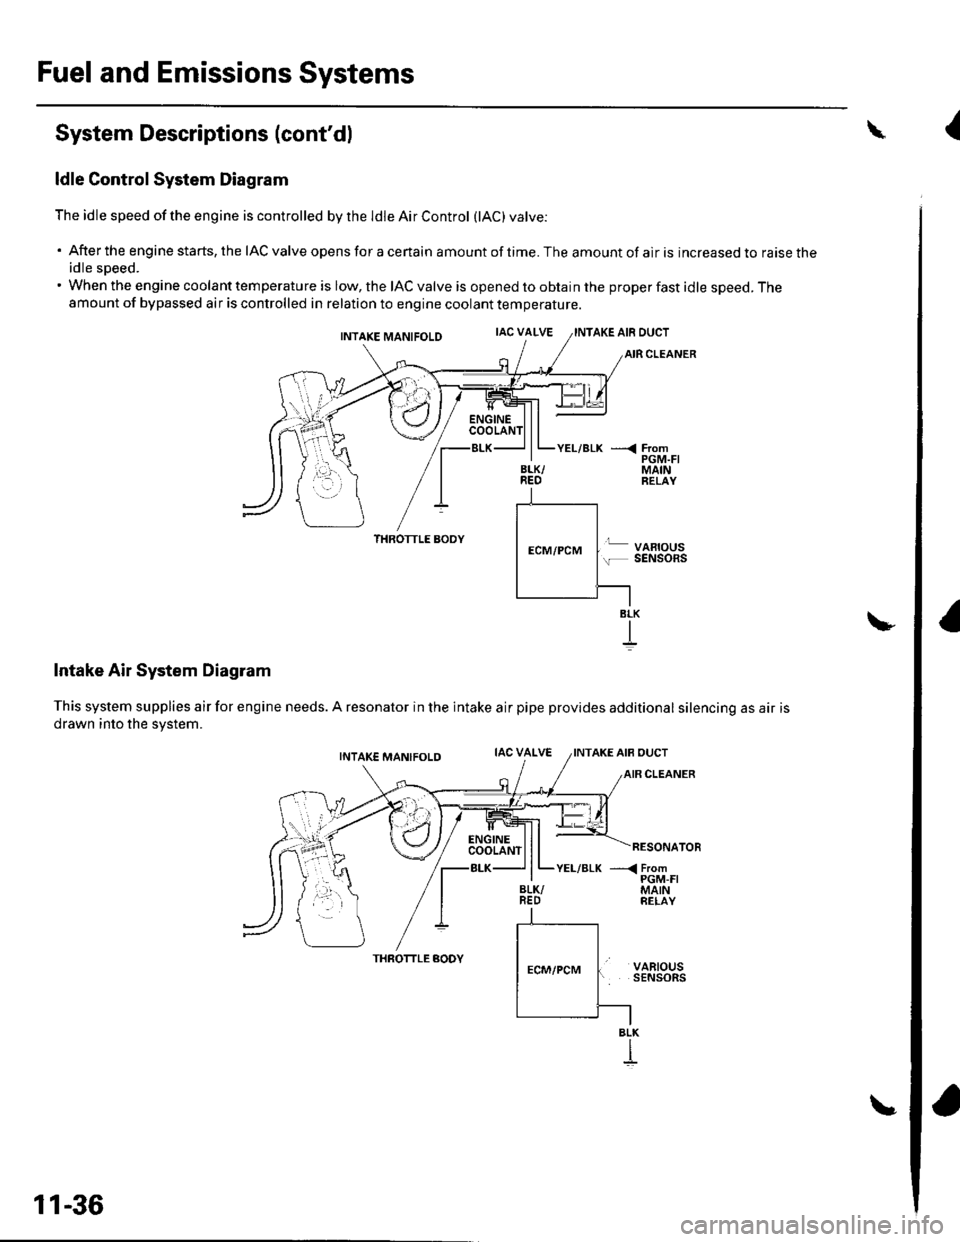
ldle Control System Diagram
The idle speed of the engine is controlled by the ldle Air Control (lAC) varve:
'Aftertheenginestarts,theIACvalveopensforacertainamountoftime.Theamountofairisincreasedtoraisethe
idle sDeed.. When the engine coolant temperature is low, the IAC valve is opened to obtain the proper fast idle speed. Theamount of bypassed air is controlled in relation to engine coolant temperature.
INTAKE MANIFOLDIAC VALVEAKE AIR DUCT
CLEANER
\
BLK/REO
YEL/BLK ---< FromPGM.FIMAINRELAY
THROTTLE AODY
Intake Air System Diagram
This system supplies air for engine needs. A resonator in the intake air
drawn into the svstem.
VARIOUSSENSOnS
pipe provides additional silencing as air is
THROTTLE AODYVARIOUSSENSORS
BLK
BLK
I
11-36
{
Page 251 of 1139
Fuel and Emissions Systems
a
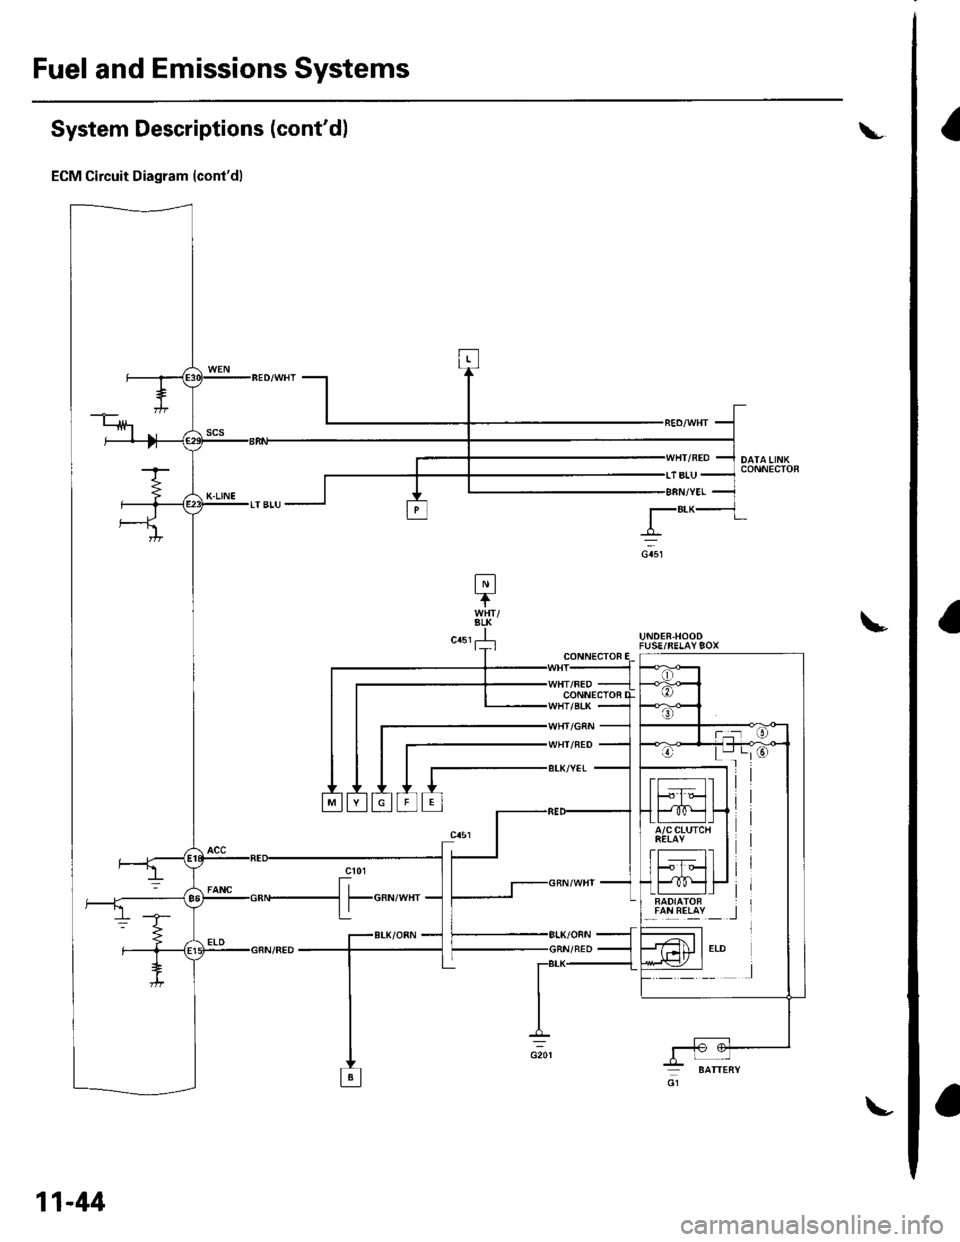
System Descriptions (cont'dl
ECM Circuit Diagram (cont'd)
L
!UNDER.HOODFUSE/RELAY9OX
lalLREllY _ _l
CONN€CTOF
CONNECTOi
WHI/NED
BLK/YET
11-44
Page 252 of 1139
""rr"a* JIr''lHr/cnN 1
CONNECTOR E
CONNECTOi K
CONNECTOFJ/GRN
IGNITIONSWITCH
lG2
'I
TESTTACHOMETERCONNECTO8
UNDER.HOOD
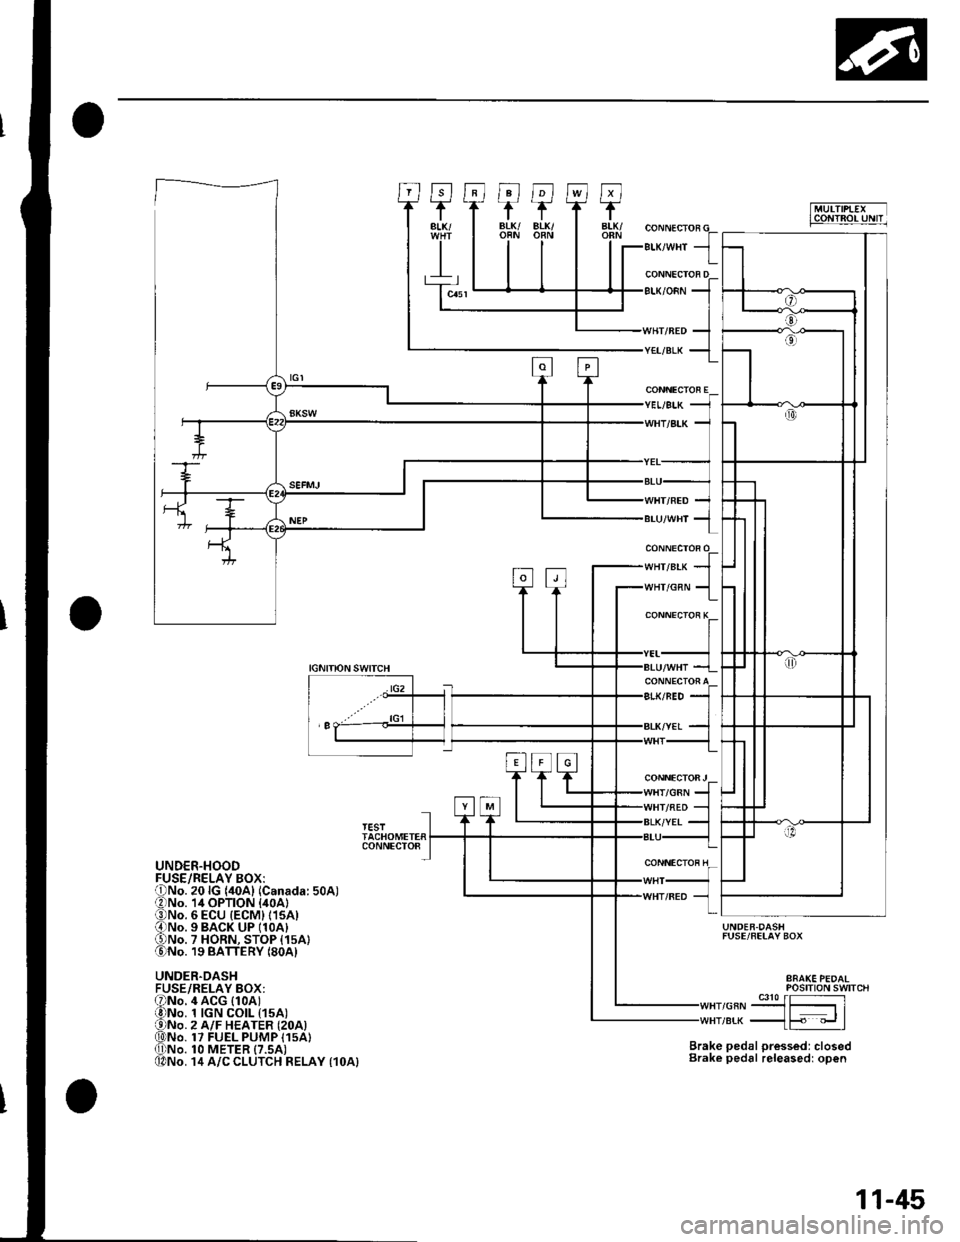
UNDER.DASHFUSE/RELAY BOX:
UNDER.DASHFUSE/FELAY BOX
Brake pedal pressed: closedBrake pedal releasedr open
POStTtON SWTTCH
,or"-9J3{51re* _{F "_.rl
4 ACG (1oAt1 tGN CO|L t15A)2 A/F HEATER {2OA)17 FUEL PUMP I15A}1O METER {7.5AI14 A/C CLUTCH RELAY {1OA}
11-45
Page 258 of 1139
'}
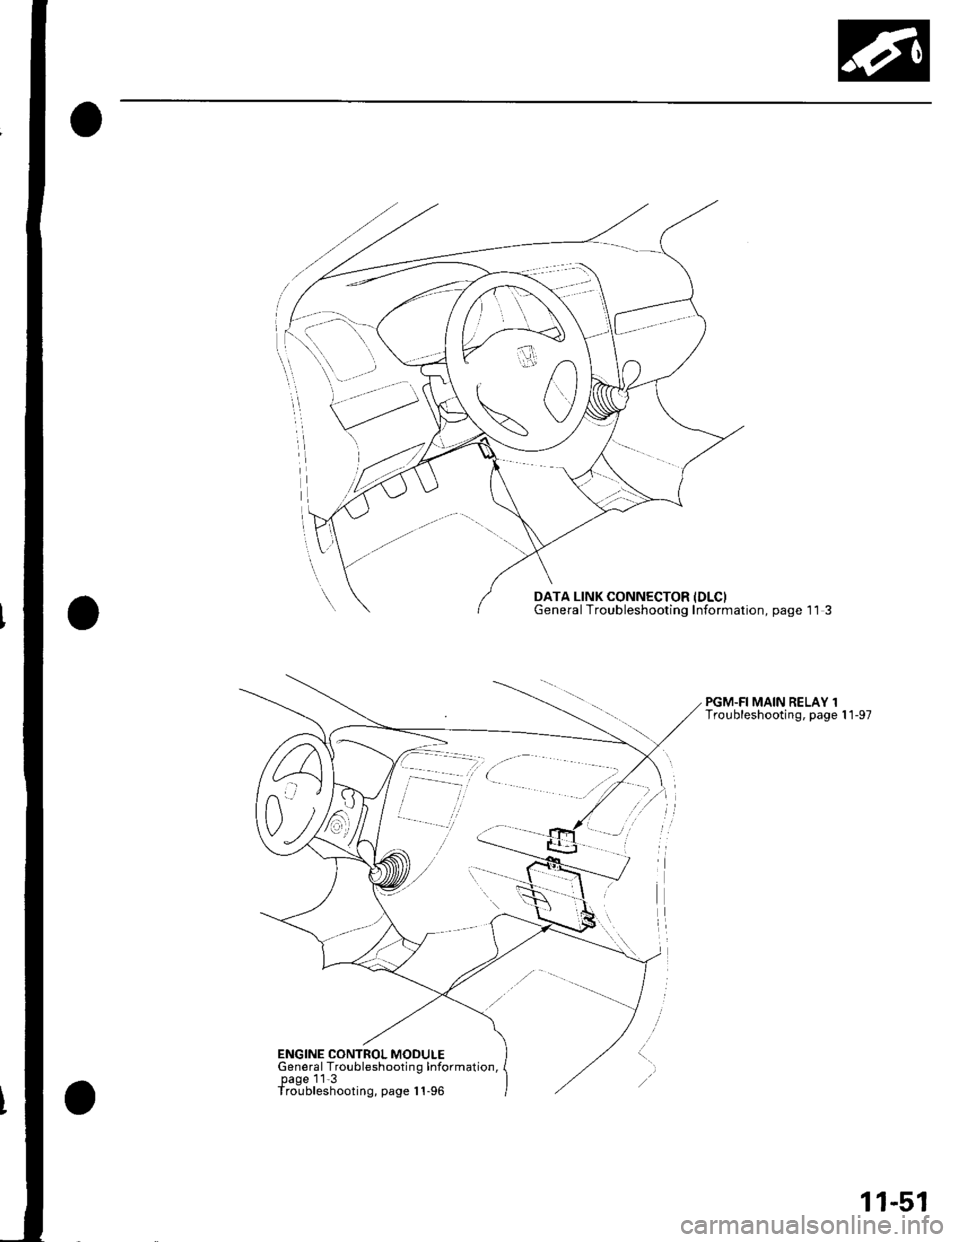
DATA LINK CONNECTOR IDLCIGeneral Troubleshooting Information, page 1 l 3
PGM.FI MAIN RELAY 1Troubleshooting, page 1 1-97
ENGINE CONTROL MODULEGeneral Troubleshootin g Information,page 11 3Troubleshooting, page I 1-96
11-51
Page 276 of 1139
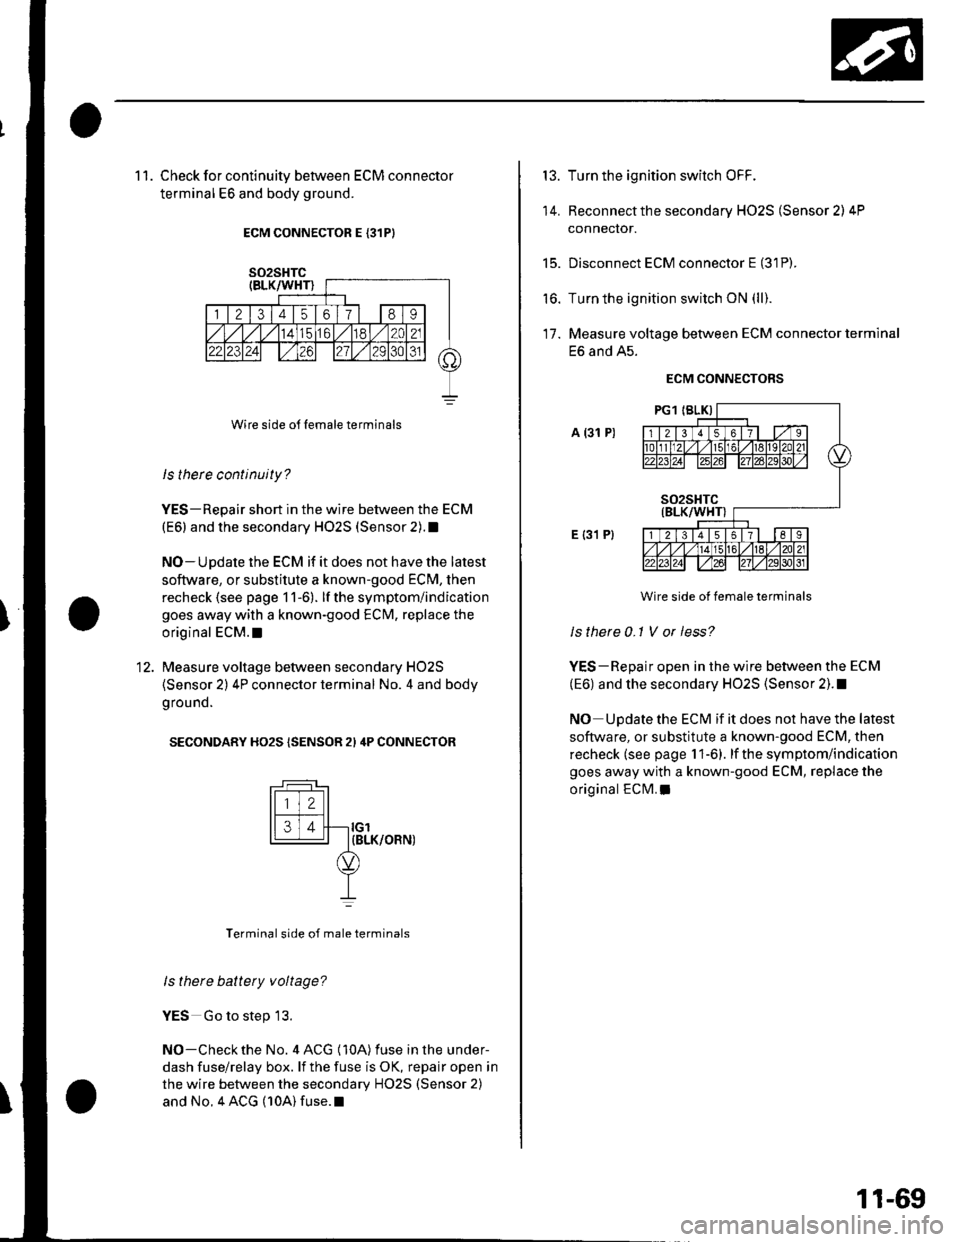
1 1. Check for continuity between ECM connector
terminal E6 and body ground.
ECM CONNECTOR E {31PI
Wire side o{f Iemale terminals
ls therc continuity?
YES-Repair short in the wire between the ECM
(E6) and the secondary HO2S (Sensor 2).1
NO-Update the ECM if it does not have the latest
soflware, or substitute a known-good ECM, then
recheck (see page 1 1-6). lf the symptom/indication
goes away with a known-good ECM, replace the
original ECM.I
Measure voltage between secondary HO2S
(Sensor 2) 4P connector terminal No. 4 and body
g rou nd.
SECONDARY HO2S {SENSOR 2I 4P CONNECTOR
tFff I
l[faJl--ro'14 | IBLK/OFN)
YI
Terminal side of male terminals
ls there battety voltage?
YES Go to step 13.
NO-Checkthe No. 4 ACG (10A) fuse in the under-
dash fuse/relay box. lf the fuse is OK, repair open in
the wire between the secondary HO2S (Sensor 2)
and No. 4 ACG (10A) fuse.l
13.
14.
t5.
to.
Turn the ignition switch OFF.
Reconnect the secondary HO2S (Sensor 2) 4P
connector.
Disconnect ECM connector E (31P).
Turn the ignition switch ON (ll).
Measure voltage between ECM connector terminal
E6 and A5.
ECM CONNECTORS
A (31 P)
E {31 P}
Wire side ot female terminals
Is there 0-1 V or less?
YES-Repair open in the wire between the ECM
(E6) and the secondary HO2S (Sensor 2). !
NO Update the ECM if it does not have the latest
software, or substitute a known-good ECM, then
recheck (see page 1 1-6). lf the symptom/indication
goes away with a known-good ECM, replace the
original ECM. a
17.
11-69
Page 283 of 1139
![HONDA CIVIC 2003 7.G Owners Manual PGM-FI System
a
I
DTC Troubleshooting (contdl
45. Measure voltage between injector 2P connector
terminal No. 1 and body ground.
INJECTOR 2P CONNECTOR
tll-z]
,o, ,"=rrrr*, -lt-
oI
Wire side of female HONDA CIVIC 2003 7.G Owners Manual PGM-FI System
a
I
DTC Troubleshooting (contdl
45. Measure voltage between injector 2P connector
terminal No. 1 and body ground.
INJECTOR 2P CONNECTOR
tll-z]
,o, ,"=rrrr*, -lt-
oI
Wire side of female](/img/13/5744/w960_5744-282.png)
PGM-FI System
a
I
DTC Troubleshooting (cont'dl
45. Measure voltage between injector 2P connector
terminal No. 1 and body ground.
INJECTOR 2P CONNECTOR
tll-z]
,o, ,"=rrrr*, -lt-
oI
Wire side of female terminals
ls there battery voltage?
YES-Go to step 46.
NO-Repair open in the wire between the injector
and the PGM-Fl main relay l.l
Turn the ignition switch OFF.
Check for continuity between body ground and
ECM connector terminal (see table).
46.
47.
ECM CONNECTOR B {24P)
Wire side of female terminals
ls there continuity?
YES-Repair short in the wire between the ECM
and the ;njector.I
NO-Go to step 48.
PROBLEM
CYLINDER
DTCECM
TERMINAL
WIRE
COLOR
No. 1P030'1B5BRN
No.2P0302B4RED
No.3P0303B3BLU
No. 4P030482YEL
11-76
48. Connect injector 2P co nnector term inal No.2 to
body ground with a jumper wire {see table).
INJECTOR 2P CONNECTOR
Wire side of {emale terminals
49. Check for continuity between body ground and
ECM connector terminal (see table).
ECM CONNECTOR B I24P)
Wire side oJ temale terminals
ls therc continuity?
YES Replace the injector, then recheck.l
NO Repair open in the wire between the ECM and
the injector.I
tll-Z-l-]_r-l_rNJ
IJUMPER
IwrBE
PROBLEM
CYLINDER
DTCWIRE COLOR
No. 1P0301BRN
No.2P0302RED
No. 3P0303BLU
No. 4P0304YEL
PROBLEM
CYLINDER
DTCECM
TERMINAL
WIRE
COLOR
No. 1P0301B5BRN
No. 2P0302B4RED
No. 3P0303B3BLU
No. 4P030482YEL
Page 285 of 1139
PGM-FI System
a
a
DTC Troubleshooting (cont'd)
DTC P0335: CKP Sensor No Signal
DTC P0336: CKP Sensor Intermittent
Interruption
'1. Reset the ECM (see page 1 '1-4).
2. Sta rt the engine.
ls DTC P0335 and/or P0336 indicated?
YES Go to step 3.
NO Intermittent failure, system is OK at this time.
Check for poor connections or loose terminals at
the CKP sensor and at the ECM.I
3. Turn the ignition switch OFF.
4. Disconnect the CKP sensor 3P connector.
5. Turn the ignition switch ON {ll).
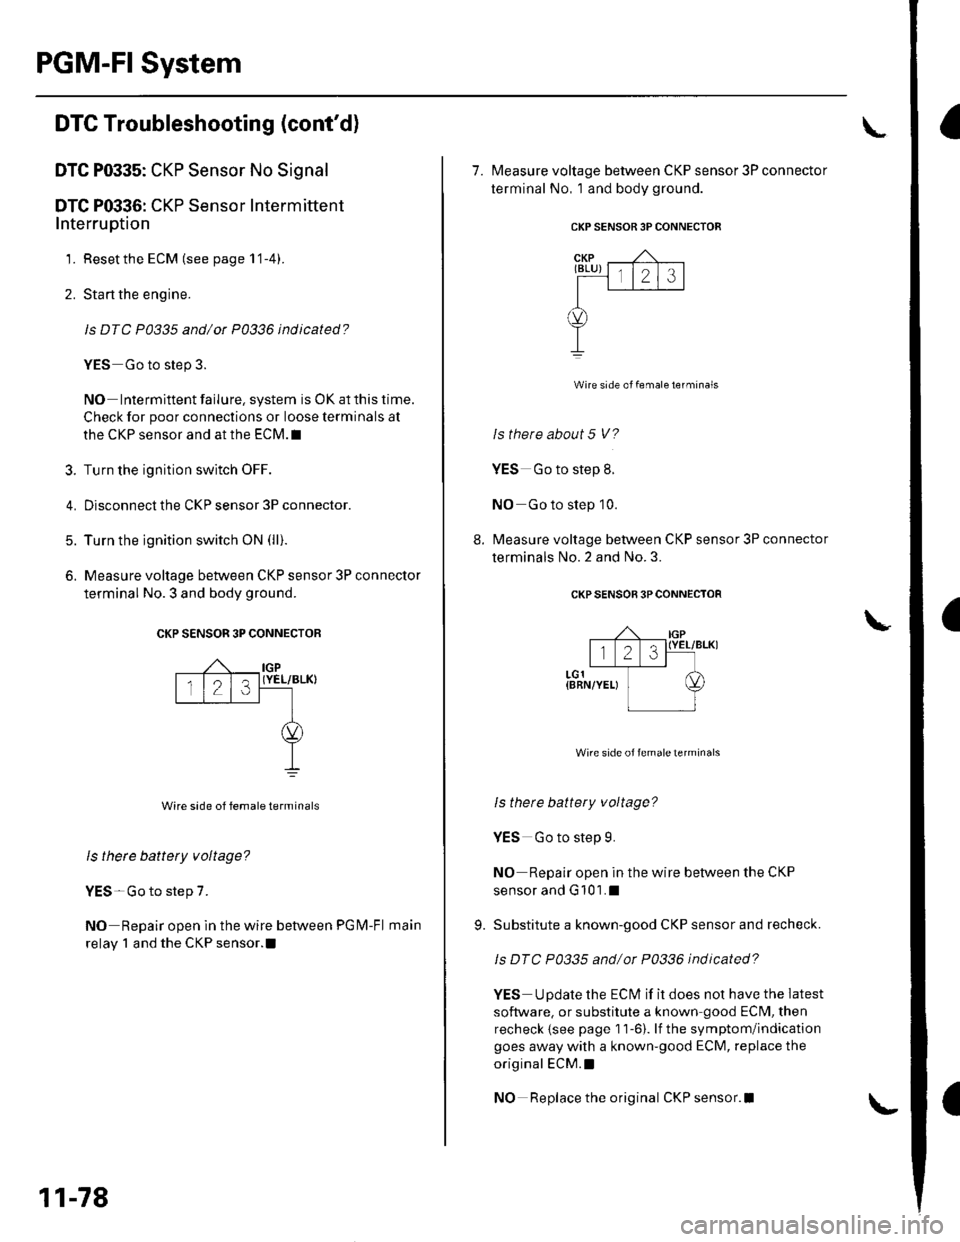
6. Measure voltage between CKP sensor 3P connector
terminal No.3 and body ground.
CKP SENSOR 3P CONNECTOF
(YEL/BLK}
Wire sade of female terminals
Is there battery voltage?
YES- Go to step 7.
NO Repair open ln the wire between PGM-Fl main
relay 1 and the CKP sensor.!
IGP
123
11-78
7. Measure voltage between CKP sensor 3P connector
terminal No, 1 and body ground
CKP SENSOR 3P CONNECTOR
Wire side of female tef minals
ls there about 5 V?
YES Go to step L
NO Go to step 10.
8. Measure voltage between CKP sensor 3P connector
terminals No.2 and No. 3.
CKP SENSOR 3PCONNECTOR
,llYtLL"l
(LGl{BRN/YELI
Wire side of female terminals
ls there battery voltage?
YES Go to step 9.
NO Repair open in the wire between the CKP
sensor and G 101 .I
9. Substitute a known-good CKP sensor and recheck.
ls DTC P0335 and/or P0336 indicated?
YES Update the ECM if it does not have the latest
software. or substitute a known good ECM, then
recheck {see page 1 1-6). lf the symptom/indication
goes away with a known-good ECM, replace the
original ECM.I
NO Replace the original CKP sensor.l
Page 288 of 1139
DTC P0563: ECM Power Source Circuit
U nexpected Voltage
1. Reset the ECI\4 {see page l1-4}.
2. Turn the ignition switch OFF.
3. Wait 5 seconds.
4. Turn the ignition switch ON {lll.
ls DTC P0563 indicated?
YES Go to step 5.
NO-lntermiltent failure, system is OK at this time.
Check for poor connections or loose terminals at
the No. 6 ECU (ECM) {15 A) fuse in the under-hood
fuse/relay box and at the ECM.I
Turn the ignition switch OFF.
Disconnect ECI\4 connector E {31P).
Turn the ignition switch ON (ll).
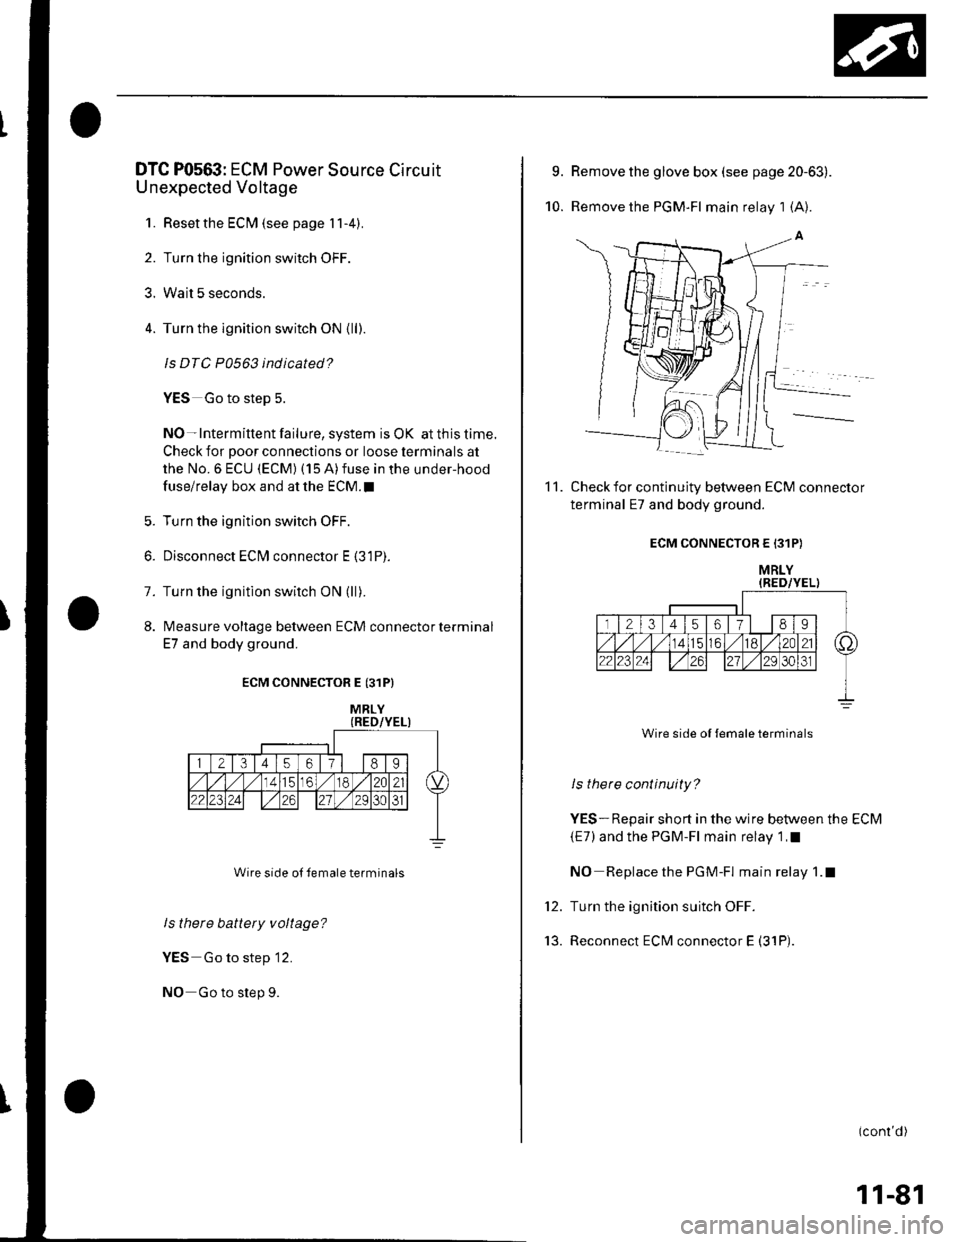
lvleasure voltage between ECM connector terminal
E7 and body ground.
6.
7.
8.
ECM CONNECTOR E {31P}
Wire side ol remale terminals
ls there battery voltage?
YES Go to step 12.
NO Go to step 9.
MRLY
9.
10.
Remove the glove box (see page 20-63).
Remove the PGM-FI main relay 1 (A7.
Check for continuity between ECM connector
terminal E7 and body ground.
ECM CONNECTOR E 131P)
MRLY{RED/YEL)
Wire side of {emale terminals
ls there continuity?
YES-Repair short in the wire between the ECM
{E7) and the PGM-Fl main relay 1 ,I
NO Replace the PGM-Fl main relay 1.1
Turn the ignition suitch OFF.
Reconnect ECM connector E (31P).
11.
tt.
'13.
(conl'd)
11-81
Page 289 of 1139
PGM-FISystem
DTC Troubleshooting (cont'dl
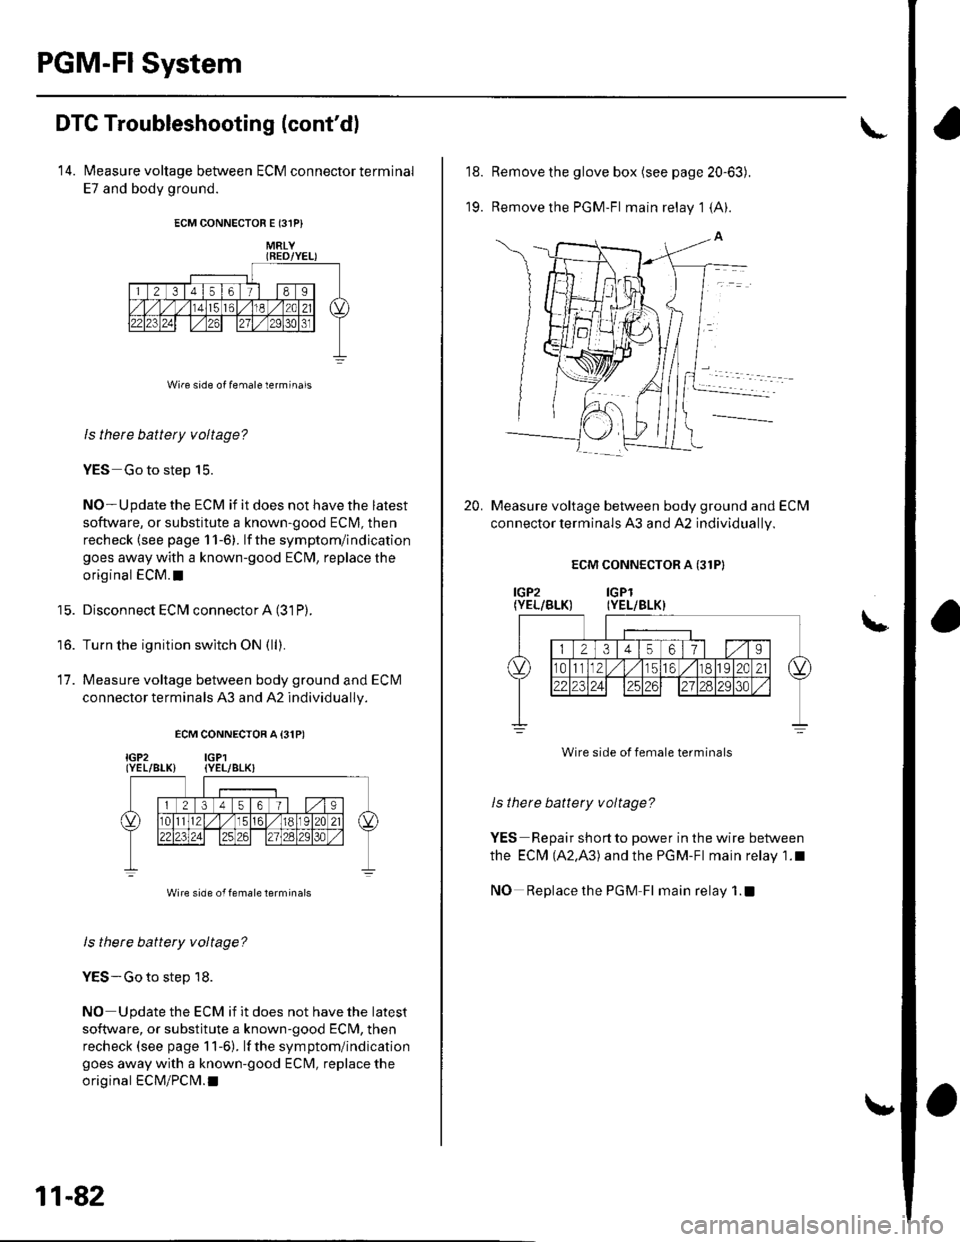
14. Measure voltage between ECM connector terminal
E7 and body ground.
ECM CONNECTOR E 13lPI
MRLYIBEO/YEL)
Wire side of female terminals
ls there battery voltage?
YES Go to step 15.
NO-Update the ECM if it does not have the latest
software, or substitute a known-good EClvl, then
recheck (see page 11-6). lf the symptom/indication
goes away with a known-good ECM, replace the
original ECM.I
Disconnect ECI\4 connector A (31P).
Turn the ignition switch ON (ll).
Measure voltage between body ground and ECIM
connector terminals 43 and 42 individually.
ECM CONNECTOR A {3.IP)
IGP2 IGP1(YEI./BLX) (YEL/BLKI
Wire side of female lerminals
ls there battery voltage?
YES-Go to step 18.
NO Update the ECM if it does not have the latest
software, or substitute a known-good ECM, then
recheck (see page 11-6). lf the symptom/indication
goes away with a known-good ECM, replace the
original ECM/PCl\4.1
15.
to.
17.
11-82
18.
19.
Remove the glove box (see page 20-63).
Remove the PGM-FI main relay '1 {A).
Measure voltage between body ground and ECM
connector terminals A3 and A2 individually.
ECM CONNECTOR A {31PI
IGP2 IGP1(YEL/BLK) (YEL/BLK)
Wire side of female terminals
I s there battery v oltage?
YES Repair shortto power in the wire between
the ECI\4 (A2.A3) and the PGM-Fl main relay 1.1
NO Replacethe PGM Fl main relay 1.!
20.
Page 295 of 1139
PGM-FI System
DTC Troubleshooting (cont'dl
DTC Pl163: Ay'F Sensor (Sensor 1 ) SlowResponse
NOTE: lf DTC P1162 is stored at the same time as DTC
P1163. troubleshoot DTC P1162 first, then recheckfor
DTC P1163.
1. Reset the ECM (see page 1 1-4).
2. Start the engine. Hold the engine at 3,000 rpm with
no load (in neutral) until the radiator fan comes on.
3. Test-drive under the following conditions:
. 55 mph (89 km/h) steady speed' Transmission in sth gear' Until the Ay'F sensor readiness code or
Temporary DTC Pl163 comes on
4. Check for a Temporary DTC with the scan tool.
ls Temporary DTC P 1163 indicated?
YES Replace the Ay'F sensor (Sensor 1).I
NO Intermittent failu re, system is OK at this time.
Check for poor connections or loose terminals at
the A'lF sensor (Sensor 1 ) and at the ECM. t
11-88
DTC Pl164: A,/F Sensor (Sensor 1) Circuit
Range/Performance Problem
1. Resetthe ECI\4 (see page 1t-4).
2. Start the engine. Holdtheengineat3,000 rpmwith
no load (in neutral) until the radiator fan comes on,
3. Test-drive in 3rd gear. Starting at 1,600 rpm,
accelerate using wide open throttle for at least
5 seconds. Then decelerate for at least 5 seconds
with the throttle completely closed until the A,/F
sensor readiness code is set to complete or
Temporary DTC P1 164 comes on.
4. Check for a Temporary DTC with the scan tool.
ls Temporary DTC P1164 indicated?
YES- Replace the A,,/F sensor (Sensor 1). I
NO Intermittent failure, system is OK at this time.
Check for poor connections or loose terminals at
the Ay'F sensor relay, at the Ay'F sensor (Sensor 1),
and at the EcM.l