Control HONDA CIVIC 2003 7.G Owner's Manual
[x] Cancel search | Manufacturer: HONDA, Model Year: 2003, Model line: CIVIC, Model: HONDA CIVIC 2003 7.GPages: 1139, PDF Size: 28.19 MB
Page 78 of 1139
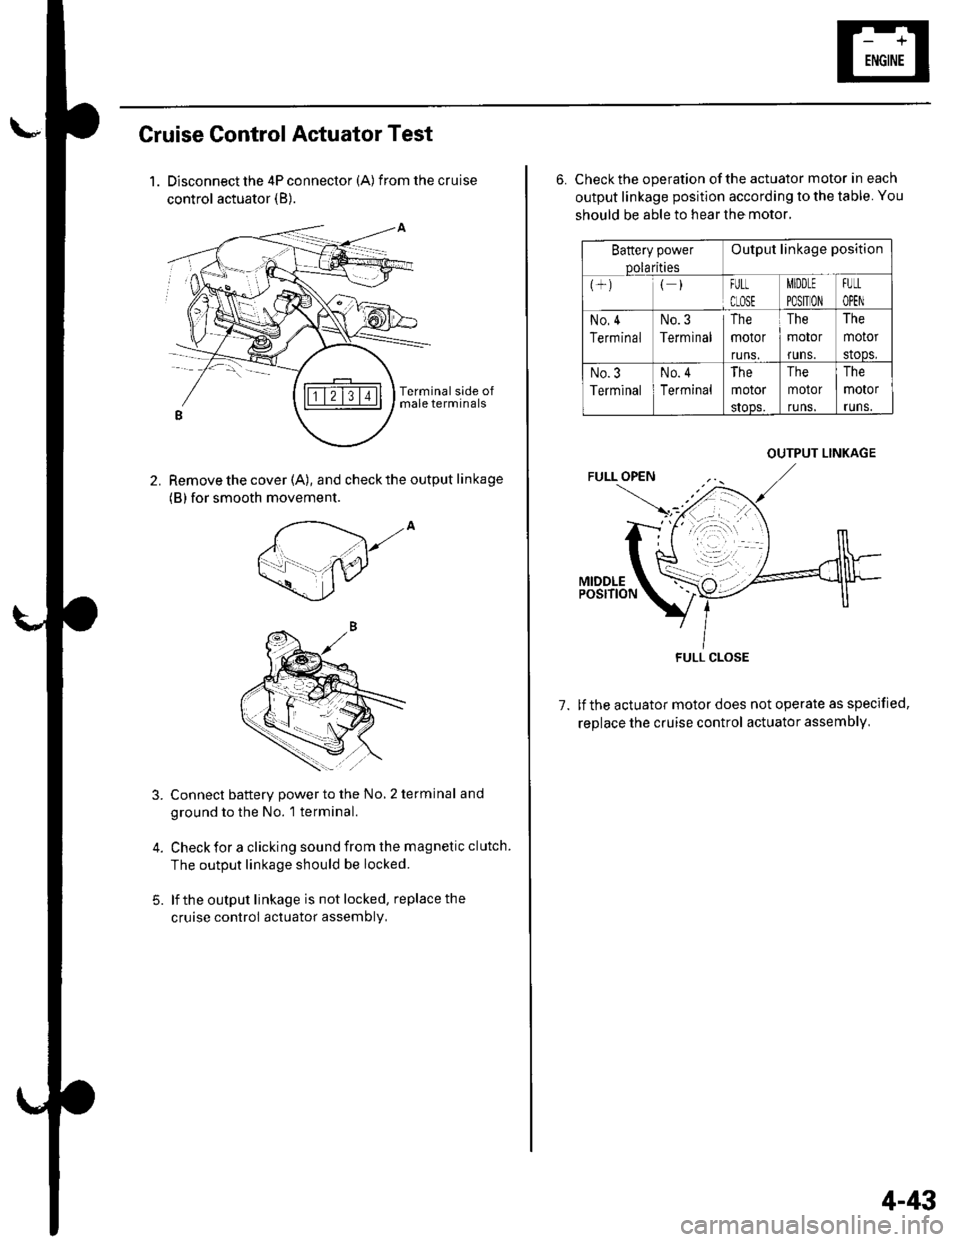
Cruise Control Actuator Test
1. Disconnect the 4P connector (A) from the cruise
control actuator (B).
Remove the cover (A), and check the output linkage
(B) for smooth movement.
2.
,to
5.
Connect battery power to the No, 2 terminal and
ground to the No. 1 terminal.
Check for a clicking sound from the magnetic clutch.
The output linkage should be locked.
lf the output linkage is not locked, replace the
cruise control actuator assembly,
6. Check the operation of the actuator motor in each
output linkage position according to the table. You
should be able to hear the motor.
Battery power
Dolarities
Output linkage position
FULt
CLOSE
MIDDLE
PO$TION
FUtL
OPEN
No,4
Terminal
No.3
Terminal
The
motor
runs.
The
motor
runs.
The
motor
stoDs,
No.3
Terminal
No. 4
Terminal
The
motor
sIoos.
The
motor
runs.
The
motor
runs.
1.lf the actuator motor does not operate as specified,
replace the cruise control actuator assembly,
OUTPUT LINKAGE
FULL CLOSE
4-43
Page 79 of 1139
Cruise Control
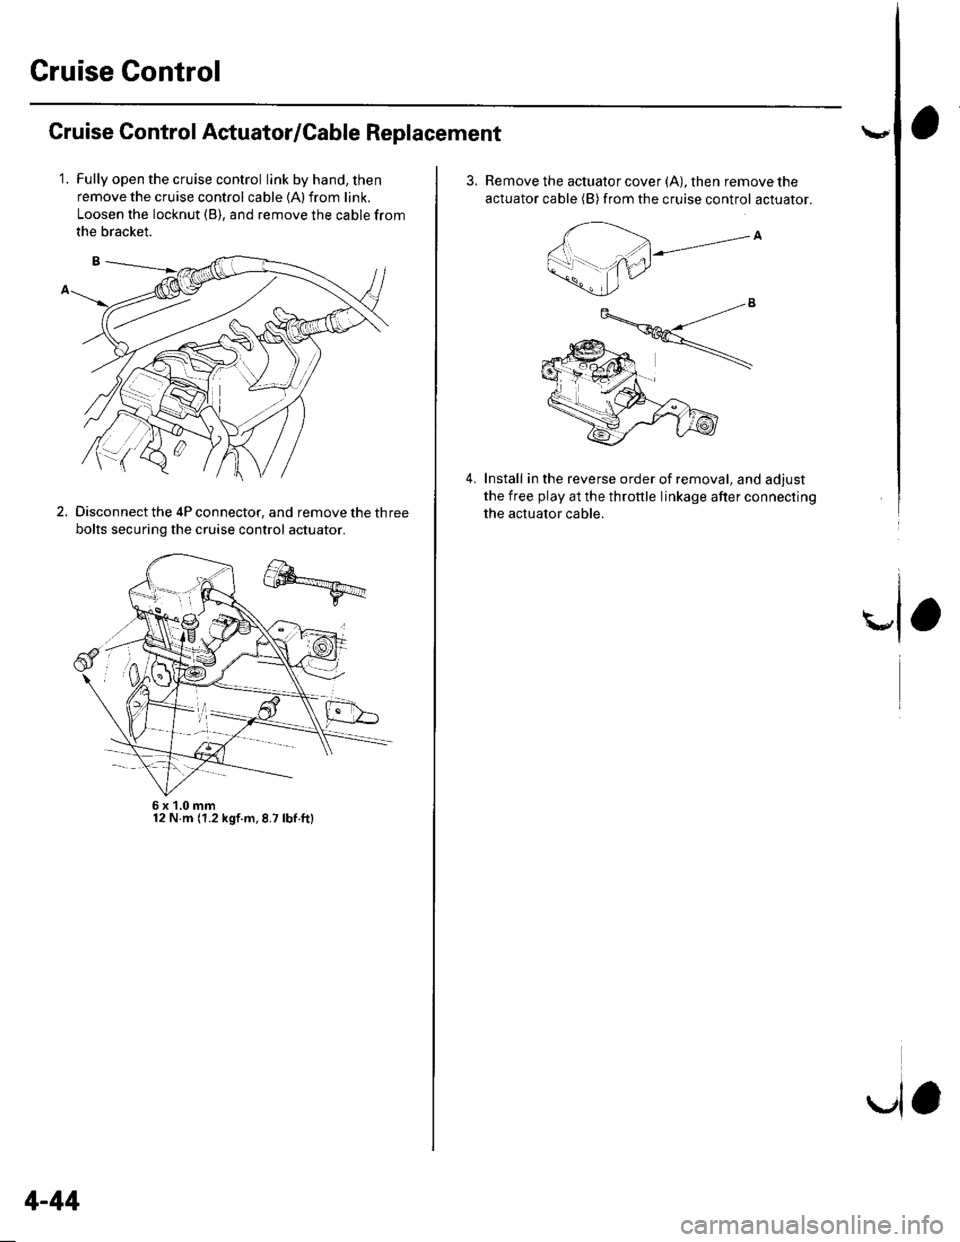
Cruise Control Actuator/Cable Replacement
1.Fully open the cruise control link by hand, then
remove the cruise control cable {A) from link.
Loosen the locknut (B), and remove the cable from
the bracket.
Disconnect the 4P connector, and remove the three
bolts securing the cruise control actuator.
2.
6x1,0mm12 N.m (1.2 kgf.m,8.7 lbf.ft)
4-44
la
3.Remove the actuator cover (A), then remove the
actuator cable (B) from the cruise control actuator.
Install in the reverse order of removal, and adjust
the free play at the throttle linkage after connecting
the actuator cable.
4.
Page 83 of 1139
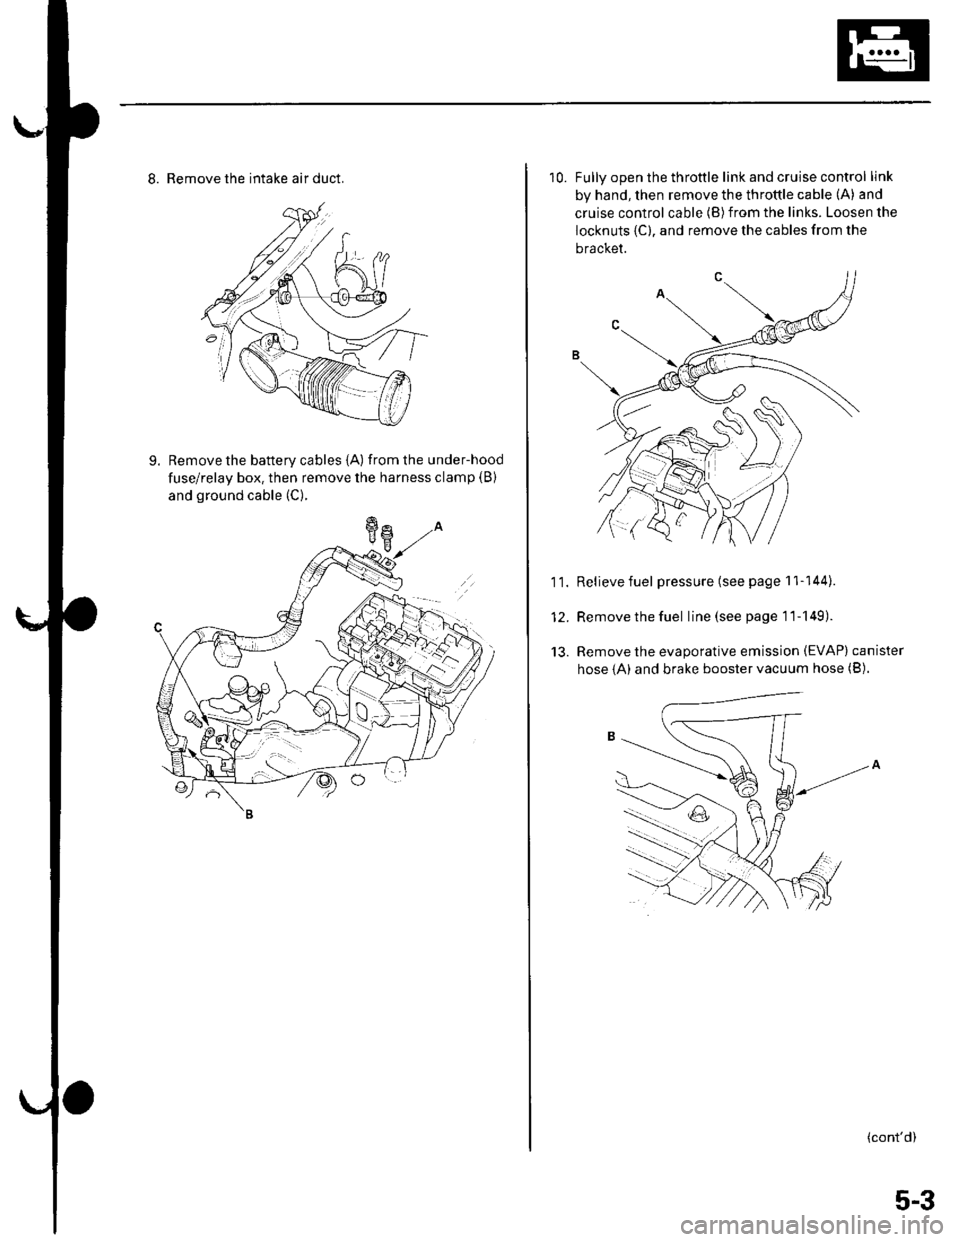
8. Remove the intake air duct.
9. Remove the battery cables {A) fromthe under-hood
fuse/relay box. then remove the harness clamp (B)
and ground cable (C).
10. Fullv ooen the throttle link and cruise control link
by hand, then remove the throttle cable (A) and
cruise control cable (B)from the links. Loosen the
locknuts {C), and remove the cables from the
bracket.
11. Relievefuel pressure (see page 11-144).
12. Remove the fuel line(seepagell-149).
13. Remove the evaporative emission (EVAP) canister
hose {A) and brake booster vacuum hose (B).
(cont'd)
5-3
Page 84 of 1139
Engine Assembly
Engine Removal (cont'dl
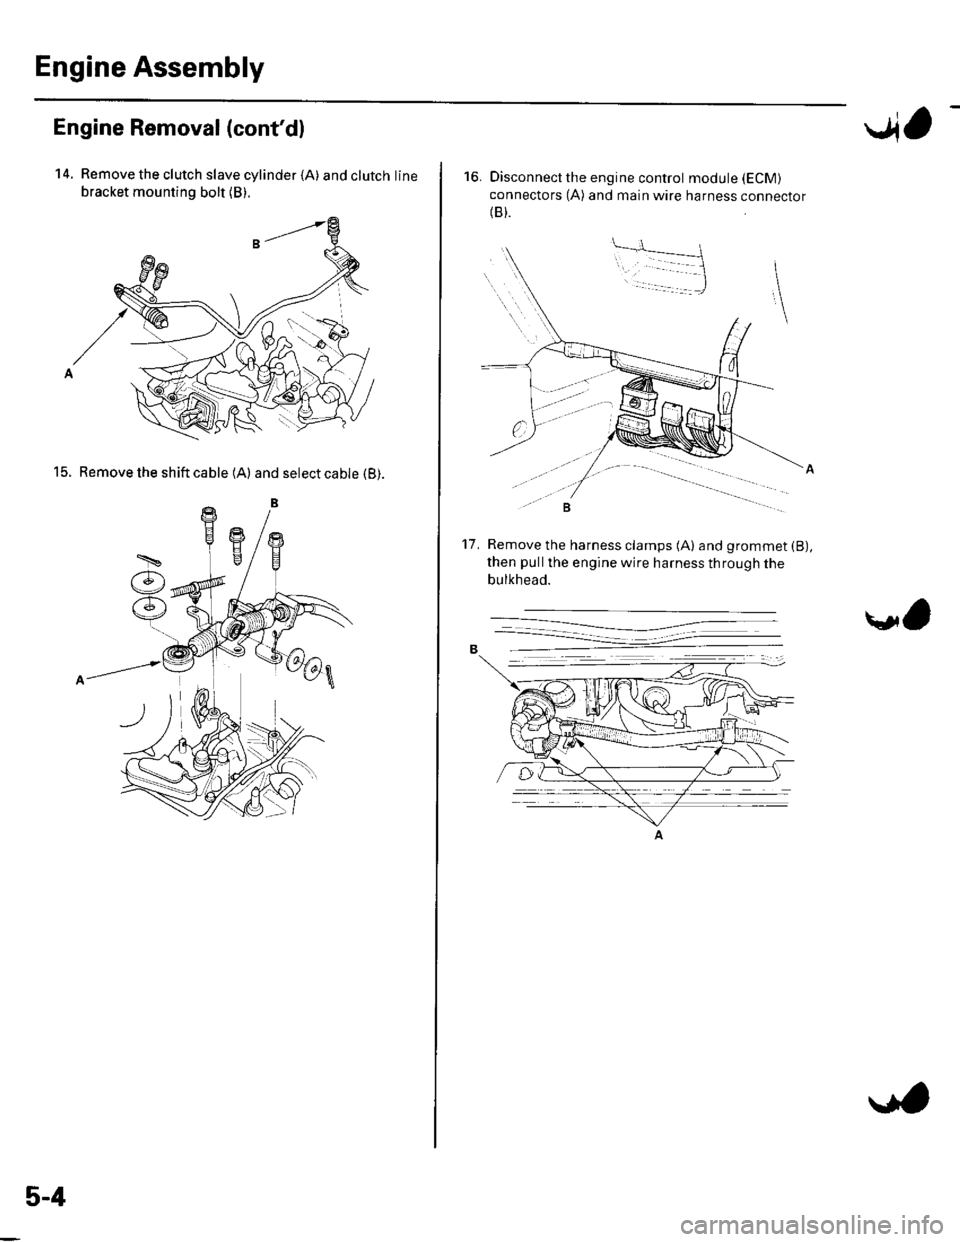
14. Remove the clutch slave cylinder {A) andclutchline
bracket mounting bolt (B).
15. Remove the shift cable (A) and select cable (B).
5-4
..4,
16. Disconnect the engine control module (ECM)
connectors (A) and main wire harness connector(B).
Remove the harness clamps (A) and grommet (B),
then pullthe engine wire harness through the
bulkhead.
't7 .
\l,
Page 93 of 1139
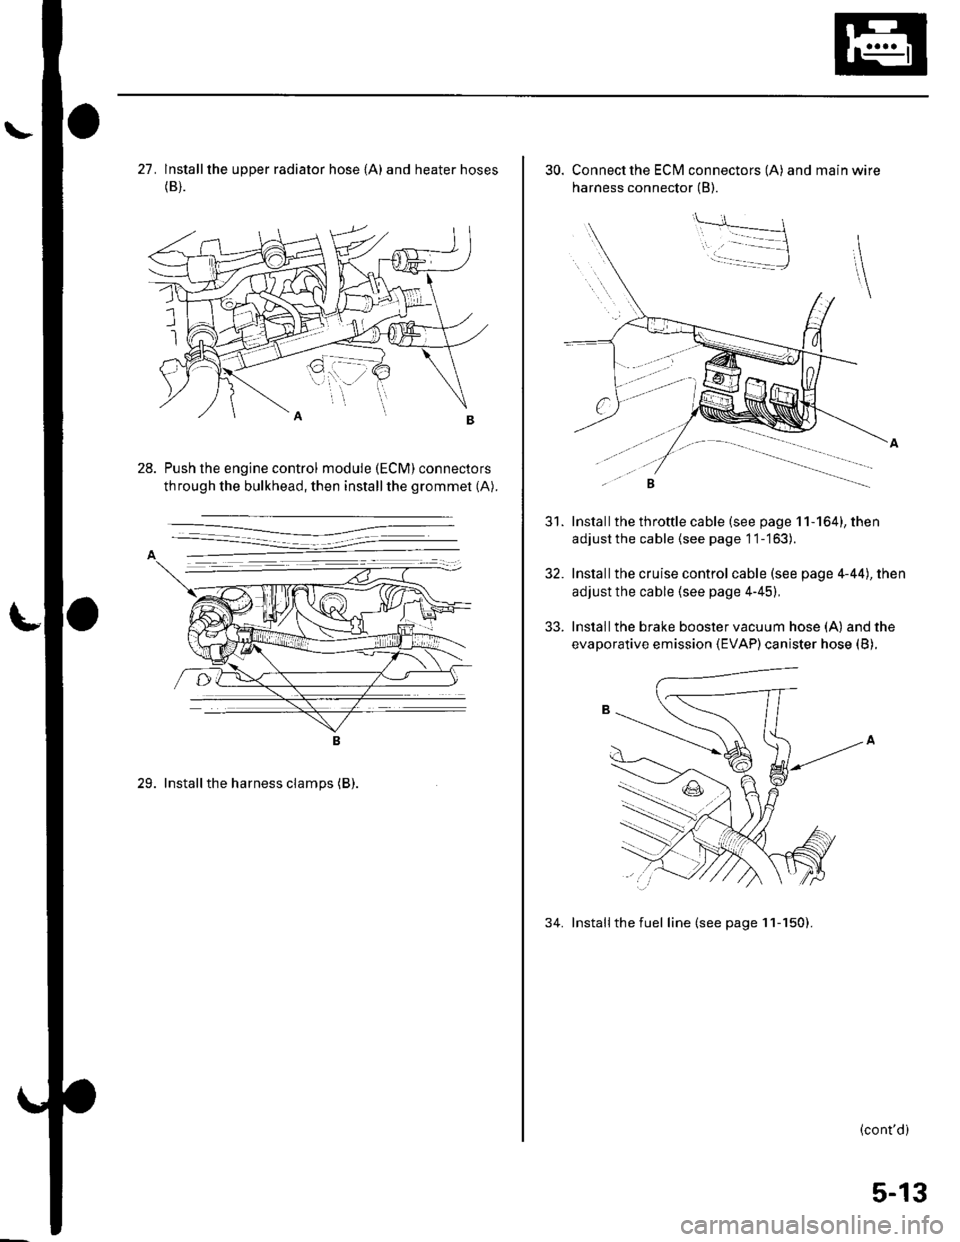
27. lnstallthe upper radiator hose {A) and heater hoses(B).
Push the engine control module (ECM) connectors
through the bulkhead, then installthe grommet (A).
29. Installthe harness clamps (B).
30. Connect the ECI\4 connectors (A) and main wire
harness connector (B).
Install the throttle cable (see page 11-164), then
adjustthe cable {see page 11-'163).
Installthe cruise control cable (see page 4-44), then
adjust the cable (see page 4-45),
Install the brake booster vacuum hose (A) and the
evaporative emission (EVAP) canister hose (B).
34. Installthe fuel line (see page 11-150).
31.
32.
33.
(cont'd)
5-13
Page 95 of 1139
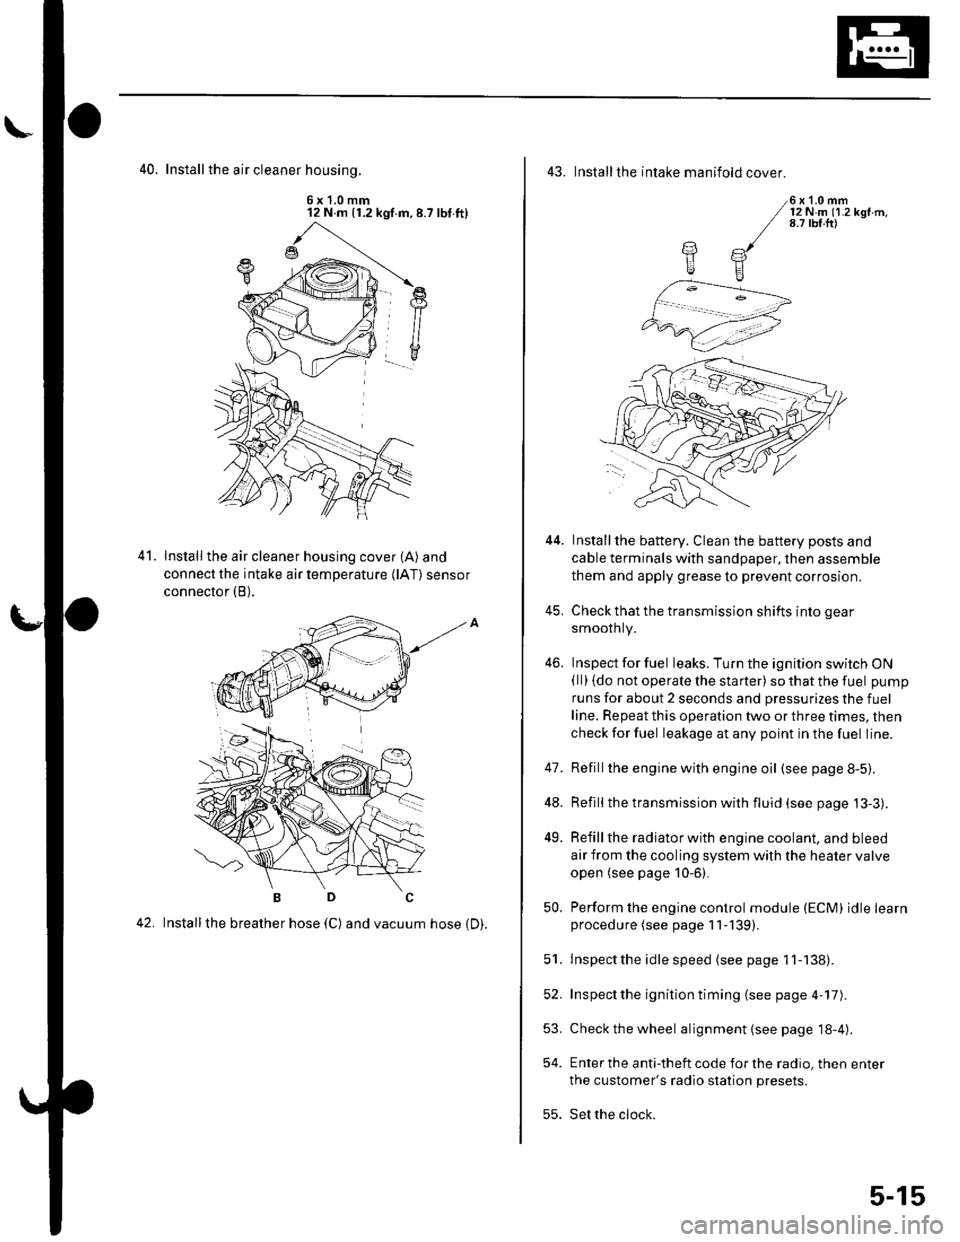
40. Install the air cleaner housinq.
6x1.0mm12 N m (1.2 kgf.m,8.7 lbt.ft)
Install the air cleaner housing cover (A) and
connect the intake air temperature (lAT) sensor
connector (B),
42. Installthe breather hose (C) and vacuum hose 1D).
41.
43. Installthe intake manifold cover.
6x1.0mm12Nm11.2kgf.m.8.7 tbf.ft)
Installthe battery. Clean the battery posts and
cable terminals with sandpaper, then assemble
them and apply grease to prevent corrosion.
Check that the transmission shifts into gear
smoothly.
Inspect for fuel leaks. Turn the ignition switch ON(ll) {do not operate the starter) so that the fuel pump
runs for about 2 seconds and pressurizes the fuel
line. Repeat this operation two or three times, then
check for fuel leakage at any point in the fuel line.
Refillthe engine with engine oil (see page 8-5).
Refill the transmission with fluid (see page 13-3).
Refill the radiator with engine coolant, and bleed
air from the cooling system with the heater valve
open (see page 10-6).
Perform the engine control module (ECM) idle learnprocedure (see page 11-139).
Inspect the idle speed (see page 1 1-138).
Inspect the ignition timing (see page 4-17).
Check the wheel alignment {see page 18-4).
Enter the anti-theft code for the radio, then enter
the customer's radio station presets.
Set the clock.
YE
44.
41.
]tE
46.
48.
49.
52.
53.
54.
50.
51.
55.
5-15
Page 98 of 1139
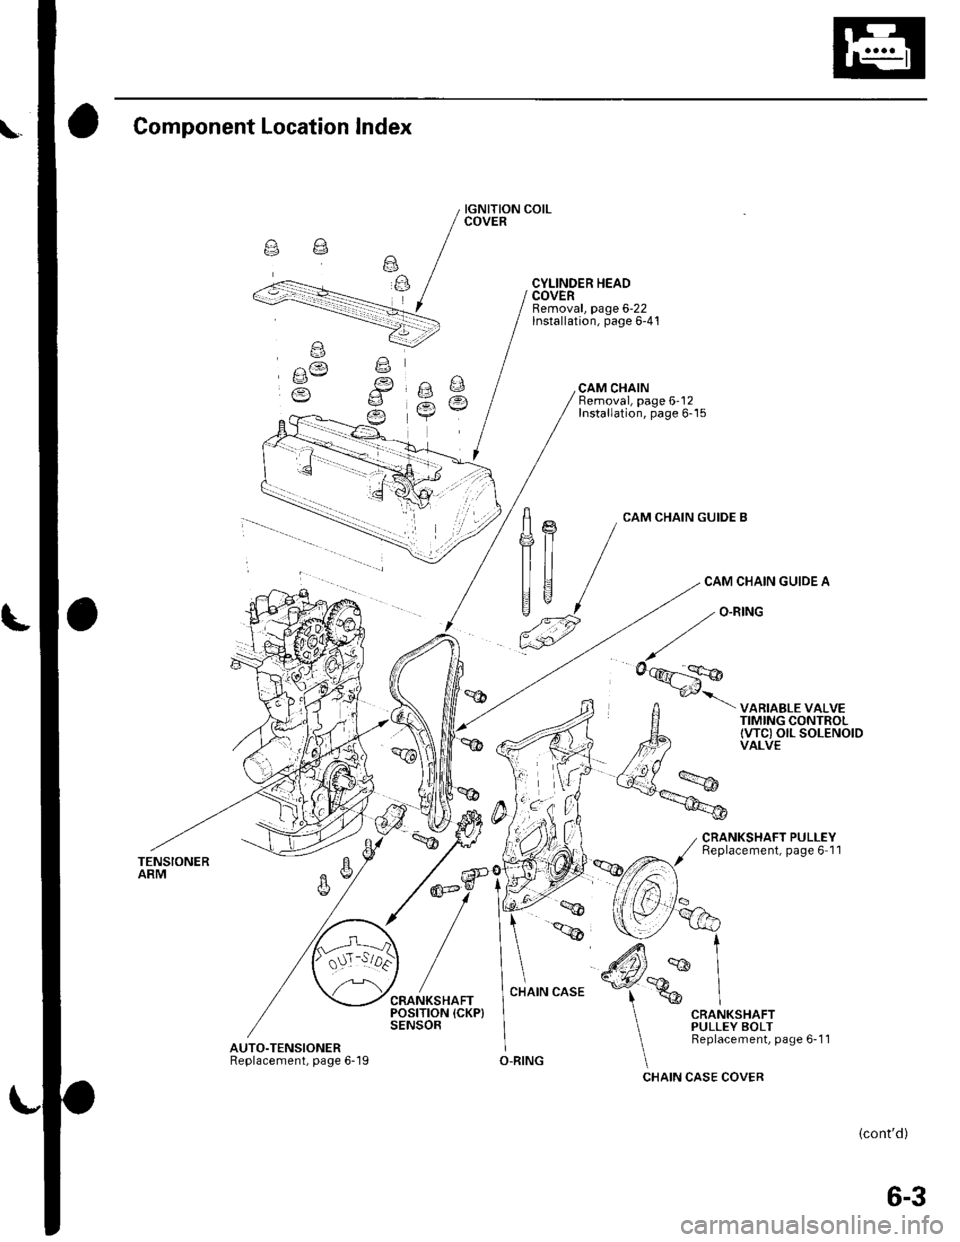
Component Location lndex
TENSIONERARM
AUTO.TENSIONERReplacement, page 6-'l I
IGNITION COILCOVER
CYLINDER HEADCOVERRemoval, page 6-22lnstallation, page 6-41
CAM CHAINBemoval, page 6-'12Installation, page 6-15
frn
|]tJ ,"p
CAM CHAIN GUIDE B
CAM CHAIN GUIDE A
VARIABLE VALVETIMING CONTROLtwc) olL soLENotDVALVE
CRANKSHAFT PULLEYReplacement, page 6 11
O-RING
(cont'd)
6-3
Page 103 of 1139
Cylinder Head
WEC Rocker Arms Test (cont'dl
'10. Loosen the valve on the regulator, and apply thespecified air pressure.
Specified air pressure:
290 kPa 13.0 kgt/cm', 42 psi)
NOTE: lf the synchronizing piston does not moveafter applying air pressure; move the primary orsecondary rocker arm up and down manually byrotating the crankshaft clockwise.
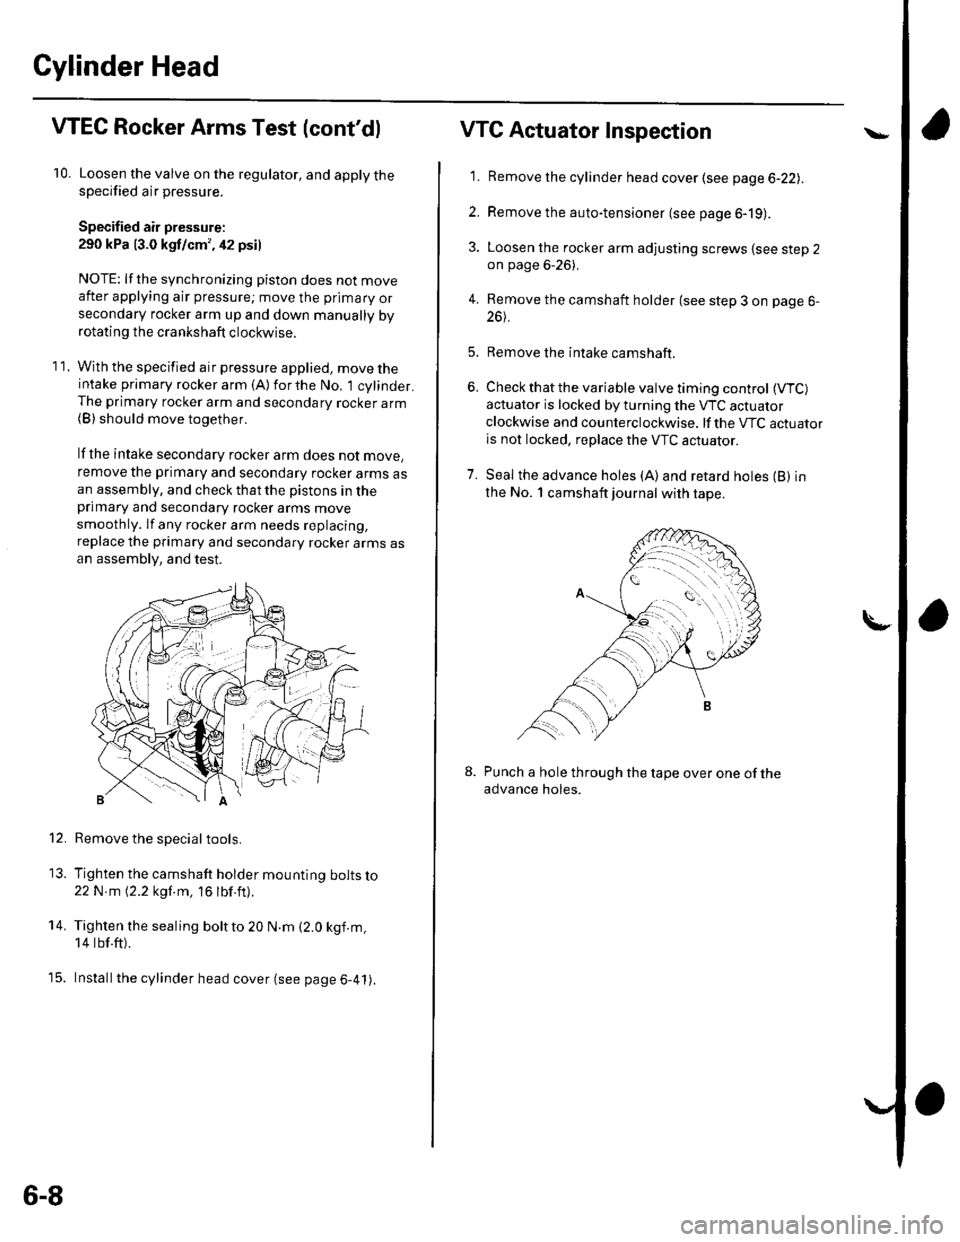
11. With the specified air pressure applied, move theintake primary rocker arm (A)forthe No, 1 cylinder.The primary rocker arm and secondary rocker arm(B) should move together.
lf the intake secondary rocker arm does not move,
remove the primary and secondary rocker arms asan assembly, and check that the pistons in theprimary and secondary rocker arms move
smoothly. lf any rocker arm needs replacing,
replace the primary and secondary rocker arms asan assembly, and test.
Remove the special tools.
Tighten the camshaft holder mounting bolts lo22N m 12.2 kgf.m, 16 lbf.ft).
Tighten the sealing boltto 20 N.m (2.0 kgf.m,
14 tbf.ft).
Installthe cylinder head cover (see page 6-41).
12.
13.
14.
t5.
6-8
VTG Actuator Inspection
'11. Remove the cylinder head cover (see page 6-22lr.
2. Remove the auto-tensioner (see page 6-19).
3. Loosen the rocker arm adjusting screws lsee step 2on page 6-26).
4. Remove the camshaft holder (see step 3 on page 6-
26t.
5. Remove the intake camshaft.
6, Check that the variable valve timing control (VTC)
actuator is locked by turning the VTC actuator
clockwise and counterclockwise. lf the VTC actuatoris not locked, replace the VTC actuator.
7. Seal the advance holes (A)and retard holes (B) in
the No. 1 camshaft journal with tape.
Punch a hole through the tape over one of theadvance holes.
Page 104 of 1139
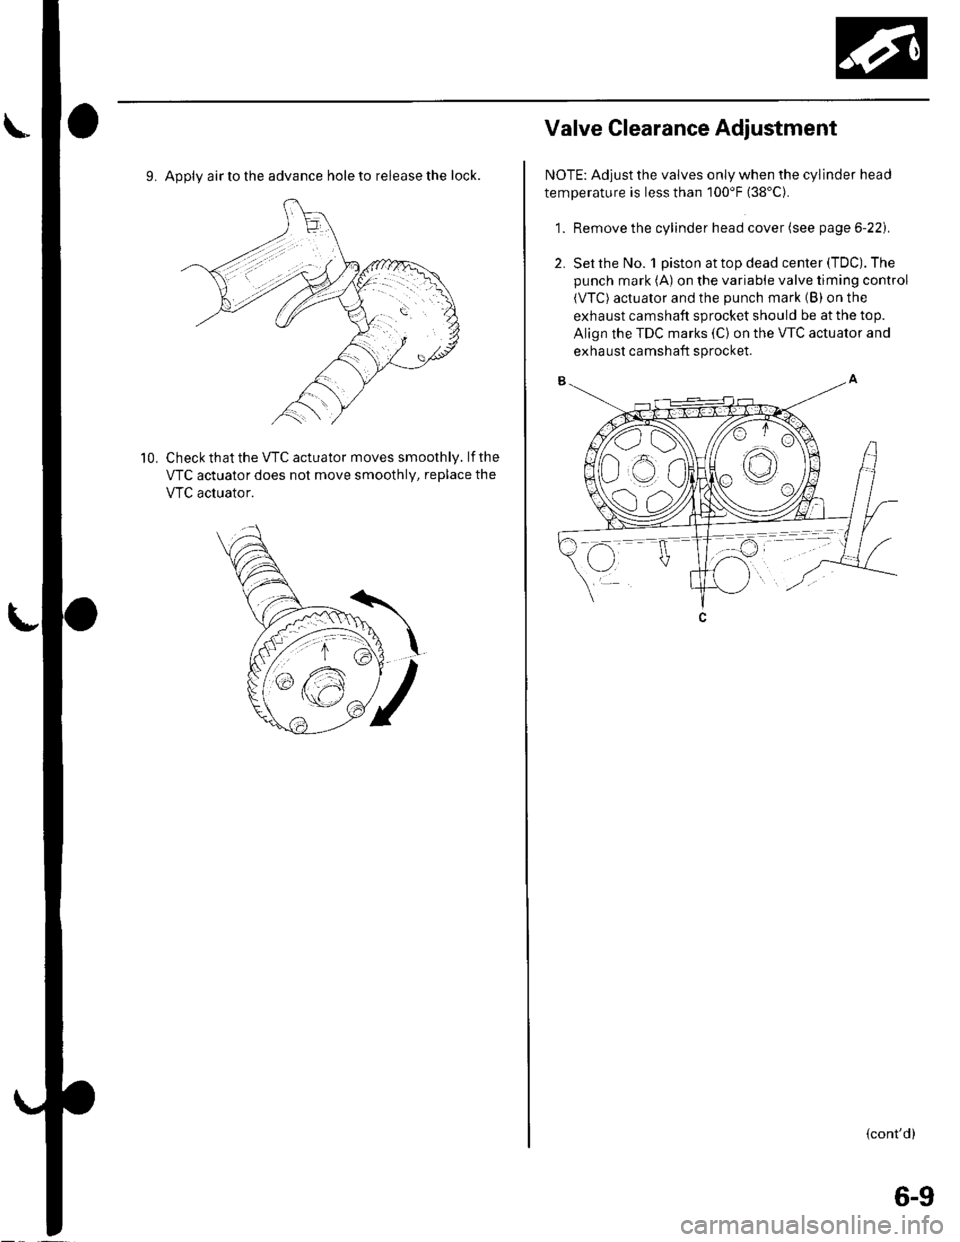
9. Apply air to the advance hole to release the lock.
Check that the VTC actuator moves smoothly. lf the
VTC actuator does not move smoothly, replace the
VTC acluator.
10.
Valve Glearance Adiustment
NOTE: Adjust the valves only when the cylinder head
temperature is less than 100'F (38'C).
1. Remove the cylinder head cover (see page 6-22).
2. Set the No. 1 piston at top dead center (TDC). The
punch mark (A) on the variable valve timing control
(VTC) actuator and the punch mark (B) on the
exhaust camshaft sprocket should be at the top.
Align the TDC marks (C) on the VTC actuator and
exhaust camshaft sprocket.
{cont'd)
6-9
Page 108 of 1139
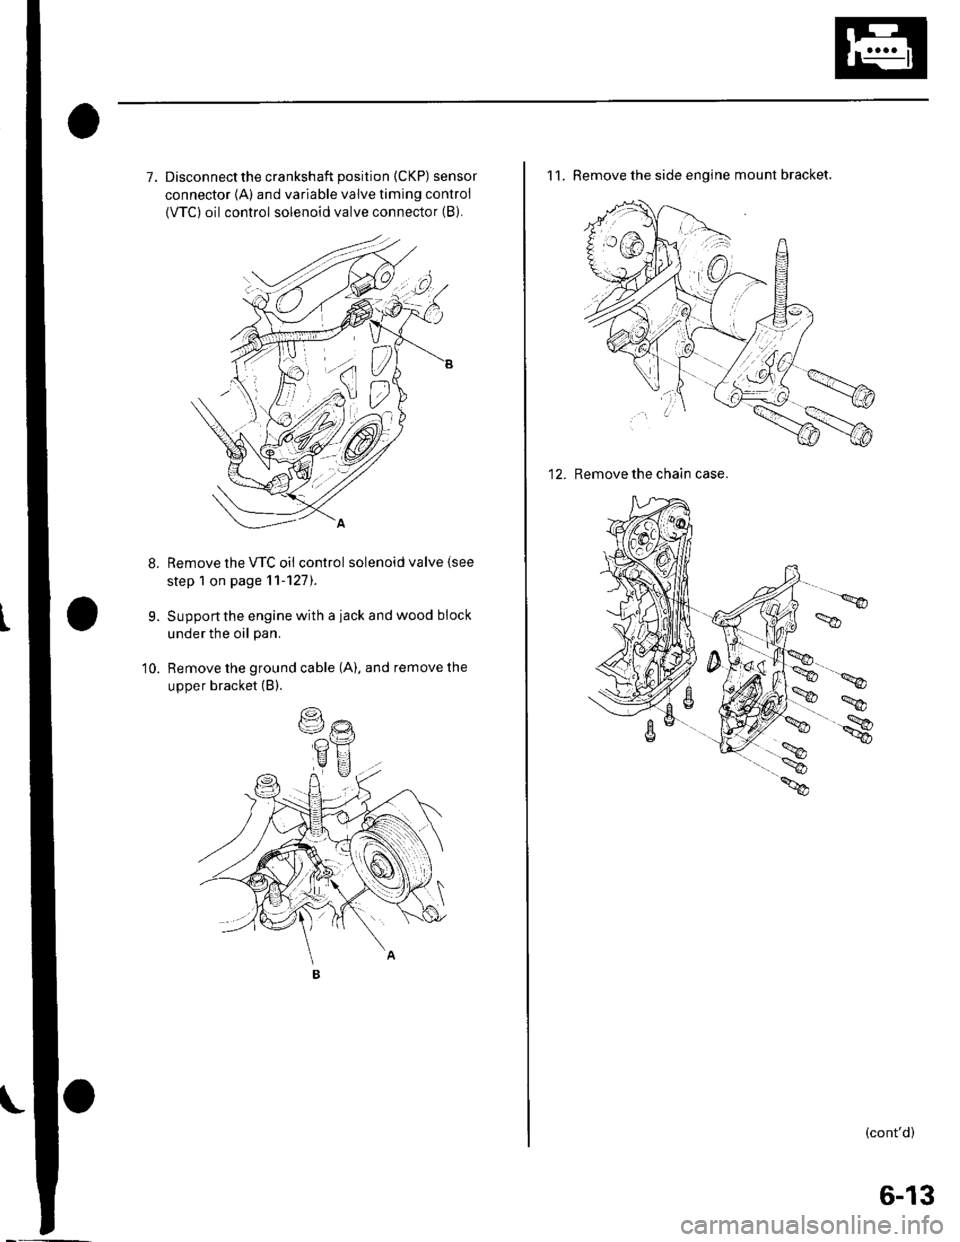
7. Disconnectthe crankshaft position (CKP) sensor
connector {A) and variable valve timing control
{VTC) oil control solenoid valve connector (B).
Remove the VTC oil control solenoid valve (see
step 1 on page 11-127).
Support the engine with a iack and wood block
under the oil pan.
Remove the ground cable (A). and remove the
upper bracket (B).
9.
10.
11. Remove the side engine mount bracket.
12. Remove the chain case.
(cont'd)
6-13