evap HONDA CIVIC 2003 7.G Repair Manual
[x] Cancel search | Manufacturer: HONDA, Model Year: 2003, Model line: CIVIC, Model: HONDA CIVIC 2003 7.GPages: 1139, PDF Size: 28.19 MB
Page 778 of 1139
Heating and Air Conditioning
A/C Service Tips and Precautions
Compressed air mixed with R- 134a forms a
combustible vapor.
The vapor can burn or explode causing serious
injury.
Never use compressed air to pressure test
R-134a service equipment or vehicle air
conditioning systems.
Air conditioning refrigerant or lubricant vapor
can irritate your eyes, nose, or throat.
Be careful when connecting service equipment.
Do not breathe refrigerant or vapor.
The air conditioning system uses HFC-134a (R-134a)
ref rigerant and polyalkyleneglycol (PAG) ref rigerant oil,
which are not compatible with CFC'12 (R-12) refrigerant
and mineral oil. Do not use R-'12 refrigerant or mineral
oil in this system, and do not aftempt to use R 12
servicing equipment; damage to the air conditioning
system or your servicing equipment will result.
Use only service equipment that is U.L.-listed and is
certified to meet the requirements of SAE J2210 to
remove R-134a from the air conditioning system.
lf accidental system discharge occurs, ventilate the
work area before resuming service.
R-134a service equipment or vehicle air conditioning
systems should not be pressure tested or leak tested
with compressed air.
Additional health and safety information may be
obtained from the refrigerant and lubricant
manufacturers.
. Always disconnect the negative cable from the
battery whenever replacing air conditioning parts.
. Keep moisture and dirt out of the system. When
disconnecting any lines, plug or cap the fittings
immediately; don't remove the caps or plugs until
iust be{ore you reconnect each line.' Before connecting any hose or line, apply a few drops
of relrigerant oil to the O-ring.. When tightening or loosening a fitting, use a second
wrench to support the matching fitting.. When discharging the system, use a R-'134a
ref rigerant recovery/recycling/charging station; don't
release refrigerant into the atmosphere.
21-6
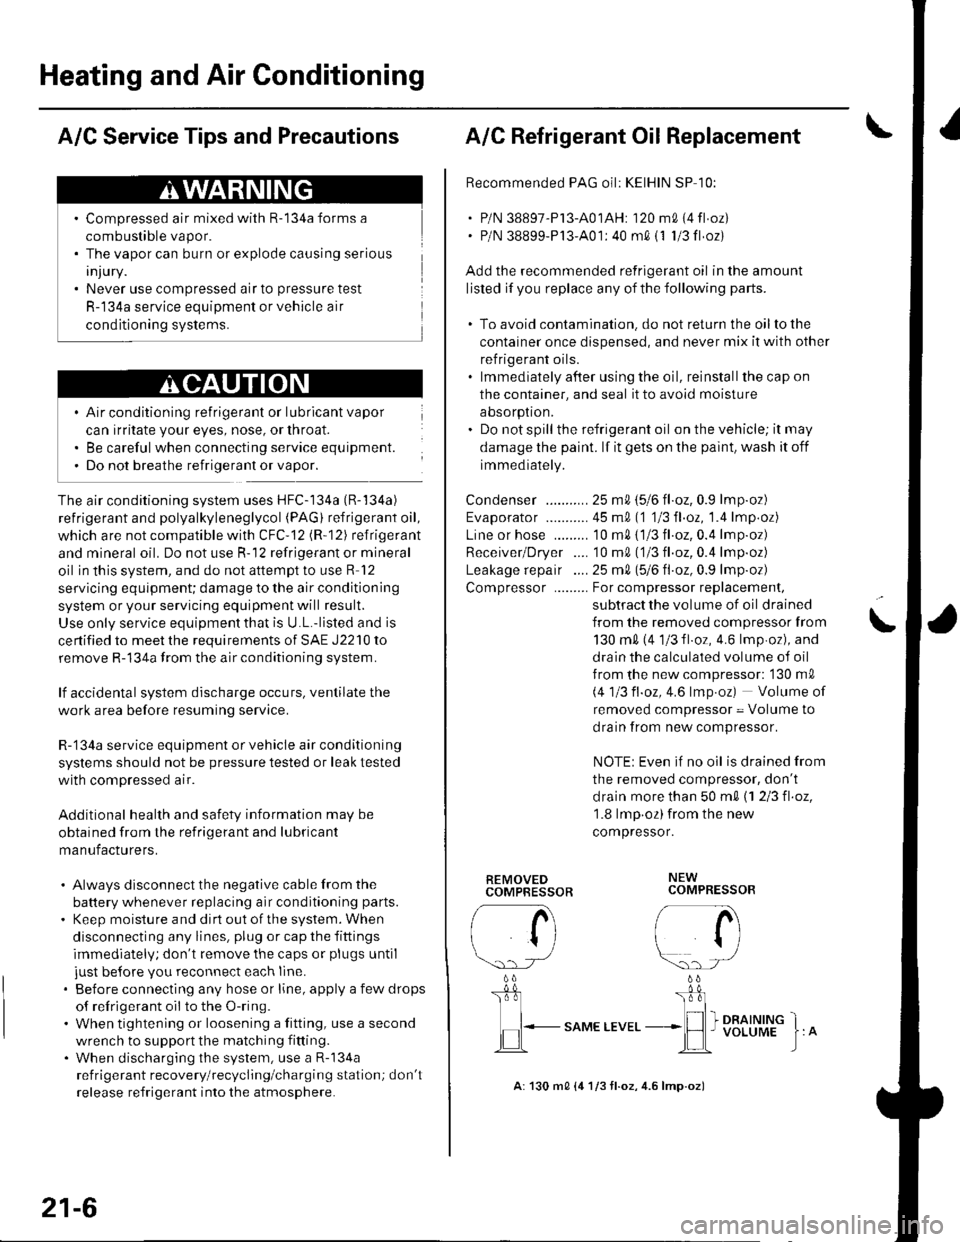
A: 130 m0 {4 l/3 tl.oz,4.6 lmp.oz)
],^
A/C Refrigerant Oll Replacement
Recommended PAG oil: KEIHIN SP 10:
. P/N 38897-P l3-A01AH: '120 m0 i4 fl oz). P/N 38899-P13'A01: 40 m0 i1 1/3 fl oz)
Add the recommended refrigerant oil in the amount
listed if you replace any of the following parts.
. To avoid contamination. do not return the oilto the
container once dispensed, and never mix it with other
refrigerant oils.. lmmediately af'ter using the oil, reinstallthe cap on
the container, and seal it to avoid moisture
aosorpron.. Donotspill the refrigerant oil on the vehicle; it may
damage the paint. lf it gets on the paint, wash it off
immediately.
Condenser ...........25 mA \516 tl.oz, 0.9 lmp.oz)
Evaporator ........... 45 m0 (1 113Il.oz, '1.4 lmp.oz)
Line or hose ......... '10 m0 {1/3 fl.oz,0.4 lmp.oz)
Receiver/Dryer .... '10 m0 ('113 fl.oz,0.4 lmp.oz)
Leakage repai r .... 25 m0, 1516 Il oz, 0.9 lmp.oz)
Compressor ......... For compressor replacemenl,
subtract the volume of oil drained
from the removed compressor from
130 m0 (4 1/3fl.oz, 4.6lmp.oz), and
drain the calculated volume of oil
f rom the new compressor: '130 m0
i.4113 fl.oz,4.6 lmp.oz) Volume of
removed compressor = Volume to
drain from new compressor.
NOTE: Even if no oil is drained from
the removed compressor, don't
d rain more than 50 m0 \1 2/3 fl.oz,'1.8 lmp oz)from the new
compressor.
\
REMOVEDCOMPBESSOR
rA
li
\.. rJ
b
I
,lEL.-
"o*t ttu"
NEWCOMPRESSOR
/- a\i tl
r/
\:)-) -/
_ 0L'r:l_
I I I DRAINING_*lH I voLUME
Page 779 of 1139
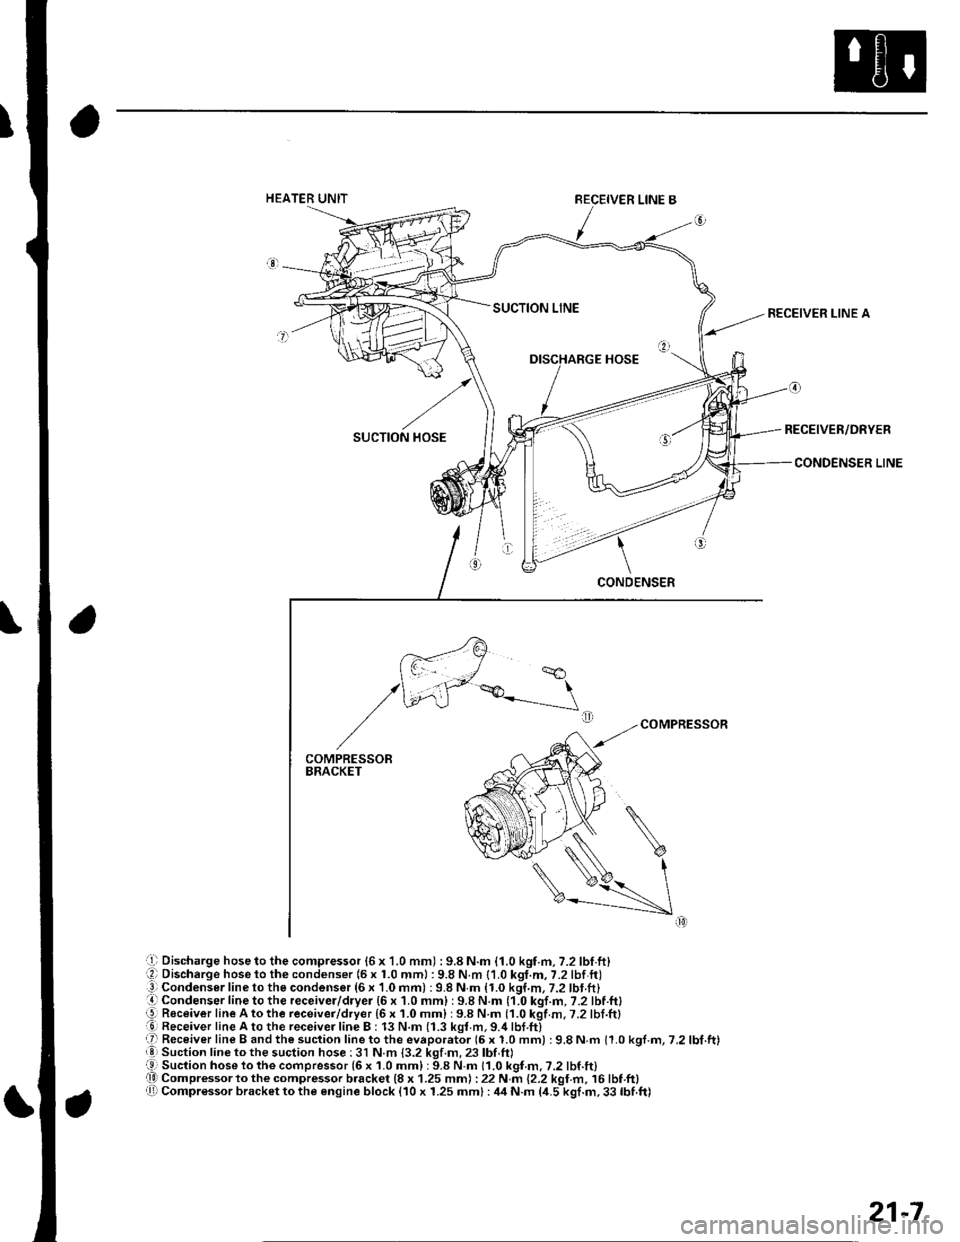
Discharge hose to the compressor {6 x 1.0 mm) : 9.8 N.m {1.0 kgf.m, 7.2 lbl.ft}Discharge hose to the condenser (5 x 1.0 mml : 9.8 N.m {1.0 kgt.m, 7.2 lbf ft)Condenser line to the condenser (6 x 1.0 mm) : 9.8 N.m {1.0 kgf,m, 7.2 lbt.ft}Condenser f ine to the receiver/dryer {6 x 1.0 mm} : 9.8 N.m (1.0 kgt.fi,7.2lbt.ltlReceiver lineAtothe receiver/dryer {6 x 1.0 mm} : 9.8 N.m {1.0 kgf .m. 7.2 lbf .ft}Receiver line A to the receivei line B : 13 N.m (1.3 kgr.m, 9.4 lbf.ft)Receiver line B and the suction line to the evaporator (6 x 1.0 mm) :9.8 N.m 11.0 kgf.m, 7,2 lbf.ft)Suction line to the suction hose : 3l N m {3.2 kgf.m, 23 lbf ftlSuction hose 1o the compressor (6 x 1.0 mm) : 9.8 N.m 11.0 kgf.m. ?.2 lbf.lt)Compressor to the compressor b.acket {8 x 1.25 mm) : 22 N m {2.2 kgt.m, 16 lbf.ft)Compr€ssor bracket to the engine block {10 x 1.25 mm} : ,14 N.m 14.5 kgf.m, 33 lbf.ft)
RECEIVER LINE A
RECEIVER/DRYER
CONDENSER LINE
21-7
Page 783 of 1139
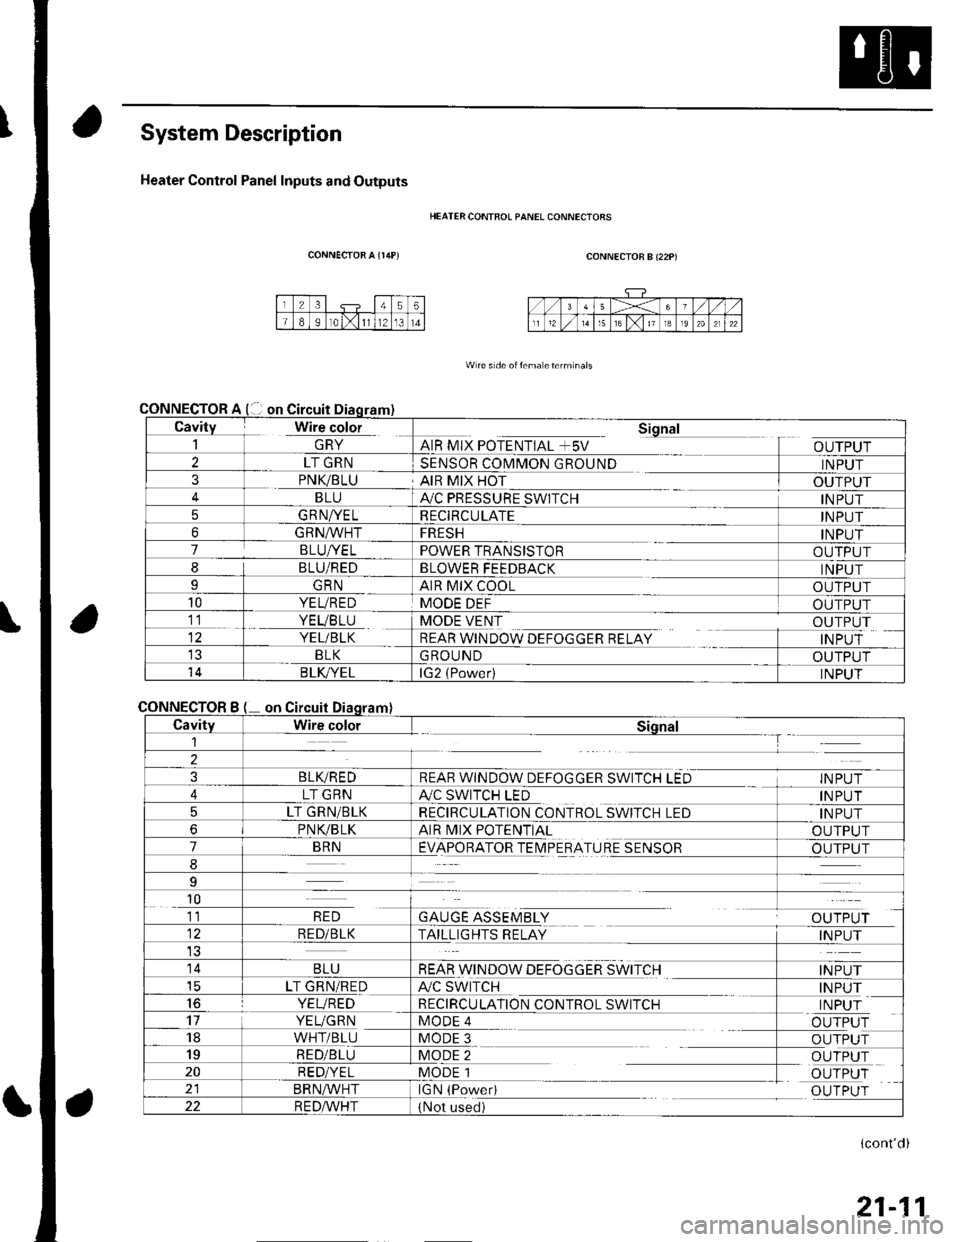
System Description
Heater Control Panel Inputs and Outputs
CONNECTOR A {r/rP)
CONNECTOR
CONNECTOR
HEATER CONTFOL PANEL CONNECIORS
CONNECTOR B (22P)
W re s de oitema eterm nals
Cavity Wire color_| \ln YAIR MIX POTENTIAL +5V
Sional
OUTPUT2LT GRNSENSOR COMMON GROUNDINPUT3PNK/BLUAIR MIX HOTOUTPUTBLUA,/C PRESSURE SWITCHINPUT5GRNA/ELRECIRCULATEINPUT6GRNA/VHTFRESHINPUT7BLUI/ELPOWER TRANSISTOROUTPUT8BLU/REDBLOWER FEEDBACKINPUTIGRNAIR MIX COOLOUTPUT10YEL/REDMODE DEFOUTPUT11. YEVBTU
YEL/BLK
MODE VENT
REAR WINDOW DEFOGGER RELAY
OUTPUT
INPUTBLKGROUNDOUTPUT14B LK/YELlG2 (Power)INPUT
Bon
CavityWire colorSiqnal1--T
2
3BLIVREDREAR WINDOW DEFOGGER SWITCH LEDINPUT
4LT GRNA./C SWITCH LEDINPUT
5LT GRN/BLKRECIRCULATION CONTROL SWITCH LEDINPUT
6PNVBLKAIR MIX POTENTIALOUTPUT
7BRNEVAPORATOR TEIMPERATURE SENSOROUTPUT
8
9
10
GAUGE ASSEMBLYal' 'TDr ri11RED
RED/BLKTAILLIGHTS RELAYINPUT
14BLUREAR WINDOW DEFOGGER SWITCHINPUTicLT GRN/REDA/C SWITCHINPUT16YEVREDRECIRCULATION CONTROL SWITCHINPUT17YEUGRNMODE 4OUTPUT18WHT/BLUMODE 3OUTPUT19RED/BLUMODE 2OUTPUT20RED/YELMODE 1OUTPUTBRN^,^/HTIGN (PowedOUTPUT22R E DA/r'HT(Not used)
(cont'd)
21-11
Page 784 of 1139
Heating and Air Gonditioning
System Description (cont'dl
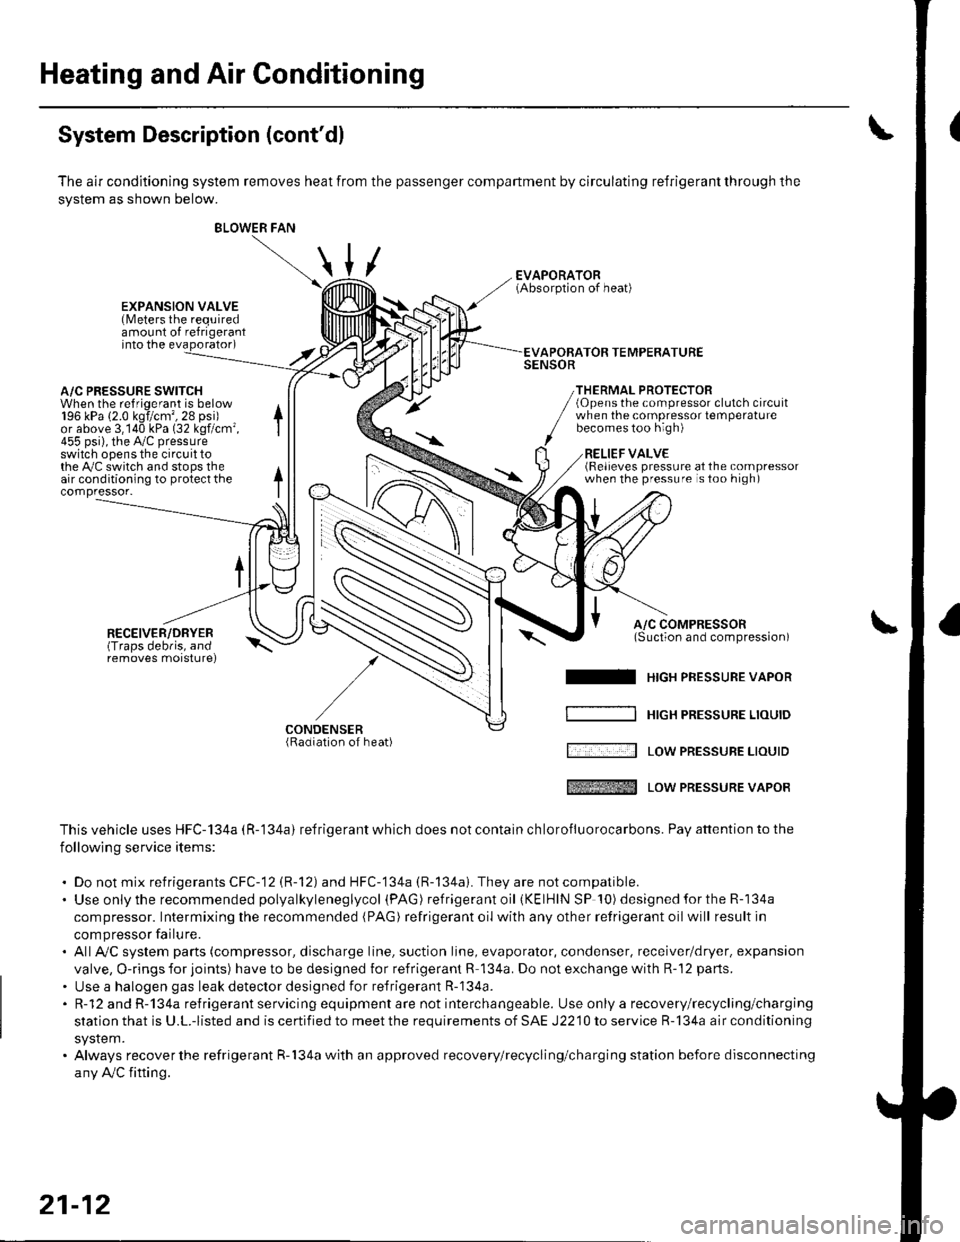
The air conditioning system removes heat from the passenger compartment by circulating refrigerant through the
system as shown below.
/
BLOWER FAN
\
\,u
EXPANSION VALVE(Meters the requiredamount of refrigerantinto the evaporator)
A/C PRESSURE SWITCHWhen the refriqerant is below196 kPa (2.0 kgi/cm',28 psi)or above 3,140 kPa (32 kgf/cm'455 psi), the Py'c pressureswitch opens the circuit tothe Py'C switch and stops theair conditioning to protect thecompressor-
RECEIVER/DRYER(Traps debris, andremoves morsturel
APOBATOR TEMPERATURESENSOR
THERMAL PROTECTOR(Opens the compressor clutch circuitwhen the compressot temperaturebecomes too high)
RELIEF VALVE(Relieves pressure at the compressorwhen the pressure is too high)
A/C COMPRESSOR(Suction and comoression)\-^
I HrcH PRESSURE vAPoR
[ '.... -:--l Low PREsSUBE LrourD
tffi Low PREssURE vAPoR
This vehicle uses HFC-134a (R-'134a) refrigerant which does not contain ch lorofluorocarbons. Pay attention to the
following service items:
. Do not mix refrigerants CFC-12 (R-12) and HFC-134a (R-134a). They are notcompatible.. Use onlythe recommended polyalkyleneglycol (PAG ) refrigera nt oil (KElHlN SP '!0) designedfortheR-134a
compressor. Intermixing the recommended (PAG) refrigerant oil with any other retrigerant oil will result in
compressor failu re.. AllAy'C system parts (compressor, discharge line, suction line, evaporator, condenser, receiver/dryer. expansion
valve, O-rings for joints) have to be designed for refrigerant R 134a. Do not exchange with R-'12 parts.
. Use a halogen gas leak detector designed for refrigerant R-134a.. R-12 and R-134a refrigerant servicing equipment are not interchangeable. Use only a recovery/recycling/charging
station that is U.L.-listed and is certified to meet the requirements of SAE J2210 to service R-134a air conditioning
system.. Always recover the refrigerant R-134a with an approved recovery/recycling/charging station before disconnecting
any Ay'C fifting.
/-
CONDENSER(Radiation of heat)
21-12
Page 786 of 1139
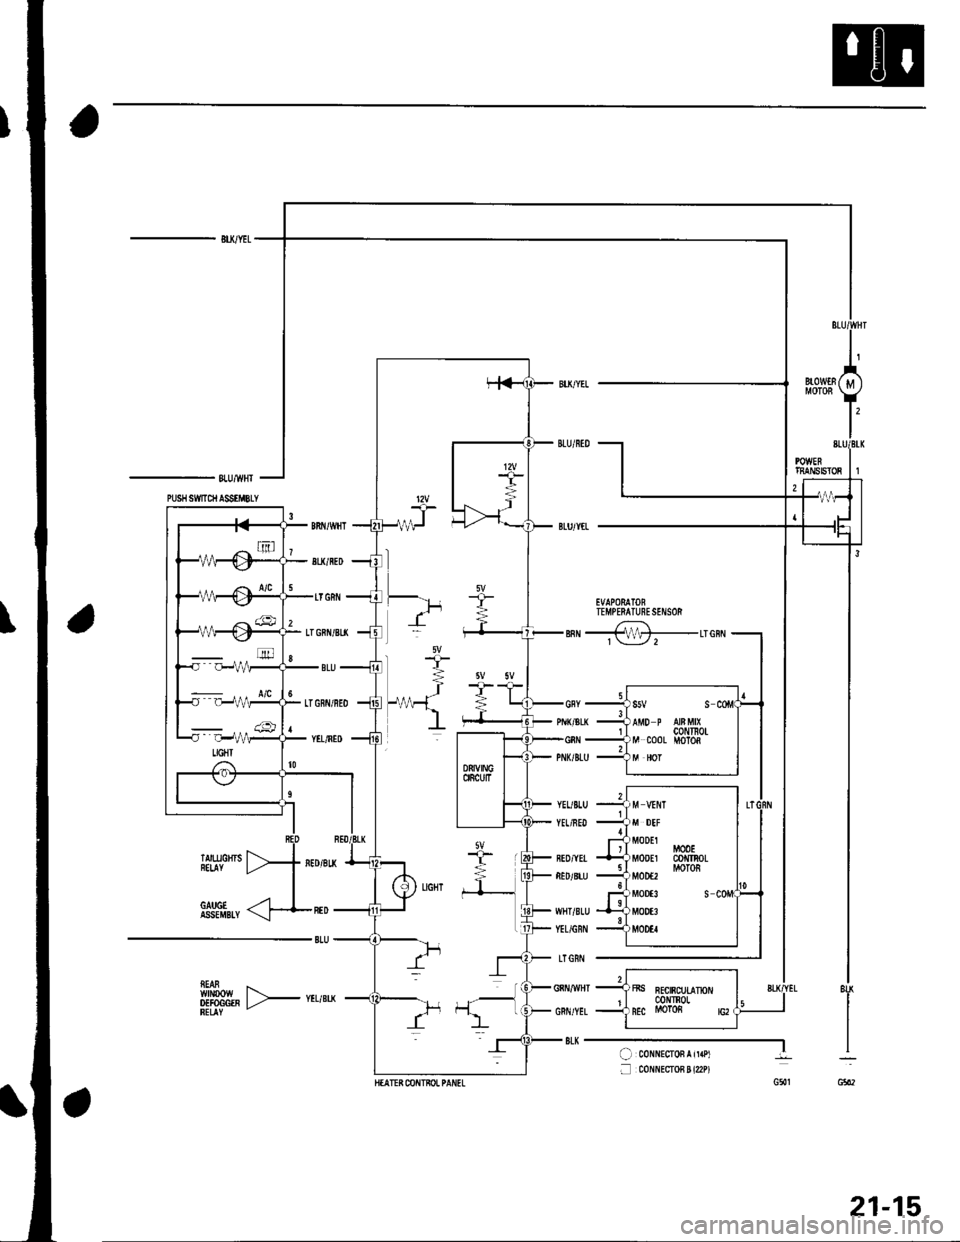
- BU/YEL
-8lU/wH'I
EVAPORATOBTEMPERATUNESENSOR
sn 4-Lrenil
ffftH,, F*u,*
YEUBLU
YEL/NED
BED/YEI
RED/8LU
WHT/8LU
YEL/GRN
LTGRI'l
GNNMHT
GRN/YEL
8LK--..-...-l( coNNEcroFrir.Pt
f mxr{EcroB ! {2P)G5'1
8U
I
G602
m
::-:::: ., . a/c
M DEF
MODEl
Mq)EI
M00€2
M00t3
MOOE3
MOOEI
M00lco TnoLMOTOS
s
21-15
Page 794 of 1139
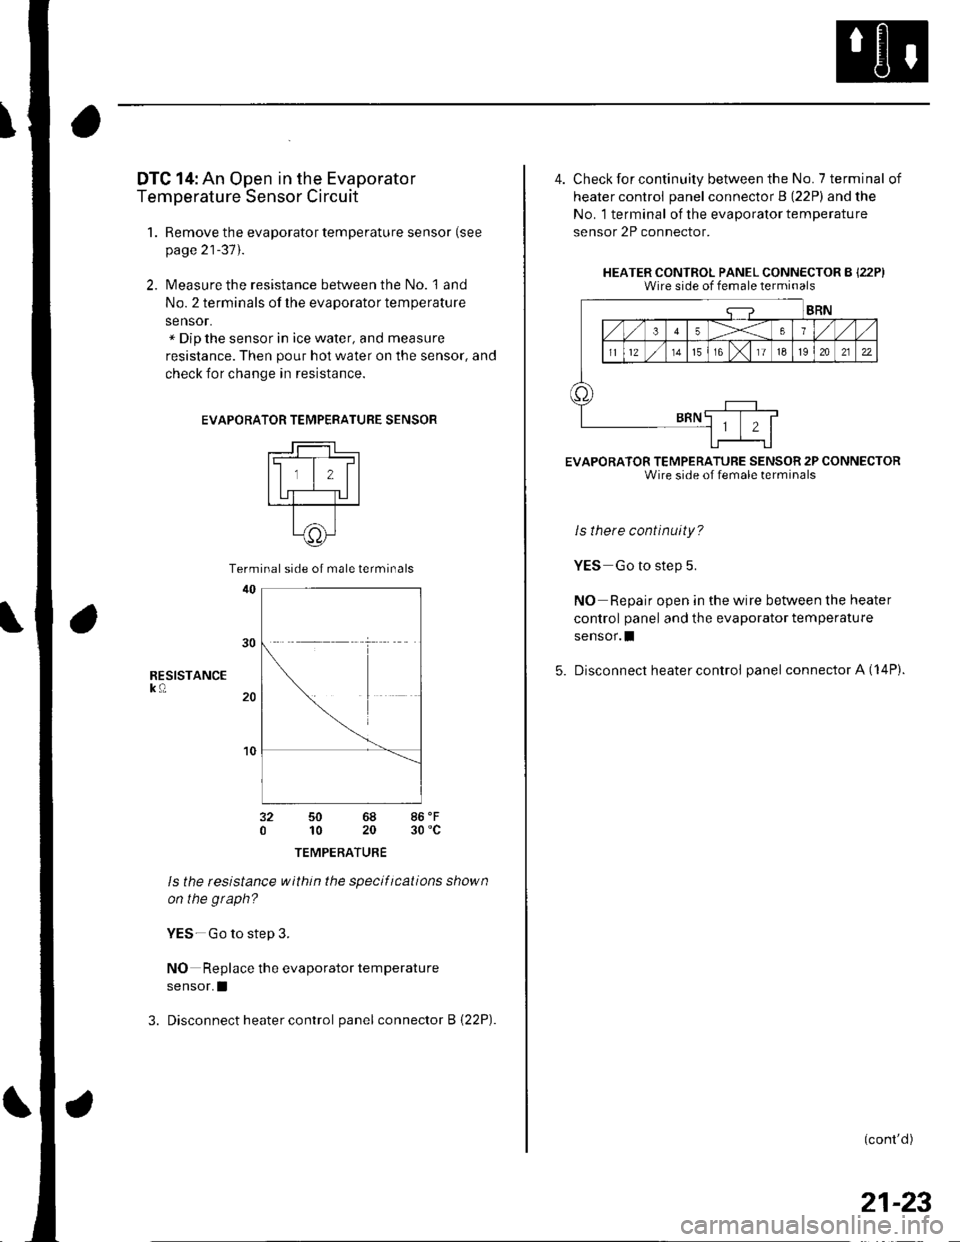
DTC 14: An Open in the Evaporator
Temperature Sensor Circuit
1. Remove the evaporator temperature sensor (see
page 21-37).
2. Measure the resistance between the No. l and
No. 2 terminals of the evaporator temperature
sensor.x Dip the sensor in ice water, and measure
resistance. Then pour hot water on the sensor, and
check for change in resistance.
EVAPORA
RESISTANCEk0
TOR TEMPERATURE SENSOR
t-lll#l
ll,l,llI UT-TU I---r---T--
t^11c))-l\9/
50 6810 20
TEMPERATURE
ls the tesistance within the specifications shown
on the graph?
YES-Go to step 3.
NO Replace the evaporator temperature
sensor.I
3. Disconnect heater control panel connector B {22P).
86'F30 'c
Terminal side of male terminals
4. Check for continuity between the No. 7 terminal of
heater control panel connector B (22P) and the
No. 1 terminal of the evaporalor temperature
sensor 2P connector.
HEATER CONTROL PANEL CONNECTOR B {22P)Wire side of female terminals
EVAPORATOR TEMPERATURE SENSOR 2P CONNECTORWire side of female terminals
ls there continuity?
YES Go to step 5.
NO Repair open in the wire between the heater
control panel and the evaporator temperature
sensor.I
5. Disconnect heater control panel connector A (14P).
(cont'd)
21-23
Page 795 of 1139
Heating and Air Gonditioning
\
DTC Troubleshooting {cont'd)
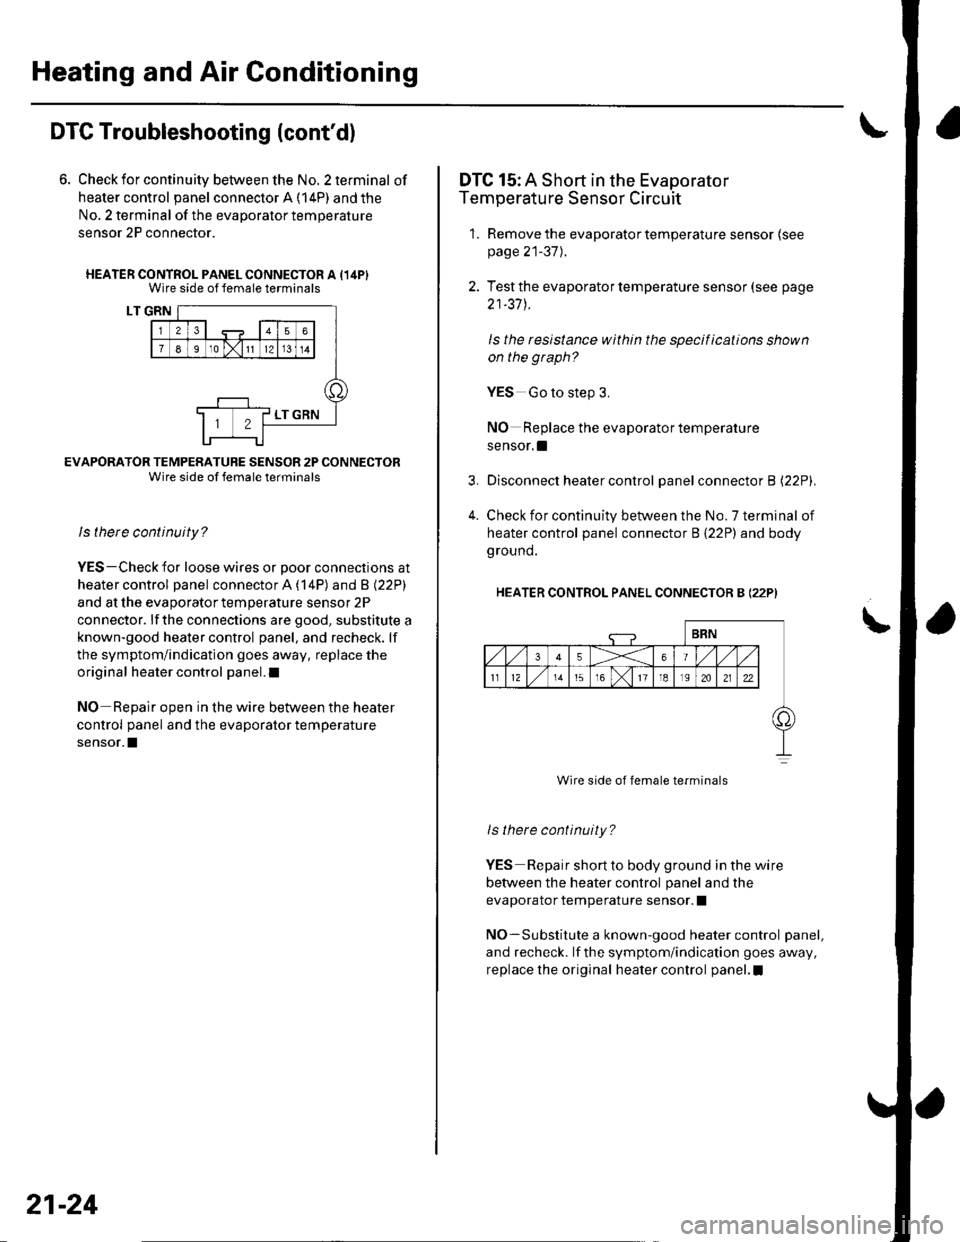
6. Check for continuity between the No. 2 terminal of
heater control panel connector A (14P) and the
No, 2 terminal of the evaporalor temperature
sensor 2P connector.
HEATER CONTROL PANEL CONNECTOR A {14PIWire side of female terminals
LT GRN
EVAFORATOR TEMPERATURE SENSOR 2P CONNECTORWire side of female terminals
ls there continuity?
YES-Check for loose wires or Door connections at
heater control panel connector A ('l4P) and B l22Pl
and at the evaporator temperature sensor 2P
connector. lf the connections are good, substitute a
known-good heater control panel, and recheck. lf
the symptom/indication goes away, replace the
original heater control panel.l
NO Reoair ooen in the wire between the heater
control panel and the evaporator temperature
sensor.I
21-24
4.
DTC 15: A Short in the Evaporator
Temperature Sensor Circuit
1. Remove the evaporator temperature sensor (see
page 21-37).
2. Test the evaporator temperature sensor (see page
21-37 J.
ls the resistance within the specifications shown
on the graph?
YES Go to step 3.
NO Replace the evaporator temperature
sensor. !
Disconnect heater control panel connector B l22Pl.
Check for continuity between the No. 7 terminal of
heater control panel connector B {22P) and body
ground.
HEATER CONTROL PANEL CONNECTOR B (22P)
Wire side of female terminals
ls there continuity?
YES Repair short to body ground in the wire
betvveen the heater control panel and the
evaporator temperature sensor. I
NO-Substitute a known-good heater control panel,
and recheck. lf the symptom/indication goes away,
replace the original heater control panel.I
Page 808 of 1139
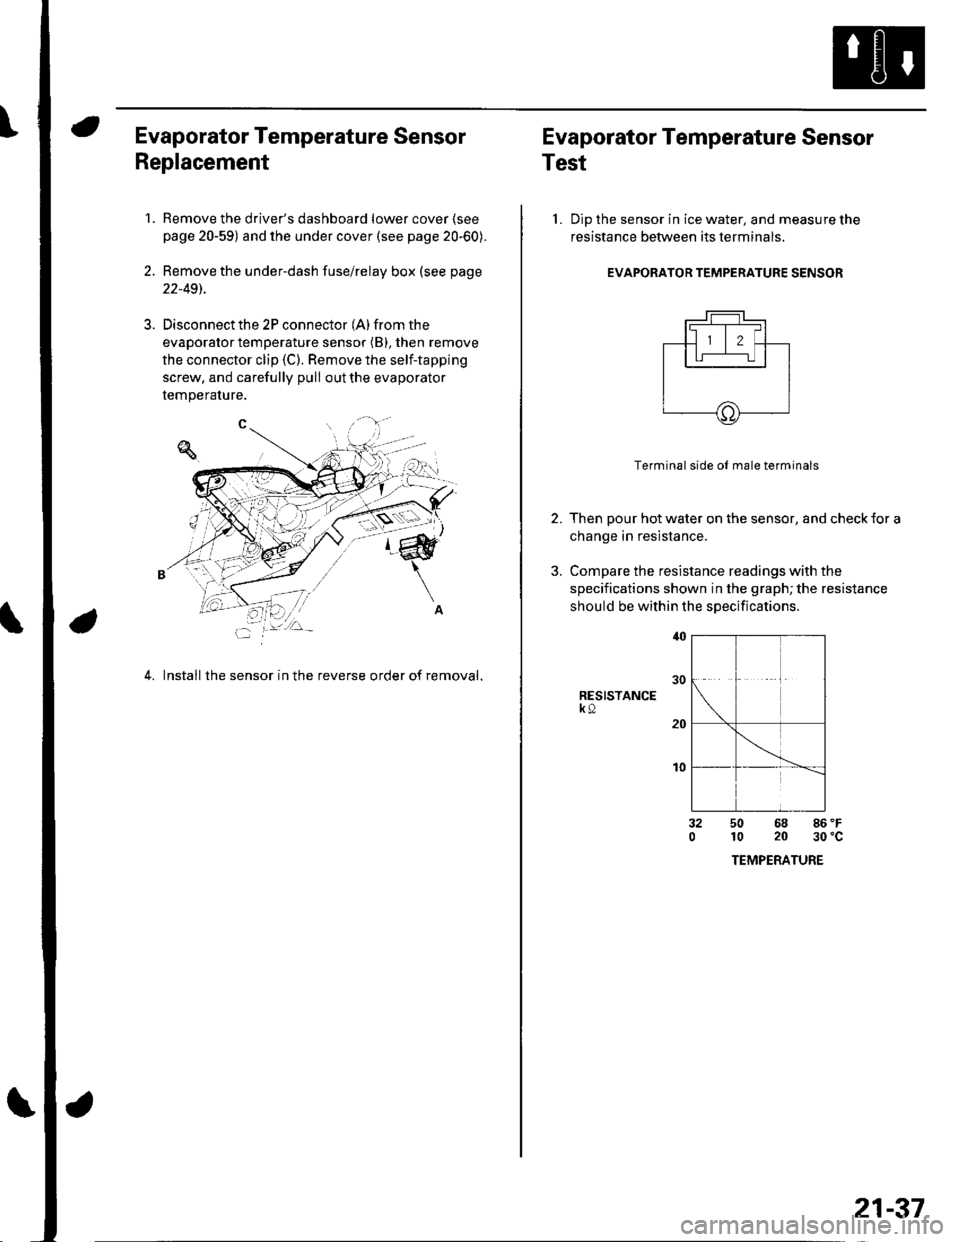
Evaporator Temperature Sensor
Replacement
1.Remove the driver's dashboard lower cover (see
page 20-59) and the under cover (see page 20-60).
Remove the under-dash fuse/relay box (see page
22-491.
Disconnect the 2P connector (A) from the
evaporator temperature sensor (B), then remove
the connector clip (C). Remove the self-tapping
screw, and carefully pull out the evaporator
temperature.
4. Install the sensor in the reverse order of removal,
Evaporator Temperature Sensor
Test
l. Dip the sensor in ice water, and measure the
resistance between its terminals
EVAPORATOR TEMPERATURE SENSOR
2.
3.
Terminal side ol male terminals
Then pour hot water on the sensor, and check {or a
change in resistance.
Compare the resistance readings with the
specifications shown in the graph; the resistance
should be within the specifications
RESISTANCEk9
t0
32050 68 86 'F
10 20 30'c
TEMPERATURE
21-37
Page 813 of 1139
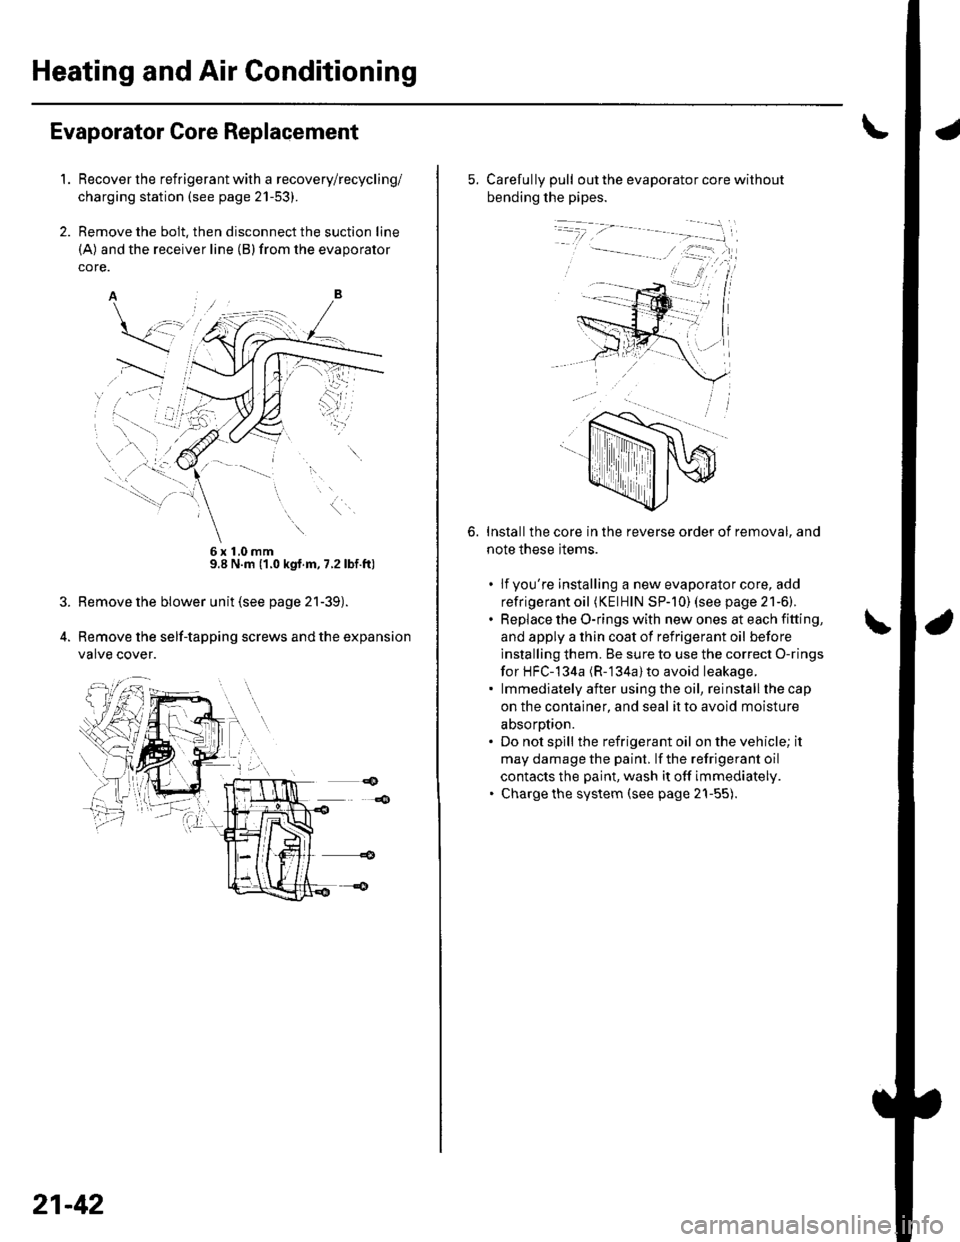
Heating and Air Gonditioning
a
1.
Evaporator Core Replacement
Recover the refrigerant with a recovery/recycling/
charging station (see page 21-53).
Remove the bolt, then disconnect the suction line
(A) and the receiver line (B)from the evaporator
core.
6x10mm9.8 N.m (1.0 kgt.m, 7.2lbf.ft)
Remove the blower unit (see page 21-39).
Remove the self-tapping screws and the expansion
valve cover.
21-42
5. Carefully pull out the evaporator core without
bending the pipes.
Installthe core in the reverse order of removal, and
note these items.
. lfyou're installing a new evaporator core, add
refrigerant oil (KElHlN SP-]0) (see page 21-6).. Replace the O-rings with new ones at each fitting,
and apply a thin coat of refrigerant oil before
installing them. Be sure to use the correct O-rings
for HFC-134a (R-'134a) to avoid leakage.. lmmediatelyafter usingthe oil, reinstallthecap
on the container, and seal it to avoid moisture
absorotion.. Do not spill the refrigerant oil on the vehicle; it
may damage the paint. lf the refrigerant oil
contacts the paint, wash it off immediately.. Charge the system (see page 21-55).
6.
Page 814 of 1139
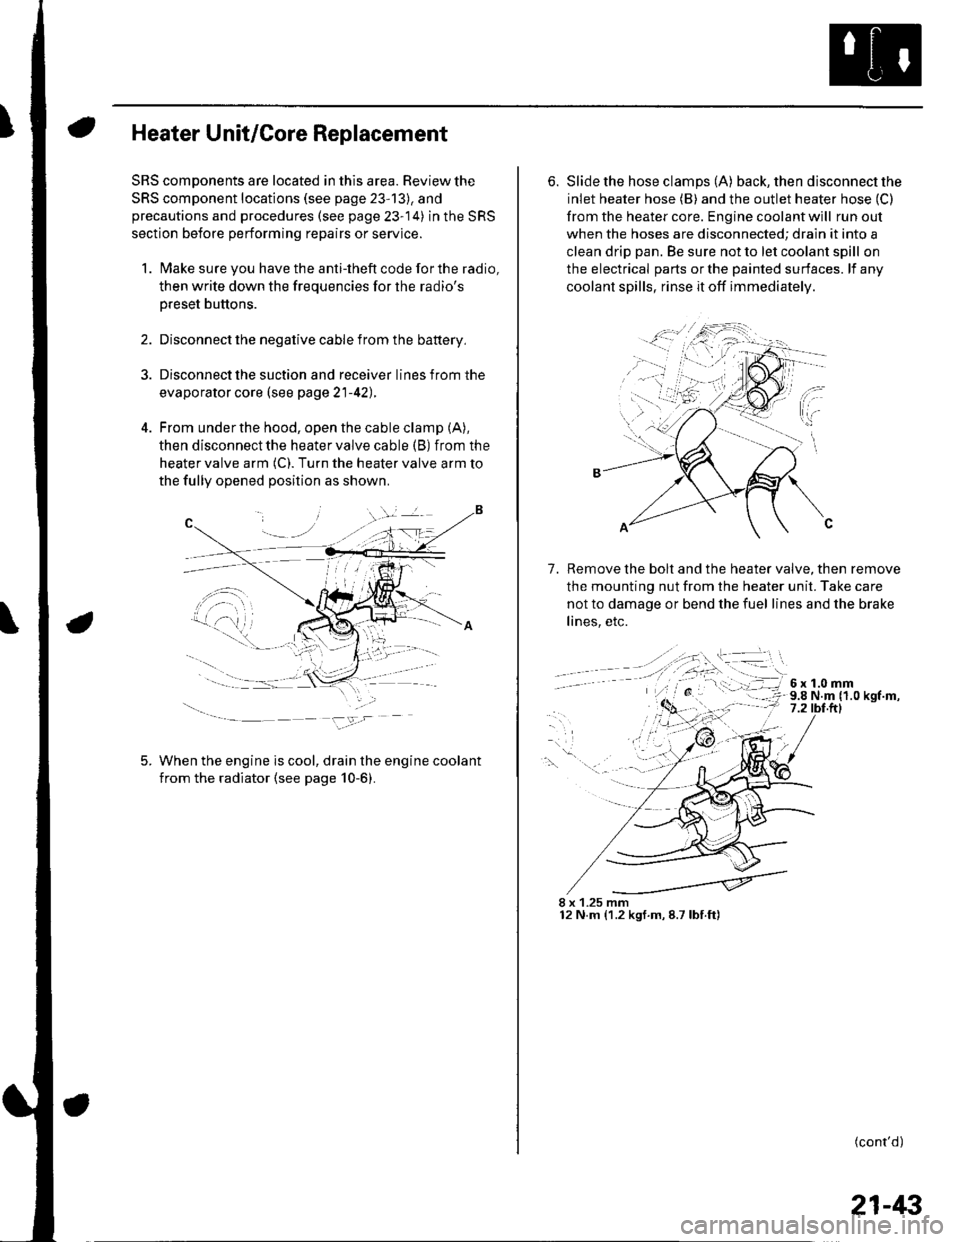
Heater Unit/Core Replacement
SRS components are located in this area. Review the
SRS component locations (see page 23'13), and
precautions and procedures (see page 23-14) in the SRS
section before performing repairs or service.
1. Make sure you have the anti-theft code forthe radio,
then write down the freouencies for the radio's
Dreset buttons.
4.
Disconnect the negative cable from the battery,
Disconnect the suction and receiver lines from the
evaporator core (see page 21-42).
From under the hood, open the cable clamp (A),
then disconnect the heater valve cable (B) from the
heater valve arm (C). Turn the heater valve arm to
the fully opened position as shown
When the engine is cool, drain the engine coolant
from the radiator (see page 10-6).
6. Slide the hose clamps (A) back, the n d isconnect the
inlet heater hose (B) and the outlet heater hose (C)
from the heater core. Engine coolant will run out
when the hoses are disconnected; drain it into a
clean drip pan. Be sure not to let coolant spill on
the electrical parts or the painted surfaces. lf any
coolant spills, rinse it off immediately.
Remove the bolt and the heater valve, then remove
the mounting nut from the heater unit. Take care
not to damage or bend the fuel lines and the brake
lines, etc.
7.
8 x 1.25 mm12 N.m (1.2 kgf.m,8.7lbf.ft)
(cont'd)
21-43