HONDA CIVIC 2003 7.G Workshop Manual
Manufacturer: HONDA, Model Year: 2003, Model line: CIVIC, Model: HONDA CIVIC 2003 7.GPages: 1139, PDF Size: 28.19 MB
Page 701 of 1139
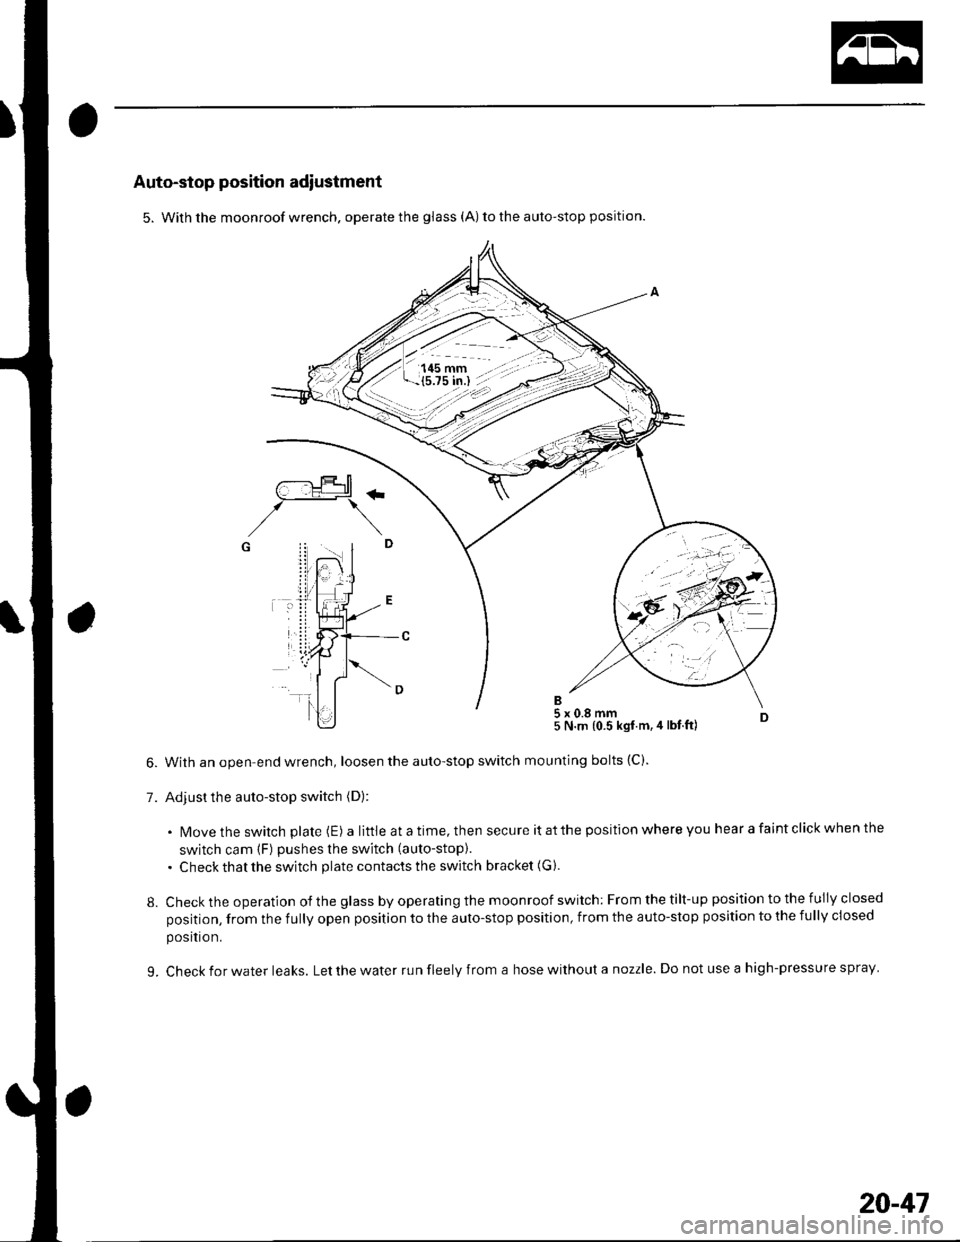
Auto-stop position adiustment
5. With the moonroof wrench. operate the glass (A) to the auto-stop position.
With an open-end wrench, loosen the auto-stop switch
Adjust the auto-stop switch (D):
5 N.m {0.5 kgt.m,4 lbt ft)
mounting bolts (C).
. N4ovethe switch plate (E) alittleatatime,thensecureitatthepositionwhereyouhearafaintclickwhenthe
switch cam (F) pushes the switch (auto-stop).
. Check that the switch plate contacts the switch bracket (G ).
Check the operation of the glass by operating the moonroof switch: From the tilt-up position to the fully closed
position, from the fully open position to the auto-stop position, from the auto-stop position to the fully closed
posltron.
Check for water leaks. Let the water run fleely from a hose without a nozzle. Do not use a high-pressure spray
/--:.!Jtr+rtl\_-_:_t+#1
,/\G i! .. I
7.
8.
L
20-41
Page 702 of 1139
Moonroof
\
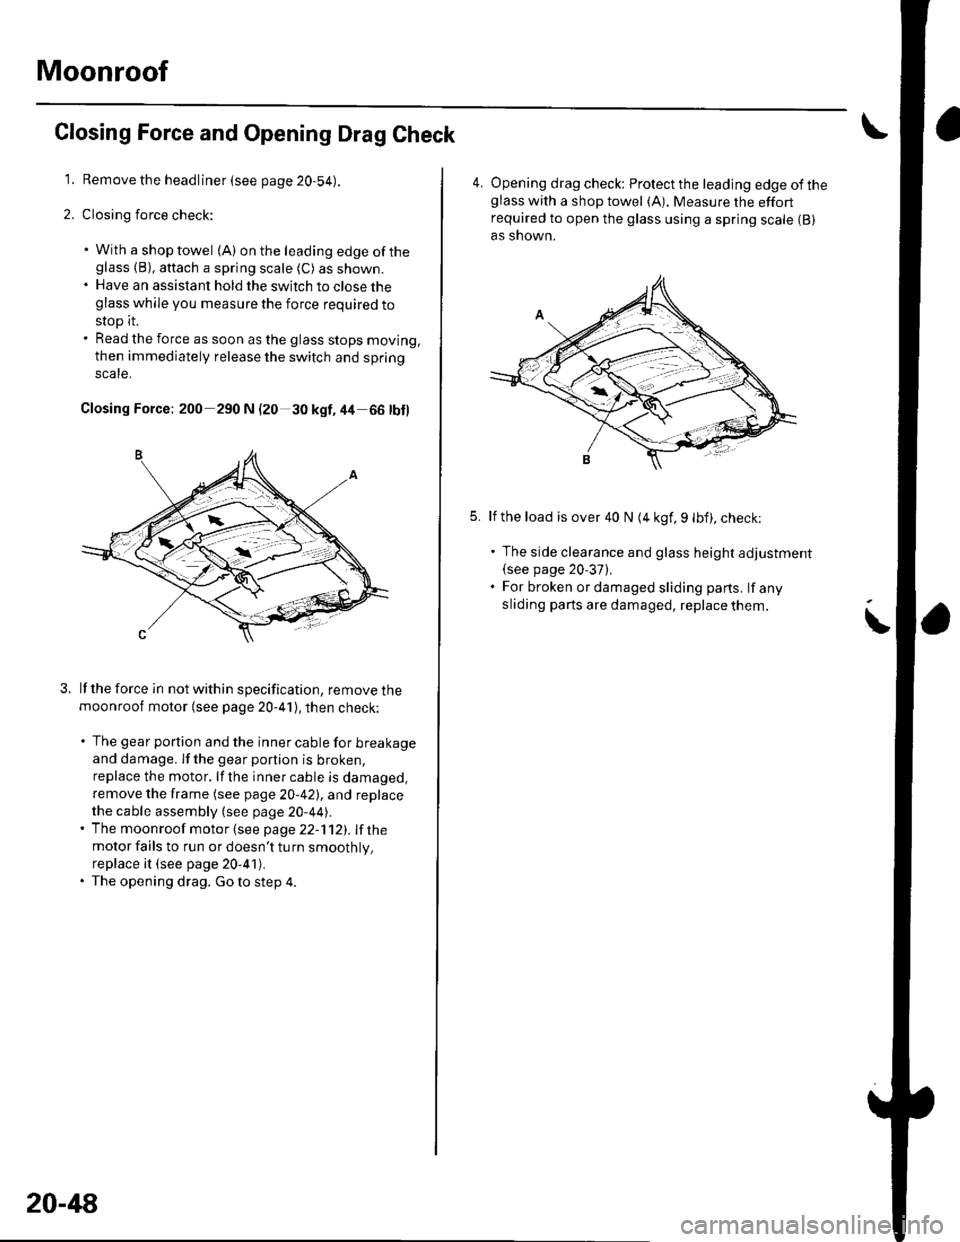
Closing Force and Opening Drag Check
1. Remove the headliner (see page 20-54).
2. Closing force check:
. With a shop towel {A) on the leading edge of theglass (B), aftach a spring scale (C) as shown.. Have an assistant hold the switch to close theglass while you measure the force required to
stop it.. Read the force as soon as the glass stops moving,
then immediately release the switch and spring
scale.
Closing Force; 200 290 N (20 30 kgf,44 66 tbl)
lf the force in not within specification, remove themoonroof motor (see page 20-41), then check:
. The gear portion and the inner cable for breakageand damage. lf the gear portion is broken,
replace the motor. lf the inner cable is damaged,
remove the frame (see page 20-42), and replace
the cable assembly (see page 20-44).' The moonroof motor (see page 22-112). Ifthe
motor fails to run or doesn't tu rn smoothlv.
replace it (see page 20-41),. The opening drag. Go to step 4.
20-48
4. Opening drag check: Protect the leading edge of theglass with a shop towel (A). Measure the effortrequired to open the glass using a spring scale (B)
as shown.
5.lf the load is over 40 N (4 kgf, 9 lbf), check;
. The side clearance and glass height adjustment(see page 20'37),. For broken or damaged sliding parts. lf any
sliding parts are damaged, replace them.
Page 703 of 1139
Interior Trim
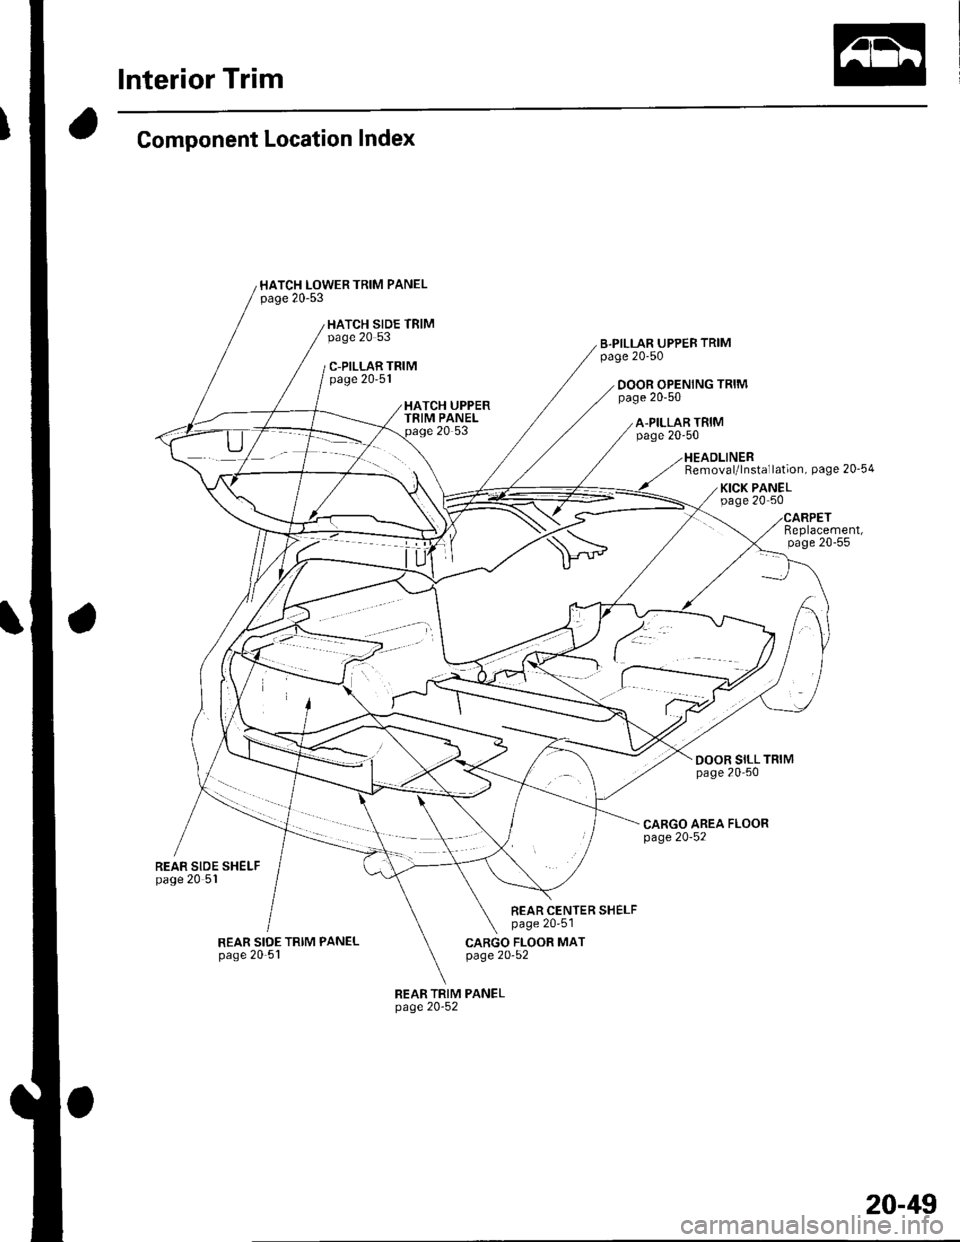
Component Location Index
HATCH LOWER TRIM PANELoaoe 20-53
HATCH SIDE TRIMpage 20 53
C-PILLAR TRIMpage 20'51
REAR SIDE SHELFpage 20 5l
REAR SIDE TRIM PANELpage 20-51
B.PILLAR UPPEB TRIMpage 20-50
DOOR OPENING TRIMpage 20-50
A.PILLAR TRIMpage 20-50
Removal/lnstallation, page 20 54
KICK PANELpage 20 50
DOOR SILL TRIMpage 20-50
Replacement,page 20-55
CARGO AREA FLOORpage 20-52
REAR CENTER SHELFpage 20-51
CARGO FLOOR MATpage 20-52
REAR TRIM PANELpage 20-52
20-49
Page 704 of 1139
Interior Trim
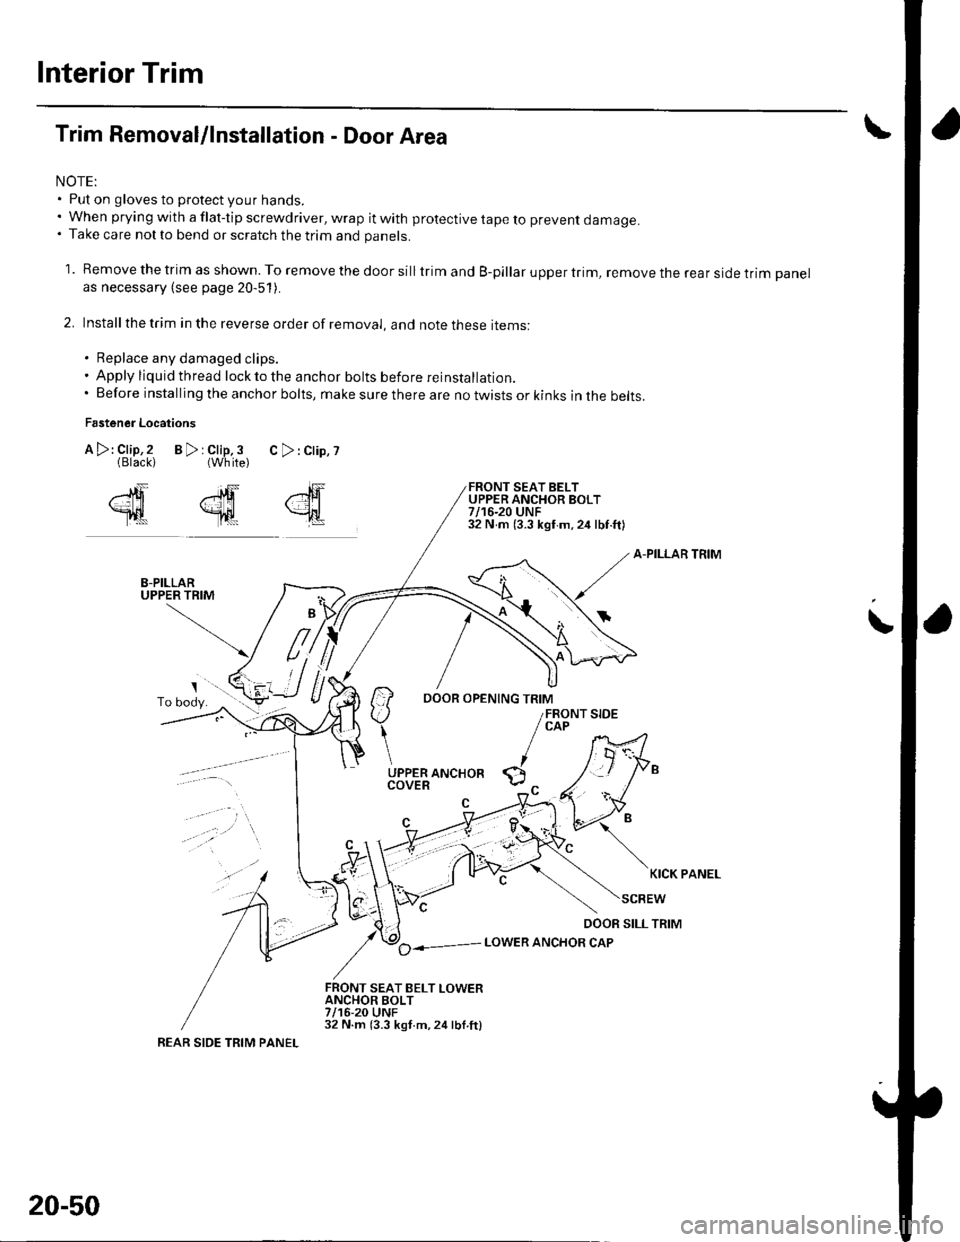
Trim Removal/lnstallation - Door Area
NOTE:. Put on gloves to protect your hands.. When prying with a flat-tip screwdriver, wrap it with protective tape to prevent damage.. Take care not to bend or scratch the trim and panels.
1. Remove the trim as shown. To remove the door silltrim and B-pillar upper trim, remove the rear side trim panelas necessary (see page 20-51).
2. Installthe trim in the reverse order of removal, and note these items:
. Replace any damaged clips.. Apply liquid thread lock to the anchor bolts before reinstallatior,.. Before installing the anchor bolts, make sure there are no twists or kinks in the belts.
Fastener Locations
B>rClip,3 C>:Clip,?{White)
FRONT SEAT BELTUPPER ANCHOR BOLT7/16-20 UNF32 N m (3.3 kgf m,24 lbf.ft)
A-PILLAR TRIM
il-::7
/ ao----- LowER ANcHoR cAP
FRONT SEAT BELT LOWERANCHOR BOLT7/16-20 UNF32 N.m (3.3 kgt.m,24lbl.ftl
,"lF
{
A >: Clip,2(Black)
2ffi
Tl|t
\
KICK PANEL
REAR SIDE TRIM PANEL
20-50
Page 705 of 1139
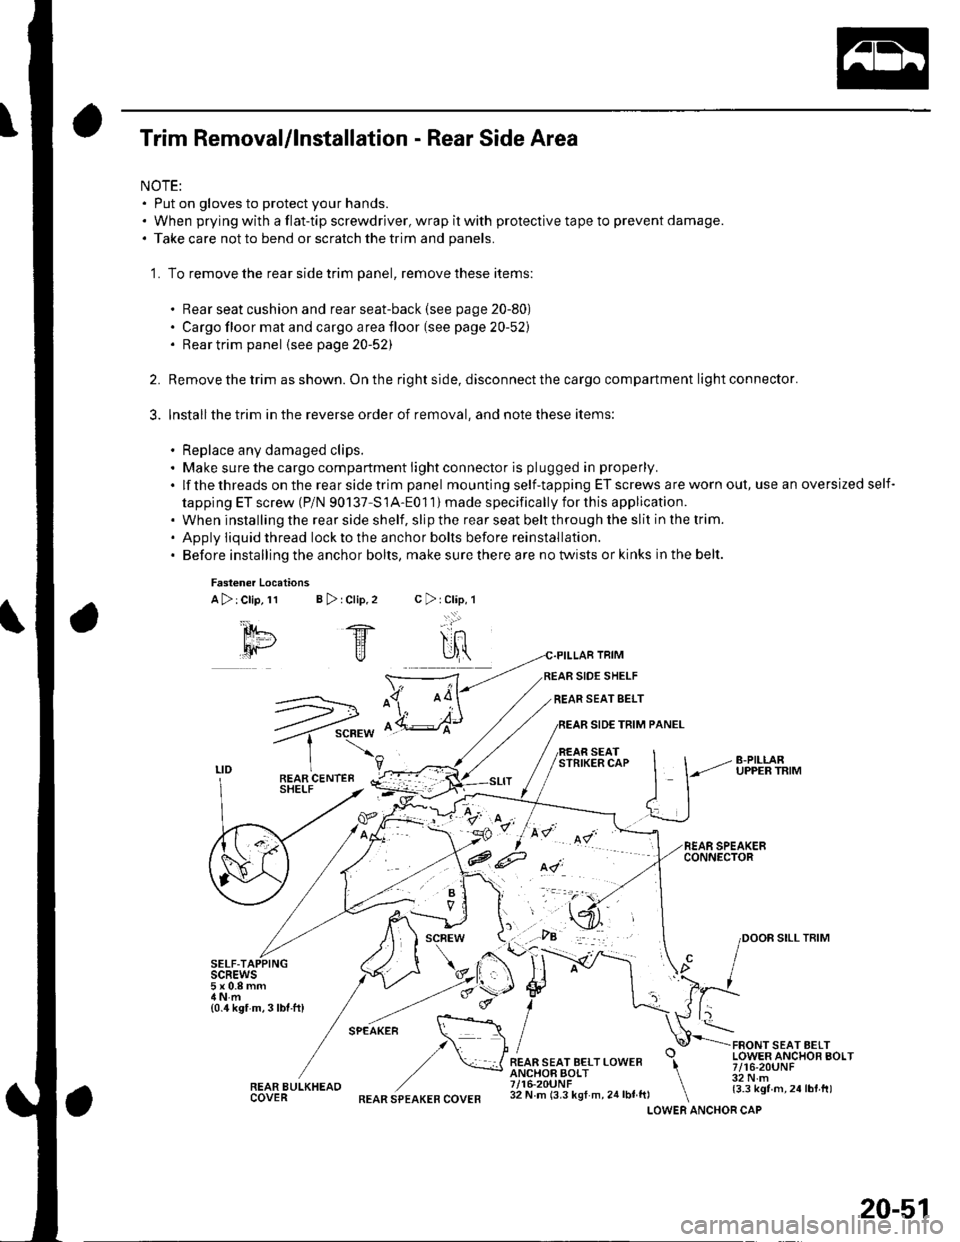
Trim Removal/lnstallation - Rear Side Area
NOTE:. Put on gloves to protect your hands.. When prying with a flat-tip screwdriver, wrap it with protective tape to prevent damage.. Take care not to bend or scratch the trim and panels.
'1. To remove the rear side trim panel, remove these items:
. Rear seat cushion and rear seat-back (see page 20-80). Cargo floor mat and cargo area floor (see page 20-52). Rear trim panel {see page20-52)
Remove the trim as shown. On the right side, disconnect the cargo compartment light connector.
Installthe trim in the reverse order of removal, and note these items:
. Replace any damaged clips.. Make sure the cargo compartment light connector is plugged in properly.
.lfthethreadsontherearsidetrimpanel mounting self-tapping ET screws are worn out, use an oversized self-
tapping ET screw (P/N 90137-S1A-Eo1 1) made specifically for this application.. When installing the rear side shelf, slip the rear seat belt through the slit in the trim.' Apply iiquid thread lockto the anchor bolts before reinstallation.. Before installing the anchor bolts, make sure there are no twists or kinks in the belt.
2.
3.
Fasten€r Locations
A>:Clip,11 B > rClip,2
SELF-TAIscREws5x0.8mm
{0.4 kgf m,3lbf.ft)
REAR BULKHEAOCOVER
TRIM
SIDE SHELF
REAR SEAT SELT
SIDE TRIM PANEL
SEATSTRIKER CAP
FRONT SEAT AELTLOWER ANCHOR BOLT7/16-20UNF32 N.m{3.3 kgf m,24lbt.tt)
c>rClap,l
-..:.:'
SILL TRIM
.F.-*-.n. \::: :\,/ I
,/ \*JREAR SEAT BELT LOWER \ANCHOF BOLT \7/16-20UNF \32 N m (3.3 kgf m, 24 lbf ft, \LOWERREAR SPEAKER COVERANCHOR CAP
20-51
Page 706 of 1139
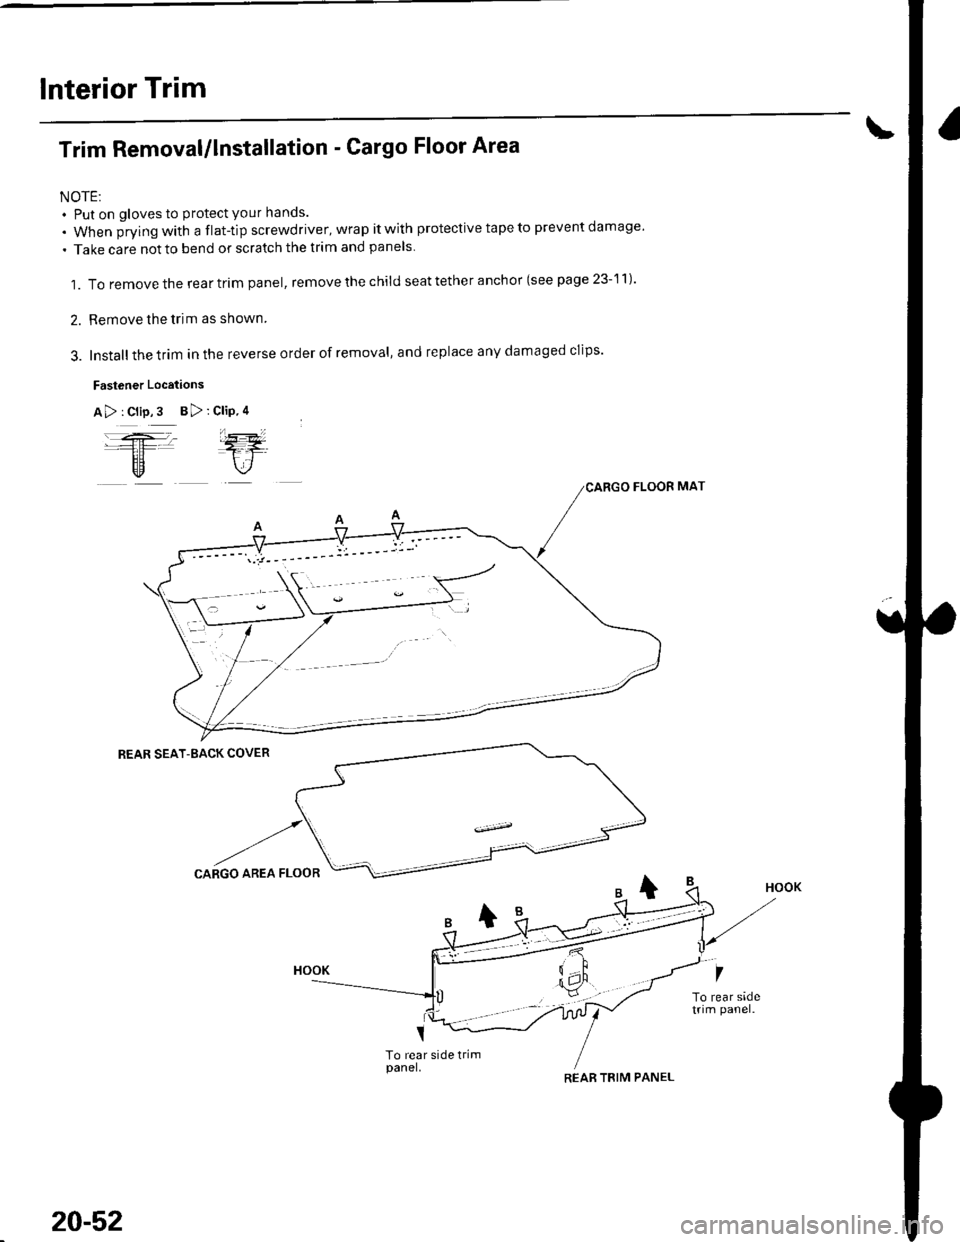
lnterior Trim
Trim Removal/lnstallation - Cargo Floor Area
NOTE:. Put on gloves to protect your hands.
. When jrying with a flat-tip screwdriver, wrap it with protective tape to prevent damage'
. Take care notto bend or scratch the trim and panels.
1. To remove the rear trim panel, remove the child seat tether anchor (see page 23-11)'
2. Remove the trim as shown.
3. Installthe trim in the reverse order of removal, and replace any damaged clips'
Fastener Locations
A> : Clip,3 B> :
REAR SEAT-BACK COVER
To rear side trimpanel.
Clip.4
j-=ETr
FLOOR MAT
-t
CARGO AREA FLO
7
To rear sadetrim panel.
20-52
REAR TBIM PANEL
Page 707 of 1139
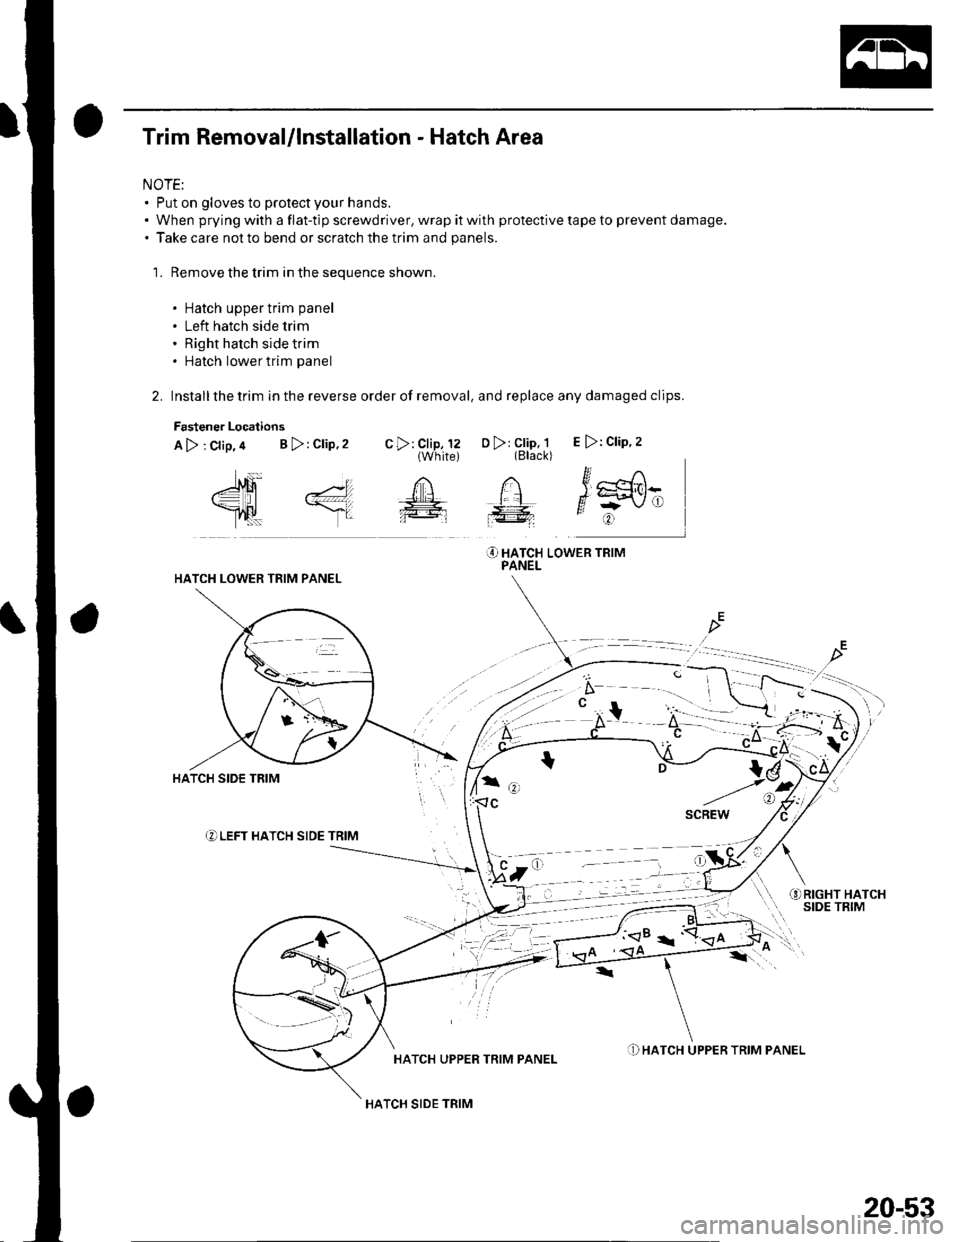
Trim Removal/lnstallation - Hatch Area
NOTE:. Put on gloves to protect your hands.. When prying with a flat-tip screwdriver, wrap it with protective tape to prevent damage.. Take care not to bend or scratch the trim and panels.
1. Remove the trim in the sequence shown.
. Hatch upper trim panel
. Left hatch side trim. Right hatch side trim. Hatch lower trim panel
2. Installthe trim in the reverse order of removal, and replace any damaged clips.
Fastener Locations
A>;crip,a B>:crip,2 .>,l,l,Jil,l3 o> 3il;1, E>:crip.2
"-{q .1 n n itr^
Y,] \.gglflt
O HATCH LowER TRrMPANELHATCH LOWER TRIM PANEL
a- ,,) I
t7,
f.
) a =- -1 a ->
HATCH UPPER TRIM PANEL
HATCH SIDE TRIM
.D HATCH UPPER TRIM PANEL
20-53
Page 708 of 1139
Interior Trim
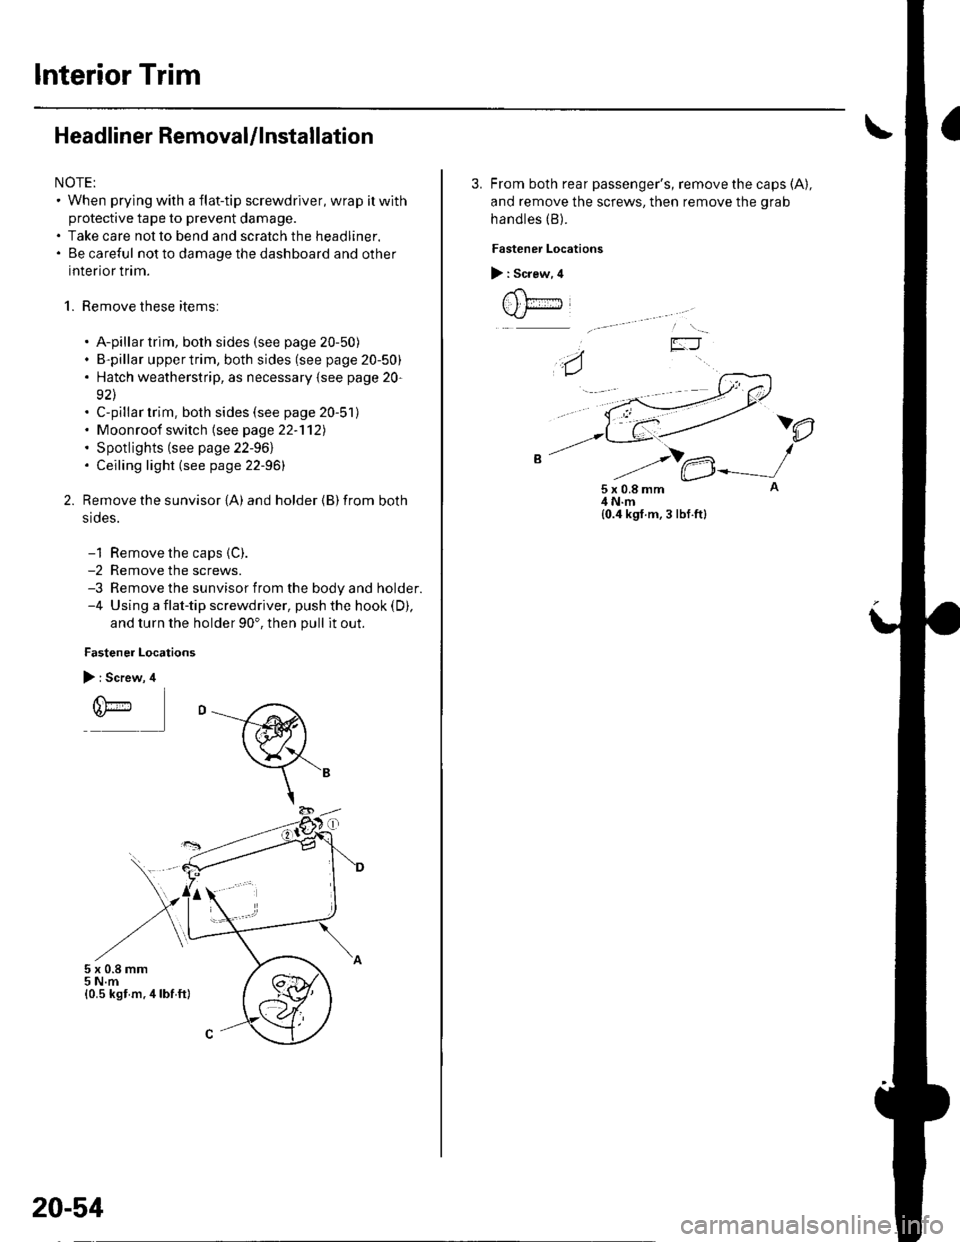
Headliner RemovaUlnstallation
NOTE:. When prying with a flat-tip screwdriver, wrap itwith
protective tape to prevent damage.. Take care not to bend and scratch the headliner.. Be careful not to damage the dashboard and other
interior trim.
1. Remove these items:
. A-pillar trim, both sides (see page 20-50). B-pillar uppertrim, both sides (see page 20-50). Hatch weatherstrip, as necessary {see page 20-
92\. C-pillar trim, both sides (see page 20-51). Moonroof switch (see page 22-'112). Spotlights (see page 22-961. Ceiling light (see page 22-96)
Remove the sunvisor {A) and holder {B) from both
srdes.
-1 Remove the caps {C).-2 Remove the screws.-3 Remove the sunvisor from the body and holder.-4 Using a flat-tip screwdriver, push the hook (D),
and turn the holder 90'. then pull it out.
Fastener Locations
> : Screw, 4
r(\'-r)*
5x0.8mm5 N.m{0.5 kst m.4lbf ft}
20-54
3. From both rear passenger's, remove the caps (A),
and remove the screws, then remove the grab
handles (B).
Fastener Locations
> : Screw, 4
t , t;---iJ
)e
5x0.8mm4 N.m{0.4 kgf.m, 3 lbf.ft}
Page 709 of 1139
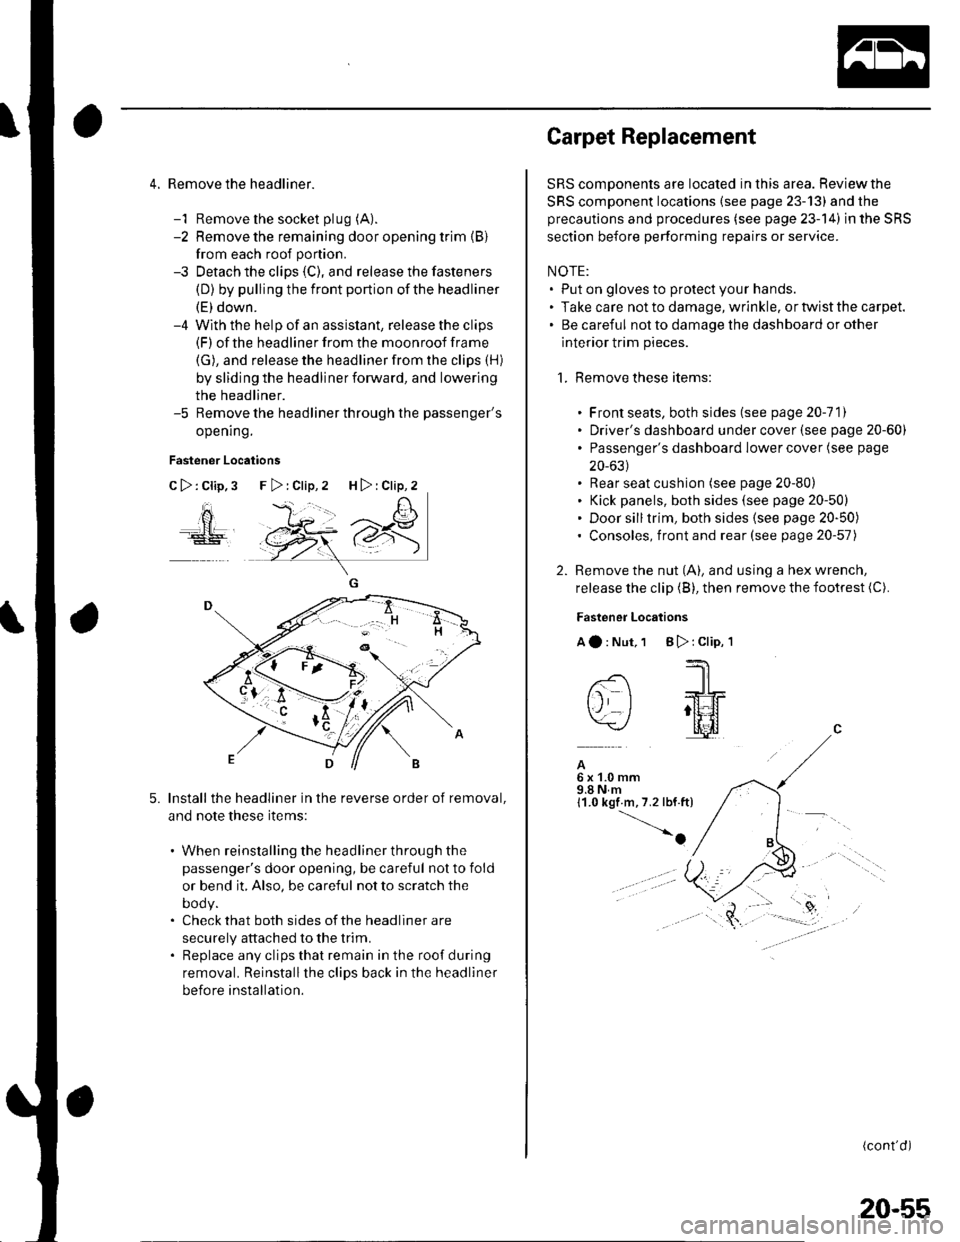
4. Remove the headliner.
-1 Remove the socket plug (A).
-2 Remove the remaining door opening trim {B}
from each roof portion.
-3 Detach the clips (C), and release the fasteners
(D) by pulling the front portion ofthe headliner
(E) down.-4 With the help of an assislant, release the clips(F) of the headliner from the moonroof frame
(G), and release the headliner from the clips (H)
by sliding the headliner forward, and lowering
the headliner.-5 Remove the headliner through the passenger's
opening.
Fastener Locations
C>:Clip,3
ao
5.Install the headliner in the reverse order of removal,
and note these items:
. When reinstalling the headliner through the
passenger's door opening, be careful not to fold
or bend it, Also, be careful not to scratch the
DOOy.. Check that both sides of the headliner are
securely attached to the trim.. Replace any clips that remain in the roof during
removal. Reinstallthe clips back in the headliner
before installation.
F>:Clip,2 H>:Clip,2
Carpet Replacement
SRS components are located in this area. Reviewthe
SRS component locations (see page 23-13) and the
precautions and procedures (see page 23-14) in the SRS
section before performing repairs or service.
NOTE:. Put on gloves to protect your hands.. Take care not to damage, wrinkle. or twist the carpet.. Be careful not to damage the dashboard or other
interior trim pieces.
1. Remove these items:
. Front seats, both sides (see page 20-111. Driver's dashboard under cover (see page 20-60). Passenger's dashboard Iower cover (see page
20-631. Rear seat cushion (see page 20-80). Kick panels, both sides (see page 20-50). Door silltrim, both sides (see page 20-50). Consoles, front and rear (see page 20-57)
2. Remove the nut (A), and using a hex wrench,
release the clip (B), then remove the footrest (C).
Fastener Locations
Aa:Nut,1 B):Clip,'l
--'1 I
-- -JrL
tj I ;tt4f=\-/ l[il
A6x1.0mm9.8Nm11.0 kgf m,7.2 lbf.ft)
-o
(cont'd)
20-55
Page 710 of 1139
Interior Trim
Carpet Replacement (cont'dl
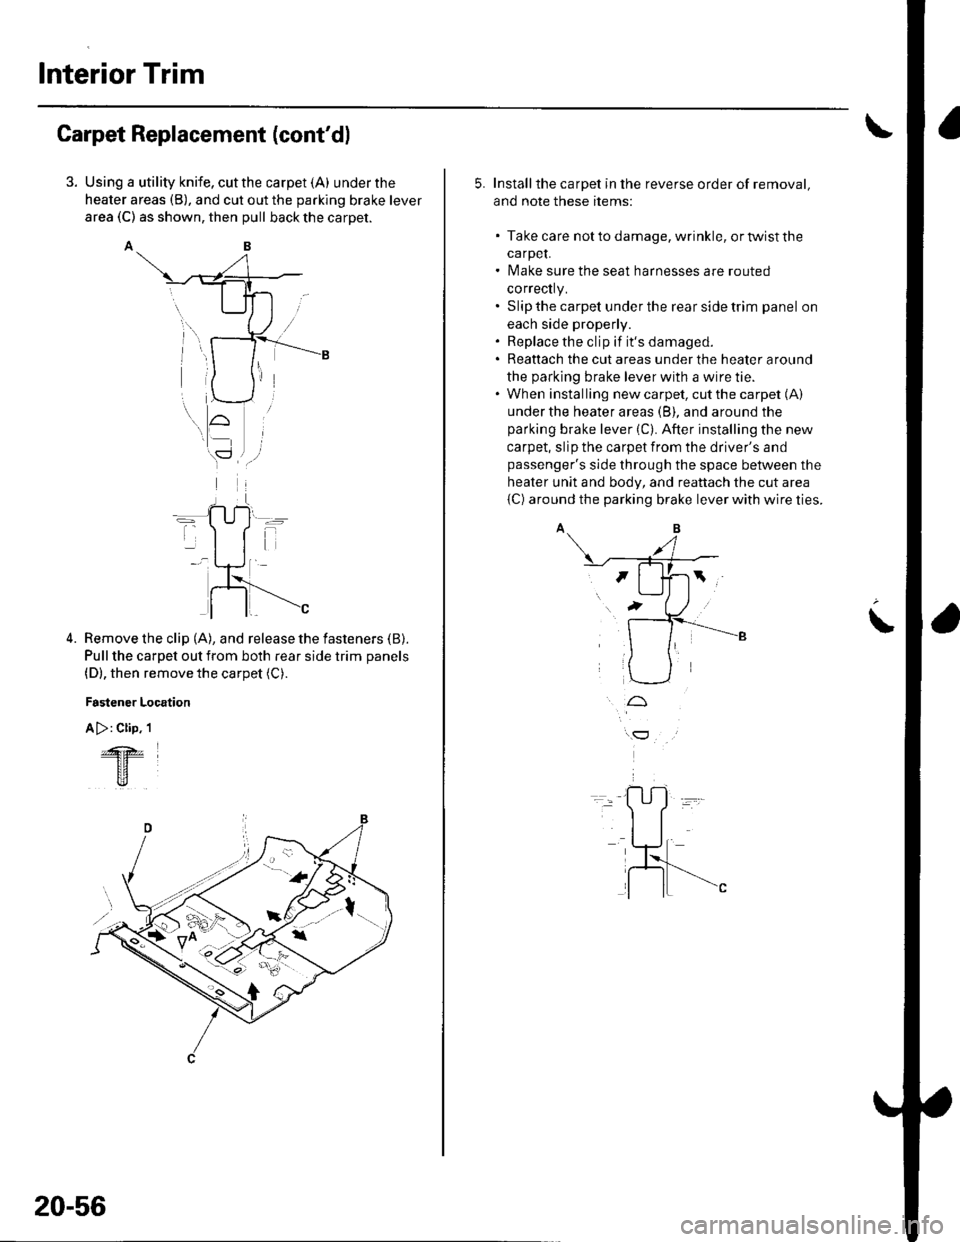
Using a utility knife, cut the carpet (A) under the
heater areas (B), and cut out the parking brake lever
area (C) as shown, then pull back the carpet.
AB
Remove the clip (A), and release the fasteners (B).
Pull the carpet out from both rear side trim panels
(D), then remove the carpet (C).
Fastener Location
A >: Clip. 1
4.
&z
tr
20-56
5. Installthe carpet in the reverse order of removal,
and note these items:
. Take care notto damage, wrinkle, ortwistthe
carpeL. Make sure the seat harnesses are routed
correctly.. Slip the carpet under the rear side trim panel on
each side properly.. Replace the clip if it's damaged.. Reattach the cut areas under the heater around
the parking brake lever with a wire tie.. When installing new carpet, cut the carpet (A)
under the heater areas (B), and around the
parking brake lever (C). After installing the new
carpet, slip the carpet from the driver's and
passenger's side through the space between the
heater unit and body, and reattach the cut area
{C) around the parking brake lever with wire ties.
t