HONDA CIVIC 2003 7.G Workshop Manual
Manufacturer: HONDA, Model Year: 2003, Model line: CIVIC, Model: HONDA CIVIC 2003 7.GPages: 1139, PDF Size: 28.19 MB
Page 731 of 1139
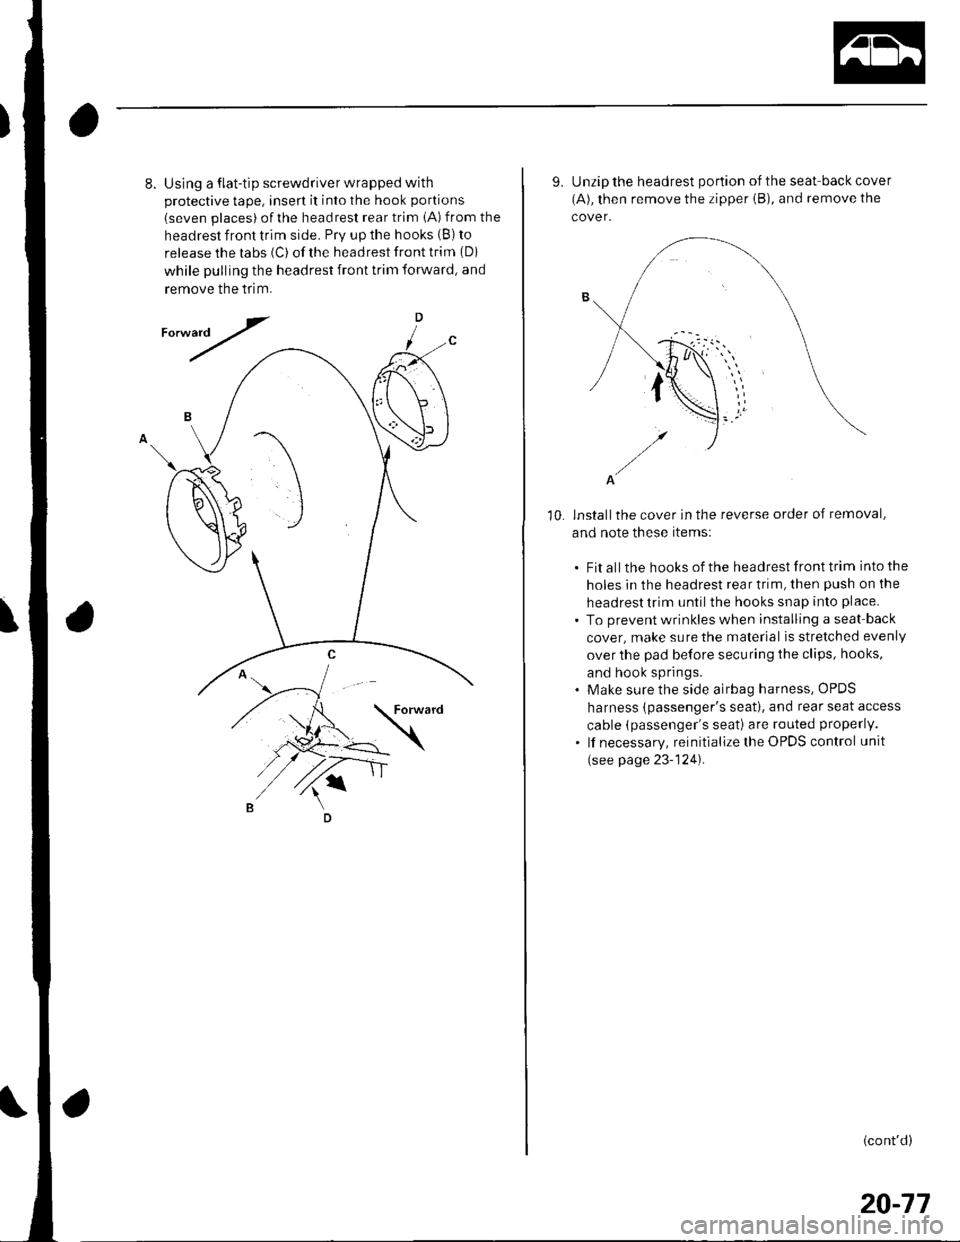
8.Using a flat-tip screwdriver wrapped with
protective tape, insert it into the hook portions
(seven places) ofthe headrest rear trim iA) from the
headrest front trim side. Prv up the hooks (B) to
release the labs (C) of the headrest front trim (Di
while pulling the headrest front trim forward, and
remove the tflm.
D
/
10.
9. Unzip the headrest portion of the seat-back cover
(A), then remove the zipper iB), and remove the
cover.
A
installthe cover in the reverse order of removal,
and note these items:
. Fit all the hooks of the headrest front trim into the
holes in the headrest rear trim, then push on the
headrest trim until the hooks snap into place.
. To prevent wrinkles when installing a seat back
cover, make sure the material is stretched evenly
over the pad before securing the clips, hooks,
and hook springs.. Make sure the side airbag harness, OPDS
harness {passenger's seat). and rear seat access
cable (passenger's seati are routed properly.
. lf necessary, reinitialize the OPDS control unit
(see page 23-124).
(cont'd)
20-77
Page 732 of 1139
Seats
Front Seat Cover Replacement {cont'd)
Seat Cushion Cover
1. Remove the front seat (see page 20,71).
2. Remove these items from the front seat:
. Recline cover, driver's seat (see page 20-73)passenger's seat {see page 20-7 4l. Front seat belt buckle {see step 4 on page 23-6)
3. From underthe seat cushion, detach the side
airbag connector clip, and on the passenger's seat,detach the OPDS unit connector clip. Release the
hook springs from the seat cushion frame spring,
then pull the guide cover back, and remove the
wire ties.
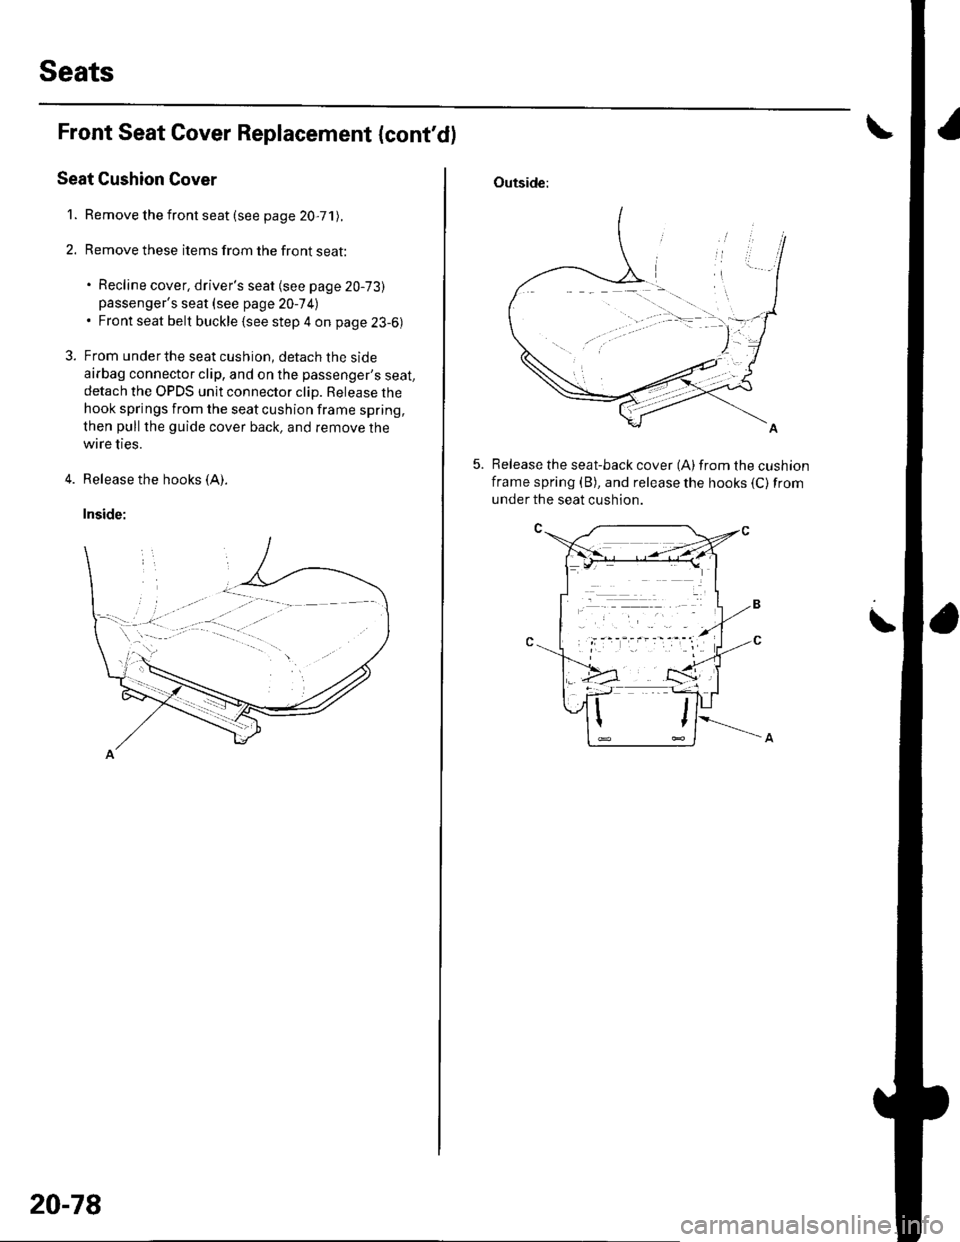
4. Release the hooks (A).
Inside:
20-78
Outside:
Release the seat-back cover (A)from the cushion
frame spring (B), and release the hooks (C) from
under the seat cushion.
Page 733 of 1139
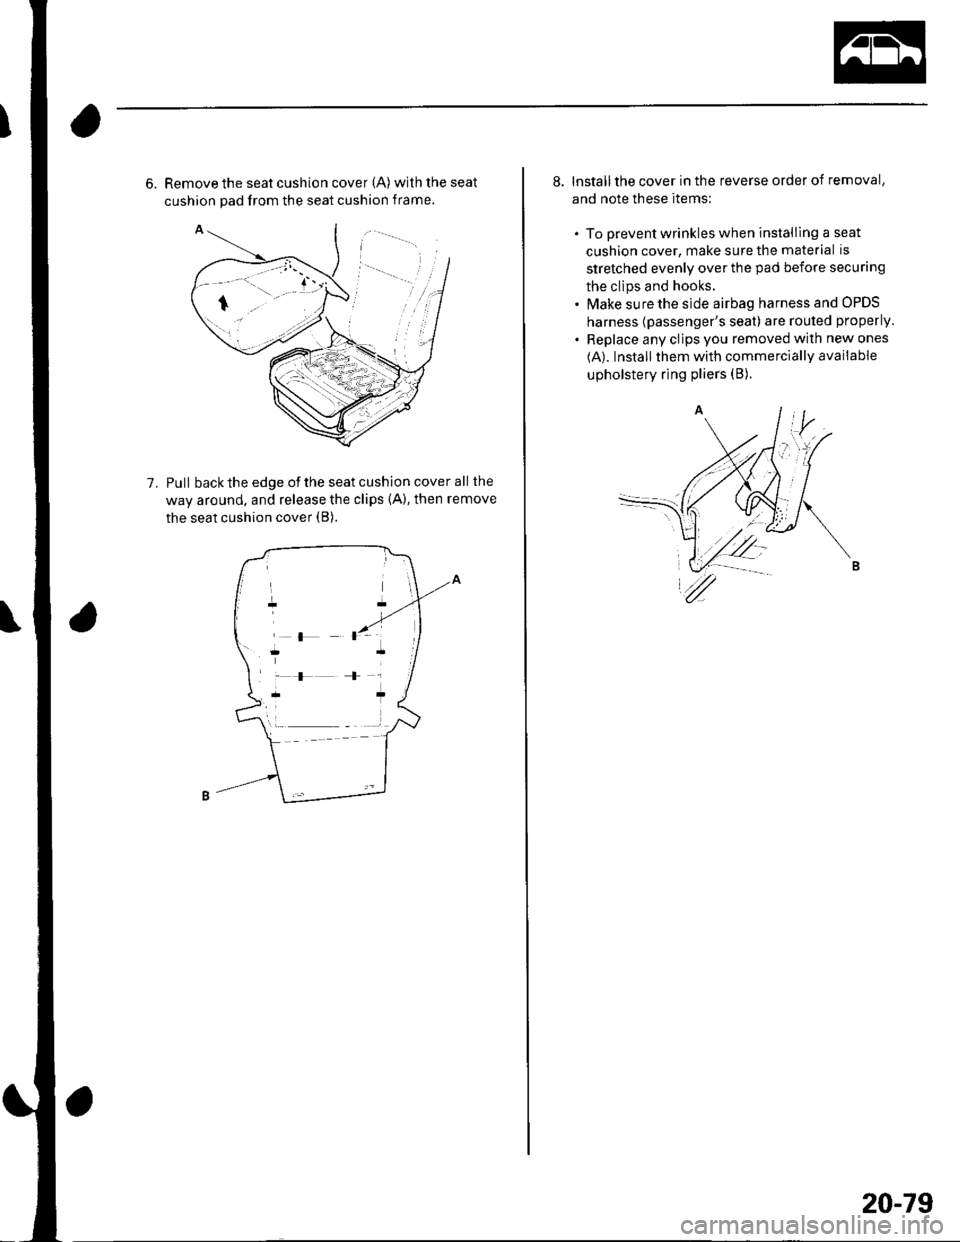
6. Remove the seat cushion cover (A) withtheseat
cushion pad from the seat cushion frame.
Pull back the edge of the seat cushion cover all the
way around. and release the clips {A), then remove
the seat cushion cover (B).
1.
r {, ]
:F+r
r* ?
8. Installthe cover in the reverse order of removal,
and note these items;
. To prevent wrinkles when installlng a seat
cushion cover, make sure the material is
stretched evenly over the pad before securing
the clips and hooks.. Make sure the side airbag harness and OPDS
harness (passenger's seat) are routed properly.
. Replace any clips you removed with new ones
(A). Installthem with commercially available
upholstery ring pliers (B).
20-79
Page 734 of 1139
Seats
Rear Seat Removal/lnstallation
NOTE: Take care not to scratch the body or tear the seat covers.
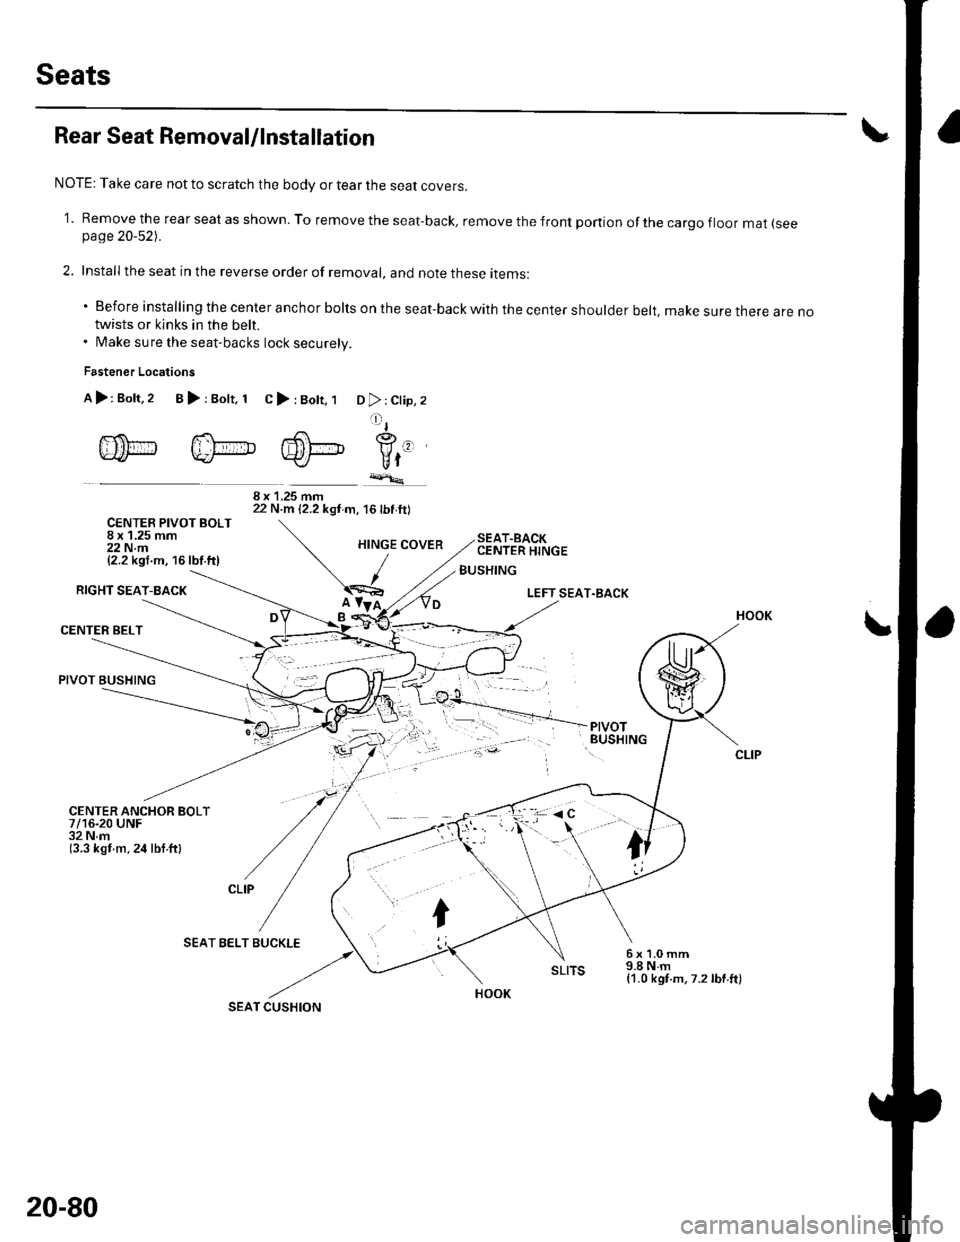
'1. Remove the rear seat as shown. To remove the seat-back, remove the front portion of the cargo floor mar lseepage 20-52).
2. Install the seat in the reverse order of removal, and note these items:
'Beforeinstallingthecenteranchorboltsontheseat-backwiththecentershoulderbelt,makesurethereareno
twists or kinks in the belt.. Make sure the seat-backs lock securelv.
Fastener Locations
A>:Bolt,2 B>rBolt, 1 C>:Bott, 1D >: Clip, 2
lltl
agrf(1
Vt-r_r+*.
\'7
CUSHION
6x1.0mm9.8Nm{1.0 kgf.m,7.2lbf.ft)
/-<.{\.-- F.i\-- K\-|J].Pt-HAP
CENTER PIVOT BOLT8 x 1.25 mm22 N.m{2.2 kgf.m, 16lbf.ftl
RIGHT SEAT-BACK
CENTER BELT
PIVOT BUSHING
CENTER ANCHOR BOLT7/16-20 UNF32Nm(3.3 kgf m.24 lbt ftl
SEAT BELT BUCKLE
8 x 1.25 mm22 N.m 12.2 kgt m, 16lbf.ft)
SEAT.BACKCENTER HINGE
BUSHING
LEFT SEAT.BACK
PIVOTBUSHING
HOOK
20-80
SEAT
Page 735 of 1139
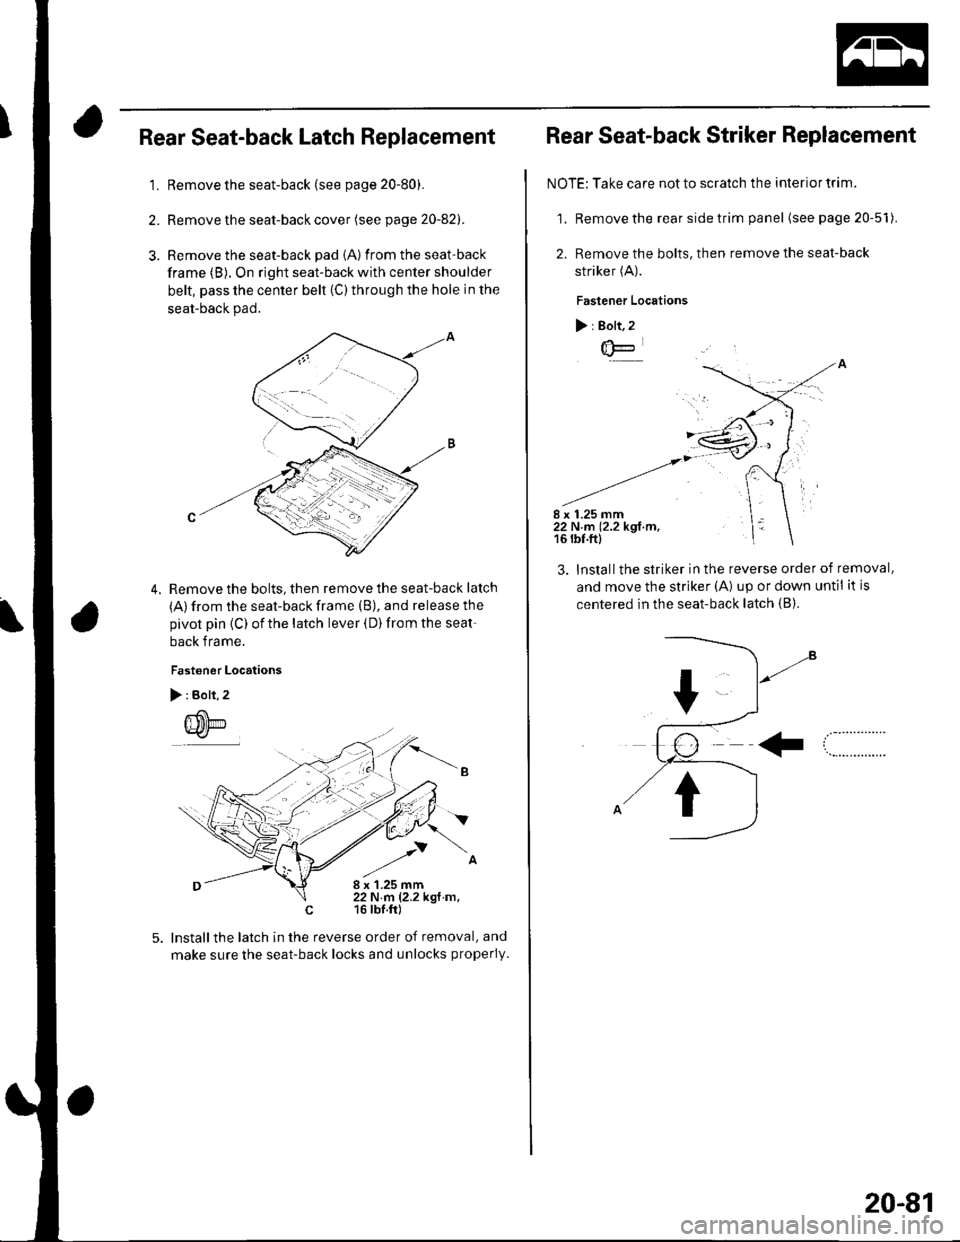
IRear Seat-back Latch Replacement
1.Remove the seat-back (see page 20-80).
Remove the seat-back cover (see page 20-82).
Remove the seat-back pad {A) from the seat-back
frame (B). On right seat-back with center shoulder
belt, pass the center belt (C) through the hole in the
seat-back pad.
Remove the bolts, then remove the seat-back latch
(A) from the seat-back frame (B), and release the
pivot pin {C) of the latch lever (D) from the seat'
back f rame.
Fastener Locations
lnstallthe latch in the reverse order of removal, and
make sure the seat-back locks and unlocks properly.
\
Rear Seat-back Striker Replacement
NOTE: Take care not to scratch the interior trim.
1. Remove the rear side trim panel (see page 20-5'l).
2. Remove the bolts, then remove the seat-back
striker (A).
Fastener Locations
) : Bolt, 2
F
,-;1
8 x 1.25 mm22 N m 12.2 kgl rn,16 tbf.ft)
3. lnstallthe striker in the reverse order of removal,
and move the striker (A) up or down until it is
centered in the seat-back latch {B).
20-81
Page 736 of 1139
Seats
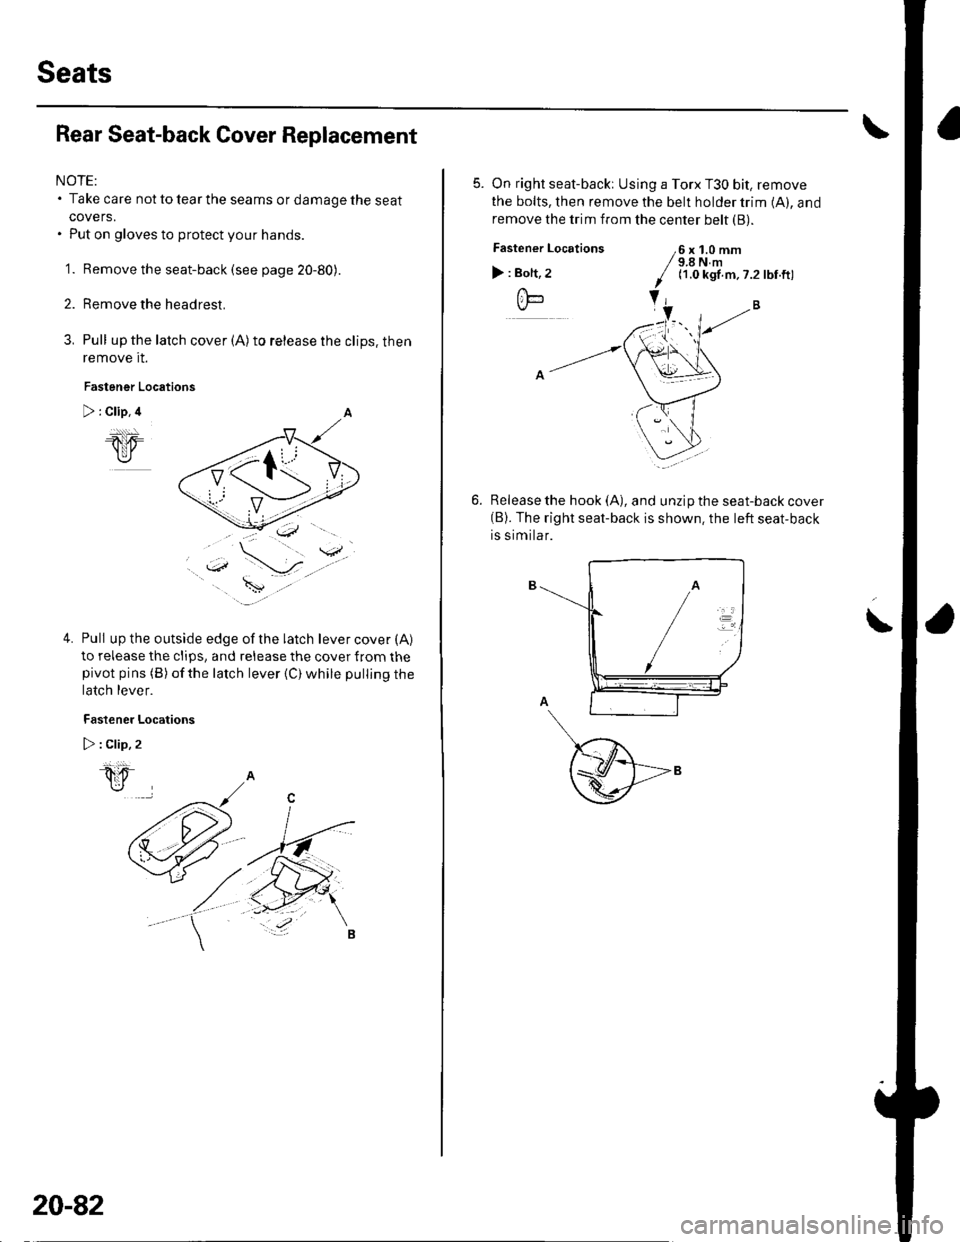
Rear Seat-back Cover Replacement
NOTE:. Take care not to tear the seams or damage the seat
covers.. Put on gloves to protect your hands.
'1. Remove the seat-back (see page 20-80).
Remove the headrest.
Pull up the latch cover (A) to telease the clips. then
remove it.
Fastener Locations
) : Clip, 4
1W
4.Pull up the outside edge of the latch lever cover (A)
to release the clips, and release the cover from thepivot pins (B) ofthe latch lever {C) while pulljng the
latch lever.
Fastener Locations
D : Clip, 2
i
*rJ
20-82
5. On right seat-backi Using a Torx T30 bit, remove
the bolts, then remove the belt holder trim (A), and
remove the trim from the center belt (B).
Fastener
) : Bolt,
A*-\./-
Locations6x1.0mm9.8Nm(1.0 kgf.m,7.2 lbf.ft)
Release the hook (A), and unzip the seat-back cover(B). The right seat-back is shown. the left seat-back
is similar.
\
Page 737 of 1139
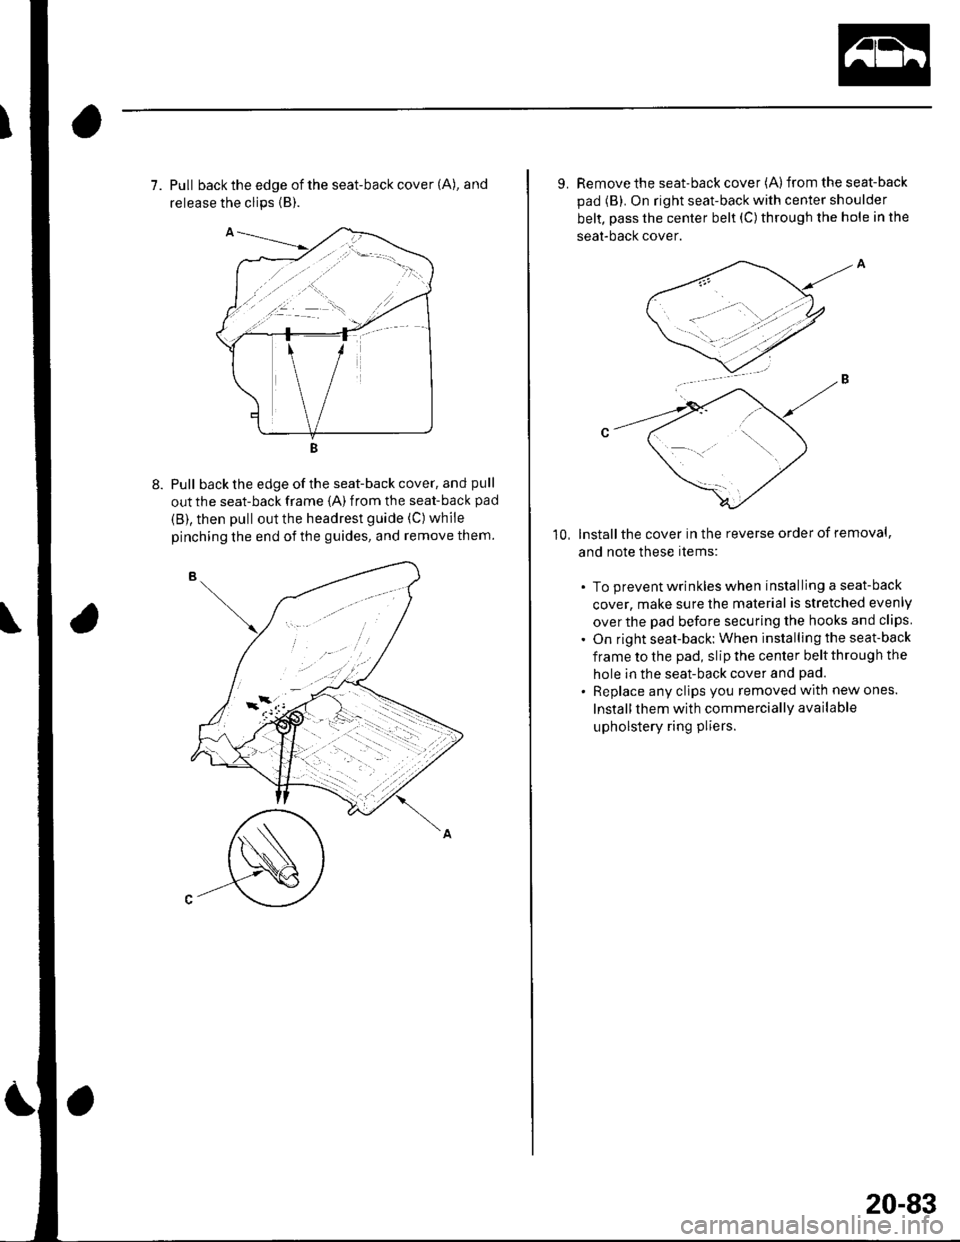
7. Pull back the edge of the seat-back cover (A), and
release the clips {B).
Pull back the edge of the seat-back cover, and pull
out the seat-back frame {A) from the seat-back pad
{B), then pull out the headrest guide (C) while
pinching the end of the guides, and remove them.
9. Remove the seat-back cover (A)from the seat-back
pad (B). On right seat-back with center shoulder
belt, pass the center belt (C) through the hole in the
seat-bacl( cover.
lnstallthe cover in the reverse order of removal,
and note these items:
. To prevent wrinkles when installing a seat-back
cover, make sure the material is stretched evenly
over the pad before securing the hooks and clips
. On right seat-back: When installing the seat-back
frame to the pad, slip the center belt through the
hole in the seat-back cover and pad.
. Replace any clips you removed with new ones.
Install them with commercially available
upholstery ring pliers.
10,
20-83
Page 738 of 1139
Seats
Rear Seat Cushion Cover Replacement
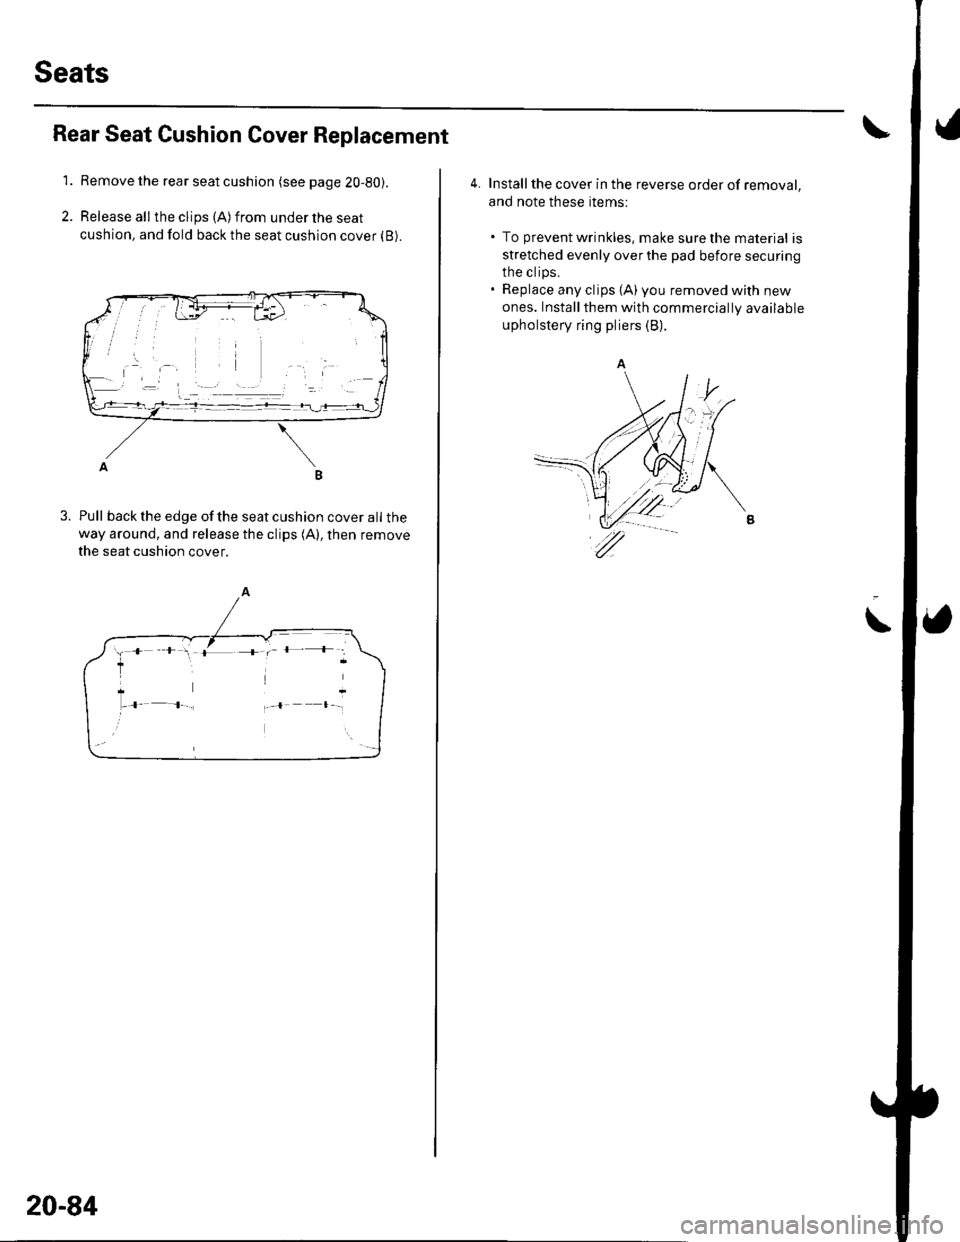
'1.Remove the rear seat cushion (see page 2O-80).
Release all the clips (A) from under the seat
cushion, and fold back the seat cushion cover (B).
B
Pull back the edge of the seat cushion cover all theway around, and release the clips (A), then remove
the seat cushion cover.
iw F 1., 1L +. ts+'
il1rl-,+ J ,+ l l
20-84
4. Installthe cover in the reverse order of removal,
and note these items;
. To prevent wrinkles, make sure the material is
stretched evenly over the pad before securing
the clips.. Replace any clips {A) you removed with new
ones. Install them with commercially available
upholstery ring pliers (B).
\
Page 739 of 1139
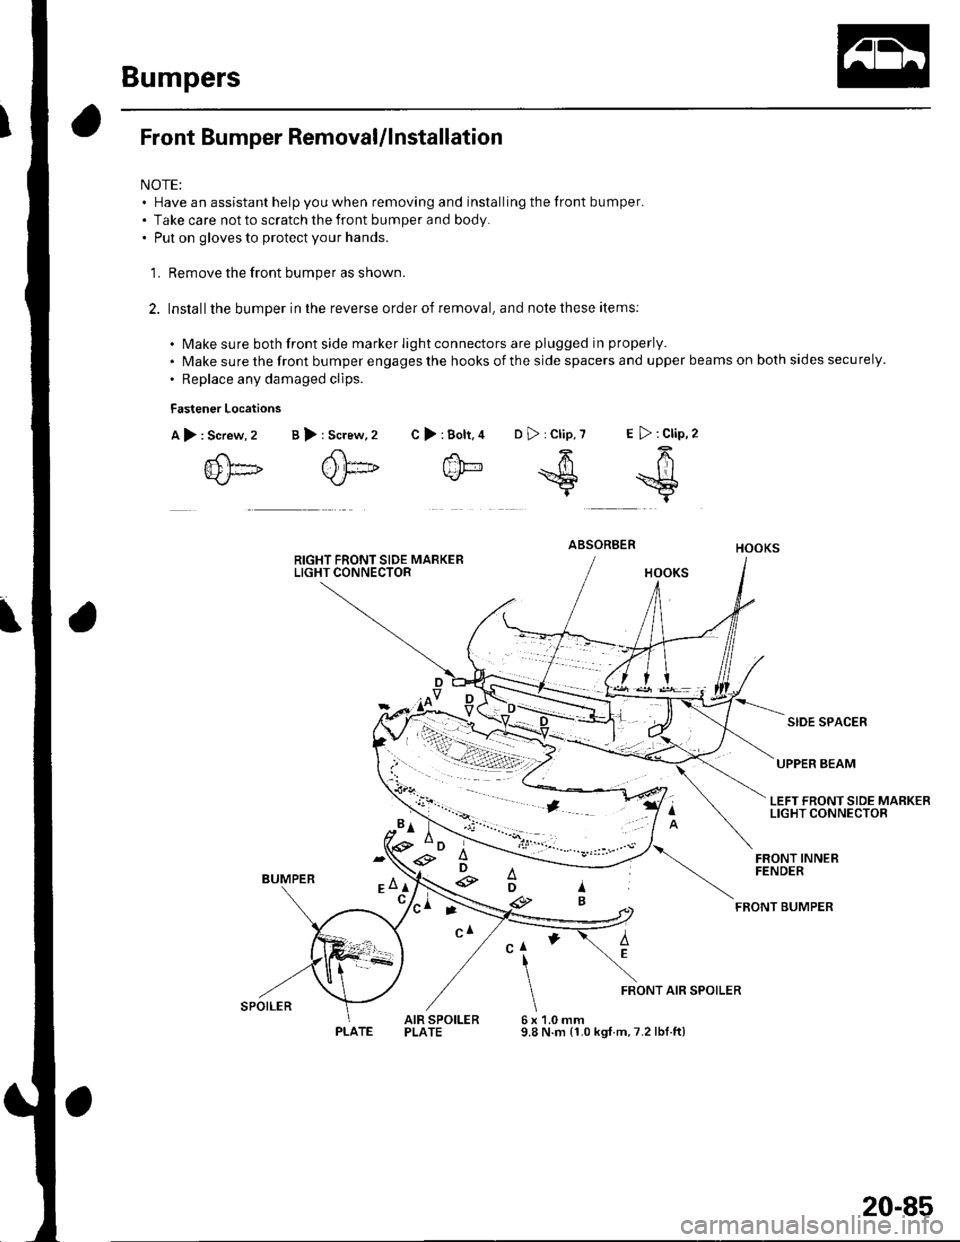
Bumpers
Front Bumper RemovaUlnstallation
NOTE:. Have an assistant help you when removing and installing the front bumper.. Take care not to scratch the front bumper and body.. Put on gloves to protect your hands.
'L Remove the front bumper as shown.
2. Installthe bumper in the reverse order of removal, and note these items:
. Make sure both front side marker light connectors are plugged in properly.
. Make sure the front bumper engages the hooks of the side spacers and upper beams on both sides securely.
. Replace any damaged clips.
Fastener Locations
A),Screw, 2
{D[]
>:Bolt.4 D>:Clip,7 E >:Clip,2
f'h-64k/- *S =$t
B >: Screw,2 C
ABSORBER
SIDE SPACER
UPPER BEAM
LEFT FRONT SIDE MARKERLIGHT CONNECTOR
BUMPER
FRONT INNERFENDER
FEONT BUMPER
AEClI
6x9.8
FRONT AIR SPOILER
AIR SPOILERPLATE1.0 mmN.m (1.0 kgt.m,7.2 lbf.ft)
'*D ;e3
e
ti-\
SPOILER
PLATE
20-85
Page 740 of 1139

Bumpers
Rear Bumper RemovaUlnstallation
NOTE:' Have an assistant help you when removing and installing the rear bumper.. Take care not to scratch the rear bumper and body.. When prying with a flat-tip screwdriver, wrap it with protective tape to prevent damage.. Put on gloves to protect your hands.
L Remove the rear bumDer as shown.
2. Installthe bumper in the reverse order of removal, and note these items:
. Make sure both rear side marker light connectors are plugged in properly.'Makesuretherearbumperengagesthehooksofthesidespacers,sidebrackets,andupperbracketsonboth
sides securely.. Make sure the upper spacers of the rear bumper engage the clips on the body securely.. Replace any damaged clips.
: Screw, 2
XJ
) : Clip,
?ri)
\sI
Fastener Locations
A>:Bolt,2 B
/h-
\-P-
) : Screw, 2
ffiI"-ut ^*
c>
SIDE BRACKET
UPPER SPACER
UPPER BRACKET
\
SIDE SPACER
:r
'-
A
AD
LEFT REAR SIDE MARKERLIGHT CONNECTOR
,6 x 1.0 mm/ 9.eN.n,/ 11.0 kgl m,./ 1.2tbt.ttl
a
\
CAP
REAR BUMPER
20-86