HONDA CLARITY ELECTRIC 2019 Owner's Manual (in English)
Manufacturer: HONDA, Model Year: 2019, Model line: CLARITY ELECTRIC, Model: HONDA CLARITY ELECTRIC 2019Pages: 559, PDF Size: 28.11 MB
Page 321 of 559
319
uuCustomized Features u
Continued
Features
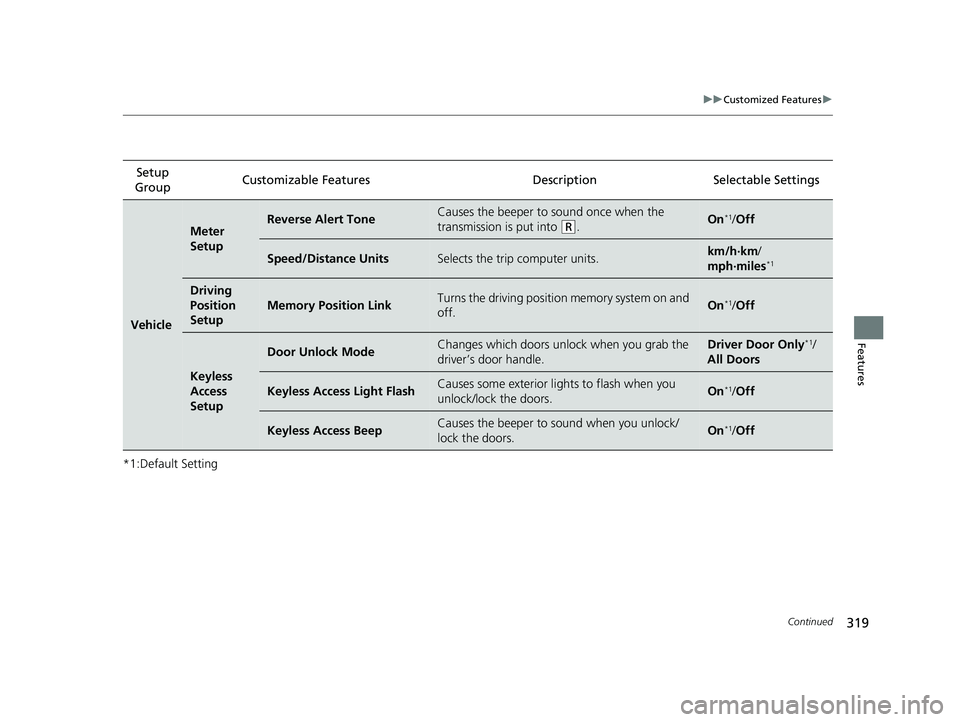
*1:Default SettingSetup
Group Customizable Features Desc
ription Selectable Settings
Vehicle
Meter
SetupReverse Alert ToneCauses the beeper to sound once when the
transmission is put into
(R.On*1/Off
Speed/Distance UnitsSelects the trip computer units.km/h∙km /
mph∙miles*1
Driving
Position
Setup
Memory Position LinkTurns the driving position memory system on and
off.On*1/ Off
Keyless
Access
Setup
Door Unlock ModeChanges which doors unlock when you grab the
driver’s door handle.Driver Door Only*1/
All Doors
Keyless Access Light FlashCauses some exterior li ghts to flash when you
unlock/lock the doors.On*1/ Off
Keyless Access BeepCauses the beeper to sound when you unlock/
lock the doors.On*1/Off
19 CLARITY BEV-31TRV6200.book 319 ページ 2018年10月29日 月曜日 午前10時54分
Page 322 of 559
320
uuCustomized Features u
Features
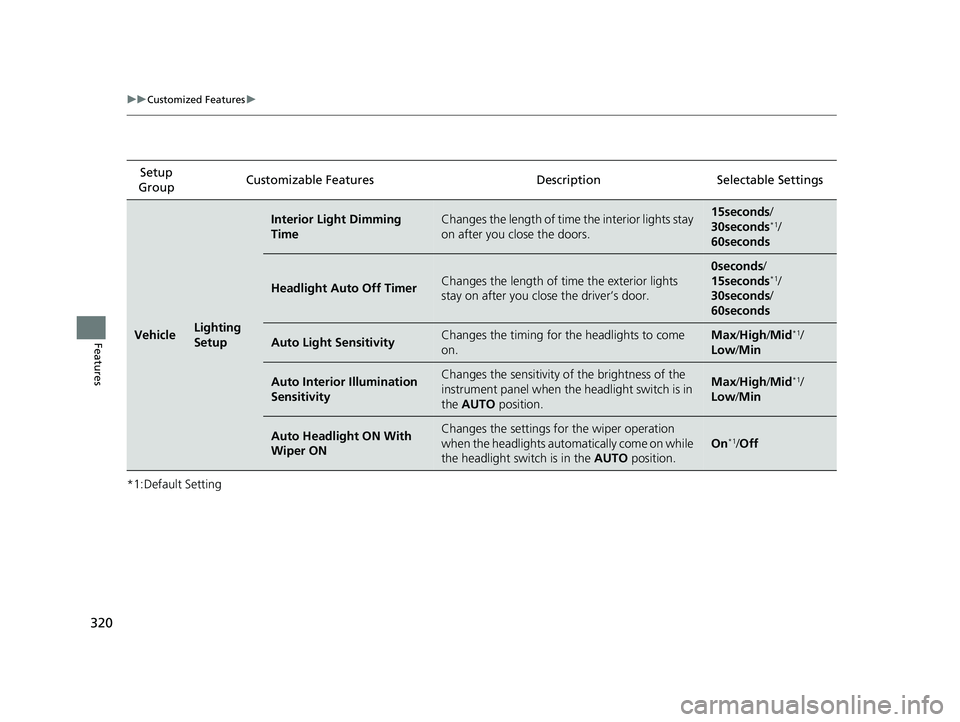
*1:Default SettingSetup
Group Customizable Features Desc
ription Selectable Settings
VehicleLighting
Setup
Interior Light Dimming
TimeChanges the length of time the interior lights stay
on after you close the doors.15seconds/
30seconds*1/
60seconds
Headlight Auto Off TimerChanges the length of ti me the exterior lights
stay on after you close the driver’s door.
0seconds /
15seconds*1/
30seconds/
60seconds
Auto Light SensitivityChanges the timing for the headlights to come
on.Max /High/ Mid*1/
Low/ Min
Auto Interior Illumination
SensitivityChanges the sensitivity of the brightness of the
instrument panel when the headlight switch is in
the AUTO position.Max/High/ Mid*1/
Low/ Min
Auto Headlight ON With
Wiper ONChanges the settings fo r the wiper operation
when the headlights automa tically come on while
the headlight switch is in the AUTO position.
On*1/Off
19 CLARITY BEV-31TRV6200.book 320 ページ 2018年10月29日 月曜日 午前10時54分
Page 323 of 559
321
uuCustomized Features u
Continued
Features
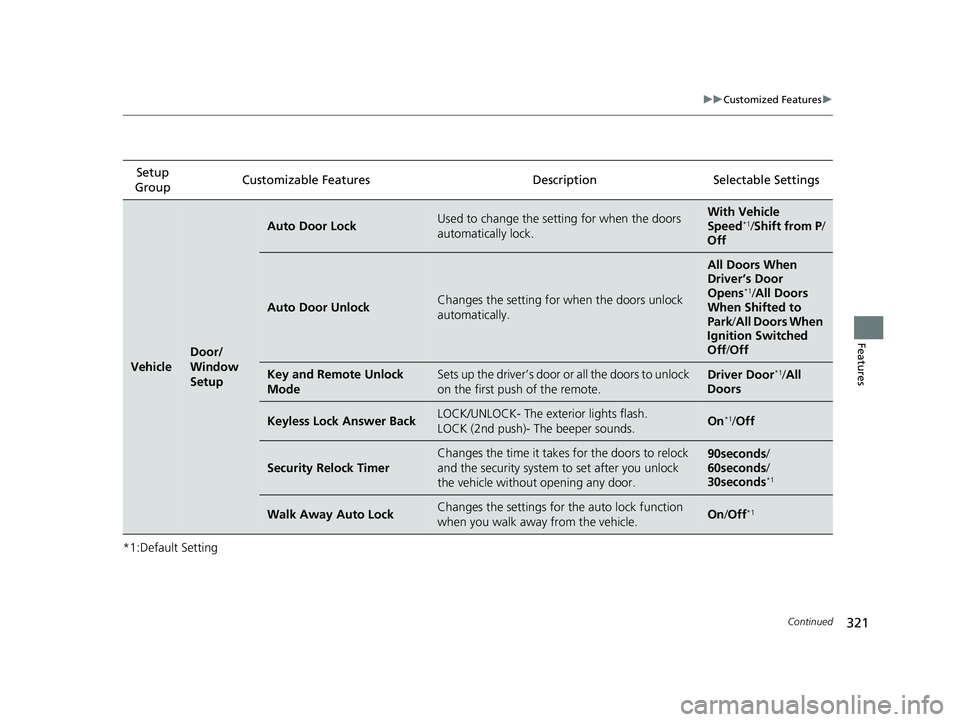
*1:Default SettingSetup
Group Customizable Features Desc
ription Selectable Settings
Vehicle
Door/
Window
Setup
Auto Door LockUsed to change the setting for when the doors
automatically lock.With Vehicle
Speed*1/ Shift from P /
Off
Auto Door UnlockChanges the setting for when the doors unlock
automatically.
All Doors When
Driver’s Door
Opens
*1/ All Doors
When Shifted to
Park /All Doors When
Ignition Switched
Off /Off
Key and Remote Unlock
ModeSets up the driver’s door or all the doors to unlock
on the first push of the remote.Driver Door*1/ All
Doors
Keyless Lock Answer BackLOCK/UNLOCK- The exterior lights flash.
LOCK (2nd push)- The beeper sounds.On*1/ Off
Security Relock Timer
Changes the time it takes for the doors to relock
and the security system to set after you unlock
the vehicle withou t opening any door.90seconds/
60seconds /
30seconds
*1
Walk Away Auto LockChanges the settings for the auto lock function
when you walk away from the vehicle.On /Off*1
19 CLARITY BEV-31TRV6200.book 321 ページ 2018年10月29日 月曜日 午前10時54分
Page 324 of 559
322
uuCustomized Features u
Features
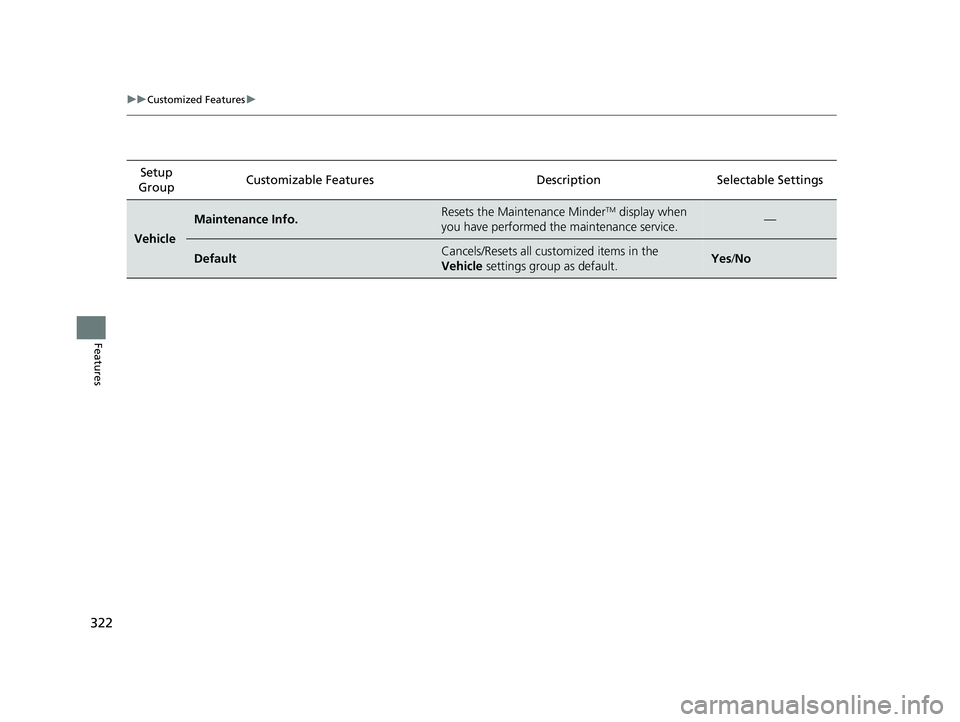
Setup
Group Customizable Features
Description Selectable Settings
Vehicle
Maintenance Info.Resets the Maintenance MinderTM display when
you have performed the maintenance service.—
DefaultCancels/Resets all customized items in the
Vehicle settings group as default.Yes/No
19 CLARITY BEV-31TRV6200.book 322 ページ 2018年10月29日 月曜日 午前10時54分
Page 325 of 559
323
uuCustomized Features uDefaulting All the Settings
Features
Defaulting All the Settings
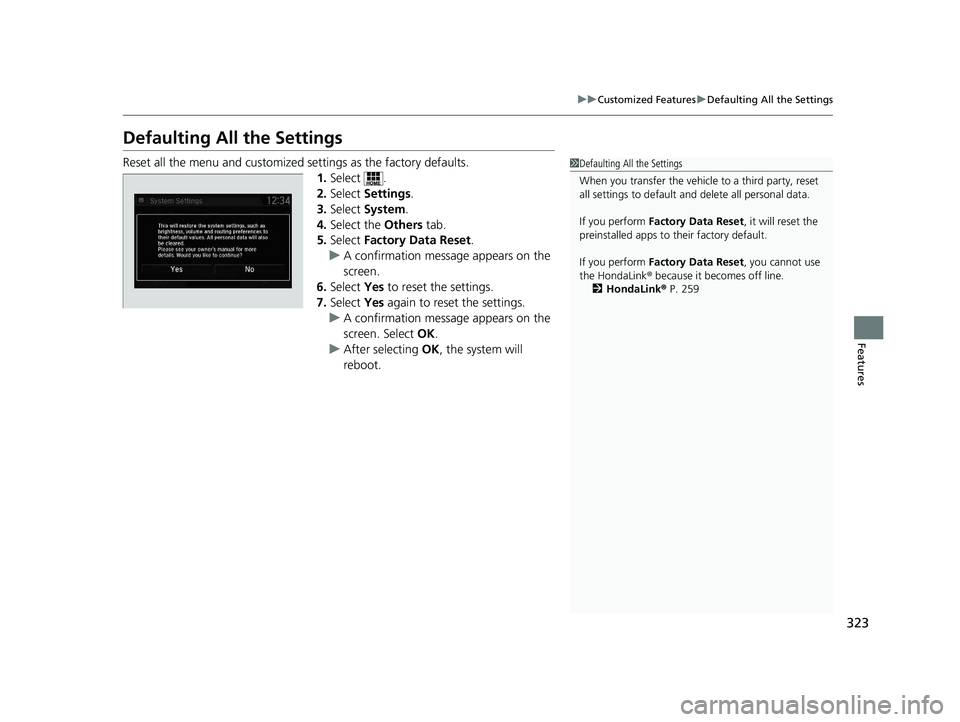
Reset all the menu and customized settings as the factory defaults.
1.Select .
2. Select Settings .
3. Select System.
4. Select the Others tab.
5. Select Factory Data Reset .
u A confirmation message appears on the
screen.
6. Select Yes to reset the settings.
7. Select Yes again to reset the settings.
u A confirmation message appears on the
screen. Select OK.
u After selecting OK, the system will
reboot.1 Defaulting All the Settings
When you transfer the vehicle to a third party, reset
all settings to default a nd delete all personal data.
If you perform Factory Data Reset , it will reset the
preinstalled apps to their factory default.
If you perform Factory Data Reset , you cannot use
the HondaLink ® because it becomes off line.
2 HondaLink ® P. 259
19 CLARITY BEV-31TRV6200.book 323 ページ 2018年10月29日 月曜日 午前10時54分
Page 326 of 559
324
Features
HomeLink® Universal Transceiver
The HomeLink ® Universal Transceiver can be pr ogrammed to operate up to three
remote controlled devices around your home, such as garage doors, lighting, or
home security systems.
Refer to the safety information that came wi th your garage door opener to test that
the safety features are functioning properly. If you do not have the safety
information, contact the manufacturer.
Before programming HomeLink, make sure that people and objects are out of the
way of the garage or gate to prevent potential injury or damage.
When programming a garage door opener, park just outside the garage door’s
path.
■Important Safety Precautions
1 HomeLink ® Universal Transceiver
Before programming HomeLi nk to operate a garage
door opener, confirm that the opener has an external
entrapment protection system, such as an “electronic
eye,” or other safety and reverse stop features. If it
does not, HomeLink may not be able to operate it.
19 CLARITY BEV-31TRV6200.book 324 ページ 2018年10月29日 月曜日 午前10時54分
Page 327 of 559
325
uuHomeLink ® Universal Transceiver uTraining HomeLink
Continued
Features
Training HomeLink
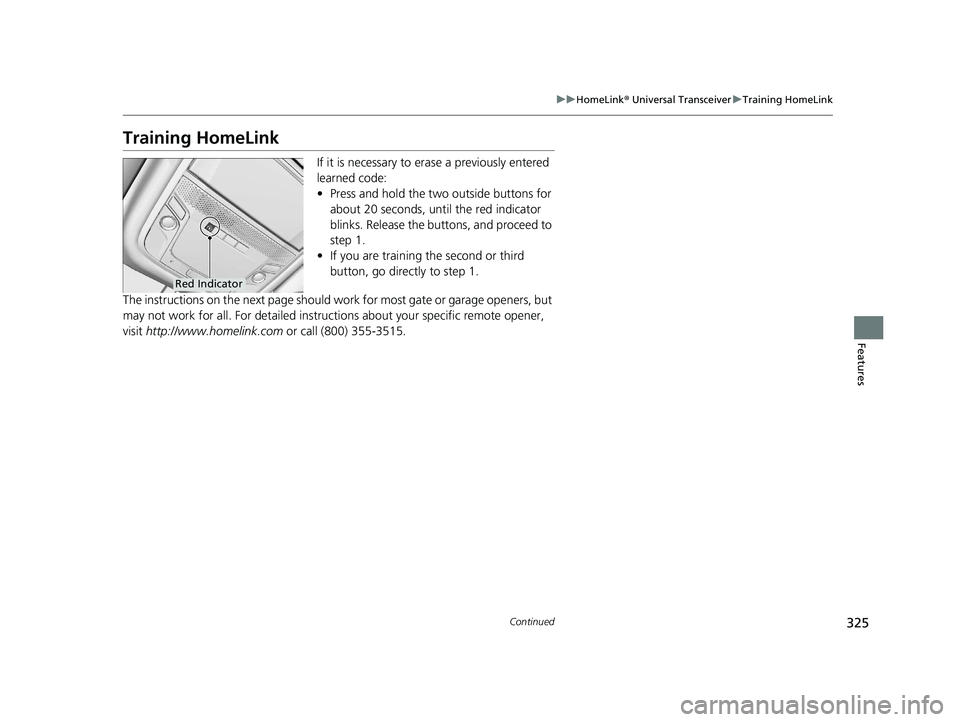
If it is necessary to er ase a previously entered
learned code:
• Press and hold the two outside buttons for
about 20 seconds, until the red indicator
blinks. Release the bu ttons, and proceed to
step 1.
• If you are training the second or third
button, go directly to step 1.
The instructions on the next page should work for most gate or garage openers, but
may not work for all. For detailed instructions about your specific remote opener,
visit http://www.homelink.com or call (800) 355-3515.
Red Indicator
19 CLARITY BEV-31TRV6200.book 325 ページ 2018年10月29日 月曜日 午前10時54分
Page 328 of 559
uuHomeLink ® Universal Transceiver uTraining HomeLink
326
Features
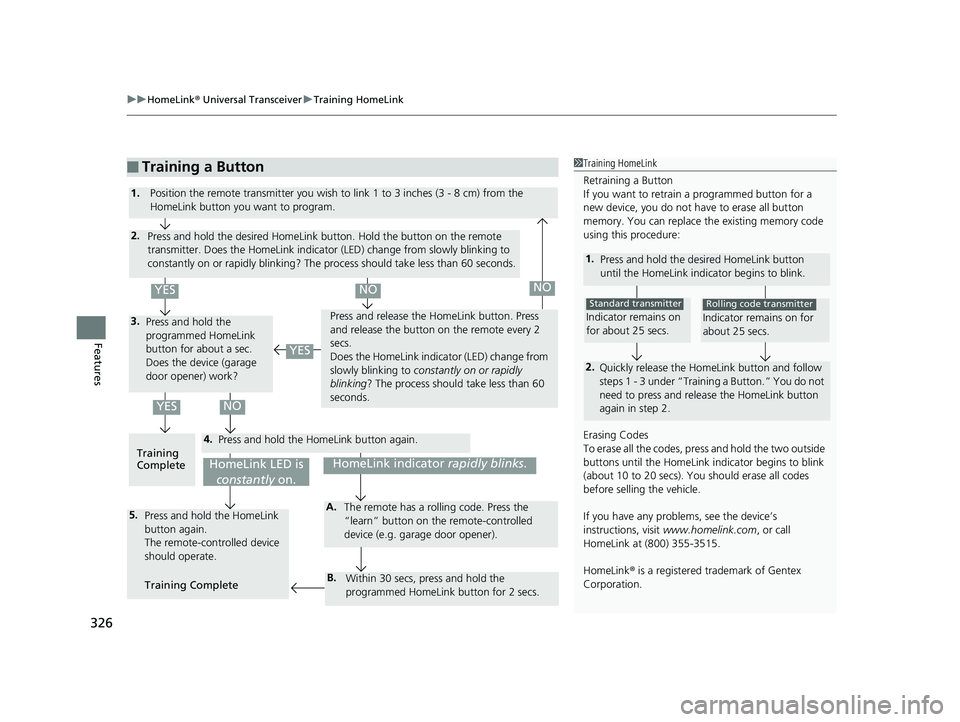
■Training a Button1Training HomeLink
Retraining a Button
If you want to retrain a programmed button for a
new device, you do not ha ve to erase all button
memory. You can replace the existing memory code
using this procedure:
1. Press and hold the desired HomeLink button
until the HomeLink indi cator begins to blink.
2.
Quickly release the Home Link button and follow
steps 1 - 3 under “Training a Button.” You do not
need to press and rele ase the HomeLink button
again in step 2.
Indicator remains on
for about 25 secs.
Standard transmitter
Indicator remains on for
about 25 secs.
Rolling code transmitter
Erasing Codes
To erase all the codes, press and hold the two outside
buttons until the HomeLink i ndicator begins to blink
(about 10 to 20 secs). You should erase all codes
before selling the vehicle.
If you have any problems, see the device’s
instructions, visit www.homelink.com , or call
HomeLink at (800) 355-3515.
HomeLink® is a registered tra demark of Gentex
Corporation.4.
3.
2.
5.A.
B.
1. Position the remote transmitter you wish to link 1 to 3 inches (3 - 8 cm) from the
HomeLink button you want to program.
Press and hold the desired HomeLink button. Hold the button on the remote
transmitter. Does the HomeLink indicato r (LED) change from slowly blinking to
constantly on or rapidly blinking? The pr ocess should take less than 60 seconds.
Press and hold the
programmed HomeLink
button for about a sec.
Does the device (garage
door opener) work? Press and release the Ho
meLink button. Press
and release the button on the remote every 2
secs.
Does the HomeLink indicator (LED) change from
slowly blinking to constantly on or rapidly
blinking ? The process should take less than 60
seconds.
Training
Complete Press and hold the HomeLink button again.
Press and hold the HomeLink
button again.
The remote-controlled device
should operate.
Training Complete The remote has a ro
lling code. Press the
“learn” button on the remote-controlled
device (e.g. garage door opener).
Within 30 secs, press and hold the
programmed HomeLink button for 2 secs.
HomeLink indicator rapidly blinks.HomeLink LED is
constantly on.
YESNO
YES
YESNONO
19 CLARITY BEV-31TRV6200.book 326 ページ 2018年10月29日 月曜日 午前10時54分
Page 329 of 559
327Continued
Features
Bluetooth® HandsFreeLink ®
Bluetooth® HandsFreeLink ® (HFL) allows you to place and receive phone calls using
your vehicle’s audio system, without handling your cell phone.
Using HFL
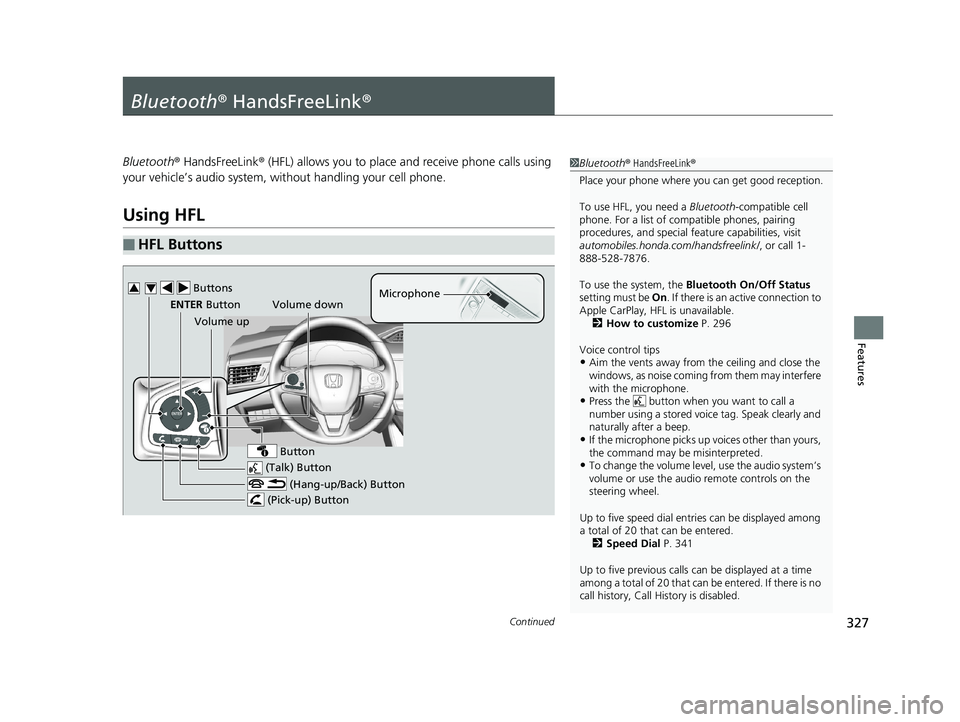
■HFL Buttons
1 Bluetooth ® HandsFreeLink ®
Place your phone where y ou can get good reception.
To use HFL, you need a Bluetooth-compatible cell
phone. For a list of compatible phones, pairing
procedures, and special fe ature capabilities, visit
automobiles.honda.com /handsfreelink/, or call 1-
888-528-7876.
To use the system, the Bluetooth On/Off Status
setting must be On . If there is an active connection to
Apple CarPlay, H FL is unavailable.
2 How to customize P. 296
Voice control tips
•Aim the vents away from the ceiling and close the
windows, as noise coming fr om them may interfere
with the microphone.
•Press the button when you want to call a
number using a stored voic e tag. Speak clearly and
naturally after a beep.
•If the microphone picks up vo ices other than yours,
the command may be misinterpreted.
•To change the volume level, use the audio system’s
volume or use the audio remote controls on the
steering wheel.
Up to five speed dial entries can be displayed among
a total of 20 that can be entered.
2 Speed Dial P. 341
Up to five previous calls can be displayed at a time
among a total of 20 that can be entered. If there is no
call history, Call History is disabled. (Talk) Button
Volume up Microphone
(Hang-up/Back) Button
(Pick-up) Button
ENTER Button
Button
Buttons34
Volume down
19 CLARITY BEV-31TRV6200.book 327 ページ 2018年10月29日 月曜日 午前10時54分
Page 330 of 559
uuBluetooth ® HandsFreeLink ®u Using HFL
328
Features
(Pick-up) button: Press to go directly to the phone menu on the driver
information interface, or to answer an incoming call.
(Hang-up/back) button: Press to end a call, go back to the previous
command, or cancel a command.
(Talk) button: Press to access Voice Portal.
buttons: Press to select an item displayed on the phone menu in the driver
information interface.
ENTER button: Press to call a number listed in the selected item on the phone
menu in the driver information interface.
button: Select and press ENTER to display Speed Dial , Call History , or
Phonebook on the phone menu in the driver information interface.
To go to the Phone Menu screen:
1. Select .
2. Select Phone to switch the display to the phone screen.
3. Select .1Bluetooth ® HandsFreeLink ®
Bluetooth ® Wireless Technology
The Bluetooth ® word mark and logos are registered
trademarks owned by Blue tooth SIG, Inc., and any
use of such marks by Honda Motor Co., Ltd., is under
license. Other trademarks and trade names are those
of their respective owners.
HFL Limitations
An incoming call on HFL will interrupt the audio
s y s te m wh e n it is p la y i n g . It wi ll re s u m e w h en t h e c a l l
is ended.
34
19 CLARITY BEV-31TRV6200.book 328 ページ 2018年10月29日 月曜日 午前10時54分