HONDA CR-V 2000 RD1-RD3 / 1.G Owners Manual
Manufacturer: HONDA, Model Year: 2000, Model line: CR-V, Model: HONDA CR-V 2000 RD1-RD3 / 1.GPages: 322, PDF Size: 4.64 MB
Page 231 of 322
Tire
s
Tire Chains
Moun t sno w chain s o n you r vehicl e
whe n warrante d b y drivin g condi -
tion s o r require d b y local laws .
Us e onl y SA E clas s "S " chains . Onl y
certai n brand s o f chain s wil l fi t you r
CR- V withou t comin g in contac t wit h
th e bod y o r causin g mechanica l
damage . Befor e buyin g an y type s o f
chains , yo u shoul d consul t wit h you r
Hond a deale r abou t th e design s an d
brand s tha t wil l wor k o n you r CR-V .
Also , mak e sur e yo u purchas e th e
correc t siz e fo r you r tires . Instal
l th e chain s onl y o n th e fron t
tires . Mountin g an y typ e o f chain s o n
th e rea r tire s wil l damag e th e bod y
an d suspension . Whe n installin g th e
chains , follo w th e manufacturer' s
instruction s an d moun t the m a s
tightl y a s yo u can . Driv e slowl y whe n
the y ar e installed . I f yo u hea r the m
comin g in contac t wit h th e body ,
sto p an d investigat e them . Mak e
sur e th e chain s ar e installe d tightly ,
an d tha t the y ar e no t contactin g th e
brak e line s o r suspension . Remov e
th e chain s a s soo n a s yo u begi n
drivin g o n cleare d roads .
Chains
that are the wrong size or
design, or are improperly installed, can
damage your vehicle's brake lines,
suspension, body, and wheels. Stop
driving if they are hitting any part of
the vehicle.
Maintenance
NOTIC
E
Page 232 of 322
Light
s
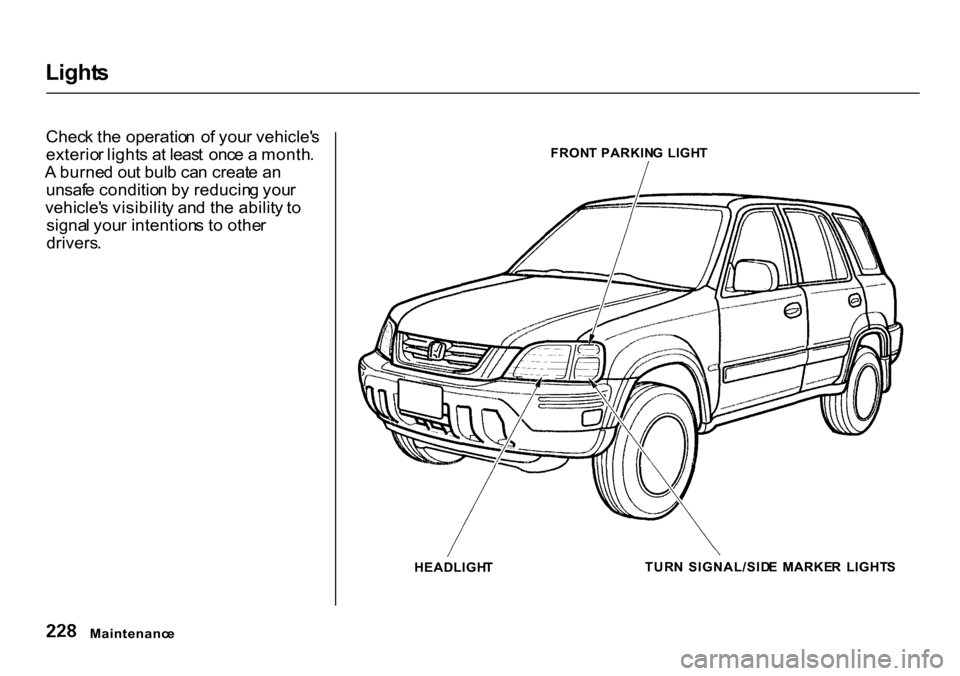
Chec k th e operatio n o f you r vehicle' s
exterio r light s a t leas t onc e a month .
A burne d ou t bul b ca n creat e a n
unsaf e conditio n b y reducin g you r
vehicle' s visibilit y an d th e abilit y t o
signa l you r intention s t o othe r
drivers .
FRON
T PARKIN G LIGH T
HEADLIGH T TUR
N SIGNAL/SID E MARKE R LIGHT S
Maintenanc e
Page 233 of 322
Light
s
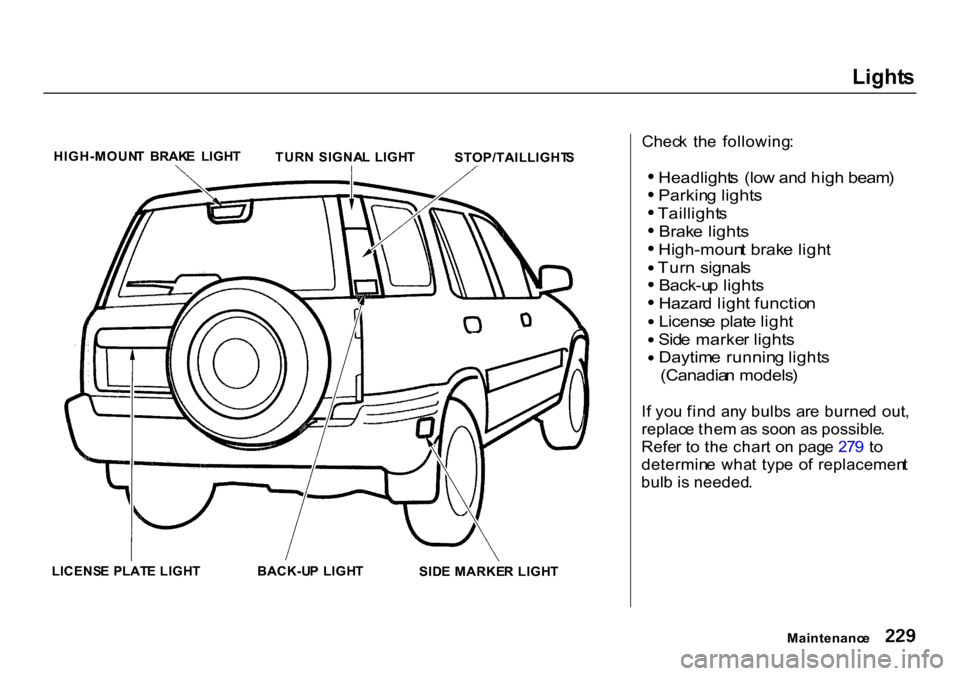
HIGH-MOUN T BRAK E LIGH T
TURN SIGNA L LIGH T
STOP/TAILLIGHT S
LICENS E PLAT E LIGH T
BACK-UP LIGH T
SIDE MARKE R LIGH T Chec
k th e following :
Headlight s (lo w an d hig h beam )
Parkin g light s
Taillight s
Brak e light s
High-moun t brak e ligh t
Tur n signal s
Back-u p light s
Hazar d ligh t functio n
Licens e plat e ligh t
Sid e marke r light s
Daytim e runnin g light s
(Canadia n models )
I f yo u fin d an y bulb s ar e burne d out ,
replac e the m as soo n a s possible .
Refe r t o th e char t o n pag e 27 9 t o
determin e wha t typ e o f replacemen t
bul b i s needed .
Maintenanc e
Page 234 of 322
Light
s
Headligh t Aimin g
Th e headlight s wer e properl y aime d
whe n you r vehicl e wa s new . Yo u
shoul d chec k thei r ai m if yo u
regularl y carr y heav y item s i n th e
trunk . Eac h headligh t assembl y ha s
horizonta l an d vertica l adjustmen t
indicators . Thes e ar e se t t o thei r "0 "
position s afte r th e headlight s ar e
aime d a t th e factory . T
o chec k thes e settings :
1 . Mak e sur e th e fue l tan k i s full .
Par k th e vehicl e o n leve l ground .
2 . Th e drive r o r someon e wh o
weigh s th e sam e shoul d b e sittin g
i n th e driver' s sea t fo r al l check s
an d adjustments .
Loa d you r vehicl e wit h th e item s
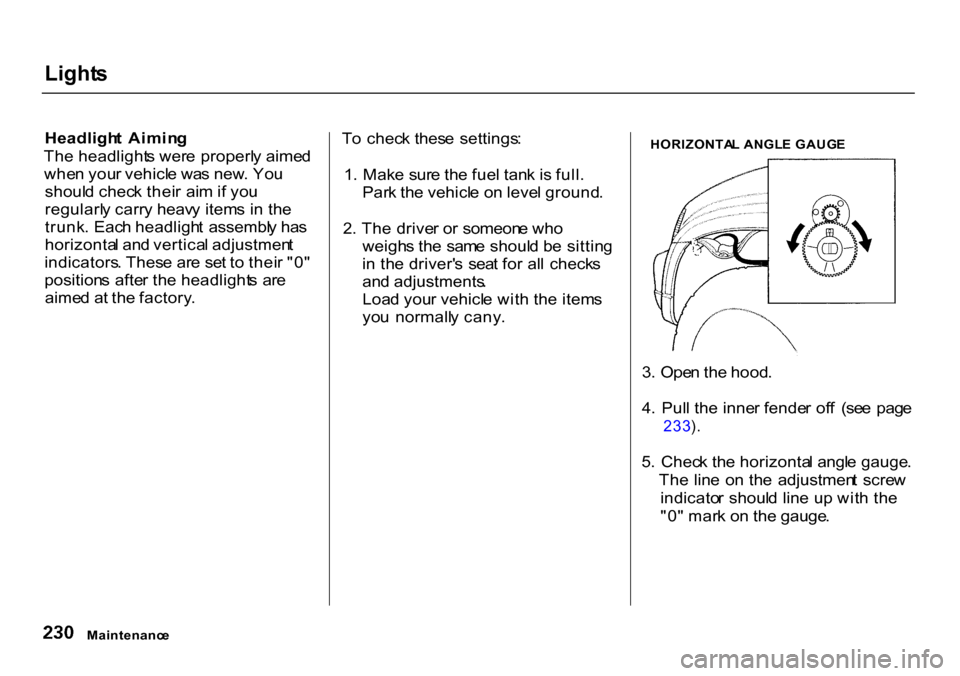
yo u normall y cany . HORIZONTA
L ANGL E GAUG E
3 . Ope n th e hood .
4 . Pul l th e inne r fende r of f (se e pag e
233 ).
5 . Chec k th e horizonta l angl e gauge .
Th e lin e o n th e adjustmen t scre w
indicato r shoul d lin e u p wit h th e
"0 " mar k o n th e gauge .
Maintenanc e
Page 235 of 322
Light
s
VERTICA L ANGL E GAUG E
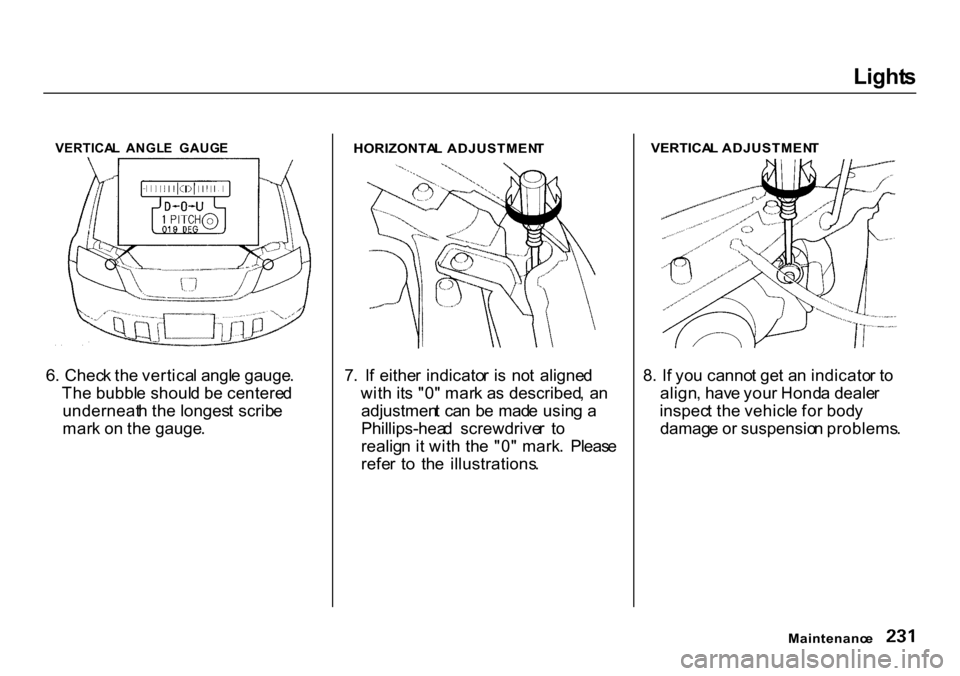
6 . Chec k th e vertica l angl e gauge .
Th e bubbl e shoul d b e centere d
underneat h th e longes t scrib e
mar k o n th e gauge .
HORIZONTA
L ADJUSTMEN T
7 . I f eithe r indicato r i s no t aligne d
wit h it s "0 " mar k a s described , a n
adjustmen t ca n b e mad e usin g a
Phillips-hea d screwdrive r t o
realig n i t wit h th e "0 " mark . Pleas e
refe r t o th e illustrations .
VERTICA
L ADJUSTMEN T
8 . I f yo u canno t ge t a n indicato r t o
align , hav e you r Hond a deale r
inspec t th e vehicl e fo r bod y
damag e o r suspensio n problems .
Maintenanc e
Page 236 of 322
Light
s
Replacin g a Headligh t Bul b
You r vehicl e ha s haloge n headligh t
bulbs , on e o n eac h side . Whe n
replacin g a bulb , handl e it b y it s stee l
bas e an d protec t th e glas s fro m
contac t wit h you r ski n o r har d
objects . I f yo u touc h th e glass , clea n
i t wit h denature d alcoho l an d a clea n
cloth .
Halogen
headlight bulbs get very hot
when lit. Oil, perspiration, or a scratch
on the glass can cause the bulb To
overheat and shatter.
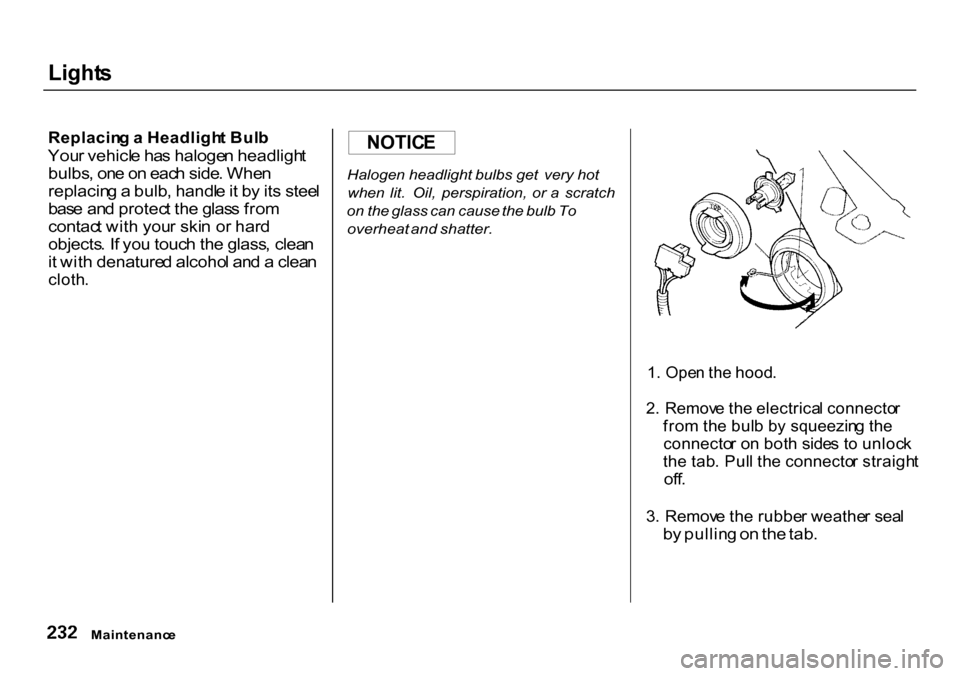
1. Ope n th e hood .
2 . Remov e th e electrica l connecto r
fro m th e bul b b y squeezin g th e
connecto r o n bot h side s t o unloc k
th e tab . Pul l th e connecto r straigh t
off .
3 . Remov e th e rubbe r weathe r sea l
b y pullin g o n th e tab .
Maintenanc e
NOTIC
E
Page 237 of 322
Light
s
4 . Uncli p th e en d o f th e hold-dow n
wir e fro m its slot . Pivo t i t ou t o f
th e wa y an d remov e th e bulb .
5 . Inser t th e ne w bul b int o th e hole ,
makin g sur e th e tab s ar e in thei r
slots . Pivo t th e hold-dow n wir e
bac k in plac e an d cli p th e en d int o
th e slot .
6 . Instal l th e rubbe r sea l ove r th e
bac k o f th e headligh t assembly .
Mak e sur e it i s righ t sid e up ; i t i s
marke d 'TOP. "
7 . Pus h th e electrica l connecto r ont o
th e ne w bulb .
Tur n o n th e headlight s t o tes t th e
ne w bulb . Replacin
g th e Fron t Sid e Marker /
Tur n Signa l an d Parkin g Ligh t
Bul b
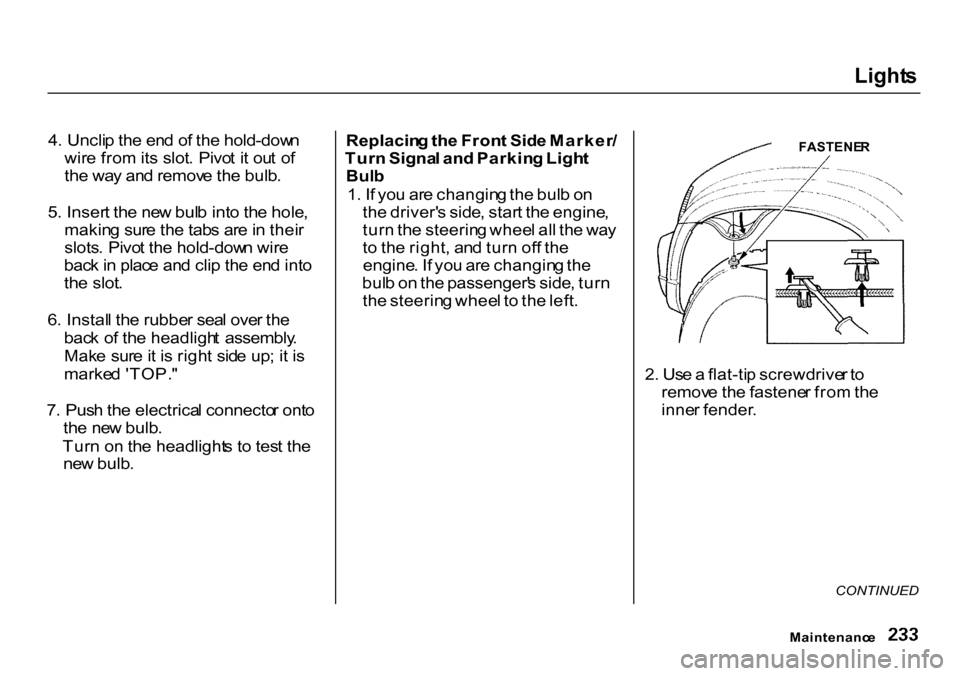
1 . I f yo u ar e changin g th e bul b o n
th e driver' s side , star t th e engine ,
tur n th e steerin g whee l al l th e wa y
t o th e right , an d tur n of f th e
engine . I f yo u ar e changin g th e
bul b o n th e passenger' s side , tur n
th e steerin g whee l t o th e left .
FASTENE
R
2 . Us e a flat-ti p screwdrive r t o
remov e th e fastene r fro m th e
inne r fender .
CONTINUED
Maintenanc e
Page 238 of 322
Light
s
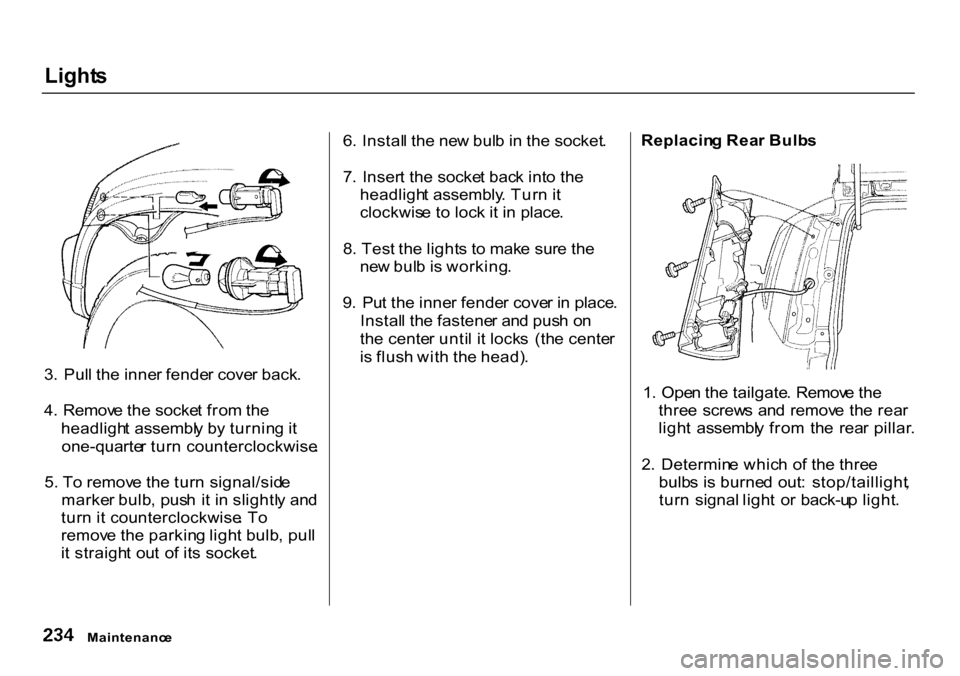
3 . Pul l th e inne r fende r cove r back .
4 . Remov e th e socke t fro m th e
headligh t assembl y b y turnin g it
one-quarte r tur n counterclockwise .
5 . T o remov e th e tur n signal/sid e
marke r bulb , pus h i t i n slightl y an d
tur n i t counterclockwise . T o
remov e th e parkin g ligh t bulb , pul l
i t straigh t ou t o f it s socket . 6
. Instal l th e ne w bul b in th e socket .
7 . Inser t th e socke t bac k int o th e
headligh t assembly . Tur n it
clockwis e t o loc k i t i n place .
8 . Tes t th e light s t o mak e sur e th e
ne w bul b is working .
9 . Pu t th e inne r fende r cove r i n place .
Instal l th e fastene r an d pus h o n
th e cente r unti l i t lock s (th e cente r
i s flus h wit h th e head) . Replacin
g Rea r Bulb s
1 . Ope n th e tailgate . Remov e th e
thre e screw s an d remov e th e rea r
ligh t assembl y fro m th e rea r pillar .
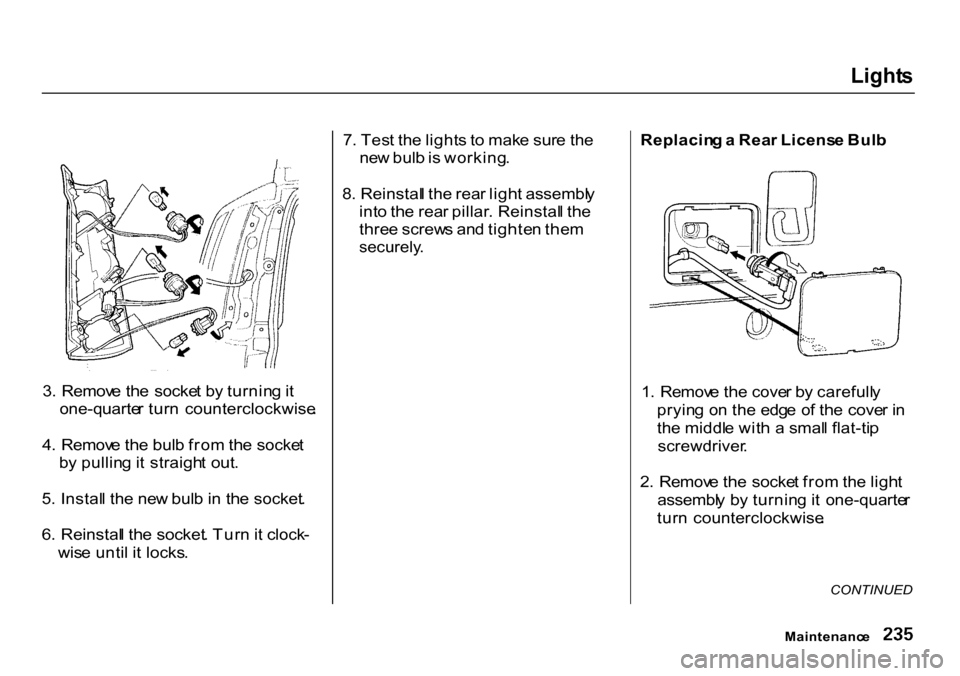
2 . Determin e whic h o f th e thre e
bulb s i s burne d out : stop/taillight ,
tur n signal light o r back-u p light .
Maintenanc e
Page 239 of 322
Light
s
3 . Remov e th e socke t b y turnin g it
one-quarte r tur n counterclockwise .
4 . Remov e th e bul b fro m th e socke t
b y pullin g it straigh t out .
5 . Instal l th e ne w bul b in th e socket .
6 . Reinstal l th e socket . Tur n it clock -
wis e unti l i t locks . 7
. Tes t th e light s t o mak e sur e th e
ne w bul b is working .
8 . Reinstal l th e rea r ligh t assembl y
int o th e rea r pillar . Reinstal l th e
thre e screw s an d tighte n the m
securely .
Replacin
g a Rea r Licens e Bul b
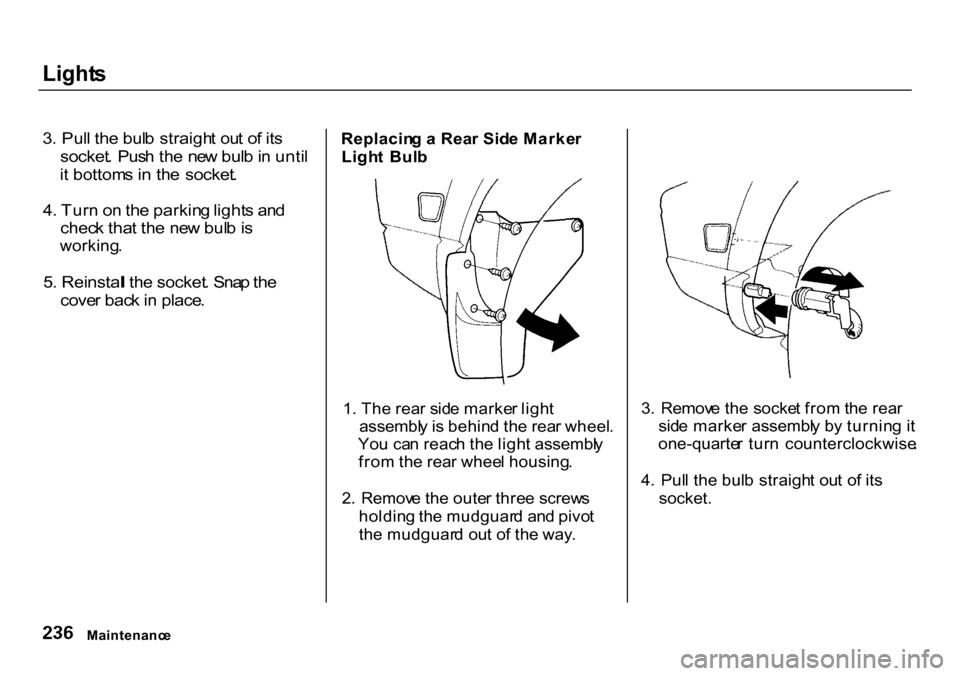
1 . Remov e th e cove r b y carefull y
pryin g o n th e edg e o f th e cove r i n
th e middl e wit h a smal l flat-ti p
screwdriver .
2 . Remov e th e socke t fro m th e ligh t
assembl y b y turnin g it one-quarte r
tur n counterclockwise .
CONTINUED
Maintenanc e
Page 240 of 322
Light
s
3 . Pul l th e bul b straigh t ou t o f it s
socket . Pus h th e ne w bul b in unti l
i t bottom s in th e socket .
4 . Tur n o n th e parkin g light s an d
chec k tha t th e ne w bul b is
working .
5 . Reinstal l th e socket . Sna p th e
cove r bac k in place .
Replacin
g a Rea r Sid e Marke r
Ligh t Bul b
1 . Th e rea r sid e marke r ligh t
assembl y is behin d th e rea r wheel .
Yo u ca n reac h th e ligh t assembl y
fro m th e rea r whee l housing .
2 . Remov e th e oute r thre e screw s
holdin g th e mudguar d an d pivo t
th e mudguar d ou t o f th e way . 3
. Remov e th e socke t fro m th e rea r
sid e marke r assembl y b y turnin g i t
one-quarte r tur n counterclockwise .
4 . Pul l th e bul b straigh t ou t o f it s
socket.
Maintenanc e