HONDA CR-V 2000 RD1-RD3 / 1.G Owners Manual
Manufacturer: HONDA, Model Year: 2000, Model line: CR-V, Model: HONDA CR-V 2000 RD1-RD3 / 1.GPages: 322, PDF Size: 4.64 MB
Page 241 of 322
Light
s
5 . Instal l th e ne w bul b in th e socket.
6. Inser t th e socke t bac k int o th e
rea r sid e marke r ligh t assembly .
Tur n it clockwis e t o loc k i t i n place .
7 . Tes t th e light s t o mak e sur e th e
ne w bul b is working .
8 . Pu t th e mudguar d bac k i n plac e
an d secur e i t wit h th e thre e
screws .
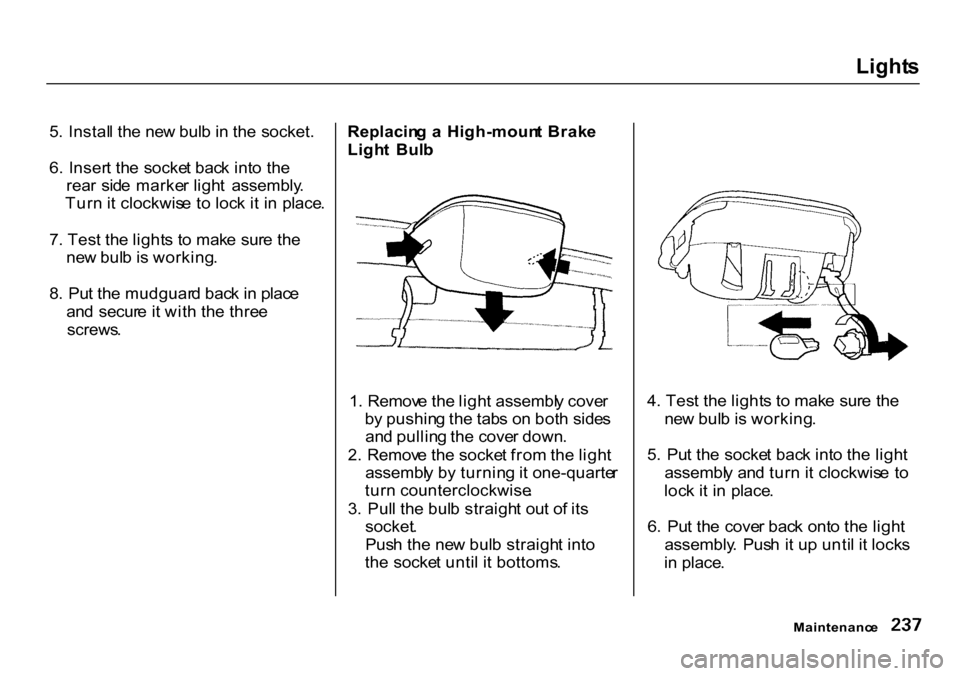
Replacin
g a High-moun t Brak e
Ligh t Bul b
1 . Remov e th e ligh t assembl y cove r
b y pushin g th e tab s o n bot h side s
an d pullin g th e cove r down .
2 . Remov e th e socke t fro m th e ligh t
assembl y b y turnin g it one-quarte r
tur n counterclockwise .
3 . Pul l th e bul b straigh t ou t o f it s
socket .
Pus h th e ne w bul b straigh t int o
th e socke t unti l i t bottoms . 4
. Tes t th e light s t o mak e sur e th e
ne w bul b is working .
5 . Pu t th e socke t bac k int o th e ligh t
assembl y an d tur n i t clockwis e t o
loc k i t i n place .
6 . Pu t th e cove r bac k ont o th e ligh t
assembly . Pus h i t u p unti l i t lock s
i n place .
Maintenanc e
Page 242 of 322
Light
s
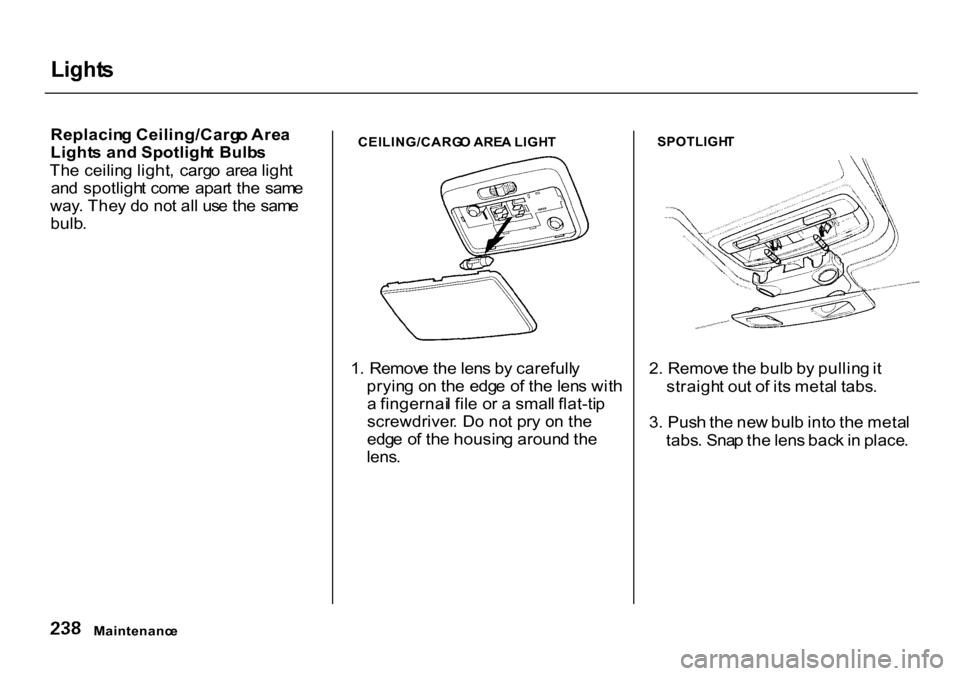
Replacin g Ceiling/Carg o Are a
Light s an d Spotligh t Bulb s
Th e ceilin g light , carg o are a ligh t
an d spotligh t com e apar t th e sam e
way . The y d o no t al l us e th e sam e
bulb . CEILING/CARG
O ARE A LIGH T
1 . Remov e th e len s b y carefull y
pryin g o n th e edg e o f th e len s wit h
a fingernai l fil e o r a smal l flat-ti p
screwdriver . D o no t pr y o n th e
edg e o f th e housin g aroun d th e
lens .
SPOTLIGH
T
2 . Remov e th e bul b b y pullin g it
straigh t ou t o f it s meta l tabs .
3 . Pus h th e ne w bul b int o th e meta l
tabs . Sna p th e len s bac k in place .
Maintenanc e
Page 243 of 322
Storin
g You r Vehicl e
I f yo u nee d t o par k you r vehicl e fo r
a n extende d perio d (mor e tha n on e
month) , ther e ar e severa l thing s yo u
shoul d d o t o prepar e i t fo r storage .
Prope r preparatio n help s preven t
deterioratio n an d make s it . easie r t o
ge t you r vehicl e bac k o n th e road . I f
possible , stor e you r vehicl e indoors .
Fil l th e fue l tank .
Chang e th e engin e oi l an d filte r
(se e pag e 199 ).
Was h an d dr y th e exterio r
completely .
Clea n th e interior . Mak e sur e th e
carpeting , floo r mats , etc . ar e
completel y dry .
Leav e th e parkin g brak e off . Pu t
th e transmissio n in Revers e (5 -
spee d manual ) o r Par k
(automatic) .
Bloc
k th e rea r wheels .
I f th e vehicl e is t o b e store d fo r a
longe r period , i t shoul d b e
supported on jackstand s s o th e
tire s ar e of f th e ground .
Leav e on e windo w ope n slightl y (i f
th e vehicl e is bein g store d
indoors) .
Disconnec t th e battery .
Suppor t th e fron t an d rea r wipe r
blad e arm s wit h a folde d towe l o r
ra g s o the y d o no t touc h th e
windshield .
T o minimiz e sticking , appl y a
silicon e spra y lubrican t t o al l doo r
an d tailgat e seals . Also , appl y a
vehicl e bod y wa x t o th e painte d
surface s tha t mat e wit h th e doo r
an d tailgat e seals . Cove
r th e vehicl e wit h a
"breathable " cover , on e mad e
fro m a porou s materia l suc h a s
cotton . Nonporou s materials , suc h
a s plasti c sheeting , tra p moisture ,
whic h ca n damag e th e paint .
I f possible , ru n th e engin e fo r a
whil e periodicall y (preferabl y onc e
a month) .
I f yo u stor e you r vehicl e fo r 1 2
month s o r longer , hav e you r Hond a
deale r perfor m th e inspection s calle d
fo r i n th e 2 4 months/30,00 0 mile s
(48,00 0 km ) maintenanc e schedul e
(Norma l Conditions ) a s soo n a s yo u
tak e it ou t o f storag e (se e pag e 18 8 ) .
Th e replacement s called for i n th e
maintenanc e schedul e ar e no t
neede d unles s th e vehicl e ha s
actuall y reache d tha t tim e o r mileage .
Maintenanc e
Page 244 of 322

240
Page 245 of 322
Appearanc
e Car e
Regula r cleanin g an d polishin g o f
you r Hond a help s t o kee p it "new "
looking . Thi s sectio n give s yo u hint s
o n ho w to clea n you r vehicl e an d
preserv e it s appearance : th e paint ,
brightwork , wheel s an d interior . Als o
include d ar e severa l thing s yo u ca n
d o to hel p preven t corrosion . Exterio
r Care................................. . 24 2
Washing..................................... 24 2
Waxing....................................... . 24 3
Aluminu m Wheels.................... . 24 3
Pain t Touch-up.......................... . 24 4
Interio r Care.................................. . 24 5
Carpeting................................... . 24 5
Fabric......................................... . 24 5
Vinyl........................................... 24 5
Sea t Belts.................................. 24 6
Windows.................................... .
24
6
Ai r Fresheners.......................... . 24 6
Corrosio n Protection.................... . 24 7
Bod y Repairs................................. . 24 8
Appearanc e Car e
Page 246 of 322
Exterio
r Car e
Washin g
Frequen t washin g help s preserv e
you r vehicle' s beauty . Dir t an d gri t
ca n scratc h th e paint , whil e tre e sa p
an d bir d dropping s ca n permanentl y
rui n th e finish .
Was h you r vehicl e in a shad y area ,
no t i n direc t sunlight . I f th e vehicl e i s
parke d in th e sun , mov e it int o th e
shad e an d le t th e exterio r coo l dow n
befor e yo u start .
Onl y us e th e solvent s an d cleaner s
recommende d in thi s Owner' s
Manual .
Chemical solvents and strong cleaners
can damage the paint, metal, and
plastic on your vehicle. Rins
e th e vehicl e thoroughl y wit h
coo l wate r t o remov e loos e dirt .
Fil l a bucke t wit h coo l water . Mi x
i n a mil d detergent , suc h a s
dishwashin g liqui d o r a produc t
mad e especiall y fo r ca r washing .
Was h th e vehicl e usin g th e wate r
an d detergen t solutio n an d a soft -
bristl e brush , sponge , o r sof t cloth .
Star t a t th e to p an d wor k you r wa y
down . Rins e frequently .
Chec k th e bod y fo r roa d tar , tre e
sap , etc . Remov e thes e stain s wit h
ta r remove r o r turpentine . Rins e i t
of f immediatel y s o it doe s no t
har m th e finish . Remembe r t o re -
wa x thes e areas , eve n if th e res t o f
th e vehicl e doe s no t nee d waxing .Whe
n yo u hav e washe d an d rinse d
th e whol e exterior , dr y i t wit h a
chamoi s o r sof t towel . Lettin g it
air-dr y wil l caus e dullin g an d wate r
spots .
A s yo u dr y th e vehicle , inspec t i t fo r
chip s an d scratche s tha t coul d allo w
corrosio n t o start . Repai r the m wit h
touch-u p pain t (se e pag e 24 4 ) .
Appearanc e Car e
NOTIC
E
Page 247 of 322
Exterio
r Car e
Waxin g
Alway s was h an d dr y th e whol e
vehicl e befor e waxin g it . Yo u shoul d
wa x you r vehicle , includin g th e meta l
trim , wheneve r wate r sit s o n th e
surfac e i n larg e patches . I t shoul d
for m int o bead s o r droplet s afte r
waxing .
Yo u shoul d us e a qualit y liqui d o r
past e wax . Appl y i t accordin g t o th e
instruction s o n th e container . I n
general , ther e ar e tw o type s o f
products :
Waxe s — A wa x coat s th e finis h an d
protect s i t fro m damag e b y exposur e
t o sunlight , ai r pollution , etc . Yo u
shoul d us e a wa x o n you r Hond a
whe n i t i s new . Polishe
s — Polishe s an d cleaner /
waxe s ca n restor e th e shin e t o pain t
tha t ha s oxidize d an d los t som e o f it s
shine . The y normall y contai n mil d
abrasive s an d solvent s tha t remov e
th e to p laye r o f th e finish . Yo u
shoul d us e a polis h o n you r Hond a if
th e finis h doe s no t hav e it s origina l
shin e afte r usin g a wax .
Cleanin g tar , insects , etc . wit h
remover s als o take s of f th e wax .
Remembe r t o re-wa x thos e areas ,
eve n i f th e res t o f th e vehicl e doe s
no t nee d waxing .
Aluminu
m Wheel s
On some models
Clea n you r Honda' s aluminu m allo y
wheel s a s yo u d o th e res t o f th e
exterior . Was h the m wit h th e sam e
solution , an d rins e the m thoroughly .
Th e wheel s hav e a protectiv e clear -
coa t tha t keep s th e aluminu m fro m
corrodin g an d tarnishing . Usin g
hars h chemicals , includin g som e
commercia l whee l cleaners , o r stif f
brushe s ca n damag e thi s clear-coat .
Onl y us e a mil d detergen t an d sof t
brus h o r spong e t o clea n th e wheels .
Appearanc e Car e
Page 248 of 322
Exterio
r Car e
Pain t Touch-u p
You r deale r ha s touch-u p pain t t o
matc h you r vehicle' s color . Th e colo r
cod e is printe d o n a sticke r o n th e
driver' s doorjamb . Tak e thi s cod e t o
you r deale r s o yo u ar e sur e t o ge t
th e correc t color . Inspec
t you r vehicl e frequentl y fo r
chip s o r scratche s i n th e paint .
Repai r the m righ t awa y t o preven t
corrosio n o f th e meta l underneath .
Us e th e touch-u p pain t onl y o n smal l
chip s an d scratches . Mor e extensiv e
pain t damag e shoul d b e repaire d b y
a professional .
Appearanc e Car e
Page 249 of 322
Interio
r Car e
Carpetin g
Vacuu m th e carpetin g frequentl y t o
remov e dirt . Ground-i n dir t wil l mak e
th e carpe t wea r ou t faster .
Periodicall y shampo o th e carpe t t o
kee p it lookin g new . Us e on e o f th e
foam-typ e carpe t cleaner s o n th e
market . Follo w th e instruction s tha t
com e wit h th e cleaner , applyin g it
wit h a spong e o r sof t brush . Kee p
th e carpetin g a s dr y a s possibl e b y
no t addin g wate r t o th e foam . Fabri
c
Vacuu m dir t an d dus t ou t o f th e
materia l frequently . Fo r genera l
cleaning , us e a solutio n o f mil d soa p
an d lukewar m water , lettin g it ai r dry .
T o clea n of f stubbor n spots , us e a
commercially-availabl e fabri c cleaner .
Tes t i t o n a hidde n are a o f th e fabri c
first , t o mak e sur e it doe s no t bleac h
o r stai n th e fabric . Follo w th e
instruction s tha t com e wit h th e
cleaner .
Viny
l
Remov e dir t an d dus t wit h a vacuu m
cleaner . Wip e th e viny l wit h a sof t
clot h dampene d in a solutio n o f mil d
soa p an d water . Us e th e sam e
solutio n wit h a soft-bristl e brus h o n
mor e difficul t spots . Yo u ca n als o us e
commercially-availabl e spra y o r
foam-typ e viny l cleaners .
Appearanc e Car e
Page 250 of 322
Interio
r Car e
Sea t Belt s
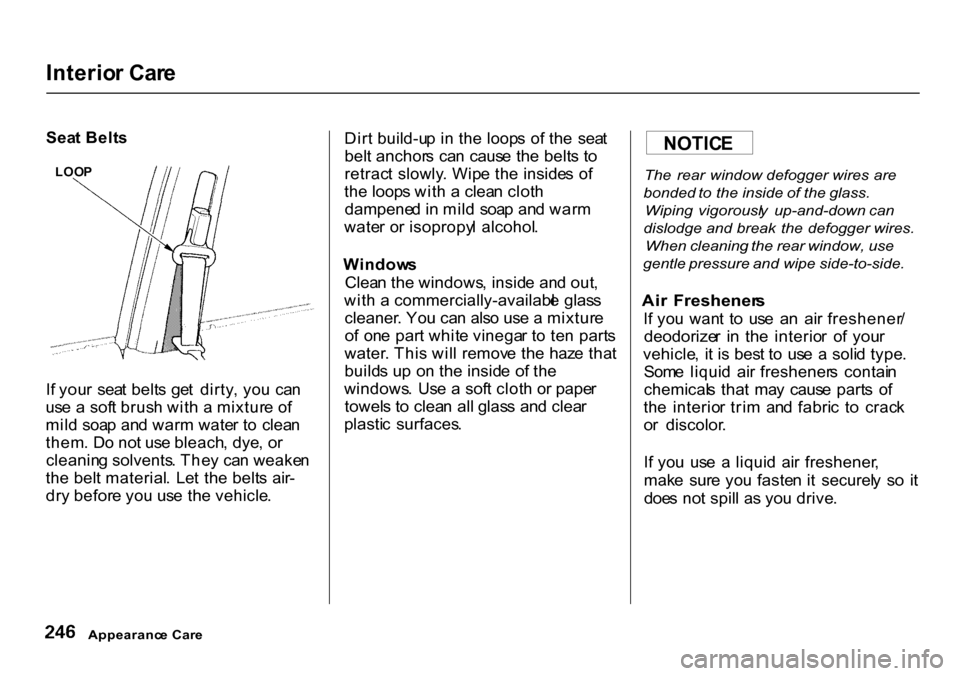
I f you r sea t belt s ge t dirty , yo u ca n
us e a sof t brus h wit h a mixtur e o f
mil d soa p an d war m wate r t o clea n
them . D o no t us e bleach , dye , o r
cleanin g solvents . The y ca n weake n
th e bel t material . Le t th e belt s air -
dr y befor e yo u us e th e vehicle . Dir
t build-u p i n th e loop s o f th e sea t
bel t anchor s ca n caus e th e belt s t o
retrac t slowly . Wip e th e inside s o f
th e loop s wit h a clea n clot h
dampene d in mil d soa p an d war m
wate r o r isopropy l alcohol .
Window s
Clea n th e windows , insid e an d out ,
wit h a commercially-availabl e glas s
cleaner . Yo u ca n als o us e a mixtur e
o f on e par t whit e vinega r t o te n part s
water . Thi s wil l remov e th e haz e tha t
build s u p o n th e insid e o f th e
windows . Us e a sof t clot h o r pape r
towel s t o clea n al l glas s an d clea r
plasti c surfaces .
The
rear window defogger wires are
bonded to the inside of the glass.
Wiping vigorousl y up-and-down can
dislodge and break the defogger wires.
When cleaning the rear window, use
gentle pressure and wipe side-to-side.
Ai r Freshener s
I f yo u wan t t o us e a n ai r freshener /
deodorize r i n th e interio r o f you r
vehicle , i t i s bes t t o us e a soli d type .
Som e liqui d ai r freshener s contai n
chemical s tha t ma y caus e part s o f
th e interio r tri m an d fabri c t o crac k
o r discolor .
I f yo u us e a liqui d ai r freshener ,
mak e sur e yo u faste n i t securel y s o i t
doe s no t spil l a s yo u drive .
Appearanc e Car e
LOO
P
NOTIC
E