display HONDA ELEMENT 2010 1.G Manual PDF
[x] Cancel search | Manufacturer: HONDA, Model Year: 2010, Model line: ELEMENT, Model: HONDA ELEMENT 2010 1.GPages: 342, PDF Size: 5.76 MB
Page 215 of 342
If you notice any undesirable
operating symptoms, try another
service station or switch to another
brand of gasoline.
For further important fuel-related
information for your vehicle, or
information on gasoline that does not
contain MMT, visit Owner Link at
owners.honda.com. In Canada, visit
www.honda.cafor additional
information on gasoline. Refueling
1. Park with the driver's side closest to
the service station pump.
2. Outside of the vehicle, open the fuel fill door by pulling its notched edge.
Gasoline is highly flammable and
explosive. You can be burned or
seriously injured when handling fuel.
● Stop the engine and keep heat,
sparks, and flame away.
● Handle fuel only outdoors.
● Wipe up spills immediately.
3. Remove the fuel fill cap slowly. You may hear a hissing sound as
pressure inside the tank escapes.
Place the cap in the holder on the
fuel fill door. 4. Stop filling the tank after the fuel
nozzle automatically clicks off. Do
not try to ‘‘top off ’’the tank. This
leaves some room in the fuel tank for
the fuel to expand with temperature changes.
If the fuel nozzle keeps clicking offeven though the tank is not full,
there may be a problem with your
vehicle's fuel vapor recovery system.
The system helps keep fuel vapor
from going into the atmosphere. Try
filling at another pump. If this does
not fix the problem, consult your dealer.
5. Screw the fuel fill cap back on until it clicks at least once. If you do not
properly tighten the cap, the
malfunction indicator lamp may
come on (see page 296). You will
also see a ‘‘CHECK FUEL CAP ’’
message on the information display.
6. Close the fuel fill door.
Fuel Recommendation, Service Station Procedures
199
Before Driving
Table of Contents
Page 219 of 342

Fuel Economy Factors
The following factors can lower your
vehicle's fuel economy:● Aggressive driving (hard
acceleration and braking)
● Excessive idling, accelerating and
braking in stop-and-go traffic
● Cold engine operation (engines are
more efficient when warmed up)
● Driving with a heavy load or the air
conditioner running
● Improperly inflated tires
Improving Fuel Economy
Vehicle MaintenanceA properly maintained vehicle
maximizes fuel economy. Poor
maintenance can significantly reduce
fuel economy. Always maintain your
vehicle according to the maintenance
messages displayed on the
information display (see Owner's
Maintenance Checks on page 248).
For example: ●
Use the recommended viscosity
motor oil, displaying the API
Certification Seal (see page 251).
● Maintain proper tire inflation -
An underinflated tire increases ‘‘ rolling resistance, ’’which reduces
fuel economy.
● Avoid carrying excess weight in
your vehicle -It puts a heavier
load on the engine, increasing fuel consumption.
● Keep your vehicle clean -In
particular, a build-up of snow or
mud on your vehicle's underside
adds weight and rolling resistance.
Frequent cleaning helps your fuel economy.
Drive Efficiently● Drive moderately -Rapid
acceleration, abrupt cornering, and
hard braking increase fuelconsumption.
● Observe the speed limit -
Aerodynamic drag has a big effect
on fuel economy at speeds above
45 mph (75 km/h). Reduce your
speed and you reduce the drag.
Trailers, car top carriers, roof
racks and bike racks are also big
contributors to increased drag.
● Always drive in the highest gearpossible -If your vehicle has a
manual transmission, you can
boost your fuel economy by up
shifting as early as possible.
● Avoid excessive idling -Idling
results in 0 miles per gallon (0 kms
per liter).
CONTINUED
Fuel Economy
203
Before Driving
Table of Contents
Page 257 of 342
This section explains why it is important
to keep your vehicle well maintained and
how to follow basic maintenance safety
precautions.
This section also includes instructions
on how to read the maintenance minder
messages on the information display,
and instructions for simple maintenance
tasks you may want to take care of
yourself.
If you have the skills and tools to
perform more complex maintenance
tasks on your vehicle, you may want to
purchase the service manual. See page
325 for information on how to obtain a
copy, or see your dealer.
U.S. Vehicles:
Maintenance, replacement, or repair
of emissions control devices and
systems may be done by any
automotive repair establishment or
individual using parts that are‘‘certified ’’to EPA standards.Maintenance Safety .....................242
Maintenance Minder ..................
243
Fluid Locations ........................... 250
Adding Engine Oil ......................
251
Changing the Engine Oil and Filter ....................................... 252
Engine Coolant ........................... 254
Windshield Washers ...................255
Transmission Fluid .....................
256
Automatic Transmission Fluid ................................... 256
Manual Transmission Fluid ....257
Rear Differential Fluid .................
258
Brake and Clutch Fluid ...............258
Power Steering Fluid ..................
260
Cleaning the Body Panels ...........260
Lights .......................................... 261
Cleaning the Seat Belts ...............
268
Floor Mats .................................. 268
Dust and Pollen Filter .................
269
Wiper Blades .............................. 269
Wheels ........................................
271
Tires ........................................... 271
Checking the Battery ..................277Vehicle Storage
...........................
278
Maintenance
241
Maintenance
Page 259 of 342
Your vehicle displays engine oil life
and maintenance service items on
the information display to show you
when you should have your dealer
do engine oil replacement and
indicated maintenance service.
Based on the engine operating
conditions and accumulated engine
revolutions, the onboard computer in
your vehicle calculates the remaining
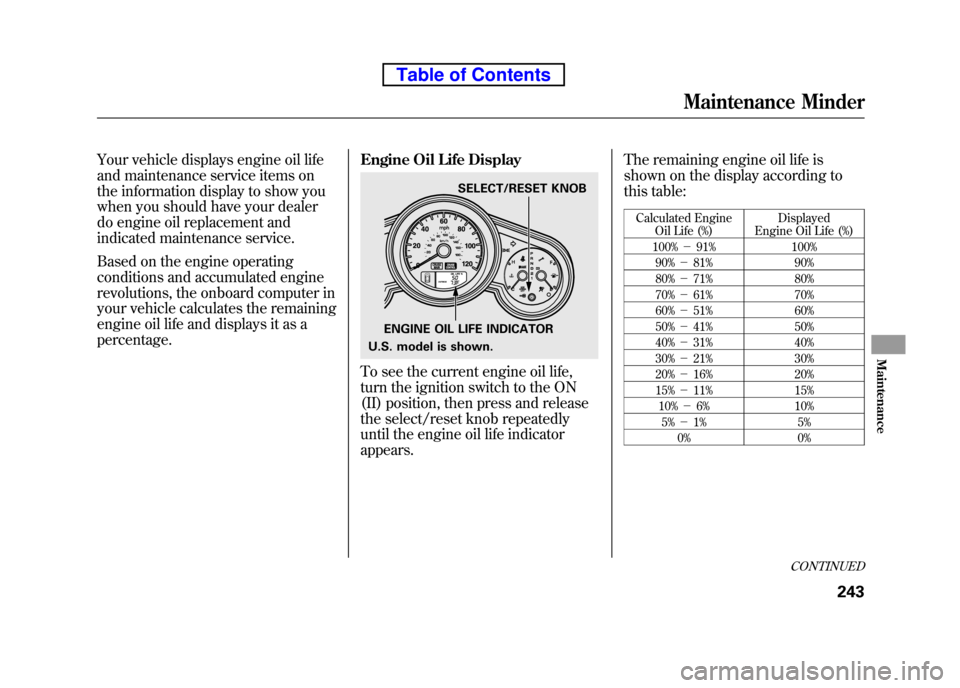
engine oil life and displays it as apercentage.Engine Oil Life Display
To see the current engine oil life,
turn the ignition switch to the ON
(II) position, then press and release
the select/reset knob repeatedly
until the engine oil life indicatorappears.The remaining engine oil life is
shown on the display according to
this table:
Calculated Engine Oil Life (%) Displayed
Engine Oil Life (%)
100% -91% 100%
90% -81% 90%
80% -71% 80%
70% -61% 70%
60% -51% 60%
50% -41% 50%
40% -31% 40%
30% -21% 30%
20% -16% 20%
15% -11% 15%
10% -6% 10%
5% -1% 5%
0% 0%
ENGINE OIL LIFE INDICATOR SELECT/RESET KNOB
U.S. model is shown.
CONTINUED
Maintenance Minder
243
Maintenance
Table of Contents
Page 260 of 342
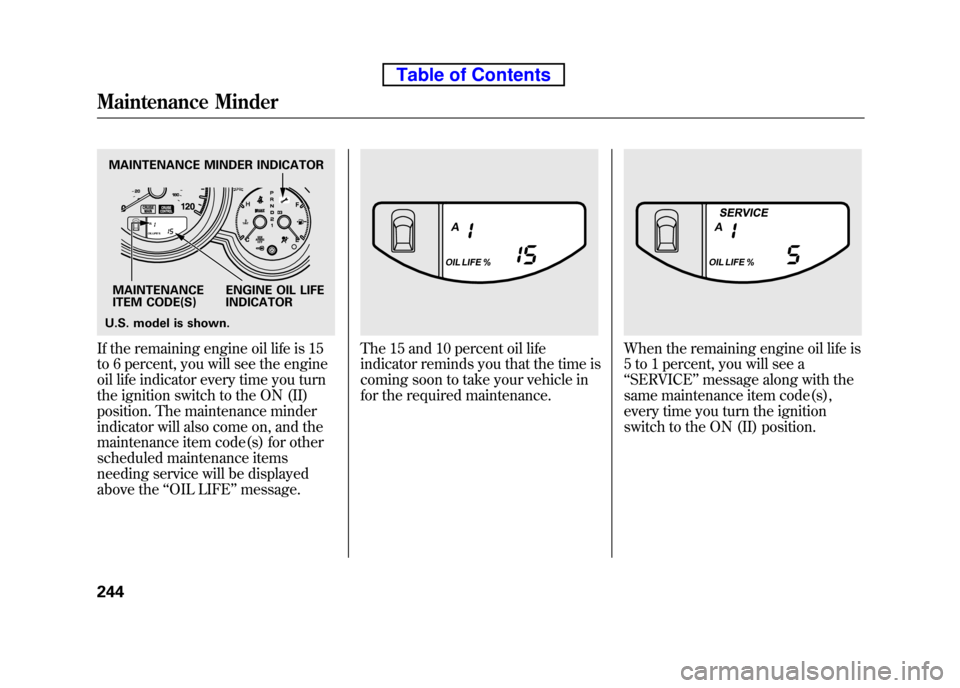
If the remaining engine oil life is 15
to 6 percent, you will see the engine
oil life indicator every time you turn
the ignition switch to the ON (II)
position. The maintenance minder
indicator will also come on, and the
maintenance item code(s) for other
scheduled maintenance items
needing service will be displayed
above the‘‘OIL LIFE ’’message.The 15 and 10 percent oil life
indicator reminds you that the time is
coming soon to take your vehicle in
for the required maintenance.When the remaining engine oil life is
5 to 1 percent, you will see a‘‘SERVICE ’’message along with the
same maintenance item code(s),
every time you turn the ignition
switch to the ON (II) position.
MAINTENANCE MINDER INDICATOR
MAINTENANCE
ITEM CODE(S) ENGINE OIL LIFE
INDICATOR
U.S. model is shown.
Maintenance Minder
244
Table of Contents
Page 261 of 342
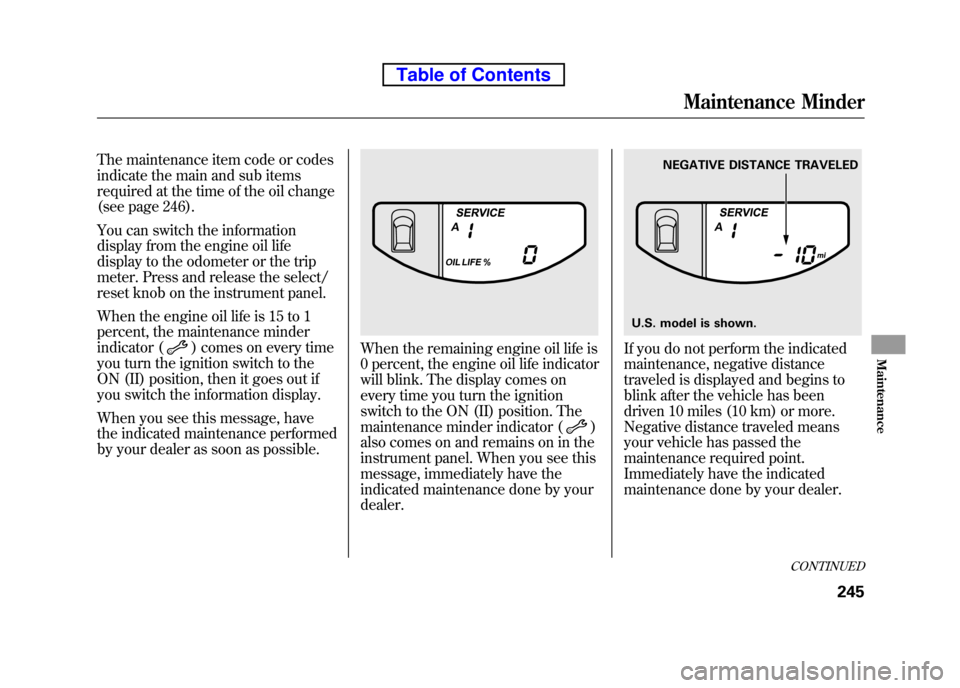
The maintenance item code or codes
indicate the main and sub items
required at the time of the oil change
(see page 246).
You can switch the information
display from the engine oil life
display to the odometer or the trip
meter. Press and release the select/
reset knob on the instrument panel.
When the engine oil life is 15 to 1
percent, the maintenance minder
indicator (
) comes on every time
you turn the ignition switch to the
ON (II) position, then it goes out if
you switch the information display.
When you see this message, have
the indicated maintenance performed
by your dealer as soon as possible.When the remaining engine oil life is
0 percent, the engine oil life indicator
will blink. The display comes on
every time you turn the ignition
switch to the ON (II) position. The
maintenance minder indicator (
)
also comes on and remains on in the
instrument panel. When you see this
message, immediately have the
indicated maintenance done by yourdealer.
If you do not perform the indicated
maintenance, negative distance
traveled is displayed and begins to
blink after the vehicle has been
driven 10 miles (10 km) or more.
Negative distance traveled means
your vehicle has passed the
maintenance required point.
Immediately have the indicated
maintenance done by your dealer.
NEGATIVE DISTANCE TRAVELED
U.S. model is shown.
CONTINUED
Maintenance Minder
245
Maintenance
Table of Contents
Page 262 of 342
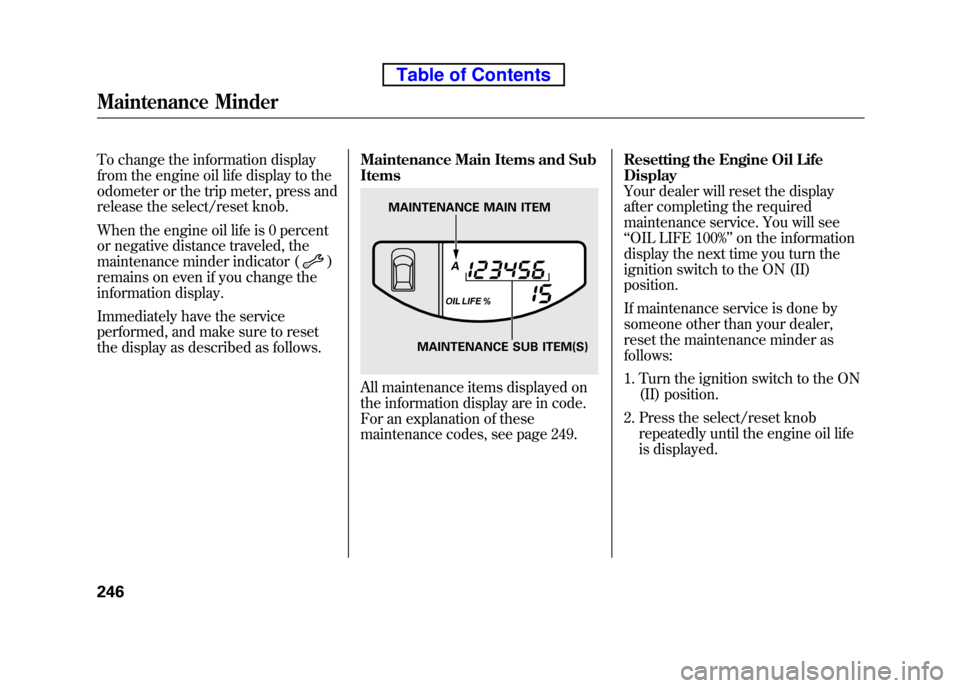
To change the information display
from the engine oil life display to the
odometer or the trip meter, press and
release the select/reset knob.
When the engine oil life is 0 percent
or negative distance traveled, the
maintenance minder indicator (
)
remains on even if you change the
information display.
Immediately have the service
performed, and make sure to reset
the display as described as follows. Maintenance Main Items and Sub Items
All maintenance items displayed on
the information display are in code.
For an explanation of these
maintenance codes, see page 249.Resetting the Engine Oil LifeDisplay
Your dealer will reset the display
after completing the required
maintenance service. You will see ‘‘
OIL LIFE 100% ’’on the information
display the next time you turn the
ignition switch to the ON (II)position.
If maintenance service is done by
someone other than your dealer,
reset the maintenance minder as follows:
1. Turn the ignition switch to the ON (II) position.
2. Press the select/reset knob repeatedly until the engine oil life
is displayed.
MAINTENANCE MAIN ITEM
MAINTENANCE SUB ITEM(S)
Maintenance Minder
246
Table of Contents
Page 263 of 342
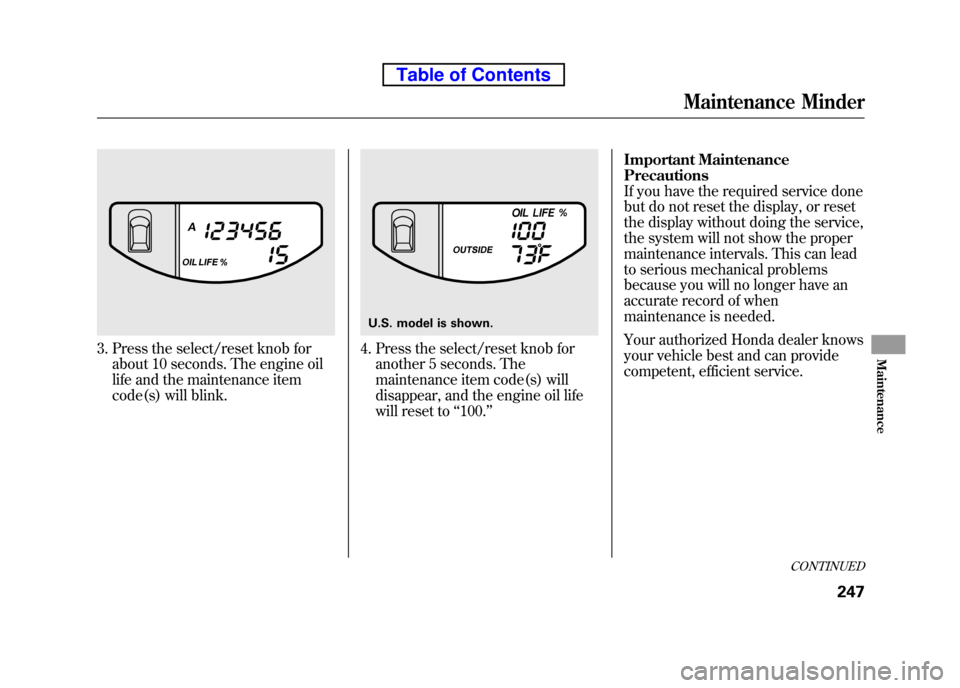
3. Press the select/reset knob forabout 10 seconds. The engine oil
life and the maintenance item
code(s) will blink.4. Press the select/reset knob foranother 5 seconds. The
maintenance item code(s) will
disappear, and the engine oil life
will reset to ‘‘100. ’’ Important MaintenancePrecautions
If you have the required service done
but do not reset the display, or reset
the display without doing the service,
the system will not show the proper
maintenance intervals. This can lead
to serious mechanical problems
because you will no longer have an
accurate record of when
maintenance is needed.
Your authorized Honda dealer knows
your vehicle best and can provide
competent, efficient service.
U.S. model is shown.
CONTINUED
Maintenance Minder
247
Maintenance
Table of Contents
Page 264 of 342

However, service at a dealer is not
mandatory to keep your warranties in
effect. Maintenance may be done by
any qualified service facility or
person who is skilled in this type of
automotive service. Make sure to
have the service facility or person
reset the display as previously
described. Keep all receipts as proof
of completion, and have the person
who does the work fill out your
Honda Service History or Canadian
Maintenance Log. Check your
warranty booklet for moreinformation.
We recommend using Honda parts
and fluids whenever you have
maintenance done. These are
manufactured to the same high
quality standards as the original
components, so you can be confident
of their performance and durability.U.S. Vehicles:
According to state and federal
regulations, failure to perform
maintenance on the items marked with
#will not void your emissions
warranties. However, all
maintenance services should be
performed in accordance with the
intervals indicated by the informationdisplay.
Owner's Maintenance Checks
You should check the following
items at the specified intervals. If you
are unsure of how to perform any
check, turn to the appropriate pagelisted.
● Engine oil level -Check every
time you fill the fuel tank. See page201.
● Engine coolant level -Check the
radiator reserve tank every time
you fill the fuel tank. See page 201. ●
Automatic transmission -Check
the fluid level monthly. See page256.
● Brakes -Check the fluid level
monthly. See page 258.
● Tires -Check the tire pressure
monthly. Examine the tread for
wear and foreign objects. See page271.
● Lights -Check the operation of
the headlights, parking lights,
taillights, high-mount brake light,
and license plate lights monthly.
See page 261.
Maintenance Minder
248
Table of Contents
Page 265 of 342

Symbol Maintenance Main ItemsA ●
Replace engine oilꭧ1
B ●
Replace engine oilꭧ1and oil filter
● Inspect front and rear brakes
● Check parking brake adjustment
● Inspect these items:
● Tie rod ends, steering gear box, and boots
● Suspension components
● Driveshaft boots
● Brake hoses and lines (including ABS/VSA)
● All fluid levels and condition of fluids
● Exhaust system
#
●Fuel lines and connections#
ꭧ1: If the message ‘‘SERVICE ’’does not appear more than 12 months after the
display is reset, change the engine oil every year.
# : See information on maintenance and emissions warranty on page 248.
NOTE: ●
Independent of the maintenance message in the information display,
replace the brake fluid every 3 years.
● Inspect idle speed every 160,000 miles (256,000 km).
● Adjust the valves during services A, B, 1, 2, or 3 if they are noisy. Symbol Maintenance Sub Items
1 ●
Rotate tires
2 ●
Replace air cleaner element
If you drive in dusty conditions, replace
every 15,000 miles (24,000 km).
● Replace dust and pollen filter
If you drive primarily in urban areas that have high
concentrations of soot in the air from industry and
from diesel-powered vehicles, replace every
15,000 miles (24,000 km).
● Inspect drive belt
3 ●
Replace transmission fluid
Driving in mountainous areas at very low vehicle
speeds or trailer towing results in higher transmission
and transfer temperatures. This requires transmission
and transfer fluid changes more frequently than
recommended by the maintenance minder. If you
regularly drive your vehicle under these conditions,
have the transmission and transfer fluid changed at
60,000 miles (100,000 km), then every 30,000 miles
(48,000 km) (For A/T only).
4 ●
Replace spark plugs
● Inspect valve clearance
5 ●
Replace engine coolant
6 ●
Replace rear differential fluid (4WD model only)
Maintenance Minder
Maintenance Minder
249
Table of Contents