HONDA FIT 2009 2.G Owners Manual
Manufacturer: HONDA, Model Year: 2009, Model line: FIT, Model: HONDA FIT 2009 2.GPages: 352, PDF Size: 17.67 MB
Page 141 of 352
–Supported standards:
MPEG1 Audio Layer3
MPEG2 Audio LSF Layer3
– Partition: Top partition only
– Maximum layers: 8
The specifications for compatible
WMA files are: – Sampling frequency:
32/44.1/48 kHz
– Bit rate:
48 -320/VBR kbps (Max 384)
– Supported standards:
WMA version 7/8/9
– Partition: Top partition only
– Maximum layers: 8
The specifications for compatible
AAC files are: – Sampling frequency:
8/11.025/12/16/22.05/24/32/
44.1/48 kHz –
Bit rate:
8- 320 kbps
– Supported standards:
MPEG4/AAC LC
MPEG2/AAC LC
– Partition: Top partition only
– Maximum layers: 8
Even if recorded in MP3, WMA or
AAC format, a file with unsupported
version cannot be played. If the
system finds it, the audio unit
displays UNSUPPORTED, and then
skips to the next file.
In WMA or AAC format, DRM
(digital rights management) files
cannot be played. If the system finds
a DRM file, the audio unit displays
UNPLAYABLE FILE, and then skips
to the next file.
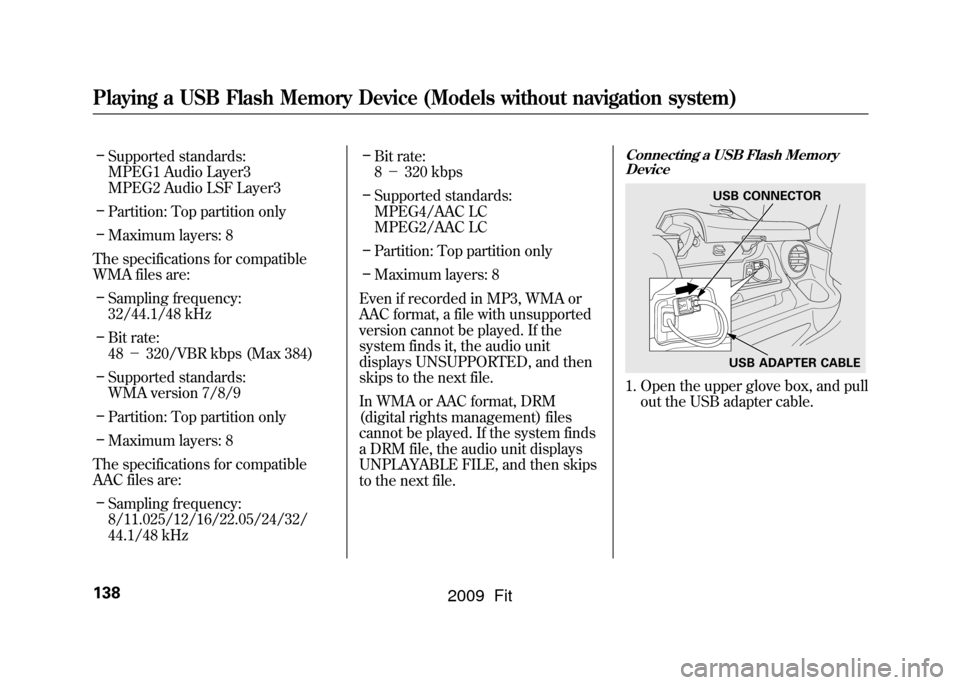
Connecting a USB Flash Memory Device1. Open the upper glove box, and pull out the USB adapter cable.
USB CONNECTOR
USB ADAPTER CABLE
Playing a USB Flash Memory Device (Models without navigation system)138
2009 Fit
Page 142 of 352
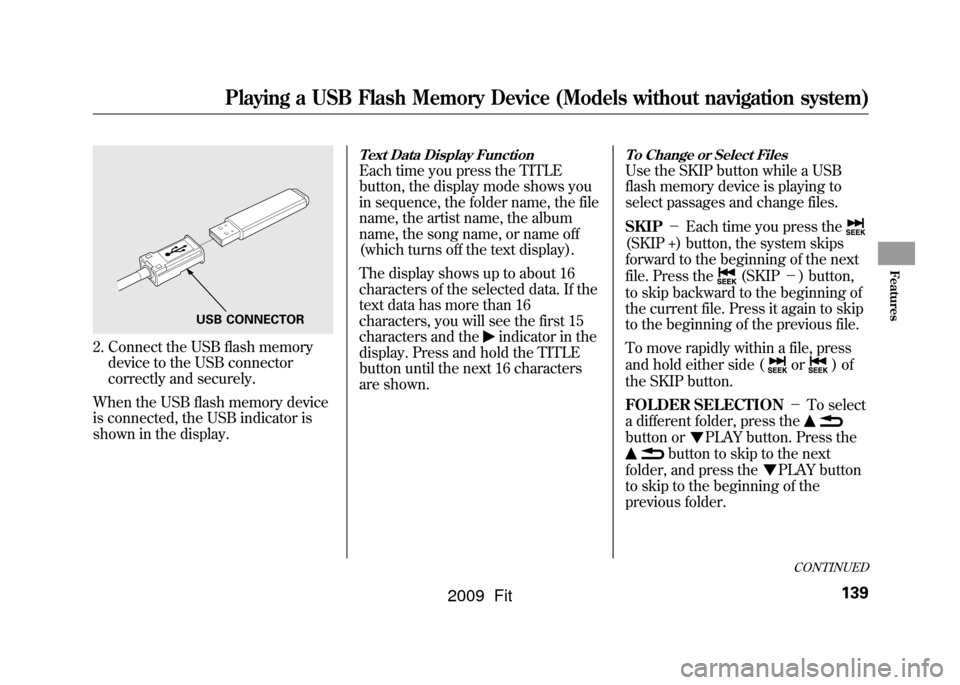
2. Connect the USB flash memorydevice to the USB connector
correctly and securely.
When the USB flash memory device
is connected, the USB indicator is
shown in the display.
Text Data Display FunctionEach time you press the TITLE
button, the display mode shows you
in sequence, the folder name, the file
name, the artist name, the album
name, the song name, or name off
(which turns off the text display).
The display shows up to about 16
characters of the selected data. If the
text data has more than 16
characters, you will see the first 15
characters and the
indicator in the
display. Press and hold the TITLE
button until the next 16 characters
are shown.
To Change or Select FilesUse the SKIP button while a USB
flash memory device is playing to
select passages and change files.
SKIP -Each time you press the(SKIP +) button, the system skips
forward to the beginning of the next
file. Press the
(SKIP -) button,
to skip backward to the beginning of
the current file. Press it again to skip
to the beginning of the previous file.
To move rapidly within a file, press
and hold either side (
or
)of
the SKIP button.
FOLDER SELECTION -To select
a different folder, press the
button or
PLAY button. Press the
button to skip to the next
folder, and press the
PLAY button
to skip to the beginning of the
previous folder.
USB CONNECTOR
CONTINUED
Playing a USB Flash Memory Device (Models without navigation system)
139
Features
2009 Fit
Page 143 of 352
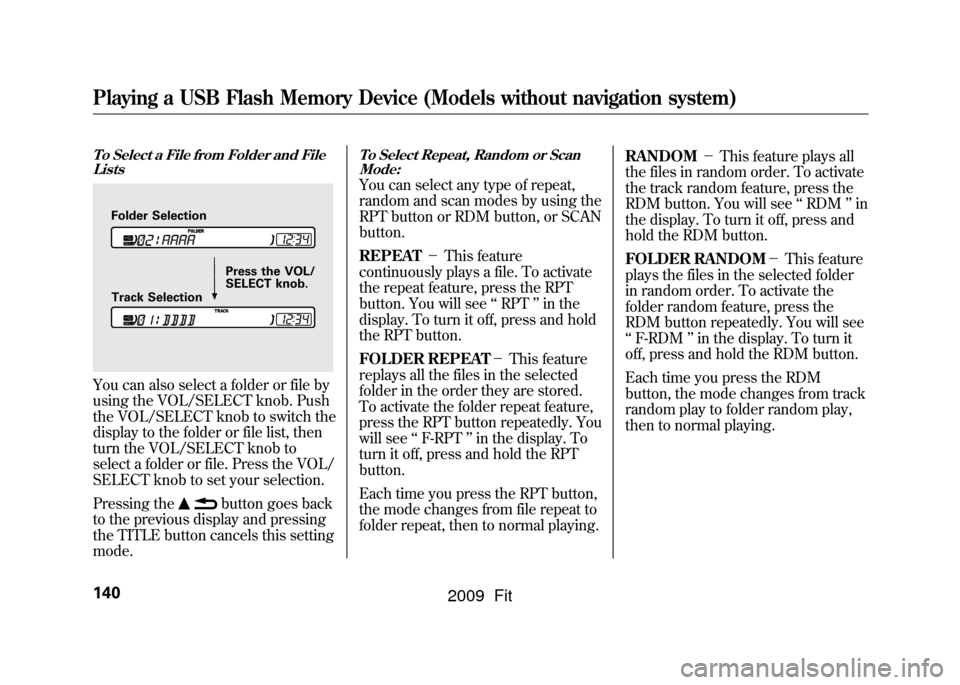
To Select a File from Folder and FileListsYou can also select a folder or file by
using the VOL/SELECT knob. Push
the VOL/SELECT knob to switch the
display to the folder or file list, then
turn the VOL/SELECT knob to
select a folder or file. Press the VOL/
SELECT knob to set your selection.
Pressing the
button goes back
to the previous display and pressing
the TITLE button cancels this setting
mode.
To Select Repeat, Random or Scan
Mode:You can select any type of repeat,
random and scan modes by using the
RPT button or RDM button, or SCAN
button.
REPEAT -This feature
continuously plays a file. To activate
the repeat feature, press the RPT
button. You will see ‘‘RPT ’’in the
display. To turn it off, press and hold
the RPT button.
FOLDER REPEAT -This feature
replays all the files in the selected
folder in the order they are stored.
To activate the folder repeat feature,
press the RPT button repeatedly. You
will see ‘‘F-RPT ’’in the display. To
turn it off, press and hold the RPT
button.
Each time you press the RPT button,
the mode changes from file repeat to
folder repeat, then to normal playing. RANDOM
-This feature plays all
the files in random order. To activate
the track random feature, press the
RDM button. You will see ‘‘RDM ’’in
the display. To turn it off, press and
hold the RDM button.
FOLDER RANDOM -This feature
plays the files in the selected folder
in random order. To activate the
folder random feature, press the
RDM button repeatedly. You will see
‘‘ F-RDM ’’in the display. To turn it
off, press and hold the RDM button.
Each time you press the RDM
button, the mode changes from track
random play to folder random play,
then to normal playing.
Folder Selection
Track Selection Press the VOL/
SELECT knob.
Playing a USB Flash Memory Device (Models without navigation system)140
2009 Fit
Page 144 of 352

SCAN-This feature samples all
files in the selected folder in the
order they are stored. To activate the
scan feature, press the SCAN button.
You will see ‘‘SCAN ’’in the display.
You will get a 10 second sampling of
each file in the folder. Press and hold
the SCAN button to get out of the
scan mode and play the last file
sampled.
FOLDER SCAN -This feature
samples the first file in each folder in
the order they are stored. To activate
the folder scan feature, press the
SCAN button repeatedly. You will
see ‘‘F-SCAN ’’in the display. You
will get a 10 second sampling of each
first file in the folder(s). Press and
hold the SCAN button to get out of
the folder scan mode and play the
last file sampled.
Each time you press the SCAN
button, the mode changes from file
scan to folder scan, then to normal
playing. To Stop Playing a USB Flash
Memory Device
To play the radio when a USB flash
memory device is playing, press the
FM/AM button. If a disc is in the
audio unit, press the CD button to
play the disc.
Disconnecting a USB Flash Memory
DeviceYou can disconnect the USB flash
memory device in any time even if
the USB mode is selected on the
audio system. Always follow the USB
flash memory device ’s instructions
when you remove it.
When you disconnect the USB flash
memory device while it is playing,
the display shows
‘‘ USB NO DATA. ’’
If you reconnect the same USB flash
memory device, the system will
begin playing where it left off. USB Flash Memory Device Error
Messages
If you see an error message in the
display, see page
142.
Playing a USB Flash Memory Device (Models without navigation system)
141
Features
2009 Fit
Page 145 of 352

If you see an error message on the
audio display while playing a USB
flash memory device, find the
solution in the chart to the right. If
you cannot clear the error message,
take your vehicle to your dealer.Error
Message Solution
UNPLAYABLE
FILE The system cannot read the file(s). Check the files in the USB flash memory
device. There is a possibility that the files have been damaged.
UNSUPPORTED Appears when the unsupported USB flash memory device is inserted.
USB Flash Memory Device Error Messages (Models without navigation system)142
2009 Fit
Page 146 of 352
SOUND ICON
SCAN
BUTTON AM/FM
BUTTON
AUDIO
BUTTON AUTO SELECT ICON
PRESET BUTTONS BACK GROUND ICON
FM1 ICON
TUNE BAR AM ICON
FM2 ICON
POWER/VOLUME KNOB
CONTINUED
Playing the AM/FM Radio (Models with navigation system)
143
Features
2009 Fit
Page 147 of 352

Voice Control System
In addition to the standard audio
controls, the audio system in your
vehicle can be operated using the
voice control system. See the
navigation section in your quick start
guide for an overview of this system,
and the navigation system manual for
complete details.
To Play the AM/FM Radio
The ignition switch must be in the
ACCESSORY (I) or ON (II) position.
Turn the system on by pushing the
power/volume knob or the AM/FM
button. Adjust the volume by turning
the power/volume knob.
Pushing the AUDIO button will also
turn on the system.You can also operate the audio
system without using the control
icons on the audio screen. Use the
control buttons on the left side of the
screen. The status bar appears on the
bottom of the screen each time you
operate any of the control buttons.
On the navigation screen, you can
also see audio information by
touching the AUDIO INFO icon on
the lower of the screen.
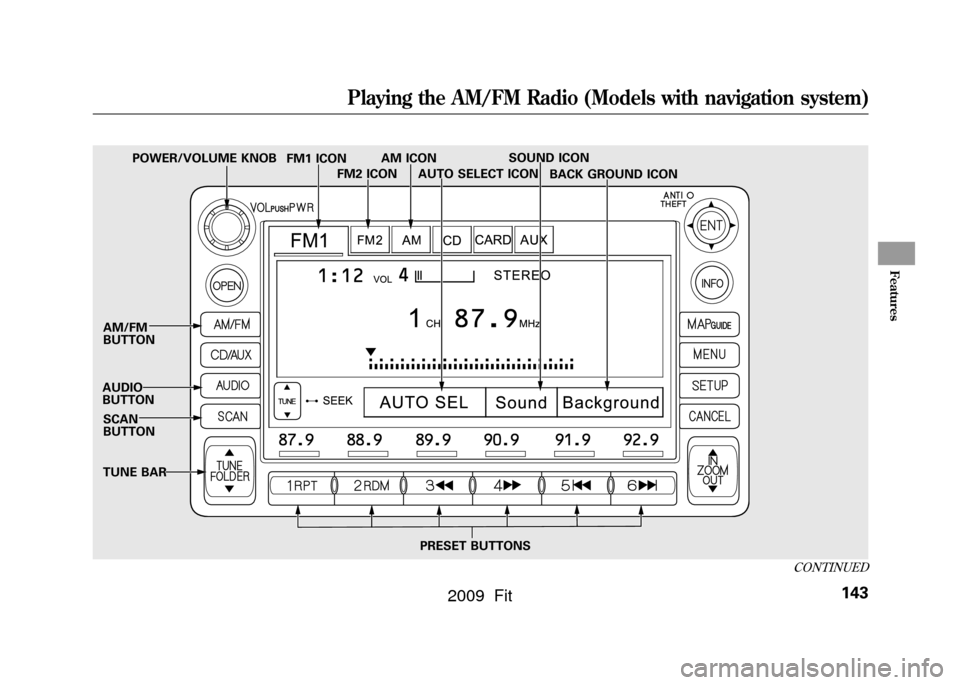
The band and frequency that the
radio was last turned to are
displayed. To change bands, press
the AM/FM button, or touch the
desired band icon (FM1, FM2, or
AM). On the FM band, STEREO will
be displayed if the station is
broadcasting in stereo. Stereo
reproduction on AM is not available.To Select a Station
You can use any of five methods to
find radio stations on the selected
band: tune, seek, scan, the preset
buttons, and auto select.
TUNE
-Use the TUNE bar to tune
the radio to a desired frequency.
Press the
side of the bar to tune to
a higher frequency, and press the
side to tune to a lower frequency.
Press and hold the
or
side of
the TUNE bar until you hear two
beeps to change the frequency
rapidly. Release the bar when the
display reaches the desired
frequency.
Playing the AM/FM Radio (Models with navigation system)144
2009 Fit
Page 148 of 352

SEEK-The SEEK function
searches up and down from the
current frequency to find a station
with a strong signal. To activate it,
press and hold the
or
side of
the TUNE bar until you hear a beep,
then release it.
SCAN -The SCAN function
samples all stations with strong
signals on the selected band. To
activate it, press the SCAN button,
then release it. You will see SCAN in
the display. The system will scan for
a station with a strong signal. When
it finds one, it will stop and play that
station for about 10 seconds. If you do nothing, the system will
then scan for the next strong station
and play it for 10 seconds. When it
plays a station you want to listen to,
press the SCAN button again.
Preset
-Each preset button can
store one frequency on AM and two
frequencies on FM.
1. Select the desired band, AM or FM. FM1 and FM2 let you store
two frequencies with each preset
button.
2. Use the tune, seek, or scan function to tune the radio to a
desired station.
3. Pick a preset button, and hold it until you hear a beep.
4. Repeat steps 1 through 3 to store a total of six stations on AM and
twelve stations on FM. Each preset button's frequency is
shown on the bottom of the audio
display.
CONTINUED
Playing the AM/FM Radio (Models with navigation system)
145
Features
2009 Fit
Page 149 of 352
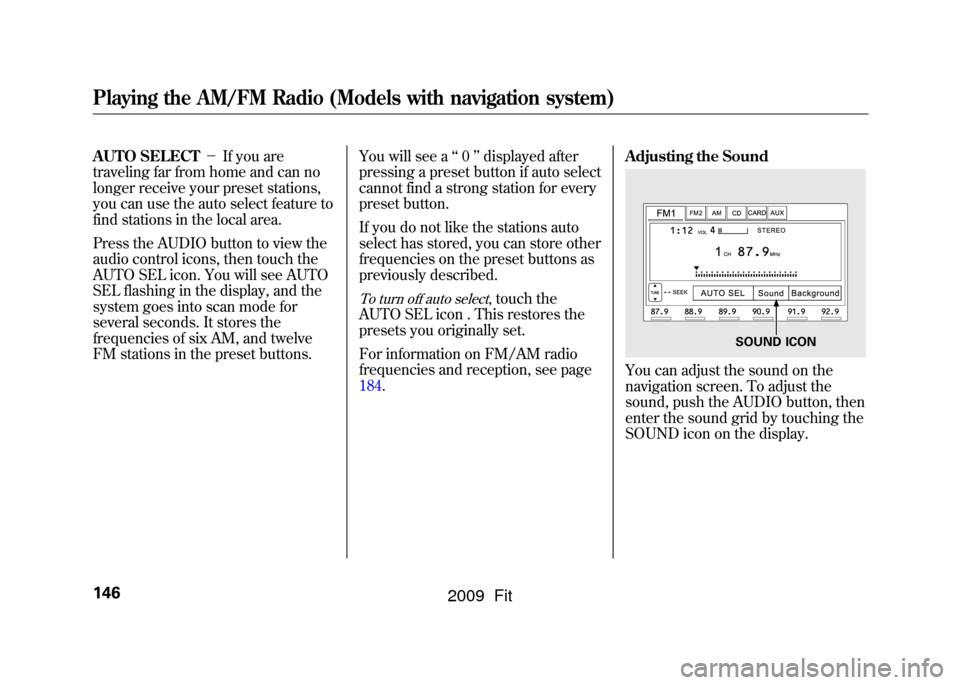
AUTO SELECT-If you are
traveling far from home and can no
longer receive your preset stations,
you can use the auto select feature to
find stations in the local area.
Press the AUDIO button to view the
audio control icons, then touch the
AUTO SEL icon. You will see AUTO
SEL flashing in the display, and the
system goes into scan mode for
several seconds. It stores the
frequencies of six AM, and twelve
FM stations in the preset buttons. You will see a
‘‘0 ’’displayed after
pressing a preset button if auto select
cannot find a strong station for every
preset button.
If you do not like the stations auto
select has stored, you can store other
frequencies on the preset buttons as
previously described.
To turn off auto select
,touch the
AUTO SEL icon . This restores the
presets you originally set.
For information on FM/AM radio
frequencies and reception, see page
184. Adjusting the Sound
You can adjust the sound on the
navigation screen. To adjust the
sound, push the AUDIO button, then
enter the sound grid by touching the
SOUND icon on the display.
SOUND ICON
Playing the AM/FM Radio (Models with navigation system)146
2009 Fit
Page 150 of 352
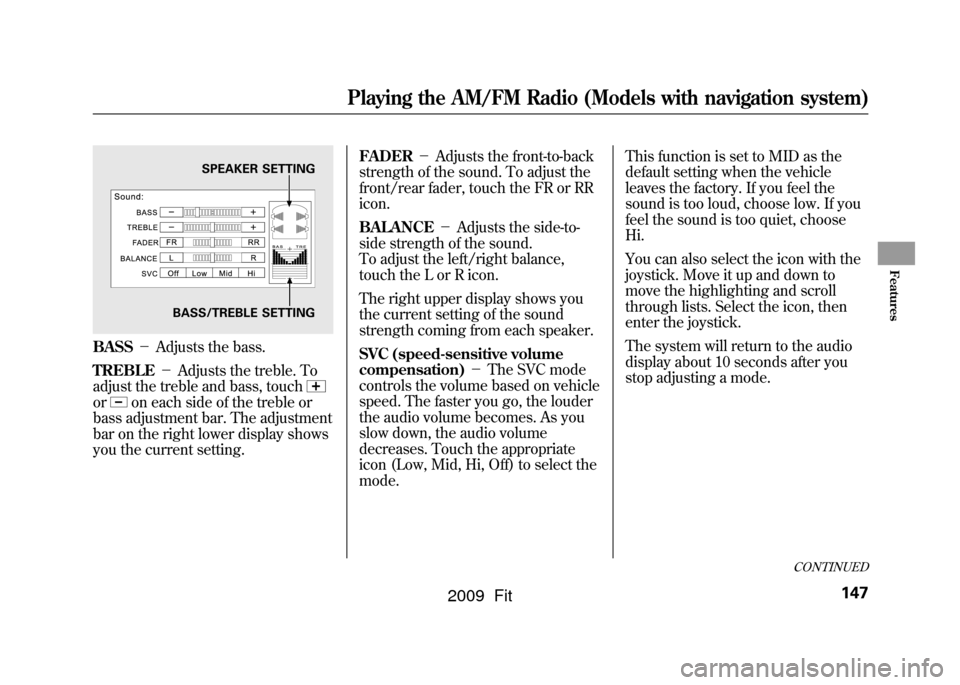
BASS-Adjusts the bass.
TREBLE -Adjusts the treble. To
adjust the treble and bass, touchor
on each side of the treble or
bass adjustment bar. The adjustment
bar on the right lower display shows
you the current setting. FADER
-Adjusts the front-to-back
strength of the sound. To adjust the
front/rear fader, touch the FR or RR
icon.
BALANCE -Adjusts the side-to-
side strength of the sound.
To adjust the left/right balance,
touch the L or R icon.
The right upper display shows you
the current setting of the sound
strength coming from each speaker.
SVC (speed-sensitive volume
compensation) -The SVC mode
controls the volume based on vehicle
speed. The faster you go, the louder
the audio volume becomes. As you
slow down, the audio volume
decreases. Touch the appropriate
icon (Low, Mid, Hi, Off) to select the
mode. This function is set to MID as the
default setting when the vehicle
leaves the factory. If you feel the
sound is too loud, choose low. If you
feel the sound is too quiet, choose
Hi.
You can also select the icon with the
joystick. Move it up and down to
move the highlighting and scroll
through lists. Select the icon, then
enter the joystick.
The system will return to the audio
display about 10 seconds after you
stop adjusting a mode.
SPEAKER SETTING
BASS/TREBLE SETTING
CONTINUED
Playing the AM/FM Radio (Models with navigation system)
147
Features
2009 Fit