HONDA FIT 2009 2.G Owners Manual
Manufacturer: HONDA, Model Year: 2009, Model line: FIT, Model: HONDA FIT 2009 2.GPages: 352, PDF Size: 17.67 MB
Page 151 of 352
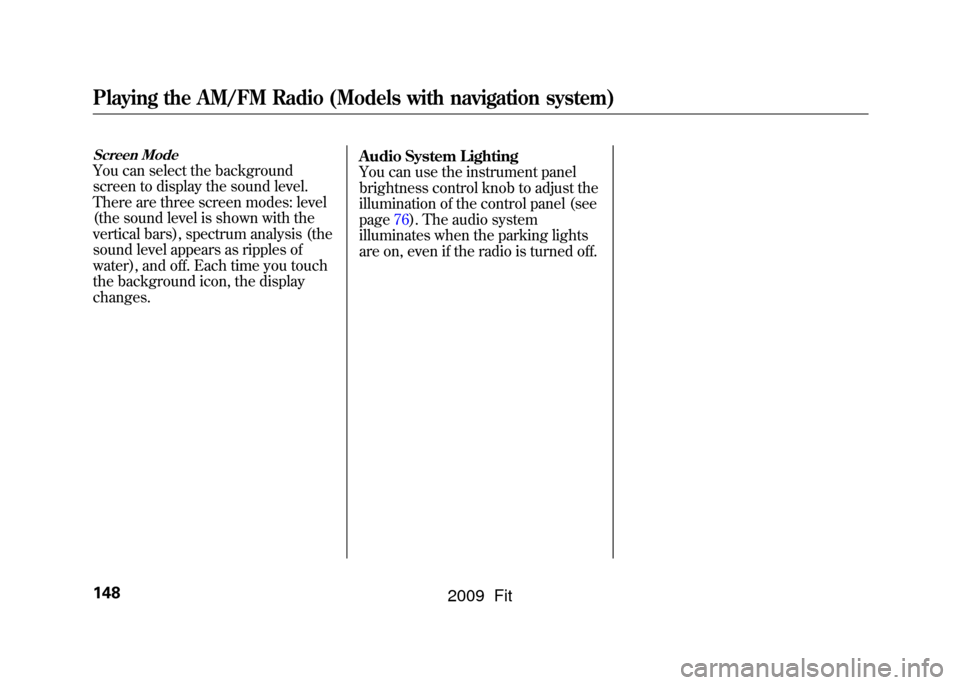
Screen ModeYou can select the background
screen to display the sound level.
There are three screen modes: level
(the sound level is shown with the
vertical bars), spectrum analysis (the
sound level appears as ripples of
water), and off. Each time you touch
the background icon, the display
changes.Audio System Lighting
You can use the instrument panel
brightness control knob to adjust the
illumination of the control panel (see
page76).The audio system
illuminates when the parking lights
are on, even if the radio is turned off.Playing the AM/FM Radio (Models with navigation system)148
2009 Fit
Page 152 of 352
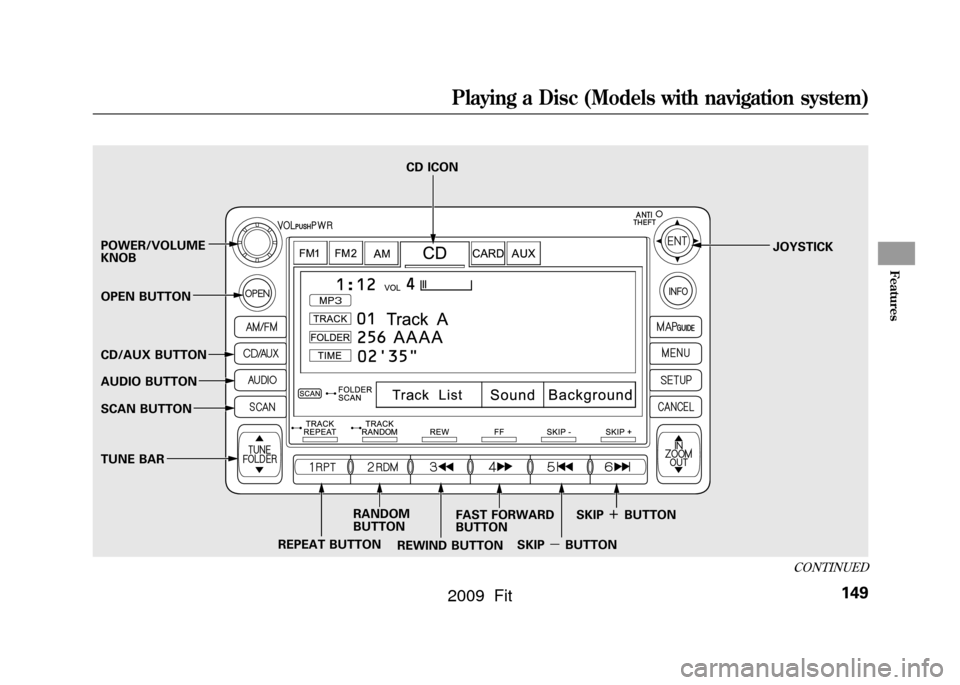
POWER/VOLUME
KNOBJOYSTICK
REPEAT BUTTON CD ICON
RANDOM
BUTTON
OPEN BUTTON
CD/AUX BUTTON
AUDIO BUTTON
SCAN BUTTON
TUNE BAR
REWIND BUTTONFAST FORWARD
BUTTON
SKIPꭚBUTTONSKIP
ꬽBUTTON
CONTINUED
Playing a Disc (Models with navigation system)
149
Features
2009 Fit
Page 153 of 352
To Play a Disc
(In-dash single player)
You operate the in-dash disc player
with the same controls used for the
radio. To load or play discs, the
ignition switch must be in the
ACCESSORY (I) or ON (II) position.Do not use discs with adhesive labels.
The label can curl up and cause the
disc to jam in the unit.
This audio system can also play
CD-Rs and CD-RWs compressed in
MP3 or WMA formats. When playing
a disc in MP3, you will see‘‘MP3 ’’
on the screen. In WMA format,
‘‘ WMA ’’will appear on the screen.
You can select up to 255 folders and
play up to 999 tracks. If the disc has a
complex structure, it takes a while to
read the disc before the system
begins to play it.
If you have a disc that is a
combination of CD-DA tracks and
MP3/WMA files, you can choose the
format to listen by pressing and
holding CD/AUX button until you
hear a beep.
Video CDs and DVD discs do not
work in this unit.
A disc compressed in AAC format
cannot be played in this audio system.
The specifications for compatible
MP3 files are:– Sampling frequency:
32/44.1/48 kHz (MPEG1)
24/22.05/16 kHz (MPEG2)
– Bit rate:
32/40/48/56/64/80/96/112/128/
160/192/224/256/320 kbps
(MPEG1)
8/16/24/32/40/48/56/64/80/96/
112/128/160 kbps (MPEG2)
– Compatible with variable bit rate
and multi-session –
Maximum layers
(including ROOT): 8 layers
The specifications for compatible
WMA files are: – Sampling frequency:
32/44.1/48 kHz
– Bit rate:
32/40/48/64/80/96/128/160/192
kbps
– Compatible with variable bit rate
and multi-session
– Maximum layers
(including ROOT): 8 layers
NOTE:
If a file on an MP3 or WMA disc is
protected by digital rights
management (DRM), the audio unit
displays FILE ERROR, and then
skips to the next file.
Playing a Disc (Models with navigation system)150
2009 Fit
Page 154 of 352
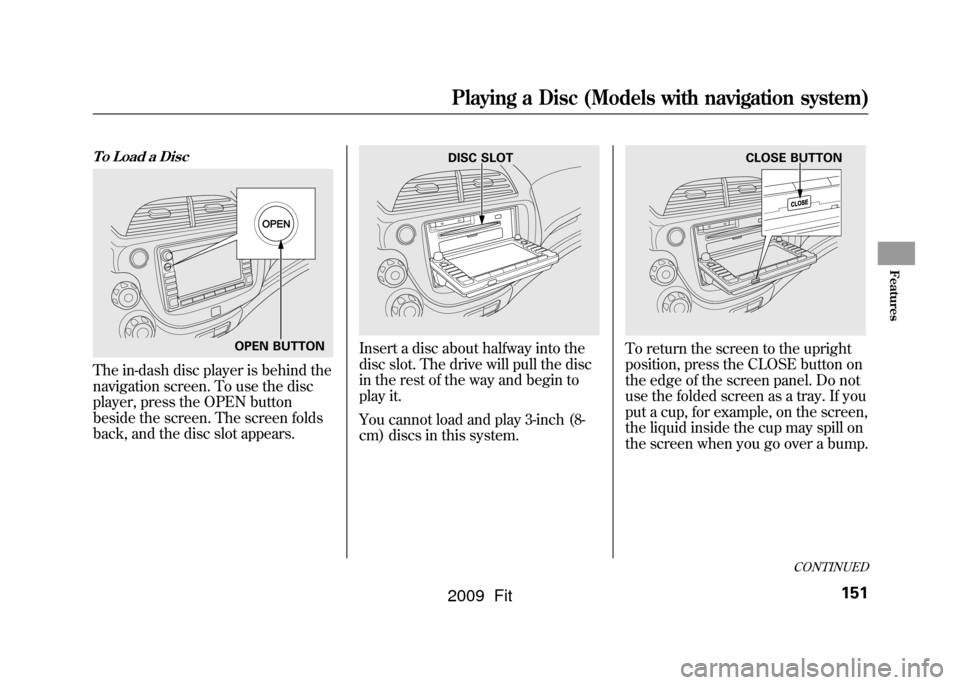
To Load a DiscThe in-dash disc player is behind the
navigation screen. To use the disc
player, press the OPEN button
beside the screen. The screen folds
back, and the disc slot appears.
Insert a disc about halfway into the
disc slot. The drive will pull the disc
in the rest of the way and begin to
play it.
You cannot load and play 3-inch (8-
cm) discs in this system.
To return the screen to the upright
position, press the CLOSE button on
the edge of the screen panel. Do not
use the folded screen as a tray. If you
put a cup, for example, on the screen,
the liquid inside the cup may spill on
the screen when you go over a bump.
OPEN BUTTON
DISC SLOT
CLOSE BUTTON
CONTINUED
Playing a Disc (Models with navigation system)
151
Features
2009 Fit
Page 155 of 352
Press the AUDIO button beside the
screen to show the audio display and
operate the in-dash disc player.
You can also operate the audio
system without using the control
icons on the audio screen. Press the
CD/AUX button. The status bar
appears on the bottom of the screen.
On the navigation screen, you can
see the audio information whenever
you touch the AUDIO INFO or
TRACK LIST icons on the lower of
the screen.
When playing a CD recorded with
text data, the track, album, and artist
name are shown on the audio
display. When playing a disc in MP3
or WMA, the folder number and
name, the file number and name, the
artist name, and the elapsed time are
shown. The system will continuously
play a disc until you change modes.
If the disc was not recorded with text
data, it will not be displayed.
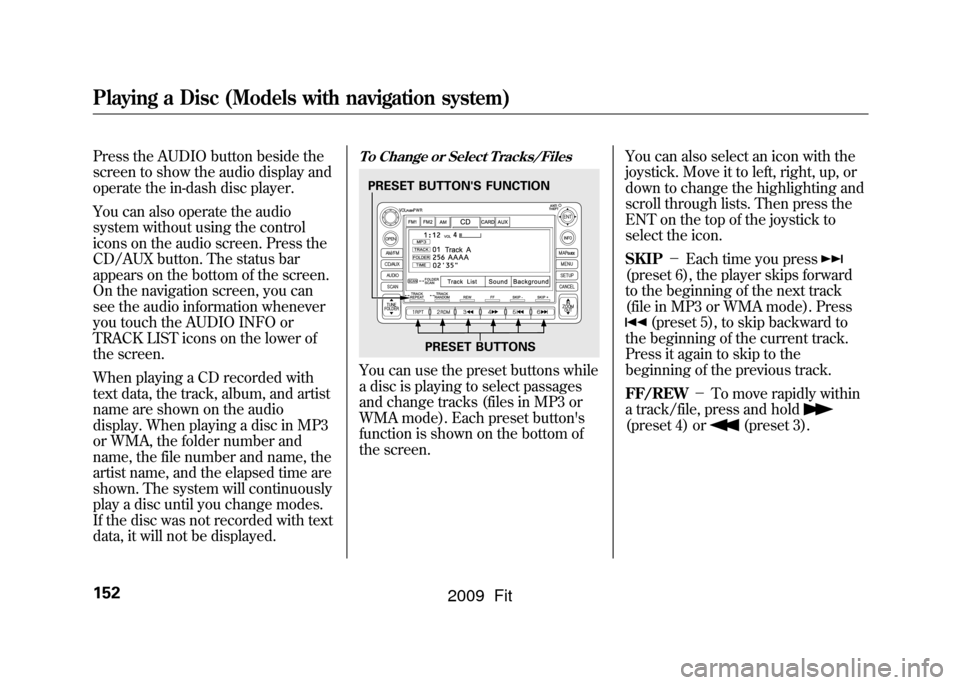
To Change or Select Tracks/FilesYou can use the preset buttons while
a disc is playing to select passages
and change tracks (files in MP3 or
WMA mode). Each preset button's
function is shown on the bottom of
the screen.You can also select an icon with the
joystick. Move it to left, right, up, or
down to change the highlighting and
scroll through lists. Then press the
ENT on the top of the joystick to
select the icon.
SKIP
-Each time you press
(preset 6), the player skips forward
to the beginning of the next track
(file in MP3 or WMA mode). Press
(preset 5), to skip backward to
the beginning of the current track.
Press it again to skip to the
beginning of the previous track.
FF/REW -To move rapidly within
a track/file, press and hold
(preset 4) or
(preset 3).
PRESET BUTTON'S FUNCTION
PRESET BUTTONS
Playing a Disc (Models with navigation system)152
2009 Fit
Page 156 of 352
In MP3 or WMA modeFOLDER SELECTION-To select
a different folder, press either side of
the TUNE bar to move to the
beginning of the next folder. Press
the
side of the TUNE bar to skip
to the next folder, and the
side to
move to the beginning of the current
folder. Press it again to skip to the
beginning of the previous folder.
TRACK REPEAT (FILE REPEAT)
- To continuously replay a track
(file in MP3 or WMA mode), press
the RPT button (preset 1). You will
see ‘‘TRACK REPEAT ’’in the
display. Press the RPT button again
to turn it off.
In MP3 or WMA modeFOLDER REPEAT -This feature,
when activated, replays all files on
the selected folder in the order they
are compressed. To activate folder
repeat, press and hold the RPT
button (preset 1) for 2 seconds. You
will see ‘‘FOLDER REPEAT ’’in the
display. The system continuously
replays the current folder. Press the
RPT button again to turn it off.
Selecting a different folder with the
TUNE bar also turns off folder
repeat.
TRACK RANDOM (Random
within a disc/folder) -This
feature plays the tracks/files within a
disc in random order. To activate
track random, press the RDM button
(preset 2). You will see ‘‘TRACK
RANDOM ’’in the display. Press the
RDM button again to return to
normal play.
In MP3 or WMA modeFOLDER RANDOM -This
feature, when activated, plays all files
in the selected folder in random
order, rather than in the order they
are compressed. To activate folder
random, press and hold the RDM
button. You will see ‘‘FOLDER
RANDOM ’’in the display. The
system then selects and plays files
randomly. This continues until you
deactivate folder random by pressing
the RDM button again, or if you
select a different folder with the
TUNE bar.
CONTINUED
Playing a Disc (Models with navigation system)
153
Features
2009 Fit
Page 157 of 352
SCAN (TRACK/FILE SCAN)-
The scan function samples all tracks
(files in MP3 or WMA) in the order
they were recorded. To activate scan,
press the SCAN button. You will see
‘‘ TRACK SCAN ’’in the display. You
will get a 10 second sampling of each
track/file on the disc. Press the
SCAN button to get out of scan mode
and play the last track/file sampled.
Pressing either SKIP button (preset
5 or 6) also turns off scan.
In MP3 or WMA modeFOLDER SCAN -This feature,
when activated, samples all the first
files in each folder on the disc in
order. To activate folder scan, press
and hold the SCAN button for 2
seconds. You will see ‘‘FOLDER
SCAN ’’in the display.
The system plays the first file in each
folder for about 10 seconds. If you do
nothing, the system then plays the
first file in each folder for 10 seconds
each. After playing the first file of the
last folder, the system goes to normal
playing.
Pressing either SKIP button (preset
5 or 6), or selecting a different folder
with the TUNE bar, or pressing the
SCAN button, also turns off folder
scan.
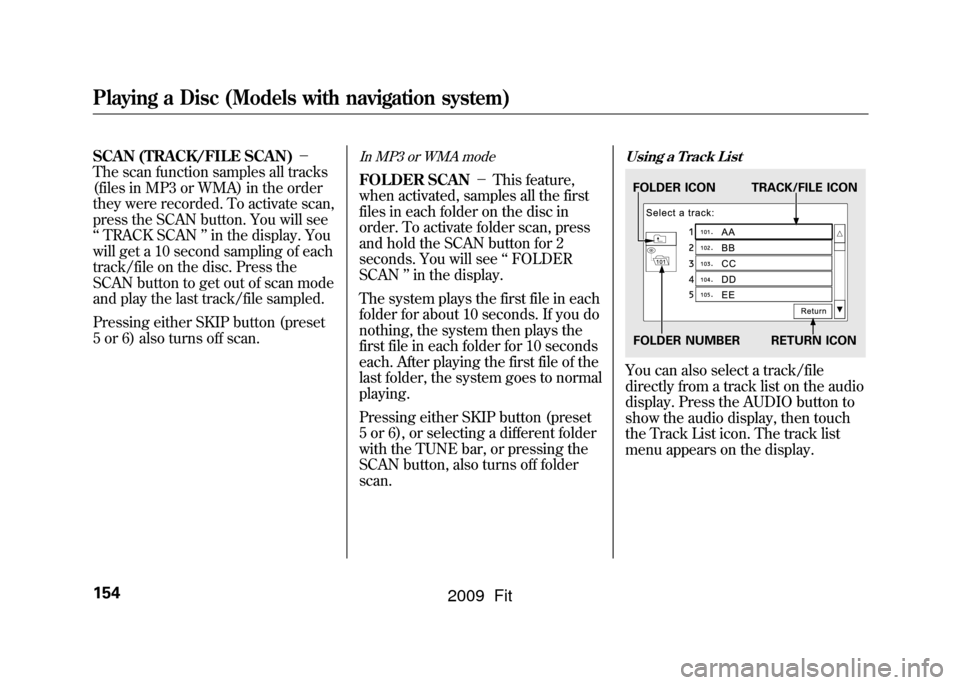
Using a Track ListYou can also select a track/file
directly from a track list on the audio
display. Press the AUDIO button to
show the audio display, then touch
the Track List icon. The track list
menu appears on the display.FOLDER ICON TRACK/FILE ICON
FOLDER NUMBER RETURN ICON
Playing a Disc (Models with navigation system)154
2009 Fit
Page 158 of 352
When playing a CD recorded with
text data, each track name is shown
on the audio display. With a disc
recorded in MP3 or WMA, the folder
number and the location are also
displayed.
If the disc was not recorded with text
data, only the track number is
shown.
To scroll through the display, touch
the
or
icon on the side of the
screen. To go back to the previous
display, touch the Return icon on the
screen. Select the desired track/file by
touching the icon on the display. The
selected icon will be highlighted in
blue. The system begins to play the
selected track/file. With a disc in
MP3 or WMA, touch the folder icon
on the upper left of the screen to
move to the root folder. The current
folder is highlighted in blue.
To Stop Playing a Disc
To play the radio when a disc is
playing, press the AM/FM button or
touch the FM1, FM2, or AM icon. If
a PC card is in the audio unit, touch
the CARD icon to play the PC card.
Press the CD/AUX button again or
touch the CD icon to switch back to
the in-dash disc player.
If you turn the system off while a disc
is playing, either with the power/
volume knob or by turning off the
ignition switch, the disc will stay in
the drive. When you turn the system
back on, the disc will begin playing
where it left off.
CONTINUED
Playing a Disc (Models with navigation system)
155
Features
2009 Fit
Page 159 of 352
Removing a DiscTo remove a disc from the audio unit,
fold back the screen by pressing the
OPEN button (see page150).Press
the disc eject button (
) to remove
the disc. If you eject the disc, but do
not remove it from the slot, the
system will automatically reload it
after 10 seconds and put it in pause
mode. To begin playing, press the
CD/AUX button.
To return the screen to the upright
position, press the CLOSE button.
You cannot close the screen if a disc
is partially inserted into its slot.
You can also eject the disc when the
ignition switch is off. Protecting Discs
For information on how to handle
and protect discs, see page186.
Playing a Disc (Models with navigation system)156
2009 Fit
Page 160 of 352
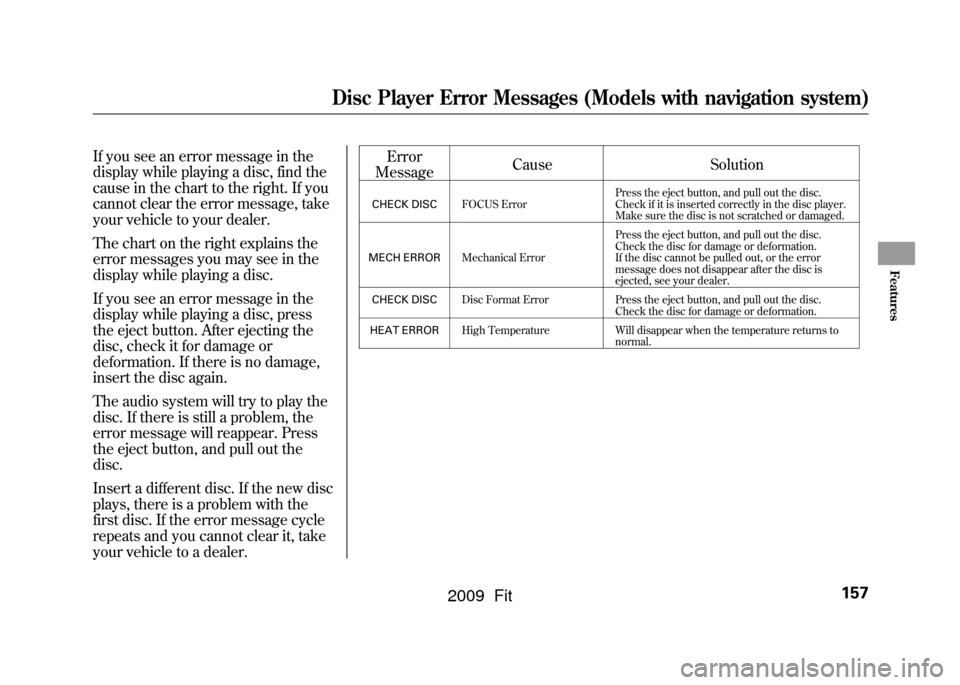
If you see an error message in the
display while playing a disc, find the
cause in the chart to the right. If you
cannot clear the error message, take
your vehicle to your dealer.
The chart on the right explains the
error messages you may see in the
display while playing a disc.
If you see an error message in the
display while playing a disc, press
the eject button. After ejecting the
disc, check it for damage or
deformation. If there is no damage,
insert the disc again.
The audio system will try to play the
disc. If there is still a problem, the
error message will reappear. Press
the eject button, and pull out the
disc.
Insert a different disc. If the new disc
plays, there is a problem with the
first disc. If the error message cycle
repeats and you cannot clear it, take
your vehicle to a dealer.Error
Message Cause
Solution
CHECK DISCFOCUS Error Press the eject button, and pull out the disc.
Check if it is inserted correctly in the disc player.
Make sure the disc is not scratched or damaged.
MECH ERROR Mechanical Error Press the eject button, and pull out the disc.
Check the disc for damage or deformation.
If the disc cannot be pulled out, or the error
message does not disappear after the disc is
ejected, see your dealer.
CHECK DISC Disc Format Error Press the eject button, and pull out the disc.
Check the disc for damage or deformation.
HEAT ERROR High Temperature Will disappear when the temperature returns to
normal.
Disc Player Error Messages (Models with navigation system)
157
Features
2009 Fit