HONDA FIT 2010 2.G Owners Manual
Manufacturer: HONDA, Model Year: 2010, Model line: FIT, Model: HONDA FIT 2010 2.GPages: 351, PDF Size: 5.67 MB
Page 111 of 351
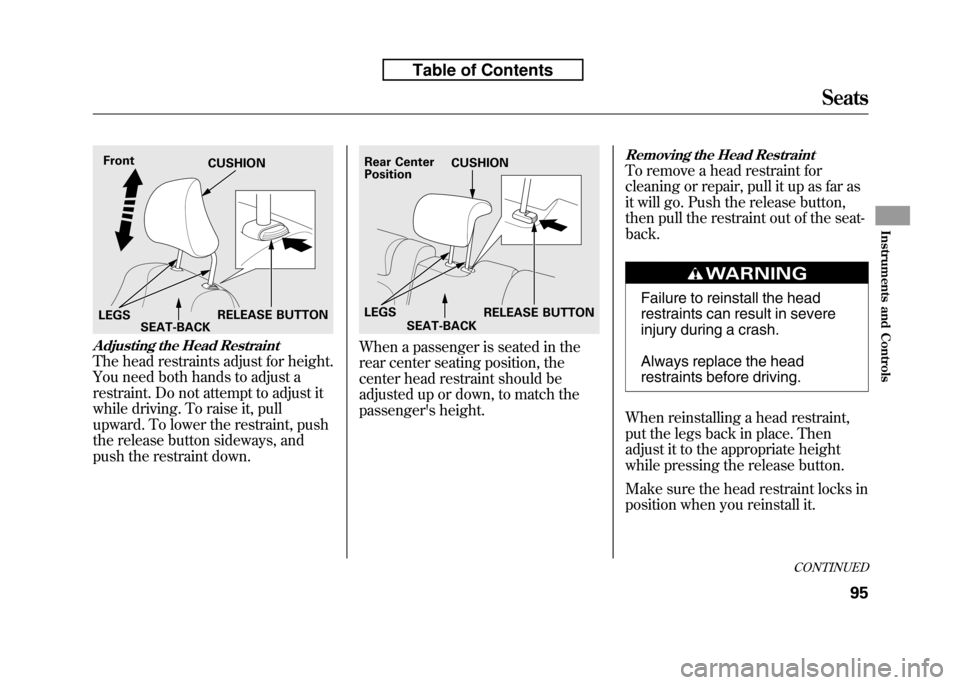
Adjusting the Head Restraint
The head restraints adjust for height.
You need both hands to adjust a
restraint. Do not attempt to adjust it
while driving. To raise it, pull
upward. To lower the restraint, push
the release button sideways, and
push the restraint down.
When a passenger is seated in the
rear center seating position, the
center head restraint should be
adjusted up or down, to match the
passenger's height.
Removing the Head Restraint
To remove a head restraint for
cleaning or repair, pull it up as far as
it will go. Push the release button,
then pull the restraint out of the seat-back.
Failure to reinstall the head
restraints can result in severe
injury during a crash.
Always replace the head
restraints before driving.
When reinstalling a head restraint,
put the legs back in place. Then
adjust it to the appropriate height
while pressing the release button.
Make sure the head restraint locks in
position when you reinstall it.
Front
RELEASE BUTTON
CUSHION
LEGS SEAT-BACKRear Center Position
RELEASE BUTTON
CUSHION
LEGS SEAT-BACK
CONTINUED
Seats
95
Instruments and Controls
Table of Contents
Page 112 of 351
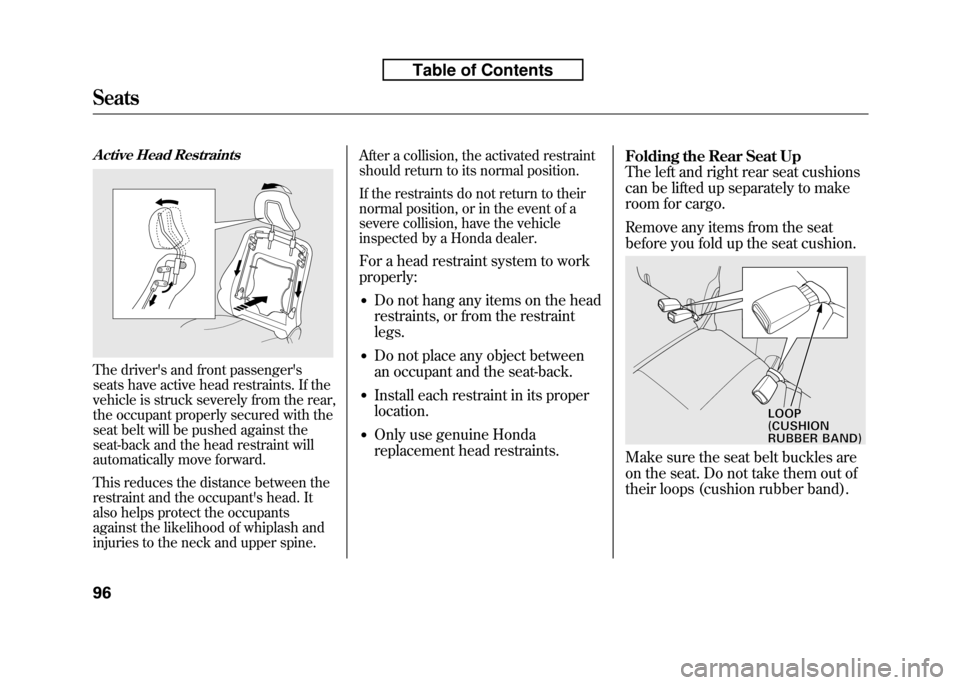
Active Head Restraints
The driver's and front passenger's
seats have active head restraints. If the
vehicle is struck severely from the rear,
the occupant properly secured with the
seat belt will be pushed against the
seat-back and the head restraint will
automatically move forward.
This reduces the distance between the
restraint and the occupant's head. It
also helps protect the occupants
against the likelihood of whiplash and
injuries to the neck and upper spine.After a collision, the activated restraint
should return to its normal position.
If the restraints do not return to their
normal position, or in the event of a
severe collision, have the vehicle
inspected by a Honda dealer.
For a head restraint system to work properly: ● Do not hang any items on the head
restraints, or from the restraintlegs.
● Do not place any object between
an occupant and the seat-back.
● Install each restraint in its properlocation.
● Only use genuine Honda
replacement head restraints. Folding the Rear Seat Up
The left and right rear seat cushions
can be lifted up separately to make
room for cargo.
Remove any items from the seat
before you fold up the seat cushion.
Make sure the seat belt buckles are
on the seat. Do not take them out of
their loops (cushion rubber band).
LOOP(CUSHIONRUBBERBAND)
Seats
96
Table of Contents
Page 113 of 351
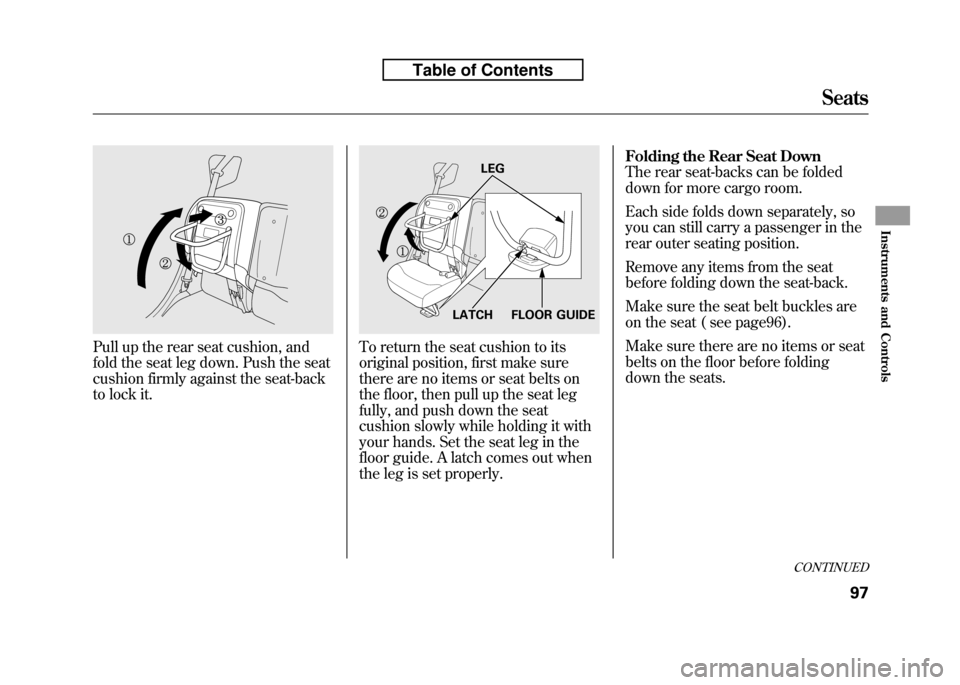
Pull up the rear seat cushion, and
fold the seat leg down. Push the seat
cushion firmly against the seat-back
to lock it.To return the seat cushion to its
original position, first make sure
there are no items or seat belts on
the floor, then pull up the seat leg
fully, and push down the seat
cushion slowly while holding it with
your hands. Set the seat leg in the
floor guide. A latch comes out when
the leg is set properly.Folding the Rear Seat Down
The rear seat-backs can be folded
down for more cargo room.
Each side folds down separately, so
you can still carry a passenger in the
rear outer seating position.
Remove any items from the seat
before folding down the seat-back.
Make sure the seat belt buckles are
on the seat ( see page96).
Make sure there are no items or seat
belts on the floor before folding
down the seats.
FLOOR GUIDE
LEG
LATCH
CONTINUED
Seats
97
Instruments and Controls
Table of Contents
Page 114 of 351
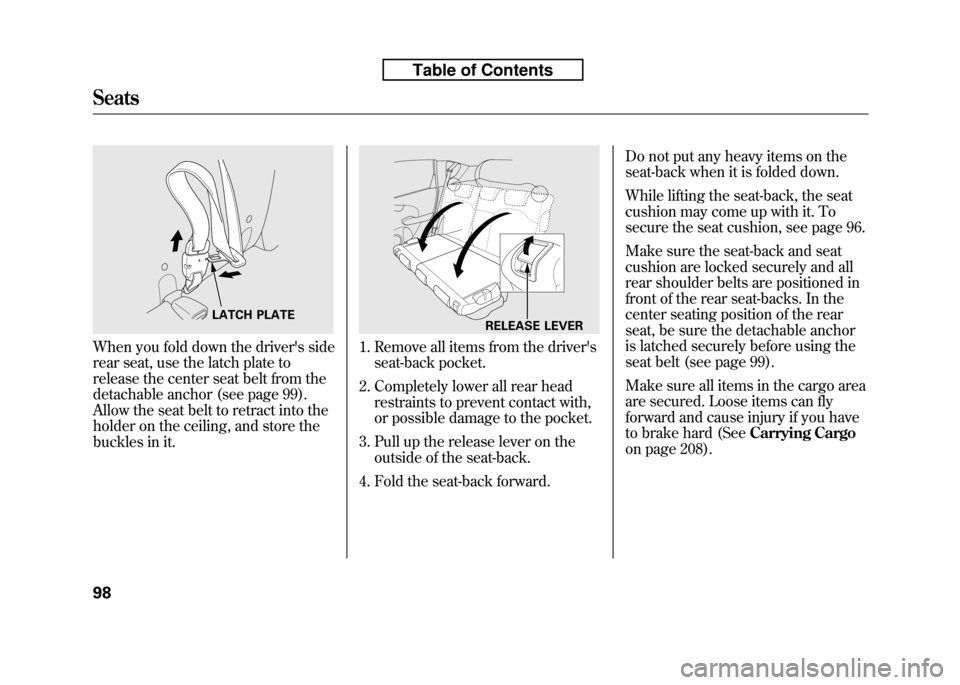
When you fold down the driver's side
rear seat, use the latch plate to
release the center seat belt from the
detachable anchor (see page 99).
Allow the seat belt to retract into the
holder on the ceiling, and store the
buckles in it.1. Remove all items from the driver'sseat-back pocket.
2. Completely lower all rear head restraints to prevent contact with,
or possible damage to the pocket.
3. Pull up the release lever on the outside of the seat-back.
4. Fold the seat-back forward. Do not put any heavy items on the
seat-back when it is folded down.
While lifting the seat-back, the seat
cushion may come up with it. To
secure the seat cushion, see page 96.
Make sure the seat-back and seat
cushion are locked securely and all
rear shoulder belts are positioned in
front of the rear seat-backs. In the
center seating position of the rear
seat, be sure the detachable anchor
is latched securely before using the
seat belt (see page 99).
Make sure all items in the cargo area
are secured. Loose items can fly
forward and cause injury if you have
to brake hard (See
Carrying Cargo
on page 208).
LATCH PLATERELEASE LEVER
Seats
98
Table of Contents
Page 115 of 351
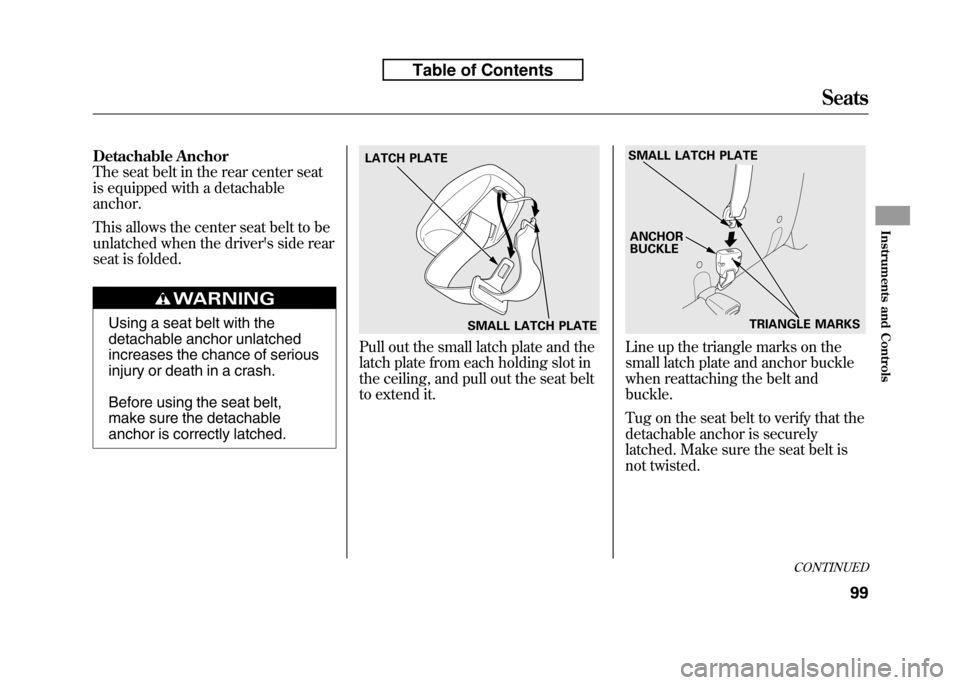
Detachable Anchor
The seat belt in the rear center seat
is equipped with a detachableanchor.
This allows the center seat belt to be
unlatched when the driver's side rear
seat is folded.
Using a seat belt with the
detachable anchor unlatched
increases the chance of serious
injury or death in a crash.
Before using the seat belt,
make sure the detachable
anchor is correctly latched.
Pull out the small latch plate and the
latch plate from each holding slot in
the ceiling, and pull out the seat belt
to extend it.Line up the triangle marks on the
small latch plate and anchor buckle
when reattaching the belt andbuckle.
Tug on the seat belt to verify that the
detachable anchor is securely
latched. Make sure the seat belt is
not twisted.
SMALL LATCH PLATE
LATCH PLATE
SMALL LATCH PLATE
TRIANGLE MARKS
ANCHOR BUCKLE
CONTINUED
Seats
99
Instruments and Controls
Table of Contents
Page 116 of 351
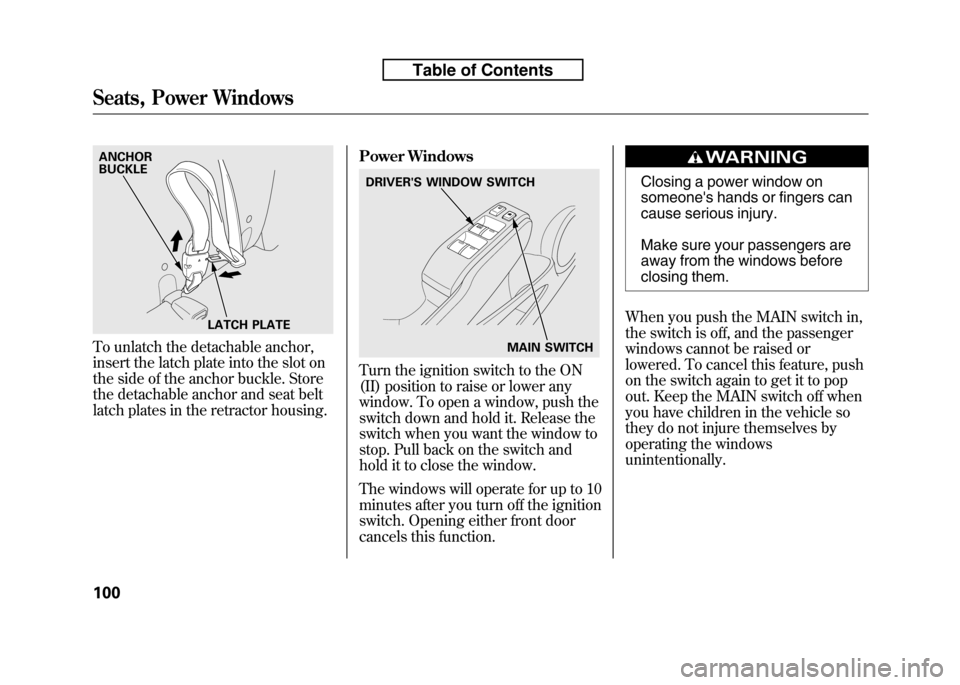
To unlatch the detachable anchor,
insert the latch plate into the slot on
the side of the anchor buckle. Store
the detachable anchor and seat belt
latch plates in the retractor housing.Power Windows
Turn the ignition switch to the ON
(II) position to raise or lower any
window. To open a window, push the
switch down and hold it. Release the
switch when you want the window to
stop. Pull back on the switch and
hold it to close the window.
The windows will operate for up to 10
minutes after you turn off the ignition
switch. Opening either front door
cancels this function.
Closing a power window on
someone's hands or fingers can
cause serious injury.
Make sure your passengers are
away from the windows before
closing them.
When you push the MAIN switch in,
the switch is off, and the passenger
windows cannot be raised or
lowered. To cancel this feature, push
on the switch again to get it to pop
out. Keep the MAIN switch off when
you have children in the vehicle so
they do not injure themselves by
operating the windows
unintentionally.
LATCH PLATE
ANCHOR BUCKLE
DRIVER'S WINDOW SWITCH
MAIN SWITCH
Seats, Power Windows
100
Table of Contents
Page 117 of 351
AUTO-To open or close the
driver's window, push or pull the
window switch firmly down or up to
the second detent, and release it.
The window will automatically go
down or up all the way. To stop the
window, pull or push the window
switch briefly.
AUTO REVERSE -If the driver's
window senses any obstacle while it
is closing automatically, it will
reverse direction, and then stop. To
close the window, remove the
obstacle, then use the window switchagain.
Auto reverse stops sensing when the
window is almost closed. You should
always check that all passengers and
objects are away from the window
before closing it. Mirrors
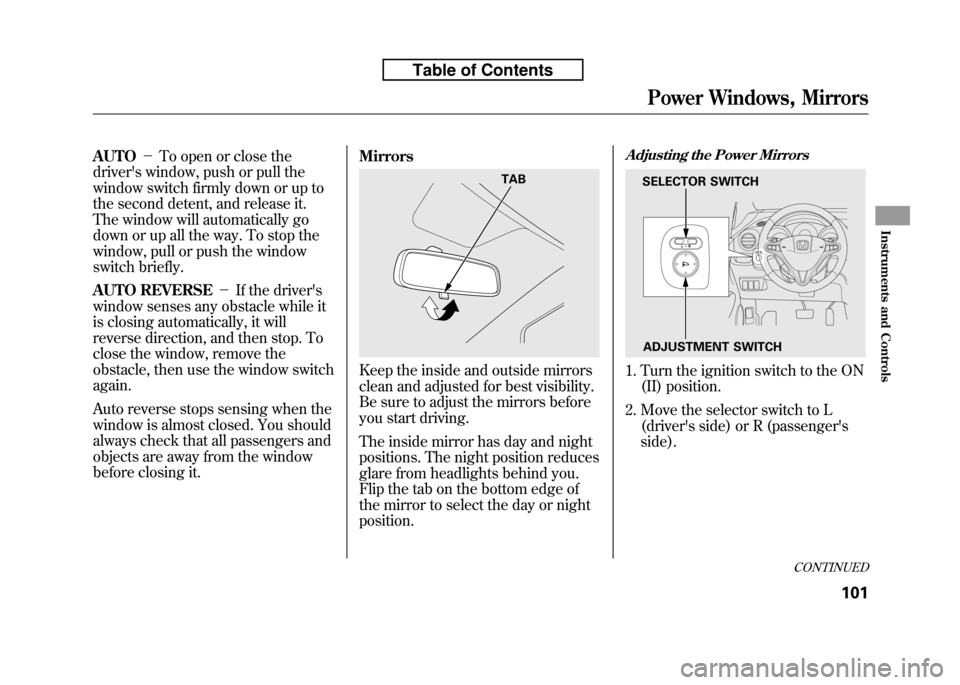
Keep the inside and outside mirrors
clean and adjusted for best visibility.
Be sure to adjust the mirrors before
you start driving.
The inside mirror has day and night
positions. The night position reduces
glare from headlights behind you.
Flip the tab on the bottom edge of
the mirror to select the day or nightposition.
Adjusting the Power Mirrors
1. Turn the ignition switch to the ON
(II) position.
2. Move the selector switch to L (driver's side) or R (passenger's side).
TABSELECTOR SWITCH
ADJUSTMENT SWITCH
CONTINUED
Power Windows, Mirrors
101
Instruments and Controls
Table of Contents
Page 118 of 351
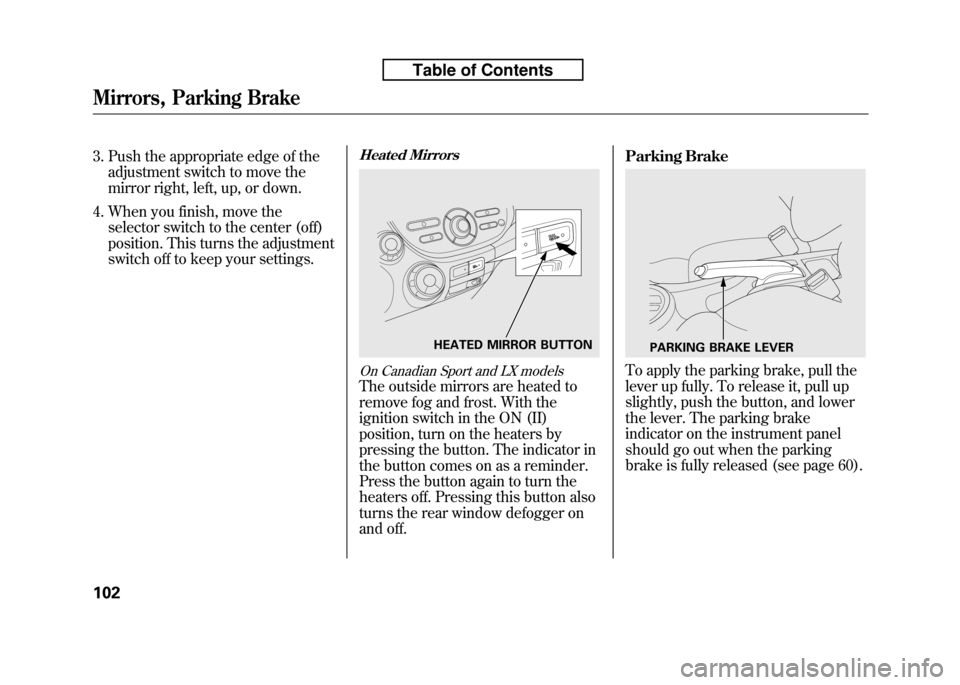
3. Push the appropriate edge of theadjustment switch to move the
mirror right, left, up, or down.
4. When you finish, move the selector switch to the center (off)
position. This turns the adjustment
switch off to keep your settings.Heated Mirrors
On Canadian Sport and LX models
The outside mirrors are heated to
remove fog and frost. With the
ignition switch in the ON (II)
position, turn on the heaters by
pressing the button. The indicator in
the button comes on as a reminder.
Press the button again to turn the
heaters off. Pressing this button also
turns the rear window defogger on
and off. Parking Brake
To apply the parking brake, pull the
lever up fully. To release it, pull up
slightly, push the button, and lower
the lever. The parking brake
indicator on the instrument panel
should go out when the parking
brake is fully released (see page 60).
HEATED MIRROR BUTTONPARKING BRAKE LEVER
Mirrors, Parking Brake
102
Table of Contents
Page 119 of 351
Driving the vehicle with the parking
brake applied can damage the rear
brakes and axles. A beeper will sound if
the vehicle is driven with the parking
brake on.
Parking Brake
103
Instruments and Controls
Table of Contents
Page 120 of 351
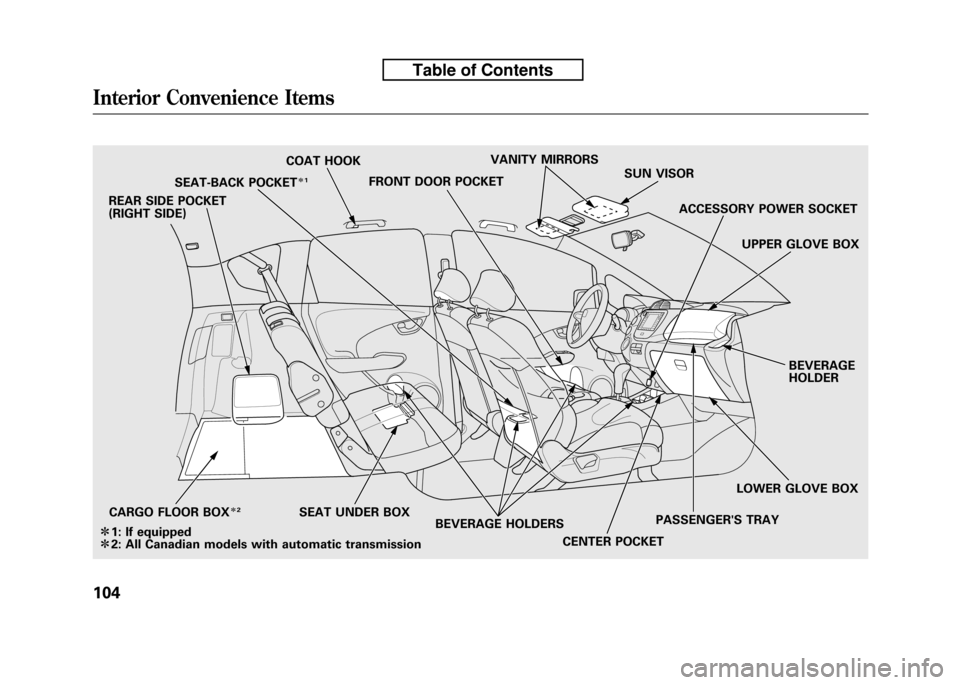
SEAT-BACK POCKETꭧ1
COAT HOOK
FRONT DOOR POCKET VANITY MIRRORS
SUN VISOR
SEAT UNDER BOX CENTER POCKETPASSENGER'S TRAYUPPER GLOVE BOX
ACCESSORY POWER SOCKET
BEVERAGE HOLDER
REAR SIDE POCKET
(RIGHT SIDE)
LOWER GLOVE BOX
BEVERAGE HOLDERS
CARGO FLOOR BOX
ꭧ
2
ꭧ 1: If equipped
ꭧ 2: All Canadian models with automatic transmission
Interior Convenience Items
104
Table of Contents