HONDA FIT 2010 2.G Owners Manual
Manufacturer: HONDA, Model Year: 2010, Model line: FIT, Model: HONDA FIT 2010 2.GPages: 351, PDF Size: 5.67 MB
Page 121 of 351
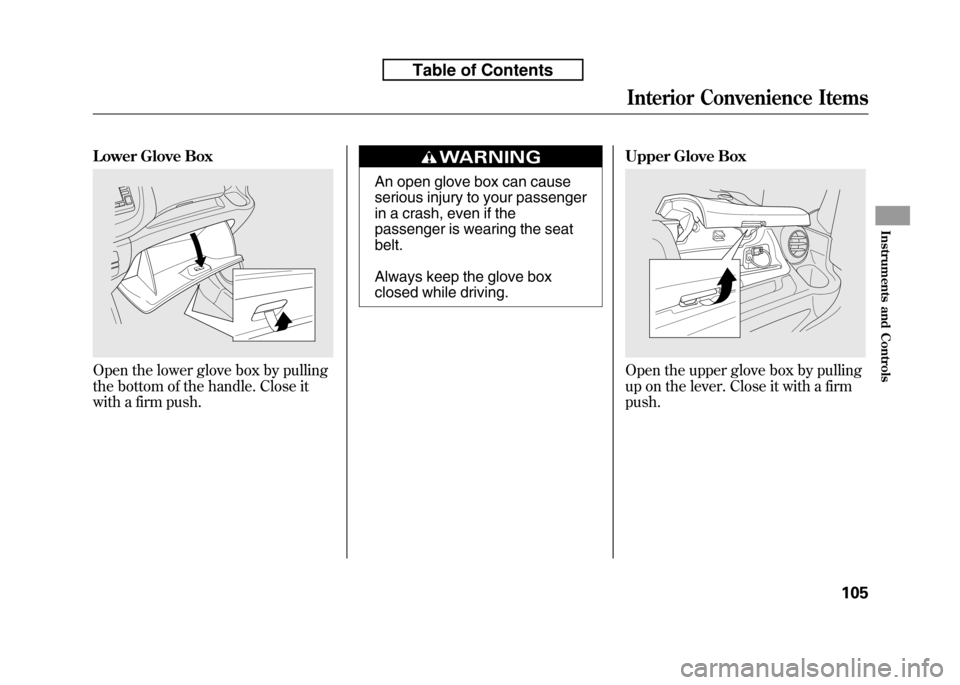
Lower Glove Box
Open the lower glove box by pulling
the bottom of the handle. Close it
with a firm push.
An open glove box can cause
serious injury to your passenger
in a crash, even if the
passenger is wearing the seatbelt.
Always keep the glove box
closed while driving.Upper Glove Box
Open the upper glove box by pulling
up on the lever. Close it with a firmpush.
Interior Convenience Items
105
Instruments and Controls
Table of Contents
Page 122 of 351
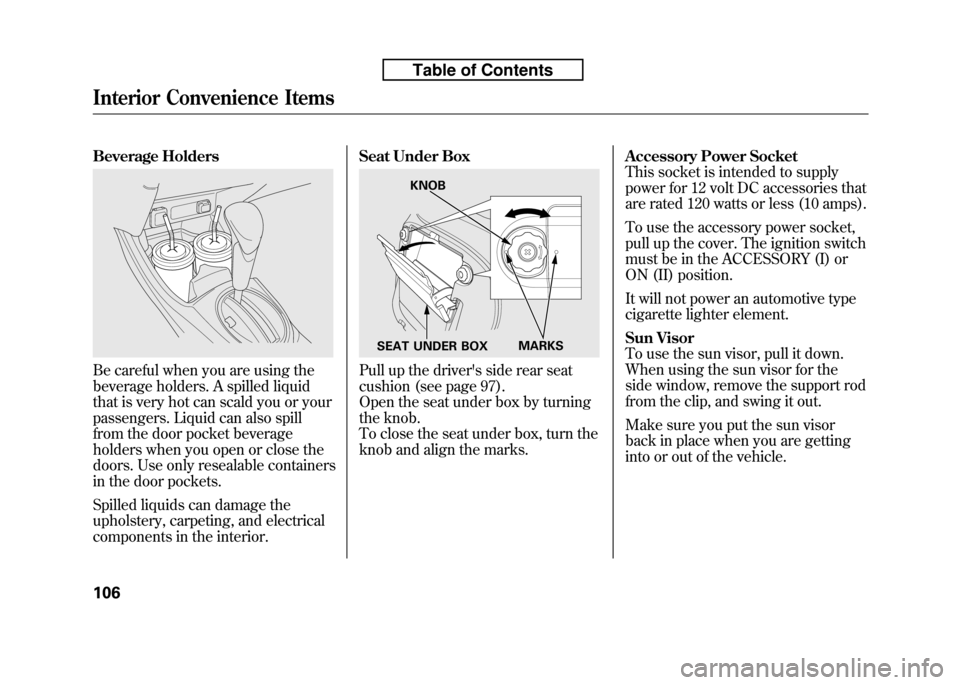
Beverage Holders
Be careful when you are using the
beverage holders. A spilled liquid
that is very hot can scald you or your
passengers. Liquid can also spill
from the door pocket beverage
holders when you open or close the
doors. Use only resealable containers
in the door pockets.
Spilled liquids can damage the
upholstery, carpeting, and electrical
components in the interior.Seat Under BoxPull up the driver's side rear seat
cushion (see page 97).
Open the seat under box by turning
the knob.
To close the seat under box, turn the
knob and align the marks.
Accessory Power Socket
This socket is intended to supply
power for 12 volt DC accessories that
are rated 120 watts or less (10 amps).
To use the accessory power socket,
pull up the cover. The ignition switch
must be in the ACCESSORY (I) or
ON (II) position.
It will not power an automotive type
cigarette lighter element.
Sun Visor
To use the sun visor, pull it down.
When using the sun visor for the
side window, remove the support rod
from the clip, and swing it out.
Make sure you put the sun visor
back in place when you are getting
into or out of the vehicle.
KNOB
MARKS
SEAT UNDER BOX
Interior Convenience Items
106
Table of Contents
Page 123 of 351
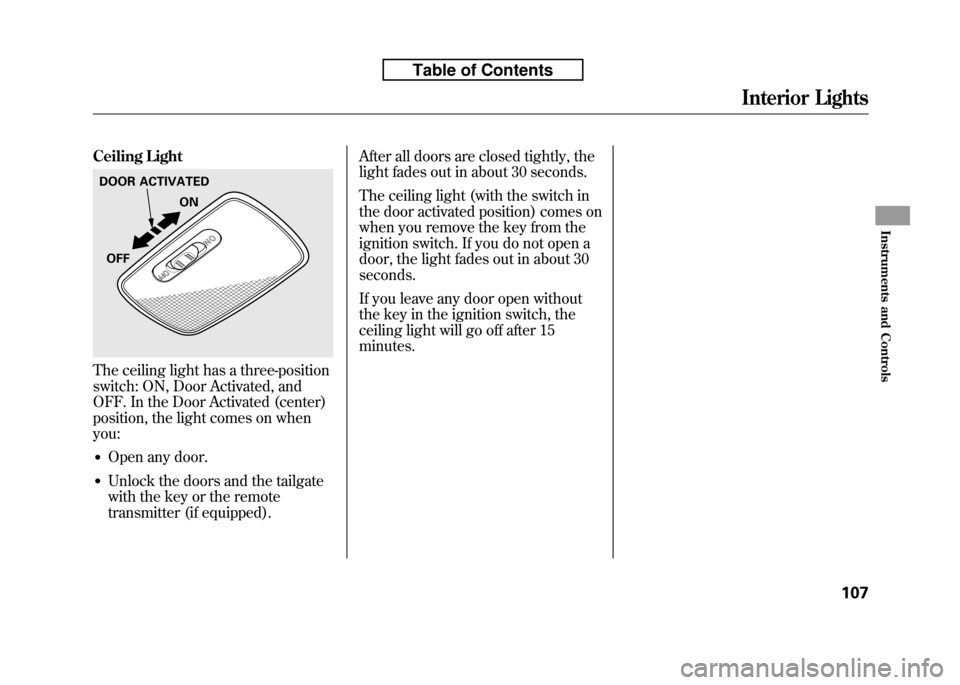
Ceiling Light
The ceiling light has a three-position
switch: ON, Door Activated, and
OFF. In the Door Activated (center)
position, the light comes on whenyou:● Open any door.
● Unlock the doors and the tailgate
with the key or the remote
transmitter (if equipped). After all doors are closed tightly, the
light fades out in about 30 seconds.
The ceiling light (with the switch in
the door activated position) comes on
when you remove the key from the
ignition switch. If you do not open a
door, the light fades out in about 30seconds.
If you leave any door open without
the key in the ignition switch, the
ceiling light will go off after 15minutes.
DOOR ACTIVATED
ON
OFF
Interior Lights
107
Instruments and Controls
Table of Contents
Page 124 of 351
The heating and air conditioning
system in your vehicle provides a
comfortable driving environment in
all weather conditions.
The standard audio system has many
features. This section describes
those features and how to use them.
Your vehicle has an anti-theft audio
system that requires a code number
to enable it.
The security system helps to
discourage vandalism and theft of
your vehicle.Vents, Heating, and A/C.............
110
Playing the FM/AM Radio (Models without navigationsystem) ...............................
115
Playing a Disc (Models without navigation system) ..................
122
Disc Player Error Messages (Models without navigationsystem) ...............................
128
Playing an iPod
®(Models without
navigation system) ..................
129
iPod
®Error Messages (Models
without navigation system) .....
135
Playing a USB Flash Memory Device (Models without
navigation system) ..............
136
USB Flash Memory Device Error
Messages (Models withoutnavigation system) ..............
142
Playing the AM/FM Radio
(Models with navigation
system) ...............................
143
Playing a Disc (Models with
navigation system) ..................
149Disc Player Error Messages
(Models with navigation
system) ...............................
157
Playing a PC card (Models with
navigation system) ..................
158
Playing an iPod
®(Models with
navigation system) ..................
170
iPod
®Error Messages (Models
with navigation system) ..........
176
Playing a USB Flash Memory
Device (Models withnavigation system) ..............
177
USB Flash Memory Device Error Messages (Models withnavigation system) ..............
183
FM/AM Radio Reception ............
184
Protecting Your Discs .................
186
Remote Audio Controls ...............
189
Auxiliary Input Jack ....................
190
Radio Theft Protection ................
191
Setting the Clock .........................
192
Security System ..........................
193
Cruise Control ............................
194
Features
109
Features
Page 125 of 351
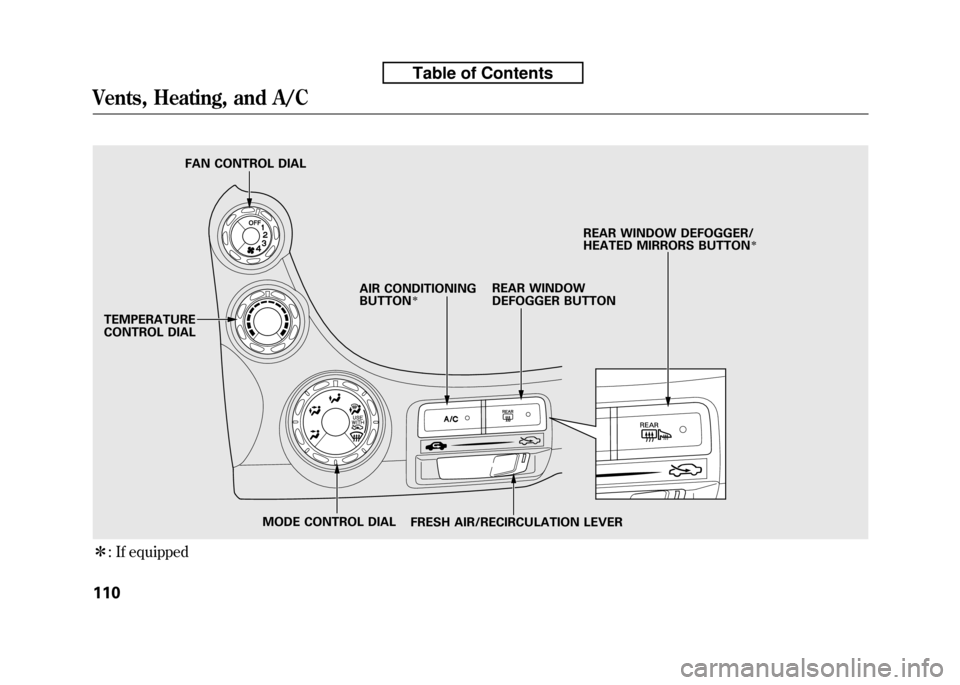
ꭧ: If equipped
TEMPERATURE
CONTROL DIAL FAN CONTROL DIAL
REAR WINDOW
DEFOGGER BUTTON
AIR CONDITIONINGBUTTON
ꭧ
FRESH AIR/RECIRCULATION LEVER REAR WINDOW DEFOGGER/
HEATED MIRRORS BUTTON
ꭧ
MODE CONTROL DIAL
Vents, Heating, and A/C
110
Table of Contents
Page 126 of 351

Airflow Controls
Fan Control Dial
Turn this dial to increase or decrease
the fan speed and airflow.
Temperature Control Dial
Turning this dial clockwise increases
the temperature of the airflow.
Air Conditioning (A/C) Button
If equipped
This button turns the air
conditioning on and off. The
indicator in the button is on when the
A/C is on.
Fresh Air/Recirculation Lever
This lever controls the source of the
air going into the system. When you
slide the lever to the
side, air is
brought in from outside the vehicle
(fresh air mode). When you selectthe
side, air from the vehicle's
interior is sent through the system
again (recirculation mode). The outside air intakes for the
heating and cooling system are at the
base of the windshield. Keep this
area clear of leaves and other debris.
The system should be left in fresh air
mode under almost all conditions.
Keeping the system in recirculation
mode, particularly with the A/C off,
can cause the windows to fog up.
Switch to recirculation mode when
driving through dusty or smoky
conditions, then return to fresh airmode.
Rear Window Defogger Button
/
This button turns the rear window
defogger on and off (see page 76).
On some models, this button also
operates the heated outside mirrors
(see page 102).
Mode Control Dial
Use the mode control dial to select
the vents the air flows from. Some air
will flow from the dashboard corner
vents in all modes.
Air flows from the center and
corner vents in the dashboard.
Airflow is divided between the
vents in the dashboard and the floor vents.
Air flows from the floor vents.
Airflow is divided between the
floor vents and defroster vents at the
base of the windshield.
Air flows from the defroster
vents at the base of the windshield.
CONTINUED
Vents, Heating, and A/C
111
Features
Table of Contents
Page 127 of 351

When you selector, the
system automatically turns on the
A/C (if equipped). You cannot turn
the A/C off in this mode. Ventilation
The flow-through ventilation system
draws in outside air, circulates it
through the interior, then discharges
it through vents near the tailgate.
1. Set the temperature to the lower limit.
2. Make sure the A/C is off.
3. Select
and.
4. Set the fan to the desired speed. Using the Heater
The heater uses engine coolant to
warm the air. If the engine is cold, it
will be several minutes before you
feel warm air coming from thesystem.
1. Select
and.
2. Set the fan to the desired speed.
3. Adjust the warmth of the air with the temperature control dial. Using the A/C
If equipped
Air conditioning places an extra load
on the engine. Check the high
temperature indicator (see page 63).
If the indicator begins to blink, turn
off the A/C until the indicator goesoff.
1. Turn on the A/C by pressing the
button. The indicator in the button
comes on when a fan speed isselected.
2. Make sure the temperature is set to maximum cool.
3. Select
.
4. If the outside air is humid, select recirculation mode. If the outside
air is dry, select
.
5. Set the fan to the desired speed.
Vents, Heating, and A/C
112
Table of Contents
Page 128 of 351

If the interior is very warm,you can
cool it down more rapidly by partially
opening the windows, turning on the
A/C, and setting the fan to maximum
speed in
.
Dehumidify the Interior
Air conditioning, as it cools, removes
moisture from the air. When used in
combination with the heater, it
makes the interior warm and dry and
can prevent the windows from
fogging up.
1. Turn the fan on.
2. If the A/C is off, turn it on (if equipped).
3. Select
and.
Adjust the temperature to your preference.
This setting is suitable for all driving
conditions whenever the outside
temperature is above 32°F (0°C). To Defog and Defrost
To remove fog from the inside of thewindows:
1. Set the fan to the desired speed or
high for faster defrosting.
2. Select
by sliding the lever.
3. Select
. The system
automatically turns on the A/C (if
equipped). The A/C indicator will
not come on if it was previously off.
4. Adjust the temperature so the airflow feels warm.
5. Select
/to help clear the
rear window.
6. To increase airflow to the windshield, close the corner vents. When you select
or, the
system automatically turns on the
A/C. This helps to dehumidify the air
and to defog the windshield. In either
mode, you cannot turn off the A/C.
When you switch to another mode,
the A/C returns to its original
setting, either on or off, as indicated
by the A/C indicator.
CONTINUED
Vents, Heating, and A/C
113
Features
Table of Contents
Page 129 of 351

To Remove Exterior Frost or Ice
From the Windows
1. Set the fan and temperaturecontrols to maximum level.
2. Select
. The system
automatically turns on the A/C (if
equipped). The A/C indicator does
not come on if it was previously off.
3. Select
.
To clear the windows faster, you can
close the dashboard corner vents by
rotating each vent. This sends more
warm air to the windshield defroster
vents. Once the windshield is clear,
select fresh air mode to avoid
fogging the windows.
For your safety, make sure you have
a clear view through all the windows
before driving. To Turn Everything Off
Turning the fan speed control dial all
the way to the left shuts the systemoff.
● Keep the system off for short
periods only.
● To keep stale air and mustiness
from collecting, you should have
the fan running at all times.
Vents, Heating, and A/C
114
Table of Contents
Page 130 of 351
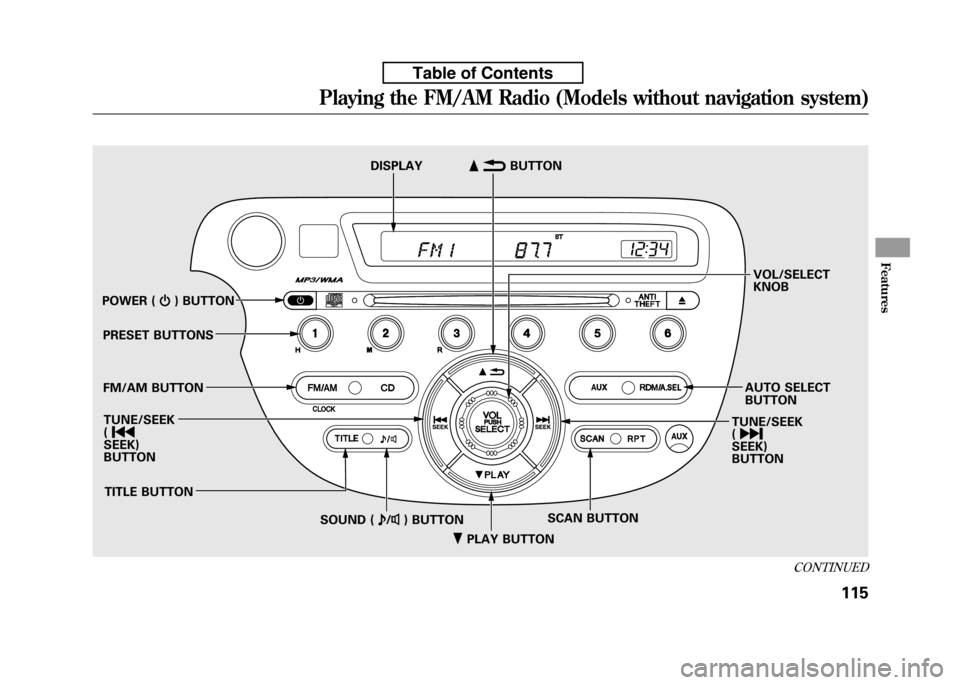
ꂺPLAY BUTTON
POWER (
ꂻ) BUTTON
PRESET BUTTONS
FM/AM BUTTON TUNE/SEEK ( ꀾ
SEEK)
BUTTON
TITLE BUTTON SCAN BUTTON
SOUND ( ꂼ/ꂽ ) BUTTON
DISPLAY
ꂹꂾ
BUTTON
VOL/SELECT KNOB
AUTO SELECT BUTTON
TUNE/SEEK ( ꀽ
SEEK)BUTTON
CONTINUED
Playing the FM/AM Radio (Models without navigation system)
115
Features
Table of Contents