HONDA INTEGRA 1994 4.G Workshop Manual
Manufacturer: HONDA, Model Year: 1994, Model line: INTEGRA, Model: HONDA INTEGRA 1994 4.GPages: 1413, PDF Size: 37.94 MB
Page 281 of 1413
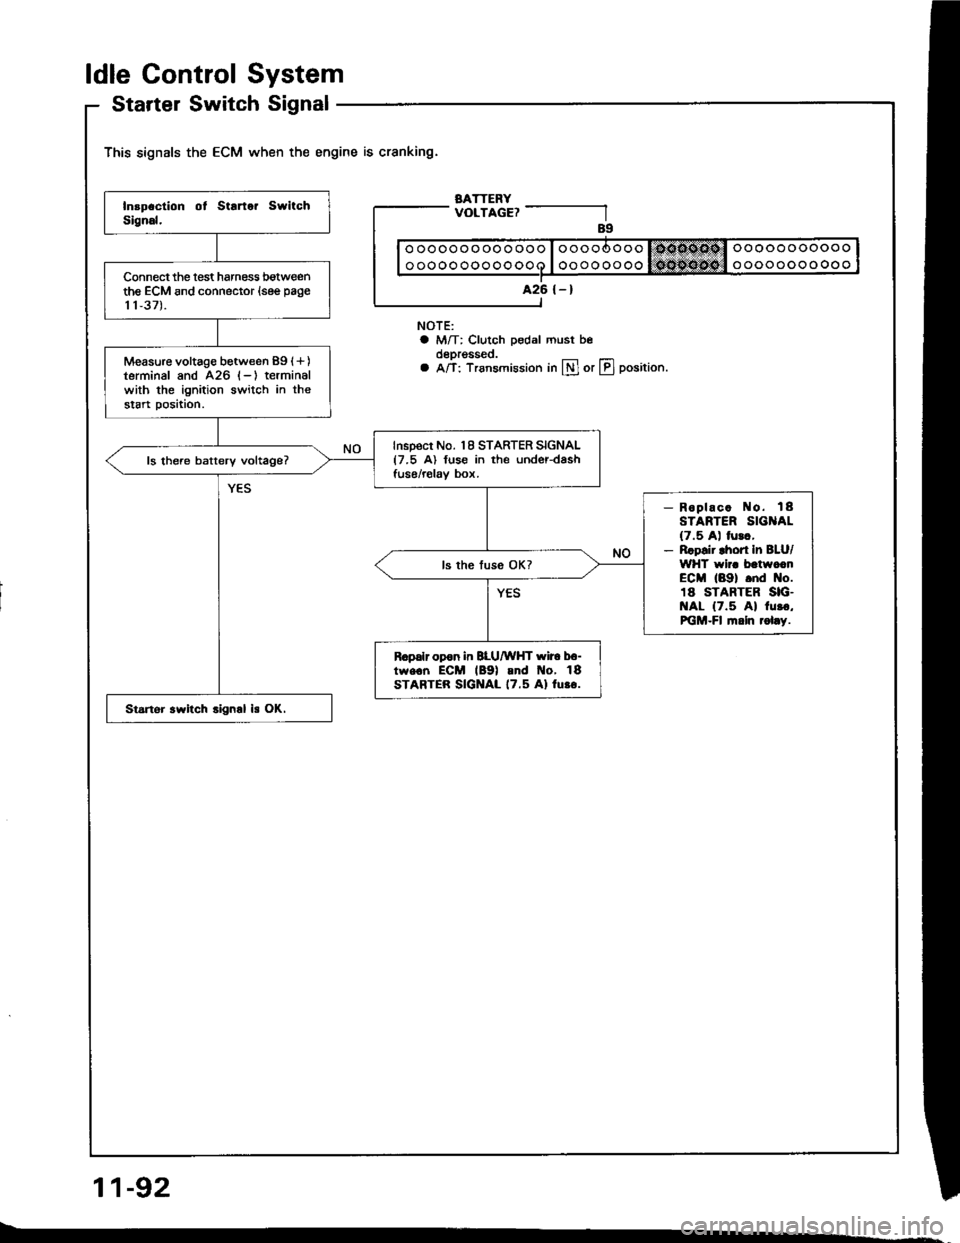
ldle Gontrol System
Startel Switch Signal
This signals the ECM when the engine is cranking.
BATTERYVOLTAGE?
NOTE:a M/T: Clutch pedal must beoeprgsseo.a A/T: Trsnsmission in lll or LIJ position.
11-92
ooooooooooooo
oooooooooooo
A26 {-}Connect the lest harness botweenthe ECM and connector (see page
11,37).
Measure voltage between 89 (+)
terminal and 426 (-) terminalwith the ignition switch in thestart position.
Inspect No. 18 STARTER SIGNAL{7.5 A) fuse in the under-dashfuse/relav box.ls there batterv voltage?
- Roplac. No. 18STARTER SIG AL(7.5 A) lurc,- Rrpsir lhort In BLU/WHT wir. batwccnECM (89) .nd No.18 STARTER SIG.t{AL {7.5 Al 1u..,PiGM-Fl fi.ln rol.y.
R.palr opon in BLU/WHT wir6 b6-tw€.n ECM lB9l and t{o, 18STARTER SIGNAL 17.5 Al lu.o.
Startor .witch .ign.l is OK.
Page 282 of 1413
![HONDA INTEGRA 1994 4.G Workshop Manual Power Steering Pressure (PSP) Switch Signal
This signals the ECM when the power steering load
-;"nection.*."------.ill]
--
;;;;;;;l w
;:"r"tffa;i
connecrors (see
Turn the ignition switch ON.
Measur HONDA INTEGRA 1994 4.G Workshop Manual Power Steering Pressure (PSP) Switch Signal
This signals the ECM when the power steering load
-;"nection.*."------.ill]
--
;;;;;;;l w
;:"r"tffa;i
connecrors (see
Turn the ignition switch ON.
Measur](/img/13/6067/w960_6067-281.png)
Power Steering Pressure (PSP) Switch Signal
This signals the ECM when the power steering load
-;"nection.*."------'.ill]
--
;;;;;;;l w
;:"r"tffa;i'
connecrors (see
Turn the ignition switch ON.
Measure voltage between 88 {+ )terminal and A26 {-) terminal.
is high.
o ooooo oooo ooo I oo ooo oo o l.Do€d(iltl ooooooooooo
o oooo ooo ooooQ I oooQ oo oo $aG$ast.l oooooooo oo
A26 l-) Bg l+l
L6s! thsn l.O V?
wire side
Turn the ignition switch OFF.
Disconnect the 2P connector tromthe PSP switch.
ls there less than 1.0 V?
Tu.n the ignition switch ON.
Turn steering wheel slowly.ls there less than 1.O V?
Measure voltage between B8 (+)
terminal and 426 (-) termanalwhile steering wheel is turning.
Ropair opon in GRN wire betwssnECM {88} and PSP srYilch ot BLKwi.o botw6cn PSP switch andG301 (locatod at loft ongin6 com-partm6ntr.
Disconnect the 2P connector lromthe PSP switch.PSP switch signal is OK.
Repair short in GRN wi.e botwoonECM {881 and PSP switch.ll wiro i3 OK, substitute a known-good ECM and.ocheck. lIproscribod vollage is now available, replaco tho original ECM.
GRN
PSP SWITCH
11-93
Page 283 of 1413
ldle Control System
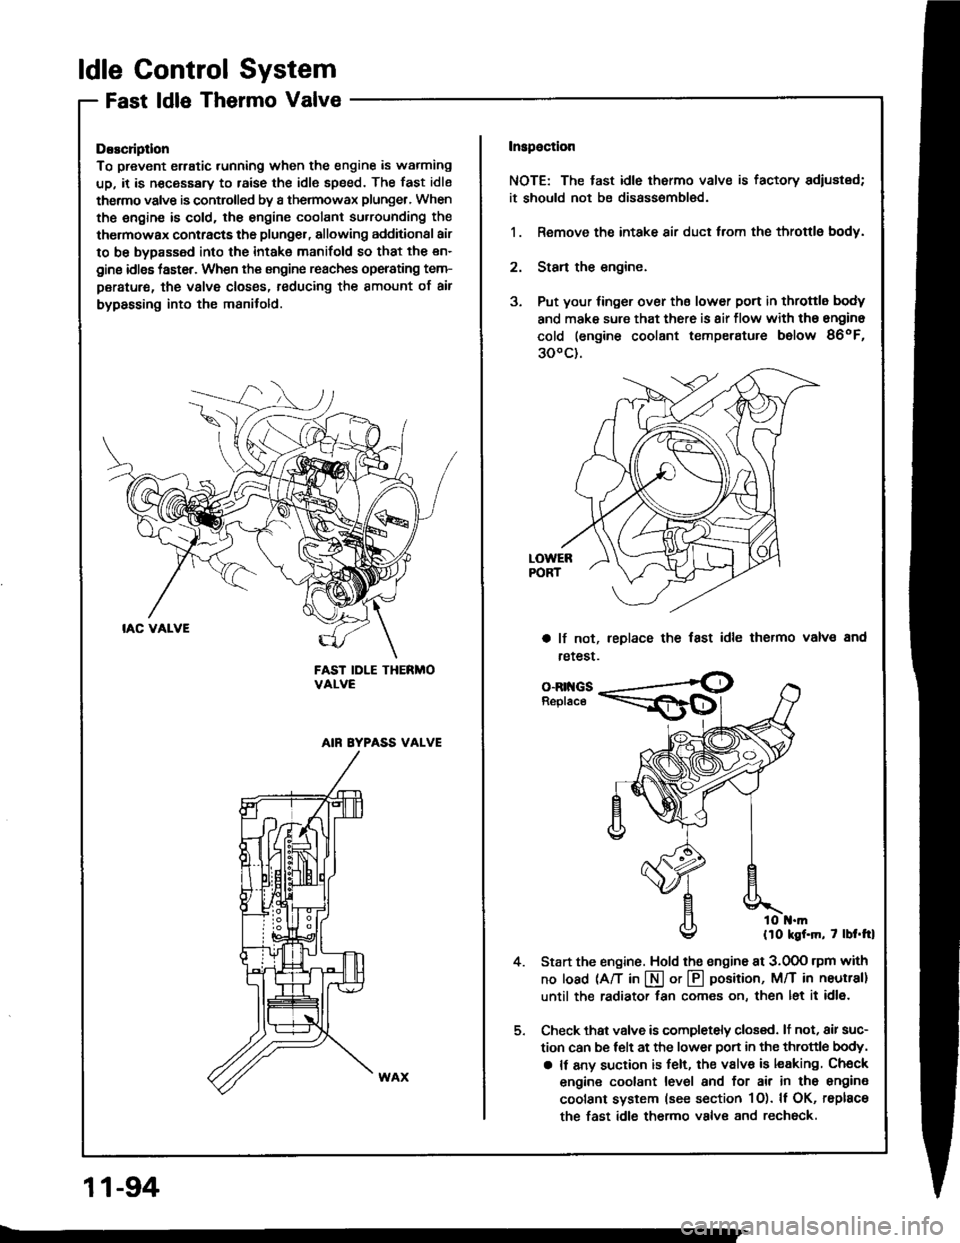
Fast ldle Thermo Valve
DEscliptlon
To prevent erratic running when the engine is warming
up, it is n€cessary to raise the idle speed. The fast idle
thermo valve is controlled by a thermowax plunger, When
the engine is cold. the engine coolant su.rounding the
thermowax contracts the plunger, allowing additional air
to be bypassed into the intake manifold so that the en-
gine idlss taster. When the engine reaches operating tem-
peratur€, the valve closss, reducing the amount of air
bypassing into the manifold.
FAST IDLE THERMOVALVE
AIN EYPASS VALVE
Inspaction
NOTE: The tast idle thermo valve is factory adiustsd;
it should not be disassombl€d.
1. Remove the intake air duct from the throttlg body.
2. Stan the engine.
3. Put your finger over ths lower port in throttle body
and make sure that there is 8ir flow with tho engine
cold (engine coolant temperatute below 86oF,
300c).
a lf not,
retest.
leplace the fast idle thermo valvs and
4.
o-Rr{GsReplace
llo kgf.m, 7 lbt.trl
Start the engine. Hold the sngine at 3.0OO rpm with
no load (A/T in I or @ position, M/T in neutral]
until the radiator fan comes on, then let it idl6.
Check thst valve is completely closed. lt not, air suc-
tion can be telt at the lower Don in the throttle body,
a It any suction is felt, the valve is leaking Check
engine coolant level and for air in tho engine
coolant system (see section 1O). ll OK, rsplace
the fast idle thermo valve and rechock.
11-94
Page 284 of 1413
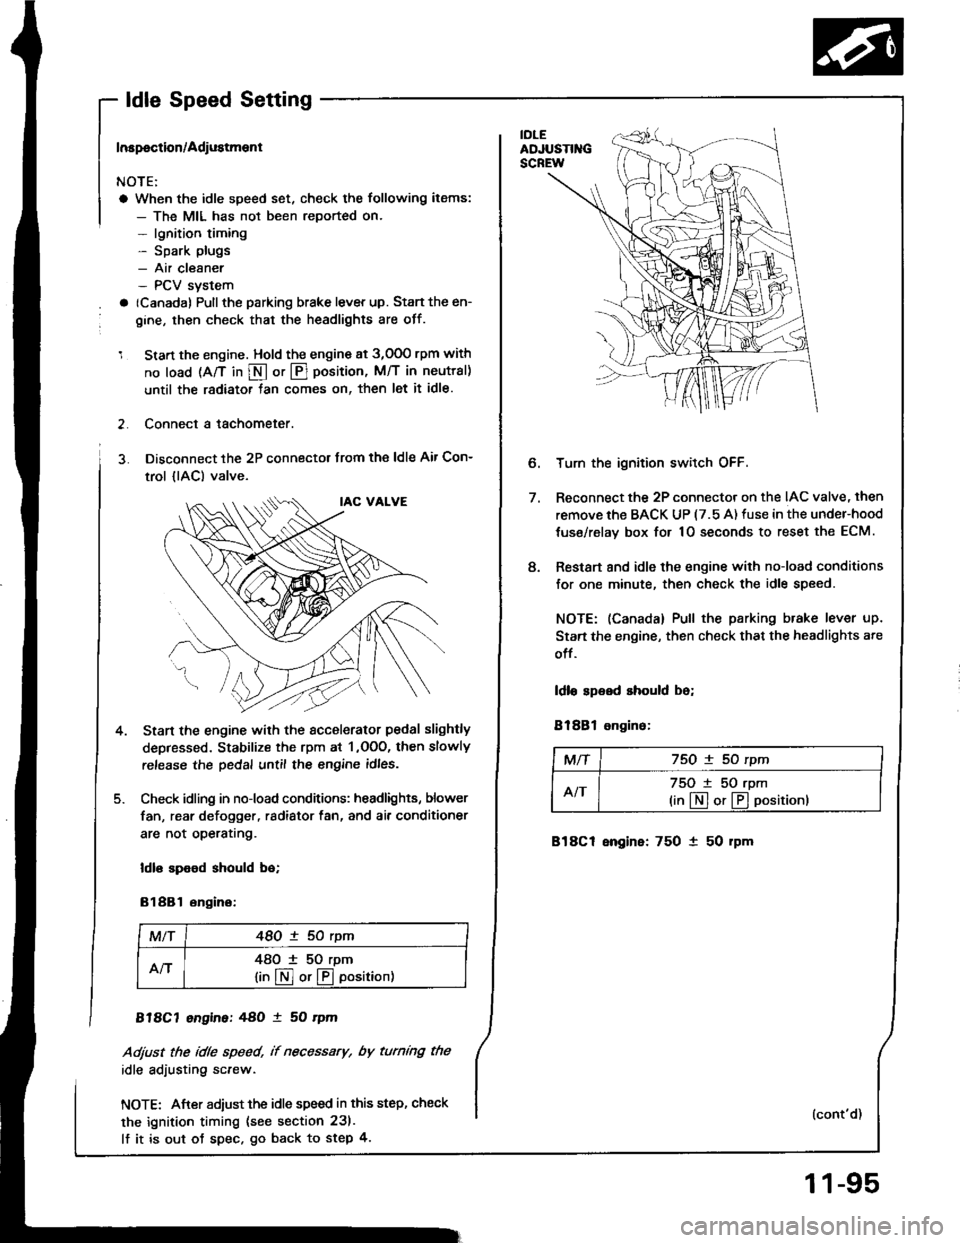
- ldle Speed Setting
Inspoction/Adiustment
NOTE:
a When the idle speed set, check the following items:
- The MIL has not been reported on.- lgnition timing- Spark plugs- Air cleaner- PCV svstem
a (Canada) Pullthe parking brake lever up. Stan the en-
gine, then check that the headlights are off.
1 Start the engine. Hold the engine at 3,000 rpm with
no load (A/T in S or @ position, M/T in neutral)
until the radiator tan comes on, then let it idle.
2. Connect a tachometer.
3. Disconnect the 2P connectot trom the ldle Air Con-
trol {lAC) valve.
Start the engine with the sccelerator pedal slightly
depressed. Stabilize the rpm at 1 ,OOO, then slowly
release the pedal until the engine idles.
Check idling in no-load conditions: headlights, blower
fan, rear defogger, radiator fan, and ai. conditioner
are not operatrng.
ldl€ spood should bo;
81881 ongino:
MlT48O ! 50 rym
An48O I 50 rpm
lin@or@oosition)
818C7 engine:48O ! 50 rym
Adjust the idle speed, if necessary, by turnmg the
idle adiusting screw.
NOTE: After adiust the idle speed in this step, check
the ignition timing (see section 231.
lf it is out ot spec. go back to step 4.
4.
e
Turn the ignition switch OFF.
Reconnect the 2P connector on the IAC valve, then
remove the BACK UP (7.5 A) fuse in the under-hood
tuse/relav box for 1O seconds to reset the ECM.
Restart 8nd idle the engine with no-load conditions
for one minute, then check the idle speed.
NOTE: (Canada) Pull the parking brake lever up.
Start the engine, then check that the headlights ate
off.
ldlo speed should be;
81881 ongino:
MTf75O ! 50 rpm
AIT75O t 50 rpm
(in[]or@positionl
818C1 engine: 750 1 50 rpm
(cont'd)
11-95
Page 285 of 1413
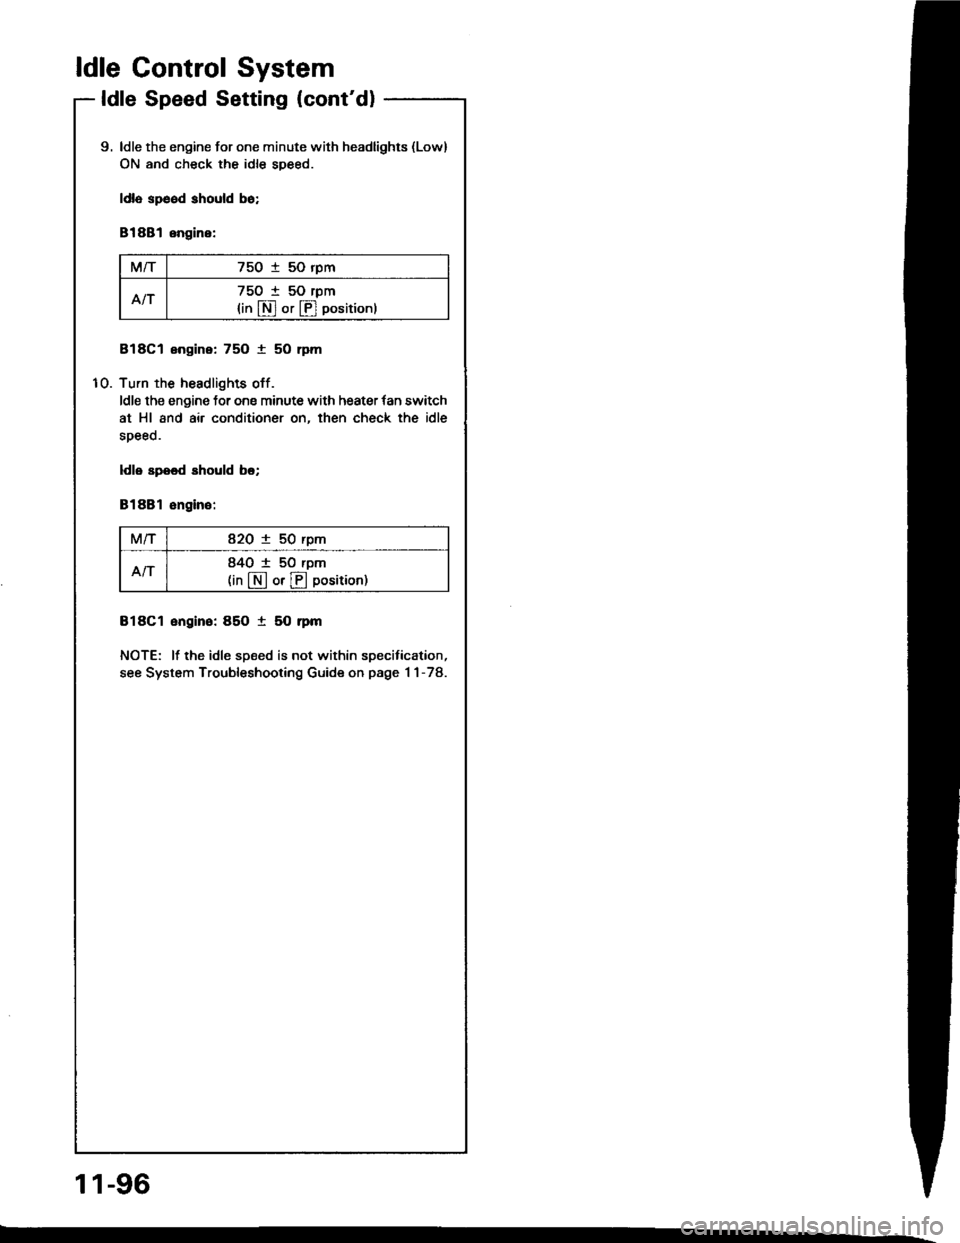
ldle Control System
ldle Speed Setting (cont'd)
10.
9. ldle the engine for one minute with headlights {Low}
ON and check the idle sDeed.
ldla sp6od should bo;
81881 engine:
M/T750 i 50 rpm
An75O t 50 rpm
{in $ or p] positionl
818C1 engine: 75O 1 50 rpm
Turn the headlights off.
ldle the engine for one minute with heater tan switch
at Hl and air conditioner on, then check the idle
speeo.
ldls spood should bo;
81881 ongino:
M/T82O 1 50 rpm
AN840 1 50 rpm(in [N] or lll position)
818C1 engino: 85O t 50 nm
NOTE: lf the idle speed is not within specitication,
see System Troubleshooting Guide on page 1 1-78.
11-96
Page 286 of 1413
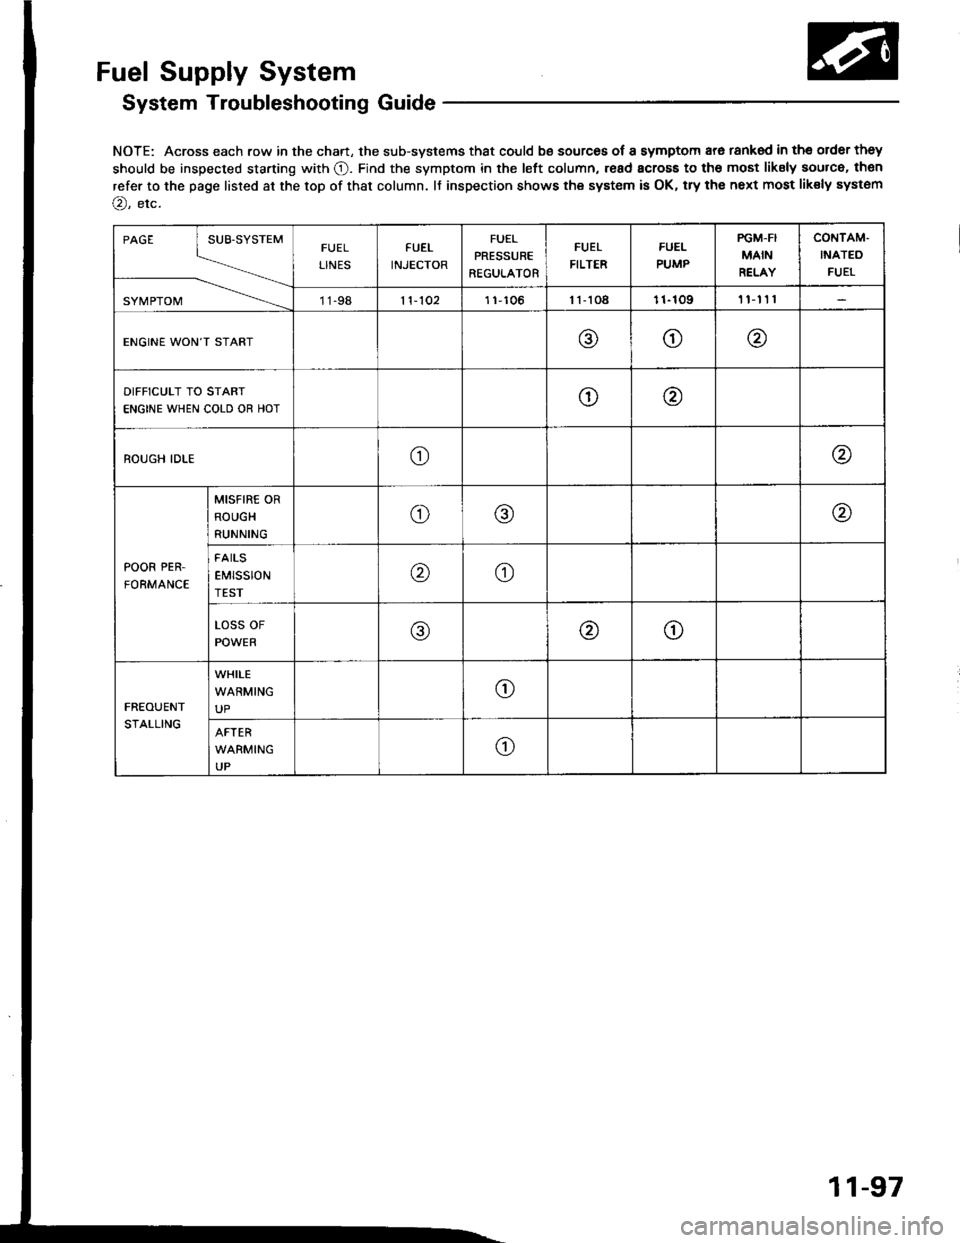
Fuel Supply System
System Troubleshooting Guide
NOTE: Across each row in the chart, the sub-systems that could be sources of a symptom ara tanked in tho order they
should be inspected starting with O. Find the symptom in the left column, read across to the most liksly source, then
refer to the page listed at the top of that column. lf inspection shows the system is OK, try the next most liksly system
@, etc.
PAGE
SYI\4 PTOM
FUEL
LINES
FUEL
INJECTOR
FUEL
PRESSURE
REGULATOR
FUEL
FILTER
FUEL
PUMP
PGM-FI
MAIN
RELAY
CONTAM'
INATEO
FUEI
11-9811-1021 1,106l1-toa11-109t'l'nl
ENGINE WON'T START@o@
DIFFICULT TO START
ENGINE WHEN COLD OR HOTo\4
ROUGH IDLEo@
POOR PER.
FORMANCE
MISFIRE OR
ROUGH
RUNNINGo@@
FAILS
EMtSSION@o
LOSS OF
POWER@@o
FREOUENT
STALLING
WHILE
WARMING
UPo
AFTER
WARMING
UPo
11-97
Page 287 of 1413
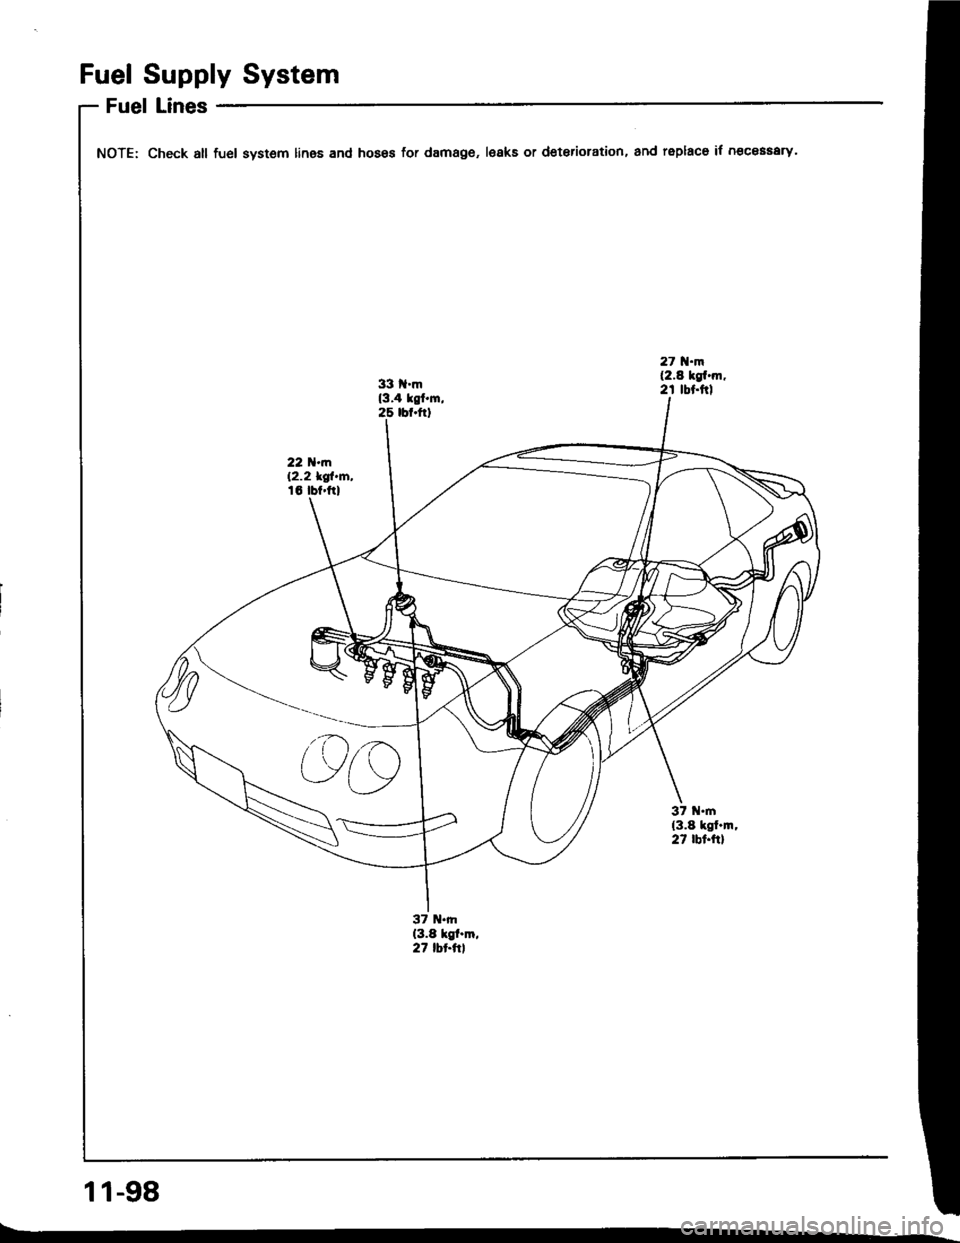
Fuel Supply System
Fuel
NOTE:Check all fuel system lines and hoses for damage, leaks or deterioration, and replaco if n€cessery.
11-98
Page 288 of 1413
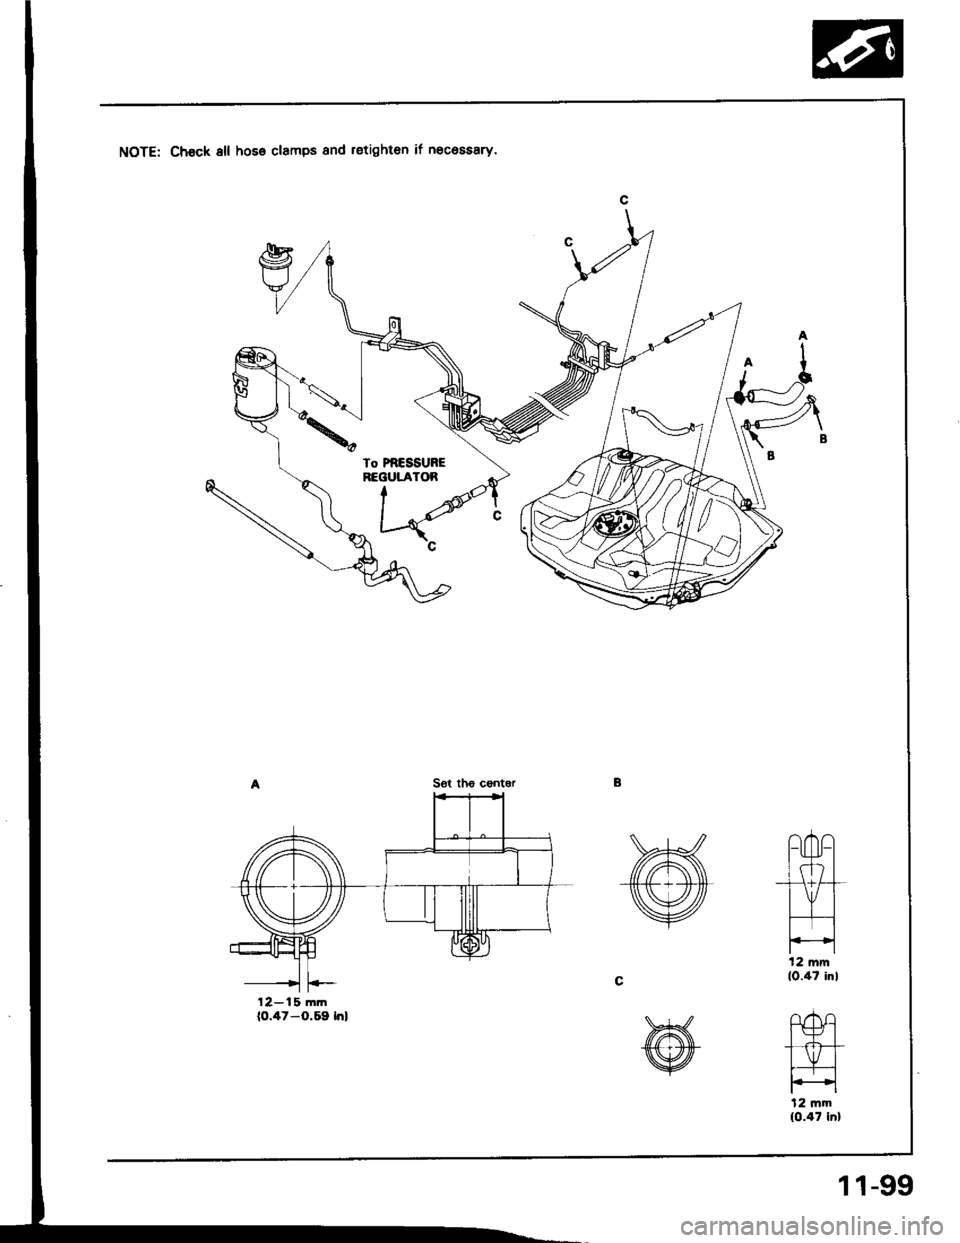
NOTE: Chock 8ll hoso clamps and r€tighton if necossary.
Sot th€ centgr
12-15 mmto.47-o.59 hl
l2 mm(0.47 inl
t2 mm{0.47 in}
11-99
Page 289 of 1413
The fusl supply system consists ot a fuel tank, in-tank
high presssure fu6l pump, PGM-FI main relay, fuel filter,
tuel pressure regulatot, fuel inioctors, fusl pulsation
damper and fuol delivery and return linss. This system
delivers pressure-regulatored fu6l to the fu6l injectors and
cuts the fuel delivory wh6n the engine is not running.
Fuel Supply System
System DescriptionFuel Pressure
a Do not smok6 while working on the fuol syst6m,
Keep open flames or spalks away tlom your work
aroa.
a 8e sure to raliavo fuol p.essur6 while th6 6n9in6 is off.
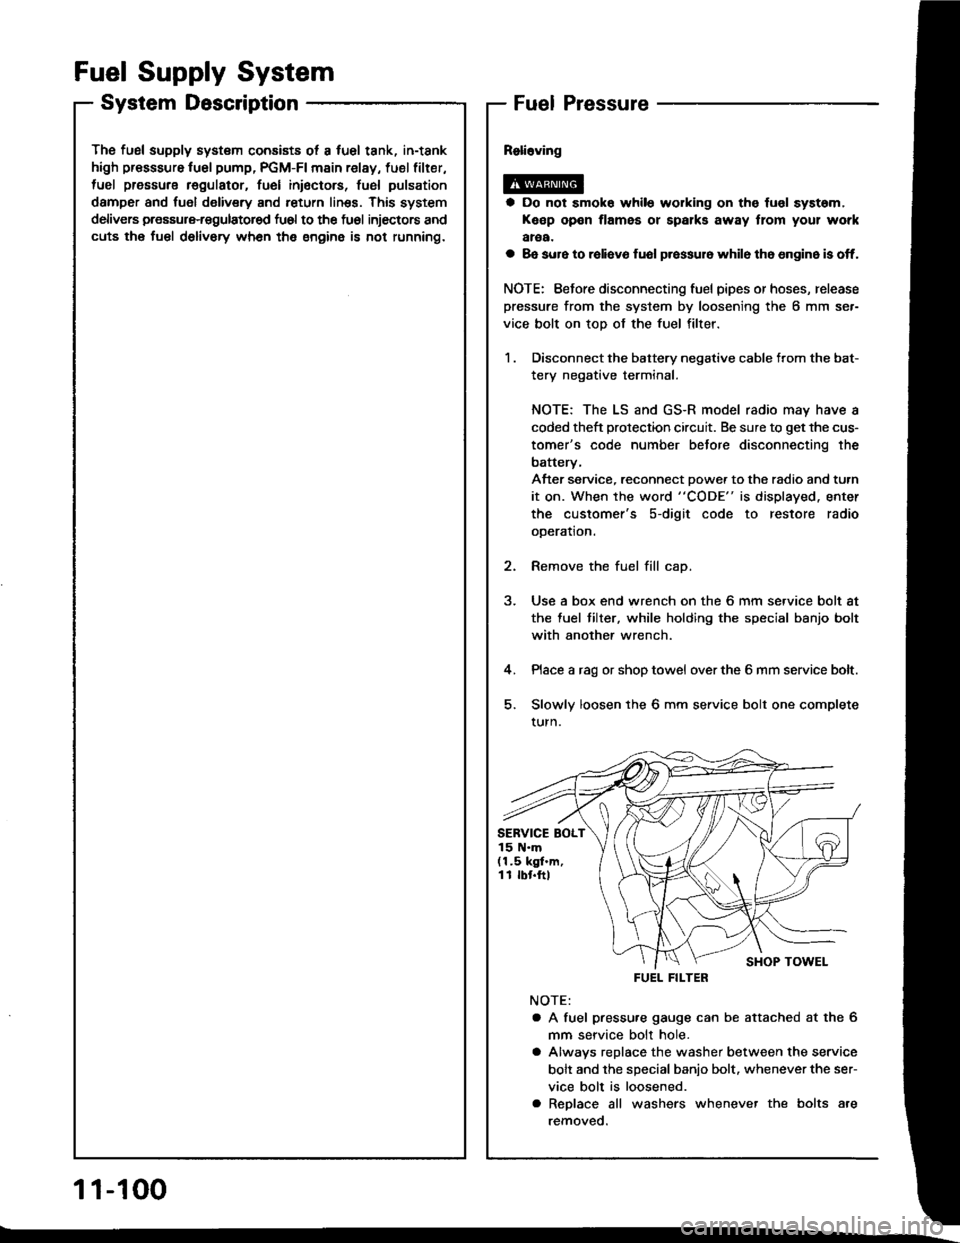
NOTE: Eefore disconnecting fuel pipes or hoses, release
pressure from the system by loosening the 6 mm se.-
vice bolt on top of the fuel filter.
1 . Disconnect the battery negative cable from the bat-
tery negative terminal.
NOTE: The LS and GS-R model radio may have a
coded theft protection circuit. Be sure to get the cus-
tomer's code number betore disconnecting the
batterv,
After service, reconnect Dowe. to the radio and turn
it on. When the word "CODE" is displayed. enter
the customer's s-digit code to restore radio
ooeration.
2. Remove the fuel fill cap.
3. Use a box end wrench on the 6 mm service bolt at
the fuel tilter, while holding the special banjo bolt
with another wrench.
4. Place a rag or shop towel over the 6 mm service bolt.
5. Slowly loosen the 6 mm service bolt one complete
turn.
NOTE:
a A fuel pressu.e gauge can be attached at the 6
mm seryice bolt hole.
a Alwavs replace the washer between the service
bolt and the special banio bolt. whenever the ser-
vice bolt is loosened.
a Replace all washers whenever the bolts are
removeo.
SERVICE BOLT15 N.m(1.5 kgf.m,11 rbr.ftl
FUEL FILTER
1 1-100
Page 290 of 1413
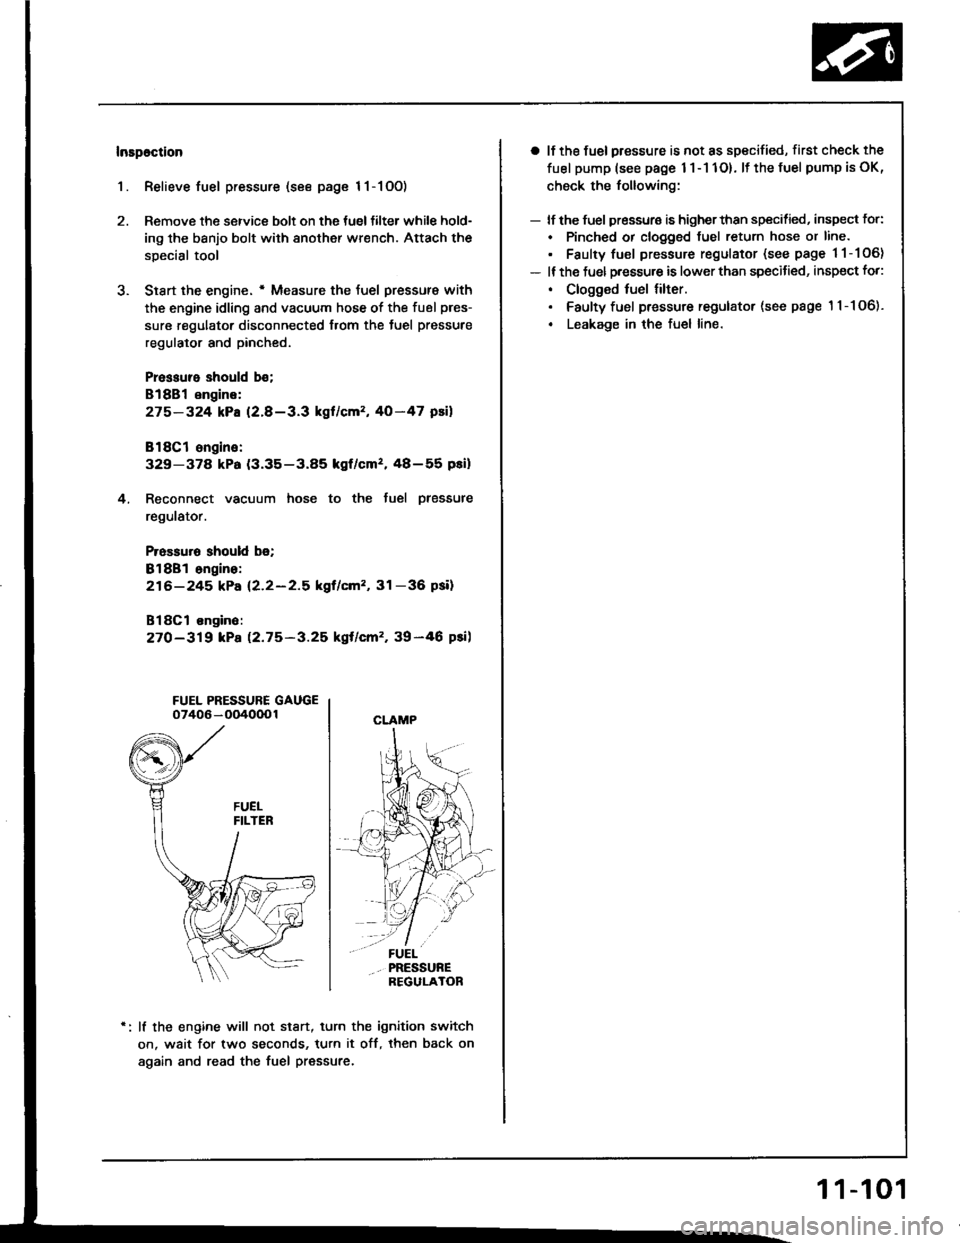
Insp6ction
1. Relieve fuel pressure (see page 11-1OO)
2. Remove the service bolt on the tueltilter while hold-
ing the banjo bolt with another wrench. Attach the
special tool
3. Siart the engine. * Measure the {uel pressur€ with
the engine idling and vacuum hose of the fuel pres-
sure regulator disconnected from the tuel pressure
regulator and pinched.
Pressure should b€;
818B1 engins:
275-324 kPa (2.8-3.3 kgl/cm2, 40-47 psil
818C1 ongine:
329-37a kPa (3.35-3.85 kgf/cmz, 48-55 pei)
4. Reconnect vacuum hose to the tuel plessure
regulator.
Prossuro should b€;
Bl8Bl ongino:
216-245 kPa (2.2-2.5 kgf/cm'�, 31 -36 psil
B18Cl on9in6:
27O-319 kPa 12.75-3.25 kgt/cm'�, 39-46 psi)
FUEL PRESSURE GAUGE07406 - OO4000 1
lf the engine will not stan, turn the ignition switch
on. wait for two seconds, turn it off, then back on
again and read the fuel pressure.
CLAMP
a lf the fuel pressure is not as specified, first check the
fuel pump (see page 1 l - 1 1O). lf the fuel pump is oK,
check the following:
- lf the fuel pressuro is higherthan specified, inspect for:
. Pinched or clogged tuel return hose or line.
. Faulty fuel pressure regulator (see page 11-106)
- It the fuel p.essu.e is lower than specitied, inspect fo.:
. Clogged fuel tilter.. Faulty fuel pressure regulator (see page '11-106).
. Leakage in the fuel line.
1 1-101