connector HONDA INTEGRA 1994 4.G Workshop Manual
[x] Cancel search | Manufacturer: HONDA, Model Year: 1994, Model line: INTEGRA, Model: HONDA INTEGRA 1994 4.GPages: 1413, PDF Size: 37.94 MB
Page 1352 of 1413
Cruise Control
Control Unit Input Test
CAUTION:
a All SRS olectrical wi ng harnessos are covored with
yellow insulation.
a Botore disconnecting any part of th6 SRS wire har-
neaa, connect the short connoctor(sl.
a Roplace the €ntir€ affectod SRS hamass assembly il
il has an opan circuit or damaged wifng.
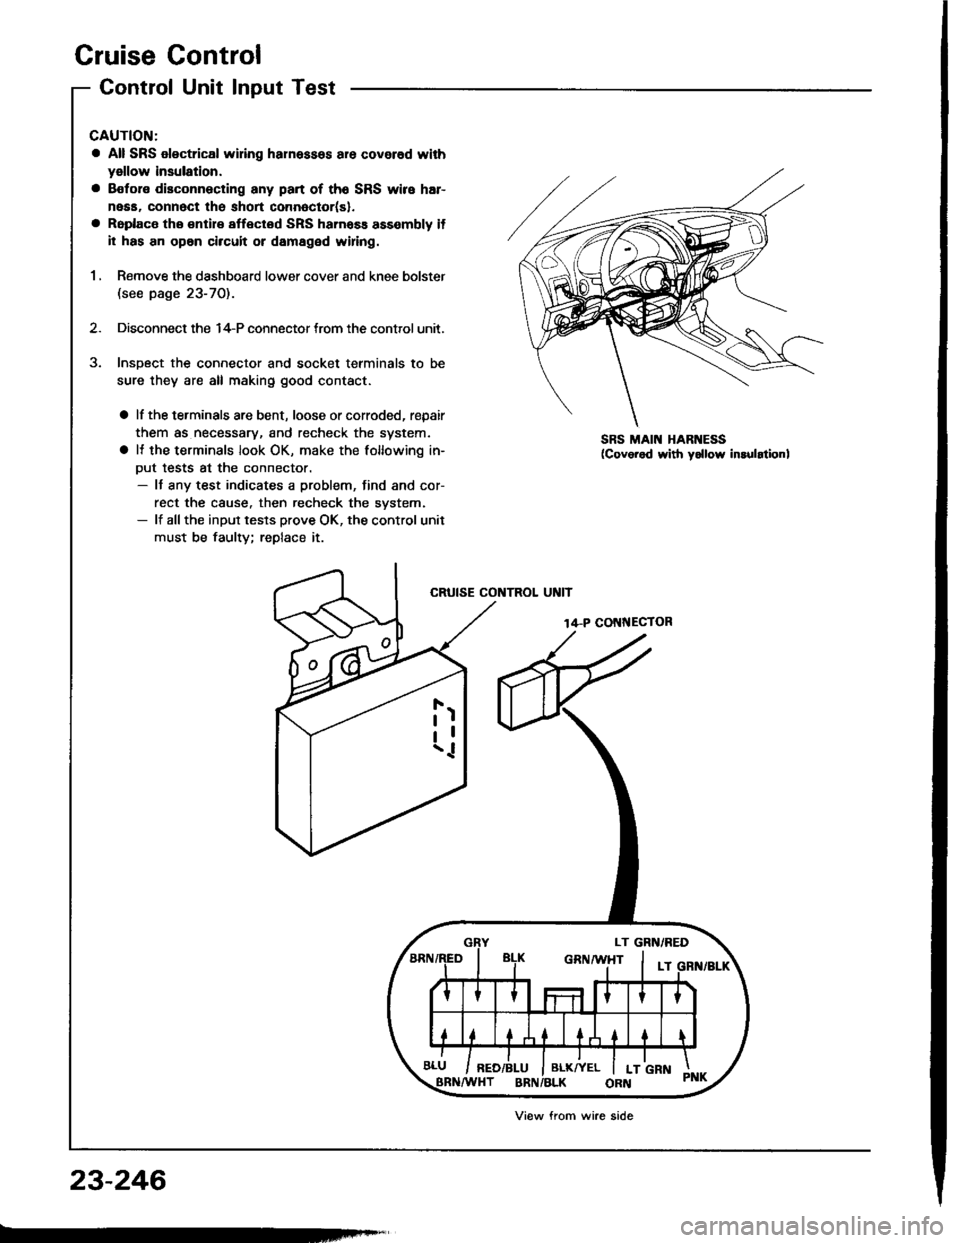
1 , Remove the dashboard lower cover and knee bolster(see page 23-70).
2. Disconnect the 14-P connector trom the control unit.
Insoect the connector and socket terminals to be
sure they are all making good contact.
a lf the terminals are bent, loose or corroded, repair
them as necessary, and recheck the system.
a It the terminals look OK, make the following in-
Dut tests at the connector.- It any test indicates a problem, find and cor-
rect the cause. then recheck the svstem.- lf allthe input tesls prove OK, the control unit
must be faulty; replace it.
CRUISE CONTROL UNIT
14-P COI{NECTOR
SRS MAIN HARNESS
23-246
Viow from wire side
Page 1354 of 1413
Cruise Gontrol
Set/Resume Switch Test/Replacement
CAUTION:
a All SRS ol6ct cal widng herne$a3 err covorod with
y6llow insulation.
a Bototo disconnecting any part ot tho SRS wiro h8r-
n6sa, connoct tho ghort connector(sl,
a Rsplaco the antire aftected SRS harness arsombly if
it has an op6n chcuit or damagod wiring.
NOTE: The original radio has a coded theft protection
circuit, Be sure to get the customer's code number befor€- disconnecting the battery.- removing the No. 32 (7.5 A) fuse from the under-hood
fuse/relay box.- removing the radio.
Afte, service, reconnect power to the radio and turn it
on. When the word "CODE" is displayed, enter the cus-
tomer's s-digit code to restore radio op€ration.
1 . Disconnect the battery negative cable, then discon-
nect the Dositive cable.
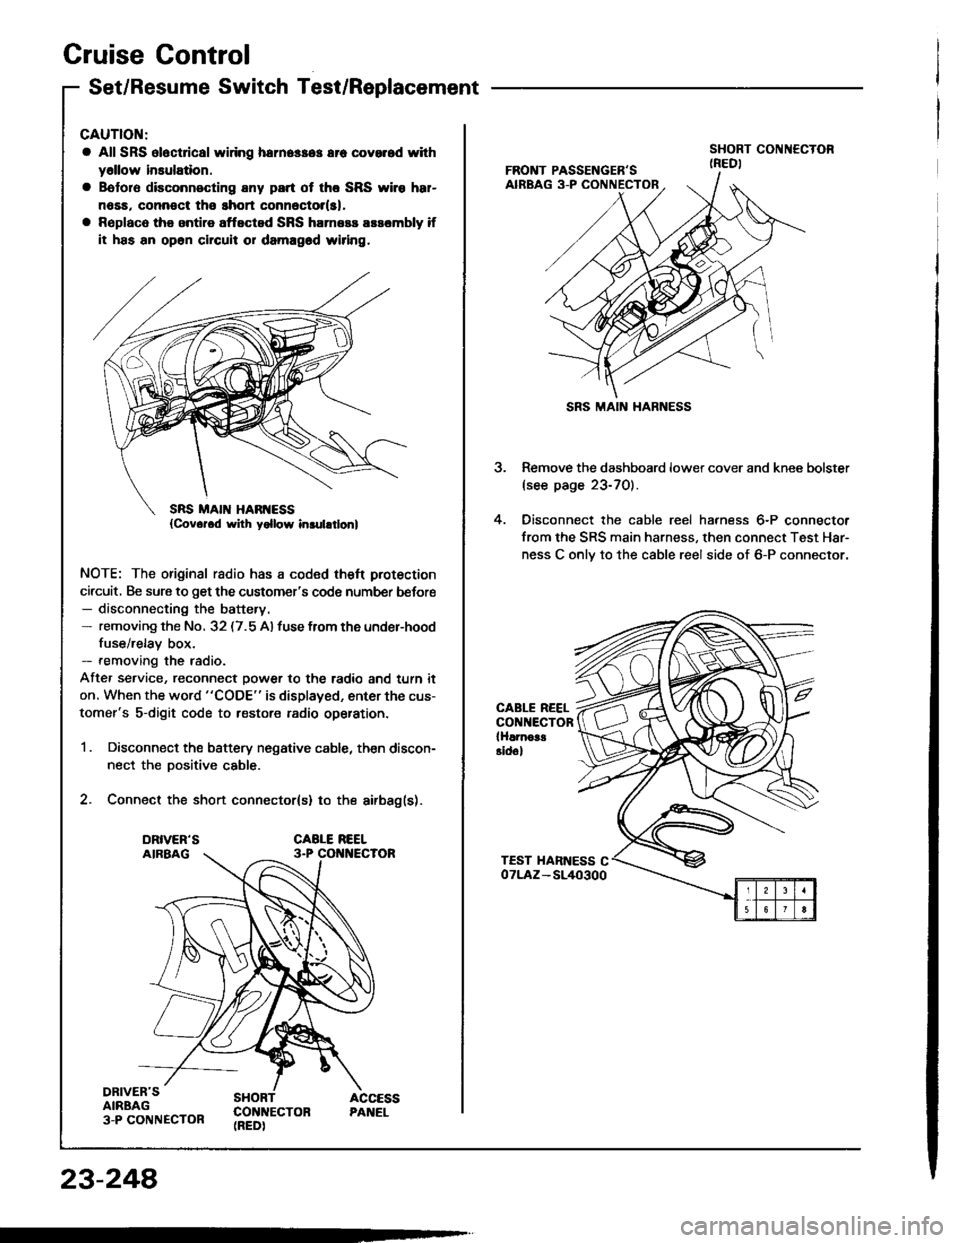
2. Connect the short connector(s) to the airbag(s).
DRIVER'SAIRBAG3-P CONNECTOR
SHORT ACCESSCON]TECTON PANEL(REDI
23-248
SRS MAIN HARNESS
3. Remove the dashboard lower cover and knee bolster(see page 23-70).
4. Oisconnect the cable reel harness 6-P connector
from the SRS main harness, then connect Test Har-
ness C onlv to the cable reel side of 6-P connector.
CABLE REELCONNECTORlHlrnoa!Eidol
Page 1357 of 1413
Brake Switch Test
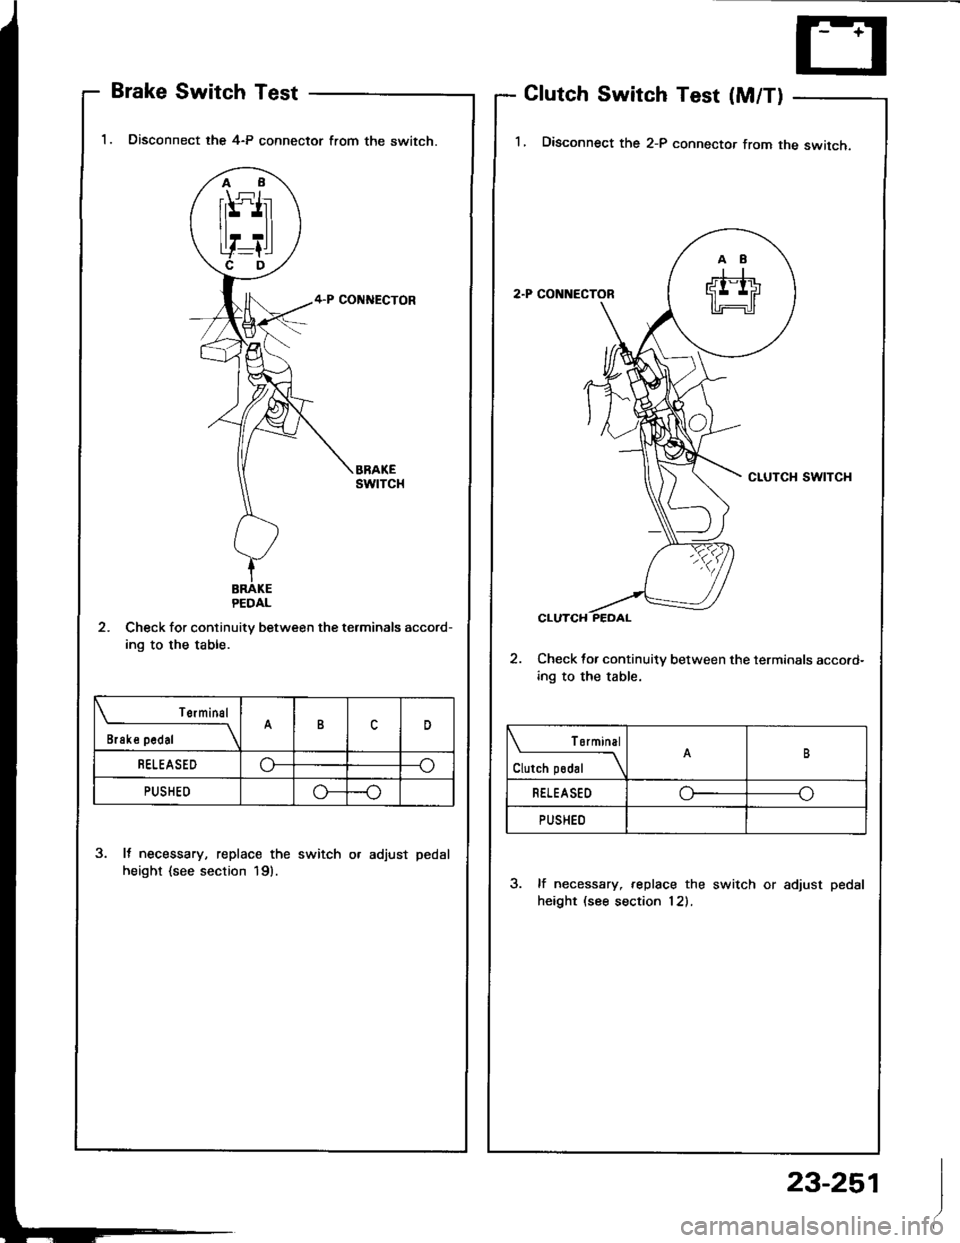
'1. Disconnect the 4-P connector from the switch.
2. Check for continuitv between the terminals accord-
ing to the table.
3. It necessary, replace the switch or adjust pedal
height {see section 19).
Glutch Switch Test (M/T)
I� Disconnect the 2-P connector from the switch,
2. Check {or continuitv between the terminals accord-
ing to the table.
3. lf necessary, replace the switch or adjust pedal
height (see section 12).
I
Terminal
il"*on---\B
BELEASEDo---o
PUSHED-o
| ormtnal
Clutch podal \
RELEASEDoo
PUSHED
23-251
Page 1358 of 1413
Cruise Control
A/T Gear PositionSwitch Test
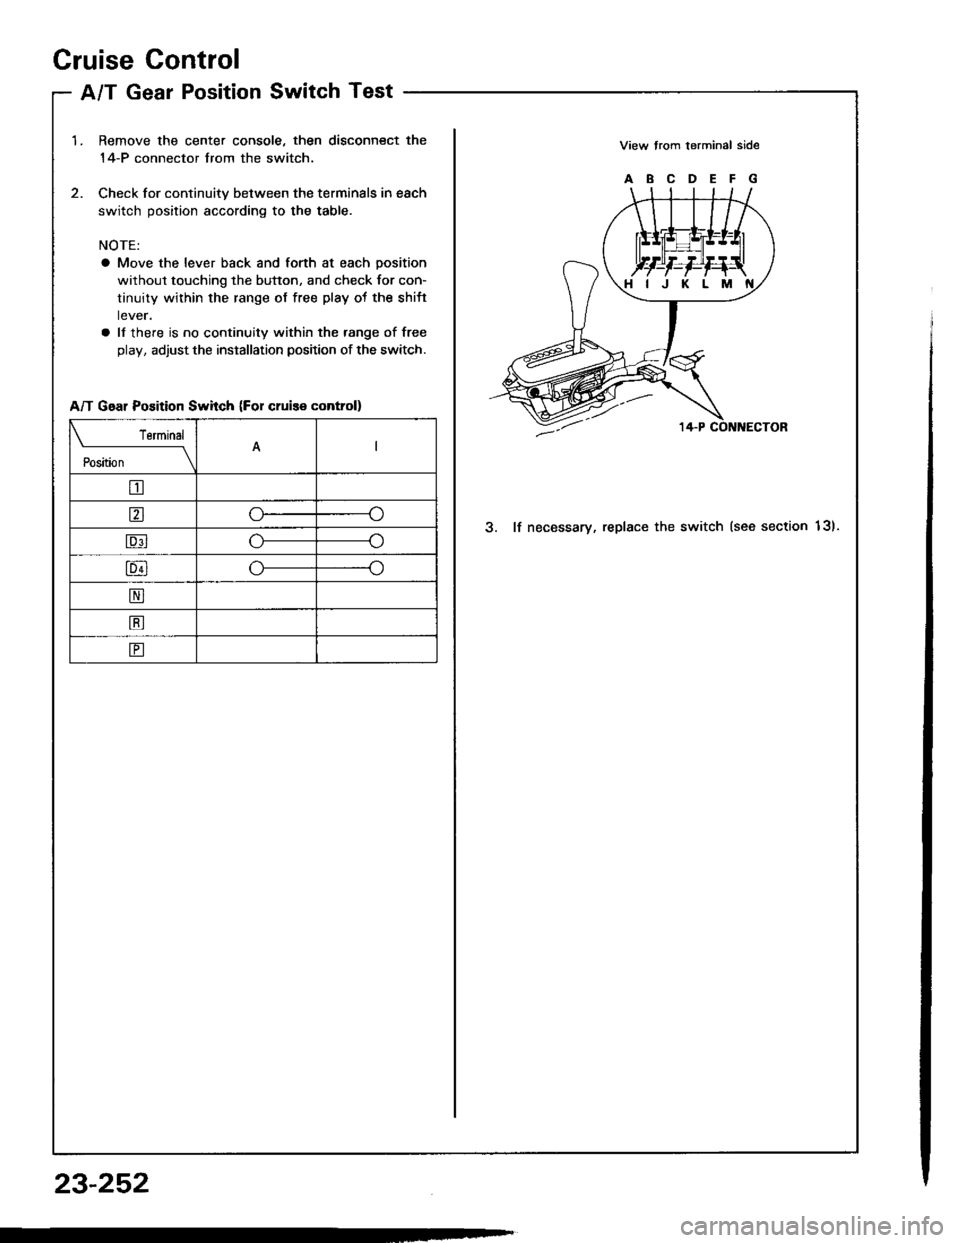
1.Remove the center console, then disconnect the
14-P connector trom the switch.
Check for continuitv between the terminals in each
switch position according to the table.
NOTE:
a Move the lever back and forth at each position
without touching the button, and check for con-
tinuity within the range of free play ot the shift
lever.
a ll there is no continuity within the range of free
play, adjust the installation position of the switch.
View trom terminal side
ABCDEFG
3. lf necessary, replace the switch (see section 13).
HIJKLM
A/T Gear Position Swhch (For cruis€ control)
Terminal
il;---t
tr
ao
Eo
lu4lo---o
N
B
E
23-252
Page 1359 of 1413
1.
2.
3.
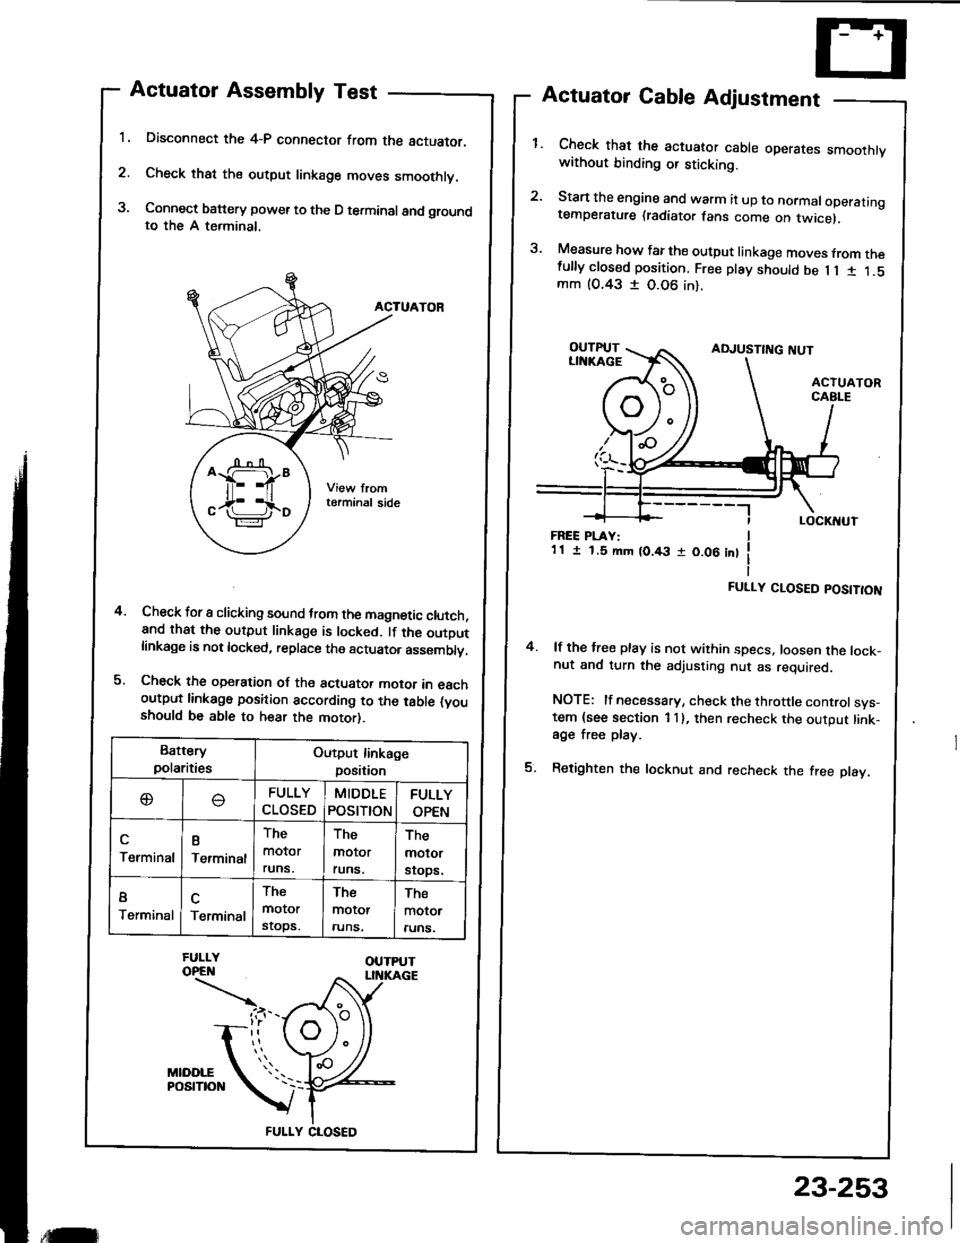
Actuator Assembly Test
Disconnect the 4-P connector from the actuator.
Check that the output linkage moves smoothly.
Connect battery power to the D terminal and groundto the A terminal,
ACTUATOR
Check for I clicking sound trom the magnetic clutch,and that the output linkage is locked. lf the outDutlinkage is not locked, replace the actuator asssmblv.
Check the operation oJ the actuator motor in eachoutput linkago position according to the table (youshould be able to hear the motor).
Actuator Cable Adjustment
Check that the actuator cable operares smoothtvwithout binding or sticking.
Start the engine and warm it up to normaloperatingtemperature (radiator fans come on twicel,
Measure how far the output linkage moves from thefully closed position. Free play should be 1 1 1 1.5mm (O.43 I 0.06 in).
4.
FREE PLAY:1 1 I 1.5 mm (0.43 r 0.06 int
FULLY CLOSED POSITION
4. lf the free play is not within specs, loosen the lock-nut and turn the adjusting nut as required.
NOTE: lf necessary, check the throttle controlsys-tem {see section 1 I }, then recheck the output link-age free play.
5. Retighten the locknut and recheck the free play.
Battery
polaritiesOutput linkage
position
oFULLY
CLOSED
MIDDLE
POStTtON
FULLY
OPEN
Terminal
B
Terminal
The
molor
runs.
The
molor
runs.
The
molor
srops.
I
TerminalTerminal
The
motor
stops.
The
motor
runs.
The
motor
runs.
FULLY CLOSED
,tilr
23-253
Page 1363 of 1413
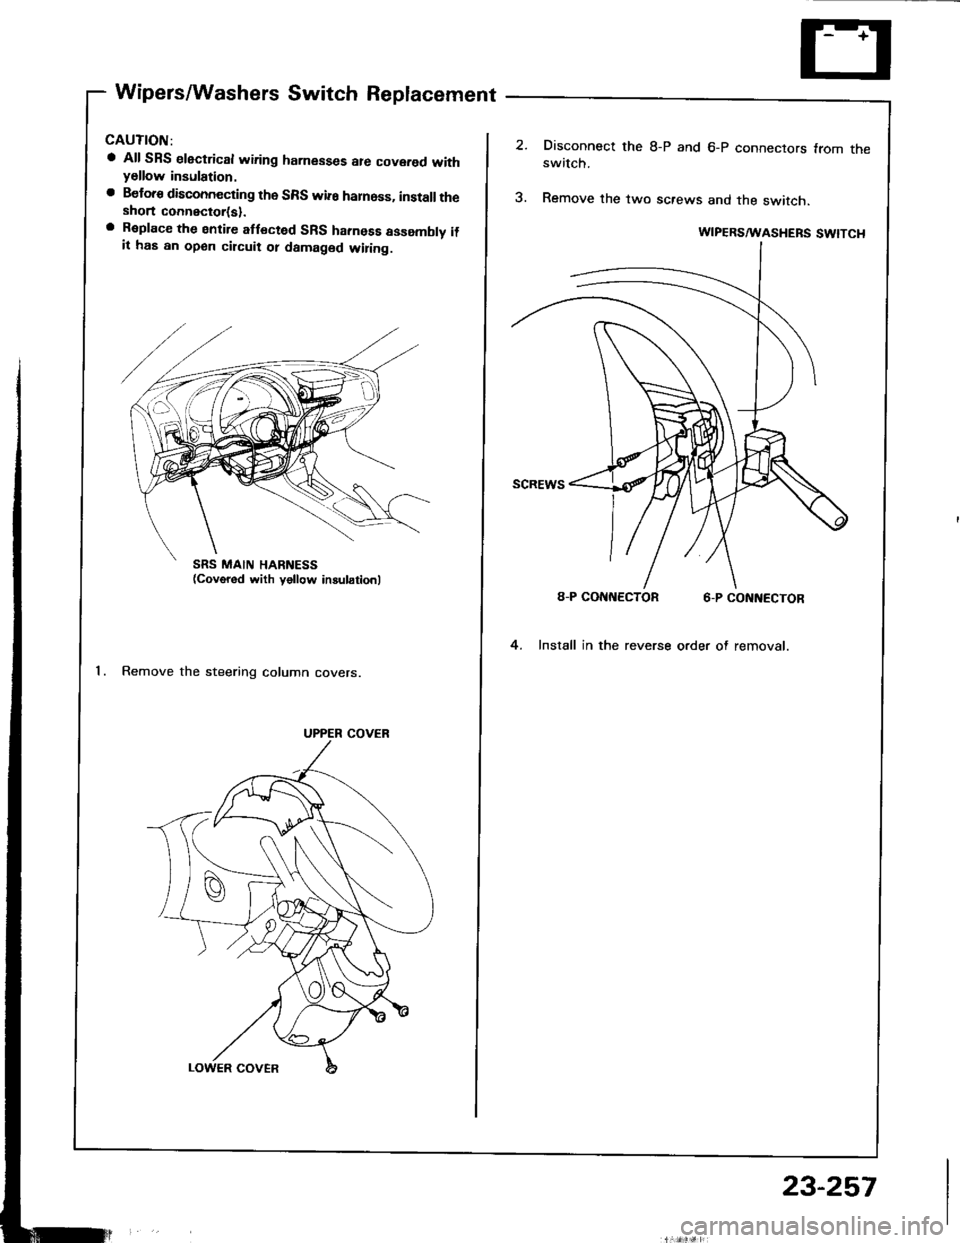
Wipers/Washers Switch Replacement
a All SRS electrical wiring harnesses ale covered withyellow insulation.
a Beloro disconnecting the SRS wif6 harnoss, install theshort connector(sl.a R€place the entire atlscted SRS hamess assombly ilit ha6 an open citcuii ot damaged wiring.
Remove the steering column covers.
UPPER COVER
A-P CONNECTOR
Disconnect the 8-P and 6-p connectors from theswitch.
Remove the two sctews and the switch.
wIPERS^IITASHEBS SWtTCl.t
A-P CONNECTOR 6-P CONNECTOR
4. Install in the reverse order of removal.
23-257
Page 1364 of 1413
Wipers/Washers
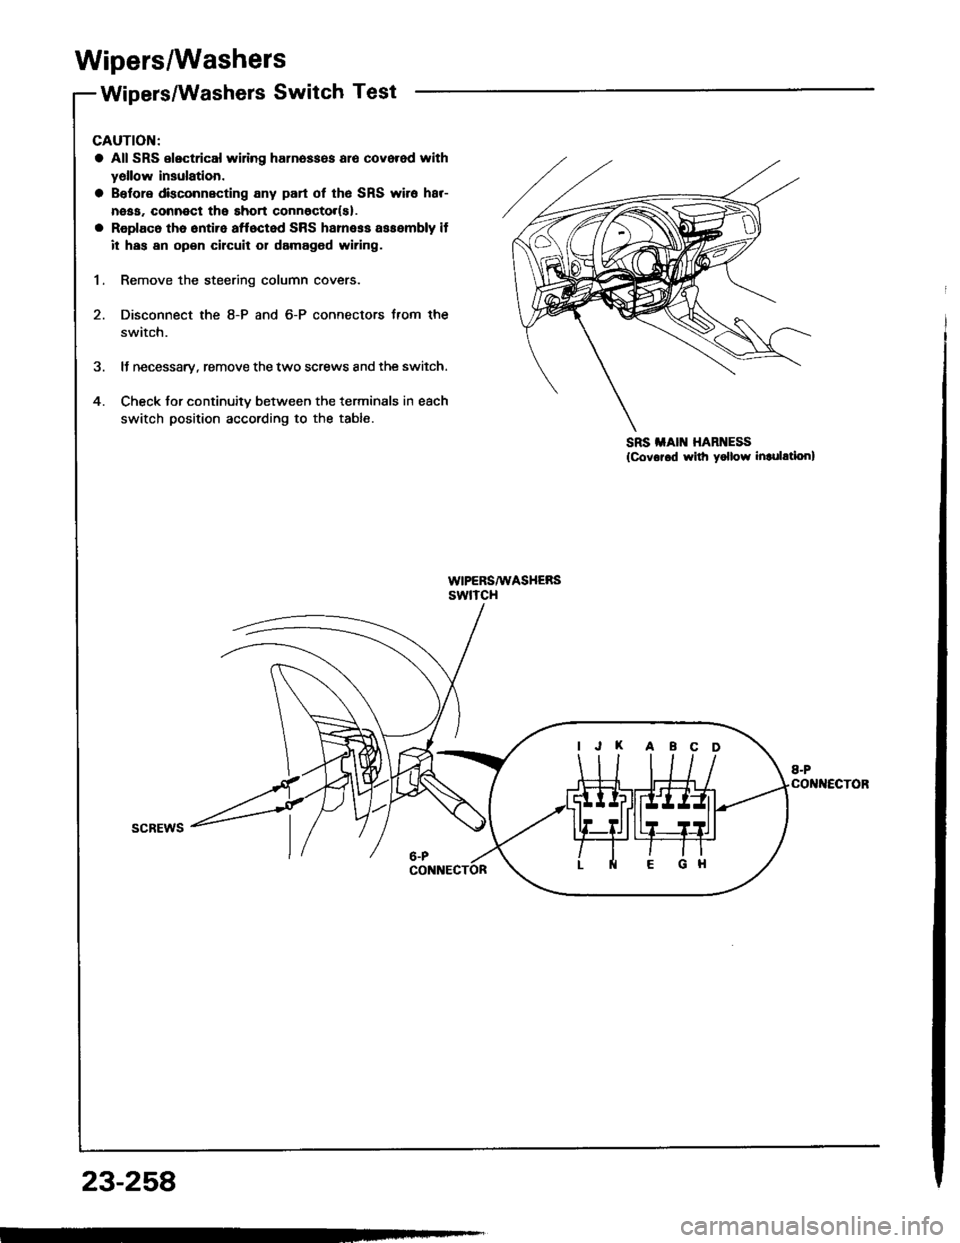
Wipers/Washers Switch Test
5
4
CAUTION:
a All SRS electrical wiring harn6ss6s alo covered with
yellow insulation.
a Belore dkconnecting any part ot th6 SRS wire har-
neaa. connect the short connoctor(sl.
a Replac6 the 6ntire affoctod SRS harness assembly it
it has an open cilcuit 01 damaged wiring.
1. Remove the steering column covers.
2. Disconnect the 8-P and 6-P connectors Jrom the
swatch.
It necessary, remove the two screws and the switch.
Check for continuitv between the terminals in each
switch position according to the table.
scREws
SRS iIAIN HARNESS
{Covor.d rvilh yollow inrulation}
IJK ABCD
23-258
Page 1366 of 1413
Wipers/Washers
Windshield Wiper Motor Test
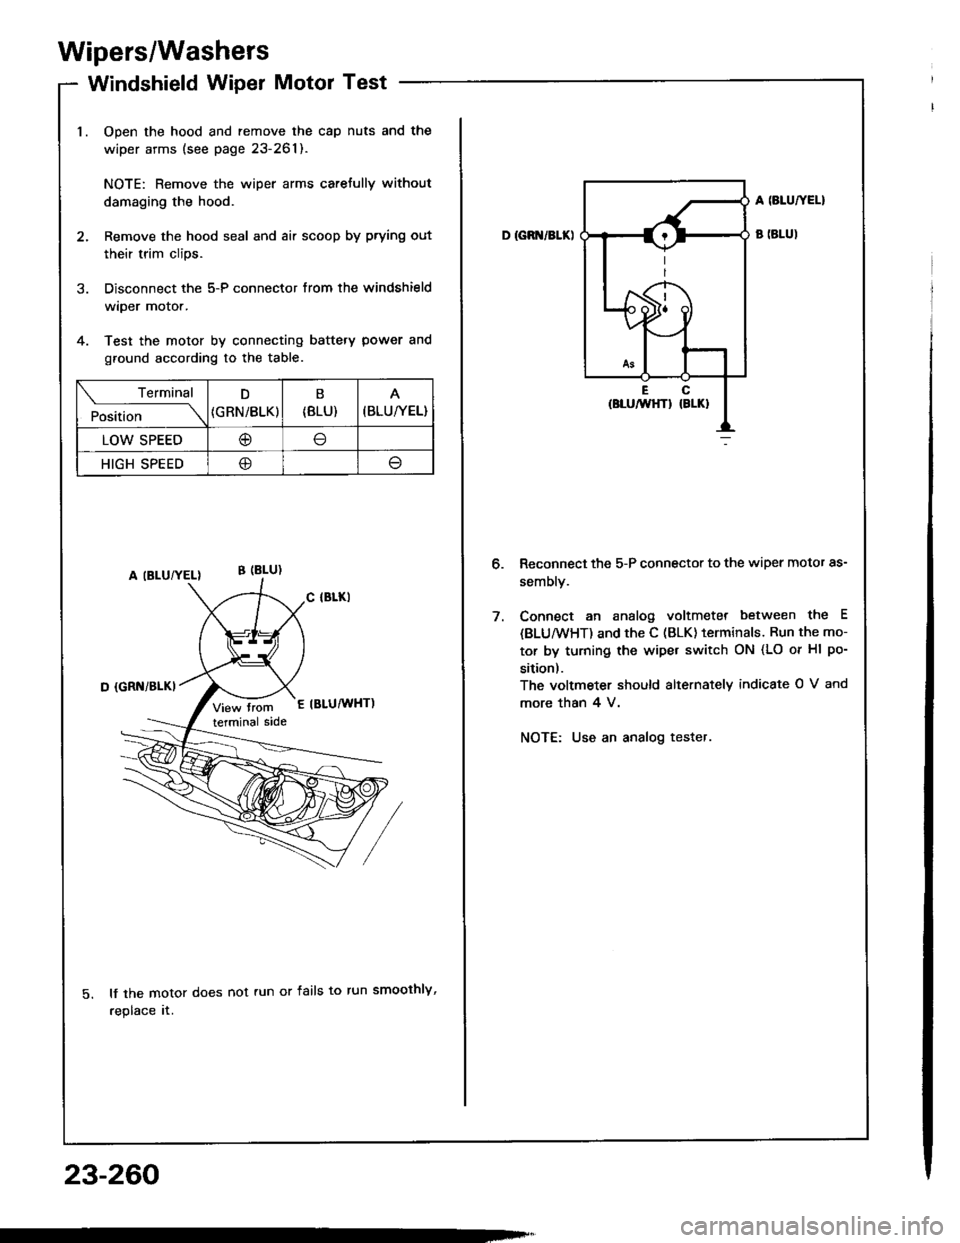
Open the hood and remove the cap nuts and the
wiper arms (see page 23-261).
NOTE: Remove the wiper arms carefully without
damaging the hood.
Remove the hood seal and air scoop by prying out
their trim clips.
Disconnect the 5-P connector from the windshield
wiper motor.
Test the motor by connecting battery power and
ground according to the table.
lf the motor does not run or fails to run smoothly,
replace rr.
Terminal
Pi"i,i""---\
D
{GRN/BLK)
B
{8LU)(BLU/YEL}
LOW SPEED@
HIGH SPEED@
23-260
D IGB /BLK)
A SLUTYEL}
B (BLUI
Reconnect the 5-P connector to the wiper motor as-
sembly.
Connect an analog voltmeter between the E
{BLU/wHT) and the C (BLK) terminals. Run the mo-
tor by turning the wipet switch ON (LO or Hl po-
sition).
The voltmeter should alternately indicate O V and
more than 4 V.
NOTE: Use an analog tester.
Page 1367 of 1413
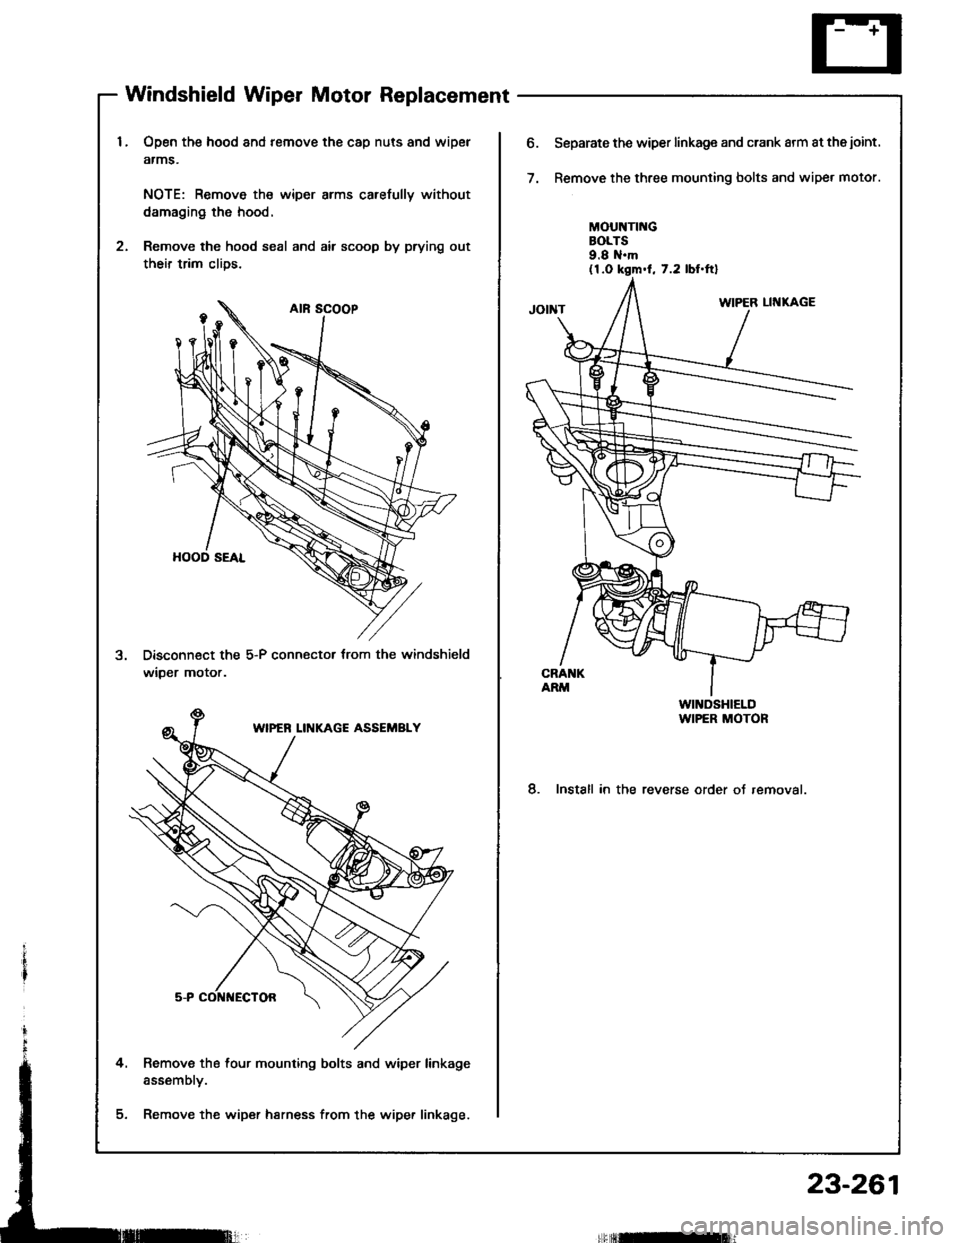
Windshield Wiper Motor Replacement
Open the hood and remove the cap nuts and wipel
atms.
NOTE: Remove th€ wiper arms carefully without
damaging the hood.
Remove the hood seal and air scoop by prying out
their trim clios.
Disconnect the 5-P connector trom the windshield
wiDer motor.
Remove the four mounting bolts and wiper linkage
assembly.
Remove the wiper harn€ss from the wipe. linkage.
o.Separate the wiper linkage and crank arm at thejoint.
Remove the three mounting bolts and wipet motor.
MOUNTII{GBOLTS9.8 N.m(1.0 kgm.l, 7.2 lbI.ftl
8. Install in the reverse order of removal.
Irflnfi]
23-261
Page 1368 of 1413
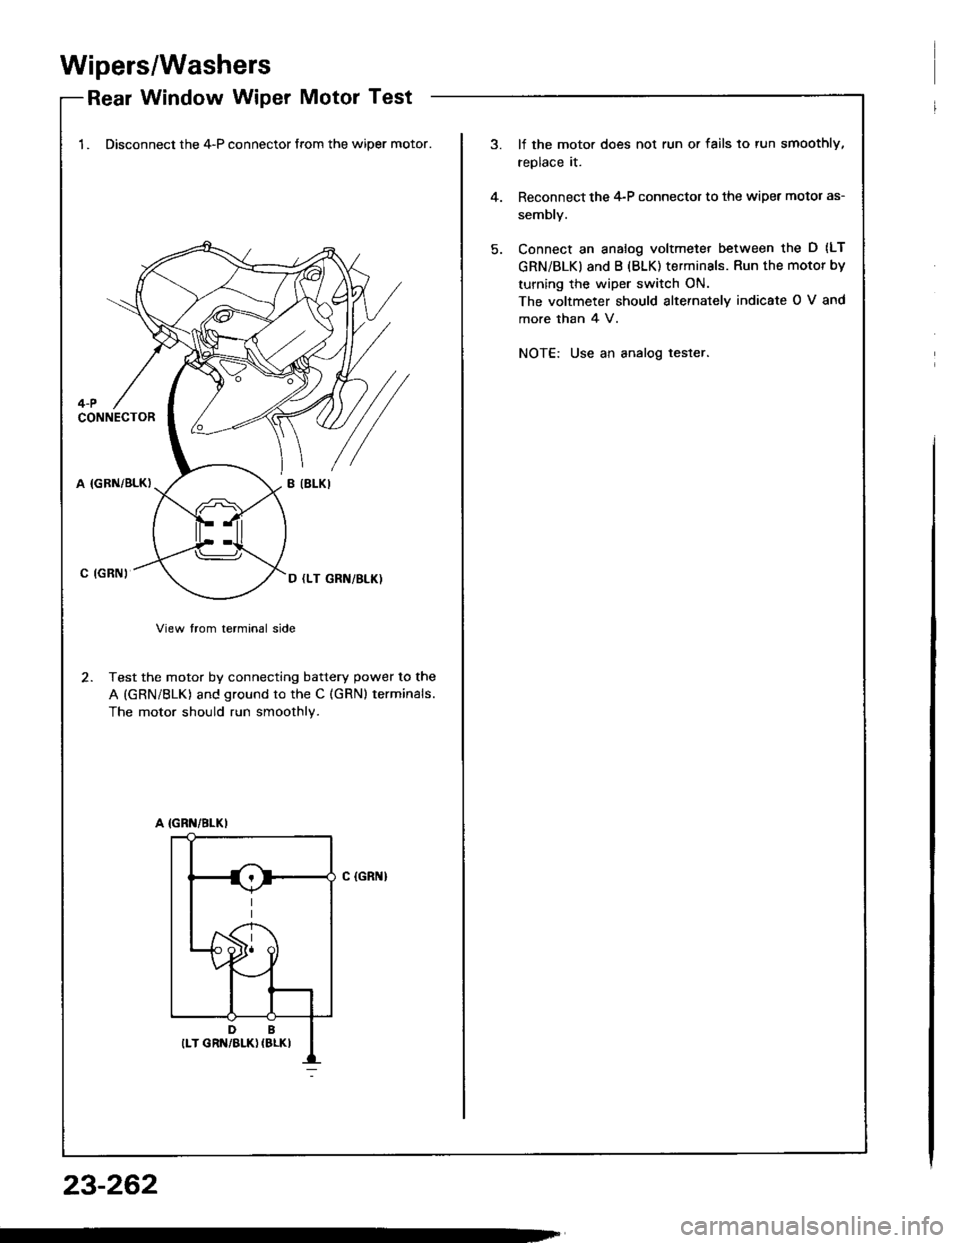
Wipers/Washers
Rear Window Wiper Motor Test-Keal wlnqow wlper |Yloror I esr
1. Disconnect the 4-P connector from the wiper motor.lf the moto. does not run or fails to tun smoothly,
replace it.
Reconnect the 4-P connector to the wipet motor as-
sembly.
Connect an analog voltmeter between the D (LT
GRN/BLKI and B (BLK) terminals. Run the motor by
turning the wiper switch ON.
The voltmeter should slternately indicate O V and
more than 4 V.
NOT€: Use an analog tester.
4.
4-PCONNECTOR
A (GBN/BLK)
C IGRNI
View trom terminal side
2. Test the motor by connecting battery power to the
A (GRN/BLK) and ground to the C (GRN) terminals.
The motor should run smoothly.
C (GRI{}
23-262