indicator HONDA INTEGRA 1994 4.G Owner's Guide
[x] Cancel search | Manufacturer: HONDA, Model Year: 1994, Model line: INTEGRA, Model: HONDA INTEGRA 1994 4.GPages: 1413, PDF Size: 37.94 MB
Page 339 of 1413
InspectionReplacement
Flywheel, Flywheel Bearing
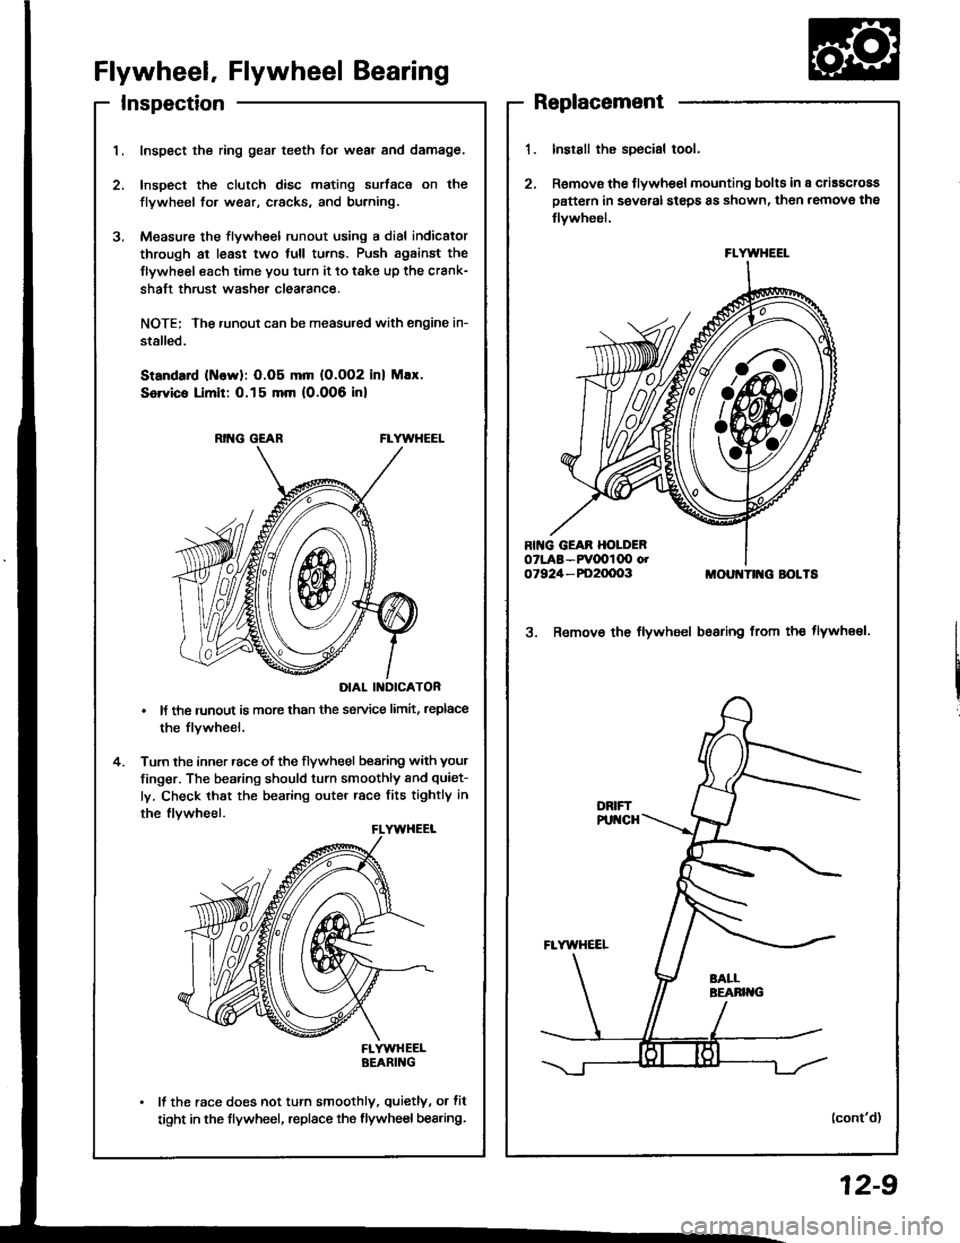
Inspect the ring gear teeth for wear and damage.
Inspect the clutch disc mating surface on the
flywheel fo. wear, cracks, and burning.
Measure the flywheel runout using a dial indicator
through at least two full tu.ns. Push against the
Ilywheel each time you turn it to take up the crank-
shaft thrust washe. clearance.
NOTE; The runout can be measu.ed with engine in-
stalled.
Standard (ttlervl: O.O5 mm (O.002 inl Max.
Service Limit: 0.15 mm 10.006 inl
RING GEABFLYWHEEL
DIAL II{DICATOR
It the runout is more than the service limit, leplace
the flvwheel.
Turn the inner race of the flywheel bearing with your
finger. The bearing should turn smoothly and quiet-
ly, Check that the bearing outer race fits tightly in
the flvwheel.
FLYWHEELBEARING
It the race does not turn smoothly, quietly, or fit
tight in the flywheel, replace the flywheel bearing.
Install the special tool.
Remov€ the flywhe€l mounting bolts in a criascross
pattern in several steps 8s shown, then remove the
tlywheel.
MOUI{TII{G BOLTS
3. Remov€ the flywheel bsaring from th€ tlywheel.
(cont'd)
FLYWHEEL
12-9
Page 393 of 1413
Automatic Transmission
'l4-2
14-3't 4-6
14-8
14-14
14-23
Hvdraulic Flow ...--...... 14-24
Lock-up System ........ 14-38
Eloctrical Systom
Component Location ............,...,................ I 4-45
Circuit Diagram ............. 14-46'Troubleshooting Procedures ........,..........., l4-48
Symptom-to-Component Chart
Electrical System ...... 14-50
Electrical Troubleshooting
Troubleshooting Flowchart .................... 14-52
Lock-uo Control Solenoid Valve A/8
Test .................. --.... \4-82
ReDlacement ,...,...,..,. 14-82
Shift Control Solenoid Vslve A/B
Test .................. ...... 14-83
Reolacement .............. 14-83
Transmission Control Module (TCM)*ReDlacement ........... 14-84
Mainshalt/CountershaJt SDeed Sensors
Reolacement ............. 14-85
Hydraulic Systom
Symptom-to-Component Chart
Hydraulic System
Road Test
Slall Speed
Test ..................
Fluid Level
Checking/Changing
Pressu.e Testing
Transmission
Transmission
Removal ............. ...... 14-99
lllustrated Index
Right Side Cover .................................. 1 4- 1 04
Transmission Housin9 ..................,,....... I 4-1 06
Torque Converter HousingNalve
Body .................. ... 14- 1O8
Right Side Cover
Removal ............. ...... 14-110
Transmission Housing
Removal ............. .-..-. 14-112
Torque Convener HousingNalve Body
Removal ............. ...... 14-114
Valve Caps
Description ................ 14-116
Valve Body
Repair ................ ...-.. 14-117
Valve
Assembly ...........
Oil Pump
Main Valve Body
Disassembly/lnspection/Reassembly
Regulator Valve Body
Disassembly/lnspection/Reassembly
Lock-up Valve Body
Disassembly/lnspection/Reassembly .......
Secondary Valve Body
Disassembly/lnspection/Reassembly .......
Servo Body
Disassembly/lnspection/Reassembly .......
1st-hold Accumulator/Right Side Covet
Oisassembly/lnspection/Reassembly .,..,..
Mainshaft
Disassembly/lnspection/Reassembly -.. -... 1 4- 1 29
lnsDection ................. 14- 130
Countershaft
Disassembly/lnspection/Reassembly ....... 14-132
Disassembly/Reassembly ....................... 1 4-1 33
lnsDection ................. 14-134
One-way Clutch/Parking Gear
Disassembly/lnspection .................... -.. -. 1 4-137
Sub-shaft
Disassembly/lnspection/Reassembly ....... 14-138
Disassemblv/Reassemblv ....................... 1 4-1 39
Sub-shaft Bearings
Replacement ............. l4-140
Clutch
fllustrated lndex ................. -..-...-.......... 14-1 41
Disassembly ,,,.,,........ 14-144
Reassembly .............. 14-146
Torque Converter Housing Bearings
Mainshaft Bearing/Oil Seal
Reolacement ......... 14-1 50
Countershaft Bearing Replacement .......,, 14-1 5l
Transmission Housing Bearings
Mainshsft/Countershaft Bearing
Repfacement ...-..-..14-152
Sub-shaft Bearing Replacement .............. 1 4-1 53
Reve.se ldler Gear
lnstallation ................ 14-154
Parking Brake Stopper
lnspection/Adjustment ..........................'14-'154
Transmission
Reassemblv .............,. .14_156
Toroue Converter/Drive Plate ..,..,............... 1 4- 1 63
Transmission
14-120
14-122
14-123
14-124
14-126
14-124
14-86
14-90
't4-92
14-93
14-94
lnstallation
Cooler Flushing'Shitt Cable
Removal/lnstallation ..............................
Adiustment ...-..-......-. 14-'171*Gearshift Selector
Disassembly/Reassembly .....................,. 1 4-17 2*Shift Indicator Panel
Adjustment -..........-...14-173
Throttle Control Cable
fnspection .......,..,...... 14-17 4
Adjustment .............. 14-176
14-164
14-168
14-'t 7 0
Inspection
Page 396 of 1413
![HONDA INTEGRA 1994 4.G Owners Guide Description
(contd)
Gear Selection
The selector lever has seven posirions; E PARK, E REVERSE, N NEUTRAL, @ 1st through 4th positions. E 1st
through 3rd positions, Ql2nd gear and [] 1st gear.
Starting HONDA INTEGRA 1994 4.G Owners Guide Description
(contd)
Gear Selection
The selector lever has seven posirions; E PARK, E REVERSE, N NEUTRAL, @ 1st through 4th positions. E 1st
through 3rd positions, Ql2nd gear and [] 1st gear.
Starting](/img/13/6067/w960_6067-395.png)
Description
(cont'd)
Gear Selection
The selector lever has seven posirions; E PARK, E REVERSE, N NEUTRAL, @ 1st through 4th positions. E 1st
through 3rd positions, Ql2nd gear and [] 1st gear.
Starting is possible only in @ and I Oosition through use ot a slide-type, neutral-safety switch.
Automatic Tlansaxle {A/T) Gear Position Indicatol
A/T gear pos;tion indicator in the instrumenl panel shows what gear has been selected without having look down at
the console.
Position Description
l3?]] PARK Front wheels locked; parking pawl engaged with parking gear on countershatt. All clutches
reteaseo,
[R] REVERSE Reverse; reverse selector engaged with countershalt reverse gear and 4th clutch locked.
N NEUTRAL All clurches released.
D+l DRIVE General driving; starts off in 'lst, shifts automatically to 2nd, 3rd, then 4th, depending on vehicle
('lst through 4th) speed and throttle position. Do'vnshifts through 3rd, 2nd and 1st on deceleration to stop.
The lock-up mechanism comes into operation in 2nd, 3rd and 4th when the transmission in lDtposrtron.
Dgi DRIVE For rapid acceleration at highway speeds and general driving; starts off in 1st. shifts automatical-(1st through 3rd) ly to 2nd then 3rd, depending on vehicle speed and throttle position. Downshifts through lower
gears on deceleration to stop. The lock-up mechanism comes into operation in 3rd.
El SECOND Driving in 2nd geari stays in 2nd gear, does not shift up and down.
For engine braking or better traction starting off on loose or slippery surfece.
L]l FIRST Driving in 1st gear; stays in lst gear, does not shilt up.
For engine braking.
14-4
Page 414 of 1413
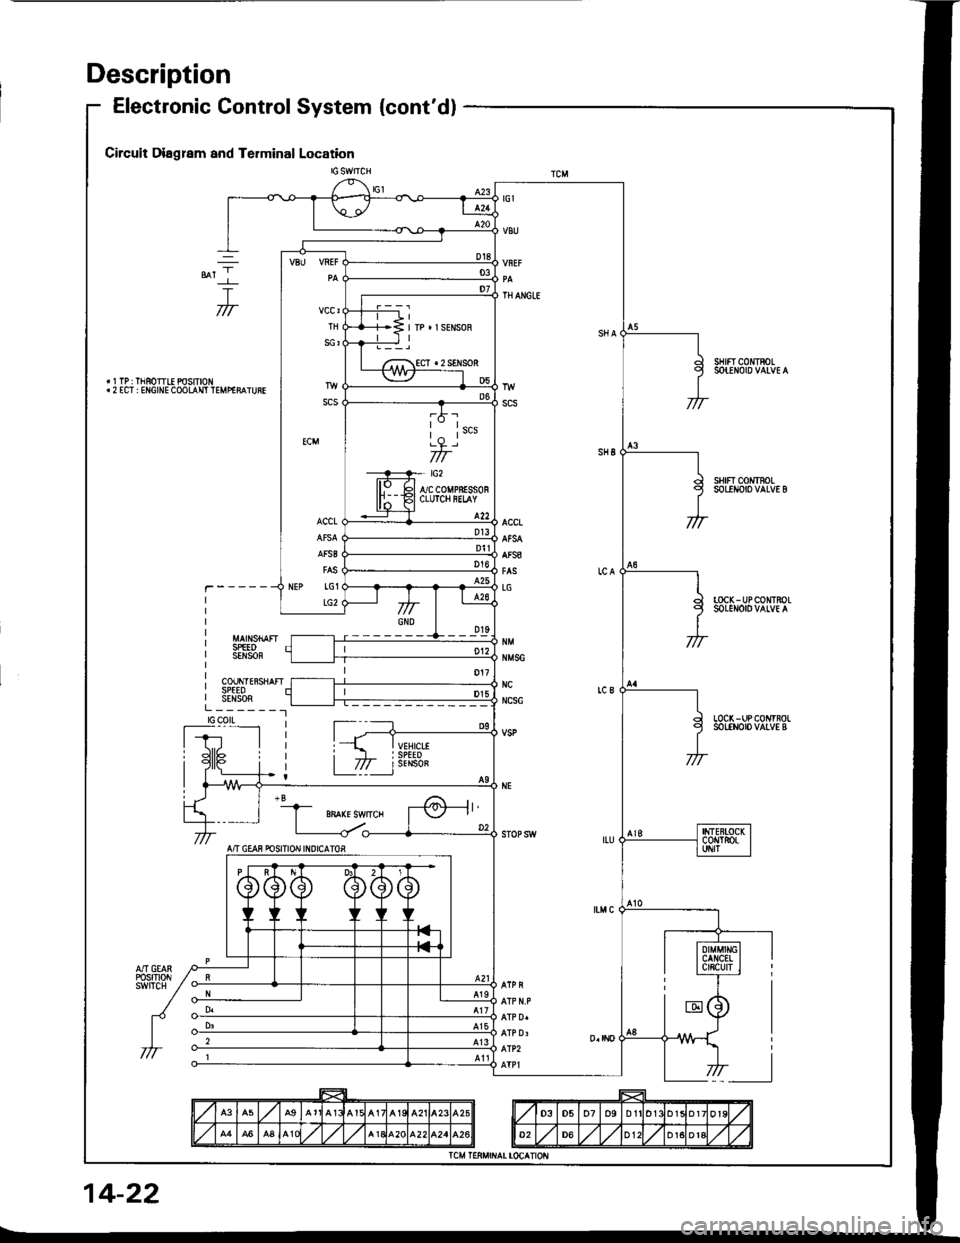
Description
Electronic Control System {cont'dl
TH
SCI
scs
ECM
ACCL
AFSB
NEP LG1
LG2
*t-l
T777
sHtfT c0mRoL
SHFT COI{rFOLSOLINOIO VALVE B
TOCK-UPCONTROLSOLENOIOVALVE A
SPEEOSENSOF
COUNTE8SHAFISPEEOSENSORL_______.1tGcotLLOC( - UP CONTROLSOLENOIO VALVE B
f-r,'__lI Jll6 i
A/T CEAN POSITION INDICATOR
14-22
Page 438 of 1413
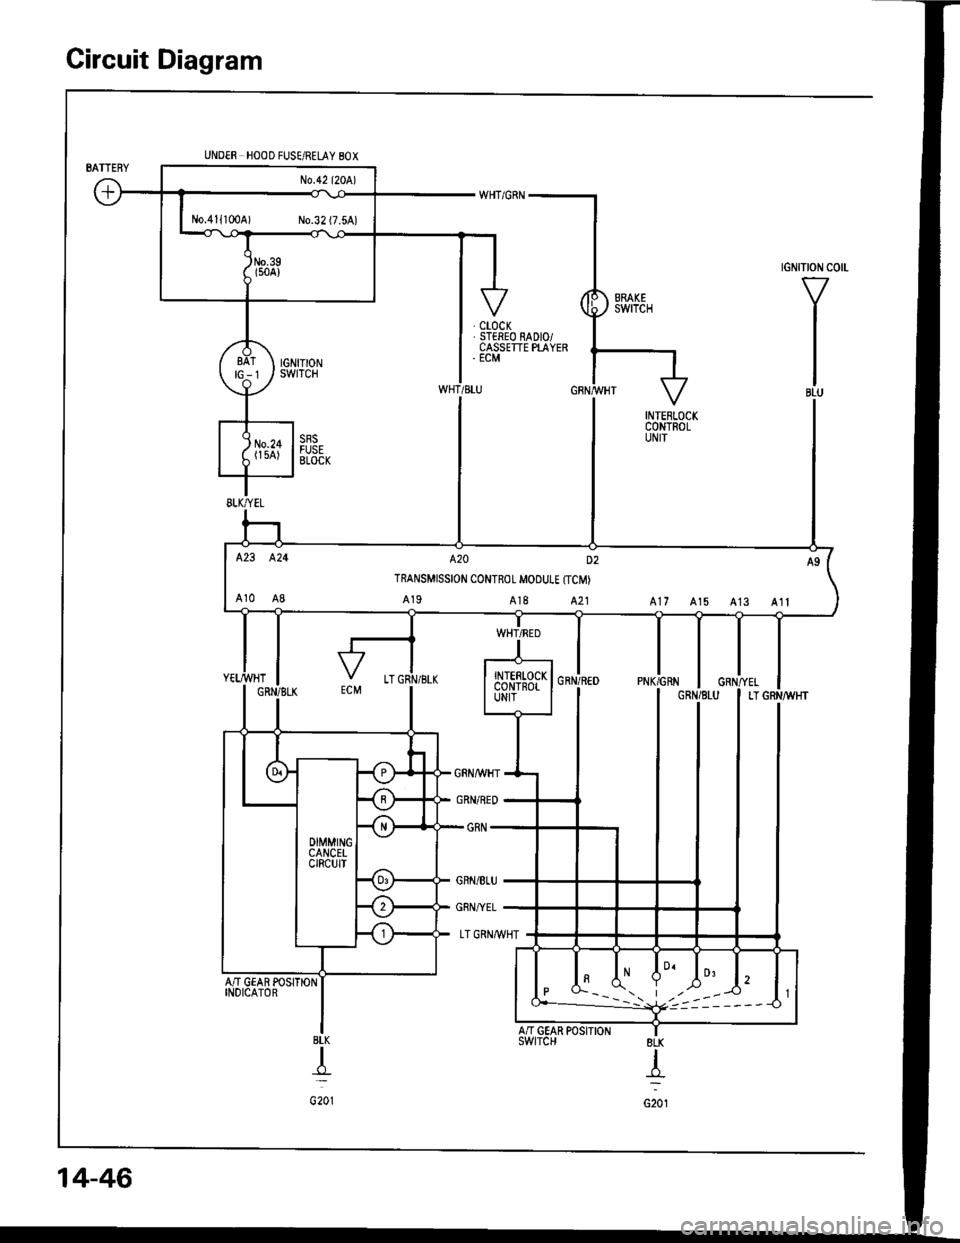
Circuit Diagram
tGNtTtoN c0 -
V
I
I
IBLU
UNDER HOOD FUSE/RELAY 80X
AN GEAR POSITIONINDICATOR
BLK
T
G201
No.411100A) No.32 (7.5A)
423 424 A20 D2
TRANSMISSION CONTROL MOOUI.E {TCM)
Ar0 A8 A19 A18 A21 A17 A15 A13 Alt
I A' V A-" t2
| *---i. t,,,:----<) l1
8LK
{
G201
14-46
A/'I GEAR POSIIIONswtrcH
Page 440 of 1413
![HONDA INTEGRA 1994 4.G Owners Guide Troubleshooting Procedures
when the TcM senses an abnormality in the input or output systems. the E]indicator light in the gaugo assembly willblink.
when the service check Connector {located under the HONDA INTEGRA 1994 4.G Owners Guide Troubleshooting Procedures
when the TcM senses an abnormality in the input or output systems. the E]indicator light in the gaugo assembly willblink.
when the service check Connector {located under the](/img/13/6067/w960_6067-439.png)
Troubleshooting Procedures
when the TcM senses an abnormality in the input or output systems. the E]indicator light in the gaugo assembly willblink.
when the service check Connector {located under the dash on the passenger side} is connected with the specaat toolas shown, the E] indicator light will blink the Diagnostic Trouble iode {DTCI when the ignition switch is turned on.
When the lDil indicator light has been reported on, connect the service check connector with the special tool.Then turn on the ignition switch and observe the @ indicator light.
GAUGE ASSEMSLY
)'t
DAI'A LI]TKcor{r{EcToR (3P)NOTE:Do not atlachjumpe. wire.
Sc. DTCI
So. DTC2
S.. DTC14
scs sHoRT CO[{]{ECTORoTPAZ-OOl0too
codes 1 through I are indicated by individual short blinks, codes 1o through 1 5 are indicated by a series of tong andshon blinks. one long blink equals l0 short blinks. Add the long and short blinks together to dete;mins the cod€. Aft6rdetermining the code, refer to the erectricar system symptom-to-component chart on pages 14-5o and 51.
ahon
f"l
some PGM-FI problems will also make the @ indicator light come on. After repairing the pGM-Fr system, disconnectthe BACK UP tuse (7.5 Al in the under-hood fuse/relay box tor more than 1o seconds to reset the TcM memorv.
NOTE:
a PGM-FI svstem
The PGM-FI system on this model is a sequential multipon fuel iniection svstem.' Disconnecting the BACK UP tuse also cancels the radio anti-theft code, preset stations and the clock setting. G6tthe customer's code numbe. and make note of the radio presets befote temoving the fuse so you can reset them.
14-48
Page 442 of 1413
![HONDA INTEGRA 1994 4.G Owners Guide Symptom-to-Component Chart
Electrical System
Number of @indicator light
blinks while
Service Check
Connector is
connected with
the special tool.
@] indicaror
lightPossible CauseSymptomRefer to
page
Bl HONDA INTEGRA 1994 4.G Owners Guide Symptom-to-Component Chart
Electrical System
Number of @indicator light
blinks while
Service Check
Connector is
connected with
the special tool.
@] indicaror
lightPossible CauseSymptomRefer to
page
Bl](/img/13/6067/w960_6067-441.png)
Symptom-to-Component Chart
Electrical System
Number of @indicator light
blinks while
Service Check
Connector is
connected with
the special tool.
@] indicaror
lightPossible CauseSymptomRefer to
page
BlinksDisconnected lock-up control solenoidvalve A connector
Short or open in lock-up control sole-noid valve A wire
Faulty lock-up control solenoid valve A
Lock-up clutch does not
engage.
Lock-up clutch does not
disengage.
Unstable idle speed.
14-52
BlinksDisconnected lock-up control solenoidvalve B connector
Short or open in lock-up control sole-noid valve B wire
Faulty lock-up cont.ol solenoid valve B
. Lock-up clutch does not
enga9e.
14-54
Blinks or
OFF
Disconnected throttle position (Tp)
sensor connector
Short or open in TP sensor wireFaully TP sensor
. Lock-up clutch does not
engage.14-56
4BlinksDisconnected vehicle speed sensor(VSS) connector
Short or open in VSS wire
Faulty VSS
. Lock-up clutch does not
engage.'t 4-57
Blinks. Short in A/T gear position switch wire. Faulty A/T gear position switch
. Fails to shift other than
2nde4th gears.. Lock-up clutch does not
engage.
14-58
OFFDisconnected A/T gear position switch
connector
Open in A/T gear position switch wireFaulty A/T gear position switch
Fails to shift other than
2nd-4th gears.
Lock-up clutch does not
en98ge.
Lock-up clutch engages
and disengages alter-
nately.
14-60
7BlinksDisconnected shift control solenoidvalve A connector
Short or open in shitt control solenoidvalve A wire
Faulty shift control solenoid valve A
. Fails to shift (between
1st-4th, 2nd-4th or
2nd-3rd gears only).. Fails to shift (stuck in
4th gear).
14-62
8BlinksDisconnected shitt control solenoid
valve B connector
Shon or open in shift control solenoidvalve B wi.e
Faulty shift control solenoid valve B
. Fails to shiJt (stuck in
lst or 4th gears).'t 4-64
aBlinksDisconnected countershatt speed sen-sor connector
Short or open in the countershaft
speed sensor wire
Faulty countershaft speed sensor
. Lock-up clutch does not
engage_
14-50
Page 443 of 1413
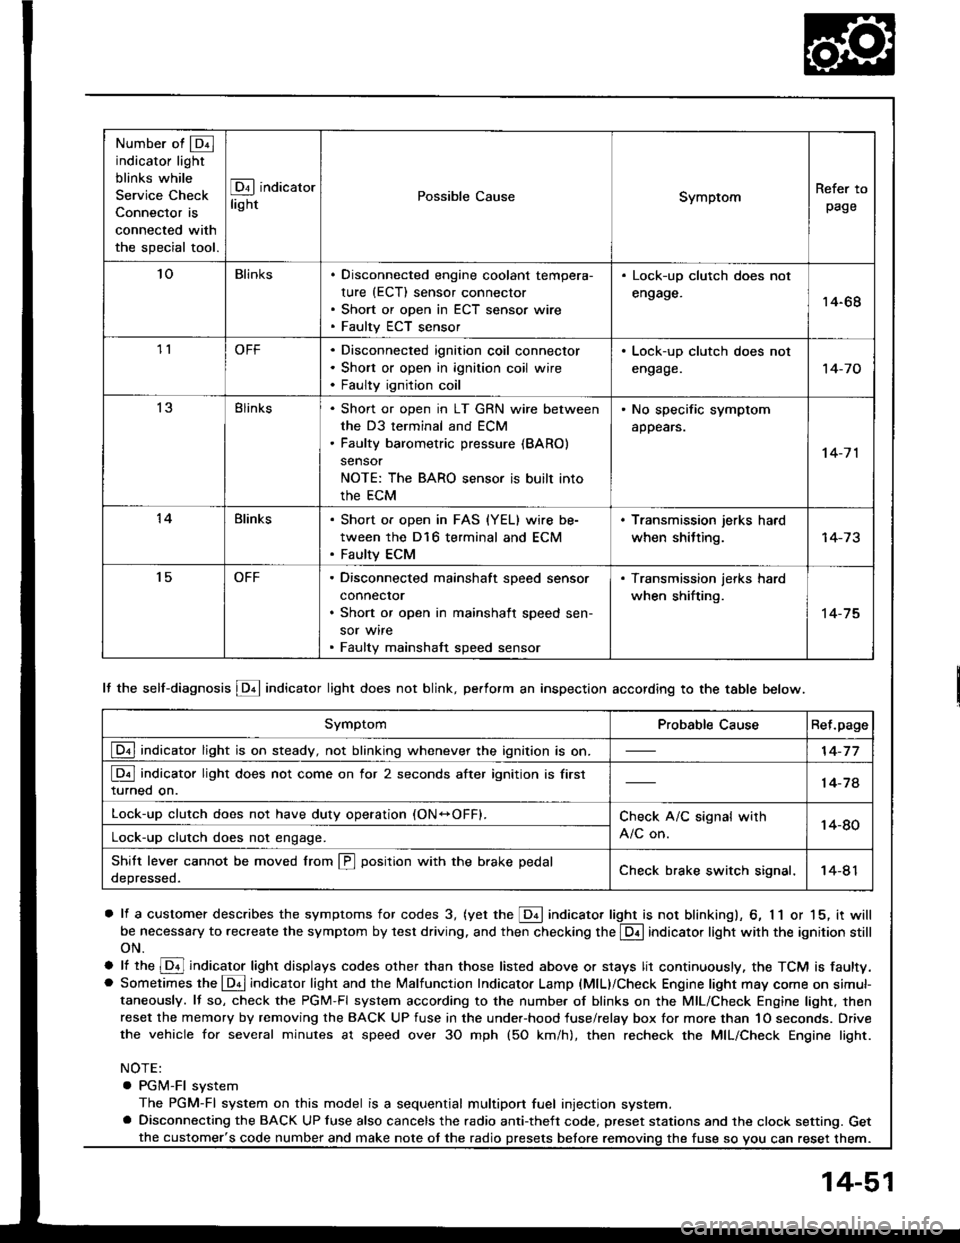
Number of @indicator light
blinks while
Service Check
Connector is
connected with
the special tool.
@ indicator
lightPossible CauseSymptomRefer to
page
'loBlinksDisconnected engine coolant tempera-
rure (ECT) sensor connector
Short or open in ECT sensor wire
Faulty ECT sensor
Lock-up clutch does not
engage.14-68
1lOFFDisconnected ignition coil connector
Short or open in ignition coil wire
Faulty ignition coil
. Lock-up clutch does not
engage.'t 4-7 0
13Blinks. Shon or open in LT GRN wire between
the D3 terminal and ECM. Faulty barometric pressure {BARO)
sensor
NOTE: The BARO sensor is built into
the ECM
. No specific symptom
appears.
14-7 1
14Blinks. Short of open in FAS {YEL} wire be-
tween the D16 terminal and ECM. Faulty ECM
. Transmission jerks hard
when shitting.
't5OFFDisconnected mainshaft speed sensor
connecror
Short or open in mainshaft speed sen-
sor wire
Faulty mainshaft speed sensor
. Transmission jerks hard
when shifting.
14-75
SymptomProbable CauseRet.page
LQ! indicator light is on steady, not blinking whenever the ignition is on.14-77
[Q3] indicator light does not come on for 2 seconds after ignition is first
turned on.14-78
Lock-up clutch does not have duty operation (ON-OFFI.Check A/C signal with
A/C on.14-80Lock-up clutch does not engage.
Shitt leve. cannot be moved lrom @ position with the brake pedal
depressed.Check brake switch signal,14-41
It the self-diagnosis LQ4 indicator light does not blink, perform an inspection according to the table below.
a lf a customer describes the symptoms for codes 3, (yet the LQ! indicator light is not blinkingl, 6, 1 1 or 15, it will
be necessa.y to recreate the symptom by test driving. and then checking the @ indicator light with the ignition still
oN.
e lt ttre @ indicator light displays codes olher than those listed above or stays lit continuously, the TCM is faulty.. Sometimes the Lqd indicator light and the Malfunction Indicator Lamp (MlL)/Check Engine light may come on simul-taneously. lf so, check the PGM-Fl system according to the numbe. of blinks on the MIL/Check Engine light. thenreset the memory by removing the BACK UP fuse in the unde.-hood fuse/relay box for more than 1O seconds. Drive
the vehicle for several minutes at speed over 30 mph (5O km/h), then recheck the MIL/Check Engine light.
NOTE:
. PGM-FI system
The PGM-Fl system on this model is a sequential multiport fuel injection system.a Disconnecting the BACK UP luse also cancels the radio anti-theft code. preset stations and the clock setting. Get
the fuse so vou can reset them.the customer's code number and make note ot the radio
14-51
Page 444 of 1413
Electrical Troubleshooting
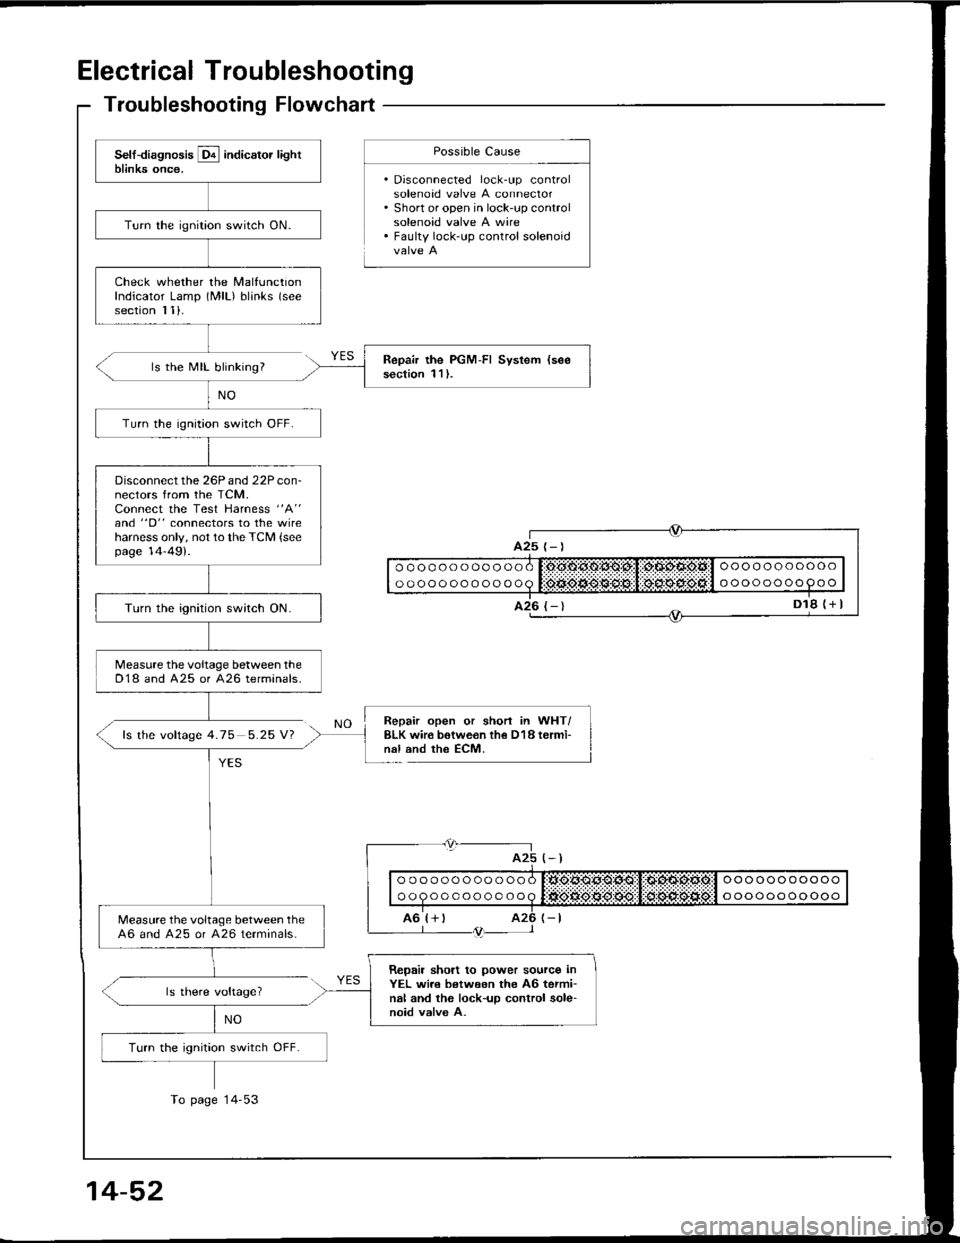
Troubleshooting Flowchart
ls the MIL blinking?
fs the voftage 4.75 5.25 V?
Possible Cause
. Disconnected lock-up controlsolenoad valve A connector. Short or open in lock-up controlsolenoid valve A wire. Faulty lock-up control solenoid
NO
YES
Repair open or shorl in WHT/BLK wir€ botwe€n th€ D18 termi-nal and the ECM.
(-)
| | o " q " " o o o o o o o q litigse.*grq$:,1:d:sd:siia:l " "" o " " o o oo " I
I ro'r+ r rz6 r-tL--- l /trtr-- l
ls there voltage?
NO
ooooooooooo
oooooooo9oo
oooooooooooo
oooooooooooo
A25
Turn the ignition switch ON.
Check whether the MalfunctionIndicator Lamp (MlL) blinks (see
section I 1).
Repair the PGM-FI System (see
section 1 l ).
Turn the ignition switch OFF.
Disconnect the 26P and 22P con-nectors from the TCM.Connect the Test Harness "A"
and "D" connectors to the wireharness only, not to the TCM {seepage 14-49).
Turn the ignition switch ON.
Measure the voltage between theD18 and A25 or 426 terminals.
Measure the voltage between the46 and A25 or A26 terminals-
Repail short to power sourco inYEL wi.e between the A6 termi-nal and the lock-up control sole-noid valve A.
Turn the ignition switch OFF.
To page 14'53
14-52
Page 446 of 1413
Electrical Troubleshooting
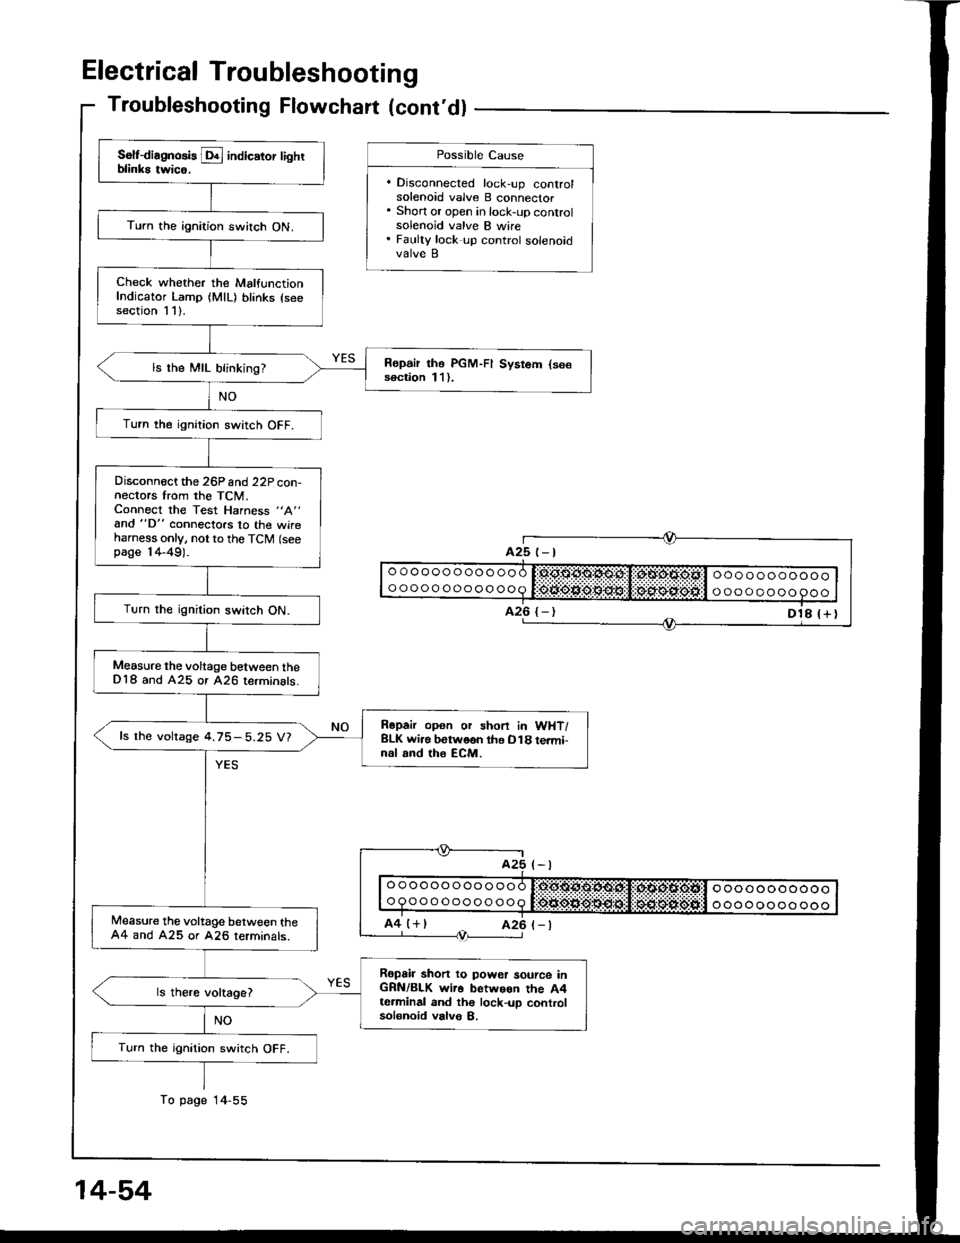
Troubleshooting Flowchart (cont'dl
Turn the ignition switch ON.
Check whether the MalfunctionIndicator Lamp (MlL) blinks (seesection 1 1).
Ropair tho PGM-FI Sysrom (se€soction 11).ls the MIL blinking?
Turn the ignition switch OFF.
Disconnect the 26P and 22P con-nectors trom the TCM.Connect the Test Harness "A"
and "D" connecto.s lo the wireharness only, not to the TCM (seepage 14-49).
Turn the ignition switch ON.
Measure the voltage between theD'18 and A25 or 426 terminats_
Rapair opon or shon in WHT/BLK wi.e botweon the O18 te.mi-nal rnd the ECM.
ls the voltage 4.75-5.25 V?
lvleasure the voltage between the44 and A25 or 426 rerminals.
Ropsir shon to power source inGRN/BLK wi.o betwoon the A4t6.minal and th€ lock-up controlsolonoid valve B.
Turn the ignition switch OFF.
14-54
Possible Cause
. Disconnected lock-up conlrolsolenoid valve B connector. Short or open in lock-up controlsolenoid valve B wire. Faulty lock up control solenoidvalve B