HONDA INTEGRA 1994 4.G Workshop Manual
Manufacturer: HONDA, Model Year: 1994, Model line: INTEGRA, Model: HONDA INTEGRA 1994 4.GPages: 1413, PDF Size: 37.94 MB
Page 601 of 1413
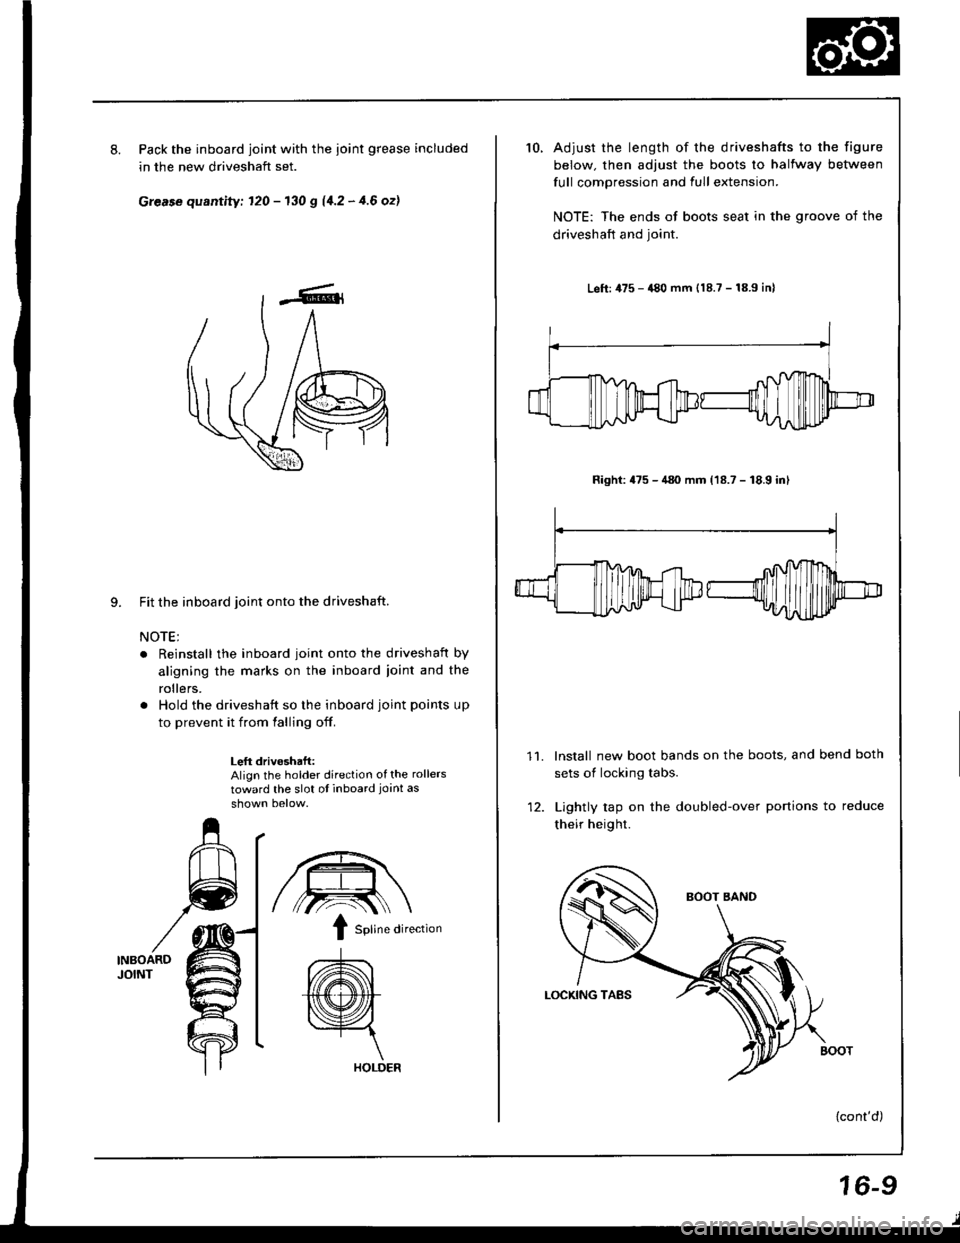
8.Pack the inboard joint with the ioint grease included
in the new driveshaft set.
Grease quantity; 120 - 130 g 11.2 - 4.6 ozl
9. Fit the inboard joint onto the driveshaft.
NOTE;
. Reinstall the inboard joint onto the driveshaft by
aligning the marks on the inboard ioint and the
rollers.
. Hold the driveshaft so the inboard joint points up
to prevent it from falling off.
Left drivoshaft:Align the holder direction of the rollers
toward the slot ot inboard joint as
INBOARDJOINT
/,.-:--\ \
I sotine di,ection
A\
{(@}
HOLDER
10.Adjust the length of the driveshafts to the figure
below. then adjust the boots to halfway between
full compression and full extension.
NOTE: The ends of boots seat in the groove of the
driveshaft and joint.
Left: 475 - 480 mm {18.7 - 18.9 inl
Right: 475 - 480 mm (18.7 - 18.9 inl
lnstall new boot bands on the boots, and bend both
sets of locking tabs.
Lightly rap on the doubled-over portions to reduce
their height.
{cont'd)
11.
16-9
Page 602 of 1413
Driveshafts
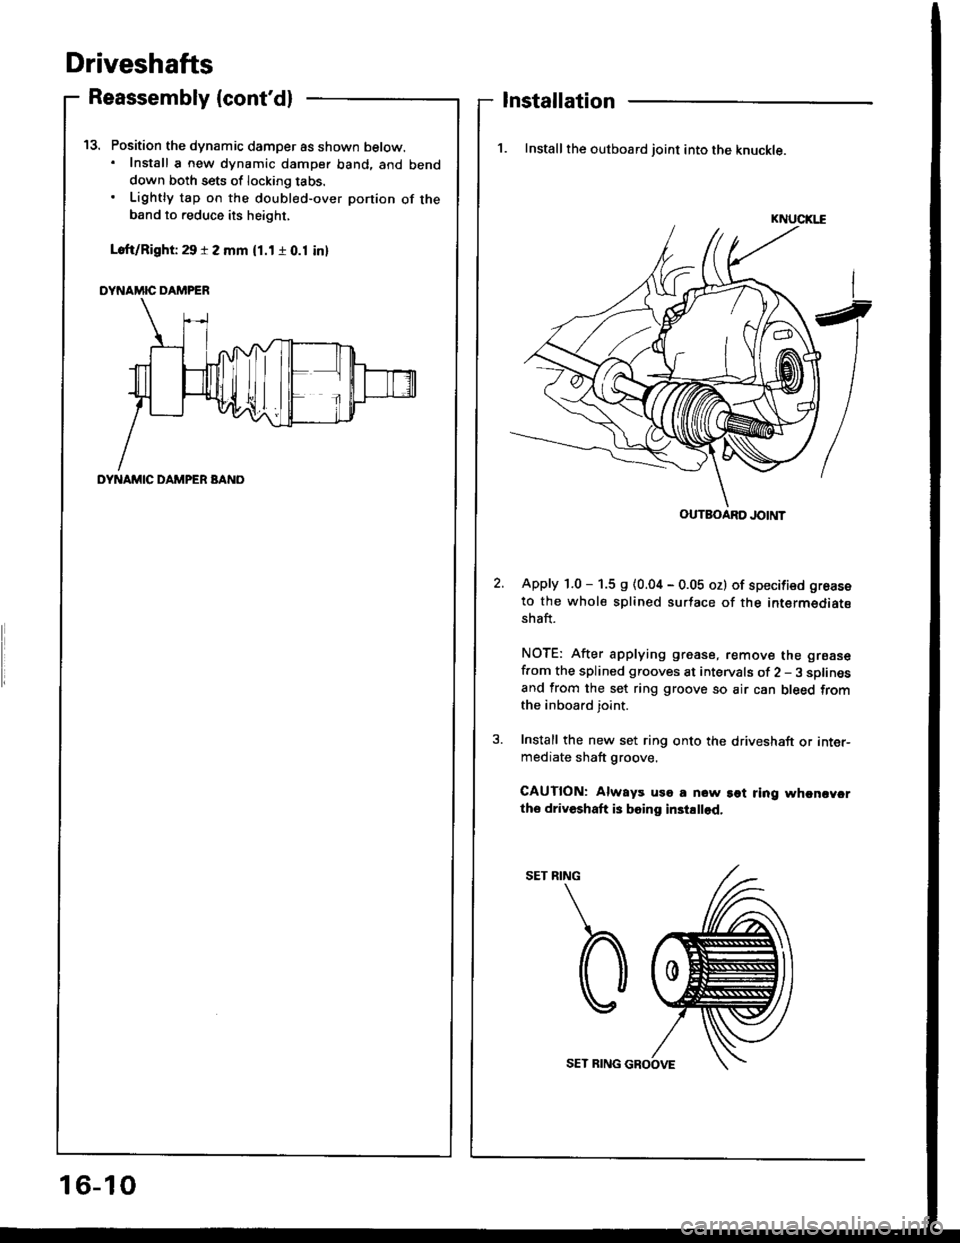
Position the dynamic damper as shown below.. Install a new dynamic damper band. and benddown both sets of locking tabs.
Lightly tap on the doubl€d-over ponion of theband to reduce its height,
Loft/Right 29 r 2 mm (1.1 r 0.1 inl
DYNAMIC DAMPER
t5.
Reassembly (cont'dl
DYNAMIC DAMPER BANO
Installation
1. Install the outboard joint into the knuckle.
KNUCIGE
Apply 1.0 - 1.5 s (0.04 - 0.05 oz) of specified groase
to the whole splined surtace of the intermediatsshaft.
NOTE: After applying grease, remove the grsase
f.om the splined grooves at intervals of 2 - 3 sDlinesand from the set ring groove so air can bleed fromthe inboard joint.
Install the new set ring onto the driveshaft or inter-mediate shaft groove.
CAUTION: Always uso a now sot ring whcncycrtho driveshaft is boing in3tallod.
RING
b
OUTBOARD JOINT
16-10
SET RING GROOVE
Page 603 of 1413
5.
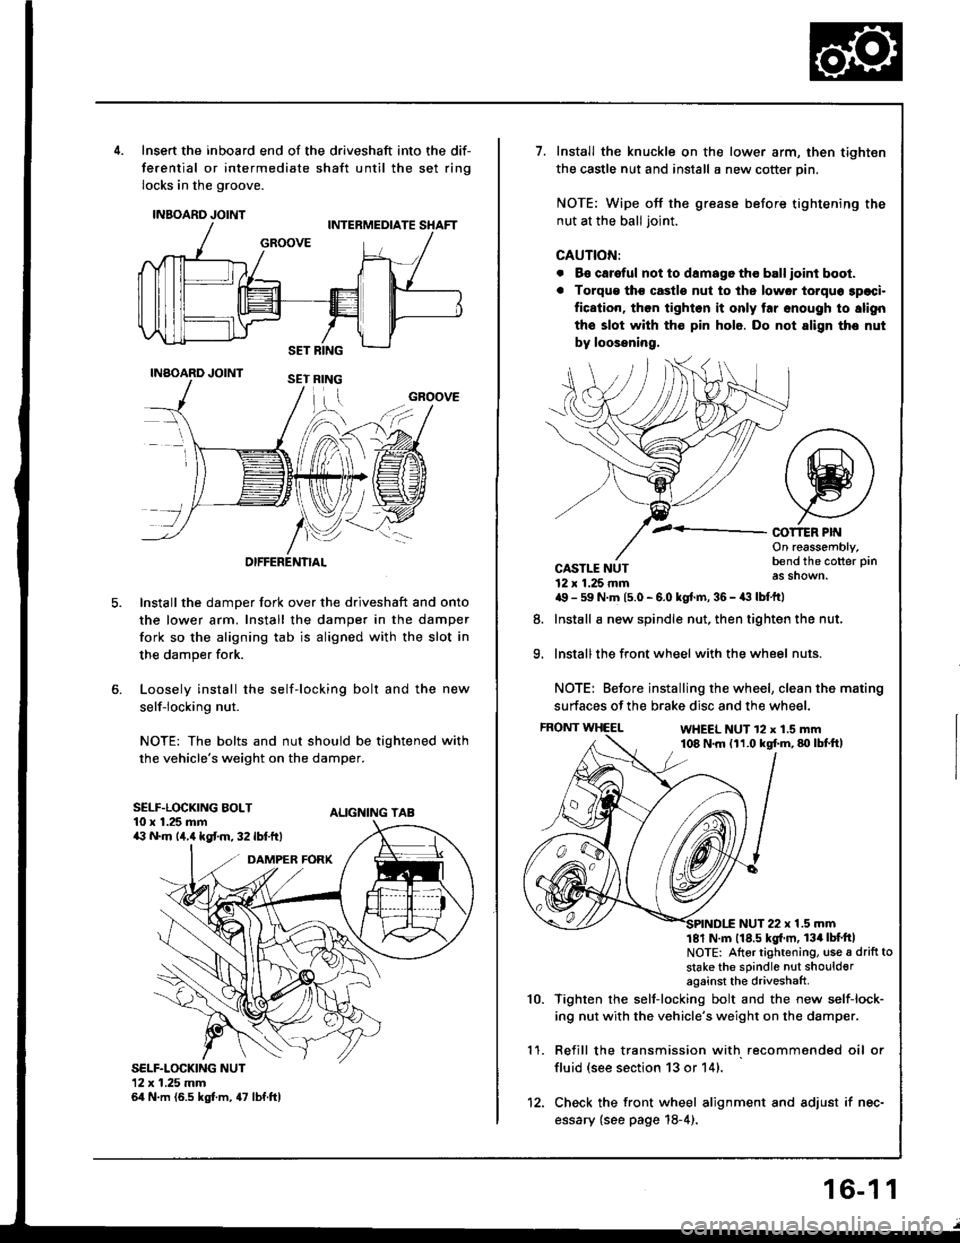
Insert the inboard end of the driveshaft into the dif-
ferential or intermediate shaft until the set ring
locks in the groove.
INBOARD JOINT
INAOARD JOINT
OIFFERENTIAL
Install the damper fork over the driveshaft and onto
the lower arm. Install the damper in the damper
fork so the aligning tab is aligned with the slot in
the damper fork.
Loosely install the self-locking bolt and the new
self-locking nut.
NOTE: The bolts and nut should be tightened with
the vehicle's weight on the damper.
ALIGNING TAB
SELF.LOCKING NUT12x 1.25 mm64 N.m (6.5 kgt m, 47 lbf.ftl
GROOVE
SELF.LOCKING BOLT10 x 1.25 mma:' N.m lir,4 kgt m, 32 lbf.ftt
1.Install the knuckle on the lower arm, then tighten
the castle nut and install a new cotter pin.
NOTE: Wipe off the grease before tightening the
nut at the ball joint.
CAUTION:
. B€ careful not to damago tho ball ioint boot.
. Torqu€ tho castle nut to ths lower torquo 3paci.
fication, then tighlon it only tar snough to slign
the slot with th€ pin hole. Do not align tho nut
by loossning,
COT1ER PIf{On reassembly,bend the cotter pin
as shown.
9.
CASTLE NUT12 x 1.25 rnma9 - 59 N.m 15.0 - 6.0 kgt.m, 36 - a:t lbtftl
Install a new spindle nut, then tighten the nut,
Install the front wheel with the wheel nuts.
NOTE: Before installing the wheel, clean the mating
surfaces of the brake disc and the wheel.
FRONT WHEELWHEEL NUT 12 x 1.5 mm108 N.m (11.0 kgf.m,80lbtft,
8.
1 '�I.
10.
NUT 22 x 1.5 mm181 N m 118.5 kgl'm, 134lbt'ftlNOTE: Altor tightening, use a drift to
stake the sPindle nut shoulderagainst the driveshaft
Tighten rhe self-locking bolt and the new self-lock-
ing nut with the vehicle's weight on the damper.
Refill the transmission with recommended oil or
fluid (see section 13 or 14).
Check the front wheel alignment and adjust if nec-
essary {see page 18-4).
12.
16-1 1
Page 604 of 1413
Intermediate shaft
Removal
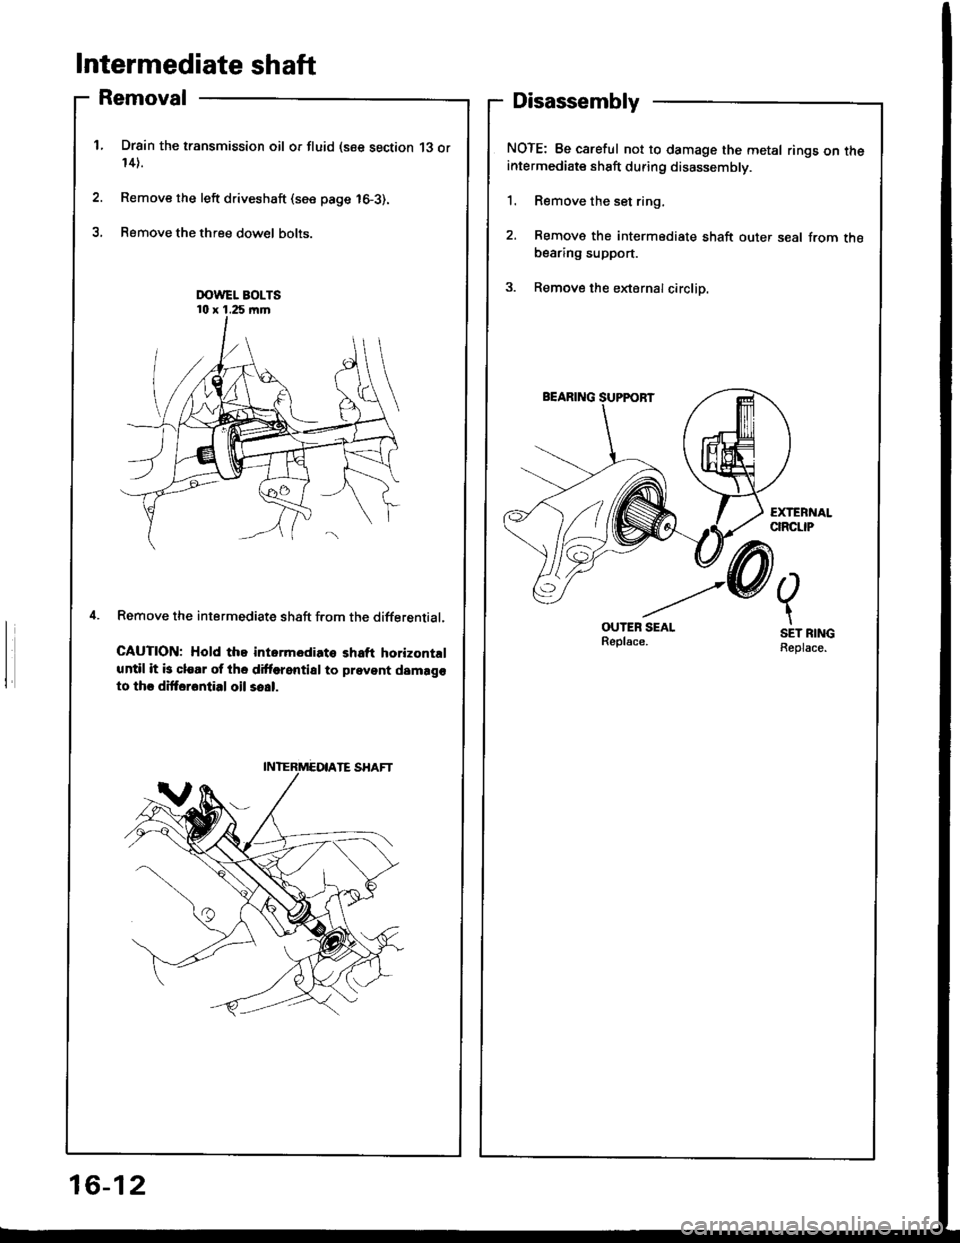
Drsin the transmission oil or fluid (see section 13 or14).
Remove the left driveshaft (see page 16-3).
Remove the three dow€l bolts.
Remove the intermediate shaft f.om the differential.
CAUTION; Hold the intormediato shaft horizontrl
until it b clear of the dittorential to prevent damago
to thr dittarontial oil so!|.
Disassembly
NOTE: Be careful not to damage the metal rings on theintermediate shaft during disassembly.
1. Remove the set ring,
2. Remove the intermediate shaft outer seal from thebearing support.
3. Remove the eldernalcirclip.
OUTEB SEALReplsce.
2.
t
SET RINGReplace.
16-12
Page 605 of 1413
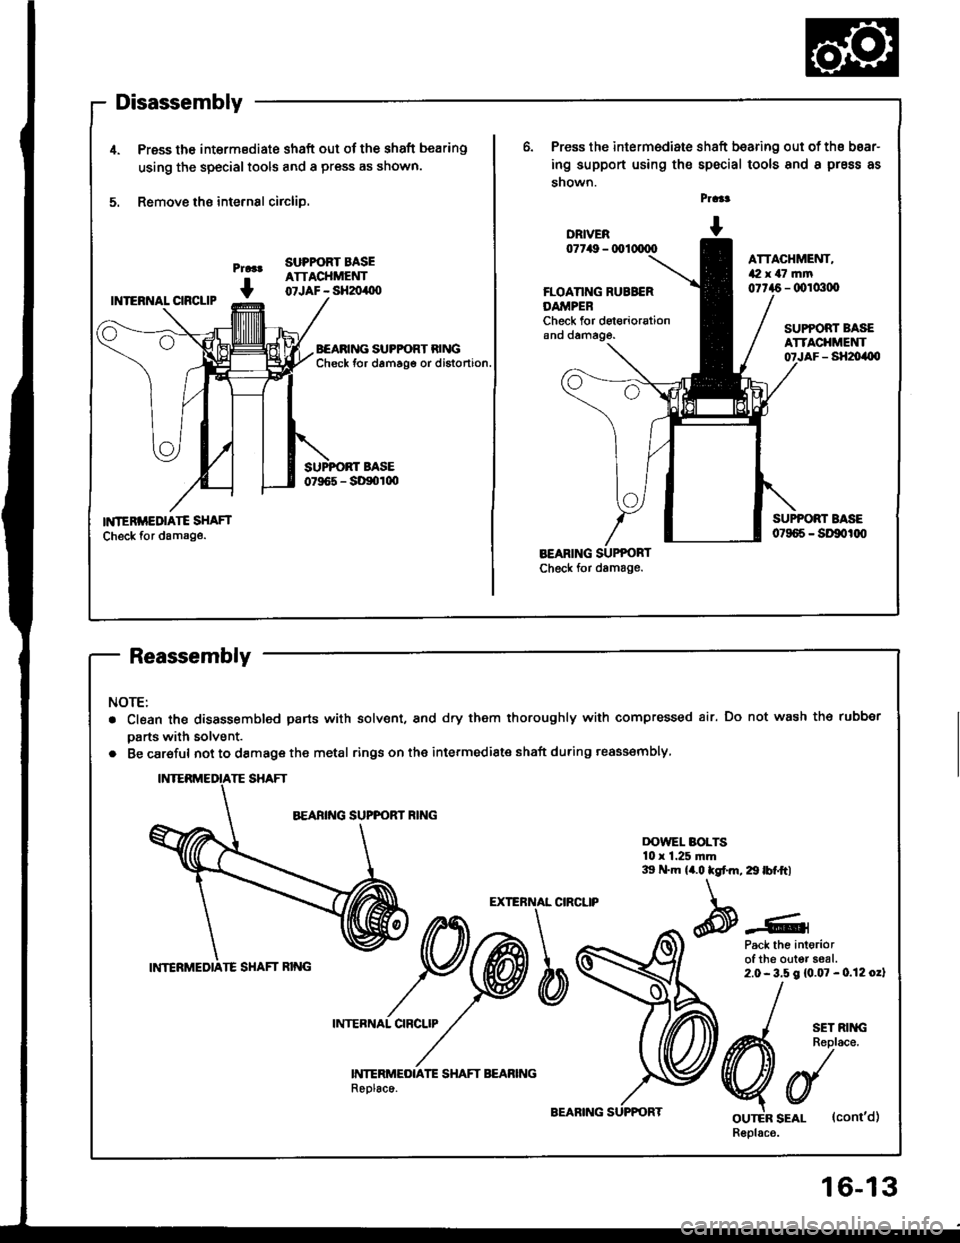
1.Press th6 intermBdiate shaft out of the shaft bearing
using the special tools and a press as shown.
Remove the internal circliD.
Press the intermediate shaft bearing out of th€ boar-
ing support using ths spscial tools and a prsss as
snown.Praa!5.
Pmar
I
SUPPORT BASEATTACHMENT07JAF - SH2oalXtFLOANNG RUBB€RDA'iIPERCheck for det€riorationand dama9e.
ATTACHMENT,1i2x a7 fim07ta6 - 00ro:!00INTEBNAL CIRCLIP
BEARING SUPFORT RINGChsck tor damagg or distonion.
SUPPORT BASEATTACHMENT- SHZ!(|O
BASE07965 - Sll9or00
INIERiIEDIAIE SHAFT
Check for damage.
SUPPORT BASE07965 - SDg,|q'
BEARING SUPPORTCheck for damage.
NOTE:
. Clean the disassembled parts with solvent, and dry them thoroughly with compressed air. Do not wash the rubber
parts with solvent.
. Be car€ful not to damage the metal rings on the intermedists shaft during reass€mbly
DOvvEL BOLTS10 r 1.25 ftm:tlt N.m {a.O tgt m, 29 lbfftl
Pack the intoriorof the outer saal.2.0- 3.5 g {0.07 - 0.12 oz}
EXTEN�TAL CIRCUP
ob.
BEARING
INTERMEOIATE SHAFT BEABINGReolaco.
SET RINGReplace.
v
ourER SEAL {conr'd)Rspbce.
Page 606 of 1413
Intermediate Shaft
Reassembly (cont'dl
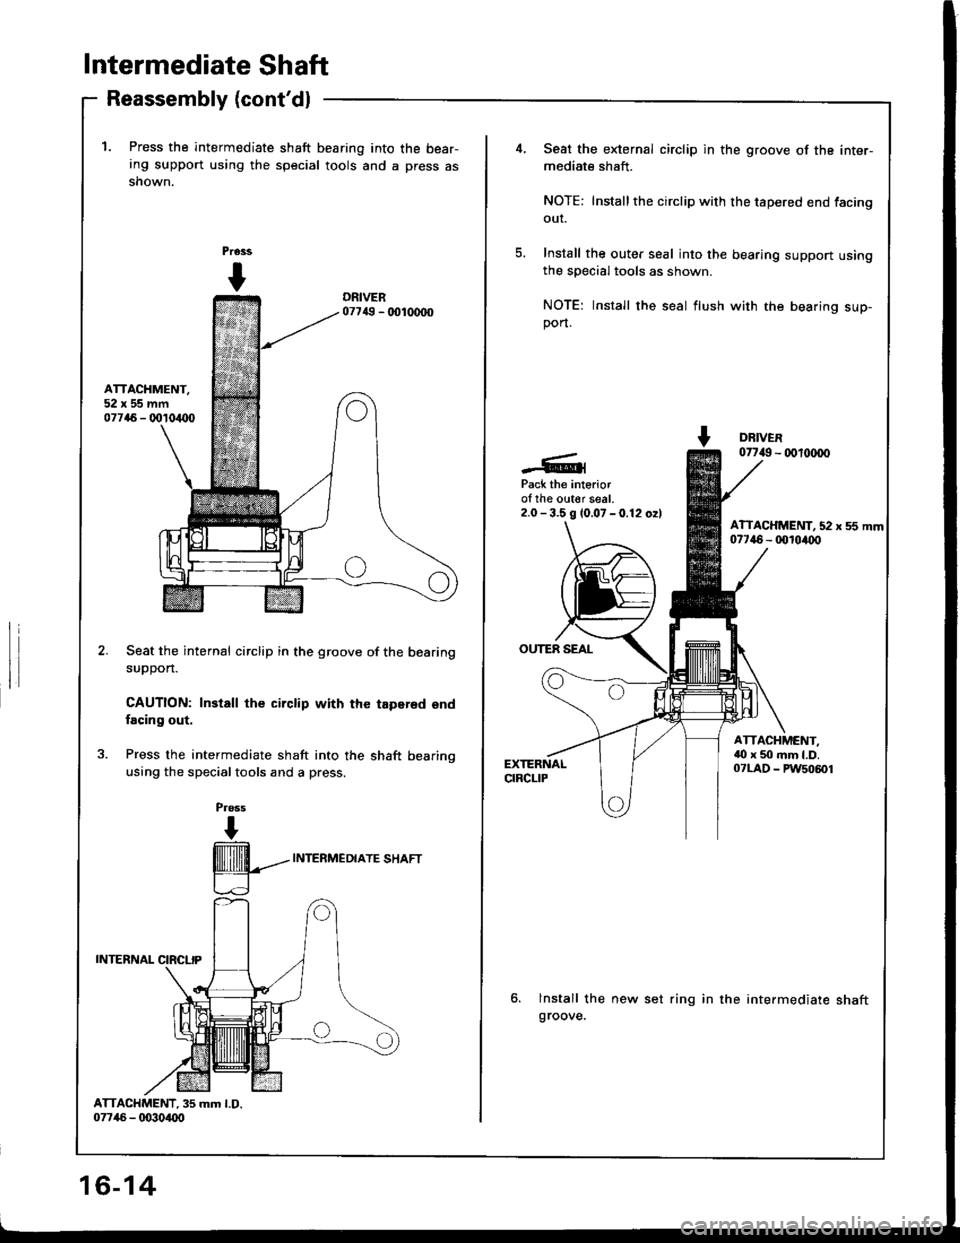
'1. Press the intermediate shaft bearing into the bear-ing support using the special tools and a press asshown.
ATTACHMENT,52x55mm07716 - 001o/UX)
Seat the internal circlip in the groove of the bearing
suoDon.
CAUTION: Install the circlip with the tapersd endfacing out.
Press the intermediate shaft into the shaft bearinqusing the specialtools and a press.
Pross
I
16-14
Seat the external circlip in the groove of the inter-
mediate shaft.
NOTE: Installthe circlip with the tapered end facing
our.
Install the outer seal into the bearing support usingthe special tools as shown.
NOTE: Install the seal flush with the bearing sup-port.
DRIVER07749 - 00t(xD0
Pack the interiorol the olter seal.2.0 - 3.5 g 10,07 - 0.12 o2l
OUTER SEAL
ATTACHMENT,aO x 5{) mm l.D.07LAD - PW50601
lnstall the new set ring in the intermediate shaftgroove.
Page 607 of 1413
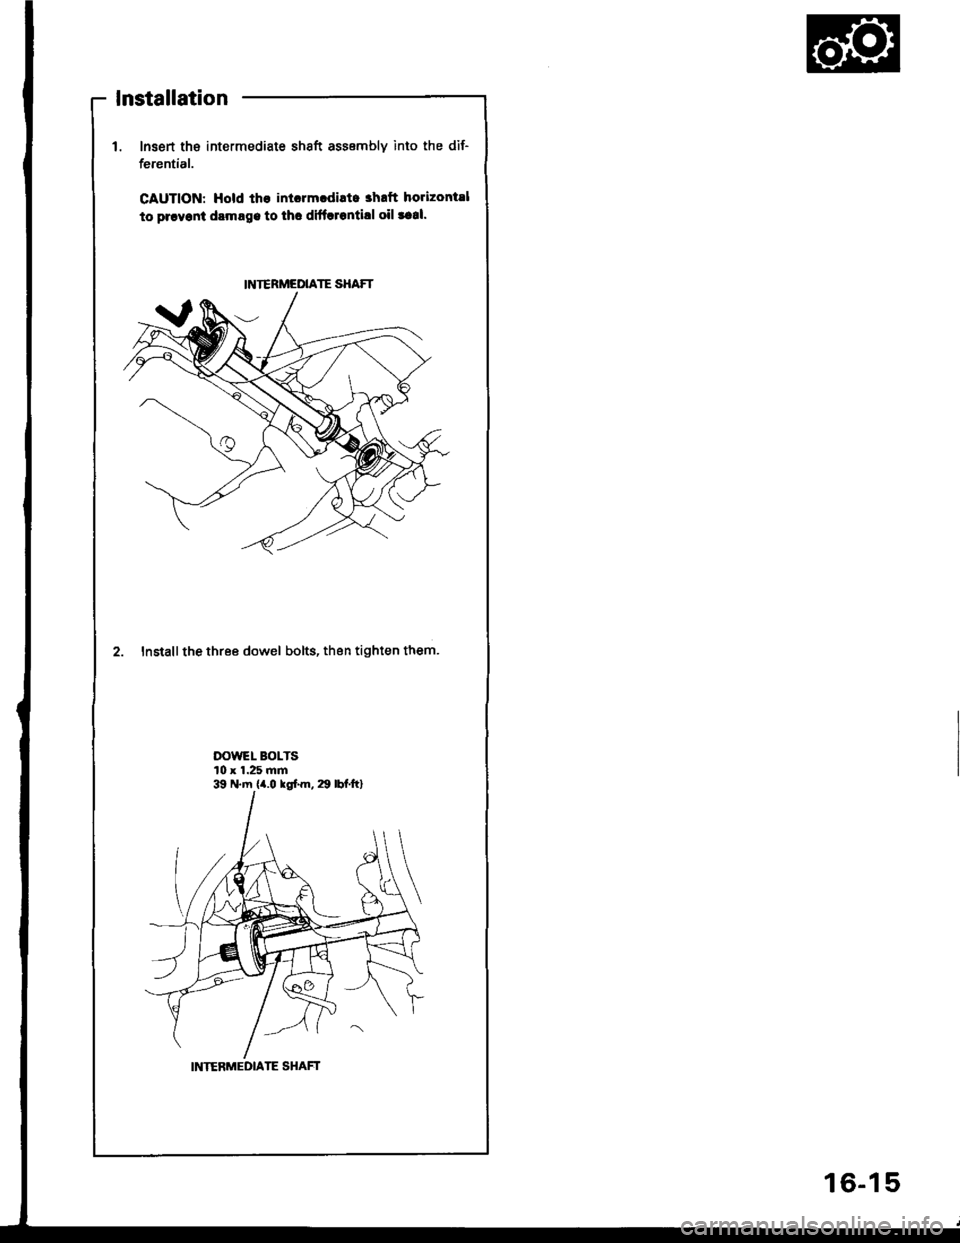
lnsert tha intermediate shaft assembly into the dif-
ferential.
CAUTION: Hold th€ inlorm.diltc ahrft horizontsl
to prryonl dsmrge to thc difflrontill oil taal.
2. Install the three dowel bolts, then tighten them.
DOWEL BOLTS10 x 1.25 mm
INTERMEDIATE SHAFT
39 N.m {a.O rgl.m, 29 lbl.ft}
INIERMEDIATE SHAFT
lnstallation
16-15
Page 608 of 1413
Steering
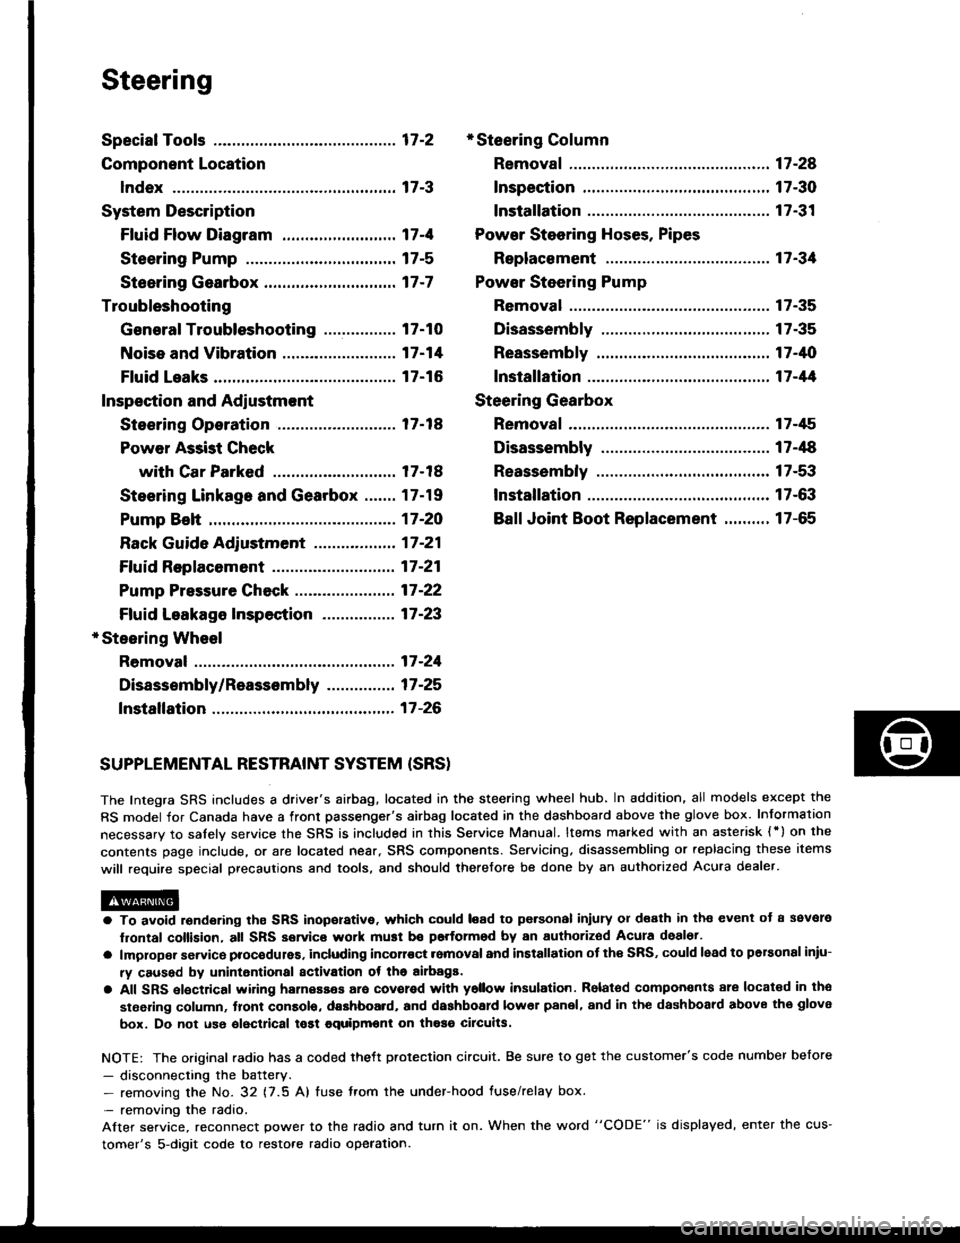
Special Tools ............. 17-2
Component Location
lndex ................ ...... 17-3
System Description
Ff uid Flow Diagram ......................... 17 -1
Steering Pump ................................. 17-5
Steering Gearbox ............................. 17-7
Troubleshooting
General Troubleshooting ................ 17-10
Noise and Vibration ......................... 17-14
Fluid Leaks ............. 17-16
Inspection and Adiustment
Steoring Operation .......................... 17 -14
Power Assist Check
with Car Parked ........................... 17-18
Steering Linkage and Gearbox ....... 17-19
Pump Beh .............. 17-20
Rack Guide Adjustment ............. ..... 17-21
Ff uid Replacement ...................... ..... 17 -21
Pump Pressure Check .................. .... 17 -22
Ffuid Leakage lnspection ................ 17-23
+ Steering Wheel
Removal ..,,,,,,,........ 17-24
Disassembly/Reassembly ............... 17 -25
fnstallation ,......,,,,,. 17-26
* Steering Column
Removaf .................17-28
Inspection .............. 17-30
Installation ............. 17-31
Power Steering Hoses. Pipes
Replacemont ......... 17-3tl
Power Steering Pump
Removal ................. 17-35
Disassembly .......... 17-35
Reassembly ........... 17-'10
lnstallation ........,..., l7-tltl
Steering Gearbox
Removaf .,.,............. 17-45
Disassembly .......... 17-/E
Reassembly ........... 17-53
lnstallation ............. 17-63
Ball Joint Boot Replacement .......... 17-65
SUPPLEMENTAL RESTRAINT SYSTEM {SRSI
The Integra SRS includes a driver's airbag. located in the steering wheel hub, In addition, all models except the
RS model for Canada have a front passenger's airbag located in the dashboard above the glove box. Information
necessarv to safely service the SRS is included in this Service Manual. ltems marked with an asterisk {') on the
contents page include, or are located near, SRS components. Servicing. disassembling or replacing these items
will require special precautions and tools, and should therefore be done by an authorized Acura dealer.
a To avoid rsndering ths SRS inoporative, which could load to po.sonal iniury 01 d€ath in th€ event ot a ssvare
lrontal collision, all SRS service work muat be performod by an authorizod Acura deal6t.
a lmploper service procodules. including incorloct romoval and installation of the SRS, could lead to personal iniu-
ry caused by unintontional activation ot the airbags.
a All SRS elsctdcal wiring harnesses ara covorod with ysllow insulation. Rolalod compon€nts 8re locatsd in tho
stse ng column, tront console, dashboard, and dashboard lower panel, and in the dashboard above the glove
box. Do not use oloctrical tost equipmoni on thosa cilcuits.
NOTE: The original radio has a coded thett protection circuit. Be sure to get the customer's code number before
- disconnecting the battery.- removing the No. 32 (7.5 A) tuse from the under-hood fuse/relay box.
- removing the radio.
Alter service, reconnect power to the radio and turn it on. When the word "CODE" is displayed' enter the cus-
tomer's 5-digit code to restore radio operation.
Page 609 of 1413
I
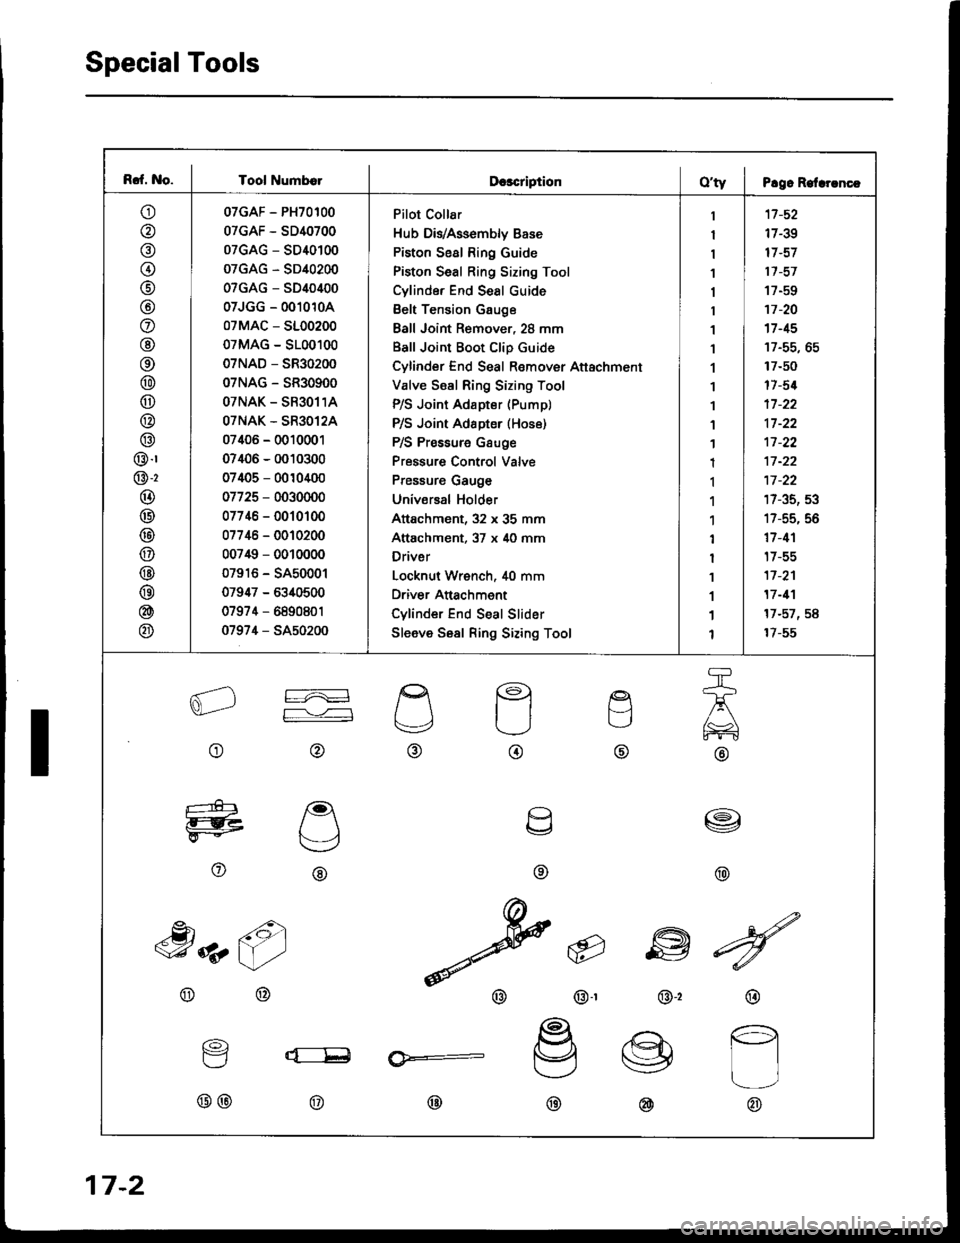
Rcf. No. I Tool Numb€lDcscriptionO'ty I P!9. Relrrrncc
o
@
@(t
@
@
o
@
@
@
@
@
@
@.r
@-2
@
@
@
@
@
@
@
@
07GAF - PH70100
07GAF - SD40700
07GAG - SD40100
07GAG - SD40200
07GAG - SD40400
07JGG - 0010104
07MAC - 5100200
07MAG - 5100100
07NAD - SR30200
07NAG - SR30900
OTNAK - SR3O11A
OTNAK - SR3O12A
07406 - 0010001
07406 - 0010300
07405 - 0010400
07725 - 0030000
07746 - 0010100
07746 - 0010200
007i$ - 0010000
07916 - SA50001
07947 - 6340500
07974 - 6890801
0797,1 - SA50200
Pilot Collar
Hub DivAssembly Base
Piston Seal Ring Guide
Piston Seal Ring Sizing Tool
Cylinde. End Seal cuide
Belt Tension Gauge
Ball Joint Remover, 28 mm
Ball Joint Boot Clip Guide
Cylinder End Seal Remover Attachment
Valve Ssal Ring Sizing Tool
P/S Joint Adapter (Pump)
P/S Joint Adapter (Hos6)
P/S Pressure Gsuge
Pressure Control Valve
Pressure Gauge
Universal Holder
Attachment, 32 x 35 mm
Attachment, 37 x 40 mm
Driver
Locknut Wrench, i[0 mm
Driver Anachment
Cylinder End Seal Slider
Sleeve Sesl Ring Sizing Tool
1
I
1
1
1
1
1
1
1'I
1
1
1
1
1
1'l
1
I
1
1
1
1
'17 -52
17-39
17 -57
17 -57
17-EO
17 -20't7 -15
17-50
17-5{
17 -22
17 -22't1-22
17 -22
17-35, 53
17-55, 56
17 -1'l
t7-55
17 -2'l
17 -11
17-57,58
17-55
aL2
o
re
F--,'---l
@
g
t.-,
@
q
o
etl
TJ
@
a\,
@
e
U
\v
o
I
@
,h z6)
@
@-r
6
w
@,2
^dN
v
@
@
16)
Y
@@
lx:__E
@
@:
@@
17-2
Page 610 of 1413
Component Location
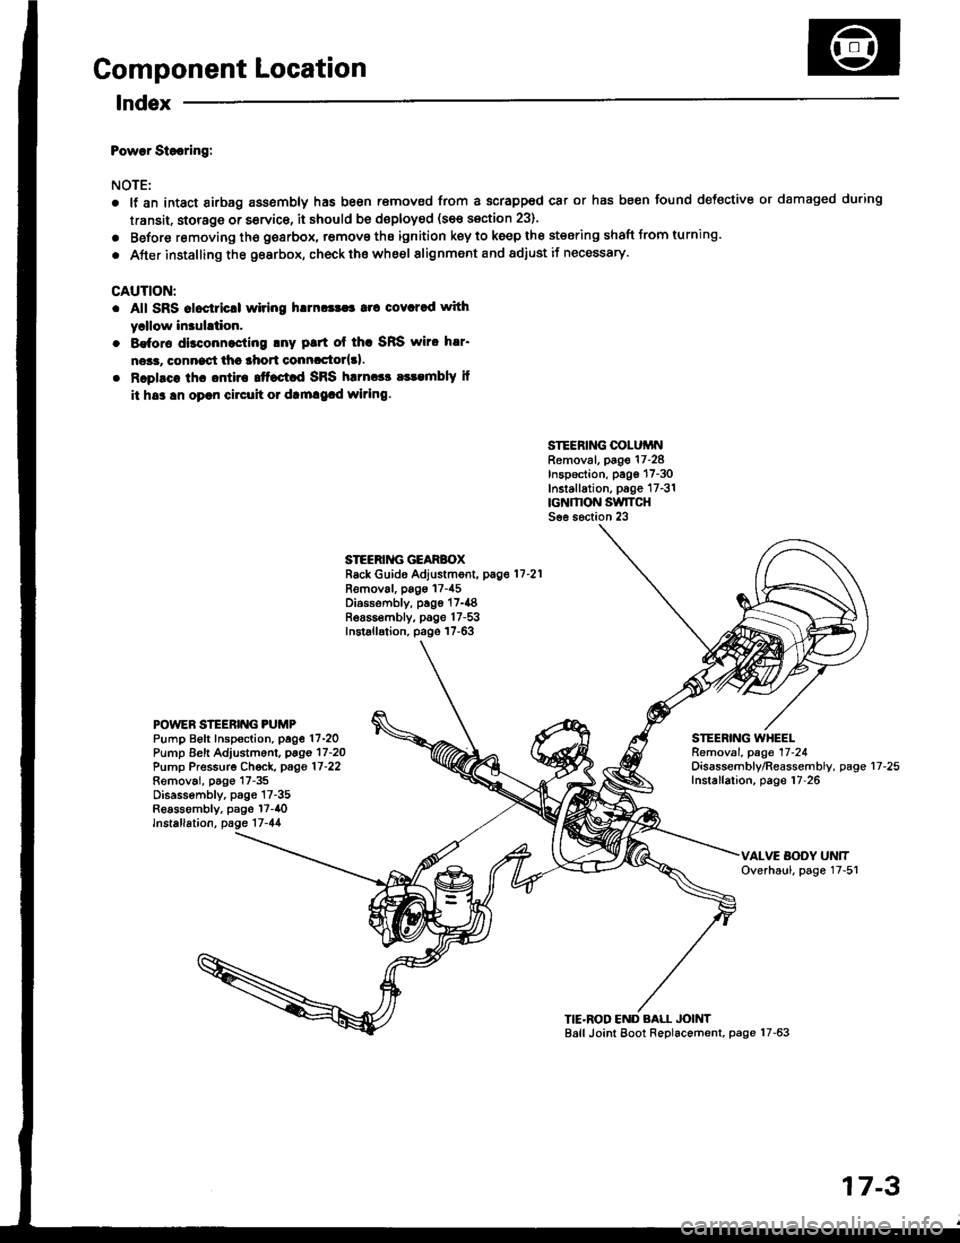
lndex
Powar Siooring:
NOTE:
a
a
It an intact airbag ass€mbly has been r€moved from a scrapped car or has been found defective or damaged during
transit. storage or service, it should be doploy€d (see section 23).
Before removing tho gearbox, remove ths ignition key to keep the steering shaft Jrom turning.
After installing the gearbox, check ths whe€l alignment and adiust if necessary.
CAUTION:
. All SRS aloctricll wiring h!m!|$a rrc covcred with
yrllow in3uhtion.
. 8€for€ disconnocling lny ptrt ol thc SRS wiro h!r'
ne*r, connect thc lhort conncctor{3l.
. Rcplsce lhc ontira ttfact d SRS harnccc a$embly il
it hs3 !n oprn circuh 01 dtm!9.d wiring.
SIEERING COLUiINRemoval, page 17-28Inspection, pago 17-30Installation, p6ge 17-31rcNMON SwlTCHSee s6ction 23
STEERII{G GEARBOXRack Guide Adjustment, pag.11-21
Removal, pags 17-45Diossombly, page 17-{8Bea65€mbly, page 17-53Installation, page 17-63
POWEN STEERING PUMPPump Beft Inspoction. page 17-2OPump Eeft Adjustm6nl, pago 17-2OPump Pressurg Ch€ck, page 17-22Removai, p6go 17-35Disassembly, p3gs 17-35Reassombly, psge l7-40lnstallation, page 17-44
STEERING WHEELRemoval. page 17-24Oisassembly/Reassembly, pageInstallation, page 17-2617-25
TIE'ROD END BALL JOINTBall Joint Eoot Replacement, page 17-63
17-3