ECU HONDA INTEGRA 1998 4.G User Guide
[x] Cancel search | Manufacturer: HONDA, Model Year: 1998, Model line: INTEGRA, Model: HONDA INTEGRA 1998 4.GPages: 1681, PDF Size: 54.22 MB
Page 284 of 1681
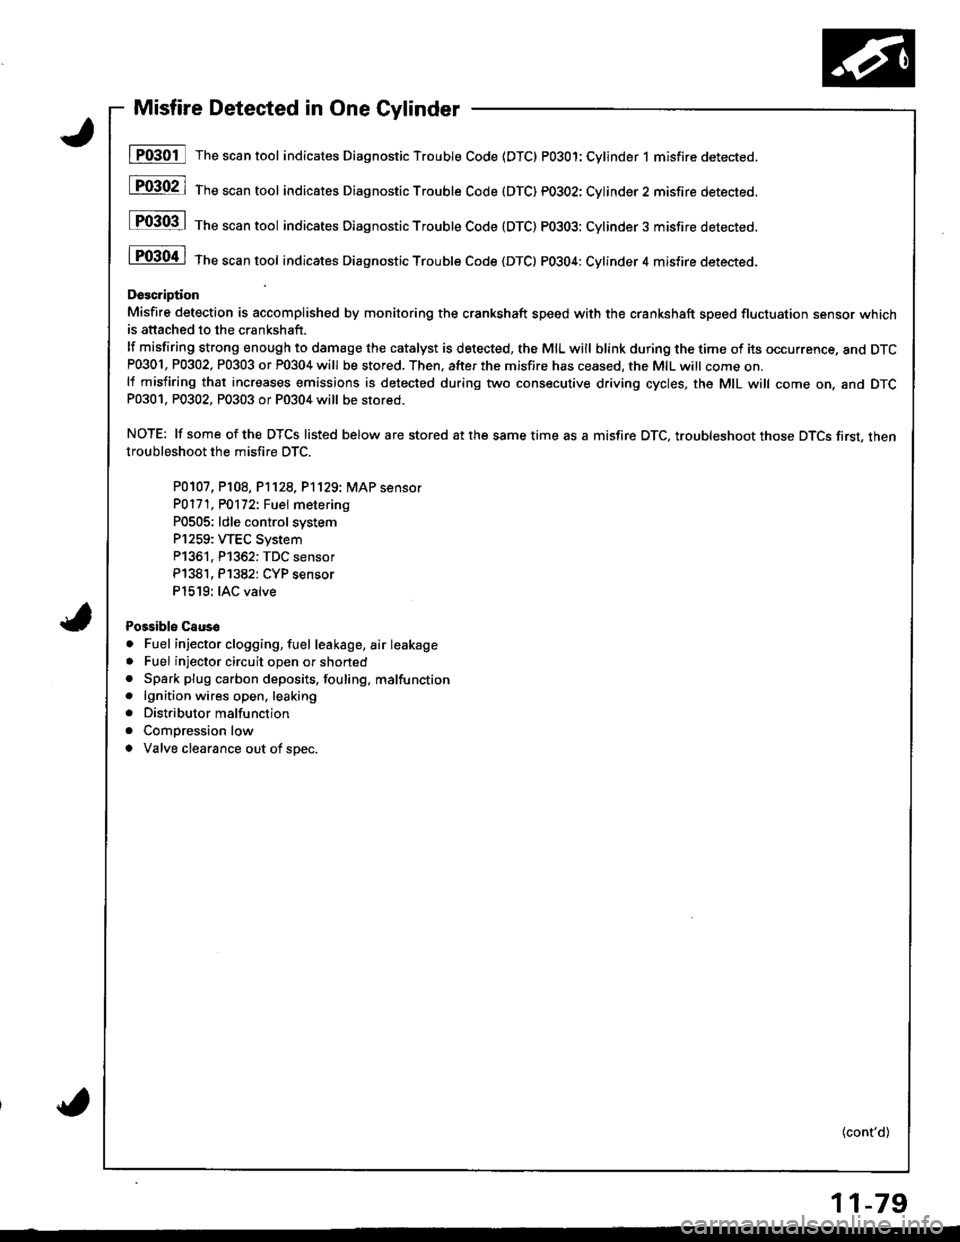
Misfire Detected in One Cylinder
I P0301 The scan tool indicates Diagnostic Trouble Code (DTC) PO3O1:Cylinder 1 misfire detected.
[F03021 1;," """n tool indicares Diagnostic Troubte Code (DTC) pO3O2: Cylinder2 misfire detected.
P0303 | ths sssn tool indicates Diagnostic Trouble Code (DTC) PO3O3: Cylinder3 misfire detected.
i P0304 | tne scan tool indicates Diagnostic Trouble code {DTC} PO3O4: Cylinder 4 misfire detected.
Doscription
Misfire detection is accomplished by monitoring the crsnkshaft speed with the crankshaft speed fluctuation sensor whichis attached to the crankshaft.
lf misfiring strong enough to damage the catalyst is detected, the MIL will blink during the time of its occurrence, and DTCP0301, P0302, P0303 or P0304 will be stored. Then, after the m;sfire has ceased, the MIL witt come on.lf misfiring that increases emissions is detected during two consecutive driving cycles, the MIL will come on, and DTCP0301, P0302, P0303 or P0304 will be stored.
NOTE: lf some of the DTCS listed below are stored at the same time as a misfire DTC, troubleshoot those DTCS first, thentroubleshoot the misfi.e DTC.
P0107, P108, P1128,P'1129:� MAP sensor
PO171, PO172t Fuel metering
P0505; ldle control system
P1259: WEC System
P1361, P1362: TDC sensor
P138'1, P1382: CYP sensor
P1519: IAC valve
Possibls Caus6
. Fuel injector clogging, fuel leakage, air leakage
. Fuel injector circuit open or shoned. Spark plug carbon deposits, fouling, malfunction. lgnition wires open, leaking
. Distributor malfunction
. Compression low
a Valve clearance out of spec.
(cont'd)
11-79
Page 322 of 1681
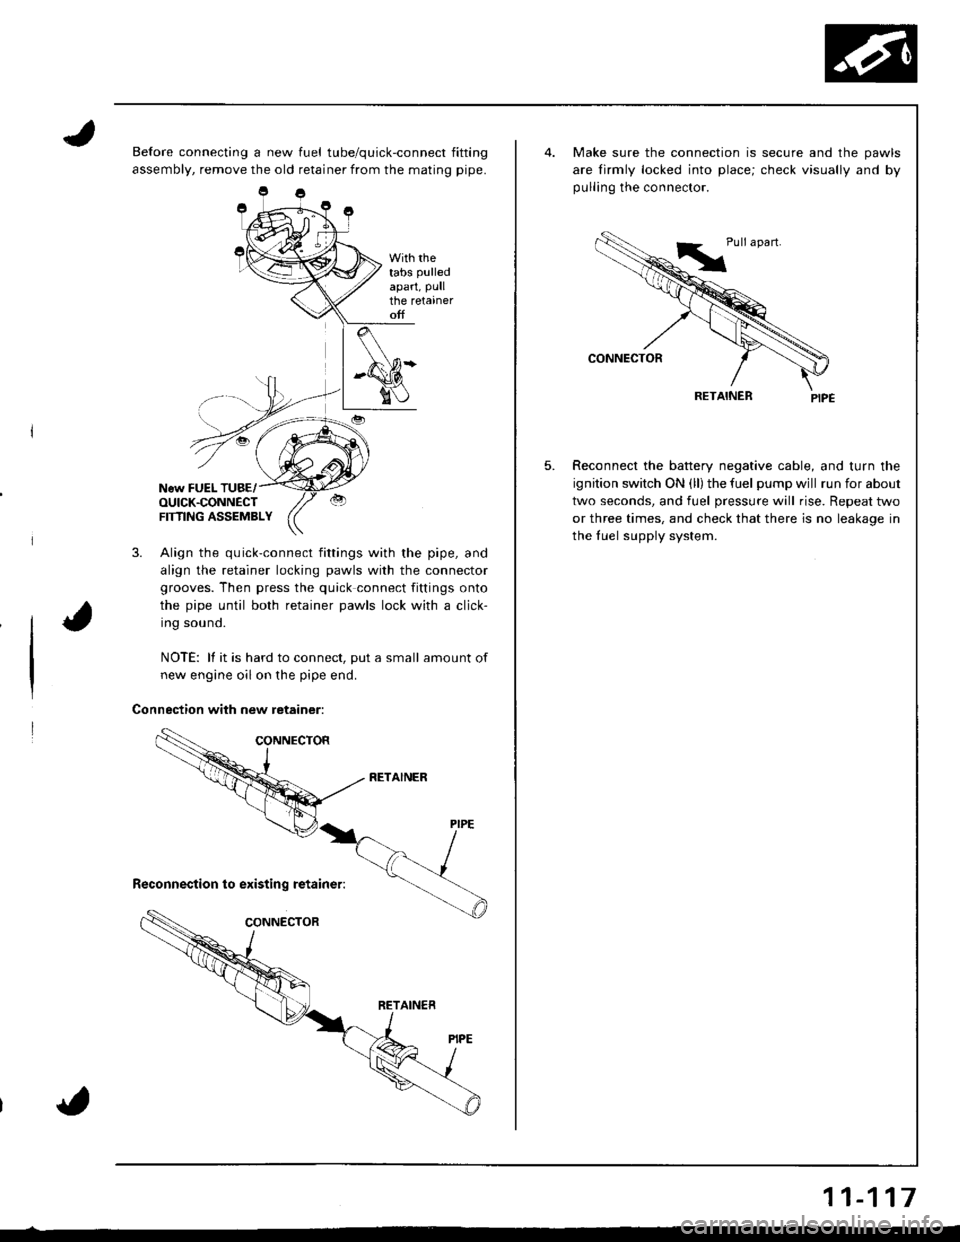
Before connecting a new fuel tube/quick-connect fitting
assembly, remove the old retainer from the mating pipe.
With rhetabs pulled
apart, Pullthe retaineroff
New FUEL TUBE/OUICK.CONNECTFTflNG ASSEMBLY
3. Align the quick-connect fittings with the pipe, and
align the retainer locking pawls with the connector
grooves. Then press the quick connect fittings onto
the pipe until both retainer pawls lock with a click-
Ing souno.
NOTE: lf it is hard to connect, put a small amount of
new engine oil on the pipe end.
Connection with new retainer:
5.
Make sure the connection is secure and the pawls
are lirmly locked into place; check visually and by
pulling the connector.
RETAINER
Reconnect the battery negative cable, and turn the
ignition switch ON (ll) the fuel pump wjll run for about
two seconds, and fuel pressure will rise. Repeat two
or three times, and check that there is no leakage in
the fuel supply system.
11-117
Page 344 of 1681
Three Way Catalytic Converter (TWC)
lT042O I Th" """n tool indicates Diagnostic Trouble Code (DTC) P0420: catatyst system efficiency below threshold.
Descriotion
This system evaluates the catalyst's capacity by means of the HO2S (Primary and Secondary) output during stable drivingconditions. lf deterioration has been detected during three consecutive driving cycles, the MIL comes on and DTC p0420 willbe stored.
NOTE: lf some of the DTCS listed below are stored at the same time as DTC PO42O. troubleshoot those DTCS tirst. thentroubleshoot DTC P0420.
P0136, P0139: Secondarv HO2S
P0141:Secondary HO2S Heater
Possible Cause
. TWC Deterioration
. Exhaust system leakage
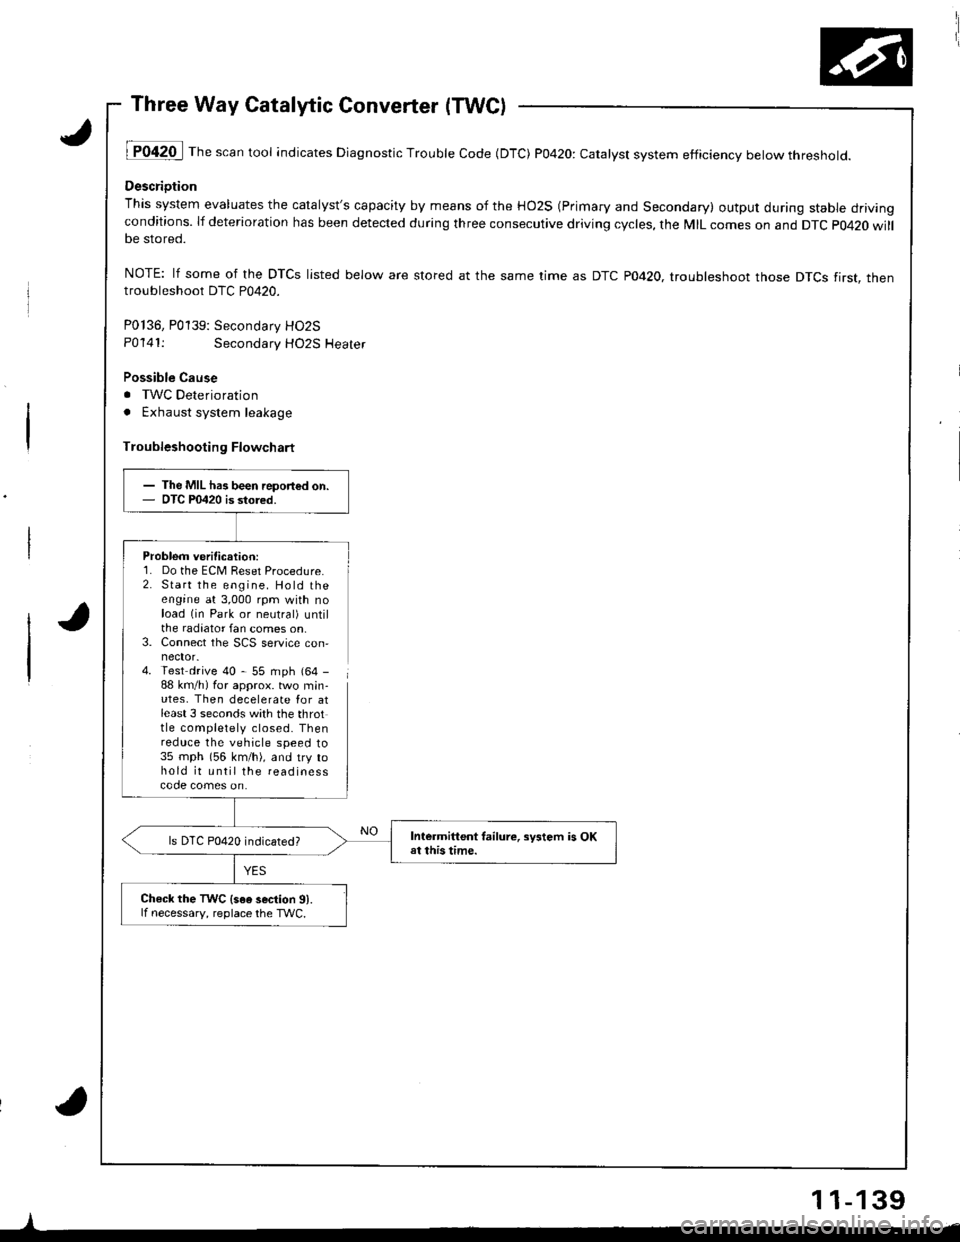
Troubleshooting Flowchart
Problem verification:1. Do the ECM Reset Procedure.2. Start the engine. Hold theengine at 3,000 rpm with noload (in Park or neutral) untilthe radiator fan comes on,3. Connect the SCS service con,
4. Test drive 40 - 55 mph (64 -
88 km/h) for approx. two min-utes, Then decelerate Ior atleast 3 seconds with the throttle completely closed. Thenreduce the vehicle speed to35 mph (56 km/h), and try tohold it until the readinesscode comes on.
I
- The MIL has been report€d on.- OTC P0420 is stored.
Intermittent tailure, sFtem is OKat this time.ls DTC P0420 indicated?
Check the TWC {s6e 3ection 91.lf necessary, reolace the TWC.
11-139
Page 396 of 1681
f-
Countershaft Assembly
BEARING PULLER
{Commerciallyavailable)
Disassembly
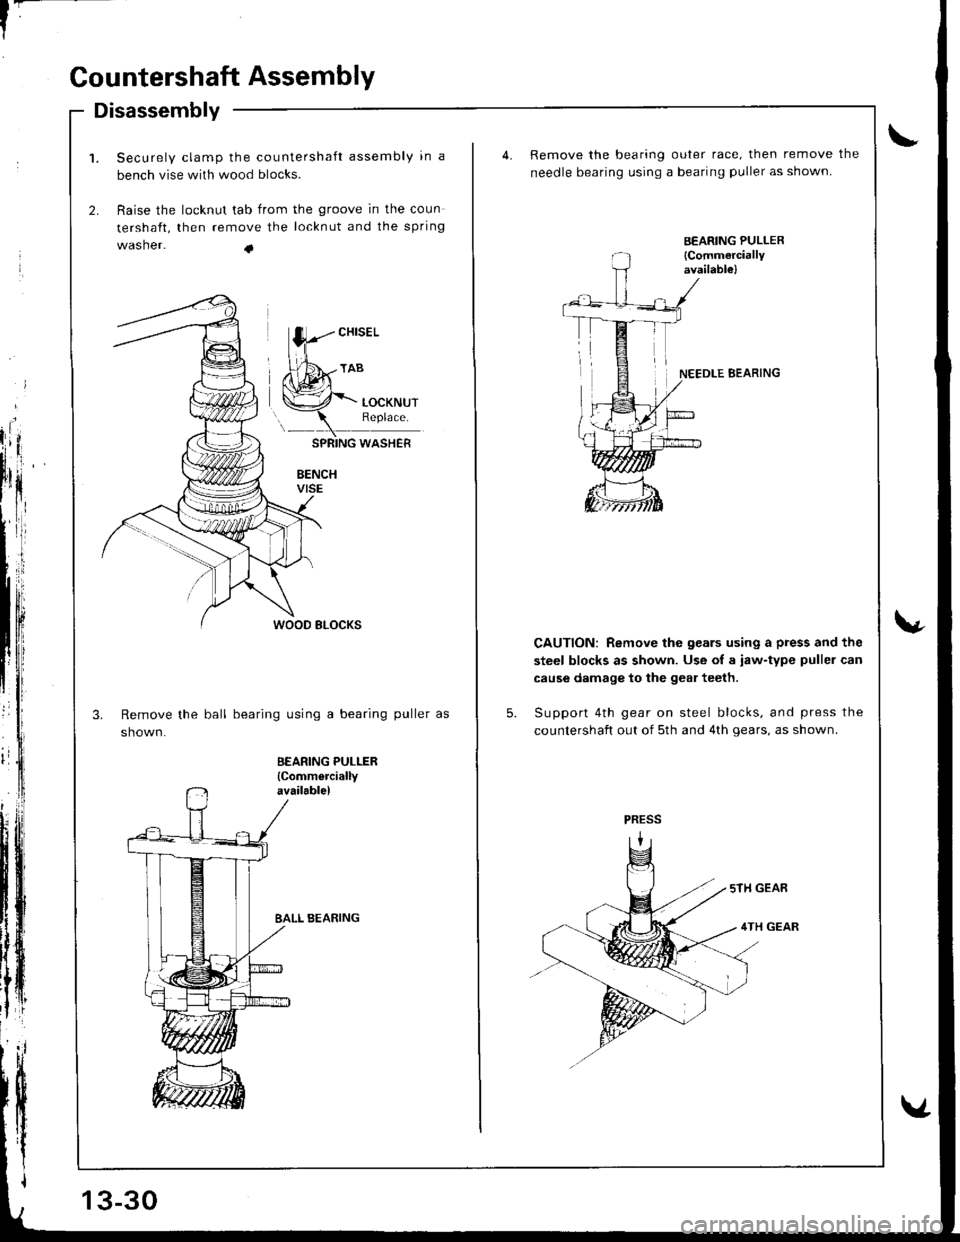
Securely clamp the countershaft assembly in a
bench vise with wood blocks.
Raise the locknut tab from the groove in the coun
tershaft, then remove the locknLlt and the spring
washer. +
WOOD BLOCKS
Remove the ball bearing using a bearing puller as
shown.
BALL BEARING
13-30
4.Remove the bearing outer race, then remove the
needle bearing using a bearing puller as shown.
,/NEEDLE BEARING
CAUTION: Remove the gears using a press and the
steel blocks as shown. Use oI a iaw-type puller can
cause damage to the geal teeth.
Support 4th gear on steel blocks. and press the
countershaft out of sth and 4th gears, as shown.
4TH GEAR
Page 399 of 1681
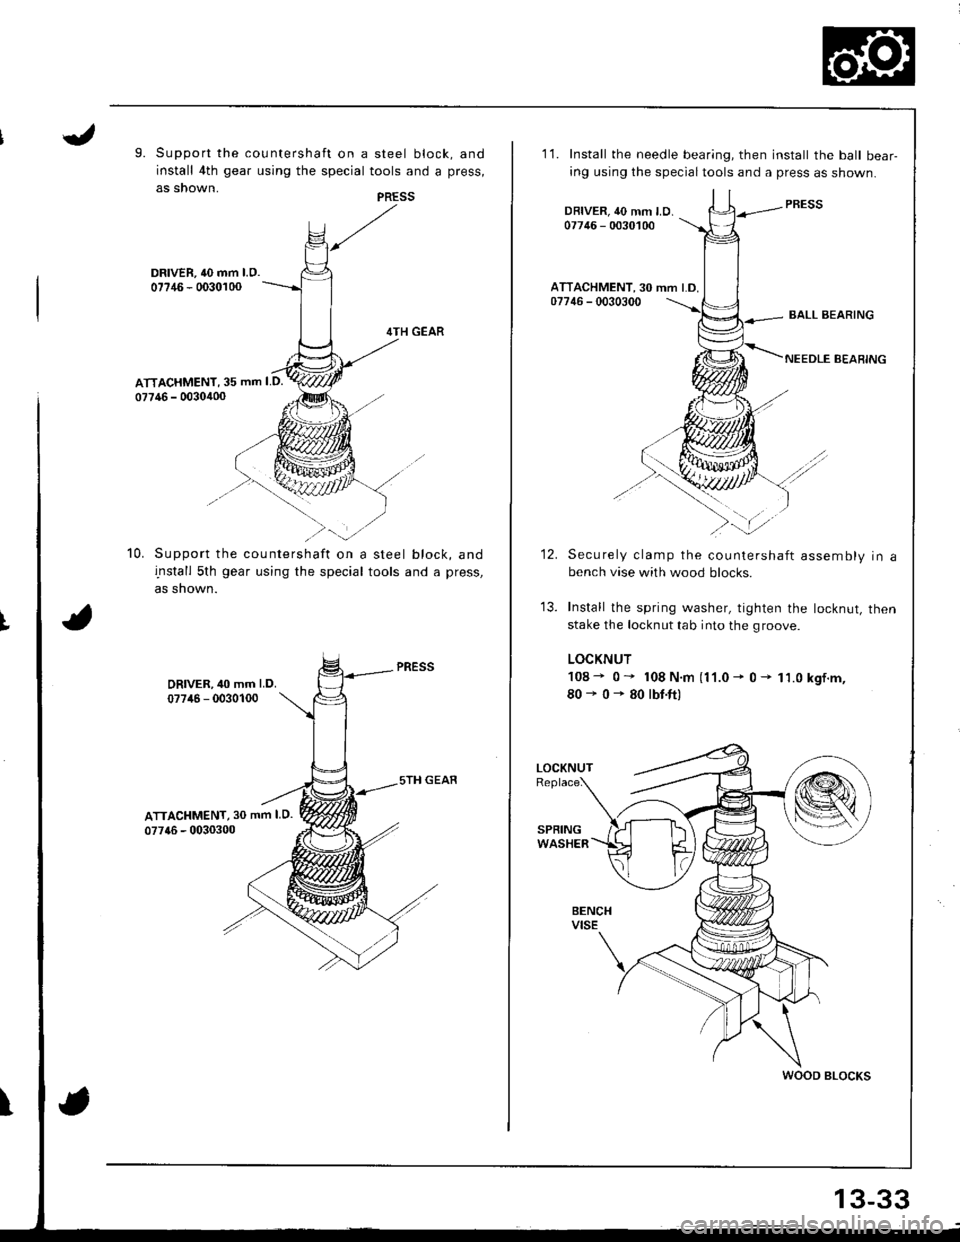
9. Support the countershaft on a steel block, and
install 4th gear using the special tools and a press,
as snown.
DRIVER, 40 mm l.O.07?46 - 0030100
4TH GEAR
ATTACHMENT, 35 mm I D.
07746 - 0030400
Support the countershaft on a steel block, and
install 5th gear using the special tools and a press,
as shown.
DRIVER,40 mm LD.
07746 - 0030100
ATTACHMENT, 30 mm I D.
077{6 - 0030300
10.
I
PRESS
11. Install the needle bearing, then install the balt bear-
ing using the specialtools and a press as shown.
DBIVER, 40 mm LD.07746 - 0030100
ATTACHMENT. 30 mm LD.07746 - 0030300
-..t
12.Securely clamp the countershaft assembly in abench vise with wood blocks.
Install the spring washer, tighten the locknut, then
stake the locknut tab into the groove.
LOCKNUT
108- 0" 108N.m (11.0- 0- 11.0kgf.m,
80'0+80rbr.ft)
WOOD BLOCKS
13-33
Page 410 of 1681
Transmission
20.
21.
Reassembly (cont'dl
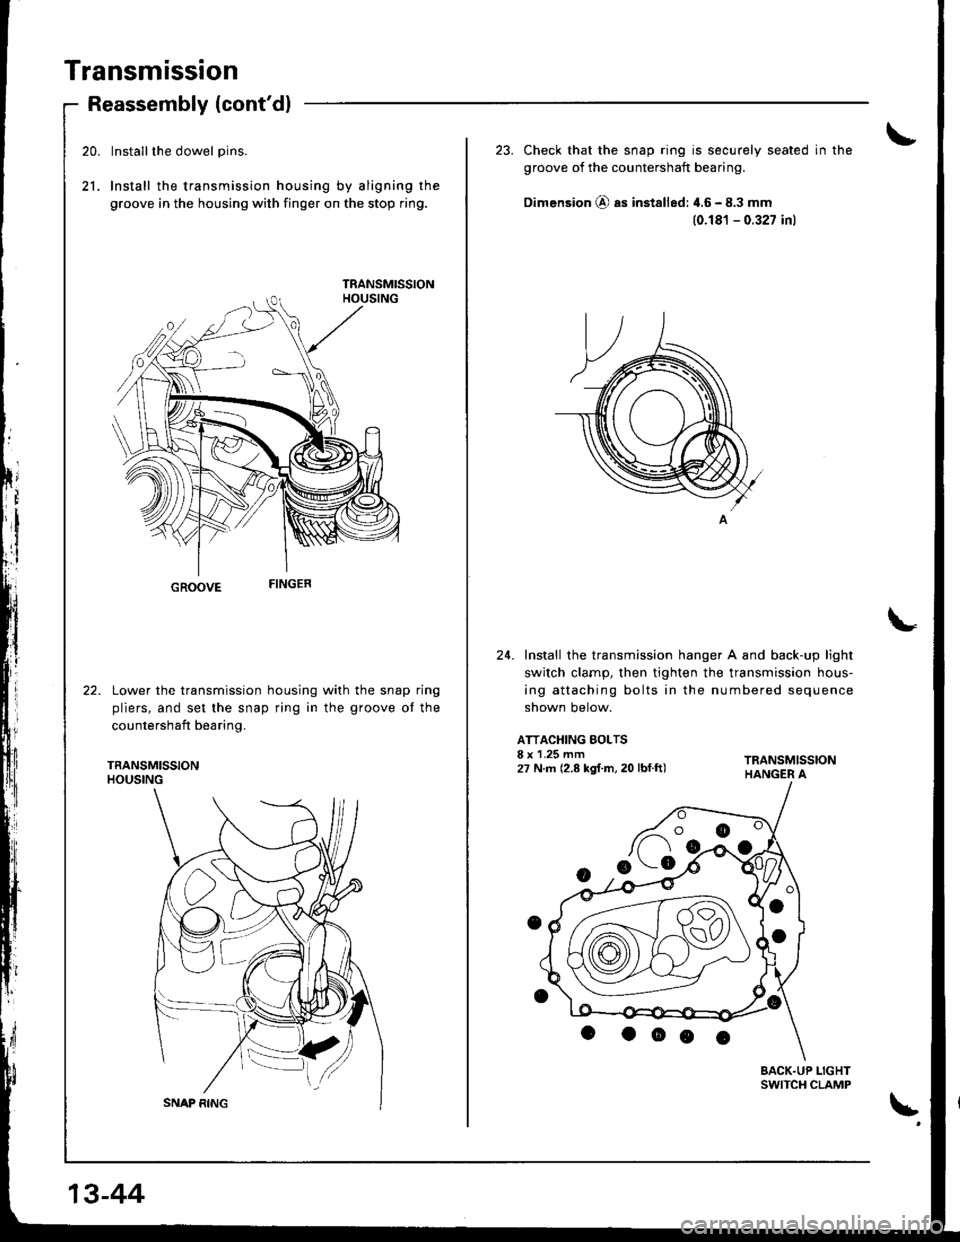
Installthe dowel pins.
Install the transmission housing by aligning the
groove in the housing with finger on the stop ring.
GROOVE
Lower the transmission housing with the snap ring
pliers, and set the snap ring in the groove of the
countershaft bearing.
TRANSMISSIONHOUSING
13-44
23. Check that the snap ring is securely seated in the
groove of the countershaft bearing.
Dimension @ as installed: 4.6 - 8.3 mm
(0.181 - 0.327 inl
24. Install the transmission hanger A and back-up light
switch clarnp, then tighten the transmission hous-
ing attaching bolts in the numbered sequence
shown below.
ATTACHING BOLTSI x 1.25 mm27 N.m (2.8 kgf.m, 20 lbf.ft)
BACK.UP LIGHTSWITCH CLAMP
\'
Page 469 of 1681
Troubleshooting Procedures
(
{
(cont'd)
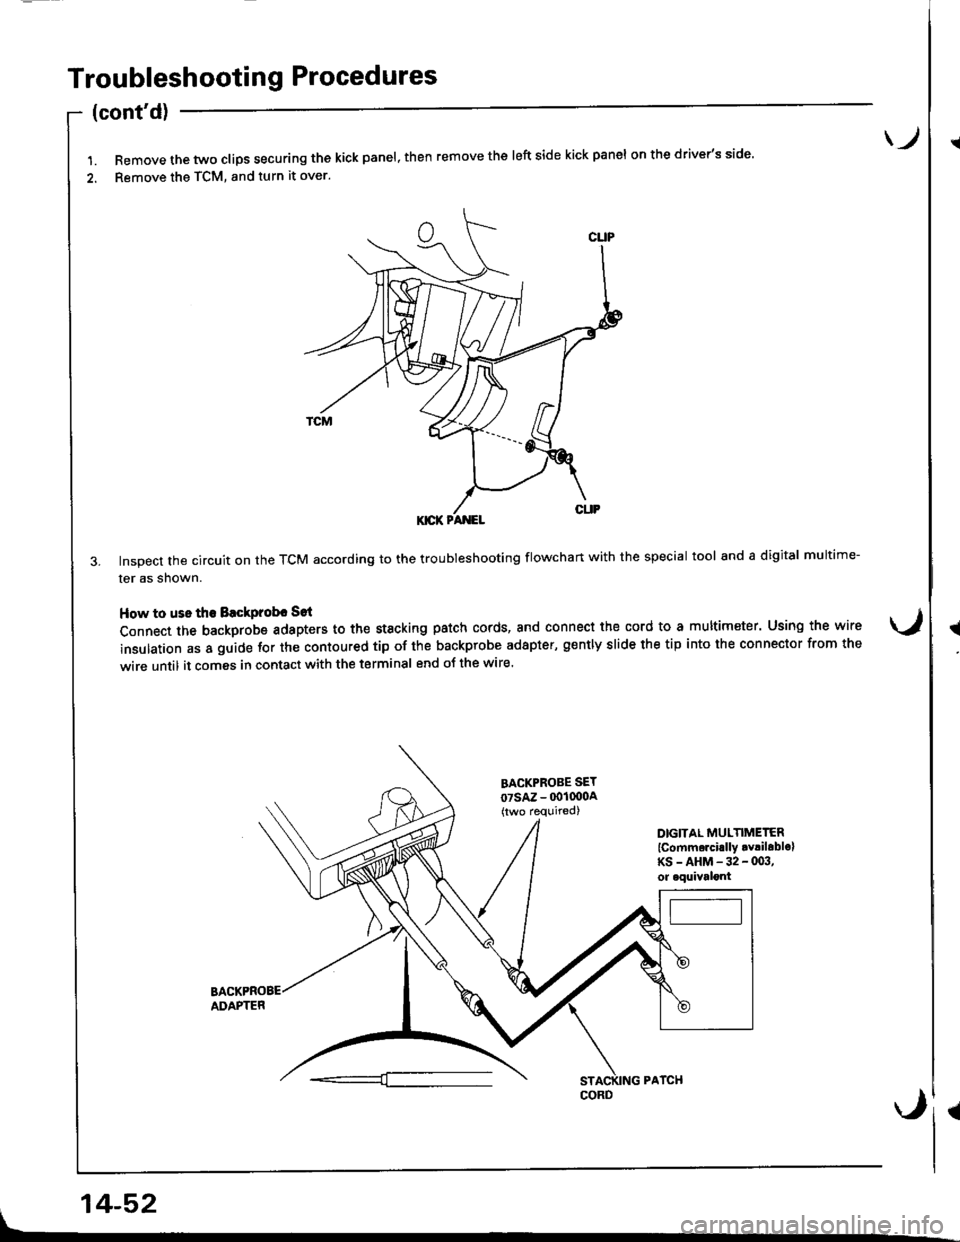
l.Removethetwoc|ipssecuringthekickpane|,thenremovethe|eftsidekickpane|onthedriver,sside.
2. Remove the TCM, and turn it over.
3. Inspect the circuit on the TCM according to the troubleshooting flowchan with the special tool and a digital multime-
ler as shown.
How to uss the Blckprobr Sat
Connect the backprobe adapters to the st8cking patch cords, and connect the cord to a multimeter. Using the wire
insulation as a guide for the contoured tip of the backprobe adapter, g€ntly slide the tip into the connector from the
wire until it comes in contact with the terminal end oJ the wire.
)
BACKPROBE SET
07sAz - 001000A(two required)
DIGITAL MULTIMETER
lcomm.rci.lly .v!ilablolKS-AHM-32-003,or oquivalont
ADAPTER
, 14-52
Page 470 of 1681
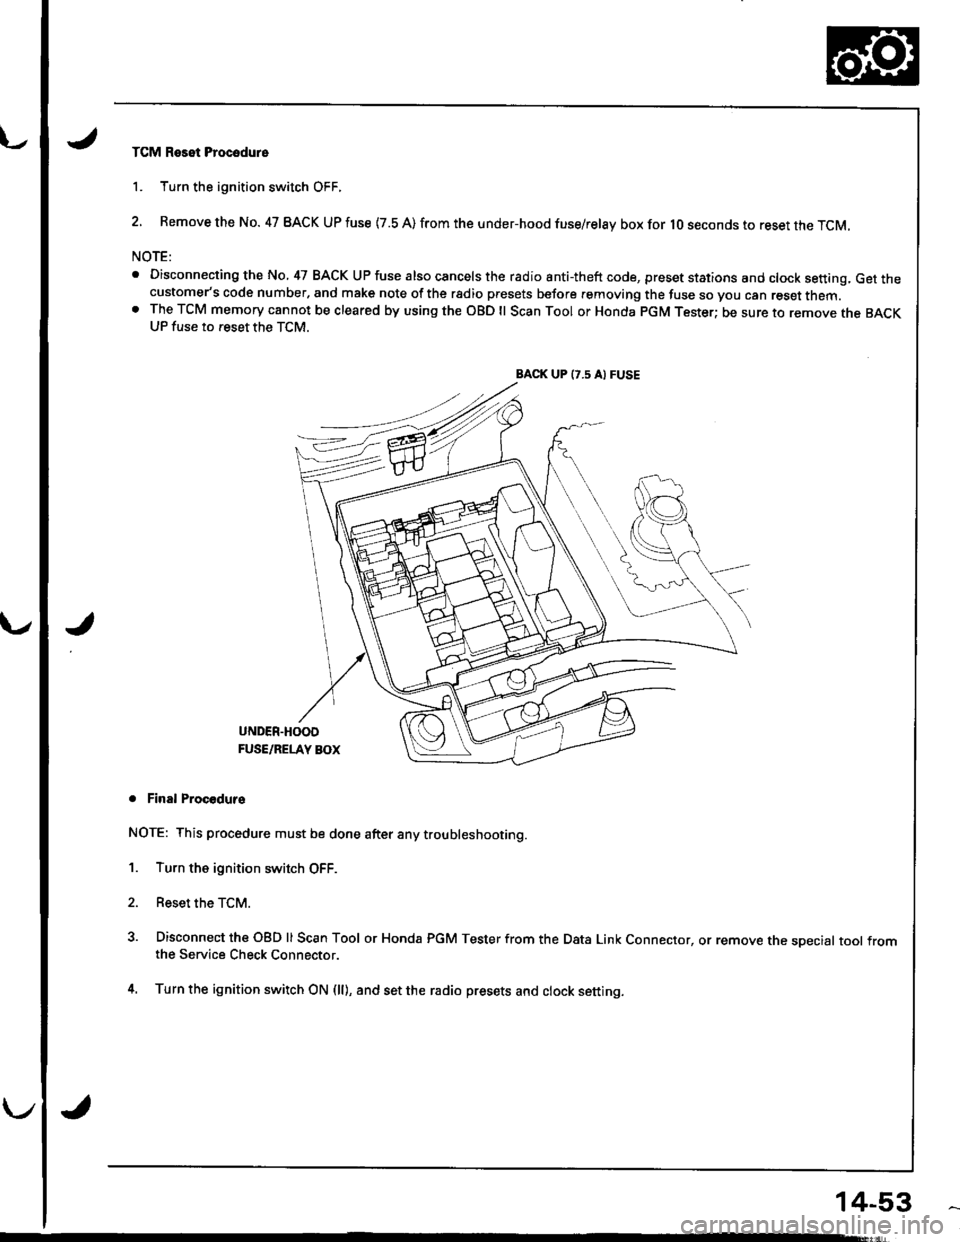
TCM Reset Procodure
1. Turn the ignition switch OFF.
2. Remove the No. 47 BACK UP fuse {7.8 A) from the under-hood fuse/relay box for lO seconds to reset the TCM.
NOTE:
. Disconnecting the No, 47 BACK UP fuse also cancels the radio anti-theft code, preset stations and clock setting, Get thecustomer's code number, and make note of the rsdio presets before removing the fuse so you can reset them.o The TCM memory cannot be cleared by using the OBD ll Scan Tool or Honda pGM Tester; be sure to remove the BACKUP fuse to reset the TCM.
BACK UP (7.5 A) FUSE
J
UNDER.HOOD
FUSE/RELAY BOX
. Final Procodurs
NOTE: This procedure must be done after any trou bleshooting.
1. Turn the ignition switch OFF.
2. Reset the TCM.
3. Disconnect the OBD ll Scan Tool or Honda PGM Tester from the Data Link Connector, or remove the sDecial tool fromthe Service Check Connector.
4. Turn the ignition switch ON (ll), and set the radio presets and clock setting.
14-53
Page 504 of 1681
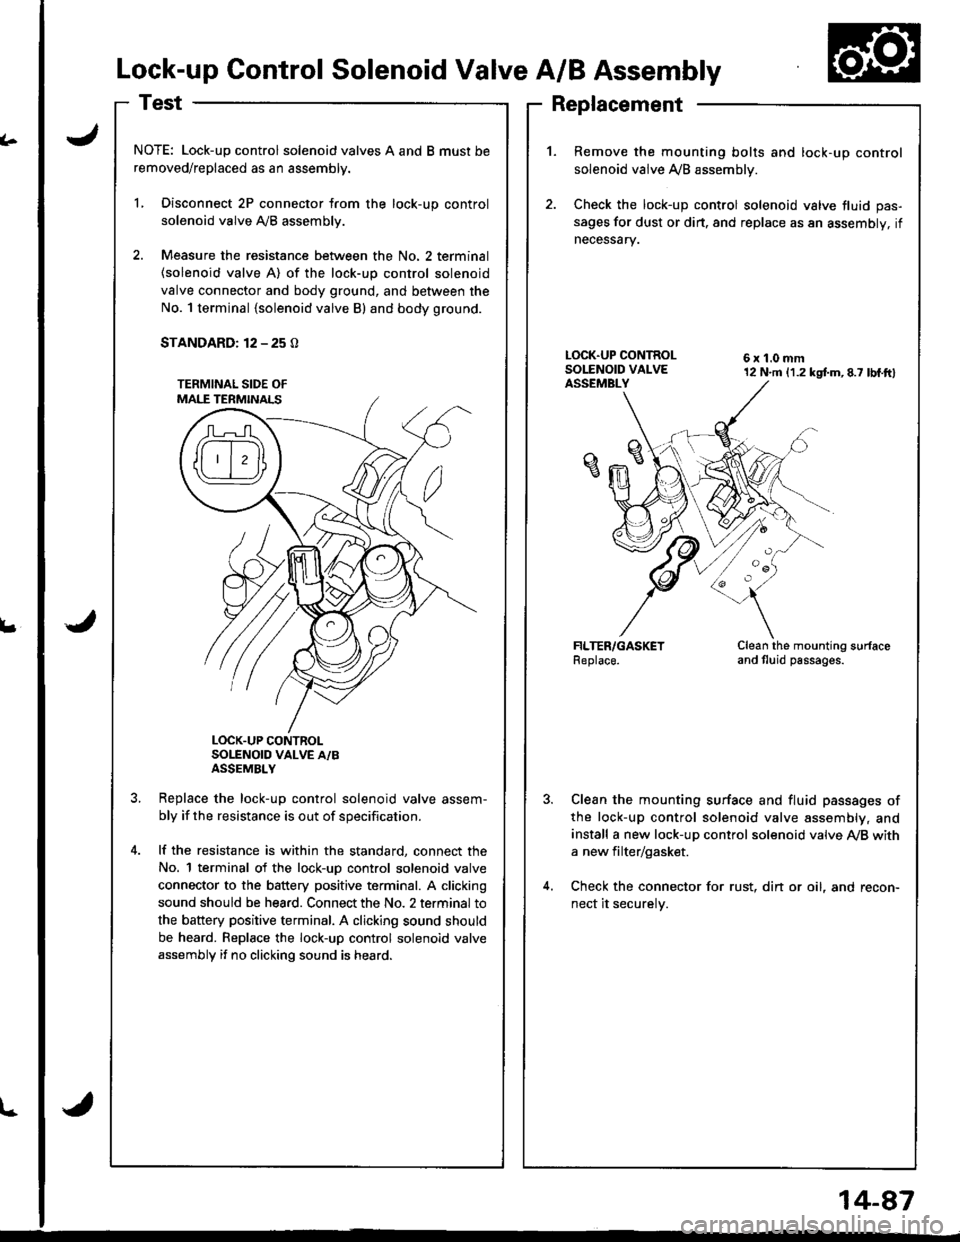
Replacement
(.
L
Lock-up Control Solenoid Valve A/B Assembly
NOTE: Lock-up control solenoid valves A and B must be
removed/replaced as an assembly.
L Disconnect 2P connector from the lock-up control
solenoid valve Ay'B assembly.
2. Measure the resistance between the No. 2 terminal
{solenoid valve A) of the lock-up control solenoid
valve connector and body ground, and between the
No. 1 terminal {solenoid valve B) and body ground.
STANDARD: 12 - 25 O
LOCK.UP CONTROLSOLENOID VALVE A/BASSEMBLY
Replace the lock-uo control solenoid valve assem-
bly if the resistance is out of specification.
lf the resistance is within the standard, connect the
No. 1 terminal of the lock-uD control solenoid valve
connector to the battery positive terminal. A clicking
sound should be hea.d. Connect the No. 2 terminal to
the battery positive terminal. A clicking sound should
be heard. Replace the lock-up control solenoid valve
assembly if no clicking sound is heard.
1.Remove the mounting bolts and lock-up control
solenoid valve A/B assemblv.
Check the lock-up control solenoid valve fluid pas-
sages for dust or dirt. and replace as an assembly, if
necessary.
6x1.0mm12 N.m (1.2 kgtm,8.7 lbf.ftl
Clean the mounting surfaceand tluid passages.
Clean the mounting surface and fluid passages of
the lock-up control solenoid valve assembly, and
install a new lock-up control solenoid valve Ay'B with
a new filter/gasket.
Check the connector for rust, din or oil, and recon-
nect it securelv.
l-
14-87
Page 505 of 1681
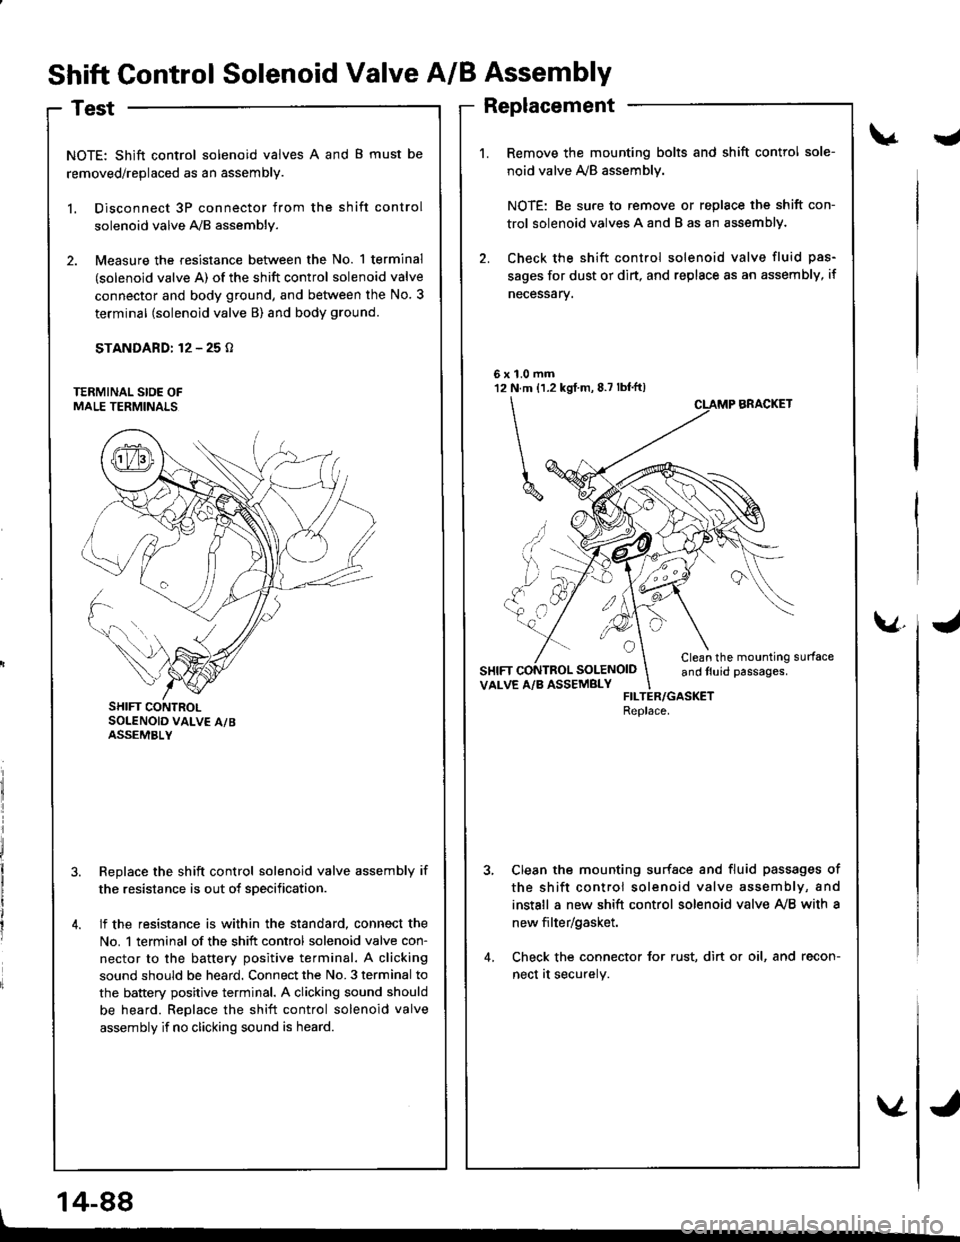
Shift Control Solenoid Valve A/B Assembly
Test
NOTE: Shift control solenoid valves A and B must be
removed/replaced as an assembly.
l. Disconnect 3P connector from the shift control
solenoid valve A,/B assembly.
2. Measure the resistance between the No. 1 terminal
(solenoid valve A) of the shift control solenoid valve
connector and body ground, and between the No. 3
terminal (solenoid valve B) and body ground.
STANDARD: 12 - 25 o
Replace the shift control solenoid valve assembly if
the resistance is out of sDecification.
lf the resistance is within the standard, connect the
No. 1 terminal of the shift control solenoid valve con-
nector to the battery positive terminal. A clicking
sound should be heard. Connect the No. 3 terminal to
the battery positive terminal. A clicking sound should
be heard. Replace the shift control solenoid valve
assembly if no clicking sound is heard.
J
1.0 mmN.m {1.2 kgf m, 8.7 lbf'ft)
\
^ ,, ..,'
UYM
6x't2
a
SOLENOID
v.
SHIFT CONTROLSOLENOID VALV€ A/BASSEMBLY
Replacement
Remove the mounting bolts and shift control sole-
noid valve ly'B assemblv.
NOTE: Be sure to remove or replace the shift con-
trol solenoid valves A and B as an assemblY.
Check the shift control solenoid valve fluid pas-
sages for dust or dirt, and replsce as an assembly, if
necessarv.
BRACKET
Clean the mounting surfaceand tluid passages.VALVE A/B ASSEMBLYFILTER/GASKETReplace.
Clean the mounting surfsce and fluid passages of
the shift control solenoid valve assembly, and
install a new shift control solenoid valve Ay'B with a
new filter/gasket.
Check the connector for rust, dirt or oil, and recon-
nect at securely.
14-88