ECU HONDA INTEGRA 1998 4.G Repair Manual
[x] Cancel search | Manufacturer: HONDA, Model Year: 1998, Model line: INTEGRA, Model: HONDA INTEGRA 1998 4.GPages: 1681, PDF Size: 54.22 MB
Page 895 of 1681
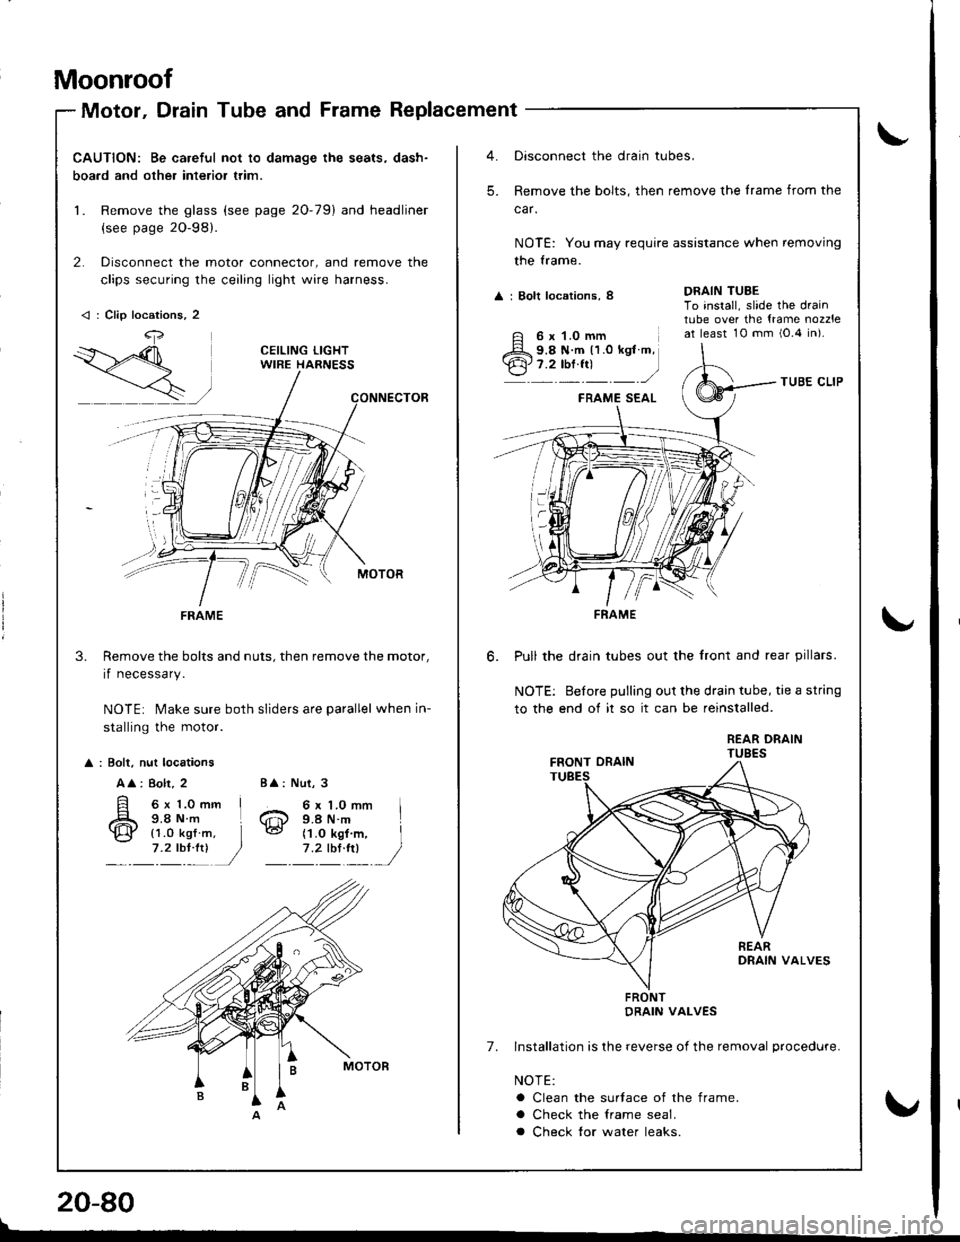
Moonroof
Motor, Drain Tube and Frame Replacement
CAUTION: Be careful not to damage the seats, dash-
boa.d and other interior trim.
1. Remove the glass (see page 20-79) and headliner
{see page 2O-98}.
2. Disconnect the motor connector, and remove the
clips securing the ceiling light wire harness.
Remove the bolts and nuts, then remove the motor,
if necessary.
NOTE: Make sure both sliders are parallel when in-
stalling the motor.
3.
: Bolt, nut locations
A
: 8olt, 2
6x 1.0mm I9.8Nm L
Nut, 3
6 x 1.0 mm I9.4 N.m
BA:
6@{1.0 kgf7 .2 tbl:!)(1.O kgf m, I
1'�lIltl /
< : Clip locations, 2
4,
FRAME
Oisconnect the drain tubes.
Remove the bolts, then remove the lrame from the
car.
NOTE: You may require assistance when removing
the trame.
A : Bolt locations, 8
TUBE CLIP
FRAME SEAL
Pull the drain tubes out the front and rear pillars.
NOTE: Before pulling out the drain tube, tie a string
to the end of it so it can be reinstalled.
REAR DRAINTUBES
7. Installation is lhe reverse of the removal procedure.
NOTE:
a Clean the surtace of the frame.
a Check the lrame seal.
a Check tor water leaks.
DRAIN TUBETo install, slide the draintube over the {rame nozzleat least 10 mm i0.4 in).
-'
6 x 1.0 mm9.8 N.m 11.0 kgt m,7.2 tbf.fr)
FRAME
FRONTDRAIN VALVES
!
\"
20-80
\
v
Page 902 of 1681
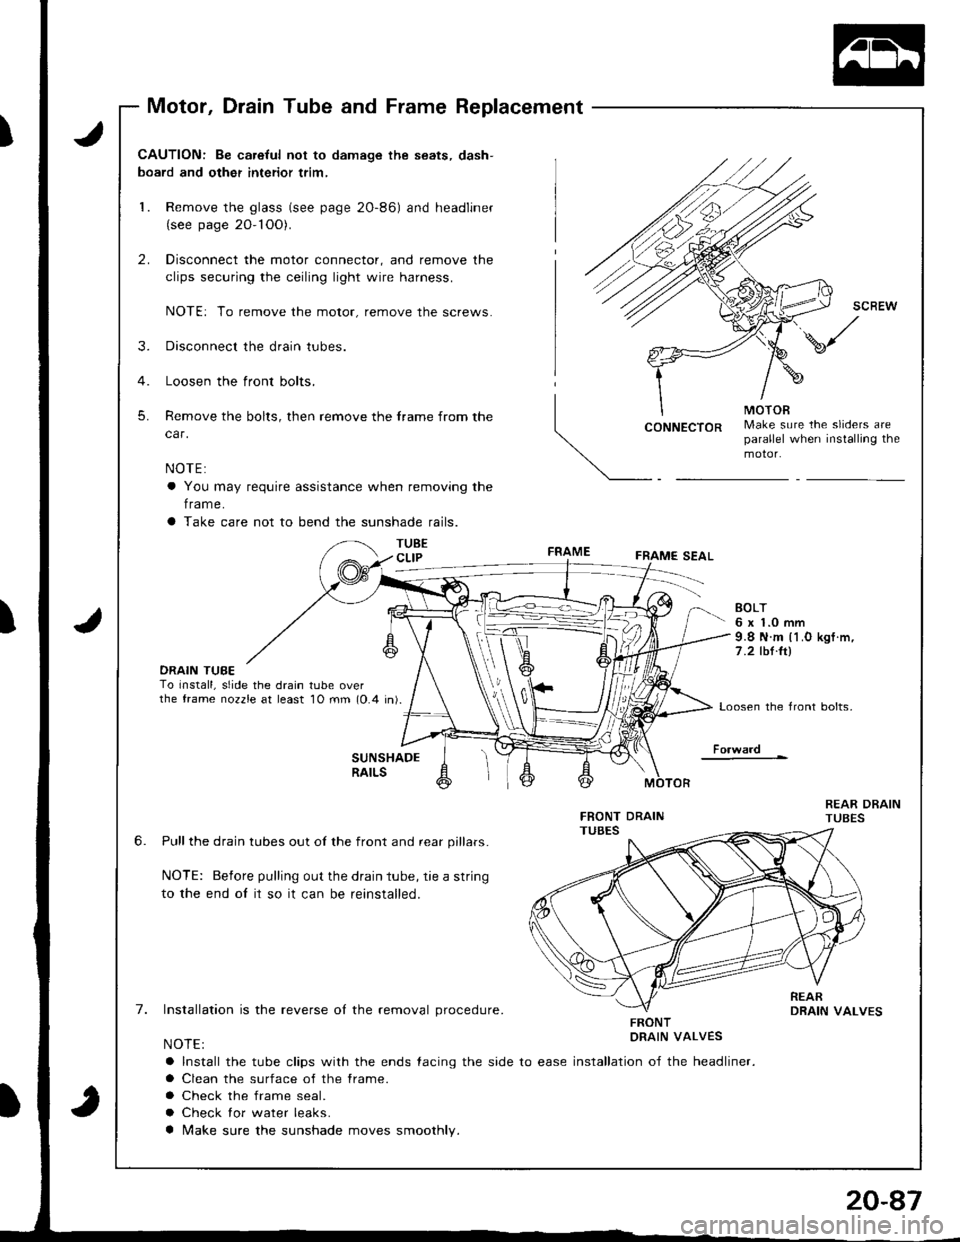
Motor, Drain Tube and Frame Replacement
J
J
CAUTION: Be ca.eful not to damage the seats, dash-
board and other interior trim,
1. Remove the glass (see page 2O-86) and headliner(see page 20- 1OO).
2. Disconnect the motor connector, and remove the
clips securing the ceiling light wire harness.
NOTE: To remove the motor, remove the screws.
3. Disconnect the drain tubes.
4. Loosen the front bolts.
5. Remove the bolts, then remove the frame from the
car.
NOTE:
a You may require assistance when removing the
f rame.
a Take care not to bend the sunshade rails.
TUBECLIP
CONNECTORMake sure the sliders areparallel when installing themotor.
FRAMEFRAME SEAL
DRAIN TUBETo Install, slide the drain tube overthe frame nozzle at least 10 mm (0.4 in).
EOLT6 x 1.0 mm9.8 N.m l1.O kgf .m,
7 .2 tbt.ltl
Loosen the front bolts,
Fo.ward
6.
7.
SUNSHADERAILS
Pull the drain tubes out of the front and rear pillars.
NOTE: Before pulling out the drain tube, rie a string
to the end oI it so it can be reinstalled.
Installation is the reverse ol the removal procedure.
NOTE:
a Install the tube clips with the ends {acing the side to ease
a Clean the surface of the frame.
a Check the frame seal.
a Check lor water leaks.
a Make sure the sunshade moves smoothly.
FRONTDRAIN VALVES
installation of the headliner.
Page 915 of 1681
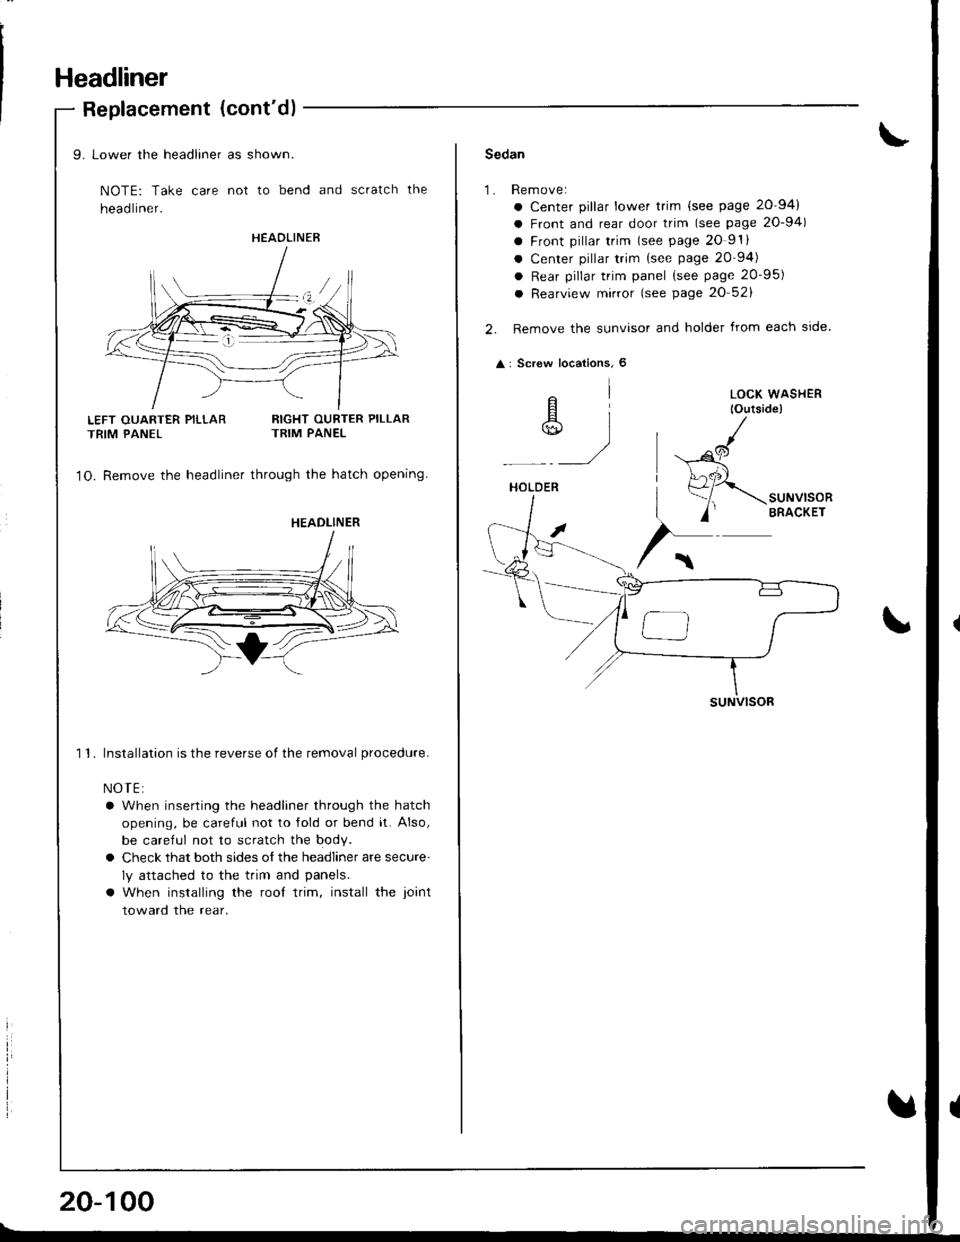
Headliner
Replacement (cont'd)
LEFT OUARTER PILLARTRIM PANEL
9. Lower the headliner as shown.
NOTE: Take care not to bend and scratch the
head liner.
RIGHT OURTER PILLARTRIM PANEL
1O. Remove the headliner through the hatch opening
1 1. Installation is the reverse of the removal procedure.
NOTE:
a When inserting the headliner through the hatch
opening, be careful not to lold or bend it. Also,
be careful not to scratch the body.
a Check that both sides o{ the headliner are secure'
ly attached to the trim and panels.
a When installing the rool trim, install the ioint
toward the rear.
HEAOLINER
HEADLINER
20-100
Sedan
1.Rem ove:
a Center pillar lower trim {see page 20-94)
a Front and rear door trim (see page 20-94)
a Front pillar trim lsee page 20 9'.
a Center pillar trim {see page 20 94)
a Rear pillar trim panel (see page 20-95)
a Rearview mirror (see page 20 52)
Remove the sunvisor and holder from each side.
: Screw locations, 6
elA]*)
HOLDER
suNVlsoR
LOCK WASHER
lOutside)
,al
(
Page 917 of 1681
Headliner
Replacement (cont'd)
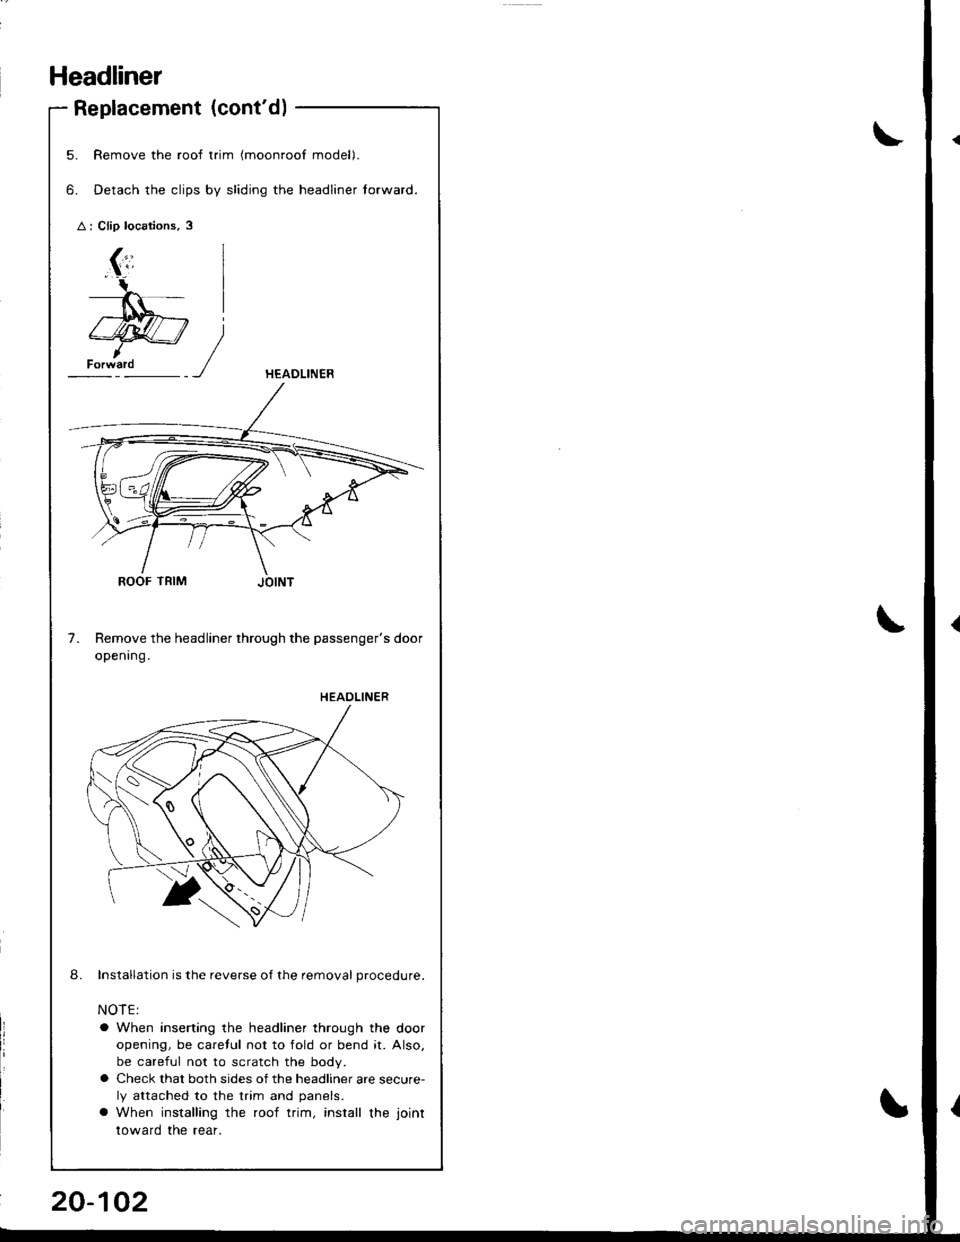
5.
6.
Remove the roof trim (moonroof model).
Detach the clips by sliding the headliner torward.
ROOF TRIM
Remove the headliner through the passenger's door
openrng.
Installation is the reverse of the removal procedure.
NOTE:
a When inserting the headliner through the door
opening, be caretul not to fold or bend it. Also,
be careful not to scratch the body.
o Check that both sides of the headliner are secure-
ly attached to the trim and panels.
a When installing the roof trim, install the joint
toward the rear.
)
7.
8.
HEAOLINER
HEAOLINER
Page 920 of 1681
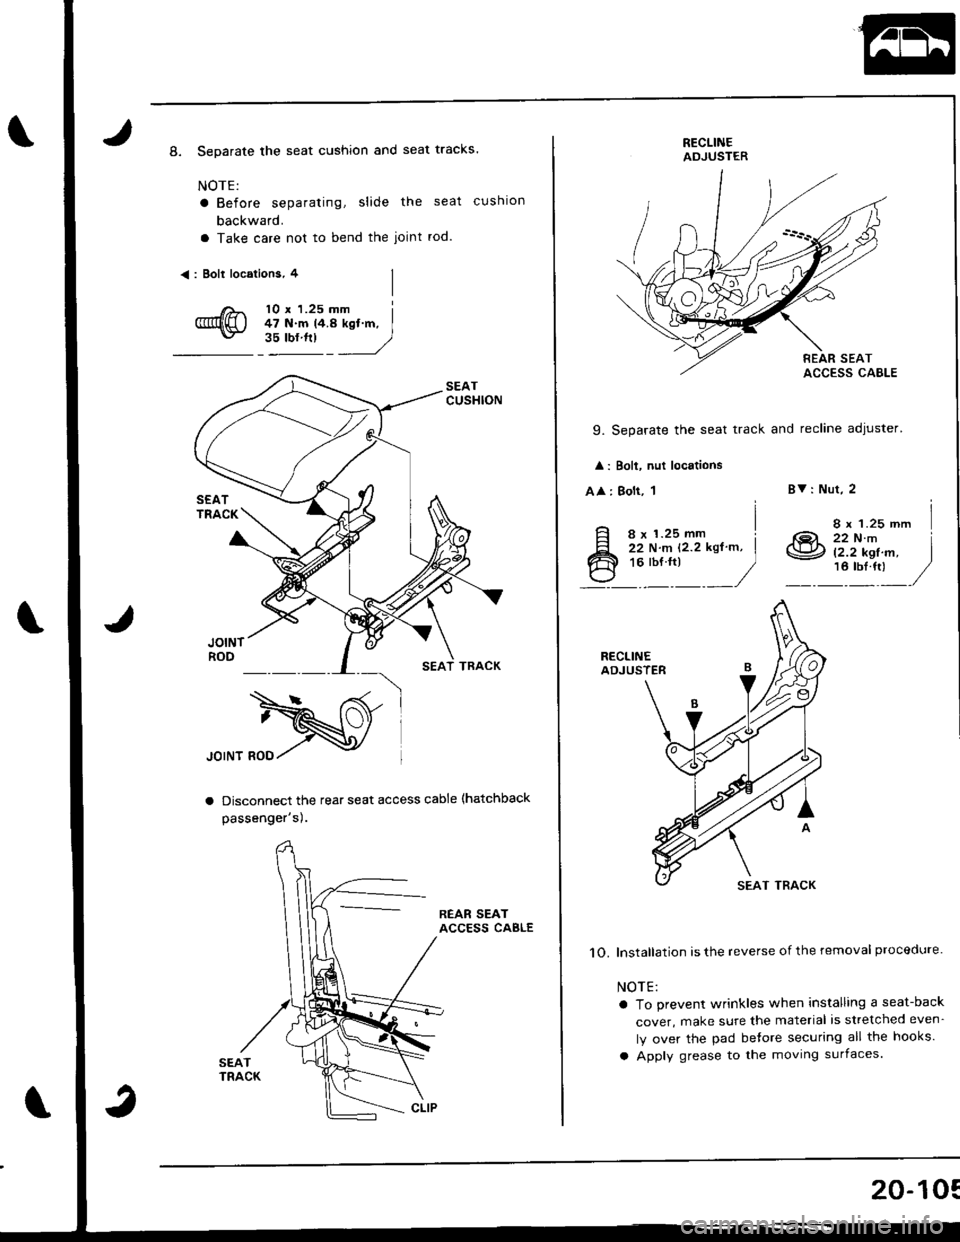
8. Separate the seat cushion and seat tracks.
NOTE:
a Before separating, slide the seat cushlon
backward.
a Take care not to bend the joint rod.
<: Bolt locations, 4
10 r 1.25 mm i47 N.m t4.a kd.m, I"::'^ _*_L
Disconnect the rear seat access cable (hatchback
passenger sl.
REAR SEATACCESS CAELE
RECLINEADJUSTER
9. Separate the seat track and recline adjuster'
: Boli, nut locations
AA : Bolt, 1
iI8 x 1.25 mm !ii rrr.- rz.z ror'., I**:_
_/
BV: Nut, 2
8 t 1.25 mm
.1QL zz ttt.-\S2 (2.2 kef m.16 tbl.ttl
I
RECLINEADJUSTER
1O. lnstallation is the reverse of the removal proceclure.
NOTE:
a To prevent wrinkles when installing a seat-back
cover, make sure the material is stretched even-
ly over the pad betore securing all the hooks.
a Apply grease to the moving surfaces.
20-10:
Page 921 of 1681
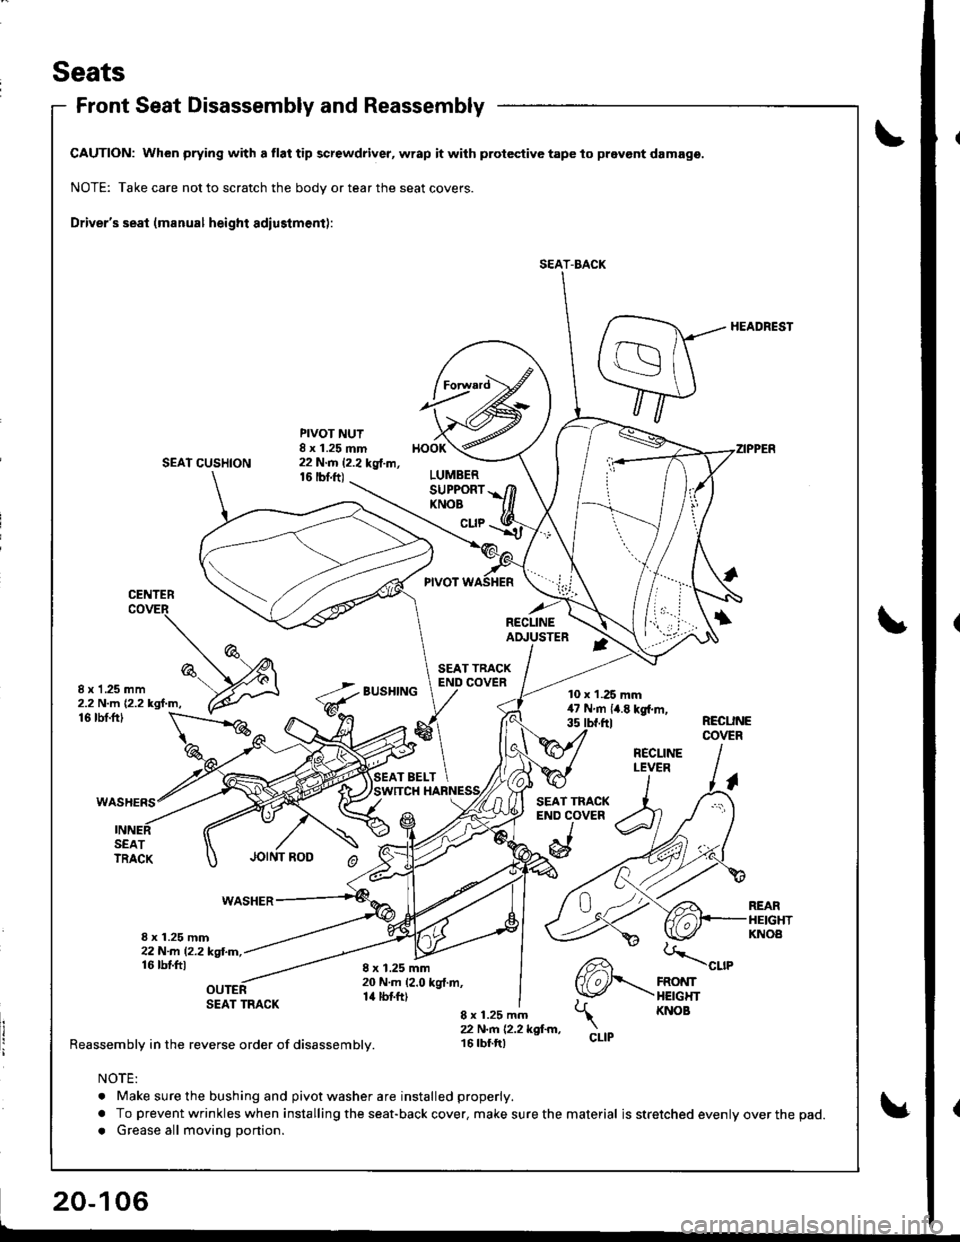
Seats
Front Seat Disassembly and Reassembly
CAUTION: When prying with a tlat tip screwdriver, wrap it with protective tape to pravont damage.
NOTE: Take care not to scratch the body or tear the seat covers.
Driver's seat (manual height adiustment):
HEADREST
SEAT CUSHION
PIVOT NUT8 x 1.25 mm22 N.m 12.2 kg{.m,16 |bnft)
BUSHING
HOOK
LUMBERSUPPORTKNOB
cuP
CENTER
RECLINEAI!USTER
8 x 1 .25 mm2.2 N.m {2.2 kgf.m,10 x 1.25 mm47Nm{4.Ekgl.m,35 tbt.ftl
CLIP
16 tbf.ftlRECUNECOVER
SEATTRACK
WASHER
8 x 1.25 mm22N-m l2.2kgl.m,16 tbtftl
SEAT TRACK
Reassembly in the reverse order of disassembly.
REARHEIGHTKNOA
8 x 1.25 mm20 N.m 12.0 kgt.m,14 tbtft)
CLIP
8 x 1.25 mm22 N.n 12.2 kgl.m,16 tbf.tt)
NOTE:
. Make sure the bushing and pivot washer are installed properly.
a To prevent wrinkles when installing the seat-back cover. make sure the material is stretched evenly over the pad.
a Grease all moving portion.
SEAT-BACK
RECLINELEVER
Page 924 of 1681
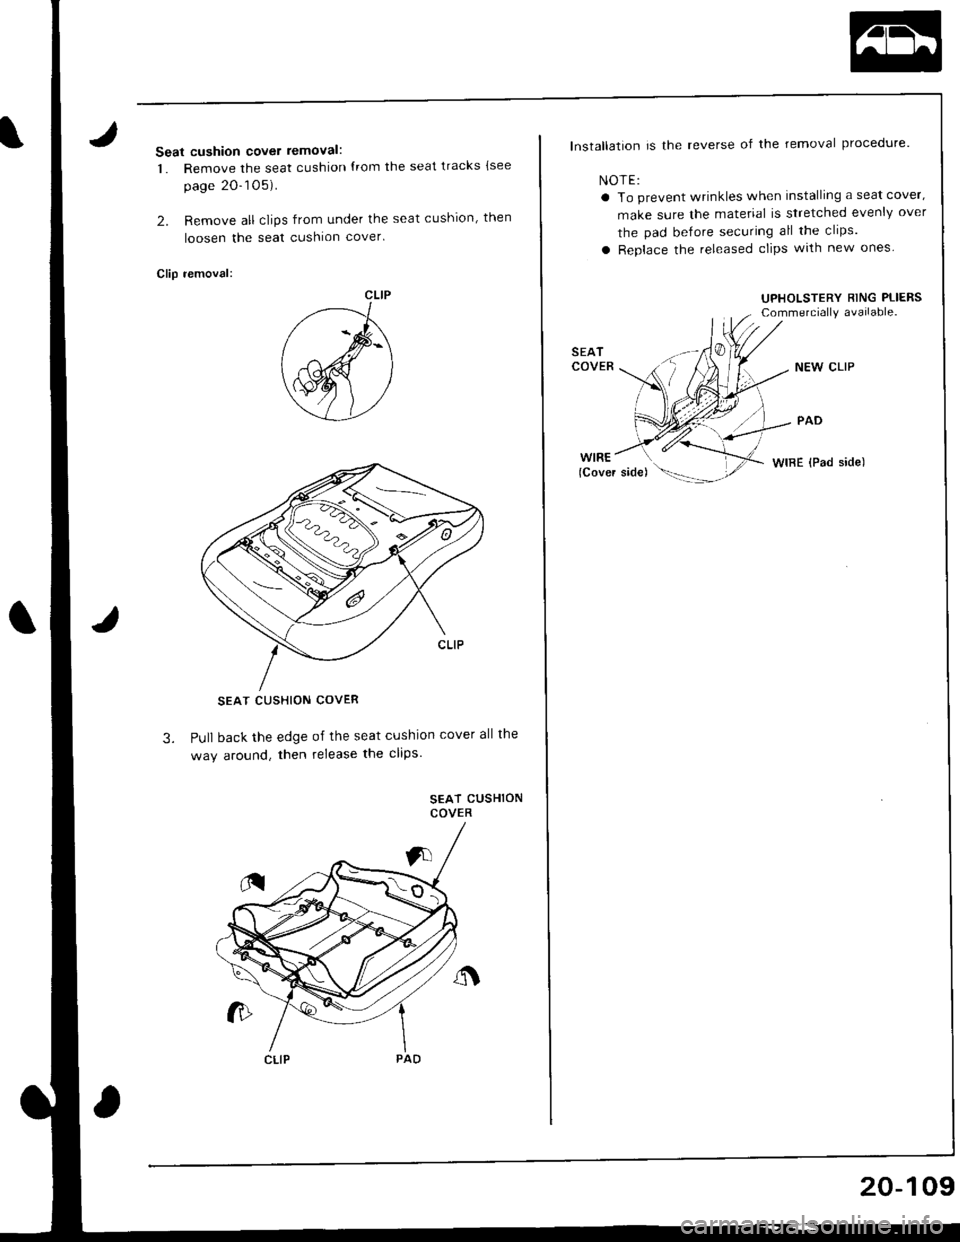
Seat cushion cover removal:
1. Remove the seat cushion {rom the seat tracks {see
page 20-105).
2. Remove all clips from under the seat cushion, then
loosen the seat cushion cover
Clip removal:
SEAT CUSHION COVER
Pull back the edge of the seat cushion cover all the
way around, then release the cltps3.
SEAT CUSHIONCOVER
CLIP
lnstallation is the reverse of the removal procedure.
NOTE:
a To prevent wrinkles when installing a seat cover,
make sure the material is stretched evenly over
the pad before securing atl the clrps.
a Replace the released clips with new ones.
UPHOLSTERY RING PLIERScommercially available.
SEATCOVER
WIBE (Pad side)
20-109
Page 926 of 1681
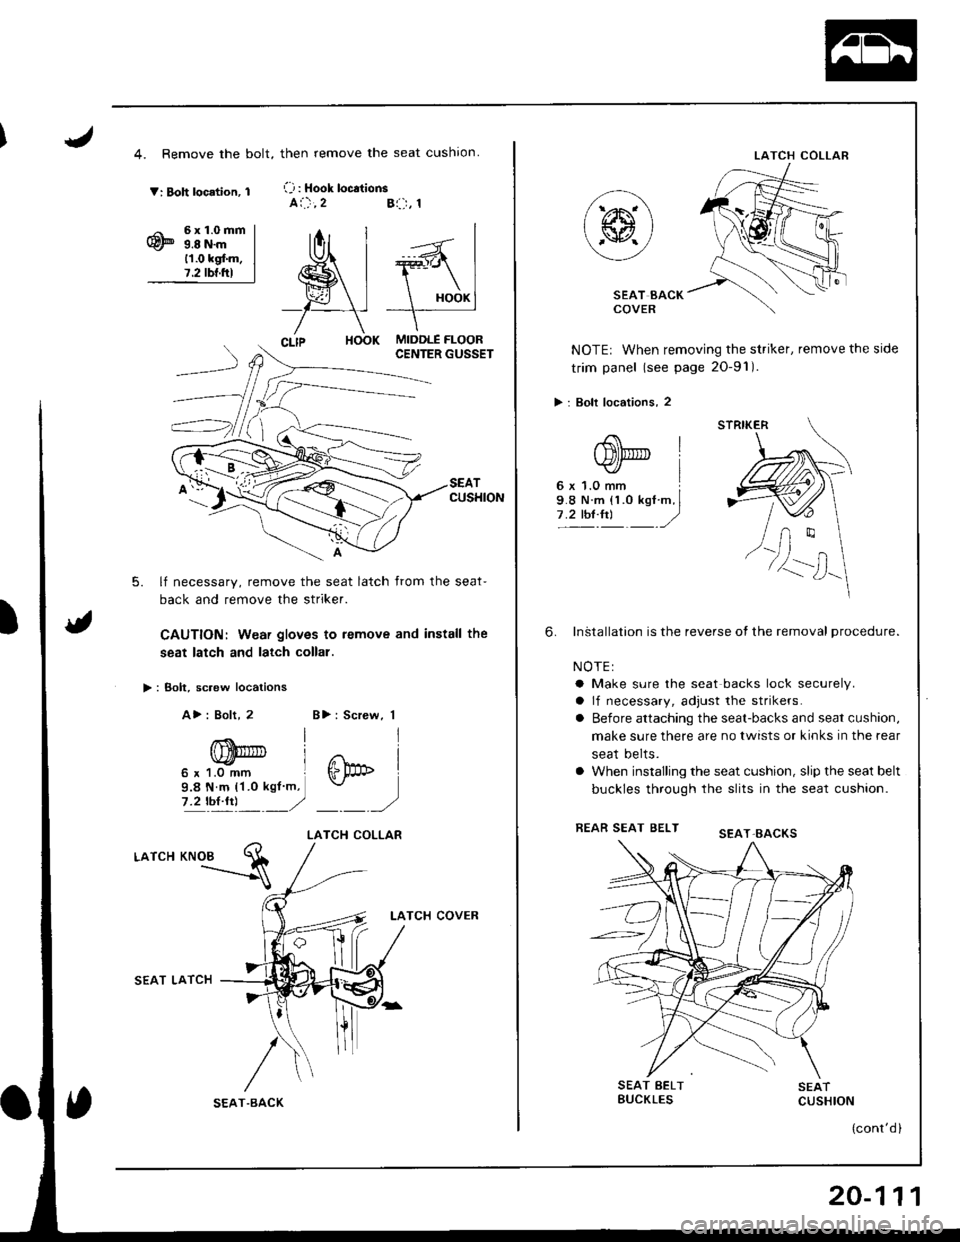
4. Remove the bolt,
V: Boh location, 1
6x1.0mm9.8 N.m11.0 kgf.m.7.2 tbf.ftl
>: Bolt, sc.ew locations
A>: Bolt, 2
CUSHION
5. lf necessary, remove the seat latch from the seat-
back and remove the striker.
CAUTION: Weai gloves to remove and install the
seat latch and latch collal.
-"":=s
then remove the seat cushron.
(-j : Hook loc.tionsai.),2Bl:-r, 1
MIDDLE FLOORCENTER GUSSET
T
)
B>: Screw, 1
j
I
ffipb I
)
LATCH COLLAR
LATCH
SEAT LATCH
LATCH COVER
/
T.BACK
LATCH COLLAR
SEAT BACKCOVER
NOTE: When removing the striker, remove the side
trim panel (see page 2O-91).
> : Bolt locations, 2
InStallation is the reverse ot the removal procedure.
NOTEI
a Make sure the seat backs lock securely.
a lf necessary, adjust the strikers.
o Before attaching the seat-backs and seat cushion,
make sure there are no twists or kinks in the rear
seat belts.
a When installing the seat cushion, slip the seat belt
buckles through the slits in the seat cushion.
FEAR SEAT BELT
6.
SEAT BELTBUCKLESSEATCUSHION
(cont'd )
STRIKER
SEAT.EACKS
20-111
Page 929 of 1681
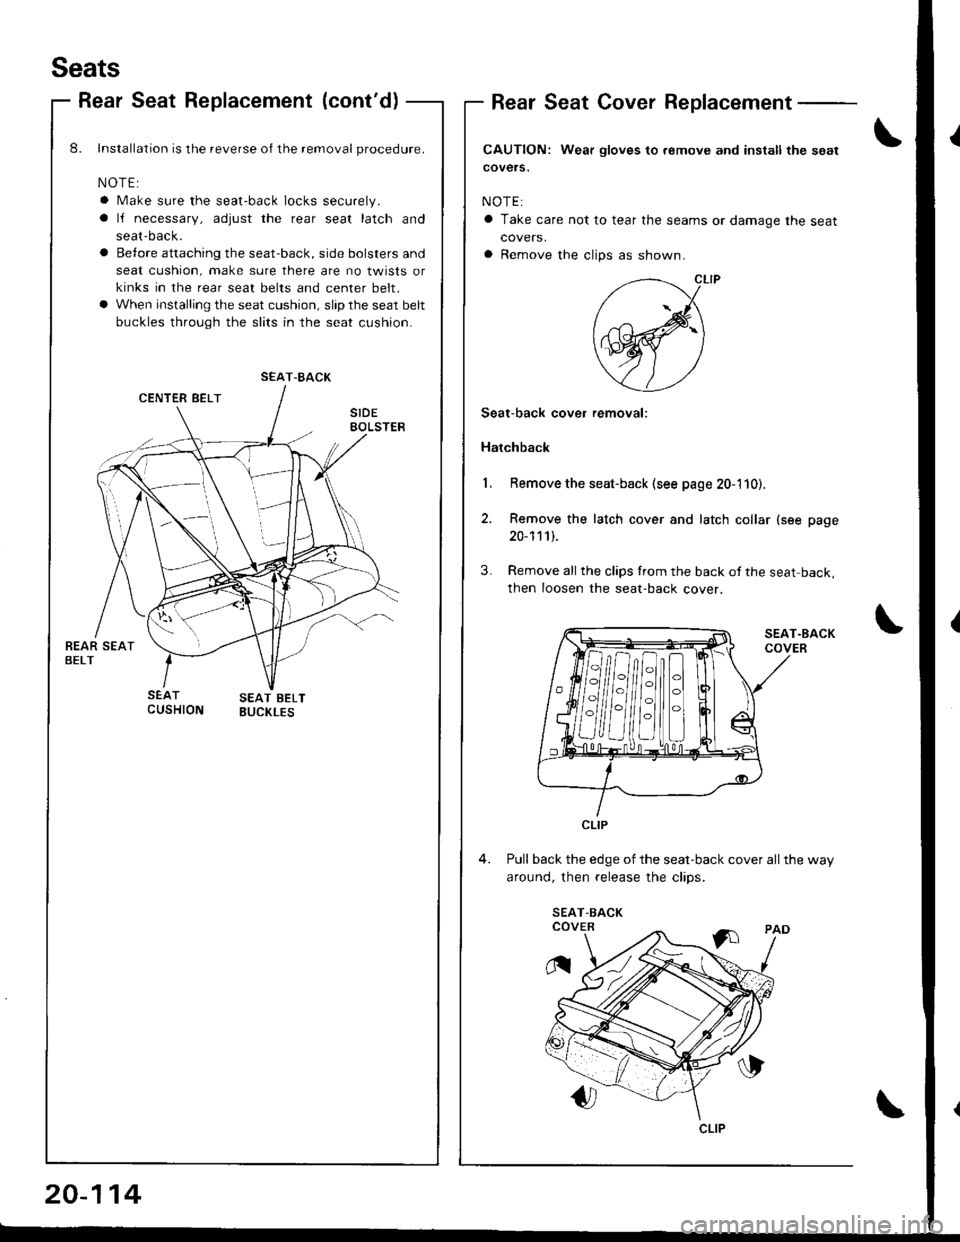
Seats
Rear Seat Replacement (cont'd)Rear Seat Cover Replacement
CAUTION: Wear gloves to.emove and install the sgat
covers.
NOTE:
a Take care not to tear the seams or damage the seat
covers,
a Remove the clips as shown.
8. Installalion is the reverse oI the removal procedure.
NOTE:
a Make sure the seat-back locks securely.
a lJ necessary, adjust the rear seat latch and
seat-back.
a Betore attaching the seat-back, side bolsters and
seat cushion, make sure there are no twists or
kinks in the rear seat belts and center belt.
a When installing the seat cushion, slip the seat belt
buckles through the slits in the seat cushion.
Remove the seat-back (see page 20-110).
Remove the latch cover and latch collar (see page
20-111).
Remove all the clips from rhe back of the seat back,
then Ioosen the seat-back cover.
Pull back the edge of the seat-back cover all the way
around. then release the clios.
Seat-back cover removal:
Hatchback
SEAT-BACK
H/HilflH
CLIP
CLIP
20-114
Page 931 of 1681
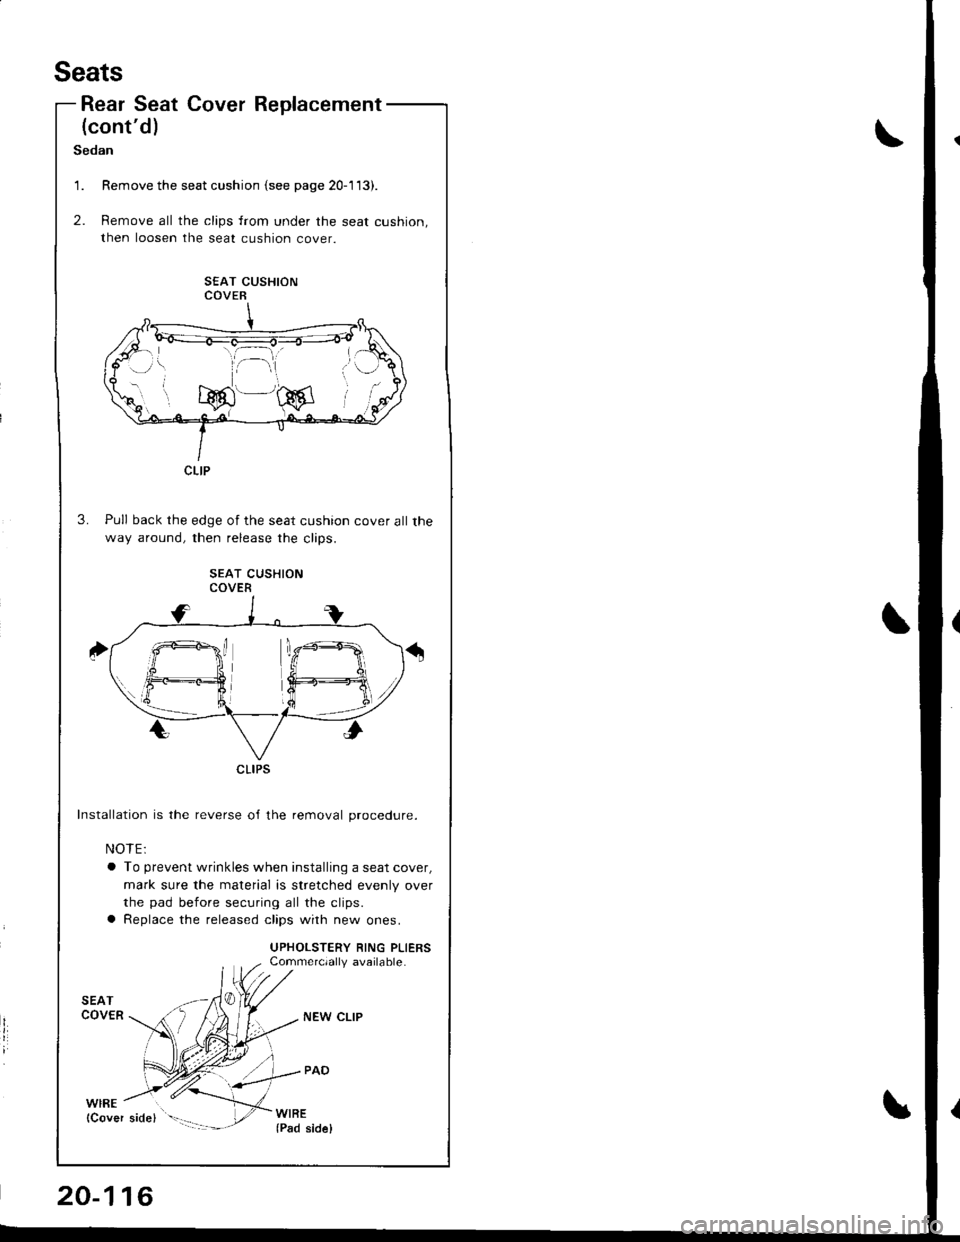
Seats
Rear Seat Cover
(cont'd)
Replacement
Sedan
Remove the seat cushion {see page 20-113).
Remove all the clips from under the seat cushion,
then loosen the seat cushion cove
SEAT CUSHIONCOVER
Pull back the edge of the seat cushion cover all the
way around, then release the clios
SEAT CUSHIONCOVER
Installation is the reverse o,f the removal procedure.
NOTE:
a To prevent wrinkles when installing a seat cover,
mark sure the material is stretched evenly over
the pad before securing all the clips.
a Replace the released clips with new ones.
UPHOLSTERY RING PLIERSCommercially available.
't.
2.
CLIP
CLIPS
20-116
NEW CLIP