HONDA ODYSSEY 1999 Owners Manual
Manufacturer: HONDA, Model Year: 1999, Model line: ODYSSEY, Model: HONDA ODYSSEY 1999Pages: 343, PDF Size: 3.73 MB
Page 111 of 343
Seats
To reinstall the seat, hook the front of the seat to the floor, then push the
back into the locks. Make sure both
the front and the back of the seat are securely latched before driving. Folding the Third Seat
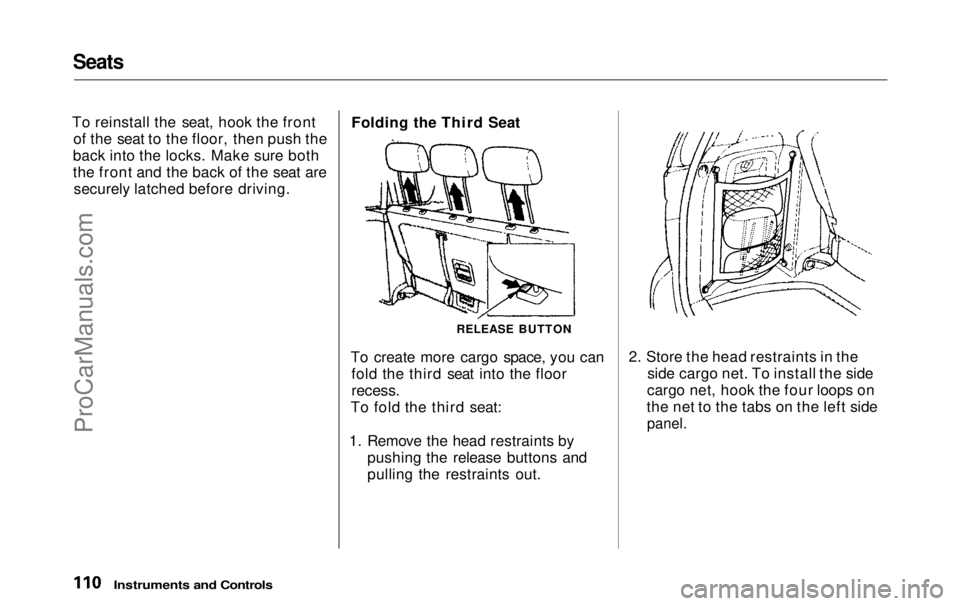
RELEASE BUTTON
To create more cargo space, you can fold the third seat into the floor
recess.
To fold the third seat:
1. Remove the head restraints by pushing the release buttons and
pulling the restraints out. 2. Store the head restraints in the
side cargo net. To install the side
cargo net, hook the four loops on
the net to the tabs on the left side
panel.
Instruments and ControlsProCarManuals.comMain Menu Table of Contents s t
Page 112 of 343
Seats
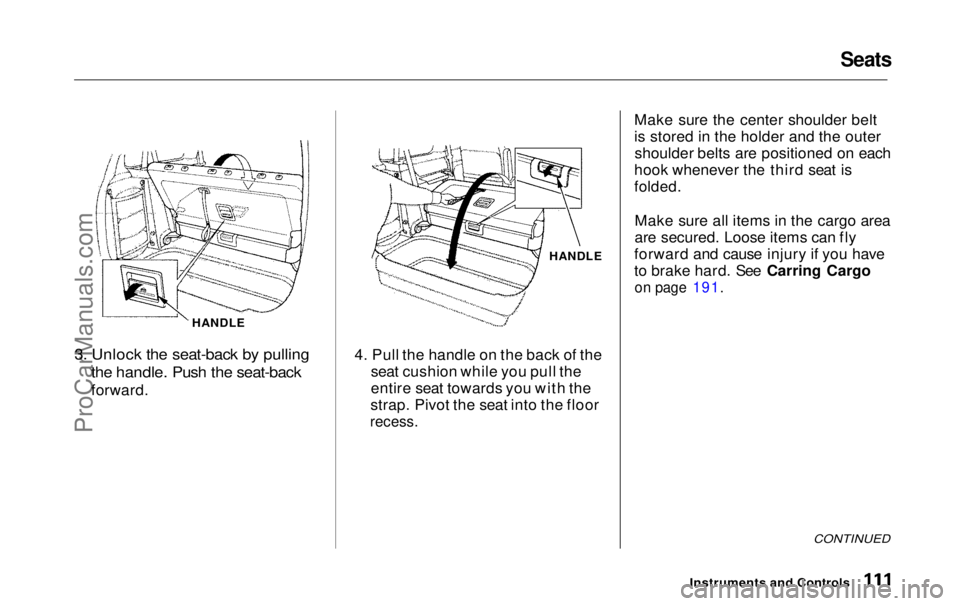
HANDLE
3. Unlock the seat-back by pulling
the handle. Push the seat-back
forward. HANDLE
4. Pull the handle on the back of the seat cushion while you pull the
entire seat towards you with the
strap. Pivot the seat into the floor
recess.
Make sure the center shoulder belt
is stored in the holder and the outer
shoulder belts are positioned on each
hook whenever the third seat is
folded.
Make sure all items in the cargo area
are secured. Loose items can fly
forward and cause injury if you have
to brake hard. See Carring Cargo
on page 191.
CONTINUED
Instruments and ControlsProCarManuals.comMain Menu Table of Contents s t
Page 113 of 343
Seats
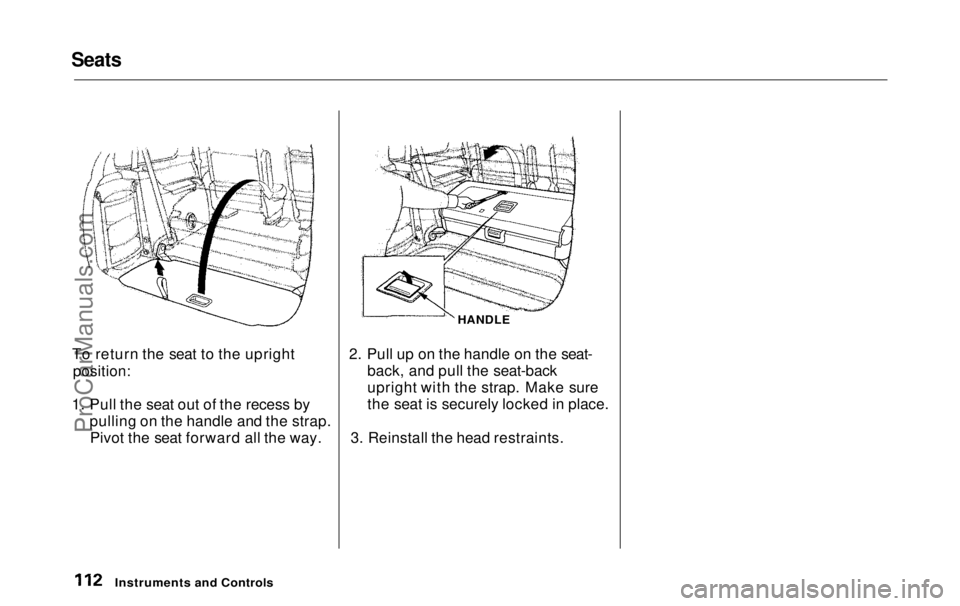
To return the seat to the upright
position:
1. Pull the seat out of the recess by pulling on the handle and the strap.Pivot the seat forward all the way. HANDLE
2. Pull up on the handle on the seat- back, and pull the seat-back
upright with the strap. Make sure
the seat is securely locked in place.
3. Reinstall the head restraints.
Instruments and ControlsProCarManuals.comMain Menu Table of Contents s t
Page 114 of 343
Power Windows
Your vehicle's front windows are electrically-powered. Turn the
ignition switch to ON (II) to raise or
lower either window.
The rear windows are also electrically-powered (see page 114).
Each front door has a switch that
controls its window. To open the
window, push the switch down and hold it. Release the switch when you
want the window to stop. Close the
window by pulling back on the switch and holding it.
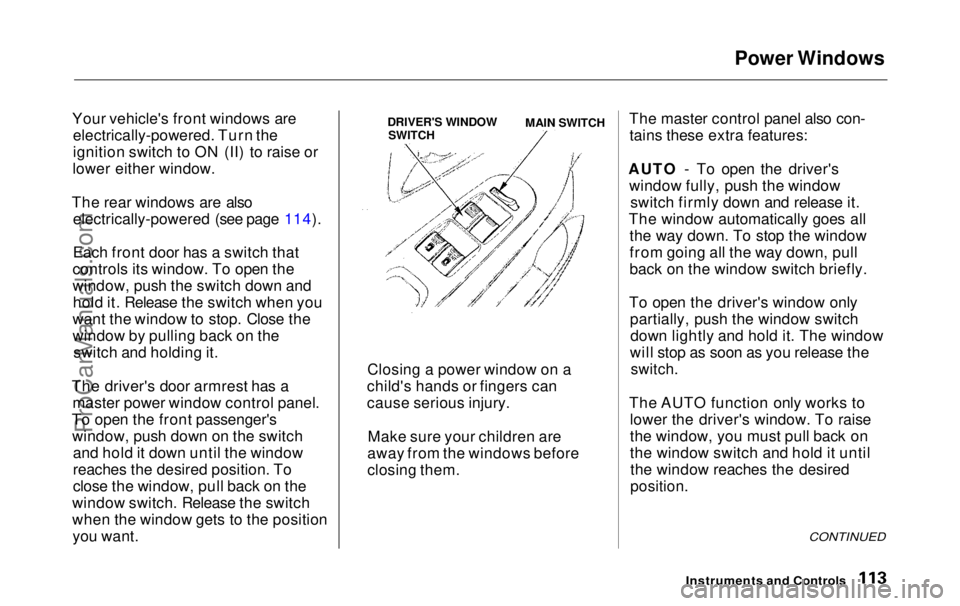
The driver's door armrest has a master power window control panel.
To open the front passenger's window, push down on the switch and hold it down until the window
reaches the desired position. To
close the window, pull back on the
window switch. Release the switch
when the window gets to the position you want. The master control panel also con-
tains these extra features:
AUTO - To open the driver's window fully, push the window switch firmly down and release it.
The window automatically goes all the way down. To stop the window
from going all the way down, pull
back on the window switch briefly.
To open the driver's window only partially, push the window switchdown lightly and hold it. The window
will stop as soon as you release the
switch.
The AUTO function only works to lower the driver's window. To raise
the window, you must pull back on
the window switch and hold it untilthe window reaches the desired
position.
CONTINUED
Instruments and Controls
Closing a power window on a
child's hands or fingers can
cause serious injury.
Make sure your children are
away from the windows before
closing them.
DRIVER'S WINDOW SWITCH MAIN SWITCH
ProCarManuals.comMain Menu Table of Contents s t
Page 115 of 343
Power Windows
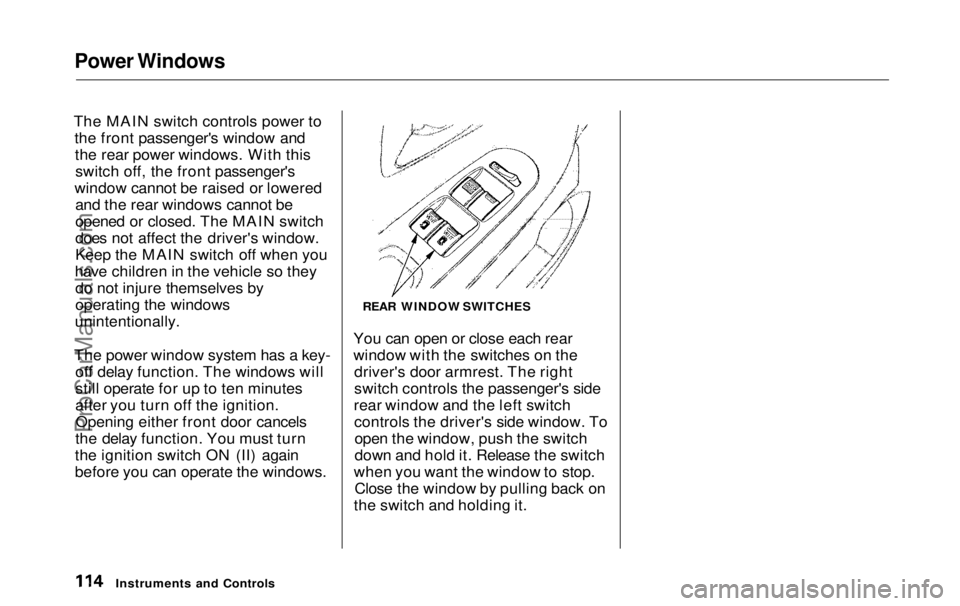
The MAIN switch controls power to the front passenger's window andthe rear power windows. With thisswitch off, the front passenger's
window cannot be raised or lowered and the rear windows cannot be
opened or closed. The MAIN switch
does not affect the driver's window.
Keep the MAIN switch off when you
have children in the vehicle so they do not injure themselves by
operating the windows
unintentionally.
The power window system has a key- off delay function. The windows will
still operate for up to ten minutes
after you turn off the ignition.Opening either front door cancels
the delay function. You must turn
the ignition switch ON (II) again
before you can operate the windows. REAR WINDOW SWITCHES
You can open or close each rear
window with the switches on the driver's door armrest. The right
switch controls the passenger's side
rear window and the left switch controls the driver's side window. Toopen the window, push the switch
down and hold it. Release the switch
when you want the window to stop. Close the window by pulling back on
the switch and holding it.
Instruments and ControlsProCarManuals.comMain Menu Table of Contents s t
Page 116 of 343
Mirrors
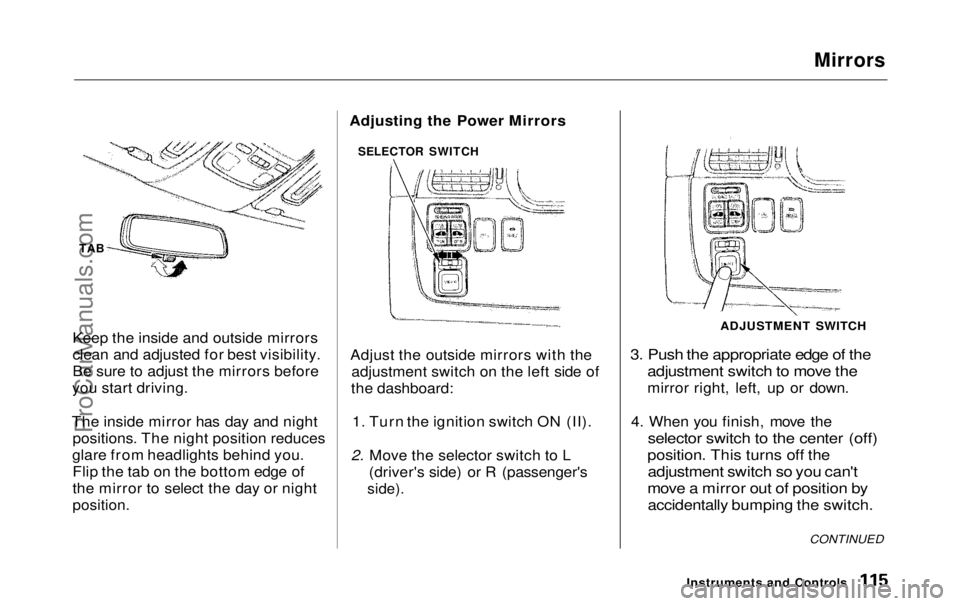
TAB
Keep the inside and outside mirrors
clean and adjusted for best visibility.
Be sure to adjust the mirrors before
you start driving.
The inside mirror has day and night positions. The night position reduces
glare from headlights behind you. Flip the tab on the bottom edge of
the mirror to select the day or night
position.
Adjust the outside mirrors with the
adjustment switch on the left side of
the dashboard:
1. Turn the ignition switch ON (II).
2. Move the selector switch to L (driver's side) or R (passenger's
side).
3. Push the appropriate edge of the
adjustment switch to move the
mirror right, left, up or down.
4. When you finish, move the
selector switch to the center (off)
position. This turns off the
adjustment switch so you can't
move a mirror out of position by
accidentally bumping the switch.
Instruments and Controls
SELECTOR SWITCH
ADJUSTMENT SWITCH
CONTINUED
Adjusting the Power MirrorsProCarManuals.comMain Menu Table of Contents s t
Page 117 of 343
Mirrors, Parking Brake
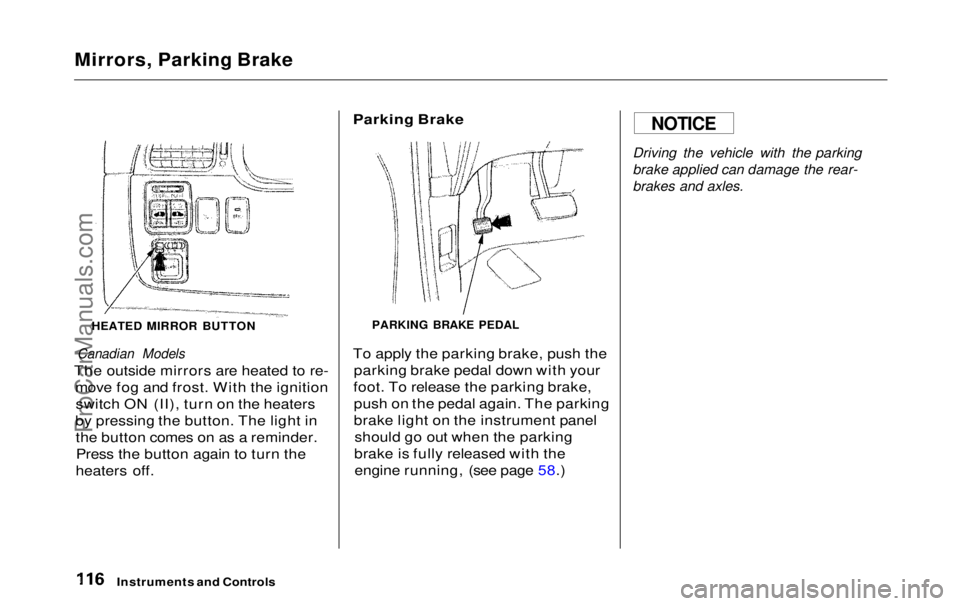
HEATED MIRROR BUTTON
Canadian Models
The outside mirrors are heated to re- move fog and frost. With the ignitionswitch ON (II), turn on the heaters
by pressing the button. The light in the button comes on as a reminder.Press the button again to turn the
heaters off.
Parking Brake
PARKING BRAKE PEDAL
To apply the parking brake, push the parking brake pedal down with your
foot. To release the parking brake, push on the pedal again. The parking
brake light on the instrument panel should go out when the parking
brake is fully released with the engine running, (see page 58.)
Driving the vehicle with the parking
brake applied can damage the rear-
brakes and axles.
Instruments and Controls
NOTICEProCarManuals.comMain Menu Table of Contents s t
Page 118 of 343
Digital Clock, Center Table
Digital Clock
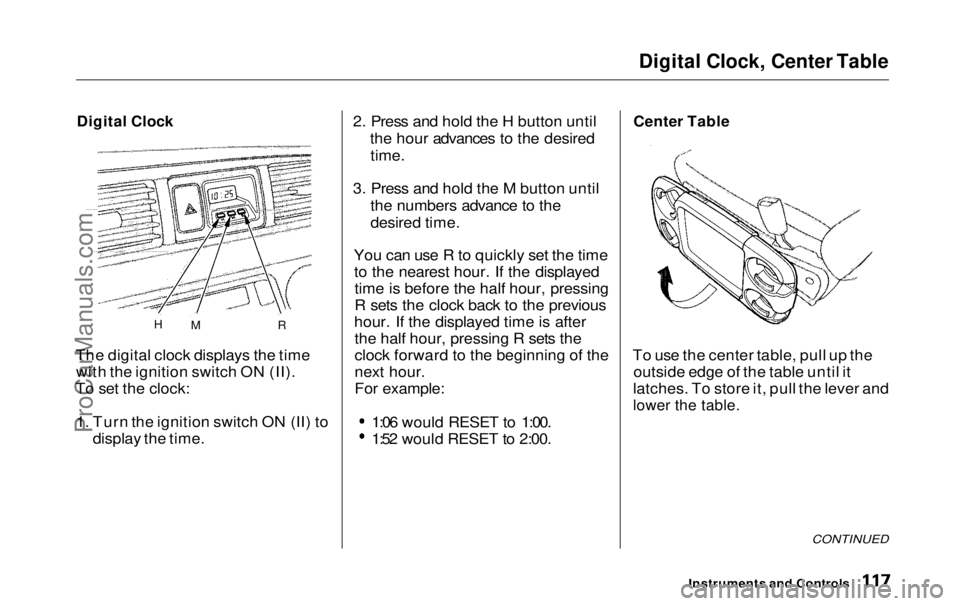
The digital clock displays the time with the ignition switch ON (II).
To set the clock:
1. Turn the ignition switch ON (II) to display the time. 2. Press and hold the H button until
the hour advances to the desired
time.
3. Press and hold the M button until the numbers advance to the
desired time.
You can use R to quickly set the time to the nearest hour. If the displayedtime is before the half hour, pressing
R sets the clock back to the previous
hour. If the displayed time is after the half hour, pressing R sets the
clock forward to the beginning of the
next hour.
For example: 1:06 would RESET to 1:00.
1:52 would RESET to 2:00.
Center Table
To use the center table, pull up the outside edge of the table until it
latches. To store it, pull the lever and
lower the table.
CONTINUED
Instruments and Controls
H
M RProCarManuals.comMain Menu Table of Contents s t
Page 119 of 343
Center Table, Beverage Holder
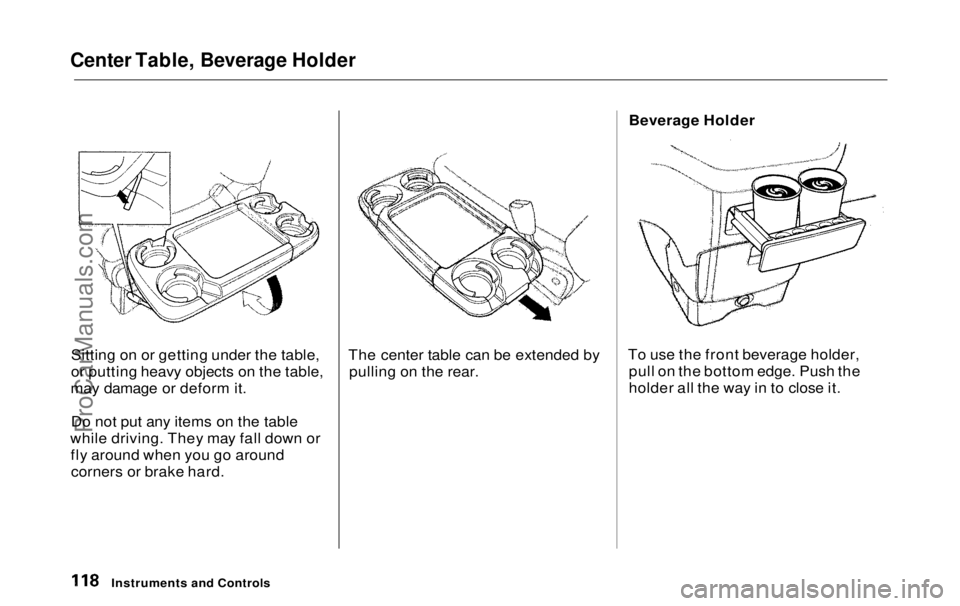
Sitting on or getting under the table,
or putting heavy objects on the table,
may damage or deform it.
Do not put any items on the table
while driving. They may fall down or fly around when you go aroundcorners or brake hard. The center table can be extended by
pulling on the rear. Beverage Holder
To use the front beverage holder, pull on the bottom edge. Push the
holder all the way in to close it.
Instruments and ControlsProCarManuals.comMain Menu Table of Contents s t
Page 120 of 343
Beverage Holder
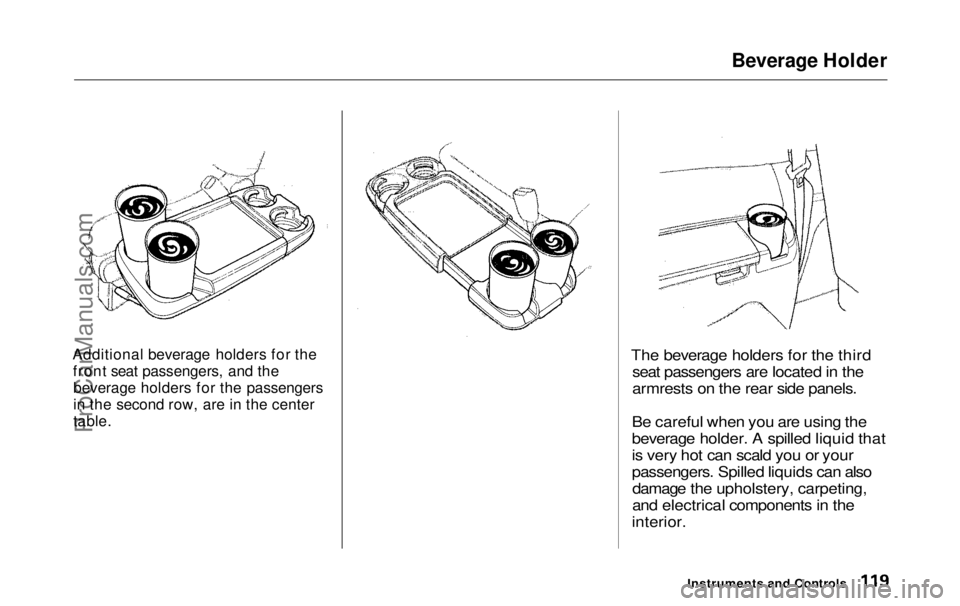
Additional beverage holders for the front seat passengers, and thebeverage holders for the passengers
in the second row, are in the center
table.
The beverage holders for the third
seat passengers are located in the
armrests on the rear side panels.
Be careful when you are using the
beverage holder. A spilled liquid that
is very hot can scald you or your
passengers. Spilled liquids can also damage the upholstery, carpeting,
and electrical components in the
interior.
Instruments and ControlsProCarManuals.comMain Menu Table of Contents s t