HONDA ODYSSEY 1999 Owners Manual
Manufacturer: HONDA, Model Year: 1999, Model line: ODYSSEY, Model: HONDA ODYSSEY 1999Pages: 343, PDF Size: 3.73 MB
Page 121 of 343
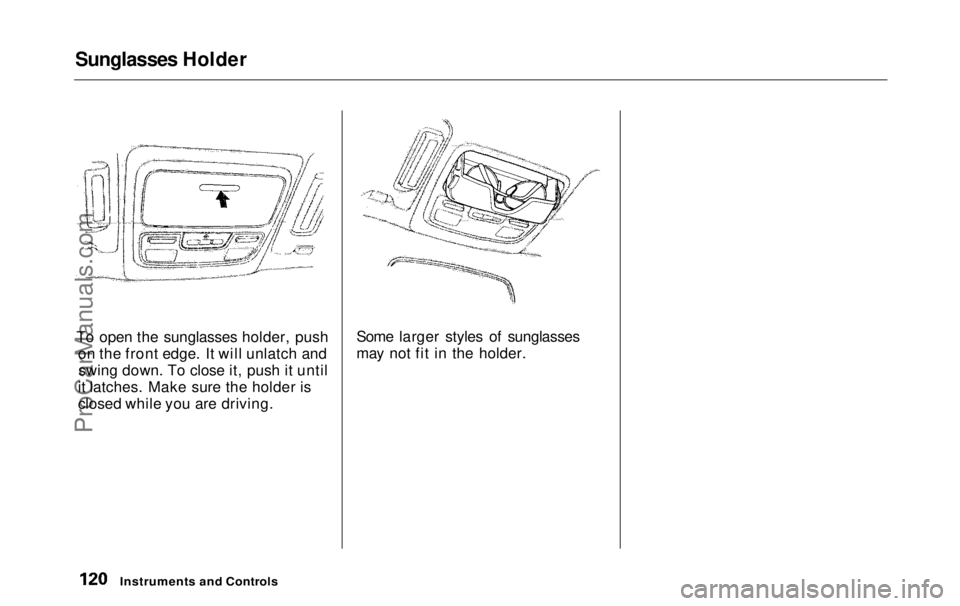
Sunglasses Holder
To open the sunglasses holder, push on the front edge. It will unlatch andswing down. To close it, push it until
it latches. Make sure the holder is
closed while you are driving. Some larger styles of sunglasses
may not fit in the holder.
Instruments and ControlsProCarManuals.comMain Menu Table of Contents s t
Page 122 of 343
Sun Visor, Vanity Mirror
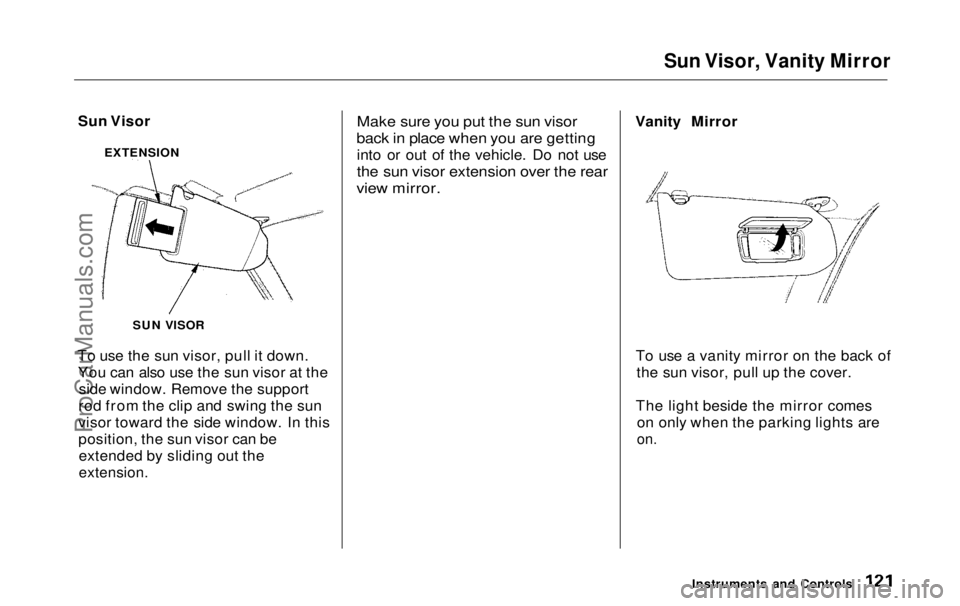
Sun Visor
To use the sun visor, pull it down. You can also use the sun visor at the side window. Remove the support
rod from the clip and swing the sun
visor toward the side window. In this
position, the sun visor can be extended by sliding out the
extension.
Make sure you put the sun visor
back in place when you are getting
into or out of the vehicle. Do not use
the sun visor extension over the rear
view mirror.
Vanity Mirror
To use a vanity mirror on the back of the sun visor, pull up the cover.
The light beside the mirror comes on only when the parking lights are
on.
Instruments and Controls
EXTENSION
SUN VISORProCarManuals.comMain Menu Table of Contents s t
Page 123 of 343
Rear Compartment, Center Pocket, Coin Holder
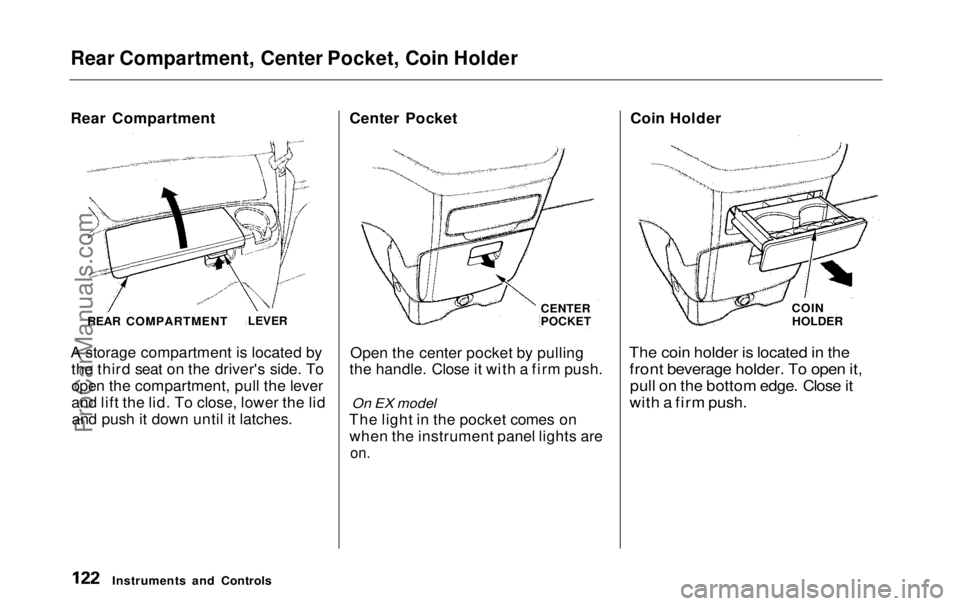
Rear Compartment
A storage compartment is located by
the third seat on the driver's side. To
open the compartment, pull the lever
and lift the lid. To close, lower the lidand push it down until it latches. Center Pocket
Open the center pocket by pulling
the handle. Close it with a firm push.
On EX model
The light in the pocket comes on when the instrument panel lights are
on.
Coin Holder
The coin holder is located in the
front beverage holder. To open it,
pull on the bottom edge. Close it
with a firm push.
Instruments and Controls
REAR COMPARTMENT
LEVER CENTER
POCKET
COIN
HOLDERProCarManuals.comMain Menu Table of Contents s t
Page 124 of 343
Storage Box, Coat Hook
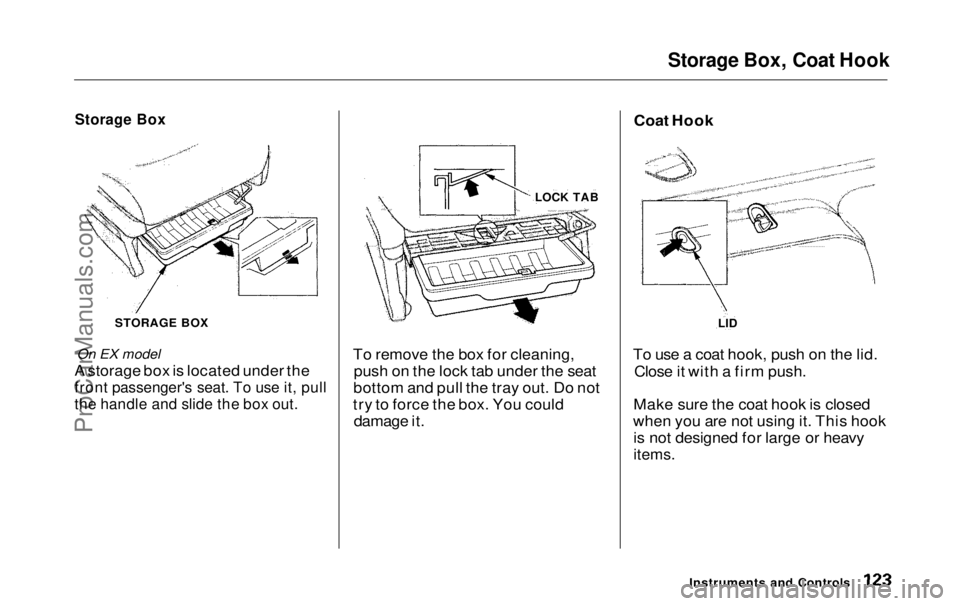
Storage Box
STORAGE BOX
On EX model
A storage box is located under the
front passenger's seat. To use it, pull
the handle and slide the box out.
To remove the box for cleaning,
push on the lock tab under the seat
bottom and pull the tray out. Do not
try to force the box. You could damage it. To use a coat hook, push on the lid.
Close it with a firm push.
Make sure the coat hook is closed
when you are not using it. This hook is not designed for large or heavy
items.
Instruments and Controls
LOCK TAB
LID
Coat HookProCarManuals.comMain Menu Table of Contents s t
Page 125 of 343
Accessory Power Sockets
FRONT
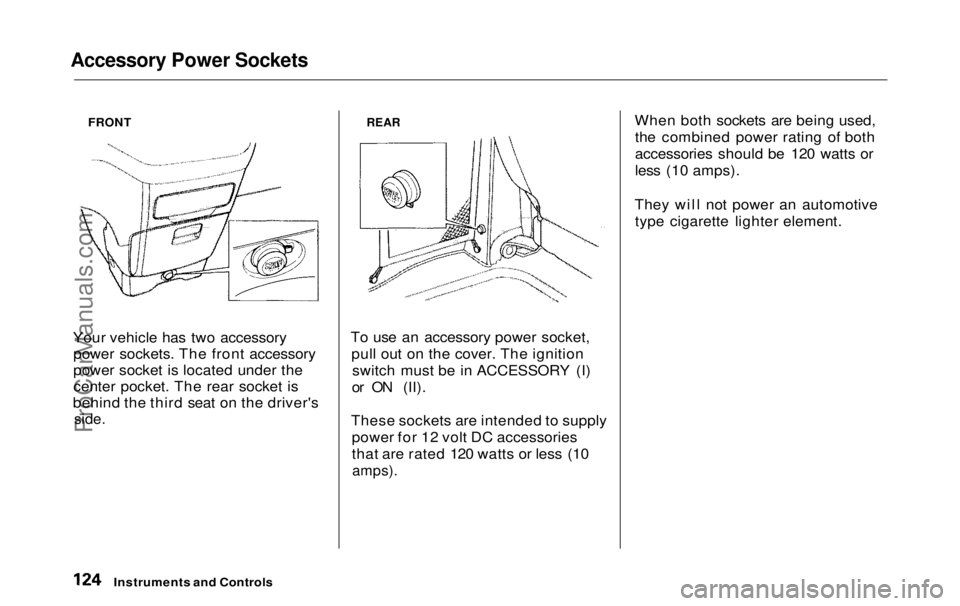
Your vehicle has two accessory power sockets. The front accessory
power socket is located under the
center pocket. The rear socket is
behind the third seat on the driver's
side.
REAR
To use an accessory power socket, pull out on the cover. The ignitionswitch must be in ACCESSORY (I)
or ON (II).
These sockets are intended to supply power for 12 volt DC accessories
that are rated 120 watts or less (10
amps).
When both sockets are being used,
the combined power rating of both
accessories should be 120 watts or
less (10 amps).
They will not power an automotive type cigarette lighter element.
Instruments and ControlsProCarManuals.comMain Menu Table of Contents s t
Page 126 of 343
Interior Lights
Light Control Switch
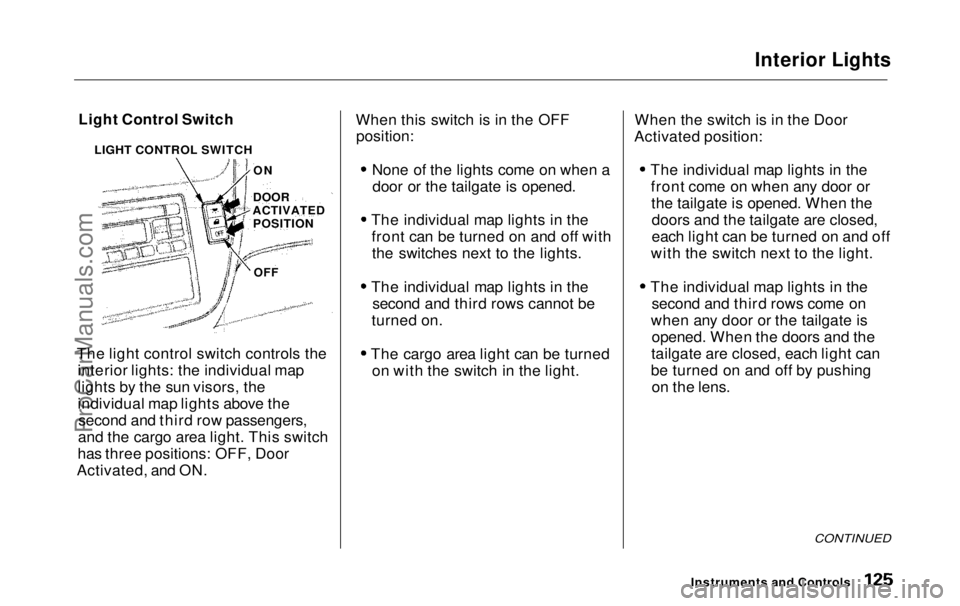
The light control switch controls the interior lights: the individual map
lights by the sun visors, the
individual map lights above thesecond and third row passengers,
and the cargo area light. This switch
has three positions: OFF, Door
Activated, and ON. When this switch is in the OFF
position:
None of the lights come on when adoor or the tailgate is opened.
The individual map lights in the front can be turned on and off withthe switches next to the lights.
The individual map lights in the second and third rows cannot be
turned on.
The cargo area light can be turned on with the switch in the light. When the switch is in the Door
Activated position:
The individual map lights in thefront come on when any door orthe tailgate is opened. When thedoors and the tailgate are closed,
each light can be turned on and off
with the switch next to the light.
The individual map lights in the second and third rows come on
when any door or the tailgate is opened. When the doors and the
tailgate are closed, each light can
be turned on and off by pushing on the lens.
CONTINUED
Instruments and Controls
LIGHT CONTROL SWITCH
ON
DOOR
ACTIVATED POSITION
OFFProCarManuals.comMain Menu Table of Contents s t
Page 127 of 343
Interior Lights
The cargo area light comes onwhen any door or the tailgate isopened if the switch in the light is
in the door activated (center)
position. When the doors and the
tailgate are closed, it can be turned
on with the switch in the light. When the switch is in the ON
position:
All the individual map lights comeon and stay on as long as theswitch remains in the ON position.
The cargo area light comes on and stays on if the switch in the light is
in the door activated (center)
position.
On EX model
The lights go out about six seconds after all the doors and the tailgate
are closed.
With the light control switch in the Door Activated position, all the
individual map lights and the cargo
area light (with the switch in the
center position) come on when you
unlock the door with the remote
transmitter (see page 81 ).
With any door or the tailgate leftopen, the lights stay on about threeminutes, then go out.
Instruments and ControlsProCarManuals.comMain Menu Table of Contents s t
Page 128 of 343
Interior Lights
Individual Map Lights
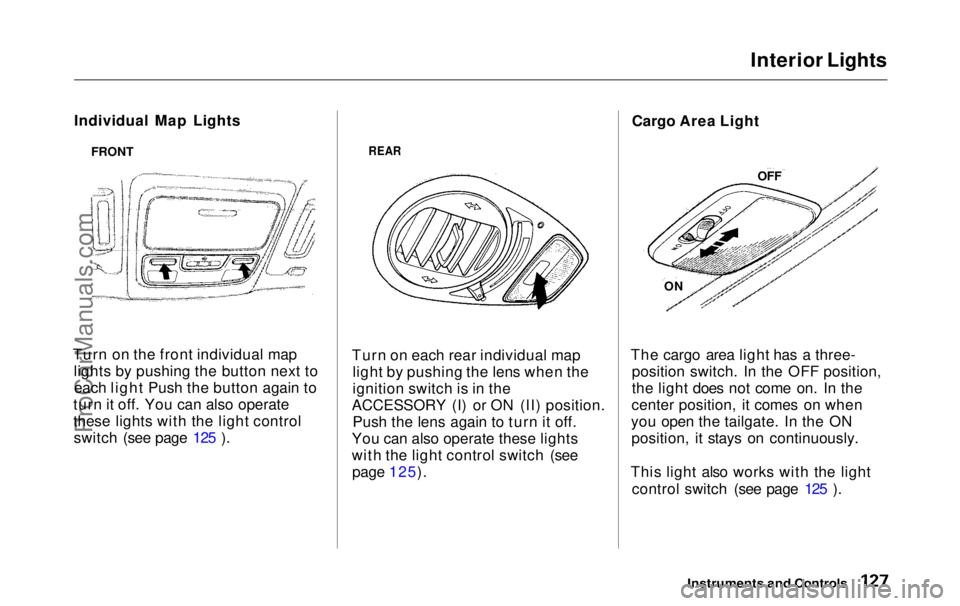
Turn on the front individual map lights by pushing the button next toeach light Push the button again to
turn it off. You can also operate
these lights with the light control switch (see page 125 ).
REAR
Turn on each rear individual map light by pushing the lens when the
ignition switch is in the
ACCESSORY (I) or ON (II) position. Push the lens again to turn it off.
You can also operate these lights
with the light control switch (see page 125). Cargo Area Light
The cargo area light has a three- position switch. In the OFF position,
the light does not come on. In the
center position, it comes on when
you open the tailgate. In the ON position, it stays on continuously.
This light also works with the light control switch (see page 125 ).
Instruments and Controls
FRONT
OFF
ONProCarManuals.comMain Menu Table of Contents s t
Page 129 of 343
Interior Lights
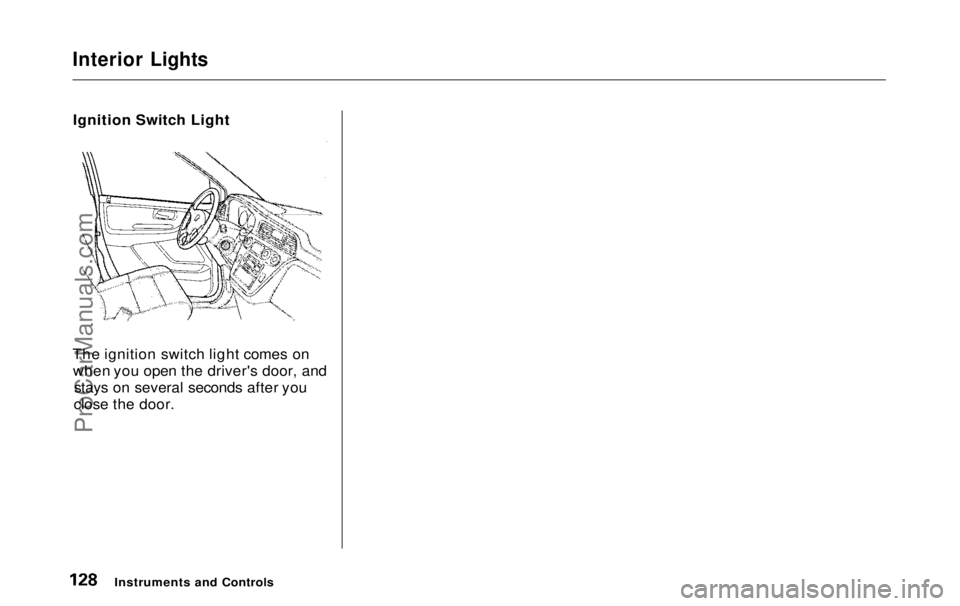
Ignition Switch Light
The ignition switch light comes on when you open the driver's door, and stays on several seconds after you
close the door.
Instruments and ControlsProCarManuals.comMain Menu Table of Contents s t
Page 130 of 343
Comfort and Convenience Features
The heating and air conditioning systems in your Honda provide a
comfortable driving environment in
all weather conditions.
The standard audio system has many features. This section de-scribes those features and how to
use them. (If you selected an optional audio system, refer to the
operating instructions that came
with it.)
On EX model
Your Honda has an anti-theft audio
system that requires a code number
to enable it.
Heating and Cooling...................... 130
What Each Control Does.......... 130How to Use the System............. 133
To Turn Everything Off........... 137
Climate Control System ................138 Fully-automatic Operation........ 140
Semi-automatic Operation........ 141
Sunlight Sensor/Temperature Sensor............. 145
Rear A/C Unit............................ 146
Audio System (LX)........................ 149 AM/FM/Cassette StereoAudio System......................... 149
Operating the Radio.................. 150
Adjusting the Sound.................. 153
Audio System Lighting............. 154
Operating the Cassette Player...................................... 154
Tape Search Functions............. 154 Operating the Optional CD Player/Changer..................... 157
CD Changer Error
Indications.............................. 160
Audio System (EX)........................ 161
AM/FM/CD Audio System..... 161
Operating the Radio.................. 162
Adjusting the Sound.................. 166
Audio System Lighting............. 167 Radio Frequencies..................... 167
Radio Reception......................... 167Operating the CD Player.......... 169
Operating the CD Changer...... 171
Protecting Compact Discs........ 172 CD Player Error Indications..... 173
CD Changer Error
Indications.............................. 174
Operating the Cassette Player...................................... 175
Tape Search Functions............. 176 Caring for the Cassette Player...................................... 178
Remote Audio Controls ............ 179
Theft Protection........................ 180
Comfort and Convenience FeaturesProCarManuals.comMain Menu s t