HONDA PRELUDE 1998 Manual PDF
Manufacturer: HONDA, Model Year: 1998, Model line: PRELUDE, Model: HONDA PRELUDE 1998Pages: 278, PDF Size: 2.61 MB
Page 71 of 278
Keys and Locks
This indicator will also blink several times when you turn the ignition switch from ON (II) to ACCESSORY (I) or LOCK (0).
The system may not recognize your key's coding if the key is in contact
with a key from another immobilizer system. If you have a key from
another vehicle's immobilizer system,
keep it separate.
Do not attempt to alter this system
or add other devices to it. Electrical
problems could result that may make
your vehicle undriveable.
If you have lost your key and you
cannot start the engine, contact your
Honda dealer.
As required by the FCC:
This device complies with Part 15 of the
FCC rules. Operation is subject to the
following two conditions: (1) This device
way not cause harmful interference, and (2) this device must accept any
interference received, including
interference that may cause undesired operation.This device complies with DOC rules in
Canada.
Changes or modifications not expressly
approved by the party responsible for
compliance could void the user's
authority to operate the equipment.
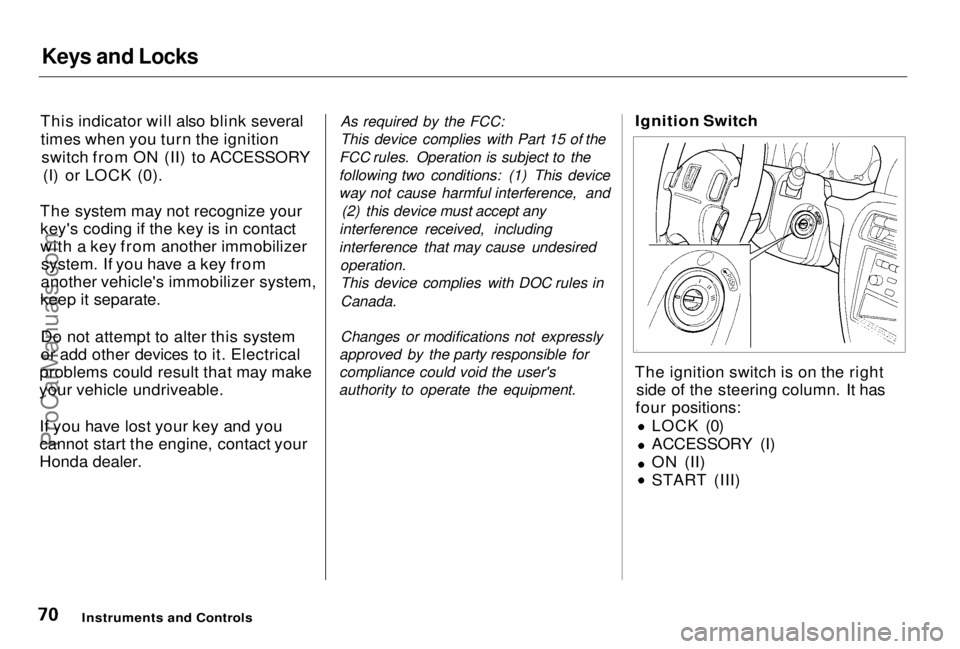
Ignition Switch
The ignition switch is on the right side of the steering column. It has
four positions:
LOCK (0)
ACCESSORY (I)
ON (II) START (III)
Instruments and ControlsProCarManuals.comMain Menu Table of Contents s t
Page 72 of 278
Keys and Locks
LOCK (0) — You can insert or
remove the key only in this position.
To switch from ACCESSORY to LOCK, you must push the key in
slightly as you turn it. If your vehicle
has an automatic transmission, it must also be in Park. The anti-theft
lock will lock the steering column
when you remove the key. If the front wheels are turned, the
anti-theft lock may sometimes make
it difficult to turn the key from
LOCK to ACCESSORY. Firmly turn
the steering wheel to the left or to
the right as you turn the key. ACCESSORY (I) — In this position,
you can operate the audio systemand the accessory power socket.
ON (II) — This is the normal key
position when driving. All features and accessories on the vehicle are
usable. Several of the lights on the
instrument panel come on as a test
when you turn the ignition switch
from ACCESSORY to ON (see page
51).
START (III) — Use this position
only to start the engine. The switch
returns to ON (II) when you let go of
the key.
The engine will not start if the Immobilizer System does not
recognize the key's coding (see page 69).
You will hear a reminder beeper if
you leave the key in the ignition switch in the LOCK (0) or
ACCESSORY (I) position and open the driver's door. Remove the key to
turn off the beeper.
Instruments and Controls
Removing the key from the
ignition switch while driving
locks the steering. This can
cause you to lose control.
Remove the key from the
ignition switch only when
parked.ProCarManuals.comMain Menu Table of Contents s t
Page 73 of 278
Keys and Locks
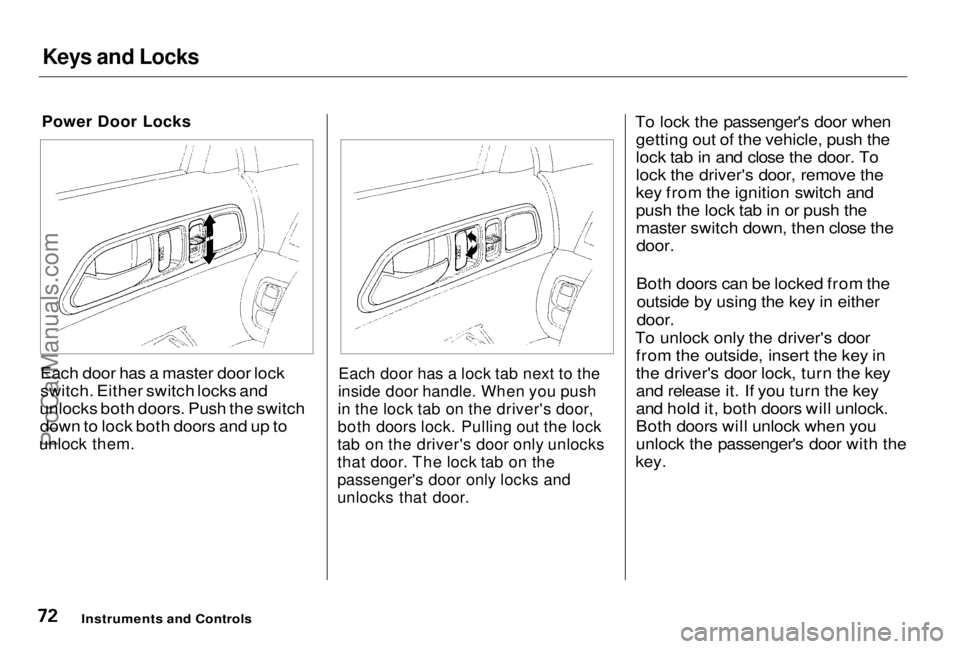
Power Door Locks
Each door has a master door lock
switch. Either switch locks and
unlocks both doors. Push the switch down to lock both doors and up to
unlock them.
Each door has a lock tab next to the
inside door handle. When you push
in the lock tab on the driver's door,
both doors lock. Pulling out the lock
tab on the driver's door only unlocks
that door. The lock tab on the
passenger's door only locks and
unlocks that door.
To lock the passenger's door when
getting out of the vehicle, push the
lock tab in and close the door. To
lock the driver's door, remove the
key from the ignition switch and
push the lock tab in or push the
master switch down, then close the
door.
Both doors can be locked from the
outside by using the key in either
door.
To unlock only the driver's door from the outside, insert the key in
the driver's door lock, turn the key
and release it. If you turn the key
and hold it, both doors will unlock.
Both doors will unlock when you
unlock the passenger's door with the
key.
Instruments and ControlsProCarManuals.comMain Menu Table of Contents s t
Page 74 of 278
Keys and Locks
Lockout Prevention
If you forget and leave the key in the
ignition switch, Lockout Prevention
will not allow you to lock the driver's door. With the driver's door open
and the key in the ignition, both
master door lock switches are
disabled.
However, if the driver's door is not open, the master door lock switches
are not disabled. Pushing the switch
down on the open passenger's door
will lock both doors. If you try to lock an open driver'sdoor by pushing in the lock tab, the
tabs on both doors pop out. Pushing
in the lock tab on the passenger's door only locks that door.
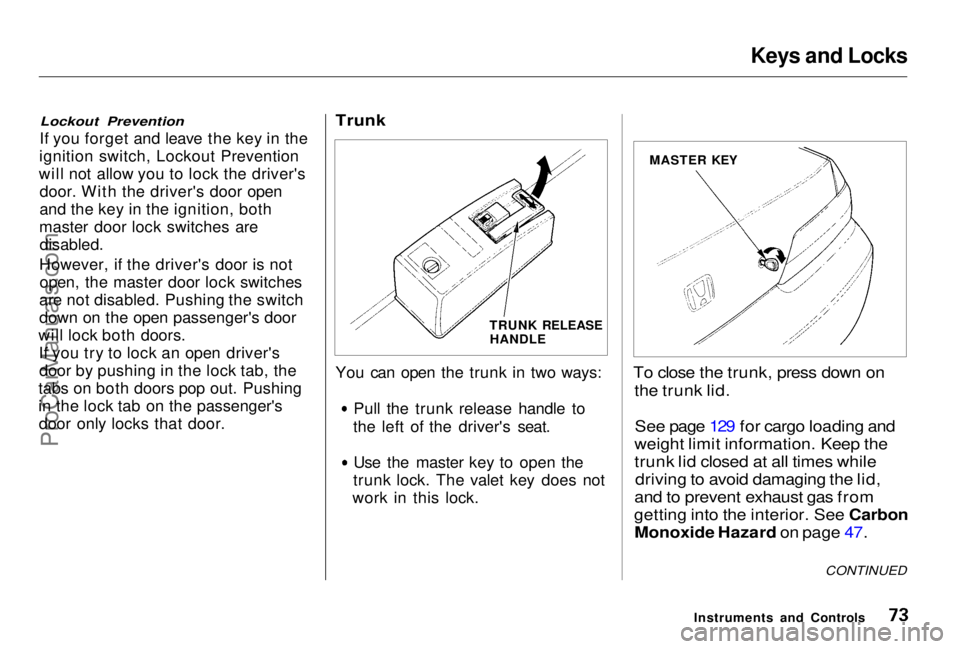
Trunk
You can open the trunk in two ways:
Pull the trunk release handle to
the left of the driver's seat. Use the master key to open the
trunk lock. The valet key does not
work in this lock.
To close the trunk, press down on
the trunk lid.
See page 129 for cargo loading and
weight limit information. Keep the
trunk lid closed at all times while
driving to avoid damaging the lid,
and to prevent exhaust gas from
getting into the interior. See Carbon
Monoxide Hazard on page 47.
Instruments and Controls
CONTINUED
TRUNK RELEASE
HANDLE MASTER KEYProCarManuals.comMain Menu Table of Contents s t
Page 75 of 278
Keys and Locks
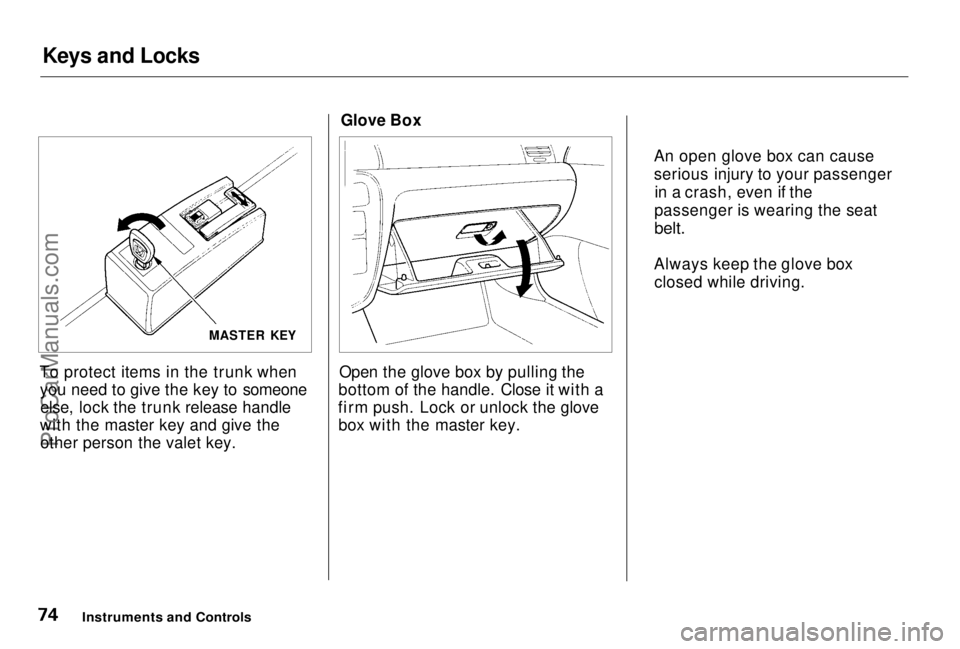
To protect items in the trunk when you need to give the key to someoneelse, lock the trunk release handle
with the master key and give the other person the valet key. Glove Box
Open the glove box by pulling the
bottom of the handle. Close it with a
firm push. Lock or unlock the glove box with the master key.
Instruments and Controls
An open glove box can cause
serious injury to your passenger
in a crash, even if the
passenger is wearing the seat
belt.
Always keep the glove box closed while driving.
MASTER KEYProCarManuals.comMain Menu Table of Contents s t
Page 76 of 278
Seat Adjustments
Front Seat Adjustments
See pages 11 — 12 for important safety
information and warnings about how to
properly position seats and seat-backs.
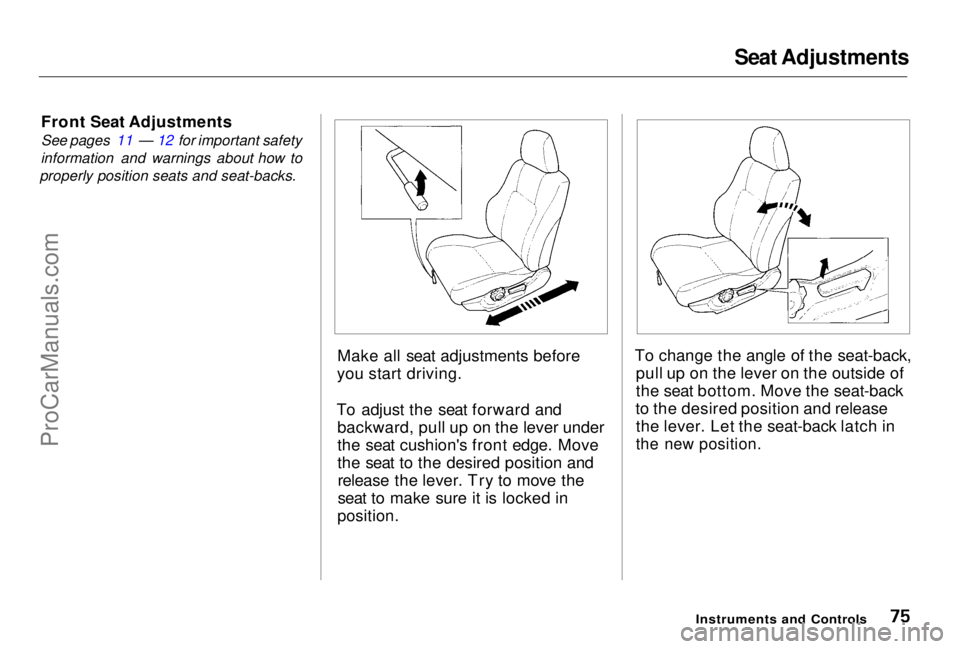
Make all seat adjustments before
you start driving.
To adjust the seat forward and backward, pull up on the lever under
the seat cushion's front edge. Move
the seat to the desired position andrelease the lever. Try to move the
seat to make sure it is locked in
position.
To change the angle of the seat-back,
pull up on the lever on the outside of
the seat bottom. Move the seat-back
to the desired position and release the lever. Let the seat-back latch in
the new position.
Instruments and ControlsProCarManuals.comMain Menu Table of Contents s t
Page 77 of 278

Seat Adjustments
Driver's Seat Height Adjustment
See pages 11 — 12 for important safety
information and warnings about how to
properly position seats and seat-backs.
To adjust the height of the driver's seat, turn the dial on the outside of
the seat bottom.
Rear Seat Access
To get into the back seat on the driver's side, pull up on the seat-back
adjustment lever.
To get into the back seat on thepassenger's side, push forward on
the release lever at the base of the seat-back. The seat-back will tilt
forward and the entire seat will move
forward to allow easier entry to the back seat. After you return the seat-
back to the upright position, push
the whole seat backwards until it
latches. Make sure the seat is fully
latched before sitting in it.
Instruments and Controls
RELEASE
LEVERProCarManuals.comMain Menu Table of Contents s t
Page 78 of 278
Seat Adjustments
Head Restraints
See page 13 for important safety
information and a warning about how to
properly position the head restraints.
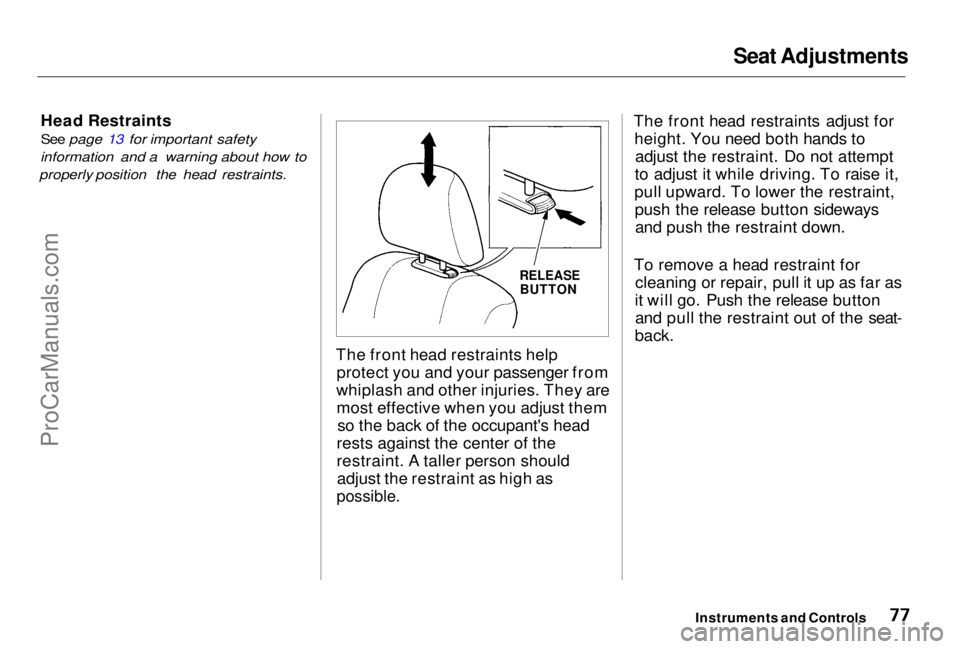
The front head restraints helpprotect you and your passenger from
whiplash and other injuries. They are most effective when you adjust them so the back of the occupant's head
rests against the center of the
restraint. A taller person should adjust the restraint as high as
possible.
The front head restraints adjust for
height. You need both hands toadjust the restraint. Do not attempt
to adjust it while driving. To raise it,
pull upward. To lower the restraint, push the release button sidewaysand push the restraint down.
To remove a head restraint for cleaning or repair, pull it up as far as
it will go. Push the release button and pull the restraint out of the seat-
back.
Instruments and Controls
RELEASE
BUTTONProCarManuals.comMain Menu Table of Contents s t
Page 79 of 278
Seat Heaters
On Canadian models
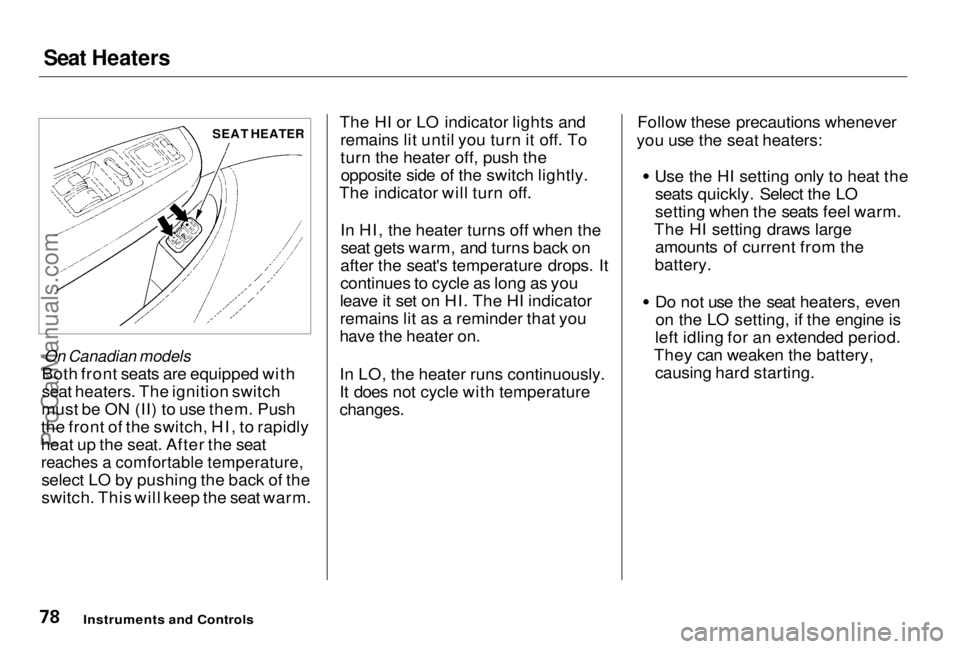
Both front seats are equipped with
seat heaters. The ignition switch
must be ON (II) to use them. Push
the front of the switch, HI, to rapidly
heat up the seat. After the seat
reaches a comfortable temperature,
select LO by pushing the back of the
switch. This will keep the seat warm. The HI or LO indicator lights and
remains lit until you turn it off. To
turn the heater off, push theopposite side of the switch lightly.
The indicator will turn off.
In HI, the heater turns off when theseat gets warm, and turns back on
after the seat's temperature drops. It
continues to cycle as long as you
leave it set on HI. The HI indicator
remains lit as a reminder that you
have the heater on.
In LO, the heater runs continuously.
It does not cycle with temperature
changes.
Follow these precautions whenever
you use the seat heaters:
Use the HI setting only to heat theseats quickly. Select the LO
setting when the seats feel warm.
The HI setting draws large amounts of current from the
battery. Do not use the seat heaters, even
on the LO setting, if the engine is
left idling for an extended period.
They can weaken the battery, causing hard starting.
Instruments and Controls
SEAT HEATERProCarManuals.comMain Menu Table of Contents s t
Page 80 of 278
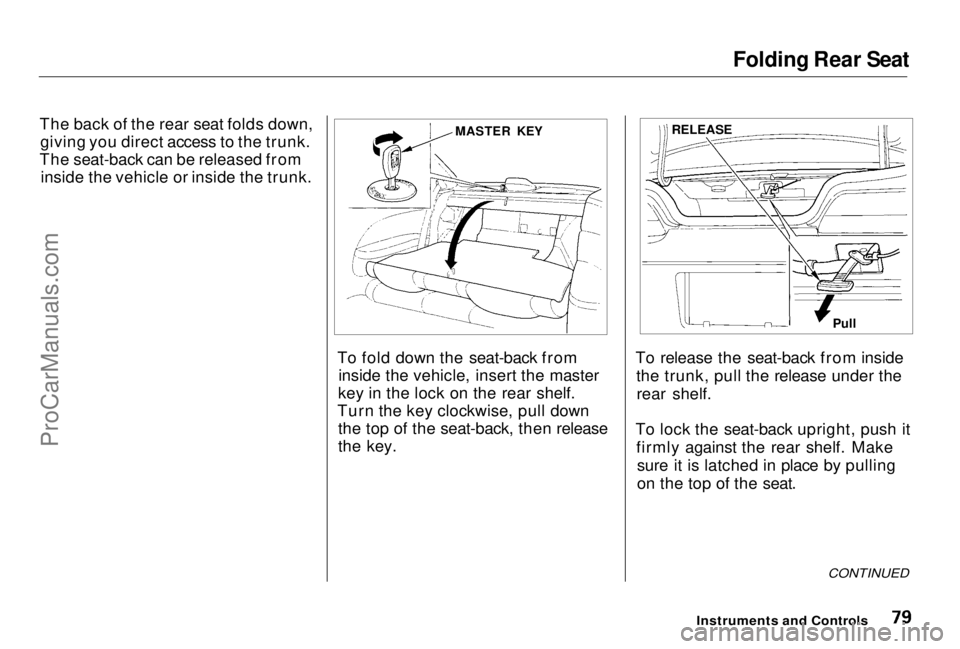
Folding Rear Seat
The back of the rear seat folds down, giving you direct access to the trunk.
The seat-back can be released from inside the vehicle or inside the trunk.
To fold down the seat-back frominside the vehicle, insert the master
key in the lock on the rear shelf.
Turn the key clockwise, pull down the top of the seat-back, then release
the key. To release the seat-back from inside
the trunk, pull the release under therear shelf.
To lock the seat-back upright, push it firmly against the rear shelf. Makesure it is latched in place by pulling
on the top of the seat.
CONTINUED
Instruments and Controls
MASTER KEY
RELEASE
PullProCarManuals.comMain Menu Table of Contents s t