HONDA PRELUDE 1998 Owners Manual
Manufacturer: HONDA, Model Year: 1998, Model line: PRELUDE, Model: HONDA PRELUDE 1998Pages: 278, PDF Size: 2.61 MB
Page 101 of 278

Audio System
AM/FM/CD Audio System
Your Honda's audio system providesclear reception on both AM and FM
bands, while the preset buttons allow
you to easily select your favorite
stations.
The Anti-theft feature will disable the system if it is disconnected from
the vehicle's battery. To get thesystem working again, you must
enter a code number (see page 117).
Comfort and Convenience Features
AM/FM 1-2 BUTTON
TUNE BAR
PWR/VOL KNOB
PRESET BUTTONS
SEEK BARProCarManuals.comMain Menu Table of Contents s t
Page 102 of 278
Audio System
Operating the Radio
The ignition switch must be in
ACCESSORY (I) or ON (II) to operate the audio system. Turn the
system on by pushing the PWR/
VOL knob. Adjust the volume by turning the same knob.
The band and frequency that the radio was last tuned to is displayed.
To change bands, press the AM/FM 1-2 button. On the FM band, ST will
be displayed if the station is broad- casting in stereo. Stereo reproduc-
tion on AM is not available. You can use any of three methods to
find radio stations on the selected
band: TUNE, SEEK, or the Preset
buttons.
TUNE— Use the TUNE bar to tune
the radio to a desired frequency. Press the side of the bar to tune
to a higher frequency, and the side to tune to a lower
frequency. The frequency numbers
will start to change rapidly. Release
the bar when the display reaches the desired frequency. To change the
frequency in small increments, press and release the TUNE bar quickly. SEEK — The SEEK function
searches the band for a station with
a strong signal. To activate it, press the SEEK bar on either the or
side, then release it.
Depending on which side you press,
the system scans upward or down-
ward from the current frequency. It stops when it finds a station with a
strong signal.
Preset — You can store the fre-
quencies of your favorite radiostations in the six preset buttons.
Each button will store one frequency on the AM band, and two on the FM
band.
CONTINUED
Comfort and Convenience Features
ProCarManuals.comMain Menu Table of Contents s t
Page 103 of 278
Audio System
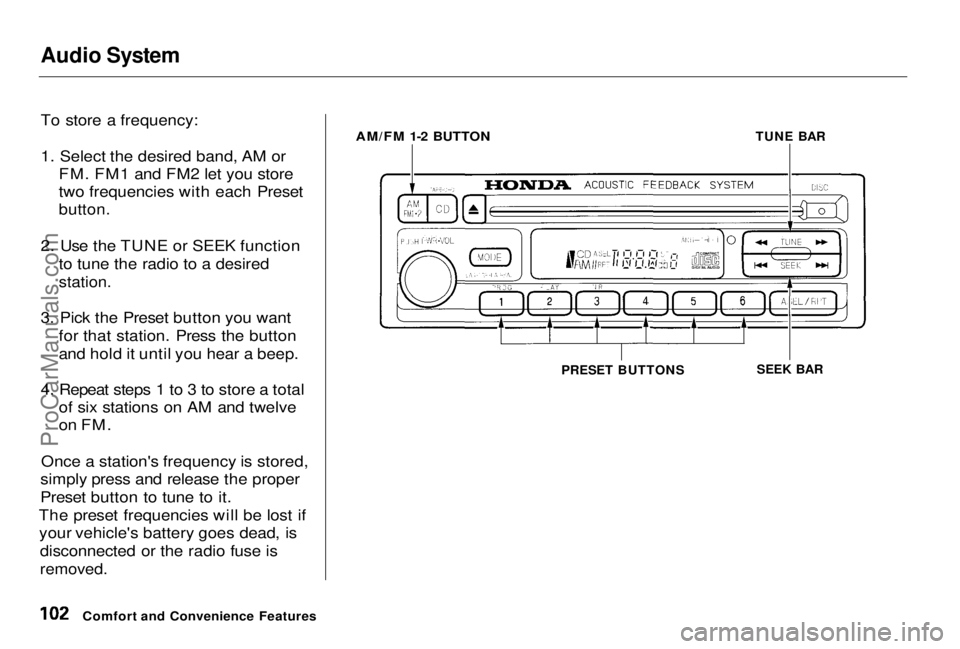
To store a frequency:
1. Select the desired band, AM or
FM. FM1 and FM2 let you store
two frequencies with each Preset
button.
2. Use the TUNE or SEEK function to tune the radio to a desired
station.
3. Pick the Preset button you want for that station. Press the button
and hold it until you hear a beep.
4. Repeat steps 1 to 3 to store a total of six stations on AM and twelve
on FM.
Once a station's frequency is stored,
simply press and release the proper
Preset button to tune to it.
The preset frequencies will be lost if your vehicle's battery goes dead, is
disconnected or the radio fuse is
removed.
Comfort and Convenience Features
AM/FM 1-2 BUTTON
TUNE BAR
PRESET BUTTONS SEEK BARProCarManuals.comMain Menu Table of Contents s t
Page 104 of 278
Audio System
AUTO SELECT — If you are traveling far from home and can no
longer receive the stations you preset, you can use the Auto Select
feature to find stations in the local
area.
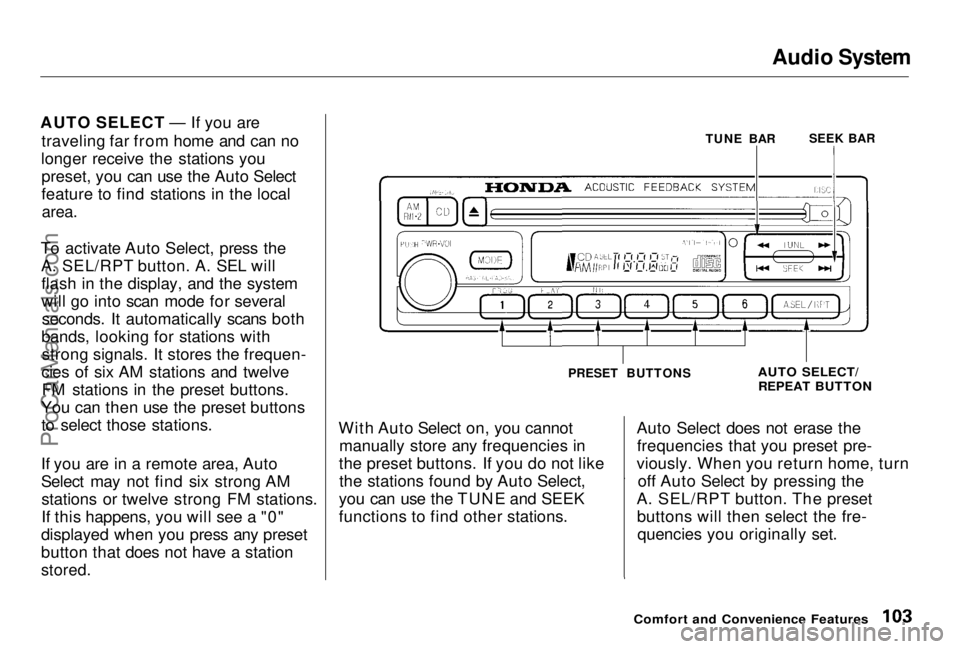
To activate Auto Select, press the A. SEL/RPT button. A. SEL willflash in the display, and the system
will go into scan mode for severalseconds. It automatically scans both
bands, looking for stations with strong signals. It stores the frequen-
cies of six AM stations and twelve FM stations in the preset buttons.
You can then use the preset buttons to select those stations.
If you are in a remote area, Auto
Select may not find six strong AM stations or twelve strong FM stations.
If this happens, you will see a "0"
displayed when you press any preset
button that does not have a station
stored.
With Auto Select on, you cannot
manually store any frequencies in
the preset buttons. If you do not like the stations found by Auto Select,
you can use the TUNE and SEEK
functions to find other stations. Auto Select does not erase the
frequencies that you preset pre-
viously. When you return home, turn off Auto Select by pressing the
A. SEL/RPT button. The preset buttons will then select the fre-quencies you originally set.
Comfort and Convenience Features
SEEK BAR
TUNE BAR
AUTO SELECT/
REPEAT BUTTON
PRESET BUTTONSProCarManuals.comMain Menu Table of Contents s t
Page 105 of 278
Audio System
Adjusting the Sound Bass, Treble, Balance, and Fader are
each adjustable. You select which of
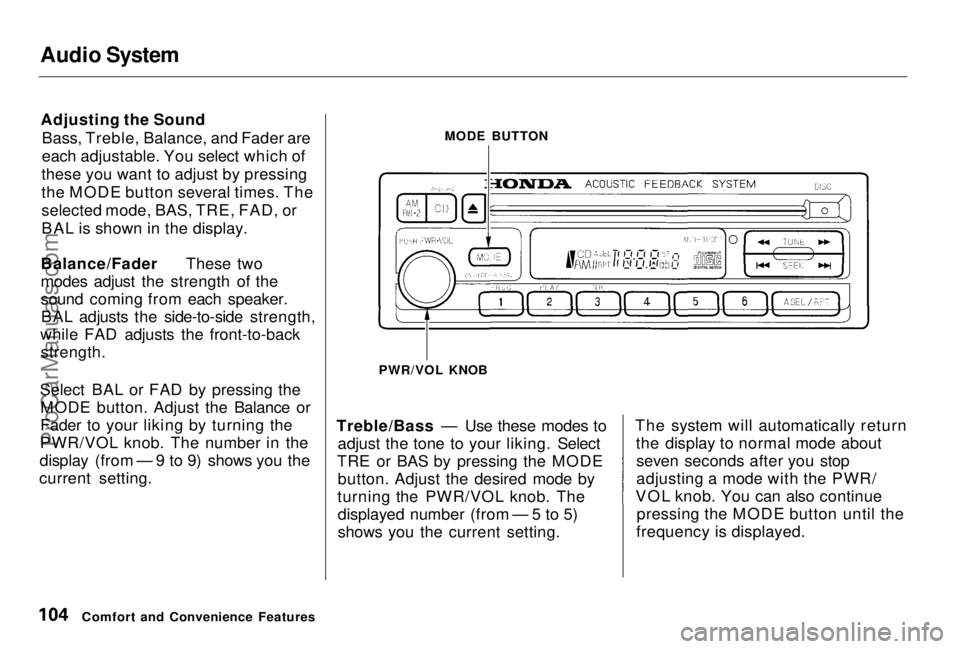
these you want to adjust by pressing
the MODE button several times. The
selected mode, BAS, TRE, FAD, or
BAL is shown in the display.
Balance/Fader These two
modes adjust the strength of the
sound coming from each speaker. BAL adjusts the side-to-side strength,
while FAD adjusts the front-to-back strength.
Select BAL or FAD by pressing the MODE button. Adjust the Balance or
Fader to your liking by turning the
PWR/VOL knob. The number in the
display (from — 9 to 9) shows you the
current setting. Treble/Bass — Use these modes to
adjust the tone to your liking. Select
TRE or BAS by pressing the MODE button. Adjust the desired mode by
turning the PWR/VOL knob. The displayed number (from — 5 to 5)
shows you the current setting. The system will automatically return
the display to normal mode aboutseven seconds after you stop
adjusting a mode with the PWR/
VOL knob. You can also continue pressing the MODE button until the
frequency is displayed.
Comfort and Convenience Features MODE BUTTON
PWR/VOL KNOBProCarManuals.comMain Menu Table of Contents s t
Page 106 of 278
Audio System
Audio System Lighting You can use the MODE button to turn the illumination on the audiosystem on or off when the headlights
are on.
Push and hold the MODE button for
three seconds and the illumination
will turn off. Push it again for three seconds to turn the illumination on. Radio Frequencies
Your Honda's radio can receive the complete AM and FM bands.
Those bands cover these frequen-
cies:
AM band: 530 to 1,710 kilohertz
FM band:
87.7 to 107.9 megahertz
Radio stations on the AM band are
assigned frequencies at least ten
kilohertz apart (530, 540, 550). Stations on the FM band are
assigned frequencies at least 0.2
megahertz apart (87.9, 88.1, 88.3).
Stations must use these exact
frequencies. It is fairly common for stations to round-off the frequency in
their advertising, so your radio could display a frequency of 100.9 even
though the announcer may identify
the station as "FM101." Radio Reception
How well your Honda's radio
receives stations is dependent on
many factors, such as the distance
from the station's transmitter, nearby large objects, and atmos-
pheric conditions.
A radio station's signal gets weaker as you get farther away from its
transmitter. If you are listening to an
AM station, you will notice the sound volume becoming weaker, and the station drifting in and out. If you are
listening to an FM station, you will see the stereo indicator flickering off
and on as the signal weakens.
Eventually, the stereo indicator will
go off and the sound will fade completely as you get out of range of
the station's signal.
CONTINUED
Comfort and Convenience FeaturesProCarManuals.comMain Menu Table of Contents s t
Page 107 of 278
Audio System
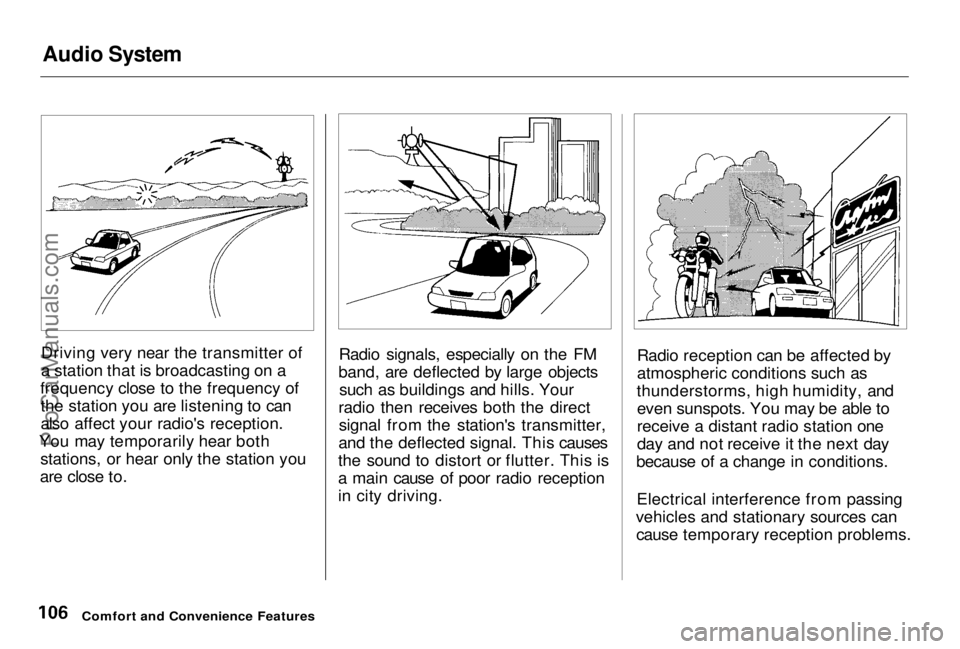
Driving very near the transmitter of
a station that is broadcasting on a
frequency close to the frequency of the station you are listening to can
also affect your radio's reception.
You may temporarily hear both stations, or hear only the station you
are close to. Radio signals, especially on the FM
band, are deflected by large objects such as buildings and hills. Your
radio then receives both the direct signal from the station's transmitter,
and the deflected signal. This causes
the sound to distort or flutter. This is
a main cause of poor radio reception
in city driving. Radio reception can be affected by
atmospheric conditions such as
thunderstorms, high humidity, and even sunspots. You may be able to
receive a distant radio station one
day and not receive it the next day
because of a change in conditions.
Electrical interference from passing
vehicles and stationary sources can cause temporary reception problems.
Comfort and Convenience FeaturesProCarManuals.comMain Menu Table of Contents s t
Page 108 of 278
Audio System
Operating the CD Player
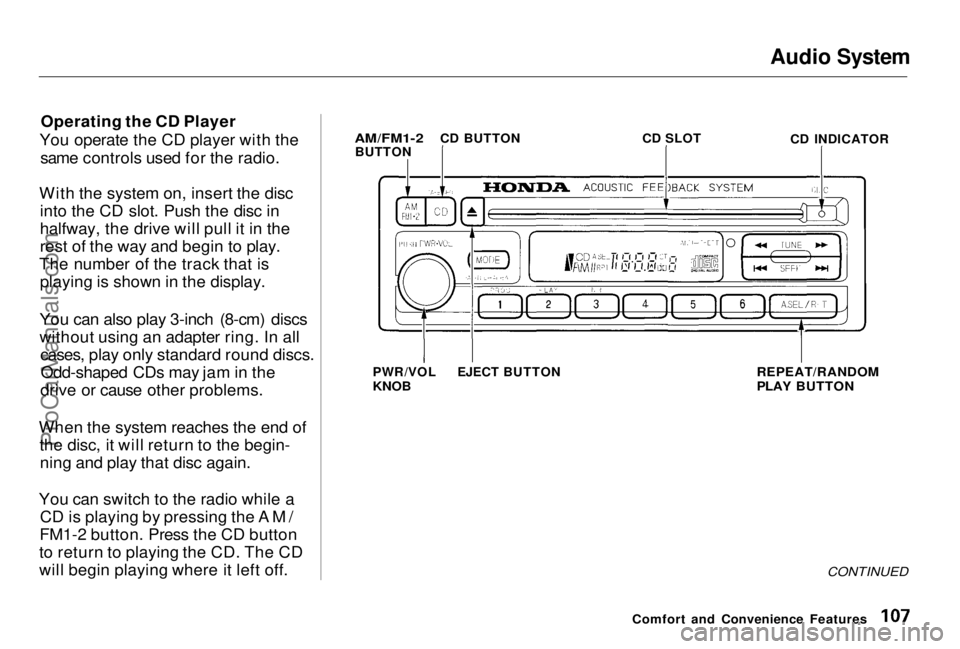
You operate the CD player with the same controls used for the radio.
With the system on, insert the disc into the CD slot. Push the disc in
halfway, the drive will pull it in the
rest of the way and begin to play.
The number of the track that is playing is shown in the display.
You can also play 3-inch (8-cm) discs
without using an adapter ring. In all cases, play only standard round discs.Odd-shaped CDs may jam in the
drive or cause other problems.
When the system reaches the end of the disc, it will return to the begin-ning and play that disc again.
You can switch to the radio while a CD is playing by pressing the AM/
FM1-2 button. Press the CD button
to return to playing the CD. The CD
will begin playing where it left off.
CONTINUED
Comfort and Convenience Features
AM/FM1-2
BUTTON CD BUTTON
CD SLOT
CD INDICATOR
PWR/VOL
KNOB
EJECT BUTTON
REPEAT/RANDOM
PLAY BUTTONProCarManuals.comMain Menu Table of Contents s t
Page 109 of 278
Audio System
If you turn the system off while a CD
is playing, either with the PWR/VOL
knob or by turning off the ignition, the disc will stay in the drive. When
you turn the system back on, the CD
will begin playing where it left off.
Press the eject button to remove the
disc from the drive.
If you eject the disc, but do not
remove it from the slot, the system
will automatically reload the disc after 15 seconds and put the CD
player in pause mode. To begin
playing the disc, press the CD button. You can use the TUNE and SEEK
bars while a disc is playing to select
passages and change tracks.
To move rapidly within a track, press and hold the TUNE bar. Press the side to move forward, or the
side to move backward.
Release the bar when the system
reaches the point you want.
Each time you press the side of
the SEEK bar, the system skips
forward to the beginning of the next track. Press the side to skip
backward to the beginning of the
current track. Press it again to skip
to the beginning of the previous
track.
REPEAT — To activate the Repeat
feature, press and release the Repeat
button. You will see RPT in the display. The system continuously
replays the current track. Press the
Repeat button again to turn it off. RANDOM PLAY — This feature,
when activated, plays the tracks on the CD in random order, rather thanin the order they are recorded on theCD. To activate Random Play, press
and hold the A. SEL/RPT button
until you see A. SEL in the display.
The system will then select and play tracks randomly. This continuesuntil you deactivate Random Play by
pressing A. SEL/RPT again.
If the system is in Repeat mode, you
must turn it off by pressing A. SEL/ RPT before you can select Random
Play. Then press and hold the button
again until you see A. SEL displayed.
Comfort and Convenience FeaturesProCarManuals.comMain Menu Table of Contents s t
Page 110 of 278
Audio System
Operating the CD Changer
(Optional)
A trunk-mounted Compact Disc changer is available for your vehicle.
It holds up to six discs, providing
several hours of continuous
entertainment. You operate this CD
changer with the same controls used
for the in-dash CD player.
Load the desired CD's in the
magazine and load the magazine in
the changer according to the instructions that came with the unit.
Play only standard round discs. Odd-shaped CDs may jam in the drive or
cause other problems.
To select the CD changer, press the CD button. The disc and track
numbers will be displayed. A "0" will
flash for the track number as the CD is loaded, then it will change to a
non-flashing "1".
To select
a different disc, press the
appropriate preset button (1 — 6). If
you select an empty slot in the magazine, the changer will, after
finding that slot empty, try to load the CD in the next slot. Thiscontinues until it finds a CD to load
and play.
If you load a CD in the in-dash player
while the changer is playing a CD, the system will stop the changer and
begin playing the in-dash CD. To select the changer again, press the
CD button. Play will begin where it
left off. Use the CD button to switch between the player and the changer.
If you eject the in-dash CD while it is
playing, the system will automaticallyswitch to the CD changer and begin
play where it left off. If there are no CDs in the changer, the display will
flash. You will have to select another mode (AM or FM) with the button. When you switch back to CD mode,
the system selects the same unit (in-dash or changer) that was playing
when you switched out of CD mode.
To use the SKIP, REPEAT, and RANDOM functions, refer to the in-dash player operating instructions.
Comfort and Convenience FeaturesProCarManuals.comMain Menu Table of Contents s t