HONDA RIDGELINE 2010 1.G Owners Manual
Manufacturer: HONDA, Model Year: 2010, Model line: RIDGELINE, Model: HONDA RIDGELINE 2010 1.GPages: 421, PDF Size: 7.23 MB
Page 371 of 421

The banks and surf ace under the
water provide good traction. The
water may hide hazards such as
rocks, holes, or mud.
Bef ore driving through water, stop,
get out if necessary, and make sure
that:
If you decide it is saf e to drive
through water, choose a suitable
speed, and proceed without shif ting,
changing speeds, stopping, or
shutting of f the engine.
Do not try to cross water at high
speeds, as this may cause severe
damage to the cooling system or
result in loss of control.
After driving through water, test
your brakes. If they got wet, gently
‘‘pump’’ them while driving slowly
until they operate normally.
If the water is deeper than the wheel
hubs, some additional service may
be required. This service is not
covered by your warranties.
The water is not f lowing too f ast.
Deep rushing water can sweep you
downstream. Even very shallow
rushingwatercanwashthe
ground f rom under your tires and
cause you to lose traction and
possibly roll over.
The banks are sloped so you can
drive out.
The water is not deep enough to
cover your wheel hubs, axles, or
exhaust pipe. You could stall and
not be able to restart your engine.
The water can also damage
important vehicle components. If you get stuck, and cannot get
unstuck with the VTM-4 system,
engage the VTM-4 Lock (see page
), and carefully try to go in the
direction (f orward or reverse) that
you think will get you unstuck. Do
notspinthetiresathighspeeds.It
will not help you get out and may
cause damage to the transmission or
VTM-4 system.
If you are still unable to f ree yourself ,
your vehicle is equipped with f ront
and rear tow hooks designed f or this
purpose (see page ). 383
276
CONT INUED
If You Get Stuck
Crossing a Stream
Of f -Highway Driving Guidelines
Driving
309
Table of Contents
Page 372 of 421

Use a nylon strap to attach your
vehicle to the recovery vehicle, and
caref ully take out the slack in the
strap. Once the strap is tight, the
recovery vehicle should apply f orce.
Remember that the recovery vehicle
needs good traction to avoid
becoming stuck, too.
You should never use a jack to try to
get unstuck. Your vehicle could
easily slip of f the jack and hurt you
or someone else.You may saf ely tow a trailer of f -road
if you f ollow these guidelines:
Do not exceed the trailer weight
or tongue limits (see page ).
Stay on smooth, level dirt roads,
and avoid driving in hilly terrain.
Allow extra room f or starting,
stopping, and turning.
Slow down if you encounter bumps
or other obstacles. 295
Towing a Trailer Off-Road
Of f -Highway Driving Guidelines
310
Table of Contents
Page 373 of 421

This section covers the more
common problems that motorists
experience with their vehicles. It
gives you inf ormation about how to
safely evaluate the problem and what
to do to correct it. If the problem has
stranded you on the side of the road,
you may be able to get going again.
If not, you will also f ind instructions
on getting your vehicle towed.......................Compact Spare Tire . 360
....................
Changing a Flat Tire . 361
.............
If the Engine Won’t Start . 369
................................
Jump Starting . 370
..............
If the Engine Overheats . 372
.........
Low Oil Pressure Indicator . 374
..........
Charging System Indicator . 374
.......
Malf unction Indicator Lamp . 375
...............
Brake System Indicator . 376
..............................................
Fuses . 378
..............................
Fuse Locations . 381
......................
Emergency Towing . 383
..........
If Your Vehicle Gets Stuck . 383
Taking Care of the Unexpected
T aking Care of t he Unexpect ed
359
Page 374 of 421
Use the compact spare tire as a
temporary replacement only. Get
your regular tire repaired or replaced,
and put it back on your vehicle as
soon as you can.
Check the air pressure of the
compact spare tire every time you
check the other tires. It should be
inf lated to:
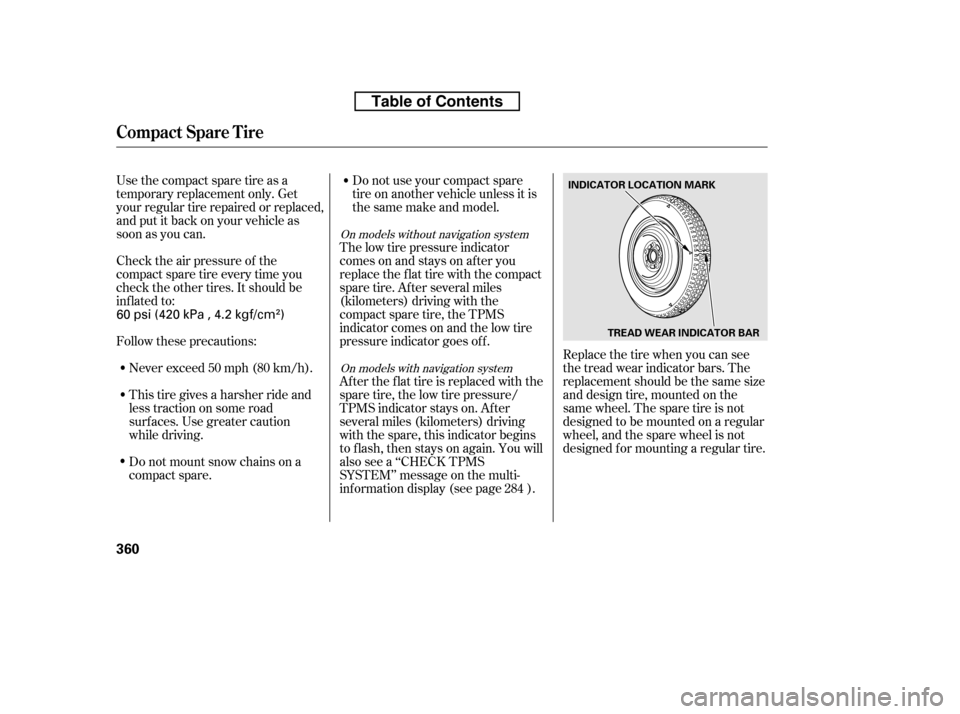
Follow these precautions:Replace the tire when you can see
the tread wear indicator bars. The
replacement should be the same size
and design tire, mounted on the
same wheel. The spare tire is not
designed to be mounted on a regular
wheel, and the spare wheel is not
designed f or mounting a regular tire.
Never exceed 50 mph (80 km/h).
This tire gives a harsher ride and
less traction on some road
surf aces. Use greater caution
while driving.
Do not mount snow chains on a
compact spare. Do not use your compact spare
tire on another vehicle unless it is
thesamemakeandmodel.
The low tire pressure indicator
comes on and stays on af ter you
replace the flat tire with the compact
spare tire. Af ter several miles
(kilometers) driving with the
compact spare tire, the TPMS
indicator comes on and the low tire
pressure indicator goes of f .
After the flat tire is replaced with the
spare tire, the low tire pressure/
TPMS indicator stays on. After
several miles (kilometers) driving
with the spare, this indicator begins
to f lash, then stays on again. You will
also see a ‘‘CHECK TPMS
SYSTEM’’ message on the multi-
inf ormation display (see page ). 284
On models without navigation system
On models with navigation system
Compact Spare Tire
360
INDICATOR LOCATION MARK
TREAD WEAR INDICATOR BAR
60 psi (420 kPa , 4.2 kgf/cm)
Table of Contents
Page 375 of 421
Turn on the hazard warning lights,
and turn the ignition switch to the
LOCK (0) position. Have all
passengers get out of the vehicle
while you change the tire.
Park the vehicle on f irm, level, and
non-slippery ground. Put the
transmission in Park. Apply the
parking brake.
If you are towing a trailer, unhitch
it.
If you have a f lat tire while driving,
stop in a saf e place to change it.
Drive slowly along the shoulder until
you get to an exit or an area to stop
that is far away from the traffic lanes.
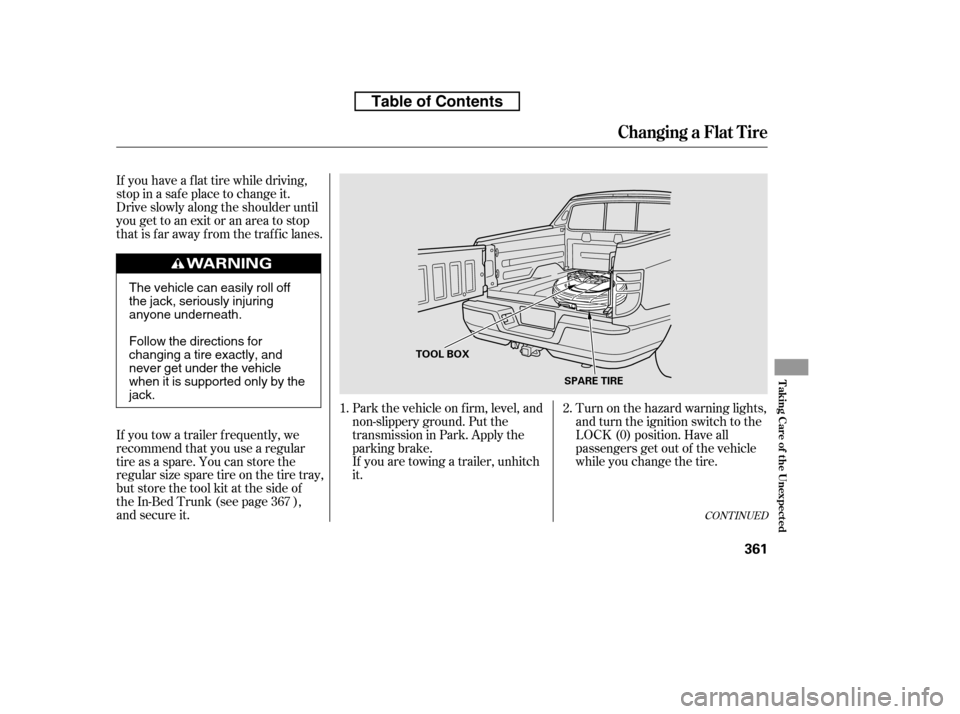
If you tow a trailer f requently, we
recommend that you use a regular
tire as a spare. You can store the
regular size spare tire on the tire tray,
but store the tool kit at the side of
the In-Bed Trunk (see page ),
and secure it.
2.
1.
367
CONT INUED
Changing a Flat T ire
T aking Care of t he Unexpect ed
361
TOOL BOX SPARE TIRE
The vehicle can easily roll off
the jack, seriously injuring
anyone underneath.
Follow the directions for
changing a tire exactly, and
never get under the vehicle
when it is supported only by thejack.
Table of Contents
Page 376 of 421
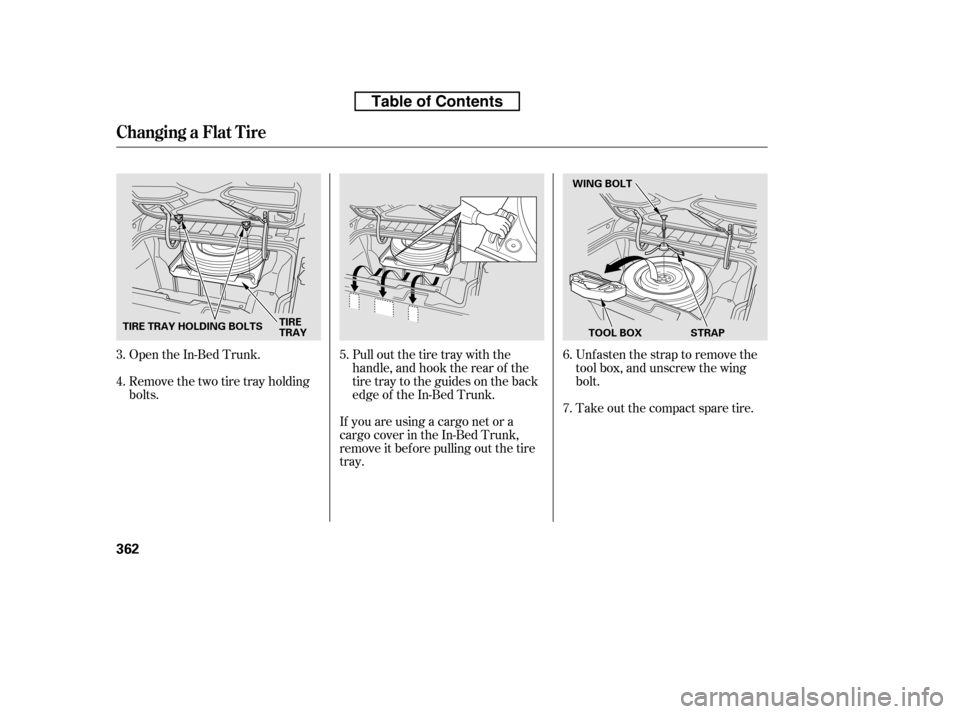
Open the In-Bed Trunk.
Remove the two tire tray holding
bolts.Pull out the tire tray with the
handle, and hook the rear of the
tire tray to the guides on the back
edge of the In-Bed Trunk.Unfasten the strap to remove the
tool box, and unscrew the wing
bolt.
Takeoutthecompactsparetire.
If you are using a cargo net or a
cargo cover in the In-Bed Trunk,
remove it bef ore pulling out the tire
tray.
4.
3.
5.6.
7.
Changing a Flat T ire
362
TIRE TRAY HOLDING BOLTS WING BOLT
TOOL BOX STRAP
TIRE
TRAY
Table of Contents
Page 377 of 421
CONT INUED
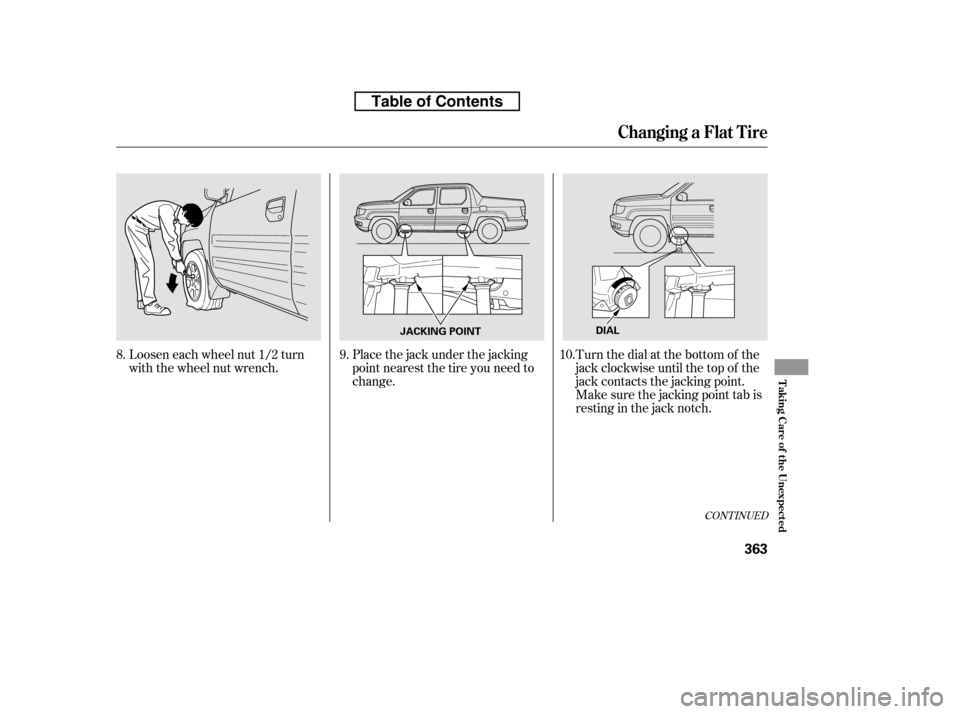
Loosen each wheel nut 1/2 turn
with the wheel nut wrench.Place the jack under the jacking
point nearest the tire you need to
change.Turn the dial at the bottom of the
jack clockwise until the top of the
jack contacts the jacking point.
Make sure the jacking point tab is
restinginthejacknotch.
8.
9.10.
Changing a Flat T ire
T aking Care of t he Unexpect ed
363
JACKING POINTDIAL
Table of Contents
Page 378 of 421
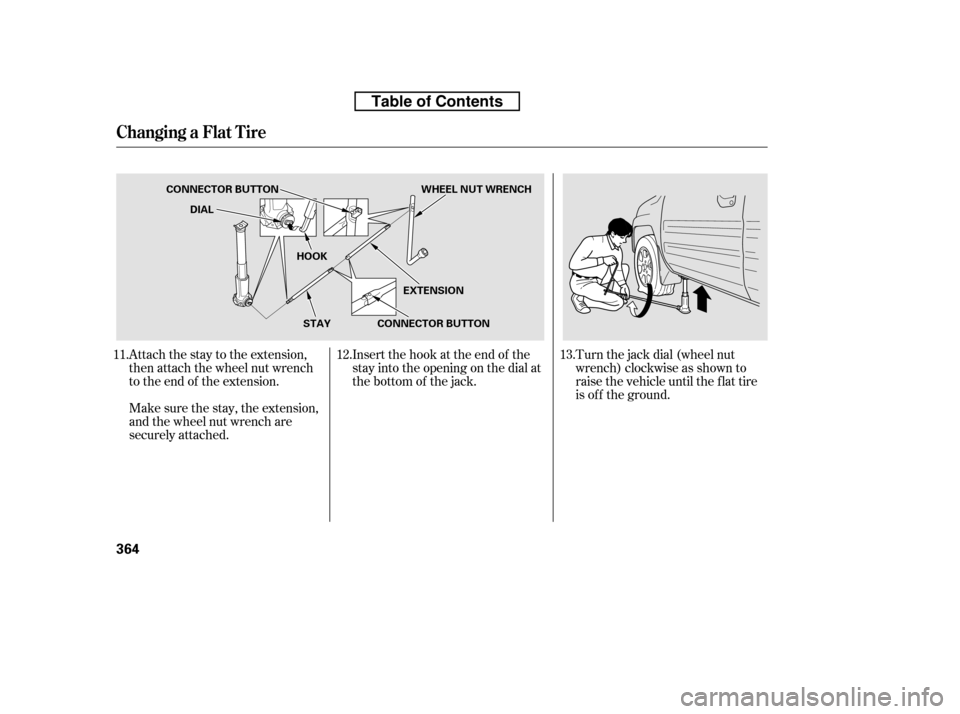
Attach the stay to the extension,
then attach the wheel nut wrench
to the end of the extension.Turn the jack dial (wheel nut
wrench) clockwise as shown to
raise the vehicle until the f lat tire
is of f the ground.
Make sure the stay, the extension,
and the wheel nut wrench are
securely attached. Insert the hook at the end of the
stay into the opening on the dial at
the bottom of the jack.
11. 12. 13.
Changing a Flat T ire
364
EXTENSION
CONNECTOR BUTTON
DIAL
CONNECTOR BUTTON WHEEL NUT WRENCH
HOOKSTAY
Table of Contents
Page 379 of 421
CONT INUED
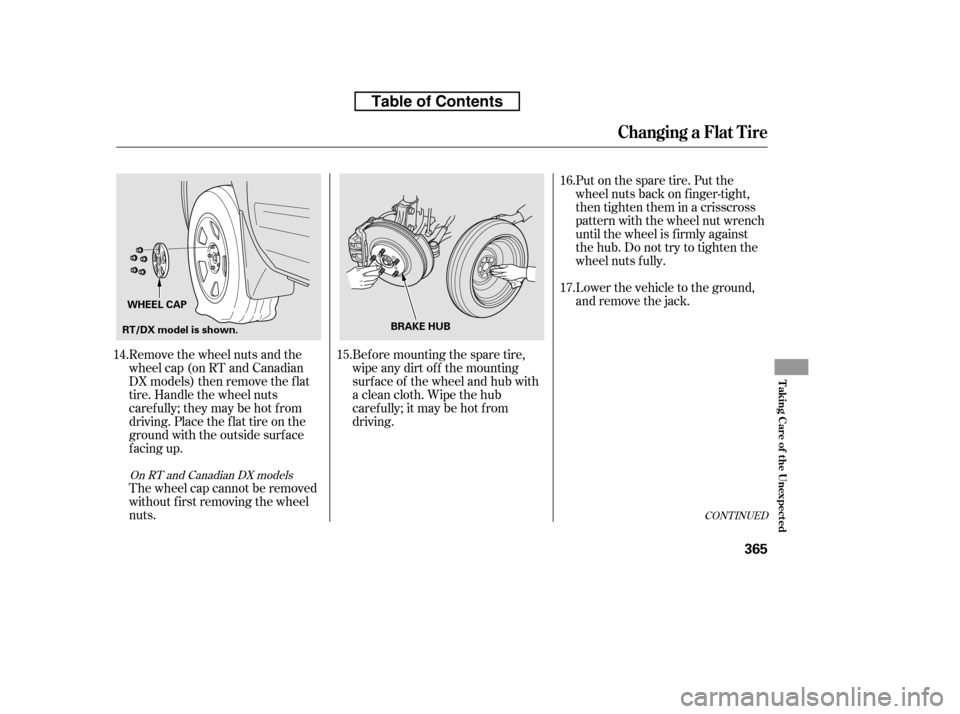
Put on the spare tire. Put the
wheel nuts back on f inger-tight,
then tighten them in a crisscross
pattern with the wheel nut wrench
until the wheel is f irmly against
the hub. Do not try to tighten the
wheel nuts f ully.
Lower the vehicle to the ground,
and remove the jack.
Bef ore mounting the spare tire,
wipeanydirtoff themounting
surface of the wheel and hub with
a clean cloth. Wipe the hub
carefully;itmaybehotfrom
driving.
The wheel cap cannot be removed
without first removing the wheel
nuts.
Remove the wheel nuts and the
wheel cap (on RT and Canadian
DX models) then remove the f lat
tire. Handle the wheel nuts
caref ully; they may be hot f rom
driving. Place the f lat tire on the
ground with the outside surf ace
f acing up.
14. 15. 16. 17.
On RT and Canadian DX models
Changing a Flat T ire
T aking Care of t he Unexpect ed
365
BRAKE HUB
WHEEL CAP
RT/DX model is shown.
Table of Contents
Page 380 of 421
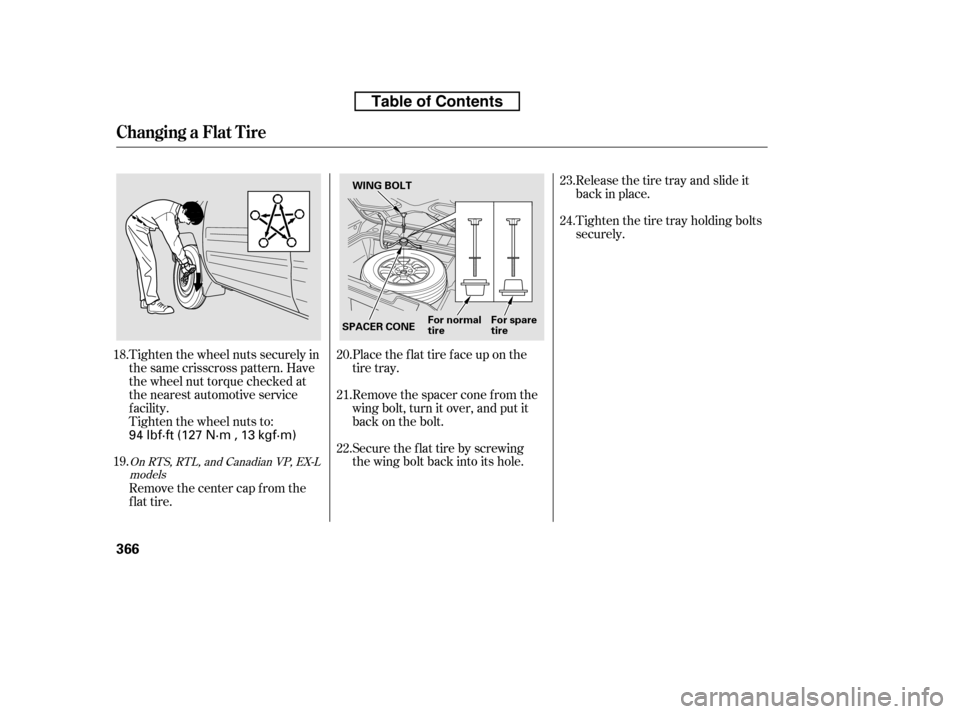
Tighten the wheel nuts securely in
the same crisscross pattern. Have
the wheel nut torque checked at
the nearest automotive service
f acility.
Tighten the wheel nuts to:Place the flat tire face up on the
tire tray.
Remove the spacer cone f rom the
wing bolt, turn it over, and put it
back on the bolt.
Securetheflattirebyscrewing
the wing bolt back into its hole.Release the tire tray and slide it
back in place.
Tighten the tire tray holding bolts
securely.
Remove the center cap from the
flat tire.
18. 19.
20. 21. 22.23. 24.
On RTS, RTL, and Canadian VP, EX-L
models
Changing a Flat T ire
366
WING BOLT
SPACER CONE For normal tireFor sparetire
94 lbf·ft (127 N·m , 13 kgf·m)
Table of Contents