light HONDA S2000 2000 1.G Workshop Manual
[x] Cancel search | Manufacturer: HONDA, Model Year: 2000, Model line: S2000, Model: HONDA S2000 2000 1.GPages: 273, PDF Size: 21.58 MB
Page 146 of 273
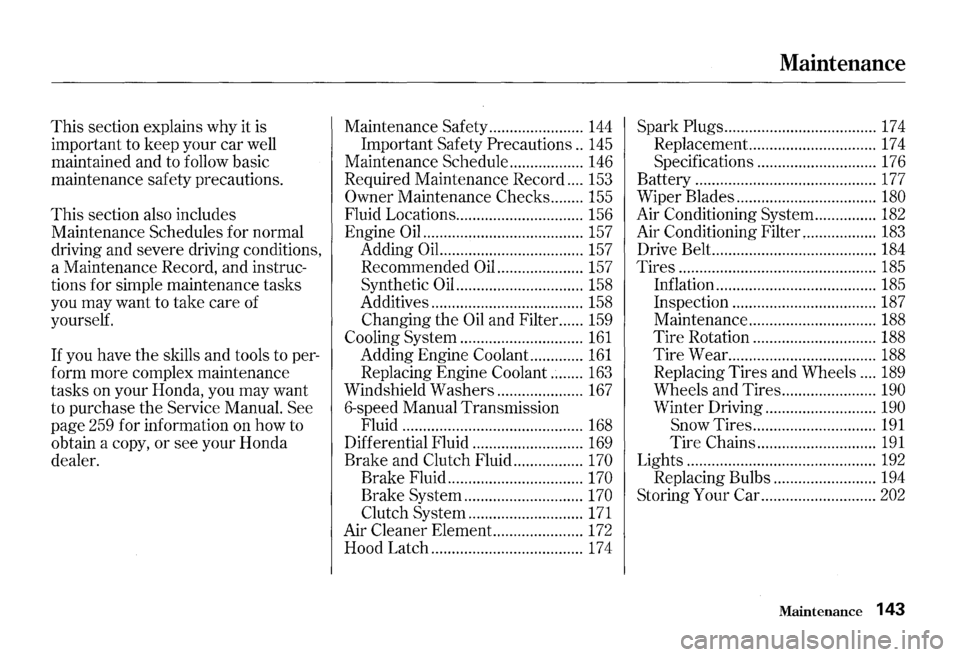
This section explains why it is
important to keep your car well
maintained and to follow basic
maintenance safety precautions.
This section also includes
Maintenance Schedules for normal
driving and severe driving conditions,
a Maintenance Record, and instruc
tions for simple maintenance tasks
you may want to take care of
yourself.
If you have the skills and tools to per
form more complex maintenance
tasks on your Honda, you may want
to purchase
the Service Manual. See
page 259 for information on how to
obtain a copy,
or see your Honda
dealer. Maintenance
Safety .......................
144
Important
Safety Precautions .. 145
Maintenance Schedule .................. 146
Required Maintenance Record
.... 153
Owner Maintenance Checks ........ 155
Fluid Locations ............................... 156
Engine Oil ....................................... 157
Adding Oil... ................................ 157
Recommended Oil ..................... 157
Synthetic
Oil ............................... 158
Additives ..................................... 158
Changing the Oil and Filter.. .... 159
Cooling System .............................. 161
Adding Engine Coolant ............. 161
Replacing Engine Coolant ........ 163
Windshield Washers ..................... 167
6-speed Manual Transmission
Fluid ............................................
168
Differential Fluid ........................... 169
Brake and Clutch Fluid ................. 170
Brake Fluid ................................. 170
Brake System ............................. 170
Clutch System ............................ 171
Air Cleaner Element.. .................... 172
Hood Latch ..................................... 174
Maintenance
Spark Plugs ..................................... 174
Replacement ............................... 17 4
Specifications ............................. 176
Battery ............................................
177
Wiper Blades .................................. 180
Air Conditioning System ............... 182
Air Conditioning Filter, ................. 183
Drive Belt ........................................ 184
Tires ................................................ 185
Inflation ....................................... 185
Inspection ................................... 187
Maintenance ............................... 188
Tire Rotation .............................. 188
Tire Wear .................................... 188
Replacing Tires and Wheels .... 189
Wheels and Tires ....................... 190
Winter Driving ........................... 190
Snow
Tires .............................. 191
Tire Chains ............................. 191
Lights .............................................. 192
Replacing Bulbs ......................... 194
Storing Your Car ............................ 202
Maintenance 143
Page 153 of 273
Service at the indicated miles x 1,000 15 30 45 60 75 90 105 120 distance or time -whichever km x 1,000 24 48 72 96 120 144 168 192 --~-~ comes first. months 12 24
36 48 60 72 84
96 Replace engine oil and oil filter Replace every 3,750 miles (6,000 km) or 6 months
Check engine oil and coolant Check oil and coolant at each fuel stop Replace air cleaner element • • r-·-. . . ·~ • • Use normal schedule except in dusty
conditions Inspect valve clearance Adjust only if noisy • Replace spark plugs • -·~-~-·-· ~~-~ f-----Inspect drive belt •
• • • Inspect idle speed I • --Replace engine coolant • • • -----Replace transmission fluid • •
• • Replace rear differential fluid • • • •
• •
• • Inspect front and rear brakes Inspect every 7,500 miles. (12,000 km) or 6 months
Replace brake fluid • -+-• Check parking brake adjustment • •
• • • • • • Replace air conditioning filter 1
" 1 •
•
• • i -~I-Lubricate al_~!lir1J:JeS, locks and latches • • • • • • • • Check tire inflation and condition Every 7,500 miles (12,000 km) Visually inspect the following items:
Tie rod ends, steering gear box, and boots Every 7,500 miles (12,000 km) or 6 months Suspension components, Drives haft boots -----r----~~ Brake hoses and lines (including ABS)
All fluid levels and condition of fluids
Cooling system hoses and connections • • • • • • • • Exhaust system", Fuel lines and connections'
1 Lights and controls, Vehicle underbody
* 1: Refer to page183 for replacement information under special driving conditions.
150 Maintenance
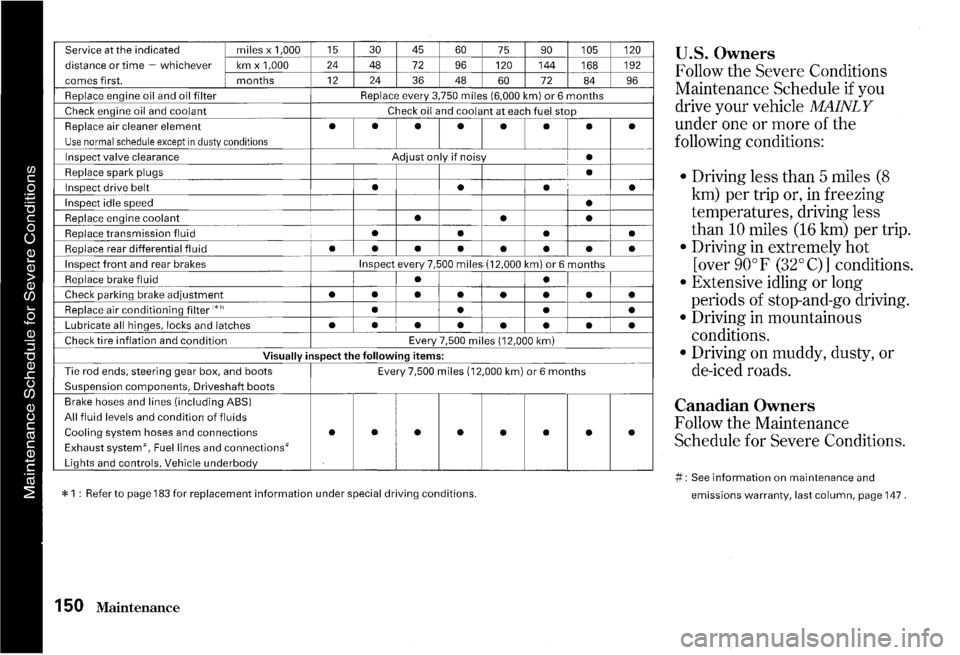
U.S. Owners
Follow the Severe Conditions
Maintenance Schedule if you
drive your vehicle
MAINLY
under one or more of the
following conditions:
• Driving less than 5 miles (8
km) per trip or, in freezing
temperatures, driving less
than
10 miles (16 km) per trip.
• Driving in extremely hot
[over
90° F (32° C)] conditions.
• Extensive idling or long
periods of stop-and-go driving.
• Driving in mountainous
conditions.
• Driving on muddy, dusty, or
de-iced roads.
Canadian Owners
Follow the Maintenance
Schedule for Severe Conditions.
#: See information on maintenance and
emissions warranty, last column, page 147.
Page 155 of 273
82,500 mi/132,000 km/51/z vrs Do items in A, B. 86,250 mi/138,000 km/-Do items in A. 90,000 mi/144,000 km/6 yrs ORe place brake fluid. Do items in A, B, C, D. 93,750 mi/150,000 km/-Do items in A. 97,500 mi/156,000 km/61/z yrs Do items in A. B. 101,250 mi/162,000 km/-Do items in A. 105,000 mi/168,000 km/7 yrs Dlnspect valve clearance. DReplace coolant. Dlnspect idle speed. DReplace spark plugs. Do items in A, B, C. 108,750 mi/174,000 km/-Do items in A. 112,500 mi/180,000 km/71/z yrs Do items in A, B. 116,250 mi/186,000 km/-Do items in A. 120,000 mi/192,000 km/8 vrs Do items in A, B, C D.
152 Maintenance
C Dlnspect brake hoses and lines (including ABS). DC heck all fluid levels, condition of fluids, and check for leaks. Dlnspect cooling system hoses and connections. D"lnspect exhaust system. D"lnspect fuel lines and connections. DCheck all lights and controls. Dlnspect the underbody.
D Dlnspect drive belt. DReplace transmission fluid. DReplace air conditioning filter. # : See information on maintenance and emissions warranty, last column, page 147. * 1: Refer to page183 for replacement information under special driving conditions.
Page 158 of 273
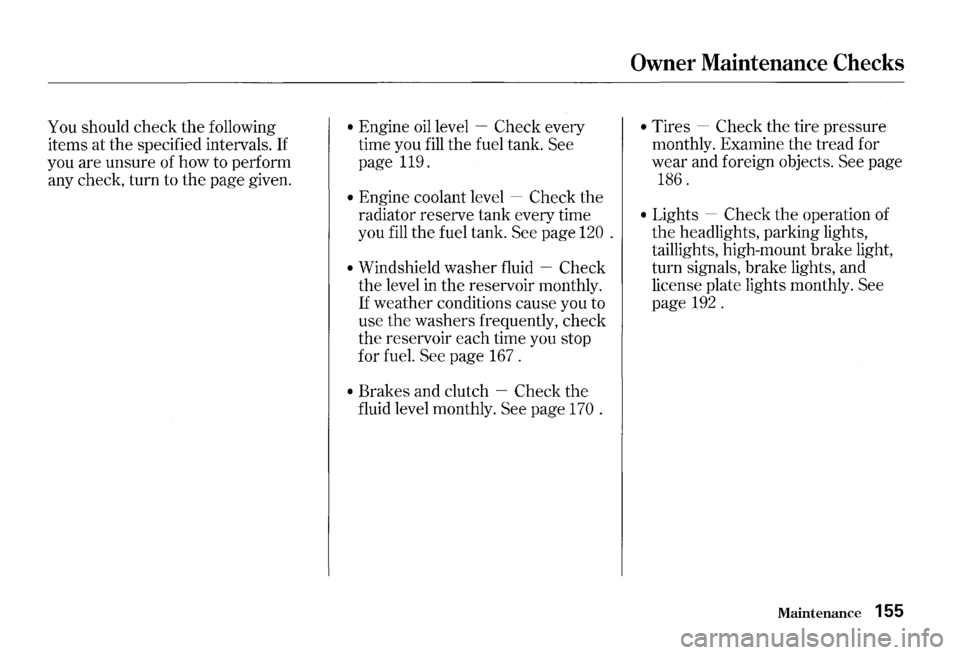
You should check the following
items at the specified intervals.
If
you are unsure of how to perform
any check, turn to the page given.
• Engine oil level -Check every
time you
fill the fuel tank. See
page 119.
• Engine coolant level -Check the
radiator reserve tank every time
you
fill the fuel tank. See page 120 .
• Windshield washer fluid -Check
the level in the reservoir monthly.
If weather conditions cause you to
use the washers frequently, check
the reservoir each time you stop
forfuel. See page 167.
• Brakes and clutch -Check the
fluid level monthly. See page
170 .
Owner Maintenance Checks
• Tires -Check the tire pressure
monthly. Examine the tread for
wear and foreign objects. See page
186.
• Lights -Check the operation of
the headlights, parking lights,
taillights, high-mount brake light,
turn signals, brake lights, and
license plate lights monthly. See
page 192.
Maintenance 155
Page 163 of 273
Engine Oil
5. Put a new washer on the drain bolt,
then reinstall the drain bolt.
Tighten it to:
33 lbf.ft (45 N·m, 4.6 kgf·m)
6. Refill the engine with the recom
mended
oil.
Engine oil change capacity
(including filter):
5.1 US qt (4.8 Q, 4.2 Imp qt)
7. Install the engine oil fill cap. Start
the engine. The oil pressure
indicator light should go out within
five seconds. If it does not, turn off
the engine and reinspect your
work.
8. Let the engine run for several
minutes and check the drain bolt
and
oil filter for leaks.
160 Maintenance
9. Turn off the engine, let it sit for
several minutes, then check the
oil
level. If necessary, add oil to bring
the level to the upper mark on the
dipstick.
NOTICE
Improper disposal of engine oil can be
harmful
to the environment. If you
change your own oil, please dispose
of
the used oil properly. Put it in a sealed
container and take it
to a recycling
center. Do not discard it
in a trash bin
or dump it on the ground.
Page 178 of 273
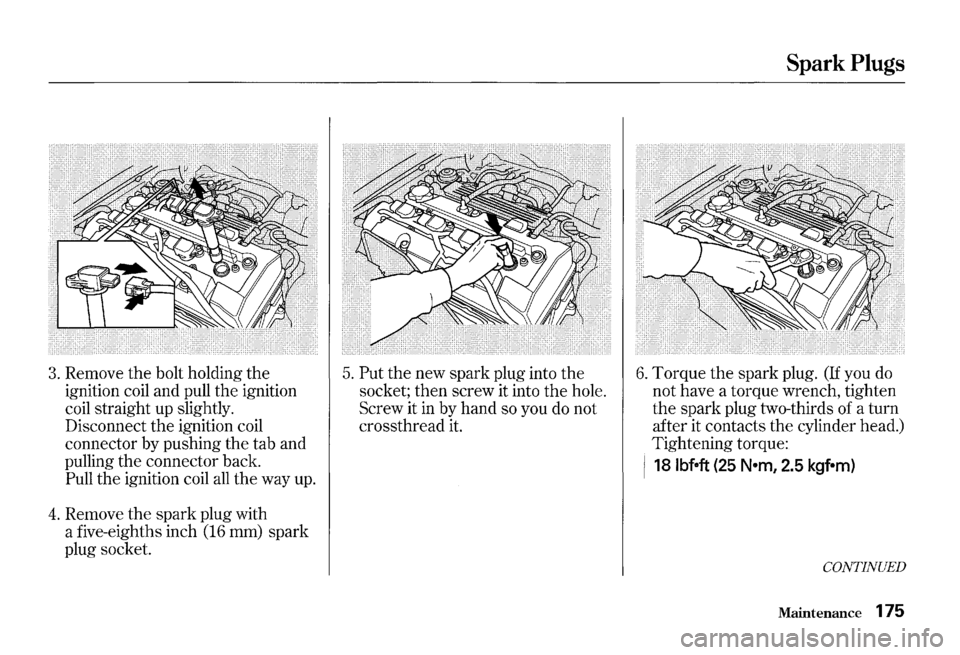
3. Remove the bolt holding the
ignition coil and pull the ignition
coil straight up slightly.
Disconnect
the ignition coil
connector by pushing the tab and
pulling the connector back.
Pull the ignition coil all the way up.
4. Remove the spark plug with
a five-eighths inch (16 mm) spark
plug socket.
5. Put the new spark plug into the
socket; then screw it into the hole.
Screw it
in by hand so you do not
crossthread it.
Spark Plugs
6. Torque the spark plug. (If you do
not have a torque wrench, tighten
the spark plug two-thirds of a turn
after it contacts the cylinder head.)
Tightening torque:
i 18 lbfeft (25 N•m, 2.5 kgf•m)
CONTINUED
Maintenance 175
Page 185 of 273
Air Conditioning System
Your car's air conditioning is a sealed
system. Any major maintenance,
such as recharging, should
be done
by a qualified mechanic. You can do
a couple of things to
make sure the
air conditioning works efficiently.
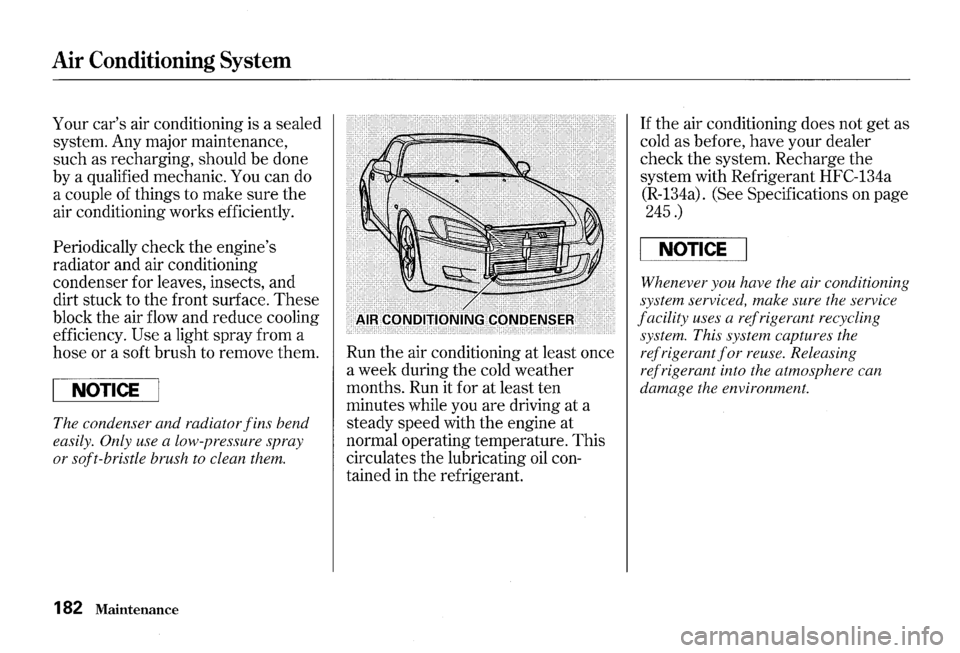
Periodically
check the engine's
radiator and air conditioning
condenser for leaves, insects, and
dirt
stuck to the front surface. These
block the air flow and reduce cooling
efficiency.
Use a light spray from a
hose or a soft
brush to remove them.
NOTICE
The condenser and radiator fins bend
easily. Only use a low-pressure
~pray
or soft-bristle brush to clean them.
182 Maintenance
Run the air conditioning at least once
a
week during the cold weather
months. Run it for at least ten
minutes while you are driving at a
steady speed with
the engine at
normal operating temperature. This
circulates the lubricating oil con
tained in
the refrigerant.
If the air conditioning does not get as
cold
as before, have your dealer
check the system. Recharge the
system with Refrigerant HFC-134a
(R-134a). (See Specifications on page
245.)
NOTICE
Whenever you have the air conditioning
system serviced, make sure the service
facility uses a refrigerant recycling
system. This system captures the
refrigerant
for reuse. Releasing
refrigerant into the atmosphere can
damage the environment.
Page 195 of 273
Lights
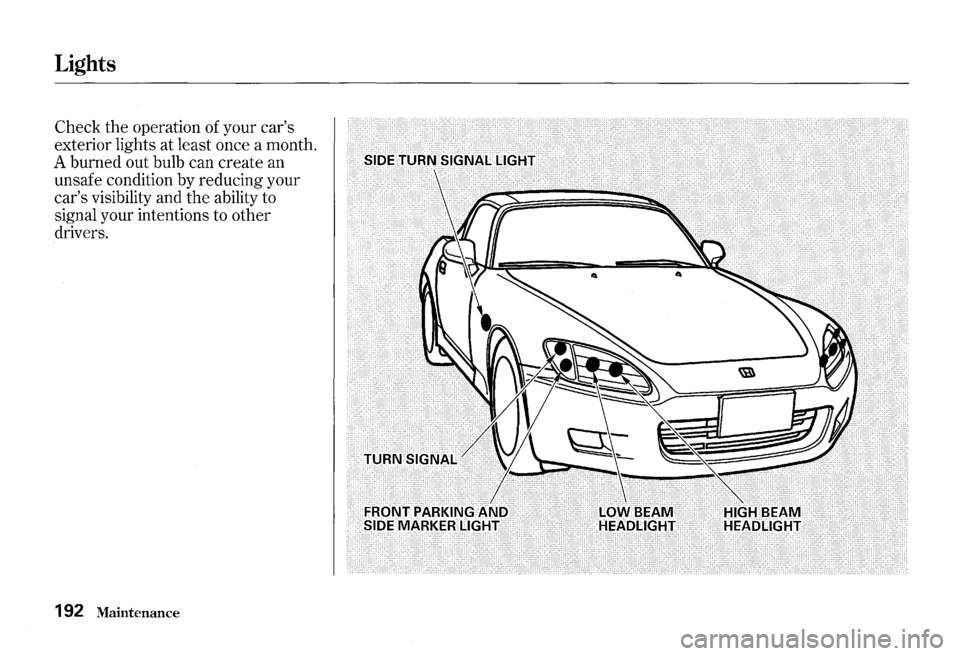
Check the operation of your car's
exterior lights at least once a month.
A burned out bulb can create an
unsafe condition
by reducing your
car's visibility and the ability to
signal your intentions to other
drivers.
192
Maintenance
Page 196 of 273
Lights
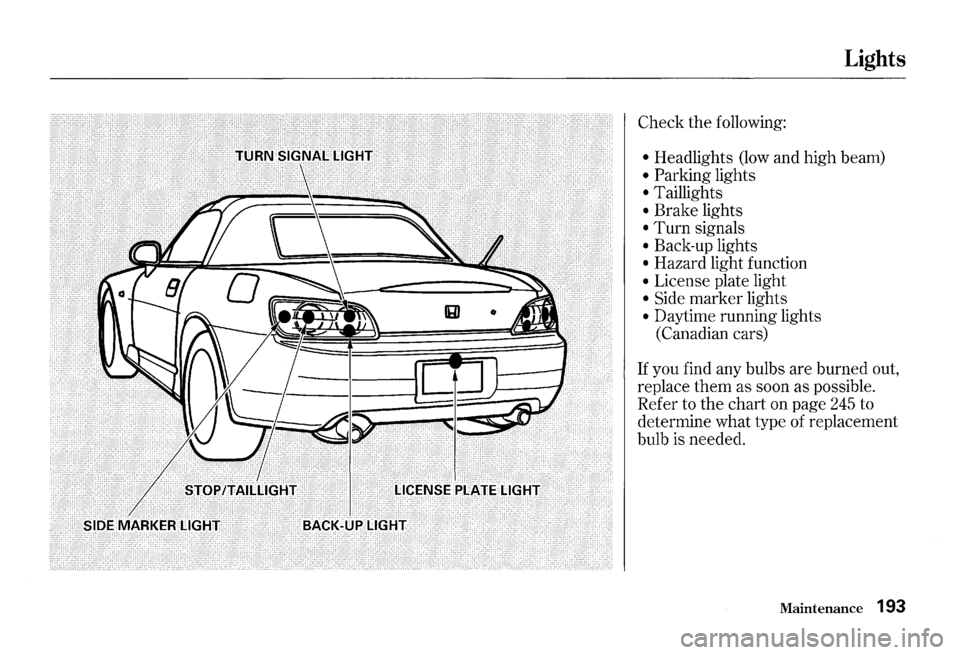
Check the following:
• Headlights (low and high beam)
• Parking lights
• Taillights
• Brake lights
• Turn signals
• Back-up lights
• Hazard light function
• License plate light
• Side marker lights
• Daytime running lights
(Canadian cars)
If you find any bulbs are burned out,
replace
them as soon as possible.
Refer to the chart on page
245 to
determine what type of replacement
bulb is needed.
Maintenance 193
Page 197 of 273
Lights
Replacing a Headlight Bulb
The low beam headlight bulbs are a
type of high voltage discharge tube.
High voltage can remain in
the
circuit even with the light switch off
and the key removed. Because of
this, you should not attempt to
examine or change a low beam
headlight bulb yourself.
If a low
beam headlight bulb fails, take the
car to your dealer to have it replaced.
194 Maintenance
Halogen bulbs are used for the high
beam headlight bulbs.
When
replacing a high beam headlight bulb,
handle it by its base and protect the
glass from contact with your skin or
hard objects.
If you touch the glass,
clean it with denatured alcohol and a
clean cloth.
NOTICE
Halogen headlight bulbs get very hot
when
lit. Oil, perspiration, or a scratch
on the glass can cause the bulb to
overheat and shatter.