light HUMMER H3 2010 Repair Manual
[x] Cancel search | Manufacturer: HUMMER, Model Year: 2010, Model line: H3, Model: HUMMER H3 2010Pages: 410, PDF Size: 2.24 MB
Page 165 of 410

Infotainment System 7-11
Loading and Ejecting CDs
Single CD Radio
To load a CD:
.To Insert a CD with the ignition
on, insert the CD partway into
the slot, label side up, until the
player pulls the CD in. The CD
begins playing automatically.
.To insert a CD with the ignition
off, press the
Z(Eject) button
or the DISP knob first.
The CD symbol displays when a CD
is inserted, and the track number
displays just before the track starts
to play.
Z(Eject): Press to eject a CD.
Eject can be used with either the
ignition or radio off.
Six-Disc CD Radio
To load CDs:
LOAD: Press to load CDs into the
CD player. To insert one CD:
1. Turn the ignition on.
2. Press and release the LOAD
button.
3. Wait for the indicator light to turn green.
4. Insert the CD partway into the slot, label side up, until the
player pulls the CD in. The CD
begins playing automatically.
To insert multiple CDs:
1. Turn the ignition on.
2. Press and hold the LOAD button for two seconds. The radio
beeps once, the indicator light
flashes, and MULTI LOAD #
displays.
3. Load a CD once INSERT CD # displays and the light stops
flashing and turns green. Insert
the CD partway into the slot,
label side up, until the player
pulls the CD in.
4. Repeat step 3 to load the remaining CDs. To load more than one CD but
less than six, complete Steps 1
through 3. When finished loading
CDs, press the LOAD button to
cancel the loading function. The
last CD loaded begins playing
automatically.
Z(Eject):
Press to eject CD(s).
Press and release
Zto eject the
CD that is currently playing.
To eject multiple CDs:
1. Press and hold
Zfor
five seconds. A beep sounds
and the indicator light begins to
flash and EJECT ALL displays.
2. Remove the CD when REMOVE CD # displays and the light
stops flashing.
Once the CD is removed, the
indicator light begins flashing
again and another CD ejects.
To stop ejecting the CDs,
press LOAD or
Z.
Page 182 of 410

8-2 Climate Controls
9(Fan Control): Turn clockwise or
counterclockwise to increase or
decrease the fan speed.
Air Delivery Mode Control: Turn
clockwise or counterclockwise to
change the direction of the airflow in
the vehicle. The airflow can be set
between modes.
To change the current mode, select
one of the following:
H (Vent): Air is directed to the
instrument panel outlets.
\(Bi-Level): Air is directed to the
instrument panel outlets, and the
remaining air to the floor outlets
and the defroster and side window
outlets. Cooler air is directed to the
upper outlets and warmer air to the
floor outlets. [
(Floor): Air is directed to the
floor outlets, side window outlets,
and defroster. Recirculation is not
available in this mode.
/ (Floor/Defog): This clears the
windows of fog and moisture. Air is
directed to the windshield, side
window, and floor outlets. The
system runs the air conditioning
unless the outside temperature is
near freezing or below. Recirculation
is not available in this mode.
0 (Defrost): This clears the
windshield of fog or frost more
quickly. Air is directed to the
windshield and side window
outlets. The system runs the air
conditioning system unless the
outside temperature is near or
below freezing. Recirculation is
not available in this mode.
Do not drive the vehicle until all the
windows are clear. #
(Air Conditioning): Press to
turn the air conditioning system
on or off. An indicator light comes
on when the air conditioning is
turned on. This system cools and
dehumidifies the air entering the
vehicle.
The air conditioning will not
function if the fan is turned off.
If air conditioning is selected with
fan off, the indicator light flashes
three times and then turns off.
A slight change in engine
performance may occur when the
air conditioning compressor shuts
off and turns on again. This is
normal. The system is designed
to make adjustments to help with
fuel economy while still maintaining
the selected temperature.
The air conditioning system
removes moisture from the air, so
water might drip under the vehicle
while idling or after turning off the
engine. This is normal.
Page 183 of 410
Climate Controls 8-3
@(Recirculation):Press to turn
the recirculation mode on or off.
An indicator light comes on when
the recirculation is on. This mode
recirculates and helps to quickly
cool the air inside the vehicle. It can
be used to prevent outside air and
odors from entering the vehicle.
Recirculation is available in the
bi-level and vent modes. This mode
cannot be selected while in the floor,
floor/defog or defrost modes. If you
try to select the recirculation mode,
the indicator flashes three times
indicating it is not available in that
mode. When the recirculation mode
is turned on, the air conditioning
turns on automatically. When it is hot enough outside, the
recirculation mode may turn on
automatically to help improve
cooling performance. The indicator
light will be lit to show this mode is
active. If the recirculation button is
pressed while in this mode, the light
flashes three times and stays on to
indicate that recirculation may not
be shut off.
Rear Window Defogger
The rear window defogger uses
a warming grid to remove fog or
frost from the rear window when the
key is in the ignition and turned to
ON/RUN.
=
(Rear Defogger): Press to turn
the rear window defogger on or off.
After the button is first pressed the
rear window defogger stays on for
about 15 minutes. If turned on
again, the defogger only runs for
about seven and one-half minutes.
Notice: Do not use anything
sharp on the inside of the rear
window. If you do, you could cut
or damage the warming grid, and
the repairs would not be covered
by the vehicle warranty. Do not
attach a temporary vehicle
license, tape, a decal or anything
similar to the defogger grid.
Page 187 of 410
Driving and Operating 9-3
Death and injury associated with
drinking and driving is a global
tragedy.
Alcohol affects four things that
anyone needs to drive a vehicle:
judgment, muscular coordination,
vision, and attentiveness.
Police records show that
almost 40 percent of all motor
vehicle-related deaths involve
alcohol. In most cases, these
deaths are the result of someone
who was drinking and driving.
In recent years, more than
17,000 annual motor vehicle-related
deaths have been associated with
the use of alcohol, with about
250,000 people injured.
For persons under 21, it is against
the law in every U.S. state to drink
alcohol. There are good medical,
psychological, and developmental
reasons for these laws.
The obvious way to eliminate the
leading highway safety problem is
for people never to drink alcohol
and then drive.Medical research shows that
alcohol in a person's system
can make crash injuries worse,
especially injuries to the brain,
spinal cord, or heart. This means
that when anyone who has been
drinking
—driver or passenger —is
in a crash, that person's chance of
being killed or permanently disabled
is higher than if the person had not
been drinking.
Control of a Vehicle
The following three systems
help to control the vehicle while
driving —brakes, steering, and
accelerator. At times, as when
driving on snow or ice, it is easy to
ask more of those control systems
than the tires and road can provide.
Meaning, you can lose control of
the vehicle. See Traction Control
System (TCS)
on page 9‑52and
StabiliTrak System on page 9‑53. Adding non‐dealer/non‐retailer
accessories can affect vehicle
performance. See
Accessories and
Modifications on page 10‑3.
Braking
See Brake System Warning Lighton page 5‑14.
Braking action involves perception
time and reaction time. Deciding to
push the brake pedal is perception
time. Actually doing it is
reaction time.
Average reaction time is about
three‐fourths of a second. But that is
only an average. It might be less
with one driver and as long as
two or three seconds or more with
another. Age, physical condition,
alertness, coordination, and
eyesight all play a part. So do
alcohol, drugs, and frustration. But
even in three‐fourths of a second,
a vehicle moving at 100 km/h
(60 mph) travels 20 m (66 ft).
Page 189 of 410
Driving and Operating 9-5
Steering in Emergencies
There are times when steering can
be more effective than braking. For
example, you come over a hill and
find a truck stopped in your lane,
or a car suddenly pulls out from
nowhere, or a child darts out from
between parked cars and stops right
in front of you. These problems can
be avoided by braking—if you can
stop in time. But sometimes you
cannot stop in time because there
is no room. That is the time for
evasive action —steering around
the problem.
The vehicle can perform very well
in emergencies like these. First
apply the brakes. See Braking
on
page 9‑3. It is better to remove
as much speed as possible from
a collision. Then steer around
the problem, to the left or right
depending on the space available.
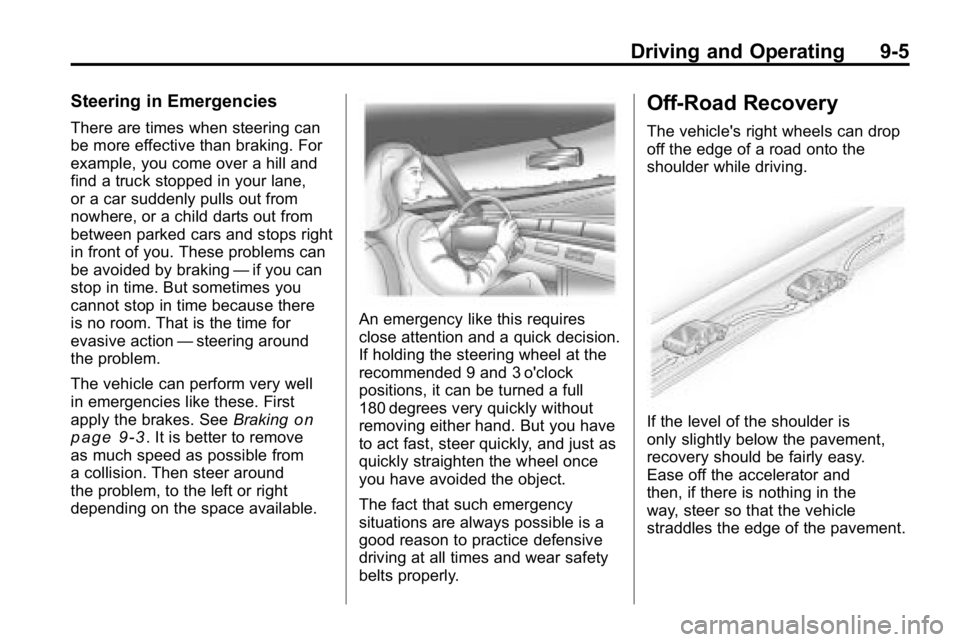
An emergency like this requires
close attention and a quick decision.
If holding the steering wheel at the
recommended 9 and 3 o'clock
positions, it can be turned a full
180 degrees very quickly without
removing either hand. But you have
to act fast, steer quickly, and just as
quickly straighten the wheel once
you have avoided the object.
The fact that such emergency
situations are always possible is a
good reason to practice defensive
driving at all times and wear safety
belts properly.
Off-Road Recovery
The vehicle's right wheels can drop
off the edge of a road onto the
shoulder while driving.
If the level of the shoulder is
only slightly below the pavement,
recovery should be fairly easy.
Ease off the accelerator and
then, if there is nothing in the
way, steer so that the vehicle
straddles the edge of the pavement.
Page 196 of 410
9-12 Driving and Operating
For mounds, washouts, loose
up-hill slopes, ditches, etc.
When wheel spin occurs as the
vehicle is moving, the driver
may notice a slight shaking or
shuddering of the vehicle. This
should be stopped as soon as
possible to prevent damage to
vehicle components. This is the
indication that a loss of traction is
occurring on this terrain. The
operator should:
1. Reduce speed and apply thebrakes.
2. Assess the terrain properly and adjust vehicle speed and gear
ranges accordingly: Four‐Wheel
High position for higher speeds
and Four‐Wheel‐Low Lock for
more torque and lower speeds.
Transmission 1 (First) gear is
generally recommended. 3. Apply slight pressure to the
brake when the shaking or
shuddering sensation is felt,
keeping the vehicle moving in
a controlled manner.
4. Be prepared to alternate between braking and
accelerating through the
adverse terrain.
Getting Familiar with Off-Road
Driving
It is a good idea to practice in an
area that is safe and close to home
before you go into the wilderness.
Off-roading requires some new and
different skills.
Tune your senses to different kinds
of signals. Your eyes need to
constantly sweep the terrain for
unexpected obstacles. Your ears
need to listen for unusual tire or
engine sounds. Use your arms,
hands, feet, and body to respond to
vibrations and vehicle bounce. Controlling the vehicle is the key to
successful off-road driving. One of
the best ways to control the vehicle
is to control the speed. At higher
speeds:
.You approach things faster and
have less time to react.
.There is less time to scan the
terrain for obstacles.
.The vehicle has more bounce
when driving over obstacles.
.More braking distance is
needed, especially on an
unpaved surface.
{WARNING
When you are driving off-road,
bouncing and quick changes in
direction can easily throw you
out of position. This could cause
you to lose control and crash.
So, whether you are driving on
or off the road, you and your
passengers should wear safety
belts.
Page 197 of 410
Driving and Operating 9-13
Scanning the Terrain
Off-road driving can take you over
many different kinds of terrain. Be
familiar with the terrain and its many
different features.
Surface Conditions:Off-roading
surfaces can be hard-packed dirt,
gravel, rocks, grass, sand, mud,
snow, or ice. Each of these surfaces
affects the vehicle's steering,
acceleration, and braking in different
ways. Depending on the surface,
slipping, sliding, wheel spinning,
delayed acceleration, poor traction,
and longer braking distances can
occur. Surface Obstacles:
Unseen or
hidden obstacles can be hazardous.
A rock, log, hole, rut, or bump can
startle you if you are not prepared
for them. Often these obstacles are
hidden by grass, bushes, snow,
or even the rise and fall of the
terrain itself.
Some things to consider:
.Is the path ahead clear?
.Will the surface texture change
abruptly up ahead?
.Does the travel take you uphill or
downhill?
.Will you have to stop suddenly
or change direction quickly?
When driving over obstacles or
rough terrain, keep a firm grip on
the steering wheel. Ruts, troughs,
or other surface features can jerk
the wheel out of your hands. When driving over bumps, rocks,
or other obstacles, the wheels can
leave the ground. If this happens,
even with one or two wheels, you
cannot control the vehicle as well or
at all.
Because you will be on an unpaved
surface, it is especially important to
avoid sudden acceleration, sudden
turns, or sudden braking.
Off-roading requires a different kind
of alertness from driving on paved
roads and highways. There are no
road signs, posted speed limits,
or signal lights. Use good judgment
about what is safe and what is not.
Page 202 of 410
9-18 Driving and Operating
Driving Downhill
When off-roading takes you
downhill, consider:
.How steep is the downhill?
Will I be able to maintain vehicle
control?
.What is the surface like?
Smooth? Rough? Slippery?
Hard-packed dirt? Gravel?
.Are there hidden surface
obstacles? Ruts? Logs?
Boulders?
.What is at the bottom of the hill?
Is there a hidden creek bank or
even a river bottom with large
rocks?
If you decide you can go down
a hill safely, try to keep the vehicle
headed straight down. Use a low
gear so engine drag can help the
brakes so they do not have to do all
the work. Descend slowly, keeping
the vehicle under control at all
times.
{WARNING
Heavy braking when going down
a hill can cause your brakes to
overheat and fade. This could
cause loss of control and a
serious accident. Apply the
brakes lightly when descending a
hill and use a low gear to keep
vehicle speed under control.
Things not to do when driving down
a hill:
.When driving downhill, avoid
turns that take you across the
incline of the hill. A hill that is not
too steep to drive down might be
too steep to drive across. The
vehicle could roll over.
.Never go downhill with the
transmission in N (Neutral),
called free-wheeling. The brakes
will have to do all the work and
could overheat and fade. Vehicles are much more likely to
stall when going uphill, but if it
happens when going downhill:
1. Stop the vehicle by applying the
regular brakes and apply the
parking brake.
2. With an automatic transmission, shift to P (Park). While still
braking, restart the engine.
3. Shift back to a low gear, release the parking brake, and drive
straight down.
4. If the engine will not start, get out and get help.
Page 206 of 410
9-22 Driving and Operating
Driving on Wet Roads
Rain and wet roads can reduce
vehicle traction and affect your
ability to stop and accelerate.
Always drive slower in these types
of driving conditions and avoid
driving through large puddles and
deep‐standing or flowing water.
{WARNING
Wet brakes can cause crashes.
They might not work as well in
a quick stop and could cause
pulling to one side. You could
lose control of the vehicle.
After driving through a large
puddle of water or a car/vehicle
wash, lightly apply the brake
pedal until the brakes work
normally.(Continued)
WARNING (Continued)
Flowing or rushing water creates
strong forces. Driving through
flowing water could cause your
vehicle to be carried away. If this
happens, you and other vehicle
occupants could drown. Do not
ignore police warnings and be
very cautious about trying to drive
through flowing water.
Hydroplaning
Hydroplaning is dangerous. Water
can build up under your vehicle's
tires so they actually ride on the
water. This can happen if the road
is wet enough and you are going
fast enough. When your vehicle is
hydroplaning, it has little or no
contact with the road.
There is no hard and fast rule about
hydroplaning. The best advice is to
slow down when the road is wet.
Other Rainy Weather Tips
Besides slowing down, other wet
weather driving tips include:
.Allow extra following distance.
.Pass with caution.
.Keep windshield wiping
equipment in good shape.
.Keep the windshield washer fluid
reservoir filled.
.Have good tires with proper
tread depth. SeeTireson
page 10‑44.
.Turn off cruise control.
Highway Hypnosis
Always be alert and pay attention
to your surroundings while driving.
If you become tired or sleepy, find a
safe place to park your vehicle
and rest.
Page 209 of 410

Driving and Operating 9-25
WARNING (Continued)
If the vehicle is stuck in the snow:
.Clear away snow from around
the base of your vehicle,
especially any that is blocking
the exhaust pipe.
.Check again from time to
time to be sure snow does
not collect there.
.Open a window about 5 cm
(two inches) on the side of
the vehicle that is away from
the wind to bring in fresh air.
.Fully open the air outlets on
or under the instrument
panel.
.Adjust the Climate Control
system to a setting that
circulates the air inside the
vehicle and set the fan speed
to the highest setting. See
Climate Control System in the
Index.(Continued)
WARNING (Continued)
For more information about
carbon monoxide, see Engine
Exhaust on page 9‑40.
Snow can trap exhaust gases
under your vehicle. This can
cause deadly CO (carbon
monoxide) gas to get inside.
CO could overcome you and kill
you. You cannot see it or smell it,
so you might not know it is in your
vehicle. Clear away snow from
around the base of your vehicle,
especially any that is blocking the
exhaust.
Run the engine for short periods
only as needed to keep warm, but
be careful. To save fuel, run the engine for only
short periods as needed to warm
the vehicle and then shut the engine
off and close the window most of
the way to save heat. Repeat this
until help arrives but only when you
feel really uncomfortable from the
cold. Moving about to keep warm
also helps.
If it takes some time for help to
arrive, now and then when you run
the engine, push the accelerator
pedal slightly so the engine runs
faster than the idle speed. This
keeps the battery charged to restart
the vehicle and to signal for help
with the headlamps. Do this as little
as possible to save fuel.