light HUMMER H3 2010 Manual PDF
[x] Cancel search | Manufacturer: HUMMER, Model Year: 2010, Model line: H3, Model: HUMMER H3 2010Pages: 410, PDF Size: 2.24 MB
Page 210 of 410
9-26 Driving and Operating
If the Vehicle is Stuck
Slowly and cautiously spin the
wheels to free the vehicle when
stuck in sand, mud, ice, or snow.
If stuck too severely for the traction
system to free the vehicle, turn the
traction system off and use the
rocking method.
{WARNING
If the vehicle's tires spin at high
speed, they can explode, and you
or others could be injured. The
vehicle can overheat, causing an
engine compartment fire or other
damage. Spin the wheels as little
as possible and avoid going
above 55 km/h (35 mph) as
shown on the speedometer.
For information about using tire
chains on the vehicle, see Tire
Chains on page 10‑64.
Rocking the Vehicle to Get
it Out
Turn the steering wheel left and
right to clear the area around the
front wheels. Turn off any traction
system. Shift back and forth
between R (Reverse) and a forward
gear, or with a manual transmission,
between 1 (First) or 2 (Second) and
R (Reverse), spinning the wheels
as little as possible. To prevent
transmission wear, wait until the
wheels stop spinning before shifting
gears. Release the accelerator
pedal while shifting, and press
lightly on the accelerator pedal
when the transmission is in gear.
Slowly spinning the wheels in the
forward and reverse directions
causes a rocking motion that could
free the vehicle. If that does not get
the vehicle out after a few tries, it
might need to be towed out. The
recovery loops can be used. If the
vehicle does need to be towed out,
see Towing the Vehicle
on
page 10‑90. Recovery Loops
{WARNING
These loops, when used, are
under a lot of force. Keep people
away from the vicinity of the loops
and any chains or cables during
use. Always pull the vehicle
straight out. Never pull on the
loops at a sideways angle. The
loops could break off and you or
others could be injured from the
chain or cable snapping back.
Notice: Never use the recovery
loops to tow the vehicle. The
vehicle could be damaged and
it would not be covered by the
vehicle warranty.
Page 218 of 410
9-34 Driving and Operating
Ignition Positions
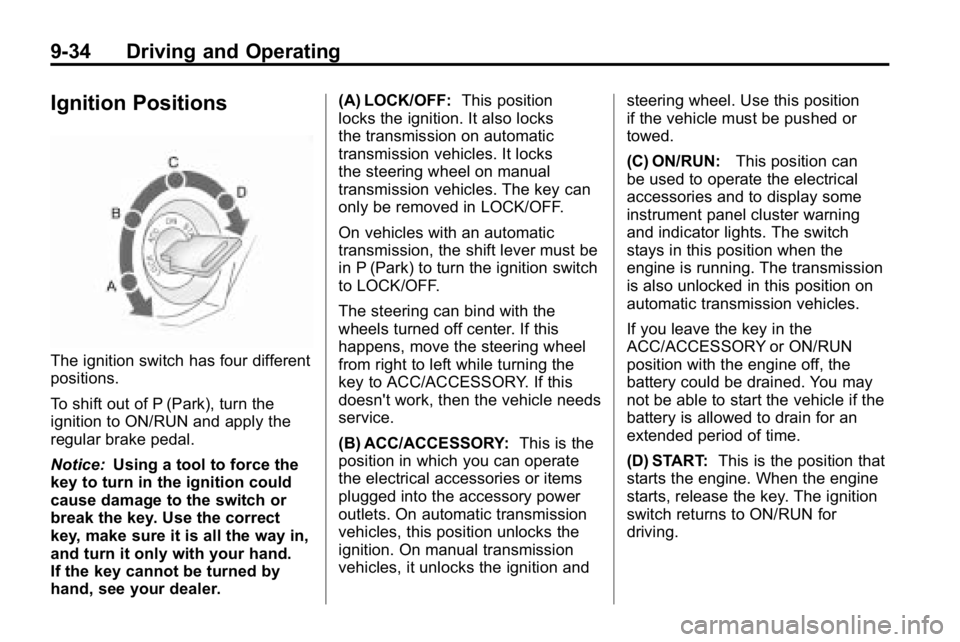
The ignition switch has four different
positions.
To shift out of P (Park), turn the
ignition to ON/RUN and apply the
regular brake pedal.
Notice:Using a tool to force the
key to turn in the ignition could
cause damage to the switch or
break the key. Use the correct
key, make sure it is all the way in,
and turn it only with your hand.
If the key cannot be turned by
hand, see your dealer. (A) LOCK/OFF:
This position
locks the ignition. It also locks
the transmission on automatic
transmission vehicles. It locks
the steering wheel on manual
transmission vehicles. The key can
only be removed in LOCK/OFF.
On vehicles with an automatic
transmission, the shift lever must be
in P (Park) to turn the ignition switch
to LOCK/OFF.
The steering can bind with the
wheels turned off center. If this
happens, move the steering wheel
from right to left while turning the
key to ACC/ACCESSORY. If this
doesn't work, then the vehicle needs
service.
(B) ACC/ACCESSORY: This is the
position in which you can operate
the electrical accessories or items
plugged into the accessory power
outlets. On automatic transmission
vehicles, this position unlocks the
ignition. On manual transmission
vehicles, it unlocks the ignition and steering wheel. Use this position
if the vehicle must be pushed or
towed.
(C) ON/RUN:
This position can
be used to operate the electrical
accessories and to display some
instrument panel cluster warning
and indicator lights. The switch
stays in this position when the
engine is running. The transmission
is also unlocked in this position on
automatic transmission vehicles.
If you leave the key in the
ACC/ACCESSORY or ON/RUN
position with the engine off, the
battery could be drained. You may
not be able to start the vehicle if the
battery is allowed to drain for an
extended period of time.
(D) START: This is the position that
starts the engine. When the engine
starts, release the key. The ignition
switch returns to ON/RUN for
driving.
Page 229 of 410
Driving and Operating 9-45
You can shift into 1 (First) when
you are going less than 30 km/h
(20 mph). If you have come to a
complete stop and it is hard to shift
into 1 (First), put the shift lever in
Neutral and let up on the clutch.
Then press the clutch pedal back
down and shift into 1 (First).
2 (Second):Press the clutch pedal
as you let up on the accelerator
pedal and shift into 2 (Second).
Then, slowly let up on the clutch
pedal as you press the accelerator
pedal.
3 (Third), 4 (Fourth) and 5 (Fifth):
Shift into 3 (Third), 4 (Fourth) and
5 (Fifth) the same way you do for
2 (Second). Slowly let up on the
clutch pedal as you press the
accelerator pedal.
To stop, let up on the accelerator
pedal and press the brake pedal.
Just before the vehicle stops, press
the clutch pedal and the brake
pedal, and shift to Neutral.
Neutral: Use this position when
you start or idle the engine. R (Reverse):
To back up, stop the
vehicle. Press the clutch pedal and
shift into R (Reverse). Slowly let up
on the clutch pedal as you press
the accelerator pedal. If it is hard
to shift, let the shift lever return to
Neutral and release the clutch
pedal. Then press the clutch again
and shift into R (Reverse). Do not
attempt to shift into the fifth gear
position prior to shifting into
R (Reverse). The transmission has
a lock out feature which prevents a
5 (Fifth) gear to R (Reverse) gear
shift.
Notice: Shifting to R (Reverse)
while the vehicle is moving
forward could damage the
transmission. The repairs would
not be covered by the vehicle
warranty. Shift to R (Reverse) only
after the vehicle is stopped.
Use R (Reverse), along with the
parking brake, for parking the
vehicle.Up-Shift Light
This light will show you when to shift
to the next higher gear for best fuel
economy.
When this light comes on, you
can shift to the next higher gear if
weather, road and traffic conditions
permit. For the best fuel economy,
accelerate slowly and shift when the
light comes on.
While you accelerate, it is normal
for the light to go on and off if you
quickly change the position of the
accelerator. Ignore the shift light
when you downshift.
Disregard the shift light when the
transfer case is in four-wheel low.
For more information, see Up-Shift
Light on page 5‑15.
Page 230 of 410

9-46 Driving and Operating
Shift Speeds
{WARNING
If you skip a gear when you
downshift, you could lose control
of the vehicle. You could injure
yourself or others. Do not shift
down more than one gear at a
time when you downshift.
Hill Start Assist
H3 and H3T vehicles have a Hill
Start Assist feature, which may be
useful when stopped on a grade.
SeeBraking
on page 9‑3for more
information.
Drive Systems
Four-Wheel Drive
Full-Time Four-Wheel Drive sends
engine power to all four wheels for
extra traction. To get the most out of
Full-Time Four-Wheel Drive, you
must be familiar with its operation.
Transfer Case Buttons
The transfer case buttons are
located to the right of the instrument
panel cluster. Use these switches
to shift into and out of the different
Full-Time Four-Wheel Drive modes. 4
m(Four-Wheel High):
This
setting is used for driving in most
street and highway situations. You
can also use this setting for light or
variable off-road conditions.
N (Neutral): Shift the transfer case
to Neutral only when towing the
vehicle. See Driving Characteristics
and Towing Tips
on page 9‑70for
more information.
Notice: Driving on pavement
in Four-Wheel High Lock or
Four Wheel Low Lock for
extended periods may cause
premature wear on the vehicle
powertrain and tires. Do not
drive in Four-Wheel High Lock
or Four-Wheel Low Lock on
pavement for extended periods.
4
m Q(Four-Wheel-High Lock):
Use this setting when you need
extra traction in most off-road
situations such as sand, mud,
snow or level, rocky trails.
Page 231 of 410
Driving and Operating 9-47
Notice:Operating the vehicle
in Four-Wheel-Low Lock above
48 km/h (30 mph) for any
extended period of time could
cause damage to the transfer
case. Do not operate the vehicle
in Four-Wheel-Low Lock above
48 km/h (30 mph) for extended
periods.
4
n Q(Four-Wheel-Low Lock):
This setting delivers extra torque
to all four wheels and is used for
extreme off-road conditions.
If the vehicle has locking axles,
they can be locked for additional
traction in extreme off-road
situations. See Locking Rear Axle
on page 9‑54andLocking Front
Axle on page 9‑55.
Indicator lights in the buttons show
which setting the transfer case is
in. The indicator lights will come
on briefly when the ignition is in
ON/RUN. The If the lights do not
come on, take the vehicle to your
dealer for service. An indicator light will flash while shifting the transfer
case. If the transfer case cannot
make a requested shift, it will return
to the last chosen setting.
If the SERV 4WD message on the
Driver Information Center (DIC)
stays on, take the vehicle to your
dealer for service. See Service 4WD
message under
Driver Information
Center (DIC) on page 5‑18.
Shifting between Four-Wheel High
and Four-Wheel-High Lock
With the vehicle traveling less than
120 km/h (75 mph), press and
release the Four-Wheel High or
Four-Wheel-High Lock button.
It may be necessary to drive
backwards while turning for a
distance of 7.5 m (25 feet) to get
the lock feature to disengage.
Shifting into Four-Wheel Low Lock
Notice: Shifting the transmission
into gear before the indicator
light stops flashing could cause
damage to the transfer case. Always wait until the indicator
light stops flashing before putting
the transmission back in gear.
To shift into Four-Wheel-Low Lock,
the ignition must be in ON/RUN and
the vehicle must be stopped or
moving less than 5 km/h (3 mph)
with the transmission in N (Neutral).
The preferred method for shifting
into Four-Wheel Low is to have
the vehicle moving 1.6 to 3.2 km/h
(1 to 2 mph). Press and release
the Four-Wheel-Low Lock button.
If the vehicle has a manual
transmission, the clutch pedal must
be pressed to the floor while you
press the Four-Wheel-Low Lock
button, or the shift will not be
completed. You must wait for the
Four-Wheel-Low Lock indicator light
to stop flashing and remain lit before
shifting the transmission into gear.
It is normal for the vehicle to have
engagement noise and bump when
shifting between Four-Wheel Low
and Four-Wheel High ranges or
from Neutral.
Page 232 of 410
9-48 Driving and Operating
If the Four-Wheel-Low Lock button
is pressed when the vehicle is in
gear and/or moving too fast, the
Four-Wheel-Low Lock indicator light
will flash for 15 seconds and not
complete the shift.
Shifting Out of
Four-Wheel-Low Lock
Notice:Shifting the transmission
into gear before the indicator
light stops flashing could cause
damage to the transfer case.
Always wait until the indicator
light stops flashing before putting
the transmission back in gear.
To shift out of Four-Wheel-Low
Lock, the vehicle must be stopped
or moving less than 5 km/h (3 mph)
with the transmission in N (Neutral)
and the ignition in ON/RUN. The
preferred method for shifting out of
Four-Wheel-Low Lock is to have
the vehicle moving 1.6 to 3.2 km/h
(1 to 2 mph). Press and release
the Four-Wheel High or
Four-Wheel-High Lock button. If the vehicle has a manual
transmission, the clutch pedal
must be pressed to the floor while
you press the Four-Wheel High
or Four-Wheel-High Lock button,
or the shift will not be completed.
You must wait for the Four-Wheel
High or Four-Wheel-High Lock
indicator light to stop flashing
and remain lit before shifting the
transmission into gear.
It is normal for the vehicle to have
engagement noise and bump when
shifting between Four-Wheel Low
and Four-Wheel High ranges or
from Neutral.
If the Four-Wheel High or
Four-Wheel-High Lock button is
pressed when the vehicle is in
gear and/or moving too fast,
the Four-Wheel High or
Four-Wheel-High Lock indicator
light will flash for 15 seconds
but will not complete the shift.
Shifting Into Neutral
To shift the transfer case to Neutral:
1. Set the parking brake.
2. Start the vehicle.
3. Put the transmission in
N (Neutral). If the vehicle has a
manual transmission, press and
hold the clutch pedal down while
you perform Steps 5 through 9.
4. Shift the transfer case to Four-Wheel High.
{WARNING
Shifting an all-wheel-drive
vehicle's transfer case into
Neutral can cause the vehicle
to roll even if the automatic
transmission is in P (Park) or the
manual transmission is in any
gear. You or others could be
injured. Make sure the parking
brake is firmly set before you shift
the transfer case to Neutral.
Page 233 of 410

Driving and Operating 9-49
5. Simultaneously press andhold the Four-Wheel High and
Four-Wheel-Low Lock buttons
for 10 seconds. The Neutral light
will come on when the transfer
case shift to Neutral is complete.
6. Press and hold the regular brake pedal and shift the transmission
to R (Reverse), then shift the
transmission to D (Drive) for
an automatic transmission,
or 1 (First) for vehicles have a
manual transmission and then
let out the clutch. This is to
ensure the transfer case is in
Neutral. If not, repeat this
procedure starting at Step 3.
7. Turn the engine off. 8. Place the transmission shift
lever in P (Park) for an automatic
transmission, or 1 (First) for
vehicles that have a manual
transmission.
9. Turn the ignition to LOCK/OFF.
Shifting Out of Neutral
To shift out of Neutral:
1. Set the parking brake and apply the regular brake pedal.
2. Shift the transmission to N (Neutral) for an automatic
transmission, or press the clutch
pedal for vehicles that have a
manual transmission. Then turn
the ignition to ON/RUN but do
not start the engine. 3. Press the button for the
desired transfer case shift
position (Four-Wheel High,
Four-Wheel-High Lock or
Four-Wheel-Low Lock).
After the transfer case has
shifted out of Neutral the light
will go out.
4. Release the parking brake.
Notice: Shifting the transmission
into gear before the indicator
light stops flashing could cause
damage to the transfer case.
Always wait until the indicator
light stops flashing before putting
the transmission back in gear.
5. You may start the engine and shift the transmission to the
desired position.
Page 234 of 410

9-50 Driving and Operating
Brakes
Antilock Brake
System (ABS)
This vehicle has the Antilock Brake
System (ABS), an advanced
electronic braking system that helps
prevent a braking skid.
When the engine is started and the
vehicle begins to drive away, ABS
checks itself. A momentary motor or
clicking noise might be heard while
this test is going on, and it might
even be noticed that the brake
pedal moves a little. This is normal.
If there is a problem with ABS, this
warning light stays on. SeeAntilock
Brake System (ABS) Warning Light
on page 5‑15. If driving safely on a wet road and
it becomes necessary to slam on
the brakes and continue braking
to avoid a sudden obstacle, a
computer senses that the wheels
are slowing down. If one of the
wheels is about to stop rolling, the
computer will separately work the
brakes at each wheel.
ABS can change the brake pressure
to each wheel, as required, faster
than any driver could. This can help
the driver steer around the obstacle
while braking hard.
As the brakes are applied, the
computer keeps receiving updates
on wheel speed and controls
braking pressure accordingly.
Remember: ABS does not change
the time needed to get a foot up to
the brake pedal or always decrease
stopping distance. If you get too
close to the vehicle in front of you,
there will not be enough time to
apply the brakes if that vehicle
suddenly slows or stops. Always
leave enough room up ahead to
stop, even with ABS.
Using ABS
Do not pump the brakes. Just hold
the brake pedal down firmly and let
ABS work. The ABS pump or motor
might be heard operating, and the
brake pedal might be felt to pulsate,
but this is normal.
Braking in Emergencies
ABS allows the driver to steer and
brake at the same time. In many
emergencies, steering can help
more than even the very best
braking.
Page 235 of 410
Driving and Operating 9-51
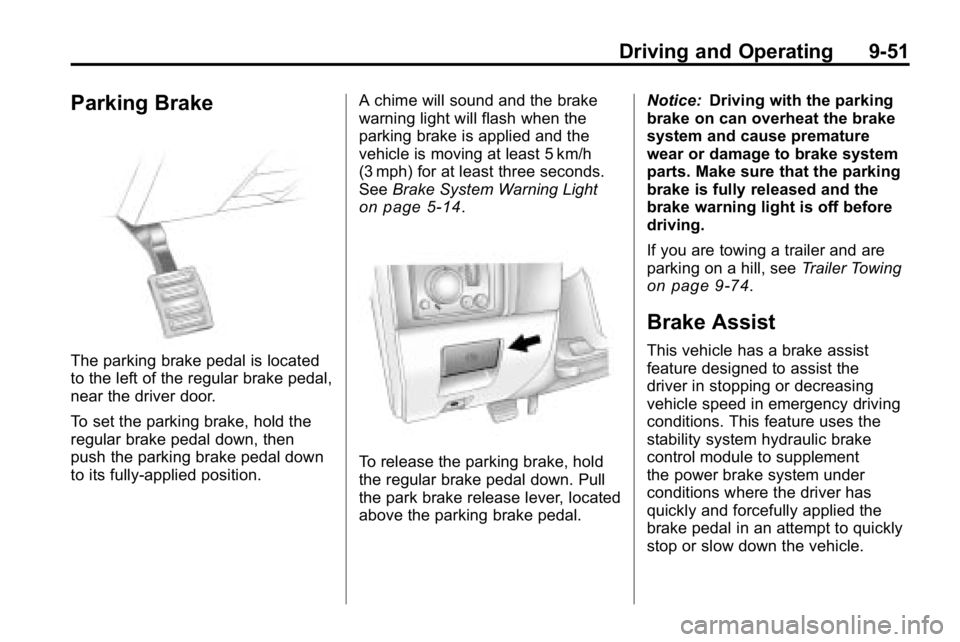
Parking Brake
The parking brake pedal is located
to the left of the regular brake pedal,
near the driver door.
To set the parking brake, hold the
regular brake pedal down, then
push the parking brake pedal down
to its fully-applied position.A chime will sound and the brake
warning light will flash when the
parking brake is applied and the
vehicle is moving at least 5 km/h
(3 mph) for at least three seconds.
See
Brake System Warning Light
on page 5‑14.
To release the parking brake, hold
the regular brake pedal down. Pull
the park brake release lever, located
above the parking brake pedal. Notice:
Driving with the parking
brake on can overheat the brake
system and cause premature
wear or damage to brake system
parts. Make sure that the parking
brake is fully released and the
brake warning light is off before
driving.
If you are towing a trailer and are
parking on a hill, see Trailer Towing
on page 9‑74.
Brake Assist
This vehicle has a brake assist
feature designed to assist the
driver in stopping or decreasing
vehicle speed in emergency driving
conditions. This feature uses the
stability system hydraulic brake
control module to supplement
the power brake system under
conditions where the driver has
quickly and forcefully applied the
brake pedal in an attempt to quickly
stop or slow down the vehicle.
Page 237 of 410
Driving and Operating 9-53
Examples of these conditions
include hard acceleration in a turn,
an abrupt upshift or downshift of the
transmission or driving on rough
roads.
If cruise control is being used when
TCS begins to limit wheel spin,
the cruise control automatically
disengages. The cruise control
can be re-engaged when road
conditions allow. SeeCruise Control
on page 9‑57for more information.
TRACTION FAILED appears on the
Driver information Center (DIC)
when a TCS or antilock brake
system problem has been detected
and the vehicle needs service.
When this message is on, the
system will not limit wheel spin.
Adjust your driving accordingly.
See Driver Information Center (DIC)
on page 5‑18for more information.
It is recommended to leave the
system on for normal driving
conditions, but it may be necessary
to turn the system off if the vehicle
is stuck in sand, mud, ice, or snow, and it is necessary to
“rock”the
vehicle to attempt to free it. See If
the Vehicle is Stuck
on page 9‑26for more information.
To turn the system off, press and
release the TCS/StabiliTrak button.
When TCS has been turned off, this
light comes on steady and TRAC
OFF appears on the DIC. This light
flashes when TCS is active.
Press and release the
TCS/StabiliTrak button again to
turn the system back on. The TRAC
OFF message then goes off. TCS automatically comes on
whenever the vehicle is started and
resets itself at each ignition cycle.
Adding non‐dealer/non‐retailer
accessories can affect the vehicle's
performance. See
Accessories and
Modifications on page 10‑3.
StabiliTrak System
The vehicle has a vehicle stability
enhancement system called
StabiliTrak. It is an advanced
computer controlled system that
assists the driver with directional
control of the vehicle in difficult
driving conditions.
StabiliTrak activates when the
computer senses a difference
between the intended path and the
direction the vehicle is actually
traveling. StabiliTrak selectively
applies braking pressure at any
one of the vehicle's brakes to assist
the driver with keeping the vehicle
on the intended path.