clock Hyundai Accent 2006 Owner's Guide
[x] Cancel search | Manufacturer: HYUNDAI, Model Year: 2006, Model line: Accent, Model: Hyundai Accent 2006Pages: 599, PDF Size: 17.59 MB
Page 261 of 599
6
DO-IT-YOURSELF MAINTENANCE
43
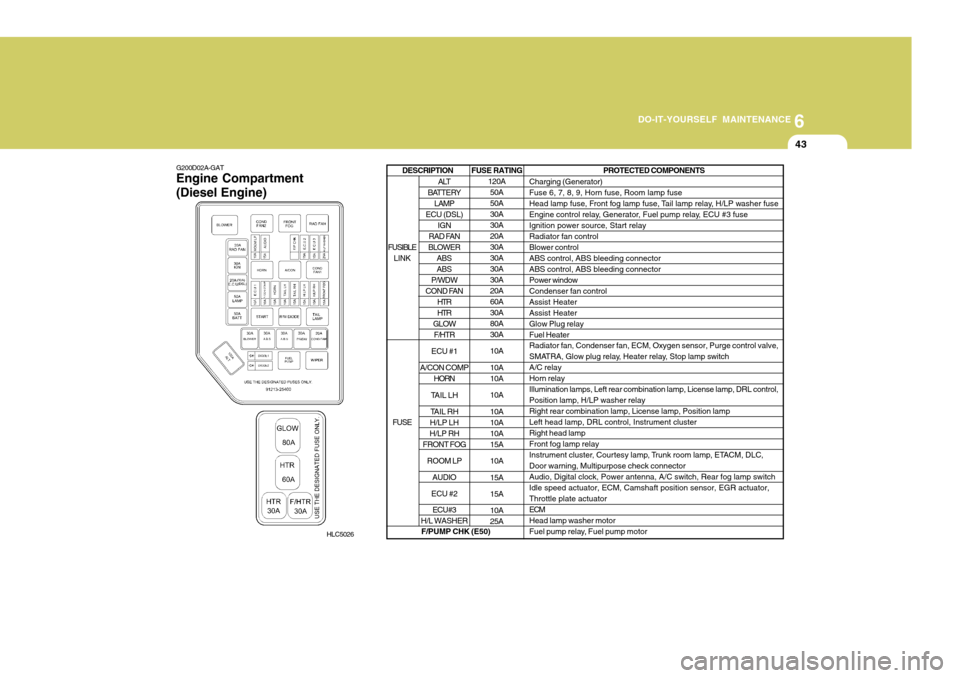
HLC5026 FUSE RATING
120A50A 50A30A30A20A30A30A30A30A20A60A30A80A30A 10A 10A 10A 10A10A 10A10A15A 10A15A 15A 10A 25A PROTECTED COMPONENTS
Charging (Generator)Fuse 6, 7, 8, 9, Horn fuse, Room lamp fuse
Head lamp fuse, Front fog lamp fuse, Tail lamp relay, H/LP washer fuse
Engine control relay, Generator, Fuel pump relay, ECU #3 fuseIgnition power source, Start relayRadiator fan controlBlower controlABS control, ABS bleeding connectorABS control, ABS bleeding connectorPower windowCondenser fan controlAssist HeaterAssist HeaterGlow Plug relayFuel Heater Radiator fan, Condenser fan, ECM, Oxygen sensor, Purge control valve,
SMATRA, Glow plug relay, Heater relay, Stop lamp switchA/C relayHorn relayIllumination lamps, Left rear combination lamp, License lamp, DRL control,Position lamp, H/LP washer relayRight rear combination lamp, License lamp, Position lampLeft head lamp, DRL control, Instrument clusterRight head lampFront fog lamp relay
Instrument cluster, Courtesy lamp, Trunk room lamp, ETACM, DLC,Door warning, Multipurpose check connectorAudio, Digital clock, Power antenna, A/C switch, Rear fog lamp switchIdle speed actuator, ECM, Camshaft position sensor, EGR actuator,Throttle plate actuatorECMHead lamp washer motor
Fuel pump relay, Fuel pump motor
ALT
BATTERY LAMP
ECU (DSL) IGN
RAD FAN
BLOWER
ABS ABS
P/WDW
COND FAN
HTRHTR
GLOW F/HTR
ECU #1
A/CON COMP HORN
TAIL LH
TAIL RH
H/LP LH
H/LP RH
FRONT FOG
ROOM LP AUDIO
ECU #2 ECU#3
H/L WASHER
FUSIBLE
LINK
FUSEDESCRIPTION
F/PUMP CHK (E50)G200D02A-GAT Engine Compartment (Diesel Engine)
Page 262 of 599
6 DO-IT-YOURSELF MAINTENANCE
44
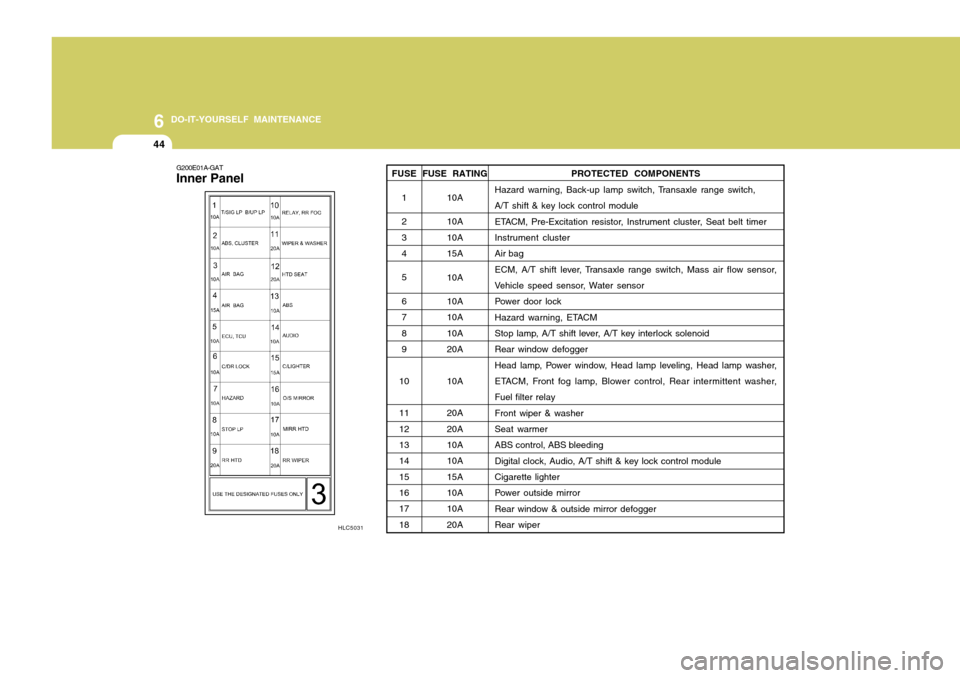
G200E01A-GAT Inner Panel
HLC5031 PROTECTED COMPONENTS
Hazard warning, Back-up lamp switch, Transaxle range switch, A/T shift & key lock control module
ETACM, Pre-Excitation resistor, Instrument cluster, Seat belt timer Instrument cluster Air bag
ECM, A/T shift lever, Transaxle range switch, Mass air flow sensor,
Vehicle speed sensor, Water sensor
Power door lock
Hazard warning, ETACM
Stop lamp, A/T shift lever, A/T key interlock solenoid Rear window defogger
Head lamp, Power window, Head lamp leveling, Head lamp washer,
ETACM, Front fog lamp, Blower control, Rear intermittent washer, Fuel filter relayFront wiper & washer Seat warmer ABS control, ABS bleedingDigital clock, Audio, A/T shift & key lock control module Cigarette lighter
Power outside mirrorRear window & outside mirror defogger Rear wiper
FUSE RATING
10A 10A 10A15A 10A10A 10A 10A20A 10A20A 20A10A 10A 15A10A 10A 20A
FUSE
1 2 3 4 56 78 9
10 11 12 13 1415 16 1718
Page 278 of 599
10INDEX
2
A Airbag ........................................................................ 1-35
Dual-stage A irbag.................................................. 1-41
Side Impact Airbag ................................................ 1-45
Air Cleaner Filter ....................................................... 6-17
Air Conditioning Care ....................................................................... 6-24
Filter ............................................................. 1-92, 6-25 Operation ............................................................... 1-91
Switch ..................................................................... 1-91
Antenna ................................................................... 1-113
Ashtray ...................................................................... 1-68
Audio Fault Code .................................................... 1-110
B
Battery ............................................................. 2-19, 6-30 Brake Anti-lock system ..................................................... 2-16
Checking the brakes .............................................. 6-22
Fluid ....................................................................... 6-22
Pedal clearance ..................................................... 6-27
Pedal freepl ay ........................................................ 6-27
Practices ................................................................ 2-14
Breaking-In your New Hyundai ................................... 1-3
Bulbs Repl acement ................................................... 6-35
Bulbs Wat tage ........................................................... 6-41C
Care of Cassette Tapes ....................
..................... 1-111
Care of Disc ............................................................ 1-111
Cargo Area Cover ..................................................... 1-81
Cassette Tape Player O peration (H225)................1-102
Catalytic Converter ..................................................... 7-3
Child-Protector Rear Door Lock ................................. 1-8
Child Restraint System............................................. 1-26
Cigarette Lighter ....................................................... 1-68
Clock ......................................................................... 1-67
Clutch
Checking the cluch fluid ............... .......................... 6-23
Pedal freepl ay ........................................................ 6-26
Combination Light Daytime running light ............................................. 1-62
Headlight flasher .................................................... 1-62
Headlight swi tch ..................................................... 1-62
High-beam swi tch .................................................. 1-62
Lane change si gnal ................................................ 1-61
Turn signal oper ation............................................. 1-61
Compact Disc Player Operation (H 265) .................1-107
Cooling Fans ............................................................. 6-31
Corrosion protection
Cleaning the interior ................................................. 4-6
Protecting your Hyundai from corrosion .................. 4-2
Washing and waxing ................................................ 4-4
Page 294 of 599
1FEATURES OF YOUR HYUNDAI
12
!
WINDOW GLASS
B050A01A-AAT
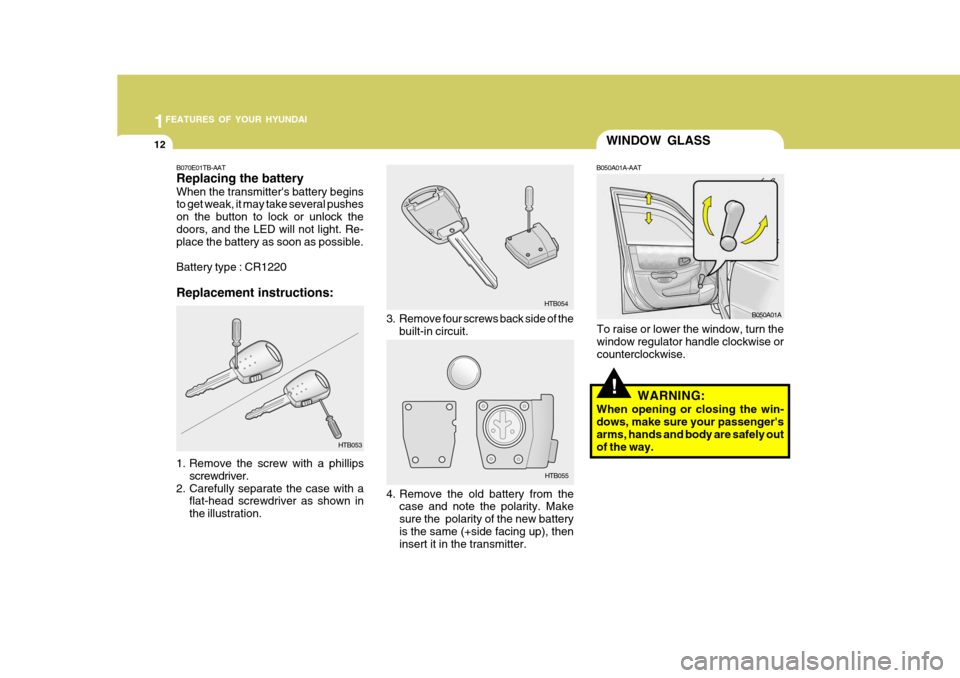
To raise or lower the window, turn the window regulator handle clockwise or counterclockwise. WARNING:
When opening or closing the win- dows, make sure your passenger'sarms, hands and body are safely out of the way.
3. Remove four screws back side of the
built-in circuit.
4. Remove the old battery from the case and note the polarity. Make sure the polarity of the new batteryis the same (+side facing up), then insert it in the transmitter. HTB054
HTB055
B050A01A
B070E01TB-AAT Replacing the battery When the transmitter's battery begins to get weak, it may take several pushes on the button to lock or unlock thedoors, and the LED will not light. Re- place the battery as soon as possible. Battery type : CR1220 Replacement instructions:
1. Remove the screw with a phillips screwdriver.
2. Carefully separate the case with a flat-head screwdriver as shown in the illustration. HTB053
Page 327 of 599
1
FEATURES OF YOUR HYUNDAI
45SIDE IMPACT AIRBAG
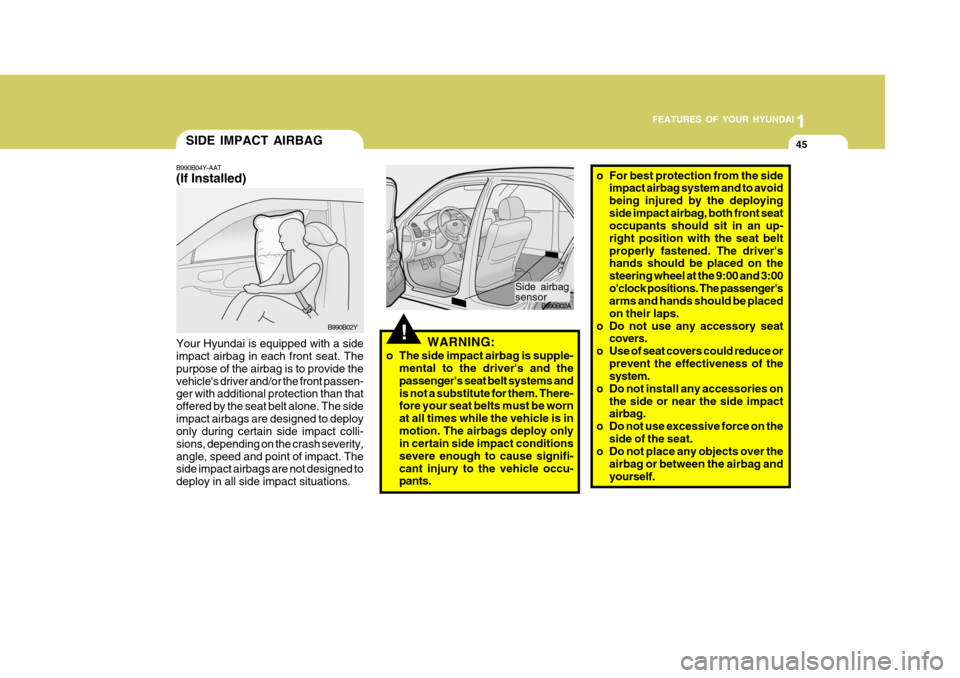
B990B04Y-AAT (If Installed) Your Hyundai is equipped with a side impact airbag in each front seat. The purpose of the airbag is to provide thevehicle's driver and/or the front passen- ger with additional protection than that offered by the seat belt alone. The sideimpact airbags are designed to deploy only during certain side impact colli- sions, depending on the crash severity,angle, speed and point of impact. The side impact airbags are not designed to deploy in all side impact situations.
B990B02Y!
o For best protection from the side impact airbag system and to avoid being injured by the deployingside impact airbag, both front seat occupants should sit in an up- right position with the seat beltproperly fastened. The driver's hands should be placed on the steering wheel at the 9:00 and 3:00o'clock positions. The passenger's arms and hands should be placed on their laps.
o Do not use any accessory seat covers.
o Use of seat covers could reduce or
prevent the effectiveness of the system.
o Do not install any accessories on
the side or near the side impactairbag.
o Do not use excessive force on the
side of the seat.
o Do not place any objects over the
airbag or between the airbag and yourself.
WARNING:
o The side impact airbag is supple- mental to the driver's and thepassenger's seat belt systems andis not a substitute for them. There- fore your seat belts must be worn at all times while the vehicle is inmotion. The airbags deploy only in certain side impact conditions severe enough to cause signifi-cant injury to the vehicle occu- pants.
B990B02A
Side airbag sensor
Page 349 of 599
1
FEATURES OF YOUR HYUNDAI
67DIGITAL CLOCKFOG LIGHT SWITCH
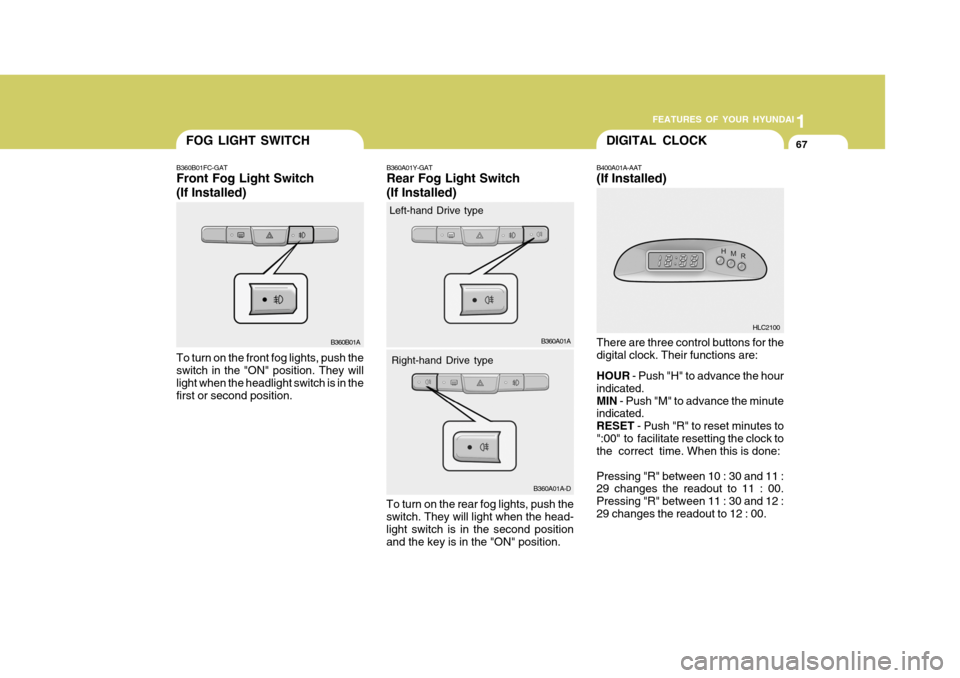
B400A01A-AAT (If Installed) There are three control buttons for the digital clock. Their functions are: HOUR
- Push "H" to advance the hour
indicated. MIN - Push "M" to advance the minute
indicated.RESET - Push "R" to reset minutes to
":00" to facilitate resetting the clock to the correct time. When this is done: Pressing "R" between 10 : 30 and 11 : 29 changes the readout to 11 : 00. Pressing "R" between 11 : 30 and 12 :29 changes the readout to 12 : 00.
B360A01Y-GAT Rear Fog Light Switch (If Installed)
To turn on the rear fog lights, push the switch. They will light when the head- light switch is in the second position and the key is in the "ON" position. B360A01A
HLC2100
B360B01A
B360B01FC-GAT Front Fog Light Switch (If Installed) To turn on the front fog lights, push the switch in the "ON" position. They will light when the headlight switch is in the first or second position.
B360A01A-D
Left-hand Drive type
Right-hand Drive type
Page 357 of 599
1
FEATURES OF YOUR HYUNDAI
75SEAT POCKETMULTI BOX
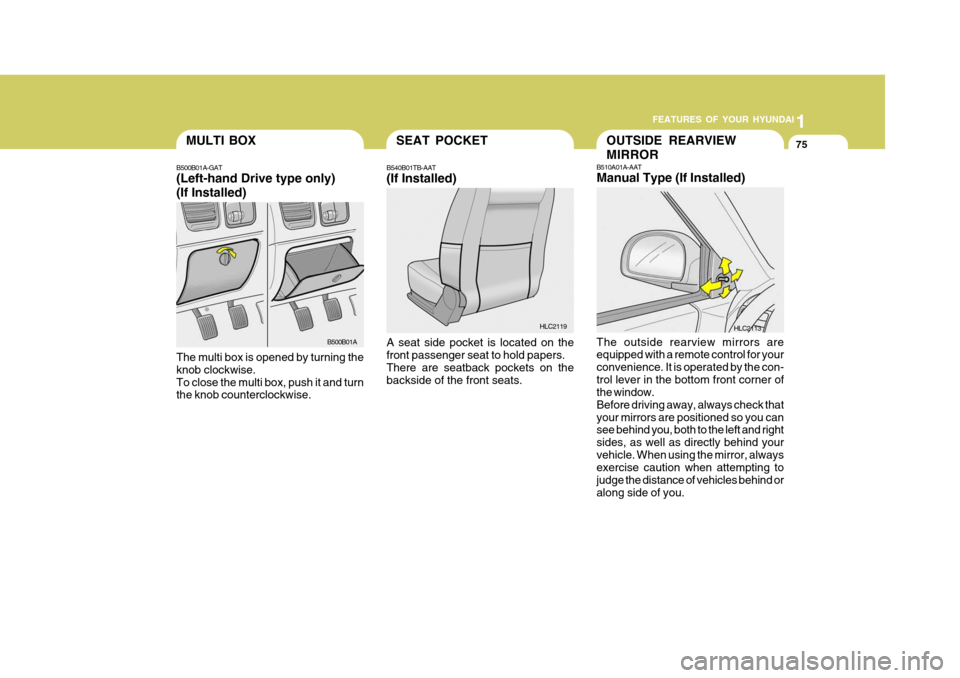
B540B01TB-AAT (If Installed) A seat side pocket is located on the front passenger seat to hold papers. There are seatback pockets on the backside of the front seats.
B500B01A-GAT (Left-hand Drive type only) (If Installed) The multi box is opened by turning the knob clockwise.To close the multi box, push it and turn the knob counterclockwise.
HLC2119
B500B01A
B510A01A-AAT Manual Type (If Installed) The outside rearview mirrors are equipped with a remote control for your convenience. It is operated by the con-trol lever in the bottom front corner of the window. Before driving away, always check thatyour mirrors are positioned so you can see behind you, both to the left and right sides, as well as directly behind yourvehicle. When using the mirror, always exercise caution when attempting to judge the distance of vehicles behind oralong side of you.
HLC2113
OUTSIDE REARVIEW MIRROR
Page 363 of 599
1
FEATURES OF YOUR HYUNDAI
81
!
TRUNK LID/TAIL GATE
B540A02A-GAT
WARNING:
The trunk lid or the tail gate should always be kept completely closedwhile the vehicle is in motion. If it is left open or ajar, poisonous exhaust gases may enter the car resulting inserious injury or death to the occu- pants. See additional warnings con- cerning exhaust gases on page 2-2.
o Do not use cellular phones around a gas station. The electric current or electronic interference fromcellular phones can ignite fuel vapors causing a fire.
o When refueling always shut the
engine off. Sparks by electricalequipment of the engine can ig- nite fuel vapors causing a fire.After refueling, check to make sure the fuel filler cap is securely closed, and then start the engine.
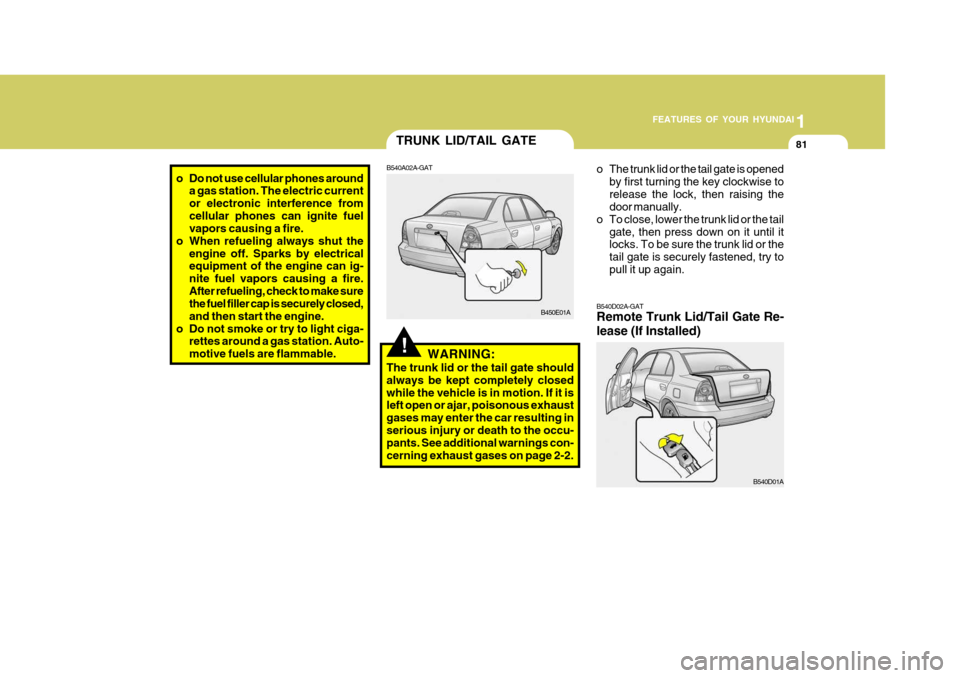
o Do not smoke or try to light ciga- rettes around a gas station. Auto-motive fuels are flammable.o The trunk lid or the tail gate is opened
by first turning the key clockwise to release the lock, then raising the door manually.
o To close, lower the trunk lid or the tail
gate, then press down on it until itlocks. To be sure the trunk lid or the tail gate is securely fastened, try topull it up again.
B540D02A-GAT Remote Trunk Lid/Tail Gate Re- lease (If Installed)
B540D01A
B450E01A
Page 379 of 599
1
FEATURES OF YOUR HYUNDAI
97
H210B04O-AAT
1. POWER ON-OFF/VOLUME Control Knob
The radio unit may be operated when the ignition key is in the "ACC" or "ON"position. Rotate the knob clockwise to switch the radio unit on and to increase the volume.The LCD shows the radio frequency in the radio mode. Turn the knob counter- clockwise to reduce the volume and toswitch the radio unit off. BAL (Balance Control) Knob Pull and turn the control knob clockwise to emphasize right speaker sound (left speaker sound will be attenuated). When the control knob is turned counterclock-wise, left speaker sound will be empha- sized (right speaker sound will be at- tenuated).After adjusting the balance, push the knob again to use the other function. SCAN Knob When the scan knob is pressed, the frequency will increase and the receiv-able stations will be tuned in one after another, receiving each station for 5 seconds. To stop scanning, press thescan knob again.
2. FAD (Fader Control) Knob Turn the control knob counterclockwise to emphasize front speaker sound (rear speaker sound will be attenuated). Whenthe control knob is turned clockwise, rear speaker sound will be emphasized (front speaker sound will be attenu-ated).
3. BASS Control Knob Press to pop the knob out and turn to the left or right for the desired bass tone. TREBLE Control Knob. Pull the bass control knob further out. Turn to the left or right for the desiredtreble tone.4. BAND Selector Pressing the button changes the AM, FM1 and FM2 bands. The modeselected is displayed on LCD.
5. TUNE (Manual) Select Button Press the ( ) side or ( ) side to increase or to decrease the frequency. With the button held down for 1 sec. ormore, the stop signal (broadcasting radio wave) is ignored and channel selection continues. SEEK Operation (Automatic Channel Selection) Press the TUNE select button for 1 sec. or more. When the ( ) side is pressed,the unit will automatically tune to the next higher frequency and when the ( ) side is pressed, it will automaticallytune to the next lower frequency.
6. PRESET STATION SELECT
Button
Six (6) stations for AM, FM1 and FM2 respectively can be preset in the elec- tronic memory circuit on this unit.
FM AM
Page 382 of 599
1FEATURES OF YOUR HYUNDAI
100
H210B04O-AAT
1. POWER ON-OFF/VOLUMEControl Knob
The radio unit may be operated when the ignition key is in the "ACC" or "ON"position. Rotate the knob clockwise to switch the radio unit on and to increase the volume.The LCD shows the radio frequency in the radio mode. Turn the knob counter- clockwise to reduce the volume and toswitch the radio unit off. BAL (Balance Control) Knob Pull and turn the control knob clockwise to emphasize right speaker sound (left speaker sound will be attenuated). When the control knob is turned counterclock-wise, left speaker sound will be empha- sized (right speaker sound will be at- tenuated).After adjusting the balance, push the knob again to use the other function. SCAN Knob When the scan knob is pressed, the frequency will increase and the receiv-able stations will be tuned in one after another, receiving each station for 5 seconds. To stop scanning, press thescan knob again.
2. FAD (Fader Control) Knob Turn the control knob counterclockwise to emphasize front speaker sound (rear speaker sound will be attenuated). Whenthe control knob is turned clockwise, rear speaker sound will be emphasized (front speaker sound will be attenu-ated).
3. BASS Control Knob Press to pop the knob out and turn to the left or right for the desired bass tone. TREBLE Control Knob. Pull the bass control knob further out. Turn to the left or right for the desiredtreble tone. 4. BAND Selector Pressing the button changes the AM, FM1 and FM2 bands. The modeselected is displayed on LCD.
5. TUNE (manual) Select Button Press the ( ) side or ( ) side to increase or to decrease the frequency. With the button held down for 1 sec. ormore, the stop signal (broadcasting radio wave) is ignored and channel selection continues. SEEK Operation (Automatic Channel Selection) Press the TUNE select button for 1 sec. or more. When the ( ) side is pressed,the unit will automatically tune to the next higher frequency and when the ( ) side is pressed, it will automaticallytune to the next lower frequency.
6. PRESET STATION SELECT
Button
Six (6) stations for AM, FM1 and FM2 respectively can be preset in the elec- tronic memory circuit on this unit.
FM AM