clock Hyundai Accent 2006 Workshop Manual
[x] Cancel search | Manufacturer: HYUNDAI, Model Year: 2006, Model line: Accent, Model: Hyundai Accent 2006Pages: 599, PDF Size: 17.59 MB
Page 524 of 599
3
IN CASE OF EMERGENCY
11
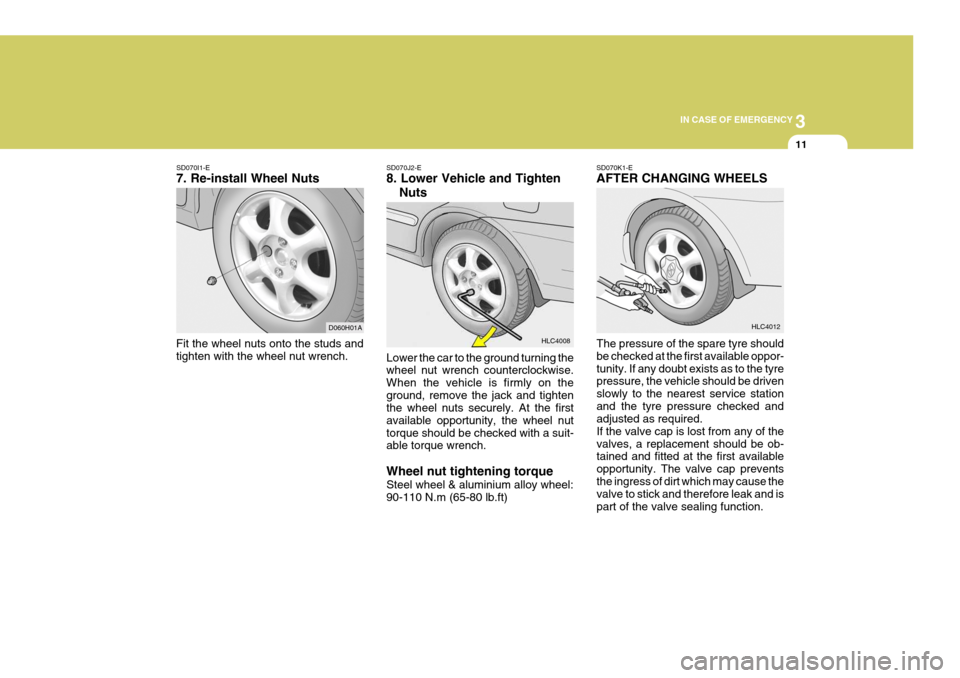
SD070I1-E 7. Re-install Wheel Nuts
Fit the wheel nuts onto the studs and tighten with the wheel nut wrench. D060H01ASD070J2-E 8. Lower Vehicle and Tighten
Nuts
Lower the car to the ground turning the wheel nut wrench counterclockwise. When the vehicle is firmly on theground, remove the jack and tighten the wheel nuts securely. At the first available opportunity, the wheel nuttorque should be checked with a suit- able torque wrench. Wheel nut tightening torque Steel wheel & aluminium alloy wheel: 90-110 N.m (65-80 lb.ft) SD070K1-E AFTER CHANGING WHEELS
The pressure of the spare tyre should be checked at the first available oppor-tunity. If any doubt exists as to the tyre pressure, the vehicle should be driven slowly to the nearest service stationand the tyre pressure checked and adjusted as required. If the valve cap is lost from any of thevalves, a replacement should be ob- tained and fitted at the first available opportunity. The valve cap preventsthe ingress of dirt which may cause the valve to stick and therefore leak and is part of the valve sealing function.
HLC4008 HLC4012
Page 549 of 599
6
OWNER MAINTENANCE
7
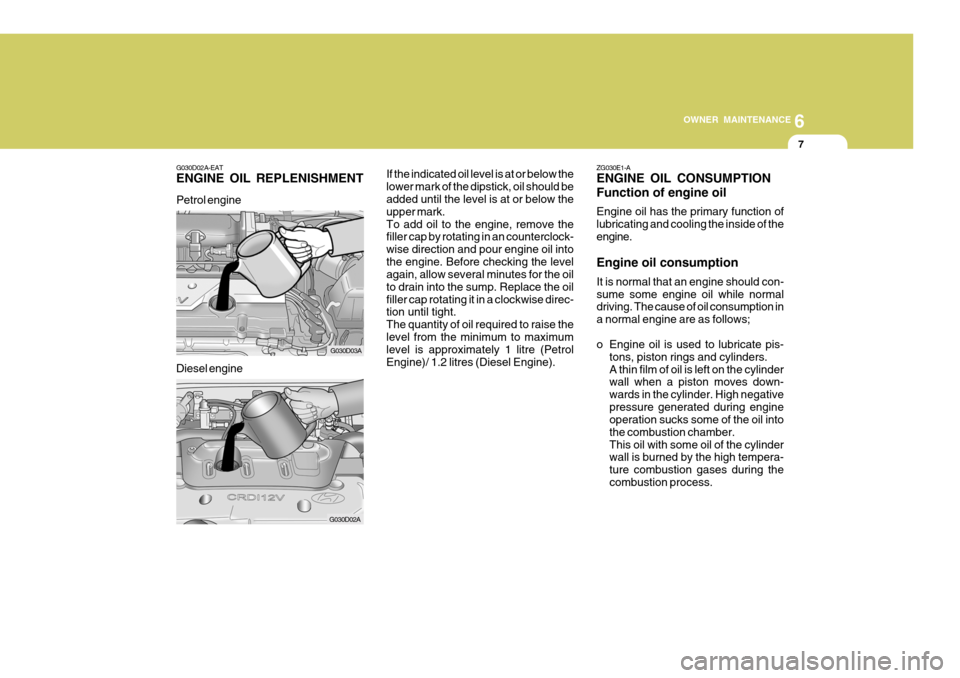
Petrol engine
Diesel engine
G030D02A-EAT ENGINE OIL REPLENISHMENT
If the indicated oil level is at or below the lower mark of the dipstick, oil should be added until the level is at or below the upper mark.To add oil to the engine, remove the filler cap by rotating in an counterclock- wise direction and pour engine oil intothe engine. Before checking the level again, allow several minutes for the oil to drain into the sump. Replace the oilfiller cap rotating it in a clockwise direc- tion until tight. The quantity of oil required to raise the level from the minimum to maximum level is approximately 1 litre (PetrolEngine)/ 1.2 litres (Diesel Engine).ZG030E1-A ENGINE OIL CONSUMPTION Function of engine oil Engine oil has the primary function of lubricating and cooling the inside of theengine. Engine oil consumption It is normal that an engine should con- sume some engine oil while normal driving. The cause of oil consumption in a normal engine are as follows;
o Engine oil is used to lubricate pis-
tons, piston rings and cylinders. A thin film of oil is left on the cylinder wall when a piston moves down- wards in the cylinder. High negativepressure generated during engine operation sucks some of the oil into the combustion chamber.This oil with some oil of the cylinder wall is burned by the high tempera- ture combustion gases during thecombustion process.
G030D03A
G030D02A
Page 551 of 599
6
OWNER MAINTENANCE
9ENGINE COOLANT CHECK-
ING AND REPLACING
CAUTION:
The oil being drained from the en- gine will be hot. Care should beexercised to prevent scalding.
!
3. Prepare a suitable receptacle to col-
lect the displaced oil and remove the drain plug from the sump.
!
4. When the oil has drained from thesump, replace the drain plug using a new washer ensuring that the plug isnot over tightened. Tightening torque is: 3.5 ~ 4.5 kgf.m
5. Remove the oil filter by rotating coun- terclockwise, using a proprietary oil filter removal tool if necessary. Note that the oil filter will contain approxi-mately 0.3 litres of oil and this should be collected in a suitable receptacle.
6. Install a new oil filter having smeared the sealing ring with clean oil androtating clockwise until the filter con- tacts the mounting and then a furtherone half turn. Do not over-tighten. WARNING:
Prolonged and repeated contact with used engine oils may result in seri- ous skin disorders including derma-titis and cancer. Avoid contact with skin as far as possible and always wash thoroughly after any contact.Keep used oils out of reach of chil- dren. It is illegal to pollute drains, water courses and soil. Use onlyauthorized waste collection facili- ties including civic amenity sites and garages for the disposal of usedoil and oil filters. If in doubt, contact the local authority for disposal in- structions. Tightening torque:
Petrol -
1.2 ~ 1.6 kgf.m
Diesel - 2.3 ~ 2.5 kgf.m
7. Pour the specified quantity of the recommended oil into the engine and replace the filler cap. Start the en- gine and ensure that no oil leaksexist. Turn off the engine and after a couple minutes, recheck the oil level.
!
SG050A1-E
WARNING:
Do not remove the radiator cap when the engine is hot, since the system is pressurized and coolant may beejected from the radiator resulting in scalding.
Page 554 of 599

6OWNER MAINTENANCE
12SPARKING PLUG REPLACEMENT
G060A01L Prior to installing a sparking plug, the gap between the centre and outer elec- trodes must be checked and adjusted as necessary.Adjustment is facilitated by bending the outer electrode towards or away from the centre electrode. Under no circum-stances should attempts be made to adjust the position of the centre elec- trode.
4. Insert the sparking plug into the cyl-
inder head and using a suitable plug socket, slowly rotate the sparkingplug, (being careful not to cross- thread), until the plug contacts the seating area. Tighten the plug withthe plug socket by a further 1/2 to 3/ 4 of a turn only.
3. Clean around the base of the plug to
be removed, and install the plugsocket ensuring that the ceramic insulator does not become damaged.Turn the socket counterclockwise to remove the plug.
CAUTION:
Sparking plugs must only be cleaned using purpose designed equipment.Wire brushing may damage the cen- tre electrode insulator causing mis- firing to occur. Only the correct gradeof sparking plug should be used. Use of an incorrect grade may result in serious engine damage.
!
SG060A1-E (Petrol Engine Only) This operation should only be performed when the engine is cold.
1. Remove the centre cover from the
engine rocker cover (DOHC Engine only).
2. Remove plug lead from the sparking
plug to be replaced, pulling the leadby the rubber cap. (Pulling the lead may damage the carbon conductor.) 0.039~0.043 in. (1.0 ~ 1.1 mm )
G060C01A
HLC5023
Page 574 of 599
6OWNER MAINTENANCE
32
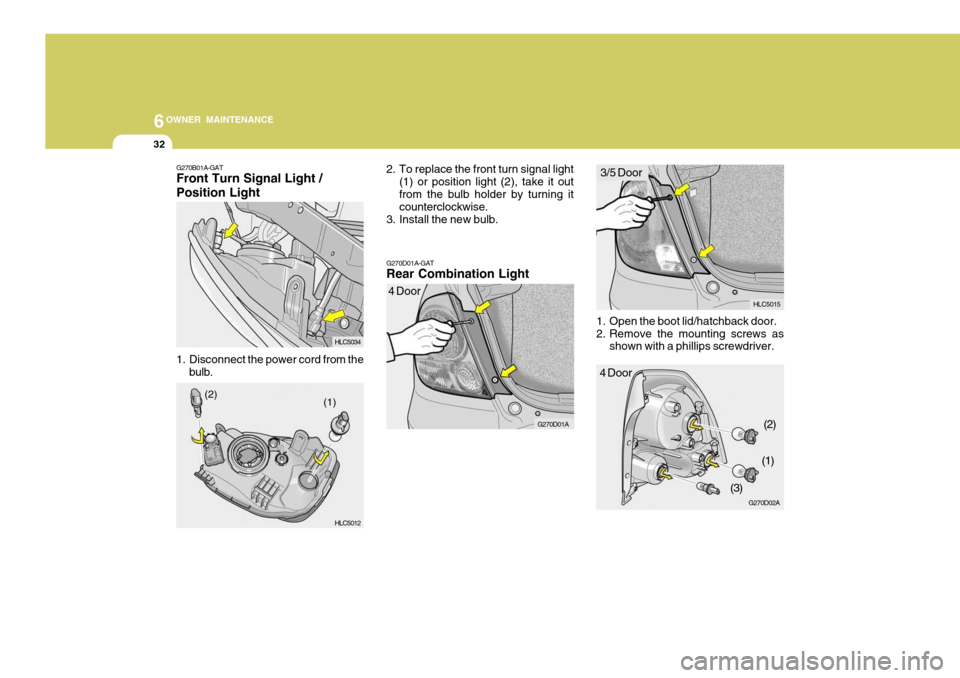
1. Open the boot lid/hatchback door.
2. Remove the mounting screws as
shown with a phillips screwdriver.
G270D01A-GAT Rear Combination Light
2. To replace the front turn signal light
(1) or position light (2), take it out from the bulb holder by turning it counterclockwise.
3. Install the new bulb.
G270B01A-GAT Front Turn Signal Light / Position Light
1. Disconnect the power cord from the
bulb.
G270D01A
HLC5034 HLC5012 4 Door
(1)
(2)
HLC5015
G270D02A
4 Door 3/5 Door
(2)
(1)
(3)
Page 575 of 599
6
OWNER MAINTENANCE
33
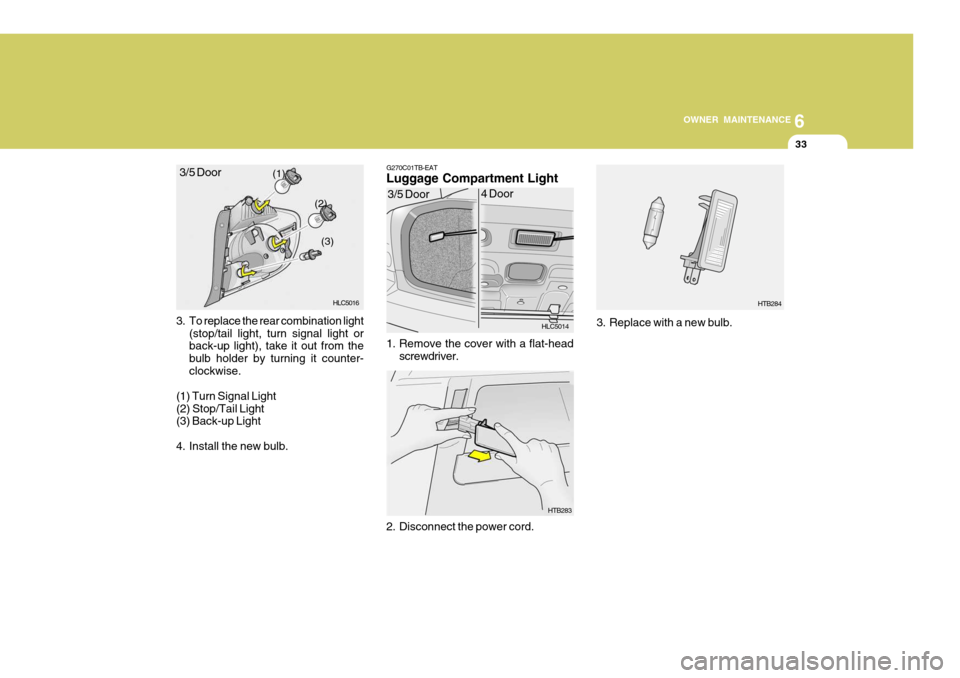
3. To replace the rear combination light (stop/tail light, turn signal light or back-up light), take it out from the bulb holder by turning it counter-clockwise.
(1) Turn Signal Light(2) Stop/Tail Light (3) Back-up Light
4. Install the new bulb. G270C01TB-EAT Luggage Compartment Light
1. Remove the cover with a flat-head
screwdriver.
2. Disconnect the power cord.
(1) (2)
(3)
HLC5016
3/5 Door
HLC5014
HTB283
3/5 Door
4 Door3. Replace with a new bulb.
HTB284
Page 577 of 599
6
OWNER MAINTENANCE
35
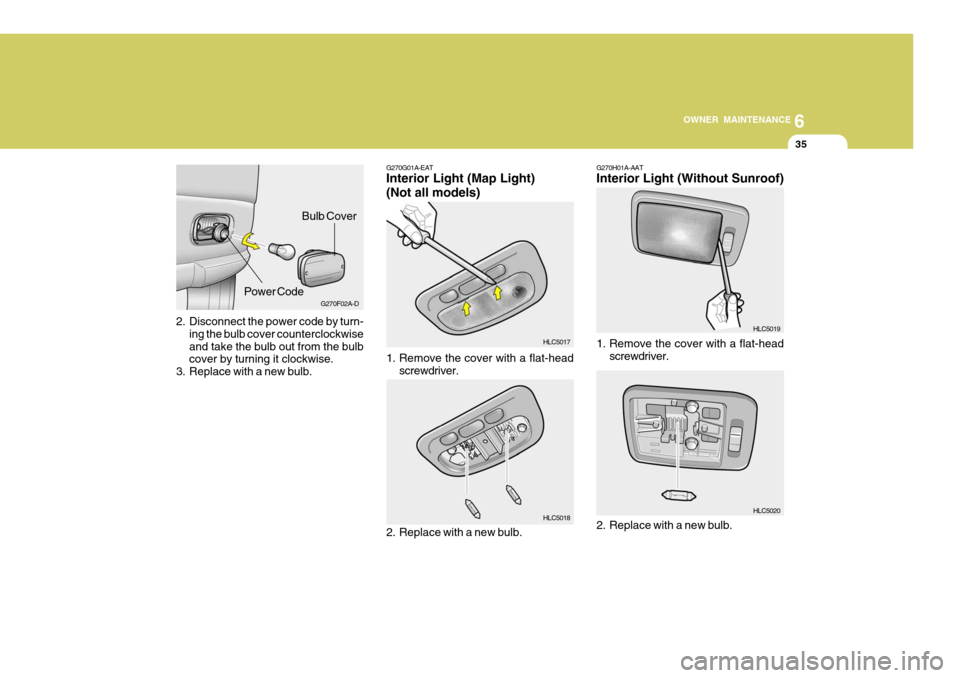
2. Disconnect the power code by turn-
ing the bulb cover counterclockwise and take the bulb out from the bulb cover by turning it clockwise.
3. Replace with a new bulb. G270F02A-D
Bulb Cover
Power Code G270G01A-EAT Interior Light (Map Light) (Not all models)
1. Remove the cover with a flat-head screwdriver.
2. Replace with a new bulb.
HLC5017 HLC5018 G270H01A-AAT Interior Light (Without Sunroof)
1. Remove the cover with a flat-head screwdriver.
2. Replace with a new bulb.
HLC5019 HLC5020
Page 579 of 599

6
OWNER MAINTENANCE
37FUSE PANEL DESCRIPTION
G200C02A-EAT Engine Compartment (Petrol Engine)
HLC5027
NOTE: Not all fuse panel descriptions in this manual may be applicable to your vehicle. It is accurate at the time of printing. When you inspect the fuse box on your vehicle, refer to the fuse box label. FUSE RATING
120A50A 50A20A30A20A 30A 30A30A30A20A 10A 10A 10A 10A10A 10A10A15A 10A15A 15A 10A 25A PROTECTED COMPONENTS
Charging (Generator) Fuse 6, 7, 8, 9, Horn fuse, Room lamp fuse
Head lamp fuse, Front fog lamp fuse, Tail lamp relay, H/LP washer fuse
Engine control relay, Generator, Fuel pump relay, ECU #3 fuse Ignition power source, Start relayRadiator fan control Blower control ABS control, ABS bleeding connectorABS control, ABS bleeding connector Power window Condenser fan controlRadiator fan, Condenser fan, ECM, Oxygen sensor, Purge control valve,
SMATRA, Glow plug relay, Heater relay, Stop lamp switch A/C relayHorn relay Illumination lamps, Left rear combination lamp, License lamp, DRL control, Position lamp, H/LP washer relayRight rear combination lamp, License lamp, Position lamp Left head lamp, DRL control, Instrument cluster Right head lampFront fog lamp relay
Instrument cluster, Courtesy lamp, Trunk room lamp, ETACM, DLC, Door warning, Multipurpose check connectorAudio, Digital clock, Power antenna, A/C switch, Rear fog lamp switch Idle speed actuator, ECM, Camshaft position sensor, EGR actuator, Throttle plate actuatorECM Head lamp washer motor
Fuel pump relay, Fuel pump motor
ALT
BATTERY LAMPECU
IGN
RAD FAN
BLOWER
ABS ABS
P/WDW
COND FAN
ECU #1
A/CON COMP HORN
TAIL LH
TAIL RH
H/LP LH
H/LP RH
FRONT FOG
ROOM LP AUDIO
ECU #2 ECU#3
H/L WASHER
FUSIBLE
LINK
FUSE
DESCRIPTION
F/PUMP CHK (E50)
Page 580 of 599
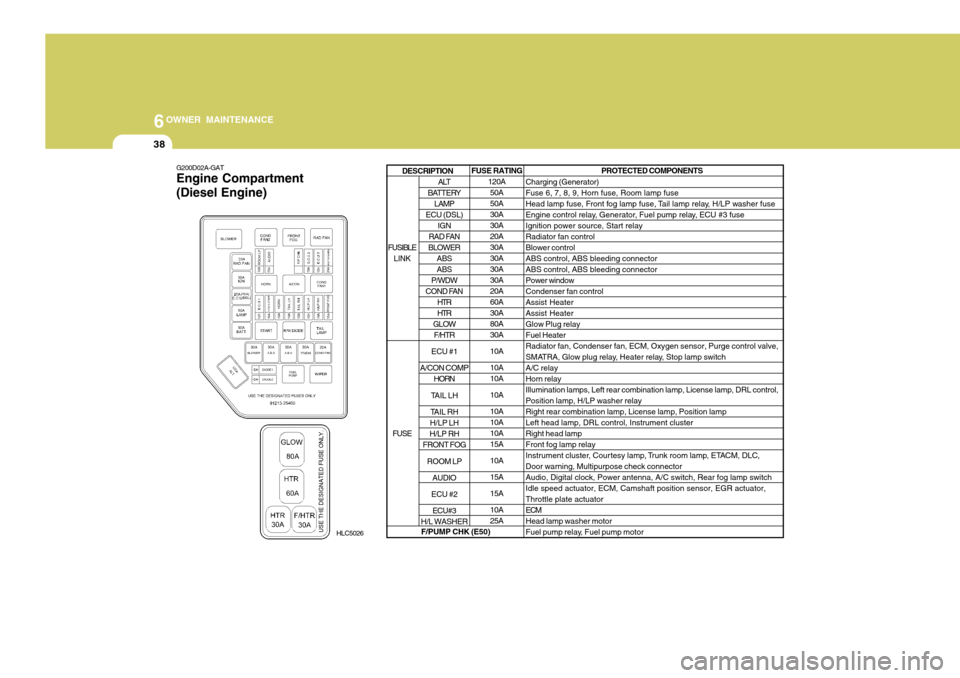
6OWNER MAINTENANCE
38
PROTECTED COMPONENTS
Charging (Generator) Fuse 6, 7, 8, 9, Horn fuse, Room lamp fuse
Head lamp fuse, Front fog lamp fuse, Tail lamp relay, H/LP washer fuse
Engine control relay, Generator, Fuel pump relay, ECU #3 fuseIgnition power source, Start relayRadiator fan controlBlower controlABS control, ABS bleeding connectorABS control, ABS bleeding connectorPower windowCondenser fan controlAssist HeaterAssist HeaterGlow Plug relayFuel HeaterRadiator fan, Condenser fan, ECM, Oxygen sensor, Purge control valve,
SMATRA, Glow plug relay, Heater relay, Stop lamp switchA/C relayHorn relayIllumination lamps, Left rear combination lamp, License lamp, DRL control,Position lamp, H/LP washer relayRight rear combination lamp, License lamp, Position lampLeft head lamp, DRL control, Instrument clusterRight head lampFront fog lamp relay
Instrument cluster, Cour tesy lamp, Trunk room lamp, ETACM, DLC,Door warning, Multipurpose check connectorAudio, Digital clock, Power antenna, A/C switch, Rear fog lamp switchIdle speed actuator, ECM, Camshaft position sensor, EGR actuator,Throttle plate actuatorECMHead lamp washer motor
Fuel pump relay, Fuel pump motor
HLC5026 FUSE RATING
120A
50A50A30A30A20A30A30A30A30A20A60A30A80A30A 10A10A 10A 10A10A 10A10A15A 10A15A15A10A 25A
ALT
BATTERY
LAMP
ECU (DSL)
IGN
RAD FAN
BLOWER ABS ABS
P/WDW
COND FAN HTRHTR
GLOW F/HTR
ECU #1
A/CON COMP HORN
TAIL LH
TAIL RH
H/LP LH
H/LP RH
FRONT FOG
ROOM LP
AUDIO
ECU #2 ECU#3
H/L WASHER
FUSIBLE
LINK
FUSEDESCRIPTION
F/PUMP CHK (E50)G200D02A-GAT Engine Compartment (Diesel Engine)
Page 581 of 599
6
OWNER MAINTENANCE
39
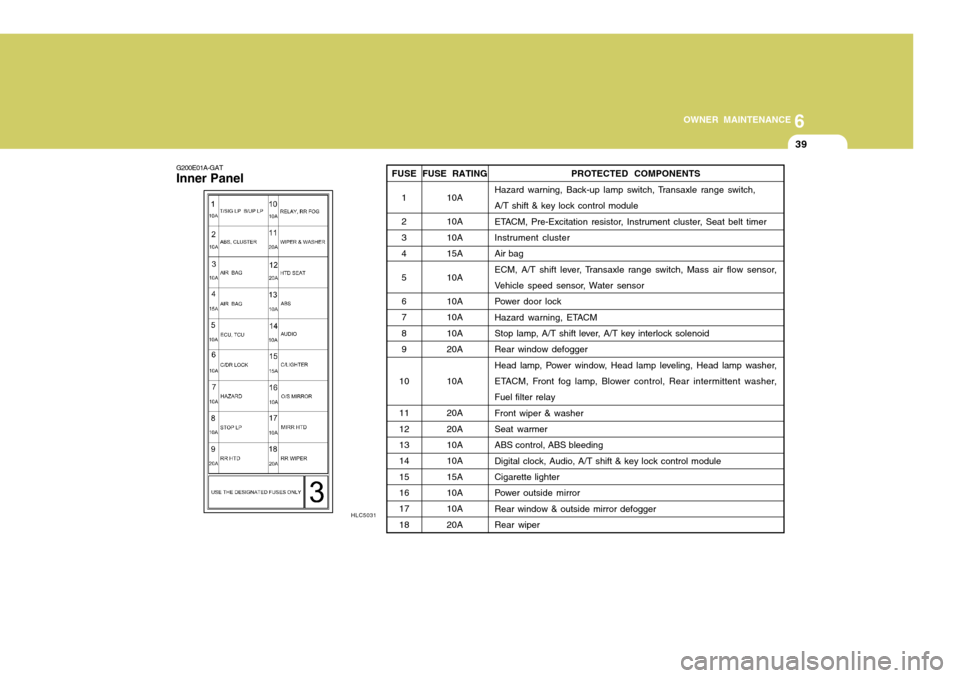
G200E01A-GAT Inner Panel
HLC5031 PROTECTED COMPONENTS
Hazard warning, Back-up lamp switch, Transaxle range switch, A/T shift & key lock control module
ETACM, Pre-Excitation resistor, Instrument cluster, Seat belt timer Instrument cluster Air bag
ECM, A/T shift lever, Transaxle range switch, Mass air flow sensor,
Vehicle speed sensor, Water sensor
Power door lock
Hazard warning, ETACM
Stop lamp, A/T shift lever, A/T key interlock solenoid Rear window defogger
Head lamp, Power window, Head lamp leveling, Head lamp washer,
ETACM, Front fog lamp, Blower control, Rear intermittent washer, Fuel filter relayFront wiper & washer Seat warmer ABS control, ABS bleedingDigital clock, Audio, A/T shift & key lock control module Cigarette lighter
Power outside mirrorRear window & outside mirror defogger Rear wiper
FUSE RATING
10A 10A 10A15A 10A10A 10A 10A20A 10A20A 20A10A 10A 15A10A 10A 20A
FUSE
1 2 34 56 7 89
10 11 1213 14 1516 17 18