height Hyundai Accent 2006 Owner's Manual
[x] Cancel search | Manufacturer: HYUNDAI, Model Year: 2006, Model line: Accent, Model: Hyundai Accent 2006Pages: 599, PDF Size: 17.59 MB
Page 28 of 599
1FEATURES OF YOUR HYUNDAI
14SEATS
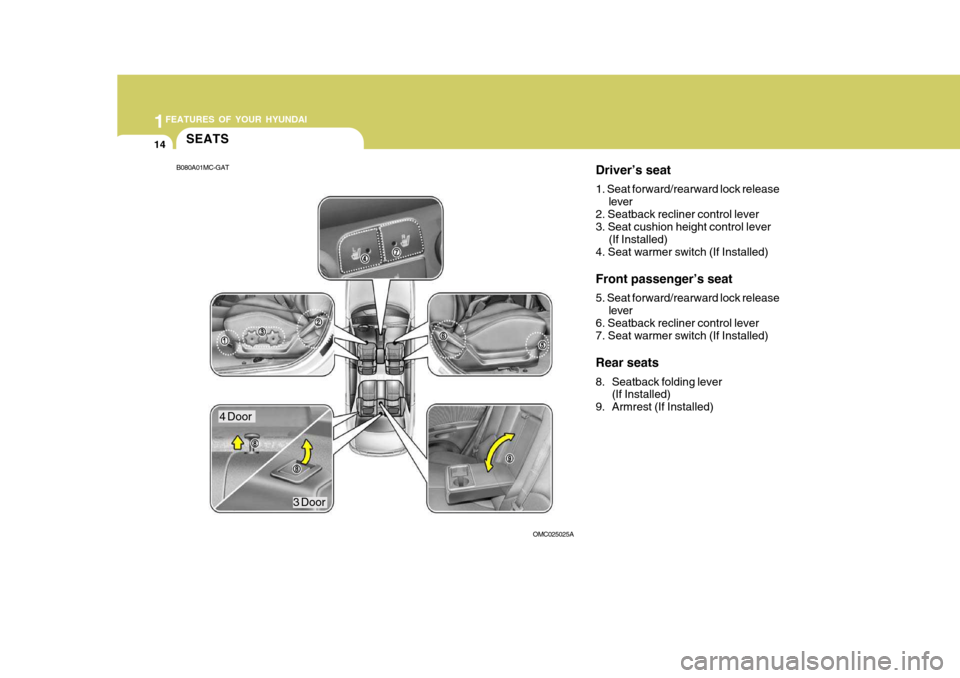
Driver’s seat 1. Seat forward/rearward lock releaselever
2. Seatback recliner control lever 3. Seat cushion height control lever
(If Installed)
4. Seat warmer switch (If Installed) Front passenger’s seat 5. Seat forward/rearward lock release
lever
6. Seatback recliner control lever 7. Seat warmer switch (If Installed) Rear seats
8. Seatback folding lever (If Installed)
9. Armrest (If Installed)
B080A01MC-GAT
OMC025025A
4 Door3 Door
Page 30 of 599
1FEATURES OF YOUR HYUNDAI
16
!!WARNING:
To minimize risk of severe injury in the event of a collision or a sudden stop, both the driver and passenger seatbacks should always be in anupright position while the vehicle is in motion. The protection provided by the seat belts and airbags in afrontal collision may be reduced sig- nificantly when the seatbacks are reclined. There is greater risk thatthe driver and passenger will slide under the seat belt which may result in serious injury if a crash occurswhen the seatbacks are reclined. The seat belt cannot provide full protec- tion to an occupant if the seatback isreclined. B080D02JM-AAT Adjustable Headrests
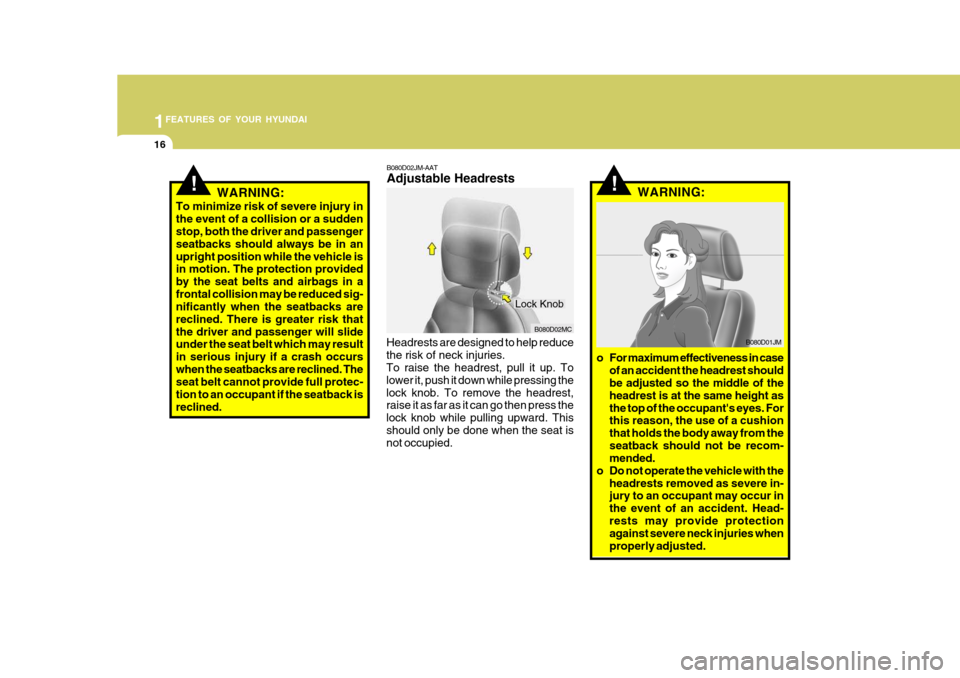
Headrests are designed to help reduce the risk of neck injuries. To raise the headrest, pull it up. To lower it, push it down while pressing thelock knob. To remove the headrest, raise it as far as it can go then press the lock knob while pulling upward. Thisshould only be done when the seat is not occupied. WARNING:
o For maximum effectiveness in case of an accident the headrest shouldbe adjusted so the middle of the headrest is at the same height asthe top of the occupant's eyes. For this reason, the use of a cushion that holds the body away from theseatback should not be recom- mended.
o Do not operate the vehicle with the headrests removed as severe in-jury to an occupant may occur in the event of an accident. Head-rests may provide protection against severe neck injuries when properly adjusted. B080D01JM
B080D02MC
Lock Knob
Page 31 of 599
1
FEATURES OF YOUR HYUNDAI
17
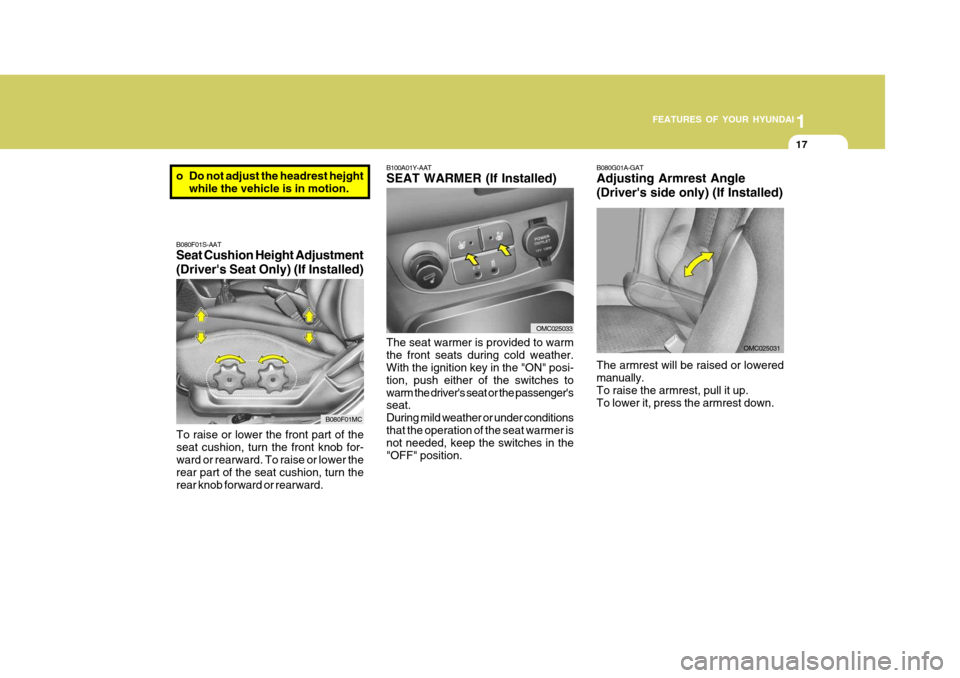
B100A01Y-AAT SEAT WARMER (If Installed) The seat warmer is provided to warm the front seats during cold weather. With the ignition key in the "ON" posi- tion, push either of the switches towarm the driver's seat or the passenger's seat. During mild weather or under conditionsthat the operation of the seat warmer is not needed, keep the switches in the "OFF" position.
B080F01S-AAT Seat Cushion Height Adjustment (Driver's Seat Only) (If Installed)
To raise or lower the front part of the seat cushion, turn the front knob for- ward or rearward. To raise or lower the rear part of the seat cushion, turn therear knob forward or rearward.o Do not adjust the headrest hejght while the vehicle is in motion.
B080F01MC
OMC025033
B080G01A-GAT Adjusting Armrest Angle (Driver's side only) (If Installed)
OMC025031
The armrest will be raised or lowered manually. To raise the armrest, pull it up. To lower it, press the armrest down.
Page 33 of 599
1
FEATURES OF YOUR HYUNDAI
19
!
!WARNING:
o For maximum effectiveness in case of an accident the headrest should be adjusted so the middle of the headrest is at the same height as the top of the occupant's eyes. Forthis reason, the use of a cushion that holds the body away from the seatback should not be recom-mended.
o Do not operate vehicle with the
headrests removed as injury tothe occupants may occur in the event of an accident. Headrests may provide protection againstneck injuries when properly ad- justed. B110A01MC-GAT Folding Rear Seatbacks (4Door) (If Installed) The rear seatbacks may be folded to facilitate carrying long items or to in-crease the luggage capacity of the vehicle.
WARNING:
The purpose of the fold-down rearseatbacks is to allow you to carry longer objects than could otherwise be accommodated. Never allow passengers to sit on topof the folded down seat back while the car is moving as this is not a proper seating position and no seatbelts are available for use. This could result in serious injury or death in case of an accident or sudden stop.Objects carried on the folded down seatback should not extend higher than the top of the front seats. Thiscould allow cargo to slide forward and cause injury or damage during sudden stops.
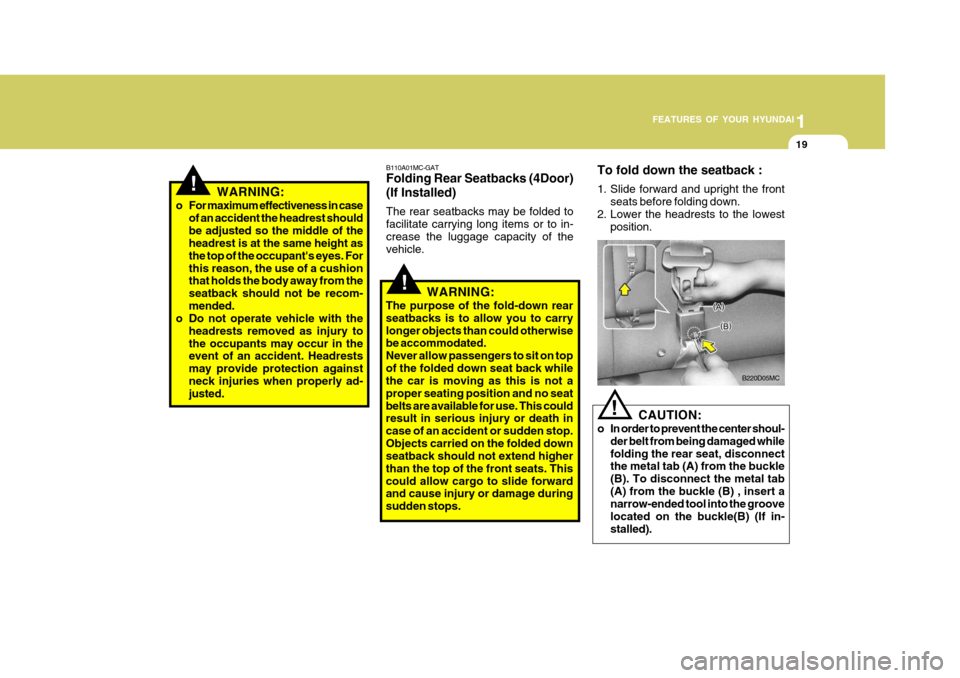
To fold down the seatback :
1. Slide forward and upright the front seats before folding down.
2. Lower the headrests to the lowest position.
B220D05MC
CAUTION:
o In order to prevent the center shoul- der belt from being damaged while folding the rear seat, disconnect the metal tab (A) from the buckle (B). To disconnect the metal tab(A) from the buckle (B) , insert a narrow-ended tool into the groove located on the buckle(B) (If in-stalled).
!
Page 39 of 599
1
FEATURES OF YOUR HYUNDAI
25
B160C01A-AAT Keep Belts Clean and Dry Seat belts should be kept clean and dry. If belts become dirty, they can becleaned by using a mild soap solution and warm water. Bleach, dye, strong detergents or abrasives should not beused because they may damage and weaken the fabric. B160D01A-AAT When to Replace Seat Belts Entire in-use seat belt assembly or assemblies should be replaced if the vehicle has been involved in an acci- dent. This should be done even if nodamage is visible. Additional questions concerning seat belt operation should be directed to your Hyundai Dealer.
!
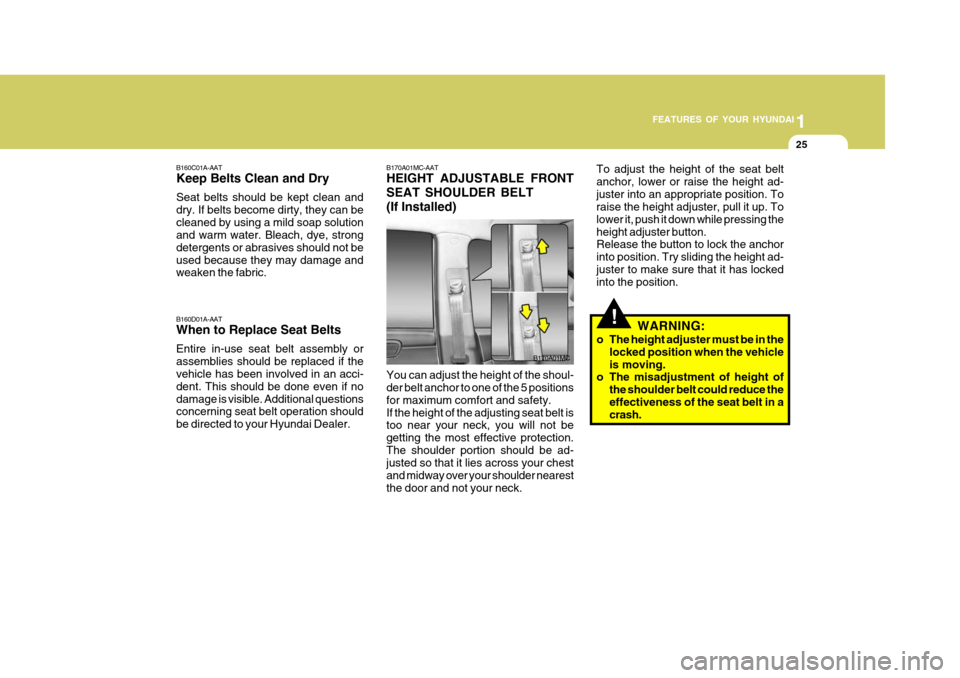
B170A01MC-AAT HEIGHT ADJUSTABLE FRONT SEAT SHOULDER BELT(If Installed)
B170A01MC
You can adjust the height of the shoul- der belt anchor to one of the 5 positions for maximum comfort and safety.If the height of the adjusting seat belt is too near your neck, you will not be getting the most effective protection.The shoulder portion should be ad- justed so that it lies across your chest and midway over your shoulder nearestthe door and not your neck. To adjust the height of the seat beltanchor, lower or raise the height ad-juster into an appropriate position. To raise the height adjuster, pull it up. To lower it, push it down while pressing theheight adjuster button. Release the button to lock the anchor into position. Try sliding the height ad-juster to make sure that it has locked into the position.
WARNING:
o The height adjuster must be in the locked position when the vehicle is moving.
o The misadjustment of height of
the shoulder belt could reduce theeffectiveness of the seat belt in a crash.
Page 46 of 599
1FEATURES OF YOUR HYUNDAI
32
o Children who are too large to be in
a child restraint should sit in the rear seat and be restrained with the available lap/shoulder belts.Never allow children to ride in the front passenger seat.
o Always make sure that the shoul-
der belt portion of the outboardlap/shoulder belt is positioned midway over the shoulder, neveracross the neck or behind the back. Moving the child closer to the center of the vehicle may helpprovide a good shoulder belt fit. The lap belt portion of the lap/ shoulder belt or the center seat lapbelt must always be positioned as low as possible on the child's hips and as snug as possible.
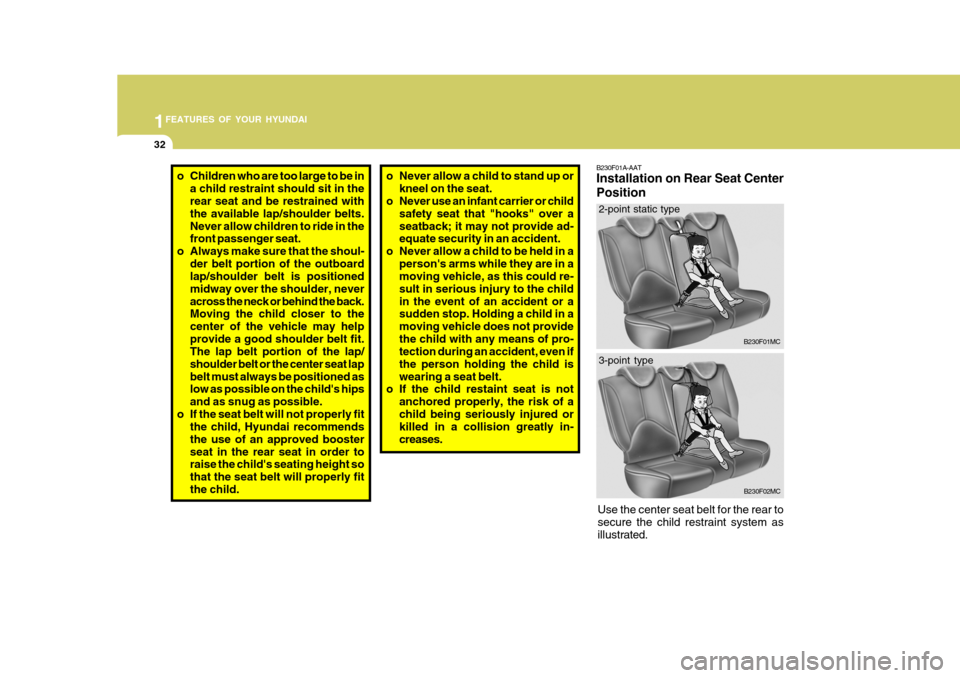
o If the seat belt will not properly fit the child, Hyundai recommendsthe use of an approved boosterseat in the rear seat in order to raise the child's seating height so that the seat belt will properly fitthe child.B230F01A-AAT Installation on Rear Seat Center Position
B230F01MC
o Never allow a child to stand up or
kneel on the seat.
o Never use an infant carrier or child
safety seat that "hooks" over a seatback; it may not provide ad- equate security in an accident.
o Never allow a child to be held in a
person's arms while they are in amoving vehicle, as this could re- sult in serious injury to the childin the event of an accident or a sudden stop. Holding a child in a moving vehicle does not providethe child with any means of pro- tection during an accident, even if the person holding the child iswearing a seat belt.
o If the child restaint seat is not
anchored properly, the risk of achild being seriously injured or killed in a collision greatly in- creases.
B230F02MC
Use the center seat belt for the rear to secure the child restraint system asillust rated.
2-point static type 3-point type
Page 162 of 599
1FEATURES OF YOUR HYUNDAI
148
NOTE: Look at a tape before you insert it. If the tape is loose, tighten it by turning one of the hubs with a pencil or your finger.If the label is peeling off, do not put it in the drive mechanism. Do not leave tapes sitting where theyare exposed to hot, warm, or high humidity, such as on top of the dash- board or in the player.If a tape is exposed to excessively hot or cold, let it reach a moderate temperature before putting it in theplayer.
B860A03L
ANTENNA
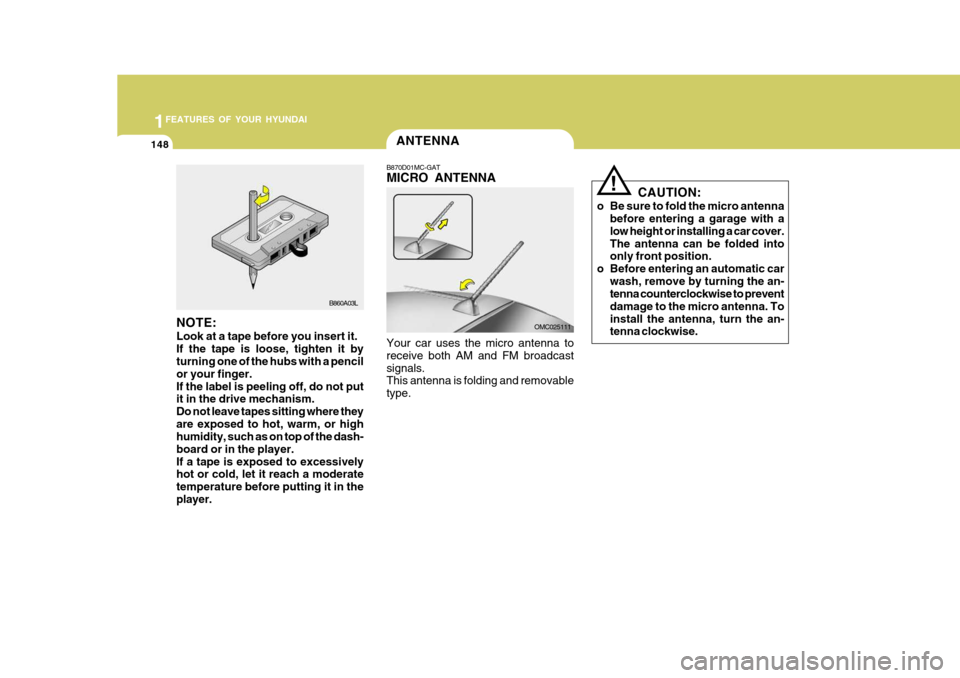
B870D01MC-GAT MICRO ANTENNA Your car uses the micro antenna to receive both AM and FM broadcastsignals. This antenna is folding and removable type. OMC025111CAUTION:
o Be sure to fold the micro antenna before entering a garage with alow height or installing a car cover.The antenna can be folded into only front position.
o Before entering an automatic car wash, remove by turning the an-tenna counterclockwise to prevent damage to the micro antenna. Toinstall the antenna, turn the an- tenna clockwise.
!
Page 178 of 599
2 DRIVING YOUR HYUNDAI
16
!WARNING:
ABS will not prevent accidents due to improper or dangerous driving maneuvers. Even though vehiclecontrol is improved during emer- gency braking, always maintain a safe distance between you and ob-jects ahead. Vehicle speeds should always be reduced during extreme road conditions. The braking distance for cars equipped with an anti-lock braking system may be longer than for thosewithout it in the following road con- ditions. During these conditions, the ve-hicle should be driven at reduced speeds.
o Rough, gravel or snow-covered roads.
o With tire chains installed.
o On roads where the road surface
is pitted or has different surface height. The safety features of an ABS equipped vehicle should not betested by high speed driving or cornering. This could endanger the safety of yourself or others.
ANTI-LOCK BRAKE SYSTEM
C120A02A-AAT (If Installed) The Anti-Lock Brake System (ABS) is designed to prevent wheel lock-upduring sudden braking or on hazard- ous road surfaces. The ABS control module monitors the wheel speed andcontrols the pressure applied to each brake. Thus, in emergency situations or on slick roads, ABS will increasevehicle control during braking. NOTE: During ABS operation, a slight pul- sation may be felt in the brake pedal when the brakes are applied. Also, a noise may be heard in the enginecompartment while braking. These conditions are normal and indicate that the anti-lock brake system isfunctioning properly.
Page 274 of 599
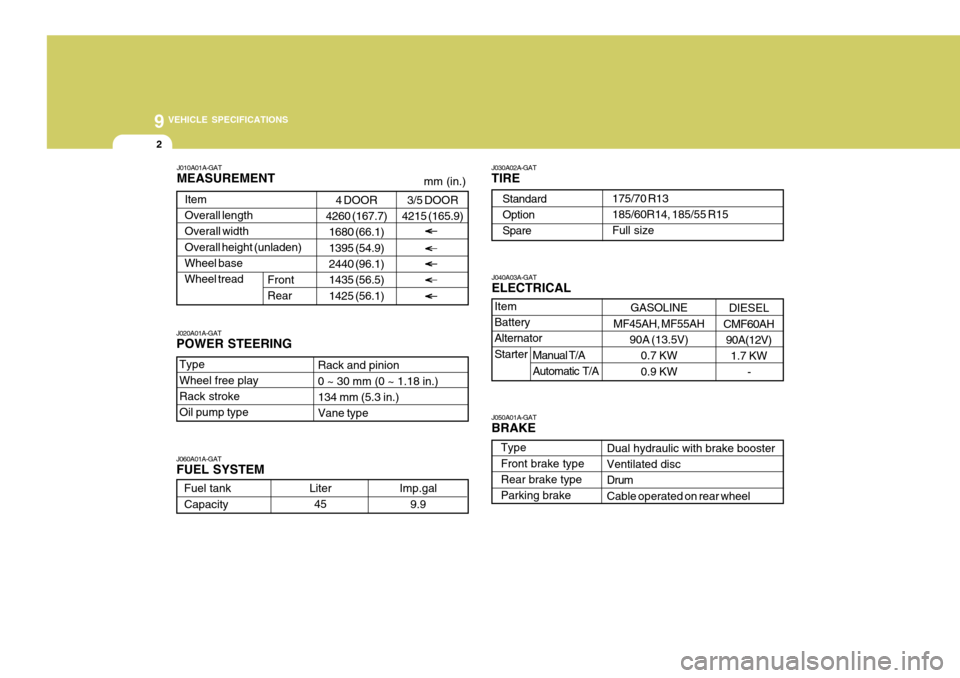
9 VEHICLE SPECIFICATIONS
2
Type Wheel free playRack stroke Oil pump type 4 DOOR
4260 (167.7)
1680 (66.1) 1395 (54.9) 2440 (96.1) 1435 (56.5)1425 (56.1)
ItemOverall length Overall width Overall height (unladen)Wheel base Wheel tread J030A02A-GAT TIRE
GASOLINE
MF45AH, MF55AH 90A (13.5V)
0.7 KW 0.9 KW
Dual hydraulic with brake booster Ventilated disc DrumCable operated on rear wheel
J010A01A-GAT MEASUREMENT
J060A01A-GAT FUEL SYSTEM
Rack and pinion 0 ~ 30 mm (0 ~ 1.18 in.) 134 mm (5.3 in.) Vane type
175/70 R13 185/60R14, 185/55 R15 Full size
StandardOption Spare
Front Rear
mm (in.)
J020A01A-GAT POWER STEERING Fuel tank Capacity Liter
45 Imp.gal
9.9
J040A03A-GAT ELECTRICAL
Item Battery Alternator Starter
J050A01A-GAT BRAKE Type Front brake typeRear brake type Parking brake
3/5 DOOR
4215 (165.9)
DIESEL
CMF60AH 90A(12V) 1.7 KW
-
Manual T/A Automatic T/A
Page 279 of 599

10
INDEX
3
D Door Central door locks .................................................... 1-8
Door locks ................................................................ 1-7
Locking, unlocking front doors with a key ............... 1-7
Drink Holder .............................................................. 1-69
Drive Belts ................................................................ 6-27
Driving Economical driving ................................................. 2-17
Smooth cornering ................................................... 2-18
Winter driving ......................................................... 2-18
EEmission Control Syst em ........................................... 7-2
Engine
Before starting the engine ....................................... 2-3
Compartment ........................................................... 6-2
Coolant ................................................................... 6-13
Coolant temperature gauge ................................... 1-57
If the engine overheats ............................................ 3-4
Number .................................................................... 8-2
Oil ............................................................................. 6-7
Starting ..................................................................... 2-5
Engine Exhaust Can Be Dangerous ........................... 2-2F Fog Light
Front ....................................................................... 1-67
Rear ....................................................................... 1-67
Front Seats
Adjustable front seats ............................................ 1-14
Adjustable headrest s .............................................. 1-15
Adjusting seat forward and rear ward..................... 1-14
Adjusting seatback angle .......................................1-14
Lumbar support control .................. ........................ 1-16
Seat cushion height adjustment............................ 1-16
Seat warmer ........................................................... 1-17
Fuel
Capacity ................................................................... 9-2
Gauge .................................................................... 1-56
Recommendations ................................................... 1-2
Fuel Filler Lid
Remote release ...................................................... 1-80
Fuses ........................................................................ 6-28
Fuse Panel description ............................................. 6-42
G General Checks .......................................................... 6-6
Glove Box ................................................................. 1-74