lock Hyundai Atos 2002 Manual PDF
[x] Cancel search | Manufacturer: HYUNDAI, Model Year: 2002, Model line: Atos, Model: Hyundai Atos 2002Pages: 249, PDF Size: 3.11 MB
Page 196 of 249
DRIVING YOUR HYUNDAI 2- 7
o Ensure that the overdrive switch is at the
"ON" position for maximum economy.
o If rapid acceleration is required, fully de- press the accelerator pedal. In this condi- tion, the kickdown mechanism will be oper-ated and the transaxle will automaticallydownshift according to the vehicle speed.
o Do not depress the accelerator pedal with the brakes applied and the selector at the"R" "D" "2" or "L" position.
o Turn the overdrive switch on for good fuel economy and smooth driving. But if enginebraking is needed in the "D" range or ifrepeated upshifting and downshifting be-tween the 3rd and 4th gear is needed whenclimbing a gentle slope, it is recommendedthat the overdrive switch be turned off. Turnthe overdrive switch back on immediatelyafterward.
the maximum fuel economy potential of thevehicle being realized.
SC140A1-E
EFFECTIVE BRAKING Braking system performance and friction mate-
rial life are greatly affected by the driving styleadopted. The following suggestions are madeto assist in achieving the best results from thebraking system.
o Anticipate the road and conditions ahead in order that heavy braking may be avoided.
o When descending long gradients, use the engine to assist in retarding the vehicle to minimize the possibility of brake fade occur-ring.
ZC120D1-E
General Operating Instructions
o The button in the selector handle must be depressed before the selector can be moved.
o The engine may only be started when the selector is at position "P" or "N".
o Ensure that the footbrake is firmly applied when shifting from "P" or "N" to "D", "2" or "L" and vice versa.
o Always engage the parking brake when the vehicle is unattended, never use the "P"position in place of the parking brake.
o Under normal circumstances, the selector should be placed in the "D" position and thetransaxle allowed to select the most idealratio for the circumstances. In this positionmaximum fuel economy will be achieved.
o When descending steep gradients where engine braking is required, the selectorshould be placed at the "2" or "L" positiondepending upon the vehicle speed.
o When ascending steep gradients and using large throttle openings, the transaxle mayrepeatedly change between two adjacentratios. This is a normal characteristic andmay be prevented by selecting "2" or "L"depending upon the vehicle speed.
o Never move the selector to or from the "P" or "N" position with the accelerator de-pressed. o When trailer towing, ensure that the trailer
brakes function correctly and use enginebrak-ing to assist the vehicle braking system.
o Use only genuine Hyundai replacement brake pads and shoes to ensure consistentfriction characteristics and wear rates.
o After driving through deep water (e.g. fording), the brakes may become wet andperformance reduced. Always check brakeefficiency after emerging from the water anddry the brakes by lightly depressing thebrake pedal several times whilst driving slow-ly.
o Apply the parking brake only when the vehi- cle is at rest.
o Since the power assistance provided by the brake servo is derived from the engine,coast-ing with the engine turned off or tow-ing of the vehicle with the engine turned offwill result in greatly increased pedal pres-sures being re-quired to stop the vehicle.
o Do not hold the vehicle on the upgrade with the accelerator pedal. This can cause thetransmission to overheat. Always use thebrake pedal or parking brake.
YC250A1-A
ANTI-LOCK BRAKE SYSTEM
(Not all models) The Anti-Lock Brake System (ABS) is designed
to prevent wheel lock-up during sudden braking or on hazardous road surfaces. The ABS con-trol module monitors the wheel speed and con-trols the pressure applied to each brake. Thus,
Page 197 of 249
DRIVING YOUR HYUNDAI
2- 8 in emergency situations or on slick roads, ABS will increase vehicle control during braking. NOTE: During ABS operation, a slight pulsation may be felt in the brake pedal when thebrakes are applied. Also, a noise may beheard in the engine compartment while brak-ing. These conditions are normal and indi-cate that the anti-lock brake system is func-tioning properly. WARNING: Your ABS will not prevent accidents due to improper or dangerous driving maneuvers.Even though vehicle control is improvedduring emergency braking, always maintaina safe distance between you and objectsahead. Vehicle speeds should always bereduced during extreme road conditions.The braking distance for cars equipped withan anti-lock braking system may be longerthan for those without it in the followingroad conditions.
o Driving on rough, gravel or snow-cov- ered roads.
o Driving with tire chains installed.
o Driving on roads where the road surface is pitted or has different surface height.
These roads should be driven at reduced speeds. The safety features of an ABSequipped vehicle should not be tested by high speed driving or cornering. This couldendanger the safety of yourself or others.
unnecessary tire wear. Check the tire pres-sures at least once a month.
o Be sure that the wheels are aligned cor- rectly. Improper alignment can result fromhitting curbs or driving too fast over irregularsurfaces. Poor alignment causes faster tirewear and may also result in other problemsas well as greater fuel consumption.
o Keep your car in good condition. For better fuel economy and reduced maintenancecosts, maintain your car in accordance withthe maintenance schedule in Section 5. Ifyou drive your car in severe conditions,more frequent maintenance is required (seeSection 5 for details).
o Keep your car clean. For maximum service, your car should be kept clean and free ofcorrosive materials. It is especially impor-tant that mud, dirt, ice, etc. not be allowed toaccumulate on the underside of the car. Thisextra weight can result in increased fuelconsumption and also contribute to corro-sion.
o Travel lightly. Don’t carry unnecessary weight in your car. Weight is an enemy of good fueleconomy.
o Don’t let the engine idle longer than neces- sary. If you are waiting (and not in traffic),turn off your engine and restart only whenyou’re ready to go.
o Remember, your car does not require ex- tended warm-up. As soon as the engine isrunning smoothly, you can drive away. Invery cold weather, however, give your en-gine a slightly longer warm-up period.
SC150A1-F
DRIVING FOR ECONOMY You can save fuel and get more miles from yourcar if you follow these suggestions:
o Drive smoothly. Accelerate at a moderate rate. Don’t make "jack-rabbit" starts or full-throttle shifts and maintain a steady cruisingspeed. Don’t race between stoplights. Try toadjust your speed to that of the other trafficso you don’t have to change speeds unnec-essarily. Avoid heavy traffic whenever possible. Al- ways maintain a safe distance from othervehicles so you can avoid unnecessary brak-ing. This also reduces brake wear.
o Drive at a moderate speed. The faster you drive, the more fuel your car uses. Driving ata moderate speed, especially on the high-way, is one of the most effective ways toreduce fuel consumption.
o Don’t "ride" the brake or clutch pedal. This can increase fuel consumption and alsoincrease wear on these components. In ad-dition, driving with your foot resting on thebrake pedal may cause the brakes to over-heat, which reduces their effectiveness andmay lead to more serious consequences.
o Take care of your tires. Keep them inflated to the recommended pressure. Incorrect infla-tion, either too much or too little, results in
Page 198 of 249
DRIVING YOUR HYUNDAI 2- 9
ZC170C1-E
Anti-freeze/Corrosion inhibitor The cooling system must always contain an
Ethylene-Glycol based anti-freeze solution. The system is filled during manufacture with solu-tion of the correct strength which should bechecked before the onset of winter and adjust-ed or changed as required.
NOTE: The anti-freeze solution contains a corro-
sion inhibitor to prevent degradation of the aluminum castings contained within theengine. Therefore, never, drain the systemand refill with water only.
In addition, anti-freeze solution must ALWAYS
be used in vehicles fitted with air conditioning,to prevent the heater matrix from freezing andsubsequently bursting with the refrigeration sys-tem in use. ZC170B1-E
Electrical System
Winter conditions impose severe demands upon
vehicle electrical systems, particularly the charg-ing circuit. The battery condition and perfor-mance along with the alternator performanceand drive belt condition should be checked priorto the onset of winter.
o Don’t "lug" or "over-rev" the engine. Lugging
is driving too slowly in too high a gearresulting in the engine bucking. If this hap-pens to you, shift to a lower gear. Over-revving is racing the engine beyond its safe limit. This can be avoided by shifting atthe recommended speeds.
o Use your air conditioning sparingly. The air conditioning system is operated by the en-gine power so your fuel economy is reducedwhen you use it.
SC160A1-F
SMOOTH CORNERING Avoid braking or gear changing in corners,
especially when roads are wet. Ideally, cornersshould always be taken under gentle accelera-tion. If you follow these suggestions, tire wearwill be held to a minimum.
SC170A1-E
WINTER MOTORING The onset of winter conditions subject motor
vehicles to greater operating demands. There-fore, the following suggestions will assist inmaintaining peak performance and reliabilityduring these periods: ZC170D1-E
Door Locks
Should the door lock mechanism become fro-
zen, a proprietary lock de-icer should be used.Alternatively, warming the door key may thawthe door lock. However, the key should behandled carefully to avoid burning the fingers.
Never attempt to thaw a frozen door lock using
hot water, since the water will eventually freezeand compound the problem.
NOTE:The proper temperature for using the immo-
bilizer key is from -40°F to 176°F(from -40°Cto 80°C). If you heat the immobilizer keyover 176°F(80°C) to open the frozen lock, itmay cause damage to the transponder in itshead.
ZC170E1-E
Windscreen Washers & Wipers The windscreen washer bottle should be filled
with a solution of water and a proprietary winterscreen wash additive. The windscreen wipersshould not be used it the blades are frozen tothe windscreen or if they are covered withsnow, before this is removed.
NOTE: Never allow undiluted screen washer fluid
additive to spill upon the paintwork or use engine coolant anti-freeze since damage tothe paintwork may result.
Page 205 of 249
WHAT TO DO IN AN EMERGENCY
3-4 SD070B1-E
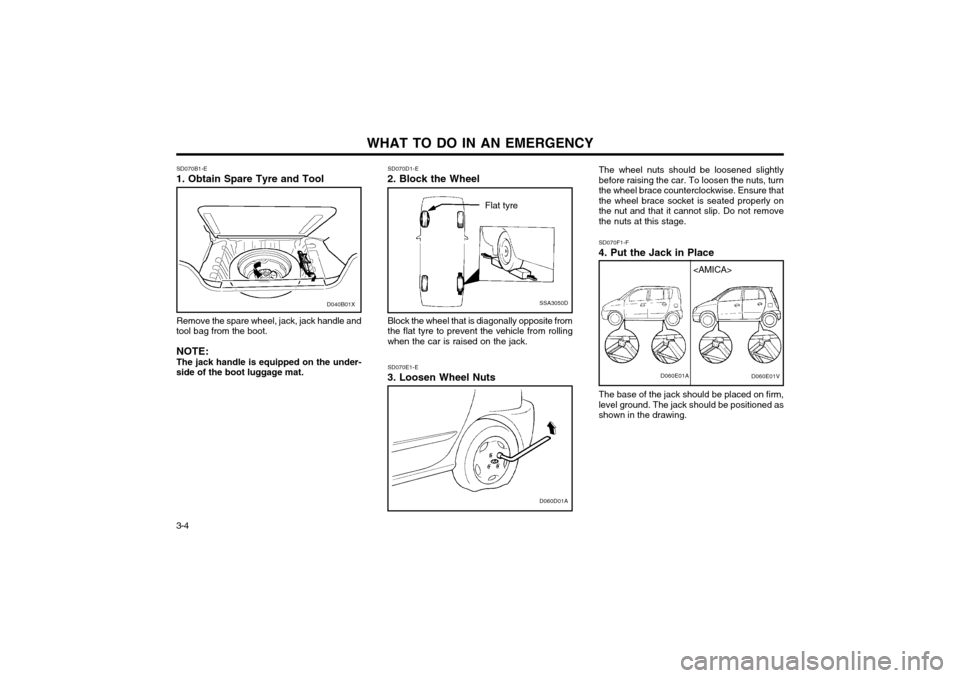
1. Obtain Spare Tyre and Tool
Remove the spare wheel, jack, jack handle and
tool bag from the boot.
NOTE: The jack handle is equipped on the under-
side of the boot luggage mat.
SSA3050D
Flat tyre
SD070D1-E
2. Block the Wheel
Block the wheel that is diagonally opposite from the flat tyre to prevent the vehicle from rollingwhen the car is raised on the jack.
D060D01A
SD070E1-E
3. Loosen Wheel Nuts The wheel nuts should be loosened slightly before raising the car. To loosen the nuts, turnthe wheel brace counterclockwise. Ensure thatthe wheel brace socket is seated properly onthe nut and that it cannot slip. Do not removethe nuts at this stage. SD070F1-F
4. Put the Jack in Place
The base of the jack should be placed on firm, level ground. The jack should be positioned asshown in the drawing.D060E01A
D040B01X
Page 206 of 249
3-5
WHAT TO DO IN AN EMERGENCY
SD070G1-E
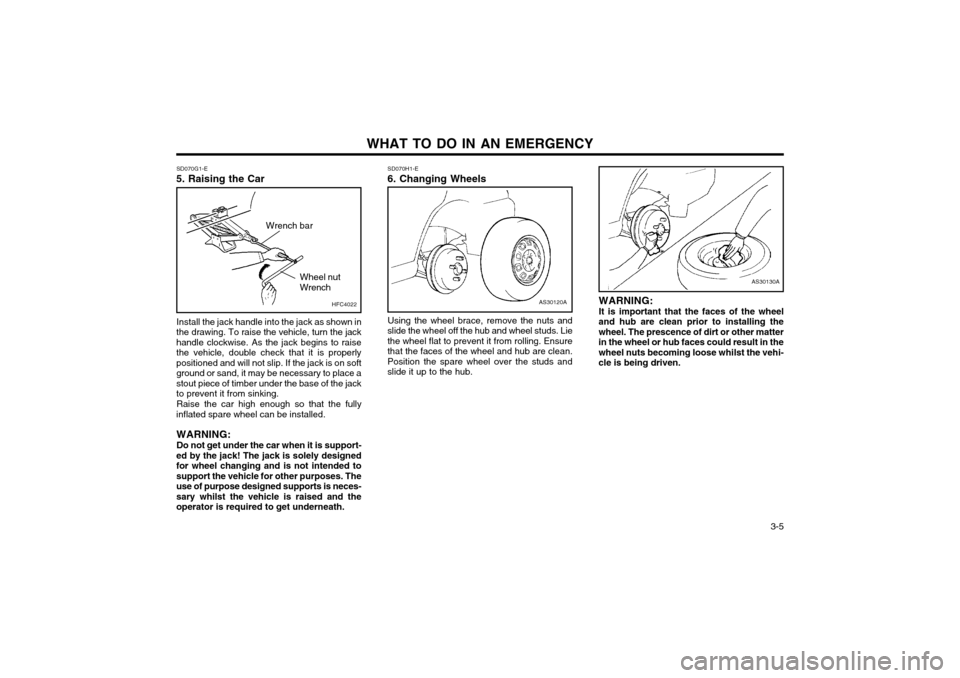
5. Raising the Car
AS30120A
SD070H1-E 6. Changing Wheels
Using the wheel brace, remove the nuts and
slide the wheel off the hub and wheel studs. Lie the wheel flat to prevent it from rolling. Ensurethat the faces of the wheel and hub are clean.Position the spare wheel over the studs andslide it up to the hub.
Install the jack handle into the jack as shown in
the drawing. To raise the vehicle, turn the jackhandle clockwise. As the jack begins to raisethe vehicle, double check that it is properlypositioned and will not slip. If the jack is on softground or sand, it may be necessary to place astout piece of timber under the base of the jackto prevent it from sinking.
Raise the car high enough so that the fully
inflated spare wheel can be installed.
WARNING: Do not get under the car when it is support-
ed by the jack! The jack is solely designed for wheel changing and is not intended tosupport the vehicle for other purposes. Theuse of purpose designed supports is neces-sary whilst the vehicle is raised and theoperator is required to get underneath. WARNING: It is important that the faces of the wheel
and hub are clean prior to installing the wheel. The prescence of dirt or other matterin the wheel or hub faces could result in thewheel nuts becoming loose whilst the vehi-cle is being driven.
AS30130A
HFC4022
Wrench bar
Wheel nut Wrench
Page 207 of 249
WHAT TO DO IN AN EMERGENCY
3-6 SD070I1-E
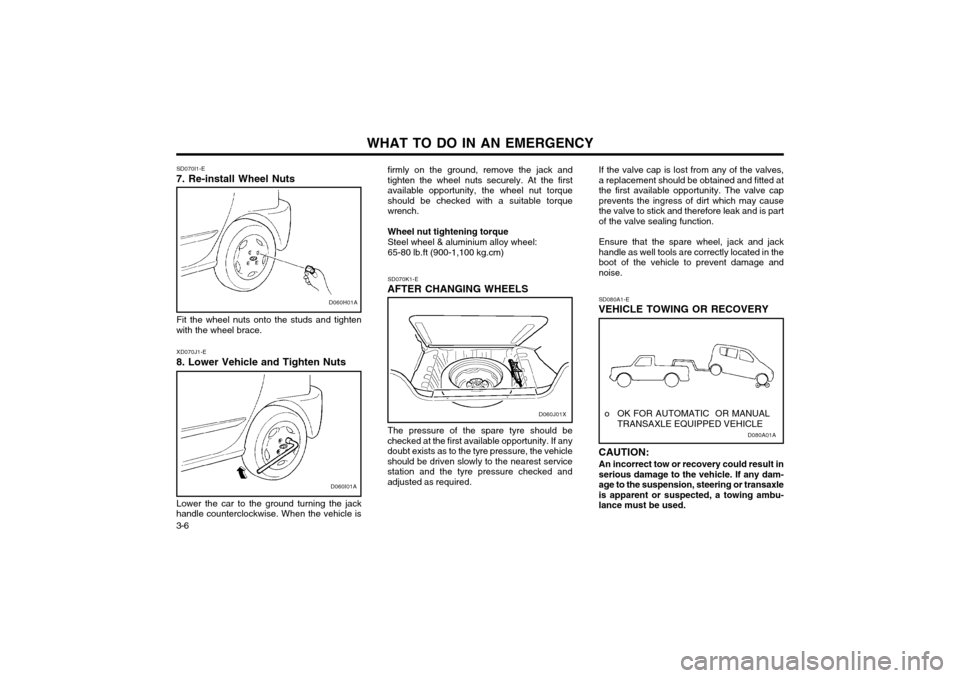
7. Re-install Wheel Nuts
D060H01A
Fit the wheel nuts onto the studs and tighten
with the wheel brace.
D060I01A
XD070J1-E
8. Lower Vehicle and Tighten Nuts
Lower the car to the ground turning the jack
handle counterclockwise. When the vehicle is firmly on the ground, remove the jack and tighten the wheel nuts securely. At the firstavailable opportunity, the wheel nut torqueshould be checked with a suitable torquewrench. Wheel nut tightening torque Steel wheel & aluminium alloy wheel:65-80 lb.ft (900-1,100 kg.cm) SD070K1-E
AFTER CHANGING WHEELS
The pressure of the spare tyre should be
checked at the first available opportunity. If any doubt exists as to the tyre pressure, the vehicleshould be driven slowly to the nearest servicestation and the tyre pressure checked andadjusted as required. If the valve cap is lost from any of the valves,a replacement should be obtained and fitted atthe first available opportunity. The valve capprevents the ingress of dirt which may causethe valve to stick and therefore leak and is partof the valve sealing function. Ensure that the spare wheel, jack and jack handle as well tools are correctly located in theboot of the vehicle to prevent damage andnoise.
D080A01A
o OK FOR AUTOMATIC OR MANUAL
TRANSAXLE EQUIPPED VEHICLE
SD080A1-E
VEHICLE TOWING OR RECOVERY CAUTION:
An incorrect tow or recovery could result in serious damage to the vehicle. If any dam-age to the suspension, steering or transaxleis apparent or suspected, a towing ambu-lance must be used.D060J01X
Page 208 of 249
3-7
WHAT TO DO IN AN EMERGENCY
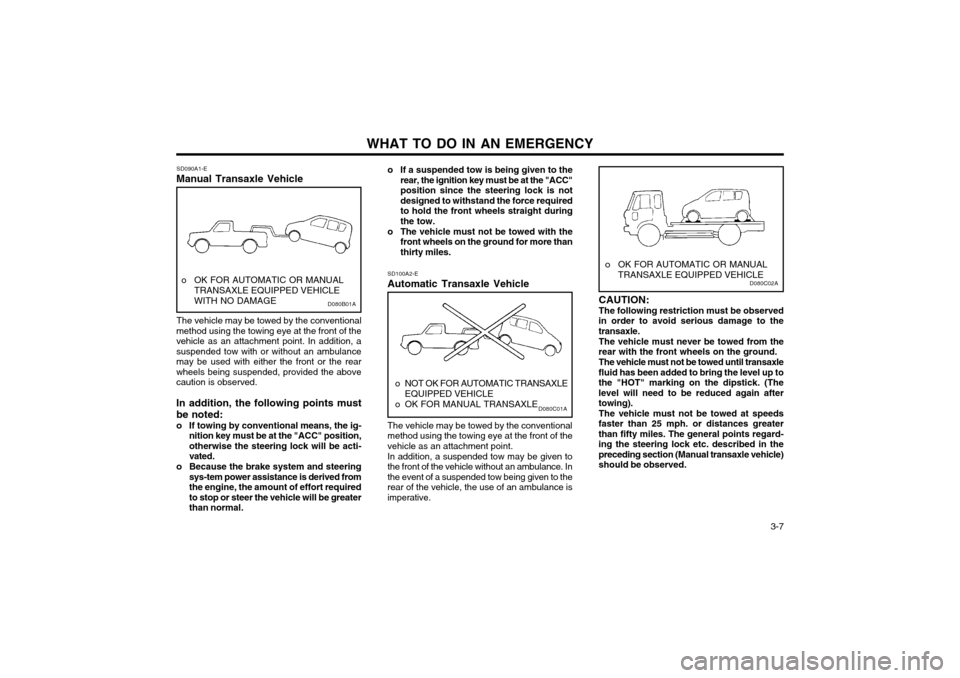
SD090A1-E
Manual Transaxle Vehicle o If a suspended tow is being given to the
rear, the ignition key must be at the "ACC" position since the steering lock is notdesigned to withstand the force requiredto hold the front wheels straight duringthe tow.
o The vehicle must not be towed with the front wheels on the ground for more thanthirty miles.
D080B01A
o OK FOR AUTOMATIC OR MANUAL
TRANSAXLE EQUIPPED VEHICLE WITH NO DAMAGE
The vehicle may be towed by the conventional
method using the towing eye at the front of the vehicle as an attachment point. In addition, asuspended tow with or without an ambulancemay be used with either the front or the rearwheels being suspended, provided the abovecaution is observed. In addition, the following points must be noted:
o If towing by conventional means, the ig- nition key must be at the "ACC" position, otherwise the steering lock will be acti-vated.
o Because the brake system and steering sys-tem power assistance is derived fromthe engine, the amount of effort requiredto stop or steer the vehicle will be greaterthan normal. SD100A2-E Automatic Transaxle Vehicle
D080C01A
o NOT OK FOR AUTOMATIC TRANSAXLE
EQUIPPED VEHICLE
o OK FOR MANUAL TRANSAXLE
The vehicle may be towed by the conventional method using the towing eye at the front of thevehicle as an attachment point. In addition, a suspended tow may be given to the front of the vehicle without an ambulance. Inthe event of a suspended tow being given to therear of the vehicle, the use of an ambulance isimperative.
D080C02A
o OK FOR AUTOMATIC OR MANUAL TRANSAXLE EQUIPPED VEHICLE
CAUTION: The following restriction must be observed
in order to avoid serious damage to the transaxle.
The vehicle must never be towed from the
rear with the front wheels on the ground.
The vehicle must not be towed until transaxle
fluid has been added to bring the level up tothe "HOT" marking on the dipstick. (Thelevel will need to be reduced again aftertowing). The vehicle must not be towed at speeds
faster than 25 mph. or distances greaterthan fifty miles. The general points regard-ing the steering lock etc. described in thepreceding section (Manual transaxle vehicle)should be observed.
Page 214 of 249
VEHICLE MAINTENANCE REQUIREMENTS 5-3
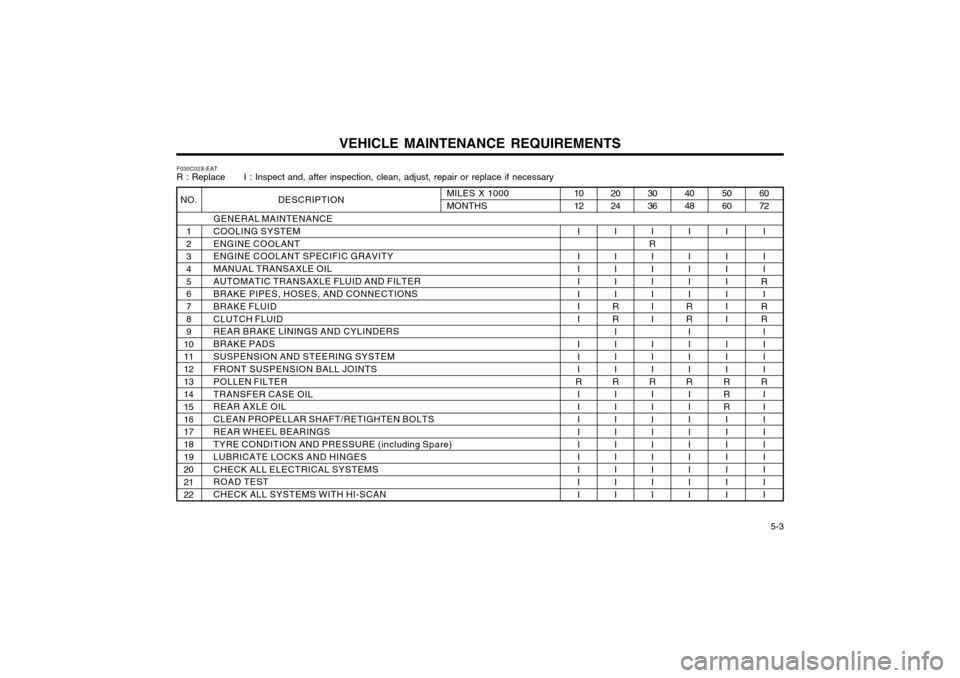
F030C02X-EAT R : Replace I : Inspect and, after inspection, clean, adjust, repair or replace if necessary
DESCRIPTION
GENERAL MAINTENANCE COOLING SYSTEMENGINE COOLANT ENGINE COOLANT SPECIFIC GRAVITY MANUAL TRANSAXLE OILAUTOMATIC TRANSAXLE FLUID AND FILTER BRAKE PIPES, HOSES, AND CONNECTIONS BRAKE FLUIDCLUTCH FLUID REAR BRAKE LININGS AND CYLINDERS BRAKE PADSSUSPENSION AND STEERING SYSTEM FRONT SUSPENSION BALL JOINTS POLLEN FILTERTRANSFER CASE OIL REAR AXLE OIL CLEAN PROPELLAR SHAFT/RETIGHTEN BOLTSREAR WHEEL BEARINGS TYRE CONDITION AND PRESSURE (incl uding Spare)
LUBRICATE LOCKS AND HINGES CHECK ALL ELECTRICAL SYSTEMS ROAD TEST CHECK ALL SYSTEMS WITH HI-SCAN
60 72
I I I
R I
R R
I I II
R
II I II I II I
50 60
I I I II I I I II
RRR III I II I
40 48
I I I II
RR
I I II
R
II I II I II I
30 36
I
R I I II I I I II
R
II I II I II I
20 24
I I I II
RR
I I II
R
II I II I II I
10 12
I I I II I I I II
R
II I II I II I
MILES X 1000 MONTHSNO.
1 2 3 45 6 78 9
1011 1213 14 1516 17 1819 20 2122
Page 220 of 249
DO-IT-YOURSELF MAINTENANCE
6-2 ZG020B1-E
GENERAL CHECKS Engine Compartment
The following should be checked regularly:
o Engine oil level and condition
o Transaxle fluid level and condition
o Brake reservoir fluid level
o Engine coolant level
o Windscreen washer fluid level
o Accessory drive belt condition
o Coolant hose condition
o Fluid leaks (on or below components)
o Power steering fluid level
o Tyre pressure and condition (including spare)
o Battery condition ZG020C1-A
Vehicle Exterior
The following should be checked monthly:
o Overall appearance and condition
o Wheel condition and wheel nut tightness
o Exhaust system condition
o Light condition and operation
o Windscreen glass condition
o Wiper blade condition
o Paint condition and corrosion
o Fluid leaks
o Door and hood lock condition o Air filter element condition G020C02X-GAT
Vehicle Interior
The following should be checked each time
when the vehicle is driven:
o Lights operation
o Windscreen wipers operation
o Horn operation
o Defroster, heating system operation (and air conditioning, if installed)
o Steering operation and condition
o Mirror condition and operation
o Turn signal operation
o Accelerator pedal operation
o Brake operation, including parking brake
o Manual transaxle operation, including clutch operation
o Automatic transaxle operation, including "Park" mechanism operation
o Seat control condition and operation
o Seat belt condition and operation
o Sunvisor operation
If you notice anything that does not operate
correctly or appear to be functioning correctly, inspect it carefully and seek assistance fromyour Hyundai dealer if service is needed. ZG030A1-A
CHECKING THE ENGINE OIL
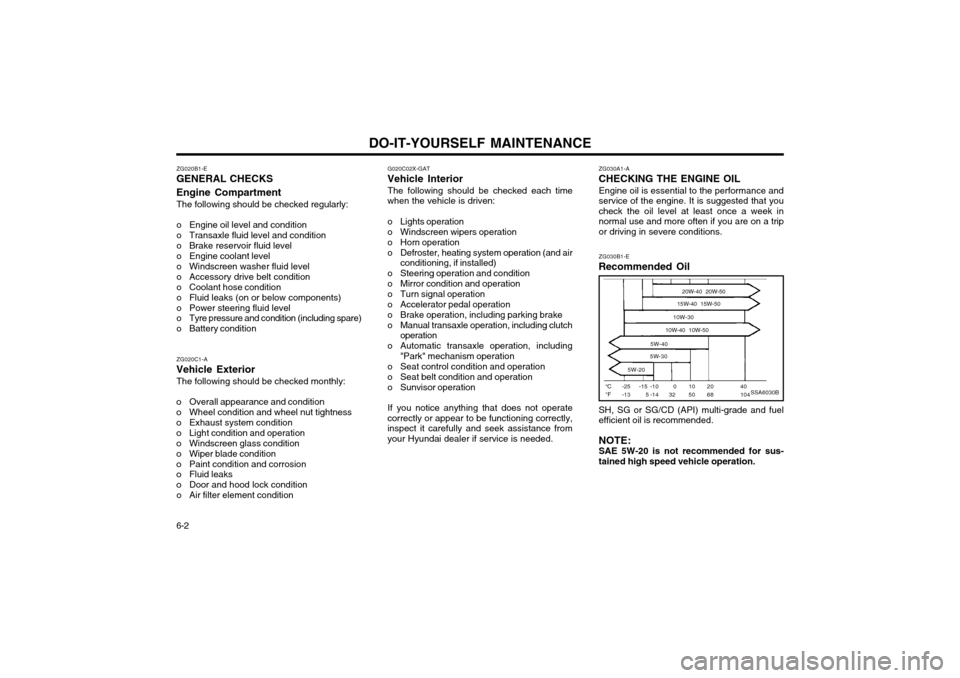
Engine oil is essential to the performance andservice of the engine. It is suggested that youcheck the oil level at least once a week innormal use and more often if you are on a tripor driving in severe conditions. ZG030B1-E
Recommended Oil
SSA6030B°C °F -25-13 20W-40 20W-50
15W-40 15W-50
10W-30
10W-40 10W-50
5W-40
5W-30
5W-20
40104
2068
1050
032
-15 5 -10-14
SH, SG or SG/CD (API) multi-grade and fuel efficient oil is recommended. NOTE: SAE 5W-20 is not recommended for sus-tained high speed vehicle operation.
Page 221 of 249
DO-IT-YOURSELF MAINTENANCE 6-3
AS60050A
FL
ZG030C1-A
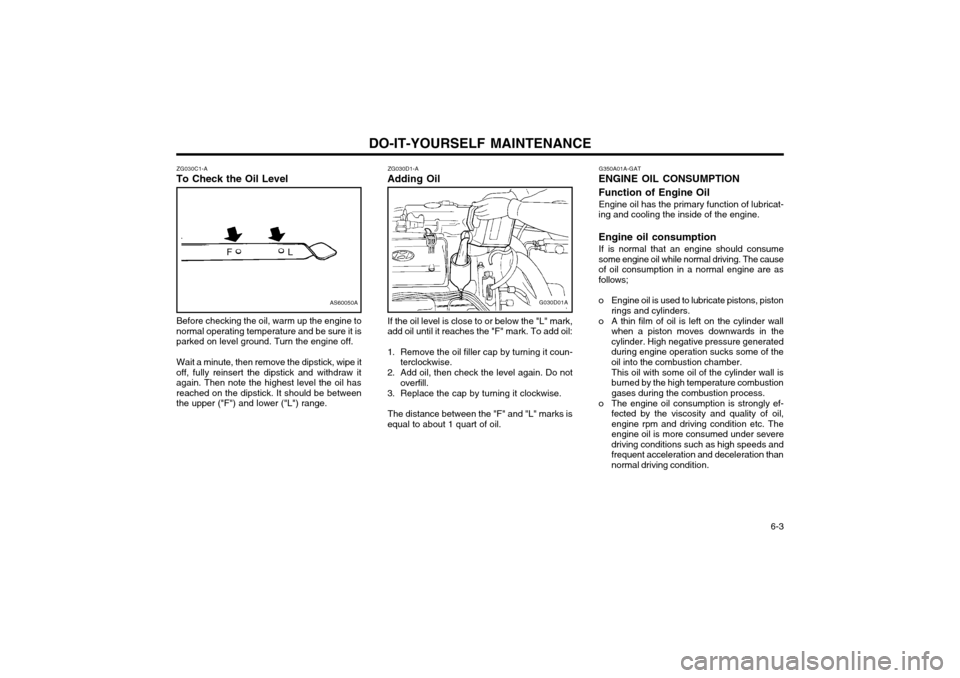
To Check the Oil Level
Before checking the oil, warm up the engine to
normal operating temperature and be sure it is parked on level ground. Turn the engine off.
Wait a minute, then remove the dipstick, wipe it
off, fully reinsert the dipstick and withdraw itagain. Then note the highest level the oil hasreached on the dipstick. It should be betweenthe upper ("F") and lower ("L") range. ZG030D1-A
Adding Oil
G030D01A
If the oil level is close to or below the "L" mark,
add oil until it reaches the "F" mark. To add oil:
1. Remove the oil filler cap by turning it coun- terclockwise.
2. Add oil, then check the level again. Do not overfill.
3. Replace the cap by turning it clockwise.
The distance between the "F" and "L" marks is
equal to about 1 quart of oil. G350A01A-GAT
ENGINE OIL CONSUMPTION Function of Engine Oil
Engine oil has the primary function of lubricat-
ing and cooling the inside of the engine. Engine oil consumption
If is normal that an engine should consume
some engine oil while normal driving. The cause of oil consumption in a normal engine are asfollows;
o Engine oil is used to lubricate pistons, piston rings and cylinders.
o A thin film of oil is left on the cylinder wall when a piston moves downwards in the cylinder. High negative pressure generatedduring engine operation sucks some of theoil into the combustion chamber. This oil with some oil of the cylinder wall is burned by the high temperature combustiongases during the combustion process.
o The engine oil consumption is strongly ef- fected by the viscosity and quality of oil,engine rpm and driving condition etc. The
engine oil is more consumed under severedriving conditions such as high speeds and
frequent acceleration and deceleration thannormal driving condition.