lock Hyundai Atos 2002 Workshop Manual
[x] Cancel search | Manufacturer: HYUNDAI, Model Year: 2002, Model line: Atos, Model: Hyundai Atos 2002Pages: 249, PDF Size: 3.11 MB
Page 148 of 249
FEATURES OF YOUR HYUNDAI 1-11
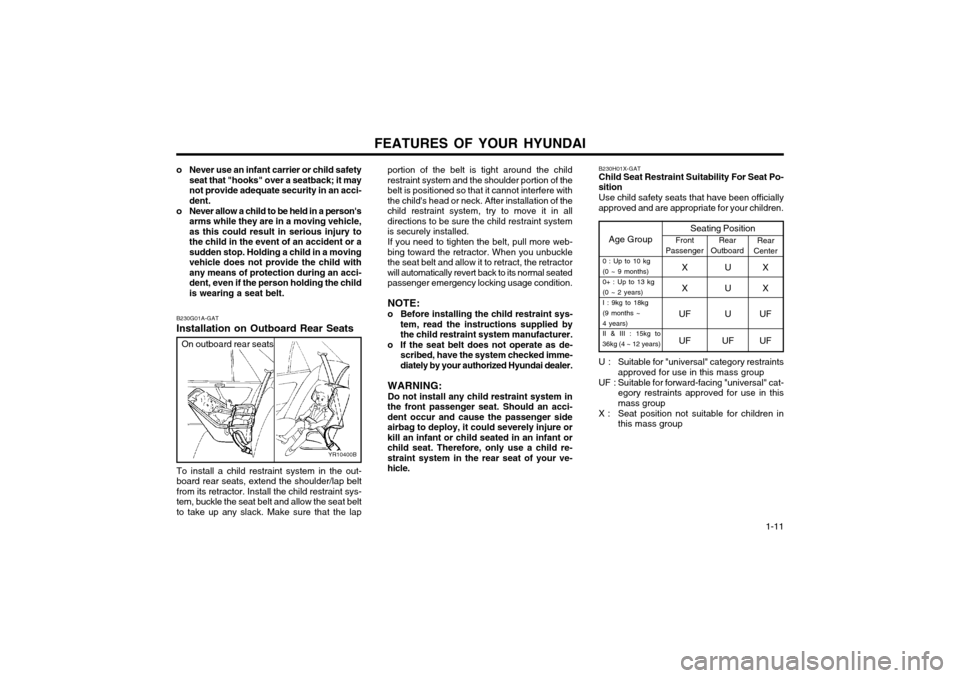
B230G01A-GAT Installation on Outboard Rear Seats
YR10400B
To install a child restraint system in the out- board rear seats, extend the shoulder/lap beltfrom its retractor. Install the child restraint sys-tem, buckle the seat belt and allow the seat beltto take up any slack. Make sure that the lap
On outboard rear seats
o Never use an infant carrier or child safety
seat that "hooks" over a seatback; it may not provide adequate security in an acci-dent.
o Never allow a child to be held in a person's arms while they are in a moving vehicle,as this could result in serious injury tothe child in the event of an accident or asudden stop. Holding a child in a movingvehicle does not provide the child withany means of protection during an acci-dent, even if the person holding the childis wearing a seat belt. portion of the belt is tight around the childrestraint system and the shoulder portion of thebelt is positioned so that it cannot interfere withthe child's head or neck. After installation of thechild restraint system, try to move it in alldirections to be sure the child restraint systemis securely installed.
If you need to tighten the belt, pull more web-
bing toward the retractor. When you unbucklethe seat belt and allow it to retract, the retractorwill automatically revert back to its normal seatedpassenger emergency locking usage condition.
NOTE:
o Before installing the child restraint sys- tem, read the instructions supplied bythe child restraint system manufacturer.
o If the seat belt does not operate as de- scribed, have the system checked imme-diately by your authorized Hyundai dealer.
WARNING: Do not install any child restraint system in
the front passenger seat. Should an acci- dent occur and cause the passenger sideairbag to deploy, it could severely injure orkill an infant or child seated in an infant orchild seat. Therefore, only use a child re-straint system in the rear seat of your ve-hicle.
Age Group Seating PositionFront
Passenger Rear
Outboard Rear
Center
0 : Up to 10 kg (0 ~ 9 months) 0+ : Up to 13 kg(0 ~ 2 years)I : 9kg to 18kg(9 months ~4 years) II & III : 15kg to
36kg (4 ~ 12 years)XUX
XUX
UF U UF
UF UF UF
B230H01X-GAT Child Seat Restraint Suitability For Seat Po-
sition
Use child safety seats that have been officially
approved and are appropriate for your children.
U : Suitable for "universal" category restraints approved for use in this mass group
UF : Suitable for forward-facing "universal" cat- egory restraints approved for use in this mass group
X : Seat position not suitable for children in this mass group
Page 149 of 249
FEATURES OF YOUR HYUNDAI
1-12 NOTE: Be sure to read information about the SRS on the labels provided on the backside ofthe sun visor and in the glove box. WARNING:
o As its name implies, the SRS is designed
to work with, and be supplemental to, the driver's and the passenger's three pointseat belt systems and is not a substitutefor them. Therefore your seat belts mustbe worn at all times while the vehicle is inmotion. In addition, the airbags deployonly in certain frontal impact conditionssevere enough to likely cause significantinjury to the vehicle occupants.
o The SRS is designed to deploy the airbags only when an impact is sufficiently se-vere and when the impact angle is lessthan 30° from the forward longitudinalaxis of the vehicle and will not deploy inside, rear or rollover impacts. Additional-ly, the airbags will only deploy once. Thus, seat belts must be worn at all times.
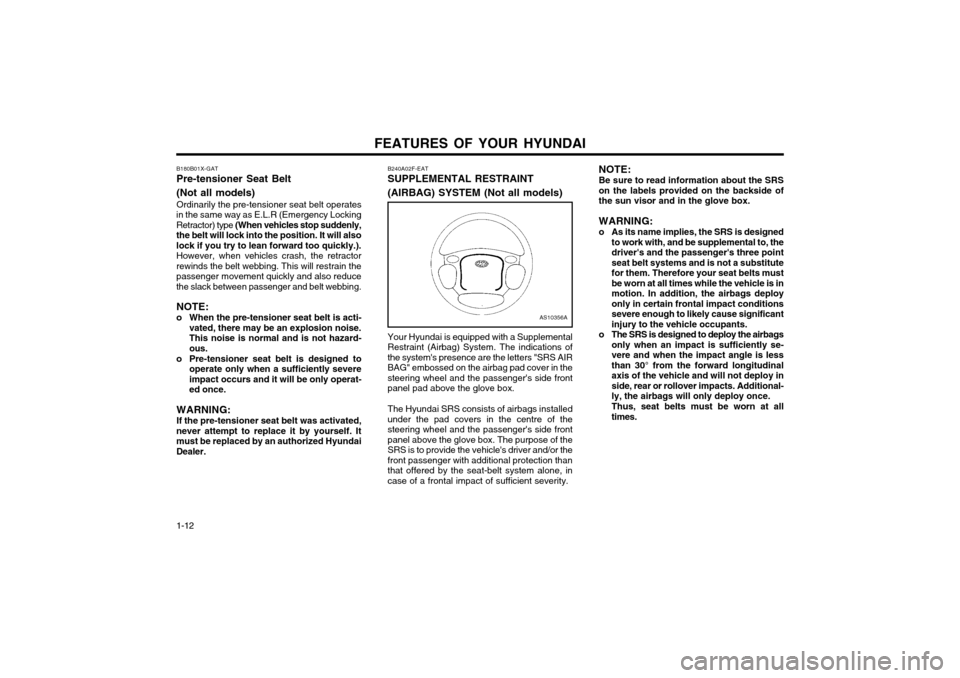
B240A02F-EAT SUPPLEMENTAL RESTRAINT (AIRBAG) SYSTEM (Not all models) Your Hyundai is equipped with a Supplemental Restraint (Airbag) System. The indications ofthe system's presence are the letters "SRS AIRBAG" embossed on the airbag pad cover in thesteering wheel and the passenger's side frontpanel pad above the glove box. The Hyundai SRS consists of airbags installed under the pad covers in the centre of thesteering wheel and the passenger's side frontpanel above the glove box. The purpose of theSRS is to provide the vehicle's driver and/or thefront passenger with additional protection thanthat offered by the seat-belt system alone, incase of a frontal impact of sufficient severity.
AS10356A
B180B01X-GAT Pre-tensioner Seat Belt (Not all models) Ordinarily the pre-tensioner seat belt operates
in the same way as E.L.R (Emergency Locking Retractor) type (When vehicles stop suddenly,
the belt will lock into the position. It will alsolock if you try to lean forward too quickly.).
However, when vehicles crash, the retractorrewinds the belt webbing. This will restrain thepassenger movement quickly and also reducethe slack between passenger and belt webbing.
NOTE:
o When the pre-tensioner seat belt is acti- vated, there may be an explosion noise.This noise is normal and is not hazard-ous.
o Pre-tensioner seat belt is designed to operate only when a sufficiently severeimpact occurs and it will be only operat-ed once.
WARNING: If the pre-tensioner seat belt was activated,
never attempt to replace it by yourself. It must be replaced by an authorized HyundaiDealer.
Page 151 of 249
FEATURES OF YOUR HYUNDAI
1-14 B240C01X-EAT SRS CareThe SRS is virtually maintenance-free and so there are no parts you can safely service byyourself. The entire SRS system must be in-spected by an authorized Hyundai dealer in 10years after the date that the car was manufac-ture. Any work on the airbag system, such as remov- ing, installing, repairing, or any work on thesteering wheel must be performed by a quali-fied Hyundai technician. Improper handling of the airbag system may result in serious personal injury. WARNING:
o Modification to SRS components or wir- ing, including the addition of any kind of badges to the pad cover or modifica-tions to the body structure, can adverse-ly affect SRS performance and lead topossible injury.
o For cleaning the horn pad, use only a soft, dry cloth or one which has beenmoistened with plain water. Solvents orcleaners could adversely affect the airbagcover and proper deployment of the sys-tem.
o No objects should be placed over or near the label identifying the airbag on thesteering wheel and instrument panel,because any such object could causeharm if the vehicle is in a crash severeenough to cause the airbag to inflate.
WARNING:
o When the SRS is activated, there may be
a loud noise and fine dust will be re- leased through out the vehicle. Theseconditions are normal and are not haz-ardous. However, the fine dust generat-ed during airbag deployment may causeskin irritation. Be sure to wash your handsand face thoroughly with lukewarm wa-ter and a mild soap after an accident inwhich the airbags were deployed.
o The SRS can function only when the ignition key is in the "ON" position. If theSRS SRI does not come on, or continu-ously remains on, after flashing for about6 seconds when the ignition key is turnedto the "ON" position, or after the engineis started, or comes on while driving, theSRS is not working properly. If this oc-curs, have your vehicle immediately in-spected by your Hyundai dealer.
o Before you replace a fuse or disconnect a battery terminal, turn the ignition key tothe "LOCK" position or remove the igni-tion key. Never remove or replace the airbag related fuse(s) when the ignition keyis in the "ON" position. Failure to heedthis warning will cause the SRS SRI toilluminate.
Upon deployment, tear seams molded directly
into the pad covers will separate under pres-sure from the expansion of the airbags. Furtheropening of the covers then allows full inflation ofthe airbags.
A fully inflated airbag in combination with a
properly worn seat belt slows the driver's for-ward motion, thus reducing the
risk of head and chest injury. After complete inflation, the airbag immediately
starts deflating, enabling the driver to maintain forward visibility.
CAUTION: When installing a container of liquid air
fresherer inside a vehicle, do not place it near the instrument cluster nor on the in-strument panel pad surface. If there is anyleakage from the air fresherer onto theseareas (instrument cluster, instrument panelpad or air ventilator), it may damage theseparts. If the liquid from the air freshererdoes leak onto these areas, wash them withwater immediately.
Page 153 of 249
FEATURES OF YOUR HYUNDAI
1-16
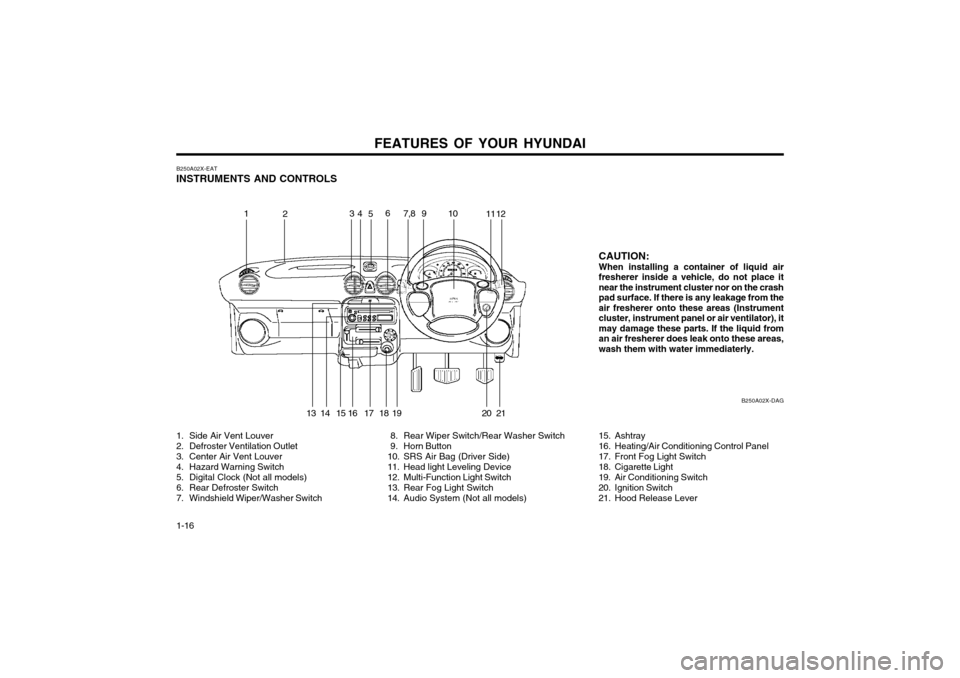
B250A02X-EAT INSTRUMENTS AND CONTROLS
1. Side Air Vent Louver
2. Defroster Ventilation Outlet
3. Center Air Vent Louver
4. Hazard Warning Switch
5. Digital Clock (Not all models)
6. Rear Defroster Switch
7. Windshield Wiper/Washer Switch 8. Rear Wiper Switch/Rear Washer Switch
9. Horn Button
10. SRS Air Bag (Driver Side)
11. Head light Leveling Device
12. Multi-Function Light Switch
13. Rear Fog Light Switch
14. Audio System (Not all models)15. Ashtray
16. Heating/Air Conditioning Control Panel
17. Front Fog Light Switch
18. Cigarette Light
19. Air Conditioning Switch
20. Ignition Switch
21. Hood Release LeverB250A02X-DAG
CAUTION: When installing a container of liquid airfresherer inside a vehicle, do not place it
near the instrument cluster nor on the crash
pad surface. If there is any leakage from theair fresherer onto these areas (Instrument
cluster, instrument panel or air ventilator), it
may damage these parts. If the liquid froman air fresherer does leak onto these areas,
wash them with water immediaterly.
1
2 34
5 9
7,8
6
1011 12
14 15 16 17 19 18 21 20
13
Page 155 of 249
FEATURES OF YOUR HYUNDAI
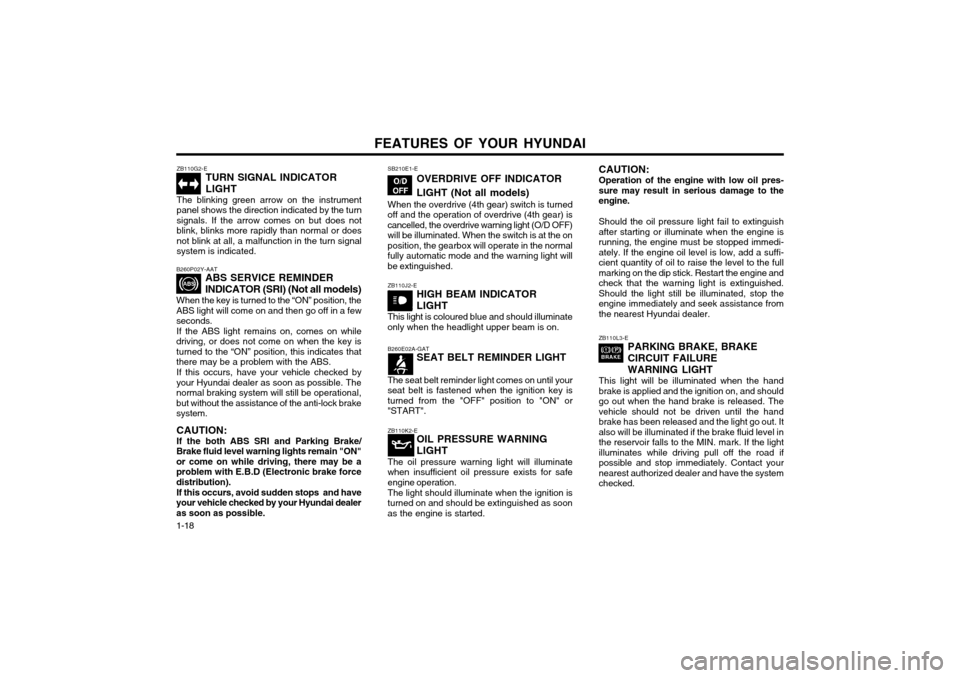
1-18 ZB110G2-E
TURN SIGNAL INDICATOR LIGHT
The blinking green arrow on the instrument panel shows the direction indicated by the turnsignals. If the arrow comes on but does notblink, blinks more rapidly than normal or doesnot blink at all, a malfunction in the turn signalsystem is indicated.
B260P02Y-AAT ABS SERVICE REMINDER INDICATOR (SRI) (Not all models)
When the key is turned to the “ON” position, the ABS light will come on and then go off in a fewseconds. If the ABS light remains on, comes on while
driving, or does not come on when the key isturned to the “ON” position, this indicates thatthere may be a problem with the ABS.
If this occurs, have your vehicle checked by
your Hyundai dealer as soon as possible. Thenormal braking system will still be operational,but without the assistance of the anti-lock brakesystem.
CAUTION: If the both ABS SRI and Parking Brake/
Brake fluid level warning lights remain "ON" or come on while driving, there may be aproblem with E.B.D (Electronic brake forcedistribution).
If this occurs, avoid sudden stops and have
your vehicle checked by your Hyundai dealeras soon as possible. SB210E1-E
OVERDRIVE OFF INDICATOR LIGHT (Not all models)
When the overdrive (4th gear) switch is turned off and the operation of overdrive (4th gear) iscancelled, the overdrive warning light (O/D OFF)will be illuminated. When the switch is at the onposition, the gearbox will operate in the normalfully automatic mode and the warning light willbe extinguished.
ZB110J2-E HIGH BEAM INDICATOR LIGHT
This light is coloured blue and should illuminate only when the headlight upper beam is on.
B260E02A-GAT SEAT BELT REMINDER LIGHT
The seat belt reminder light comes on until your seat belt is fastened when the ignition key isturned from the "OFF" position to "ON" or"START".
ZB110K2-E OIL PRESSURE WARNING LIGHT
The oil pressure warning light will illuminate when insufficient oil pressure exists for safeengine operation. The light should illuminate when the ignition is turned on and should be extinguished as soonas the engine is started.
ZB110L3-E PARKING BRAKE, BRAKE CIRCUIT FAILURE WARNING LIGHT
This light will be illuminated when the hand brake is applied and the ignition on, and shouldgo out when the hand brake is released. Thevehicle should not be driven until the handbrake has been released and the light go out. Italso will be illuminated if the brake fluid level inthe reservoir falls to the MIN. mark. If the lightilluminates while driving pull off the road ifpossible and stop immediately. Contact yournearest authorized dealer and have the systemchecked.
CAUTION: Operation of the engine with low oil pres- sure may result in serious damage to theengine. Should the oil pressure light fail to extinguish after starting or illuminate when the engine isrunning, the engine must be stopped immedi-ately. If the engine oil level is low, add a suffi-cient quantity of oil to raise the level to the fullmarking on the dip stick. Restart the engine andcheck that the warning light is extinguished.Should the light still be illuminated, stop theengine immediately and seek assistance fromthe nearest Hyundai dealer.
Page 161 of 249
FEATURES OF YOUR HYUNDAI
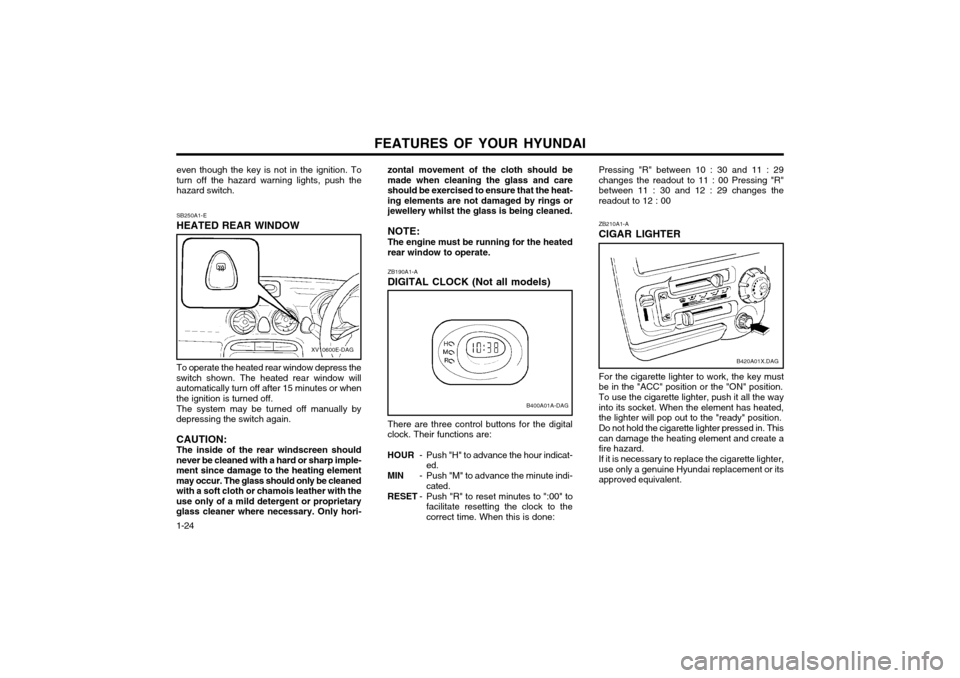
1-24 ZB210A1-A CIGAR LIGHTER
B420A01X.DAG
For the cigarette lighter to work, the key must be in the "ACC" position or the "ON" position. To use the cigarette lighter, push it all the way into its socket. When the element has heated,the lighter will pop out to the "ready" position. Do not hold the cigarette lighter pressed in. This can damage the heating element and create afire hazard. If it is necessary to replace the cigarette lighter, use only a genuine Hyundai replacement or itsapproved equivalent.
Pressing "R" between 10 : 30 and 11 : 29changes the readout to 11 : 00 Pressing "R"between 11 : 30 and 12 : 29 changes thereadout to 12 : 00
ZB190A1-A DIGITAL CLOCK (Not all models)
B400A01A-DAG
There are three control buttons for the digital clock. Their functions are:
HOUR - Push "H" to advance the hour indicat-
ed.
MIN - Push "M" to advance the minute indi-
cated.
RESET - Push "R" to reset minutes to ":00" to
facilitate resetting the clock to thecorrect time. When this is done:
zontal movement of the cloth should bemade when cleaning the glass and careshould be exercised to ensure that the heat-ing elements are not damaged by rings orjewellery whilst the glass is being cleaned. NOTE: The engine must be running for the heated rear window to operate.
SB250A1-E HEATED REAR WINDOW
XV10600E-DAG
To operate the heated rear window depress the
switch shown. The heated rear window will automatically turn off after 15 minutes or whenthe ignition is turned off.
The system may be turned off manually by
depressing the switch again. CAUTION: The inside of the rear windscreen should
never be cleaned with a hard or sharp imple- ment since damage to the heating elementmay occur. The glass should only be cleanedwith a soft cloth or chamois leather with theuse only of a mild detergent or proprietaryglass cleaner where necessary. Only hori- even though the key is not in the ignition. Toturn off the hazard warning lights, push thehazard switch.
Page 164 of 249
FEATURES OF YOUR HYUNDAI 1-27
sengers to sit on the cargo area while the car is moving as this is not a proper seatingposition and no seat belts are available foruse when the seat back is folded down. Thiscould result in serious injury or death incase of an accident or a sudden stop. Ob-jects should not extend higher than the topof the front seats. This could allow cargo toslide forward and cause injury or damageduring sudden stops.
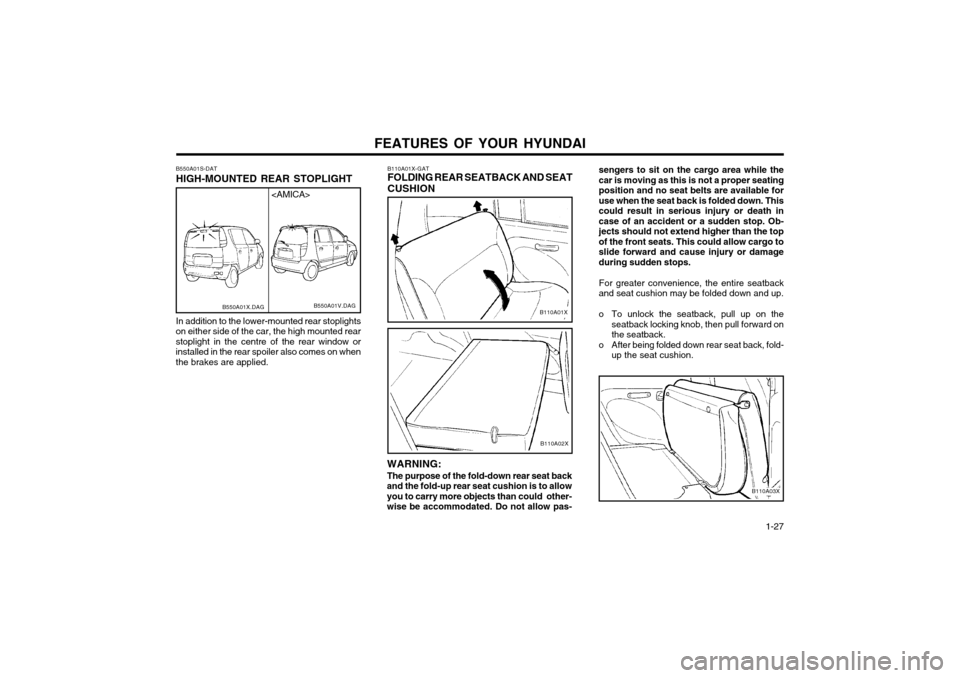
For greater convenience, the entire seatback
and seat cushion may be folded down and up.
o To unlock the seatback, pull up on the seatback locking knob, then pull forward on the seatback.
o After being folded down rear seat back, fold- up the seat cushion.
B110A03X
B110A01X-GAT FOLDING REAR SEATBACK AND SEAT CUSHION
B110A01X
WARNING: The purpose of the fold-down rear seat back
and the fold-up rear seat cushion is to allow you to carry more objects than could other-
wise be accommodated. Do not allow pas-
B110A02X
B550A01S-DAT HIGH-MOUNTED REAR STOPLIGHT In addition to the lower-mounted rear stoplights
on either side of the car, the high mounted rear stoplight in the centre of the rear window orinstalled in the rear spoiler also comes on whenthe brakes are applied.
B550A01V.DAG
B550A01X.DAG
Page 165 of 249
FEATURES OF YOUR HYUNDAI
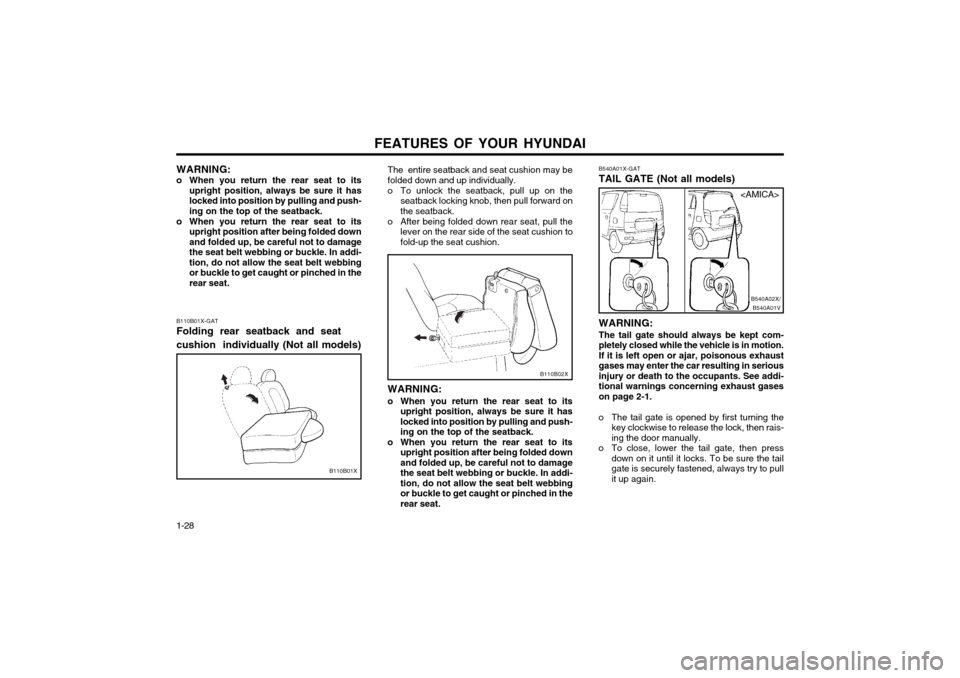
1-28 B540A01X-GAT TAIL GATE (Not all models) WARNING: The tail gate should always be kept com-
pletely closed while the vehicle is in motion.If it is left open or ajar, poisonous exhaust
gases may enter the car resulting in seriousinjury or death to the occupants. See addi-tional warnings concerning exhaust gaseson page 2-1.
o The tail gate is opened by first turning the key clockwise to release the lock, then rais-ing the door manually.
o To close, lower the tail gate, then press down on it until it locks. To be sure the tailgate is securely fastened, always try to pull
it up again.
B540A01VB540A02X/
B110B02X
The entire seatback and seat cushion may be folded down and up individually.
o To unlock the seatback, pull up on the
seatback locking knob, then pull forward on the seatback.
o After being folded down rear seat, pull the lever on the rear side of the seat cushion tofold-up the seat cushion.
WARNING:
o When you return the rear seat to its upright position, always be sure it haslocked into position by pulling and push-ing on the top of the seatback.
o When you return the rear seat to its upright position after being folded downand folded up, be careful not to damagethe seat belt webbing or buckle. In addi-tion, do not allow the seat belt webbingor buckle to get caught or pinched in therear seat.
B110B01X-GAT Folding rear seatback and seat cushion individually (Not all models)
B110B01X WARNING:
o When you return the rear seat to its upright position, always be sure it has locked into position by pulling and push-ing on the top of the seatback.
o When you return the rear seat to its upright position after being folded downand folded up, be careful not to damagethe seat belt webbing or buckle. In addi-tion, do not allow the seat belt webbingor buckle to get caught or pinched in therear seat.
Page 166 of 249
FEATURES OF YOUR HYUNDAI 1-29
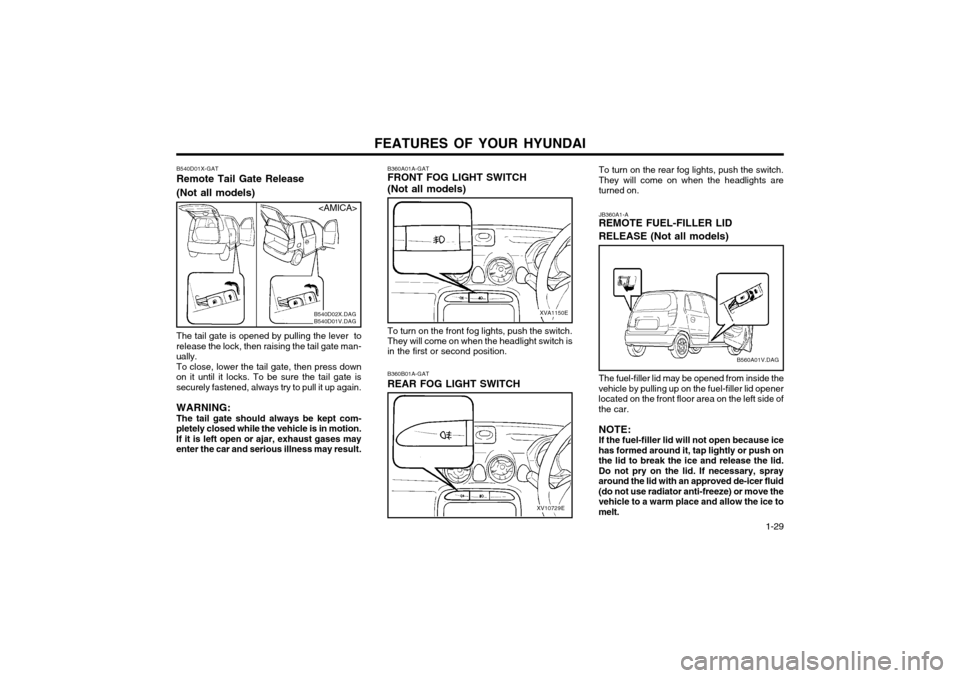
To turn on the rear fog lights, push the switch.
They will come on when the headlights areturned on. JB360A1-A REMOTE FUEL-FILLER LID RELEASE (Not all models) The fuel-filler lid may be opened from inside the
vehicle by pulling up on the fuel-filler lid opener located on the front floor area on the left side ofthe car.
NOTE:If the fuel-filler lid will not open because ice
has formed around it, tap lightly or push onthe lid to break the ice and release the lid.Do not pry on the lid. If necessary, sprayaround the lid with an approved de-icer fluid(do not use radiator anti-freeze) or move thevehicle to a warm place and allow the ice tomelt.
B560A01V.DAG
To turn on the front fog lights, push the switch. They will come on when the headlight switch is in the first or second position.
XV10729E
B360B01A-GAT REAR FOG LIGHT SWITCH
B540D01X-GATRemote Tail Gate Release (Not all models)
The tail gate is opened by pulling the lever to release the lock, then raising the tail gate man-ually.To close, lower the tail gate, then press down
on it until it locks. To be sure the tail gate issecurely fastened, always try to pull it up again. WARNING: The tail gate should always be kept com-
pletely closed while the vehicle is in motion.If it is left open or ajar, exhaust gases may
enter the car and serious illness may result. B360A01A-GAT FRONT FOG LIGHT SWITCH (Not all models)
XVA1150E
B540D02X.DAG B540D01V.DAG
Page 167 of 249
FEATURES OF YOUR HYUNDAI
1-30
B570A02A
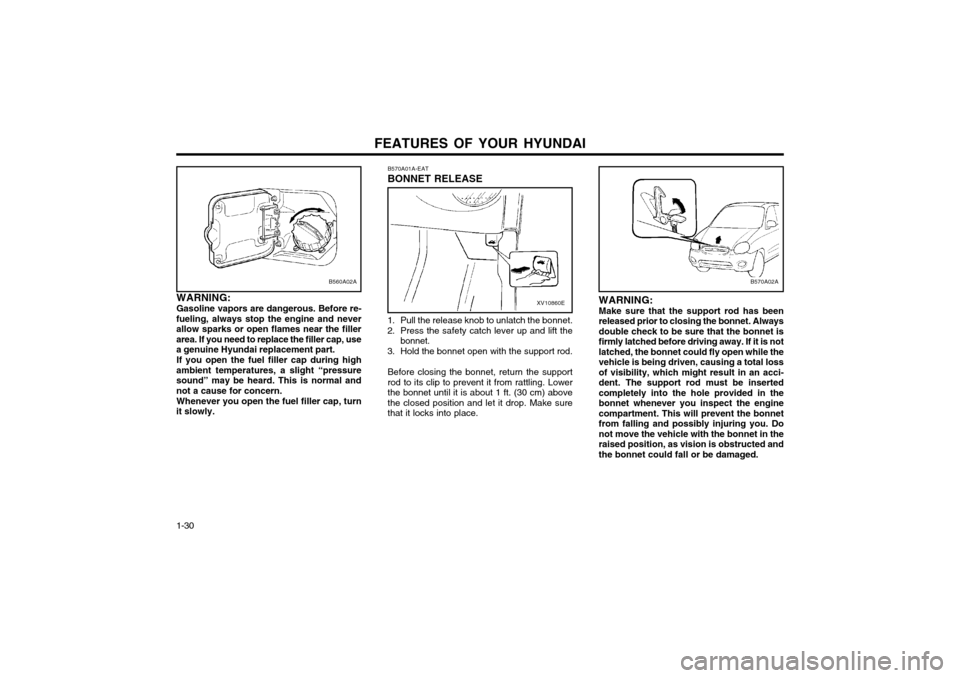
WARNING: Make sure that the support rod has been
released prior to closing the bonnet. Alwaysdouble check to be sure that the bonnet isfirmly latched before driving away. If it is notlatched, the bonnet could fly open while thevehicle is being driven, causing a total lossof visibility, which might result in an acci-dent. The support rod must be insertedcompletely into the hole provided in thebonnet whenever you inspect the enginecompartment. This will prevent the bonnetfrom falling and possibly injuring you. Donot move the vehicle with the bonnet in theraised position, as vision is obstructed andthe bonnet could fall or be damaged.
B570A01A-EAT BONNET RELEASE
B560A02A
WARNING: Gasoline vapors are dangerous. Before re-
fueling, always stop the engine and never allow sparks or open flames near the fillerarea. If you need to replace the filler cap, usea genuine Hyundai replacement part.
If you open the fuel filler cap during high
ambient temperatures, a slight “pressuresound” may be heard. This is normal andnot a cause for concern.
Whenever you open the fuel filler cap, turn
it slowly.XV10860E
1. Pull the release knob to unlatch the bonnet.
2. Press the safety catch lever up and lift the bonnet.
3. Hold the bonnet open with the support rod.
Before closing the bonnet, return the support rod to its clip to prevent it from rattling. Lowerthe bonnet until it is about 1 ft. (30 cm) abovethe closed position and let it drop. Make surethat it locks into place.