set Hyundai Azera 2015 Repair Manual
[x] Cancel search | Manufacturer: HYUNDAI, Model Year: 2015, Model line: Azera, Model: Hyundai Azera 2015Pages: 473, PDF Size: 11.92 MB
Page 225 of 473
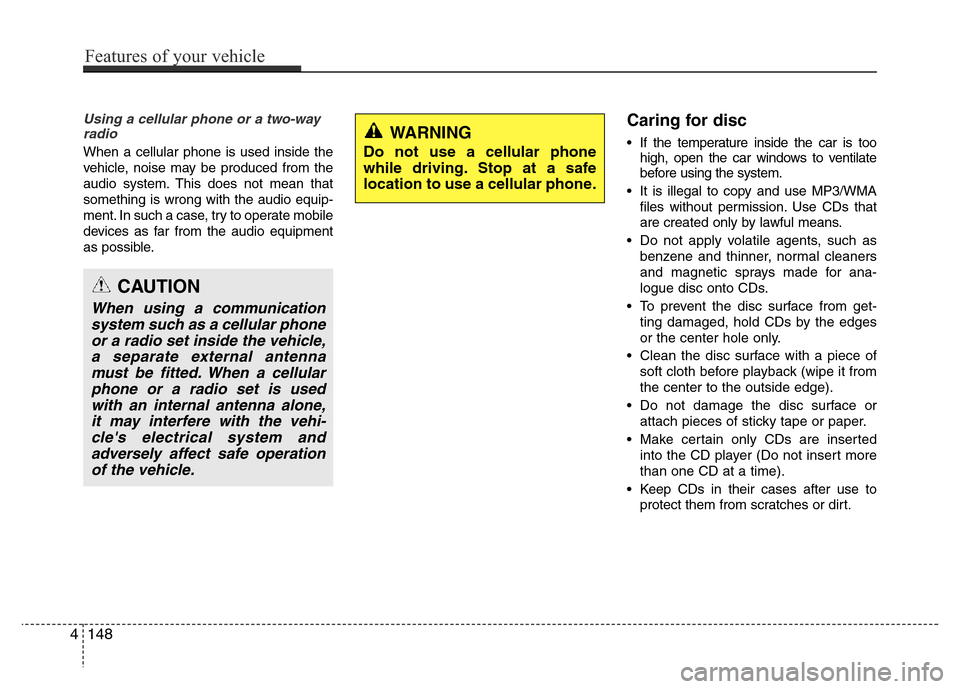
Using a cellular phone or a two-way
radio
When a cellular phone is used inside the
vehicle, noise may be produced from the
audio system. This does not mean that
something is wrong with the audio equip-
ment. In such a case, try to operate mobile
devices as far from the audio equipment
as possible.
Caring for disc
• If the temperature inside the car is too
high, open the car windows to ventilate
before using the system.
• It is illegal to copy and use MP3/WMA
files without permission. Use CDs that
are created only by lawful means.
• Do not apply volatile agents, such as
benzene and thinner, normal cleaners
and magnetic sprays made for ana-
logue disc onto CDs.
• To prevent the disc surface from get-
ting damaged, hold CDs by the edges
or the center hole only.
• Clean the disc surface with a piece of
soft cloth before playback (wipe it from
the center to the outside edge).
• Do not damage the disc surface or
attach pieces of sticky tape or paper.
• Make certain only CDs are inserted
into the CD player (Do not insert more
than one CD at a time).
• Keep CDs in their cases after use to
protect them from scratches or dirt.
CAUTION
When using a communication
system such as a cellular phone
or a radio set inside the vehicle,
a separate external antenna
must be fitted. When a cellular
phone or a radio set is used
with an internal antenna alone,
it may interfere with the vehi-
cle's electrical system and
adversely affect safe operation
of the vehicle.
WARNING
Do not use a cellular phone
while driving. Stop at a safe
location to use a cellular phone.
4148
Features of your vehicle
Page 228 of 473
(Continued)
• If you want to change the position
of device installation, please
inquire with your place of pur-
chase or service maintenance
center. Technical expertise is
required to install or disassemble
the device.
• Turn on the car ignition before
using this device. Do not operate
the audio system for long periods
of time with the ignition turned off
as such operations may lead to
battery discharge.
• Do not subject the device to
severe shock or impact. Direct
pressure onto the front side of
the monitor may cause damage to
the LCD or touch screen.
(Continued)(Continued)
• When cleaning the device, make
sure to turn off the device and
use a dry and smooth cloth.
Never use tough materials, chem-
ical cloths, or solvents (alcohol,
benzene, thinners, etc.) as such
materials may damage the device
panel or cause color/quality dete-
rioration
• Do not place beverages close to
the audio system. Spilling bever-
ages may lead to system mal-
function.
• In case of product malfunction,
please contact your place of pur-
chase or After Service center.
• Placing the audio system within
an electromagnetic environment
may result in noise interference.
Features of your vehicle
151 4
CAUTION
• Operating the device while driv-
ing could lead to accidents due to
a lack of attention to external sur-
roundings. First park the vehicle
before operating the device.
• Adjust the volume to levels that
allow the driver to hear sounds
from outside of the vehicle.
Driving in a state where external
sounds cannot be heard may lead
to accidents.
• Pay attention to the volume set-
ting when turning the device on.
A sudden output of extreme vol-
ume upon turning the device on
could lead to hearing impairment.
(Adjust the volume to a suitable
levels before turning off the
device.)
(Continued)
Page 232 of 473
✽NOTICE - USING THE iPod®
DEVICE
•iPod®is a registered trademark of
Apple Inc.
• In order to use the iPod
®while
operating the keys, you must use a
dedicated iPod
®cable. (the cable
that is supplied when purchasing
iPod
®/iPhone products)
• If the iPod®is connected to the
vehicle while it is playing, a high
pitch sound could occur for approx-
imately 1-2 seconds immediately
after connecting. If possible, con-
nect the iPod
®to the vehicle with
the iPod®stopped/paused.
• During ACC ON state, connecting
the iPod
®through the iPod®cable
will charge the iPod®through the
car audio system.
• When connecting with the iPod
®
cable, make sure to fully insert the
jack to prevent communication
interference.
(Continued)(Continued)
• When the EQ features of an exter-
nal device, such as the iPod
®, and
the audio system are both active,
EQ effects could overlap and cause
sound deterioration and distortion.
Whenever possible, turn off the EQ
feature within the external device
upon use by connecting with the
audio system.
• Noise may occur when an iPod
®or
AUX device is connected. When
such devices are not being used, dis-
connect the device for storage.
• When the iPod
®or AUX device
power is connected to the power
jack, playing the external device
may result in noise. In such cases,
disconnect the power connection
before use.
• Skipping or improper operation
may occur depending on the char-
acteristics of your iPod
®/Phone
device.
(Continued)(Continued)
• If your iPhone is connected to both
the Bluetooth
®Wireless Technology
and USB, the sound may not be
properly played. In your iPhone,
select the Dock connector or
Bluetooth
®Wireless Technology to
change the sound output (source).
•iPod
®mode cannot be operated
when the iPod®cannot be recog-
nized due to versions that do not
support communication protocols.
• For fifth generation iPod
®Nano
devices, the iPod®may not be rec-
ognized when the battery level is
low. Please charge the iPod
®for
use.
• Search/play orders shown within the
iPod
®device may differ with the
orders shown within the audio sys-
tem.
• If the iPod
®malfunctions due to an
iPod®device defect, reset the iPod®
and try again. (To learn more, refer
to your iPod®manual)
(Continued)
Features of your vehicle
155 4
Page 234 of 473
✽NOTICE- USING UPON CON-
NECTING
Bluetooth®Wireless
Technology PHONE
• Before connecting the car audio sys-
tem with the mobile phone, check to
see that the mobile phone supports
Bluetooth
®Wireless Technology fea-
tures.
• Even if the phone supports Bluetooth
®
Wireless Technology, the phone will
not be found during device searches if
the phone has been set to hidden state
or the Bluetooth
®Wireless Technology
power is turned off. Disable the hid-
den state or turn on the Bluetooth
®
Wireless Technology power prior to
searching/connecting with the car
audio system.
• If you do not want to automatically
connect yourBluetooth
®Wireless
Technology phone, try the following.
1. Turn off the Bluetooth
®feature in
your mobile phone.
(Continued)(Continued)
-For more information on Bluetooth
®
Wireless Technology features within
your mobile, refer to your mobile
phone user’s manual.
2.Turn off the Bluetooth
®Wireless
Technology feature in your car
audio system.
-To turn off the Bluetooth
®Wireless
Technology feature in your car audio
system, go to [Phone] and
[turn off] the Bluetooth
®Wireless
Technology feature.
• Park the vehicle when connecting the
car audio system with your mobile
phone.
•Bluetooth
®Wireless Technology con-
nection may become intermittently
disconnected in some mobile phones.
Follow these steps to try again.
1.Turn the Bluetooth
®Wireless
Technology function within the
mobile phone off/on and try again.
2.Turn the mobile phone power
Off/On and try again.
(Continued)(Continued)
3.Completely remove the mobile
phone battery, reboot, and then
again.
4.Reboot the audio system and try
again.
5.Delete all paired devices, pair and
try again.
• The Handsfree call volume and quali-
ty may differ depending on the mobile
phone.
•Bluetooth
®Wireless Technology fea-
tures supported within the vehicle are
as follows. Some features may not be
supported depending on your
Bluetooth
®Wireless Technologydevice.
- Answering and placing Bluetooth®
Wireless Technology Handsfree calls
- Menu operation during call (Switch
to Private, Switch to call waiting,
Outgoing volume)
- Download Call History
- Download Mobile Phone book
- Phone book/Call History Auto
Download
(Continued)
SETUP
Features of your vehicle
157 4
Page 237 of 473
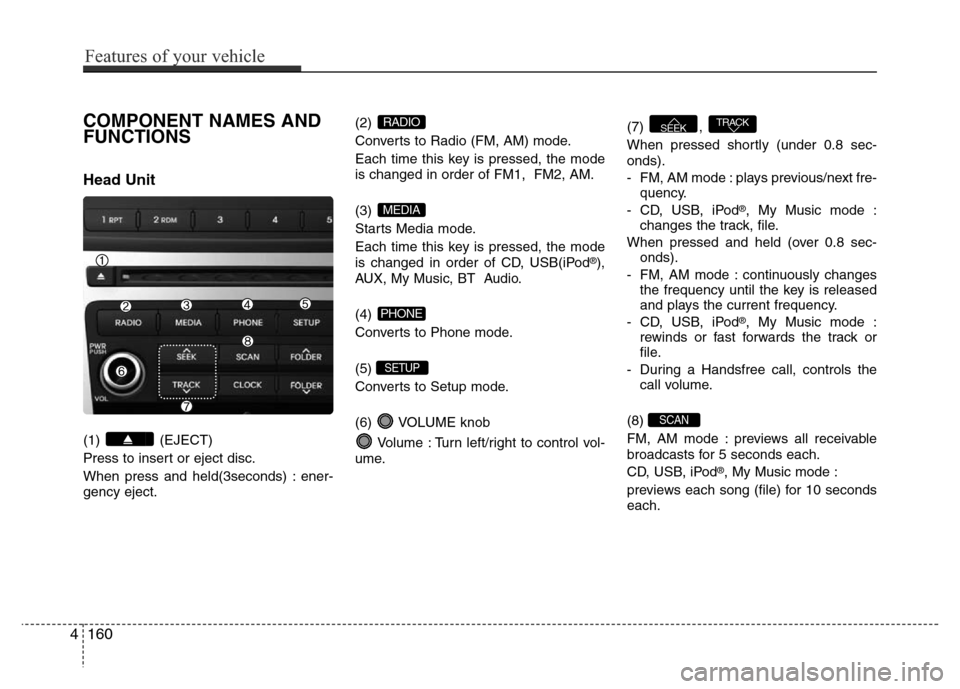
COMPONENT NAMES AND
FUNCTIONS
Head Unit
(1) (EJECT)
Press to insert or eject disc.
When press and held(3seconds) : ener-
gency eject.(2)
Converts to Radio (FM, AM) mode.
Each time this key is pressed, the mode
is changed in order of FM1, FM2, AM.
(3)
Starts Media mode.
Each time this key is pressed, the mode
is changed in order of CD, USB(iPod
®),
AUX, My Music, BT Audio.
(4)
Converts to Phone mode.
(5)
Converts to Setup mode.
(6) VOLUME knob
Volume : Turn left/right to control vol-
ume.(7) ,
When pressed shortly (under 0.8 sec-
onds).
- FM, AM mode : plays previous/next fre-
quency.
- CD, USB, iPod
®, My Music mode :
changes the track, file.
When pressed and held (over 0.8 sec-
onds).
- FM, AM mode : continuously changes
the frequency until the key is released
and plays the current frequency.
- CD, USB, iPod
®, My Music mode :
rewinds or fast forwards the track or
file.
- During a Handsfree call, controls the
call volume.
(8)
FM, AM mode : previews all receivable
broadcasts for 5 seconds each.
CD, USB, iPod
®, My Music mode :
previews each song (file) for 10 seconds
each.
SCAN
TRACKSEEK
SETUP
PHONE
MEDIA
RADIO
4160
Features of your vehicle
Page 238 of 473
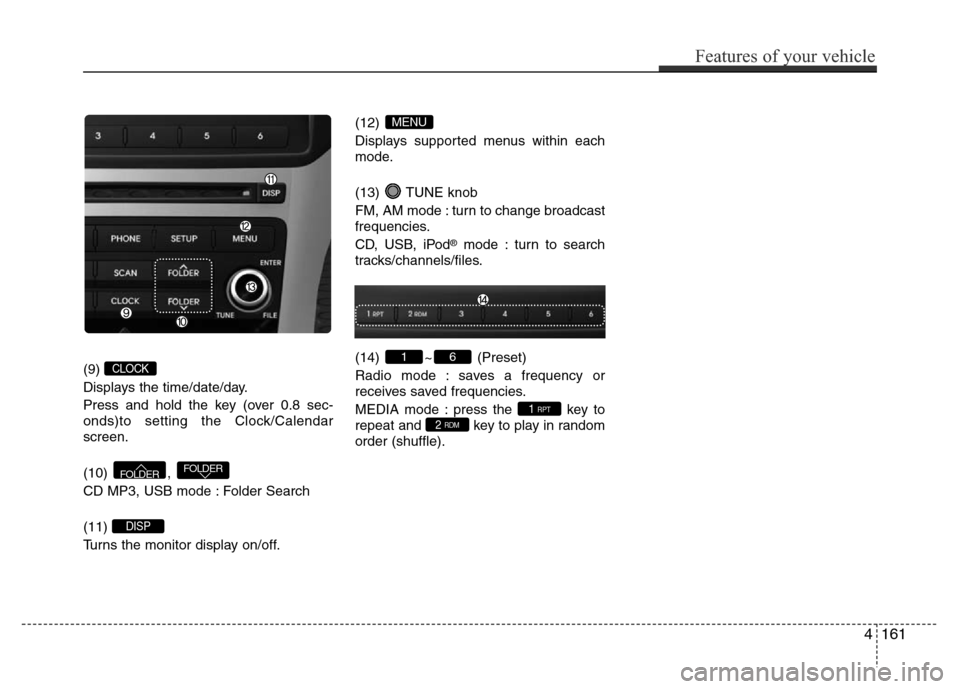
(9)
Displays the time/date/day.
Press and hold the key (over 0.8 sec-
onds)to setting the Clock/Calendar
screen.
(10) ,
CD MP3, USB mode : Folder Search
(11)
Turns the monitor display on/off.(12)
Displays supported menus within each
mode.
(13) TUNE knob
FM, AM mode : turn to change broadcast
frequencies.
CD, USB, iPod
®mode : turn to search
tracks/channels/files.
(14) ~ (Preset)
Radio mode : saves a frequency or
receives saved frequencies.
MEDIA mode : press the key to
repeat and key to play in random
order (shuffle).
2 RDM1 RPT
61
MENU
DISP
FOLDERFOLDER
CLOCK
Features of your vehicle
161 4
Page 239 of 473
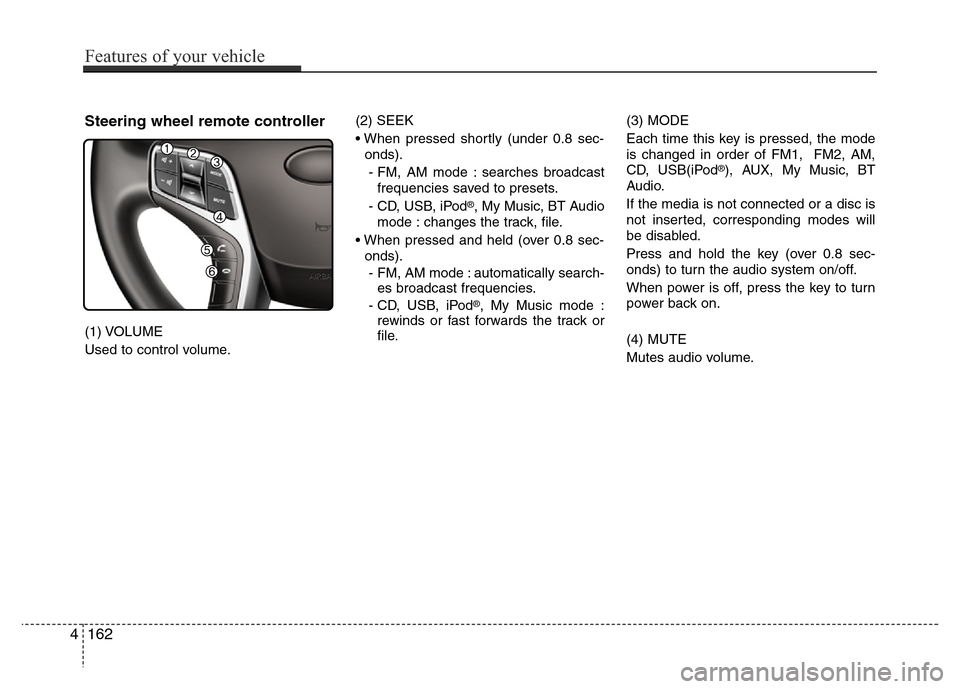
Steering wheel remote controller
(1) VOLUME
Used to control volume.(2) SEEK
• When pressed shortly (under 0.8 sec-
onds).
- FM, AM mode : searches broadcast
frequencies saved to presets.
- CD, USB, iPod
®, My Music, BT Audio
mode : changes the track, file.
• When pressed and held (over 0.8 sec-
onds).
- FM, AM mode : automatically search-
es broadcast frequencies.
- CD, USB, iPod
®, My Music mode :
rewinds or fast forwards the track or
file.(3) MODE
Each time this key is pressed, the mode
is changed in order of FM1, FM2, AM,
CD, USB(iPod
®), AUX, My Music, BT
Audio.
If the media is not connected or a disc is
not inserted, corresponding modes will
be disabled.
Press and hold the key (over 0.8 sec-
onds) to turn the audio system on/off.
When power is off, press the key to turn
power back on.
(4) MUTE
Mutes audio volume.
4162
Features of your vehicle
Page 241 of 473
![Hyundai Azera 2015 Repair Manual RADIO MODE
Basic Mode Screen
(1) Mode Display
Displays currently operating mode.
(2) Frequency
Displays the current frequency.
(3) Preset
Displays currently playing preset number
[1] ~ [6].
(4) MENU
D](/img/35/14466/w960_14466-240.png "Hyundai Azera 2015 Repair Manual RADIO MODE
Basic Mode Screen
(1) Mode Display
Displays currently operating mode.
(2) Frequency
Displays the current frequency.
(3) Preset
Displays currently playing preset number
[1] ~ [6].
(4) MENU
D")
RADIO MODE
Basic Mode Screen
(1) Mode Display
Displays currently operating mode.
(2) Frequency
Displays the current frequency.
(3) Preset
Displays currently playing preset number
[1] ~ [6].
(4) MENU
Displays Radio menus.(5) Preset Display
Displays saved presets.
(6) A.Store
Automatically saves frequencies with
superior reception to Preset buttons.
4164
Features of your vehicle
Page 242 of 473
![Hyundai Azera 2015 Repair Manual Switching to Radio Mode
Pressing the key will change the
operating mode in order of FM1
➟ FM2
➟ AM .
If [Mode Pop up] is turned on within
[Display], then pressing the
key will display the Radio](/img/35/14466/w960_14466-241.png "Hyundai Azera 2015 Repair Manual Switching to Radio Mode
Pressing the key will change the
operating mode in order of FM1
➟ FM2
➟ AM .
If [Mode Pop up] is turned on within
[Display], then pressing the
key will display the Radio")
Switching to Radio Mode
Pressing the key will change the
operating mode in order of FM1
➟ FM2
➟ AM .
If [Mode Pop up] is turned on within
[Display], then pressing the
key will display the Radio mode
pop up screen.
Use TUNE knob to move the focus.
Press the knob to select.
✽ NOTICE
If the key is pressed with the
system power off, then the power will
turn on and the most recently played
broadcast will be played.
Searching Radio Frequencies
Using Seek
Press the , key to play
the previous/next frequency.
Using TUNE
Turn the TUNE knob to select the fre-
quency.
Using Radio Mode
Selecting Presets
Press the key Select
The 6 presets are displayed.
Press the ~ key to play the
desired preset.
6 1
PresetMENU
TRACKSEEK
RADIO
RADIO
SETUP
RADIO
Features of your vehicle
165 4
Page 243 of 473
Features of your vehicle
166 4
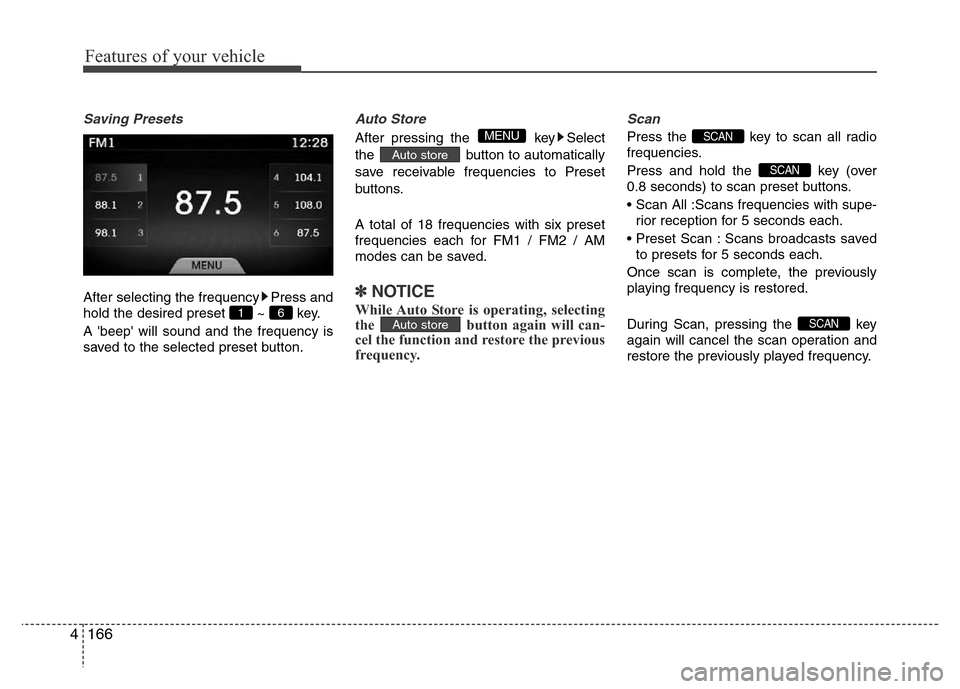
Saving Presets
After selecting the frequency Press and
hold the desired preset ~ key.
A 'beep' will sound and the frequency is
saved to the selected preset button.
Auto Store
After pressing the key Select
the button to automatically
save receivable frequencies to Preset
buttons.
A total of 18 frequencies with six preset
frequencies each for FM1 / FM2 / AM
modes can be saved.
✽NOTICE
While Auto Store is operating, selecting
the button again will can-
cel the function and restore the previous
frequency.
Scan
Press the key to scan all radio
frequencies.
Press and hold the key (over
0.8 seconds) to scan preset buttons.
• Scan All :Scans frequencies with supe-
rior reception for 5 seconds each.
• Preset Scan : Scans broadcasts saved
to presets for 5 seconds each.
Once scan is complete, the previously
playing frequency is restored.
During Scan, pressing the key
again will cancel the scan operation and
restore the previously played frequency.
SCAN
SCAN
SCAN
Auto store
Auto store
MENU
6 1