ESP Hyundai Elantra 2009 Инструкция по эксплуатации (in Russian)
[x] Cancel search | Manufacturer: HYUNDAI, Model Year: 2009, Model line: Elantra, Model: Hyundai Elantra 2009Pages: 308, PDF Size: 15.03 MB
Page 6 of 308
Introduction
6
1
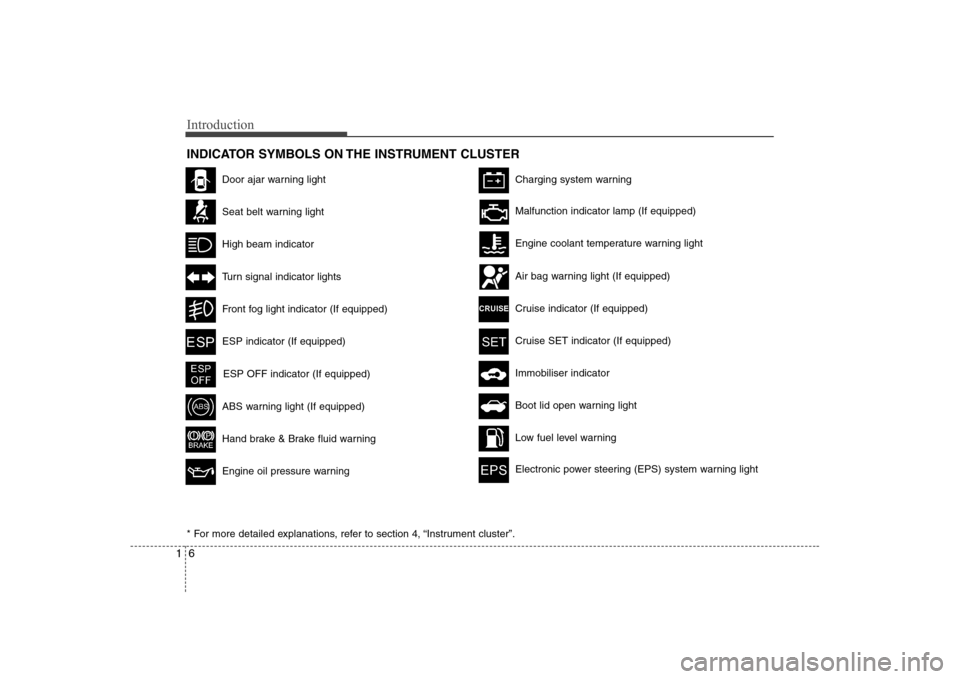
INDICATOR SYMBOLS ON THE INSTRUMENT CLUSTER
Door ajar warning light
Seat belt warning light
High beam indicator
Turn signal indicator lights
Front fog light indicator (If equipped)
ABS warning light (If equipped)
Hand brake & Brake fluid warning
Engine oil pressure warning
Charging system warning
ESP indicator (If equipped)
ESP OFF indicator (If equipped)
Malfunction indicator lamp (If equipped)
Air bag warning light (If equipped)
Cruise indicator (If equipped)
Cruise SET indicator (If equipped)
Immobiliser indicator
Low fuel level warning
Electronic power steering (EPS) system warning light
Boot lid open warning light
* For more detailed explanations, refer to section 4, “Instrument cluster”.
Engine coolant temperature warning light
Page 8 of 308
Your vehicle at a glance
2
2
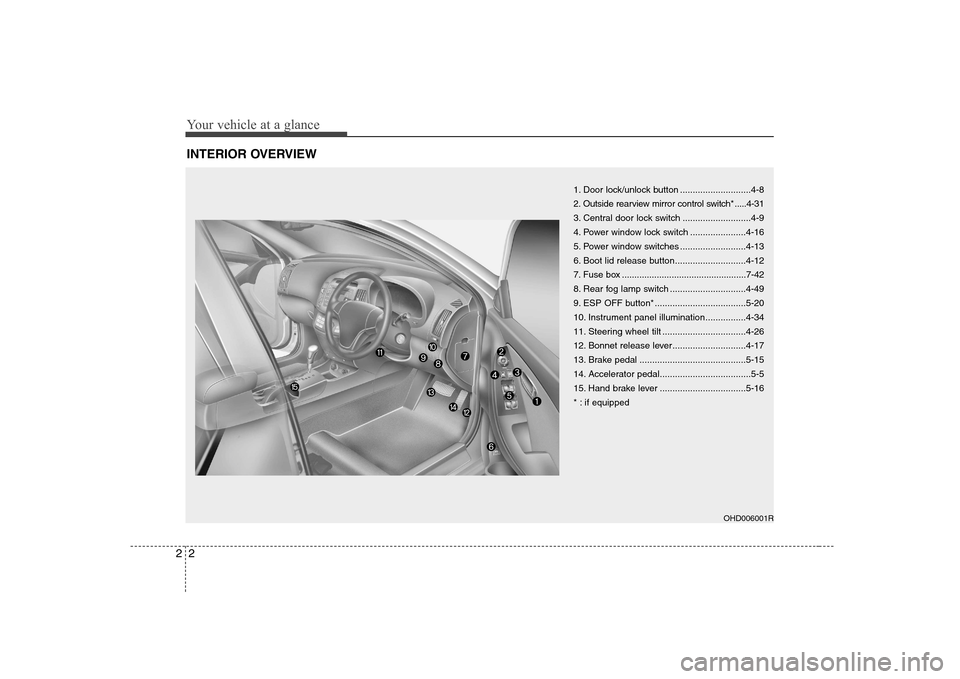
INTERIOR OVERVIEW
1. Door lock/unlock button ............................4-8
2. Outside rearview mirror control switch* .....4-31
3. Central door lock switch ...........................4-9
4. Power window lock switch ......................4-16
5. Power window switches ..........................4-13
6. Boot lid release button............................4-12
7. Fuse box ..................................................7-42
8. Rear fog lamp switch ..............................4-49
9. ESP OFF button* ....................................5-20
10. Instrument panel illumination................4-34
11. Steering wheel tilt .................................4-26
12. Bonnet release lever.............................4-17
13. Brake pedal ..........................................5-15
14. Accelerator pedal....................................5-5
15. Hand brake lever ..................................5-16
* : if equipped
OHD006001R
Page 13 of 308
Safety system of your vehicle
4
3
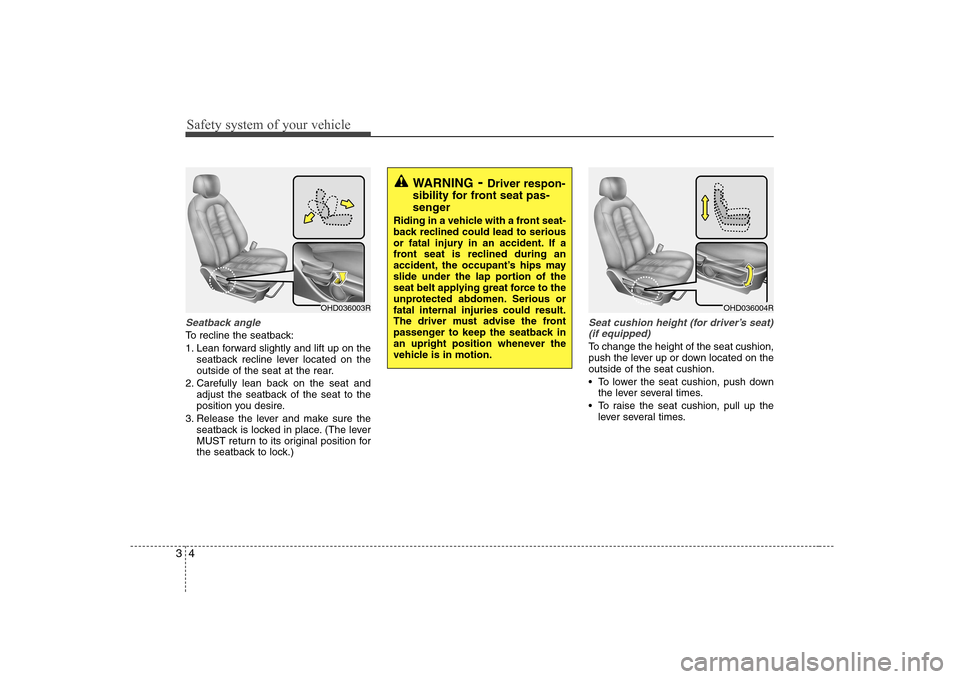
Seatback angle
To recline the seatback:
1. Lean forward slightly and lift up on the
seatback recline lever located on the
outside of the seat at the rear.
2. Carefully lean back on the seat and adjust the seatback of the seat to the
position you desire.
3. Release the lever and make sure the seatback is locked in place. (The lever
MUST return to its original position for
the seatback to lock.)
Seat cushion height (for driver’s seat)
(if equipped)
To change the height of the seat cushion,
push the lever up or down located on theoutside of the seat cushion.
• To lower the seat cushion, push down the lever several times.
To raise the seat cushion, pull up the lever several times.
OHD036003R
WARNING - Driver respon-
sibility for front seat pas-
senger
Riding in a vehicle with a front seat-
back reclined could lead to serious
or fatal injury in an accident. If a
front seat is reclined during an
accident, the occupant’s hips may
slide under the lap portion of the
seat belt applying great force to the
unprotected abdomen. Serious orfatal internal injuries could result.
The driver must advise the front
passenger to keep the seatback in
an upright position whenever the
vehicle is in motion.
OHD036004R
Page 31 of 308
Safety system of your vehicle
22
3
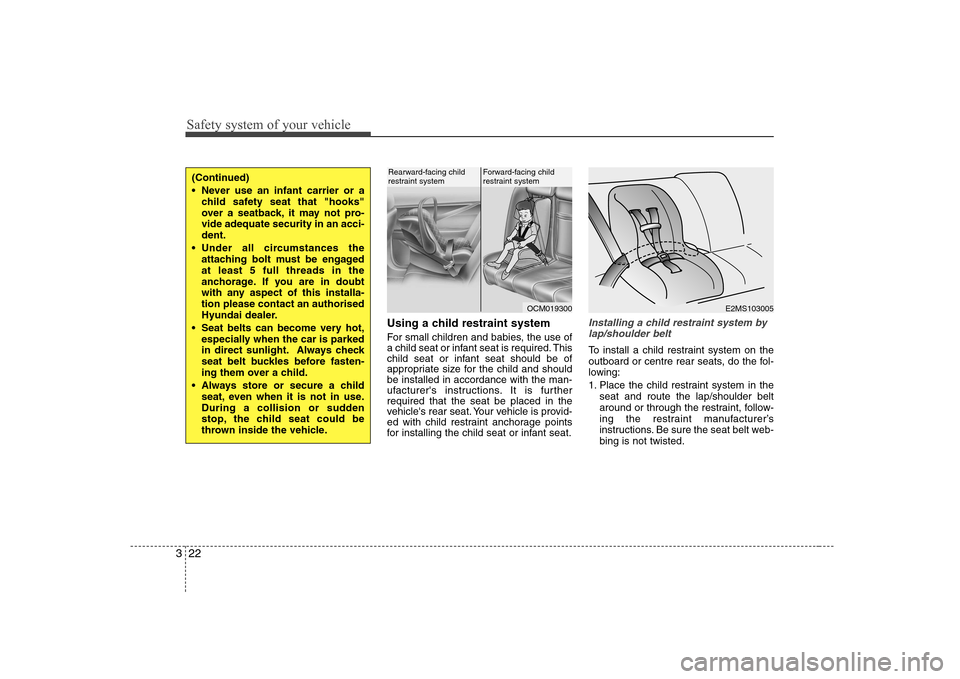
Using a child restraint system
For small children and babies, the use of
a child seat or infant seat is required. This
child seat or infant seat should be of
appropriate size for the child and shouldbe installed in accordance with the man-
ufacturer's instructions. It is furtherrequired that the seat be placed in the
vehicle's rear seat. Your vehicle is provid-
ed with child restraint anchorage points
for installing the child seat or infant seat.Installing a child restraint system by
lap/shoulder belt
To install a child restraint system on the
outboard or centre rear seats, do the fol-
lowing:
1. Place the child restraint system in the seat and route the lap/shoulder belt
around or through the restraint, follow-
ing the restraint manufacturer’s
instructions. Be sure the seat belt web-bing is not twisted.
(Continued)
Never use an infant carrier or achild safety seat that "hooks"
over a seatback, it may not pro-vide adequate security in an acci-dent.
Under all circumstances the attaching bolt must be engagedat least 5 full threads in the
anchorage. If you are in doubt
with any aspect of this installa-tion please contact an authorised
Hyundai dealer.
Seat belts can become very hot, especially when the car is parked
in direct sunlight. Always check
seat belt buckles before fasten-
ing them over a child.
Always store or secure a child seat, even when it is not in use.
During a collision or sudden
stop, the child seat could be
thrown inside the vehicle.
E2MS103005OCM019300
Rearward-facing child
restraint systemForward-facing child
restraint system
Page 50 of 308
341
Safety system of your vehicle
How does the air bag system operate
Air bag only operates when the ignitionswitch is turned to ON or START posi- tion.
Air bags inflate instantly in the event of serious frontal or side collision (if
equipped with side air bag or curtainair bag) in order to help protect the
occupants from serious physical injury.
There is no single speed at which the air bags will inflate.
Generally, air bags are designed to
inflate by the severity of a collision and
its direction. These two factors deter-mine whether the sensors send out an
electronic deployment/inflation signal.
Air bag deployment depends on a number of factors including vehiclespeed, angles of impact and the densi-
ty and stiffness of the vehicles or
objects which your vehicle hits in the
collision. Though, factors are not limit-
ed to those mentioned above.
The front air bags will completely inflate and deflate in an instant.
It is virtually impossible for you to see
the air bags inflate during an accident.
It is much more likely that you will sim-ply see the deflated air bags hanging
out of their storage compartments afterthe collision. In order to help provide protection in a
severe collision, the air bags must
inflate rapidly. The speed of air baginflation is a consequence of the
extremely short time in which a collisionoccurs and the need to get the air bag
between the occupant and the vehicle
structures before the occupant impacts
those structures. This speed of inflation
reduces the risk of serious or life-
threatening injuries in a severe collision
and is thus a necessary part of air bagdesign.
However, air bag inflation can also
cause injuries which normally can
include facial abrasions, bruises and
broken bones, and sometimes more
severe injuries because the inflationspeed also causes the air bags to
expand with a great deal of force.
There are even circumstances under which contact with the steer-
ing wheel air bag can cause fatal
injuries, especially if the occupant
is positioned excessively close tothe steering wheel.
WARNING
To avoid severe personal injury or death caused by deploying air
bags in a collision, the driver
should sit as far back from the
steering wheel air bag as possi-
ble (at least 250 mm (10 inches)
away). The front passenger
should always move their seat as
far back as possible and sit backin their seat.
Air bag inflates instantly in an event of collision, passengers
may be injured by the air bag
expansion force if they are not in
proper position.
Air bag inflation may cause injuries which normally include
facial or bodily abrasions,
injuries by the broken glasses or
burns by the explosives.
Page 76 of 308
421
Features of your vehicle
(Continued)Use only portable plastic fuel
containers designed to carry and
store petrol.
Do not use mobile phones while refuelling. Electric current and/or
electronic interference from
mobile phones can potentially
ignite fuel vapours causing a fire.
When refuelling, always shut the engine off. Sparks produced byelectrical components related tothe engine can ignite fuel
vapours causing a fire. Once
refuelling is complete, check tomake sure the filler cap and filler
door are securely closed, before
starting the engine.
DO NOT use matches or a lighter and DO NOT SMOKE or leave a lit
cigarette in your vehicle while at
a petrol station especially during
refuelling. Automotive fuel is
highly flammable and can, when
ignited, result in fire.
(Continued)(Continued)
If a fire breaks out during refu-elling, leave the vicinity of the
vehicle, and immediately contact
the manager of the petrol stationand then contact the local fire
department. Follow any safety
instructions they provide.
CAUTION
Make sure to refuel with unleaded
fuel only.
If the fuel filler cap requires replacement, use only a genuineHyundai cap or the equivalent
specified for your vehicle. Anincorrect fuel filler cap can resultin a serious malfunction of the fuel system or emission control
system.
(Continued)
(Continued) Do not spill fuel on the exterior surfaces of the vehicle. Any type
of fuel spilled on painted surfaces may damage the paint.
If the fuel filler lid will not open in cold weather because the areaaround it is frozen, push or lightly
tap the lid.
After refuelling, make sure the fuel cap is installed securely toprevent fuel spillage in the event
of an accident.
Page 86 of 308
431
Features of your vehicle
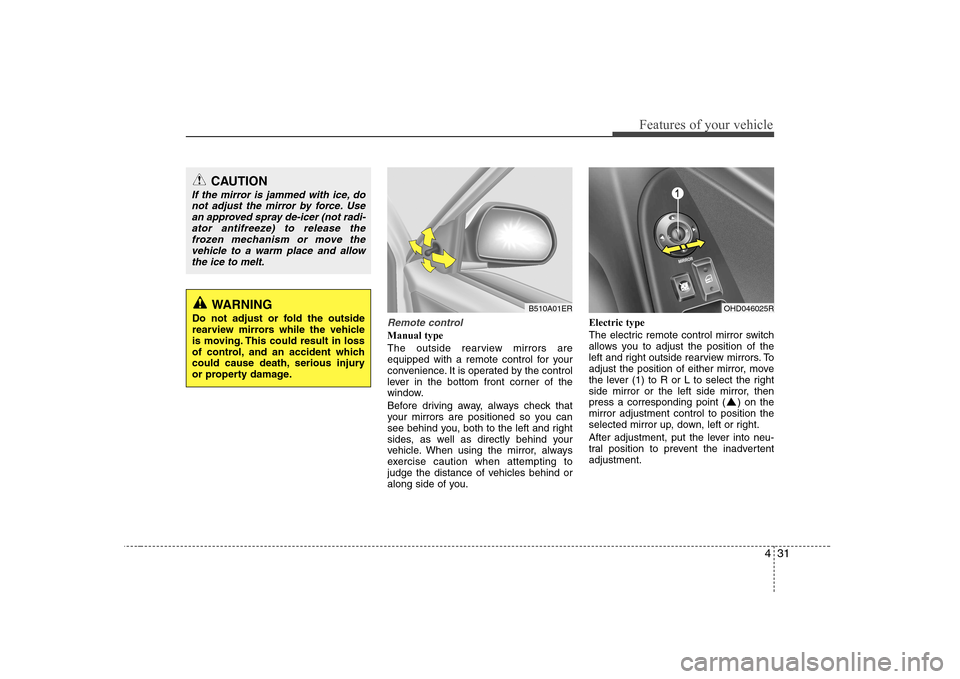
Remote control
Manual type
The outside rearview mirrors are
equipped with a remote control for your
convenience. It is operated by the control
lever in the bottom front corner of the
window.
Before driving away, always check that
your mirrors are positioned so you can
see behind you, both to the left and right
sides, as well as directly behind your
vehicle. When using the mirror, always
exercise caution when attempting to
judge the distance of vehicles behind or
along side of you.Electric type
The electric remote control mirror switch
allows you to adjust the position of the
left and right outside rearview mirrors. To
adjust the position of either mirror, move
the lever (1) to R or L to select the right
side mirror or the left side mirror, then
press a corresponding point ( ) on themirror adjustment control to position the
selected mirror up, down, left or right.
After adjustment, put the lever into neu-
tral position to prevent the inadvertentadjustment.
CAUTION
If the mirror is jammed with ice, do
not adjust the mirror by force. Use an approved spray de-icer (not radi-ator antifreeze) to release the
frozen mechanism or move thevehicle to a warm place and allowthe ice to melt.
WARNING
Do not adjust or fold the outside
rearview mirrors while the vehicle
is moving. This could result in loss
of control, and an accident which
could cause death, serious injury
or property damage.OHD046025RB510A01ER
Page 99 of 308
Features of your vehicle
44
4
CRUISE
ESP
OFF✽✽ NOTICE
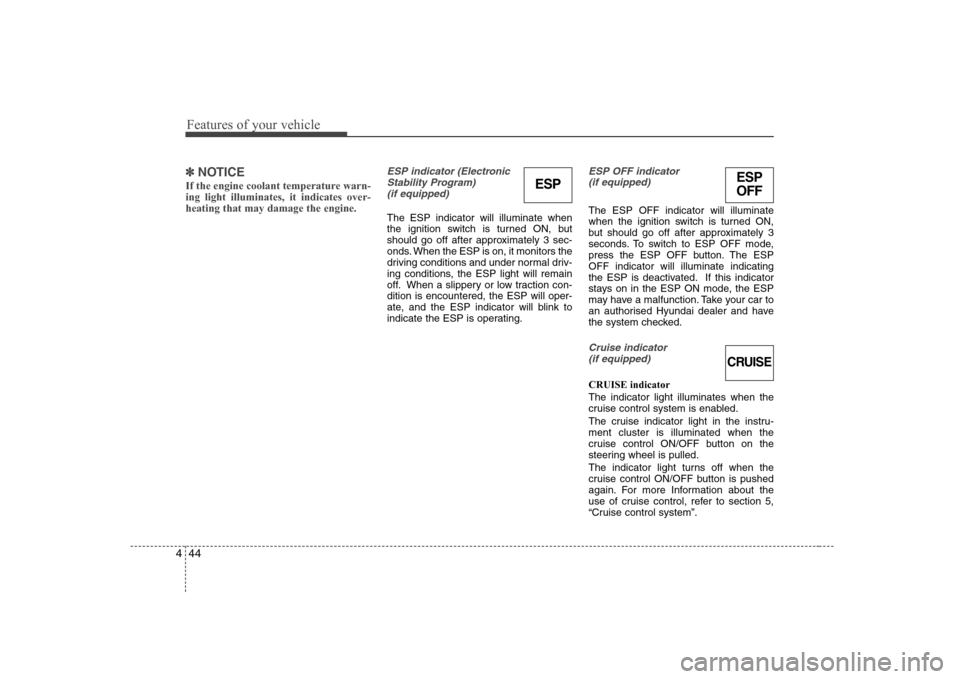
If the engine coolant temperature warn- ing light illuminates, it indicates over-heating that may damage the engine.ESP indicator (Electronic Stability Program) (if equipped)
The ESP indicator will illuminate when
the ignition switch is turned ON, but
should go off after approximately 3 sec-
onds. When the ESP is on, it monitors the
driving conditions and under normal driv-
ing conditions, the ESP light will remain
off. When a slippery or low traction con-dition is encountered, the ESP will oper-
ate, and the ESP indicator will blink to
indicate the ESP is operating.
ESP OFF indicator (if equipped)
The ESP OFF indicator will illuminate
when the ignition switch is turned ON,
but should go off after approximately 3
seconds. To switch to ESP OFF mode,
press the ESP OFF button. The ESPOFF indicator will illuminate indicating
the ESP is deactivated. If this indicator
stays on in the ESP ON mode, the ESP
may have a malfunction. Take your car to
an authorised Hyundai dealer and have
the system checked.
Cruise indicator
(if equipped)
CRUISE indicator The indicator light illuminates when the
cruise control system is enabled.
The cruise indicator light in the instru- ment cluster is illuminated when the
cruise control ON/OFF button on the
steering wheel is pulled.
The indicator light turns off when the
cruise control ON/OFF button is pushed
again. For more Information about the
use of cruise control, refer to section 5,
“Cruise control system”.
ESP
Page 104 of 308
449
Features of your vehicle
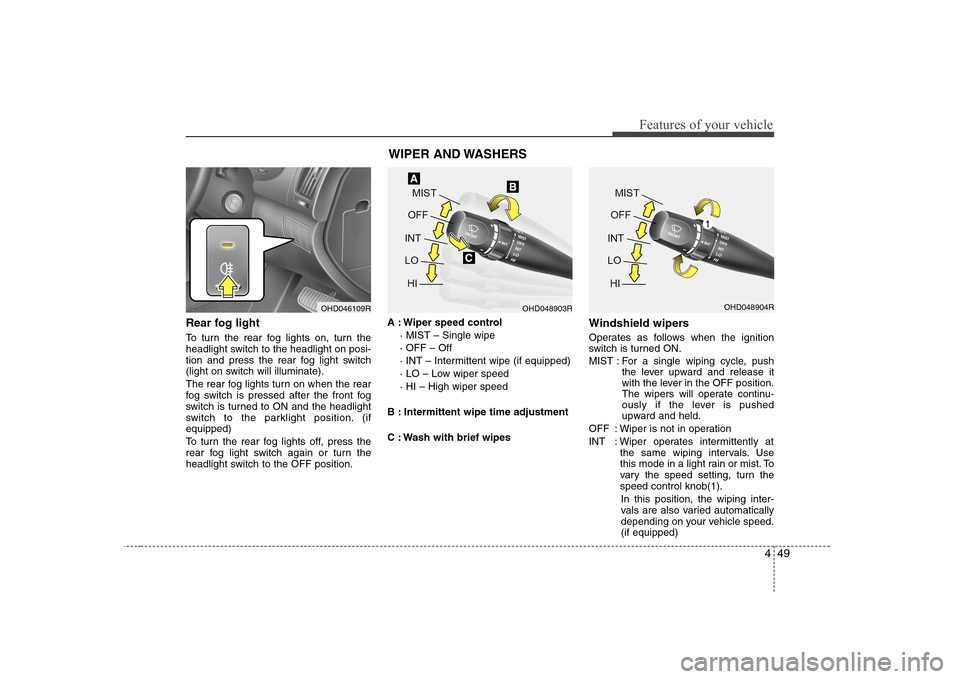
Rear fog light
To turn the rear fog lights on, turn the
headlight switch to the headlight on posi-
tion and press the rear fog light switch
(light on switch will illuminate).
The rear fog lights turn on when the rear
fog switch is pressed after the front fog
switch is turned to ON and the headlight
switch to the parklight position. (ifequipped)
To turn the rear fog lights off, press the
rear fog light switch again or turn the
headlight switch to the OFF position.A : Wiper speed control
· MIST – Single wipe · OFF – Off
· INT – Intermittent wipe (if equipped)
· LO – Low wiper speed· HI – High wiper speed
B : Intermittent wipe time adjustment
C : Wash with brief wipes Windshield wipers
Operates as follows when the ignition
switch is turned ON.
MIST : For a single wiping cycle, push
the lever upward and release it
with the lever in the OFF position.
The wipers will operate continu-
ously if the lever is pushed
upward and held.
OFF : Wiper is not in operation
INT : Wiper operates intermittently at the same wiping intervals. Use
this mode in a light rain or mist. To
vary the speed setting, turn thespeed control knob(1).
In this position, the wiping inter-
vals are also varied automatically
depending on your vehicle speed.(if equipped)
OHD046109R WIPER AND WASHERSOHD048903ROHD048904R
Page 127 of 308
Features of your vehicle
72
4
For maximum defrosting, set the temper-
ature control to the extreme right/hot posi-
tion and the fan speed control to thehighest speed.
If warm air to the floor is desired while defrosting or defogging, set the mode tothe floor-defrost position.
Before driving, clear all snow and ice from the windshield, rear window, outside rear
view mirrors, and all side windows.
Clear all snow and ice from the bonnet and air inlet in the cowl grill to improveheater and defroster efficiency and to
reduce the probability of fogging up insideof the windshield. Manual climate control system
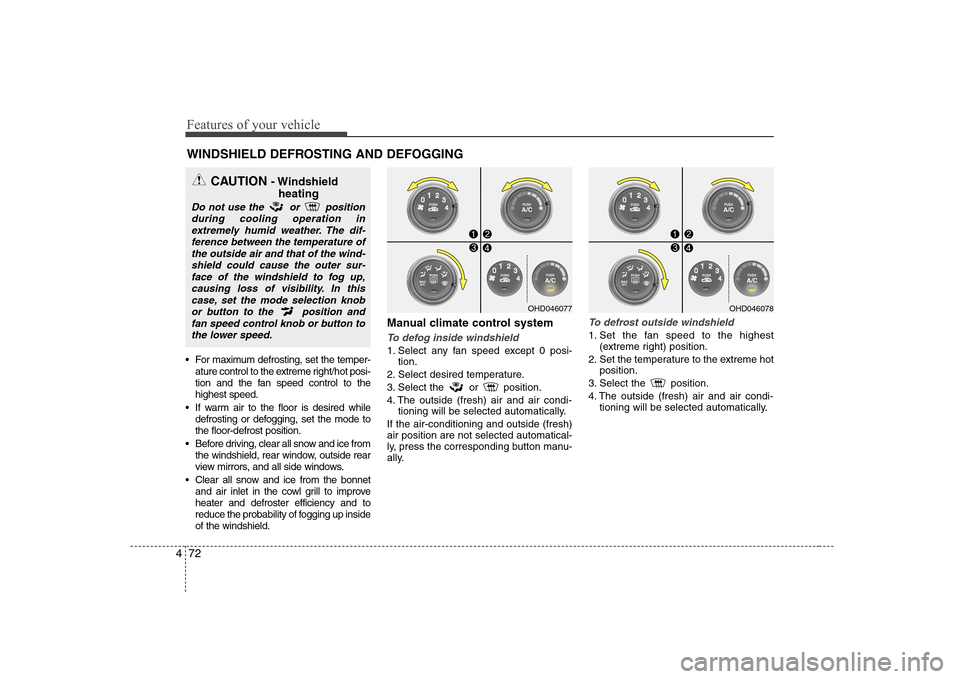
To defog inside windshield
1. Select any fan speed except 0 posi-
tion.
2. Select desired temperature.
3. Select the or position.
4. The outside (fresh) air and air condi- tioning will be selected automatically.
If the air-conditioning and outside (fresh) air position are not selected automatical-
ly, press the corresponding button manu-
ally.
To defrost outside windshield
1. Set the fan speed to the highest (extreme right) position.
2. Set the temperature to the extreme hot position.
3. Select the position.
4. The outside (fresh) air and air condi- tioning will be selected automatically.
WINDSHIELD DEFROSTING AND DEFOGGING
OHD046077OHD046078
CAUTION - Windshield
heating
Do not use the or positionduring cooling operation inextremely humid weather. The dif-ference between the temperature ofthe outside air and that of the wind-
shield could cause the outer sur- face of the windshield to fog up,causing loss of visibility. In thiscase, set the mode selection knob
or button to the position andfan speed control knob or button tothe lower speed.