ignition HYUNDAI ELANTRA GT 2019 Manual Online
[x] Cancel search | Manufacturer: HYUNDAI, Model Year: 2019, Model line: ELANTRA GT, Model: HYUNDAI ELANTRA GT 2019Pages: 486, PDF Size: 78.59 MB
Page 405 of 486
7-32
MaintenanceB
B AA TTTT EERR YY
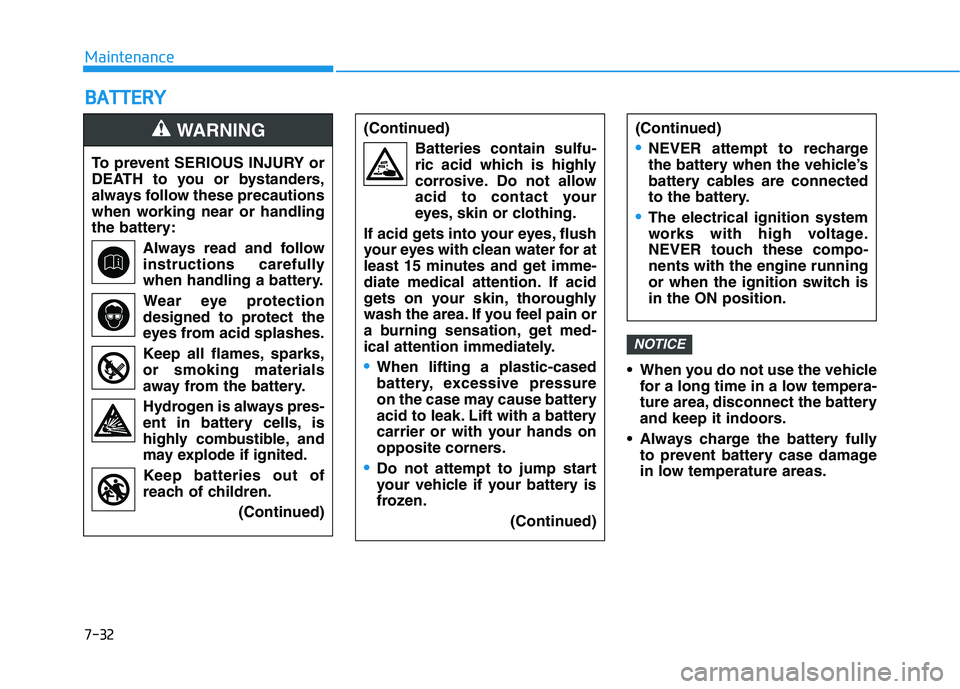
When you do not use the vehicle
for a long time in a low tempera-
ture area, disconnect the battery
and keep it indoors.
Always charge the battery fully to prevent battery case damage
in low temperature areas.
NOTICE
To prevent SERIOUS INJURY or
DEATH to you or bystanders,
always follow these precautions
when working near or handling
the battery:
Always read and follow
instructions carefully
when handling a battery.Wear eye protection
designed to protect the
eyes from acid splashes.
Keep all flames, sparks, or smoking materials
away from the battery.
Hydrogen is always pres- ent in battery cells, is
highly combustible, and
may explode if ignited.
Keep batteries out of
reach of children.
(Continued)
WARNING (Continued)Batteries contain sulfu-
ric acid which is highly
corrosive. Do not allow
acid to contact your
eyes, skin or clothing.
If acid gets into your eyes, flush
your eyes with clean water for at
least 15 minutes and get imme-
diate medical attention. If acid
gets on your skin, thoroughly
wash the area. If you feel pain or
a burning sensation, get med-
ical attention immediately.
When lifting a plastic-cased
battery, excessive pressure
on the case may cause battery
acid to leak. Lift with a battery
carrier or with your hands on
opposite corners.
Do not attempt to jump start
your vehicle if your battery is
frozen.
(Continued)
(Continued)
NEVER attempt to recharge
the battery when the vehicle’s
battery cables are connected
to the battery.
The electrical ignition system
works with high voltage.
NEVER touch these compo-nents with the engine running
or when the ignition switch isin the ON position.
Page 406 of 486
7-33
7
Maintenance
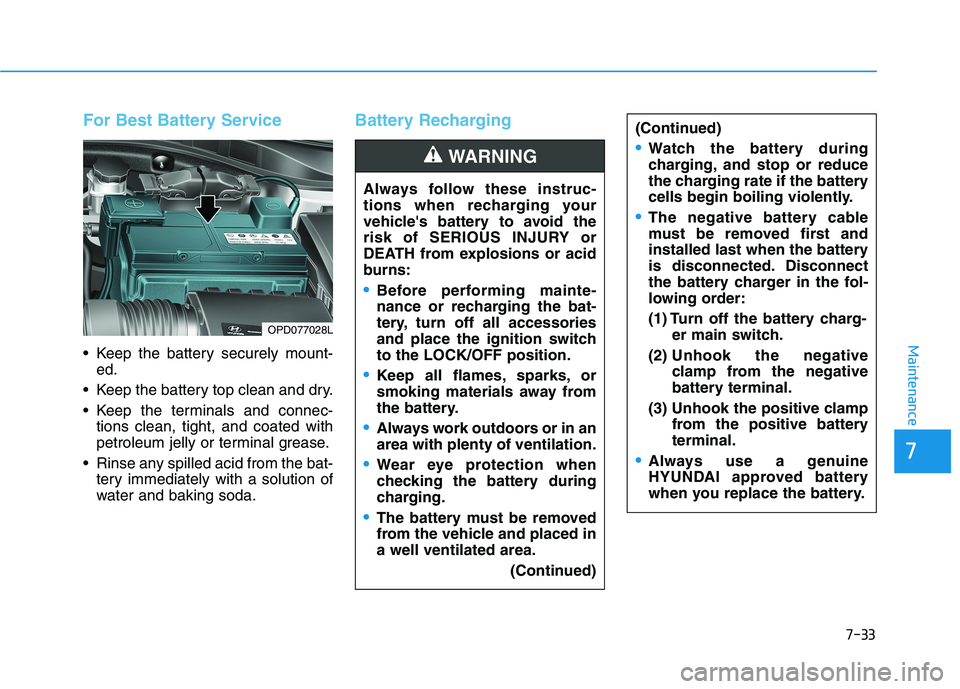
For Best Battery Service
Keep the battery securely mount-ed.
Keep the battery top clean and dry.
Keep the terminals and connec- tions clean, tight, and coated with
petroleum jelly or terminal grease.
Rinse any spilled acid from the bat- tery immediately with a solution of
water and baking soda.
Battery Recharging
Always follow these instruc-
tions when recharging your
vehicle's battery to avoid the
risk of SERIOUS INJURY or
DEATH from explosions or acid
burns:
Before performing mainte-
nance or recharging the bat-
tery, turn off all accessories
and place the ignition switchto the LOCK/OFF position.
Keep all flames, sparks, or
smoking materials away from
the battery.
Always work outdoors or in an area with plenty of ventilation.
Wear eye protection when
checking the battery during
charging.
The battery must be removed
from the vehicle and placed ina well ventilated area.
(Continued)
WARNING
OPD077028L (Continued)
Watch the battery during
charging, and stop or reduce
the charging rate if the battery
cells begin boiling violently.
The negative battery cable
must be removed first and
installed last when the battery
is disconnected. Disconnect
the battery charger in the fol-
lowing order:
(1) Turn off the battery charg-
er main switch.
(2) Unhook the negative clamp from the negative
battery terminal.
(3) Unhook the positive clamp from the positive batteryterminal.
Always use a genuine
HYUNDAI approved battery
when you replace the battery.
Page 431 of 486
7-58
Maintenance
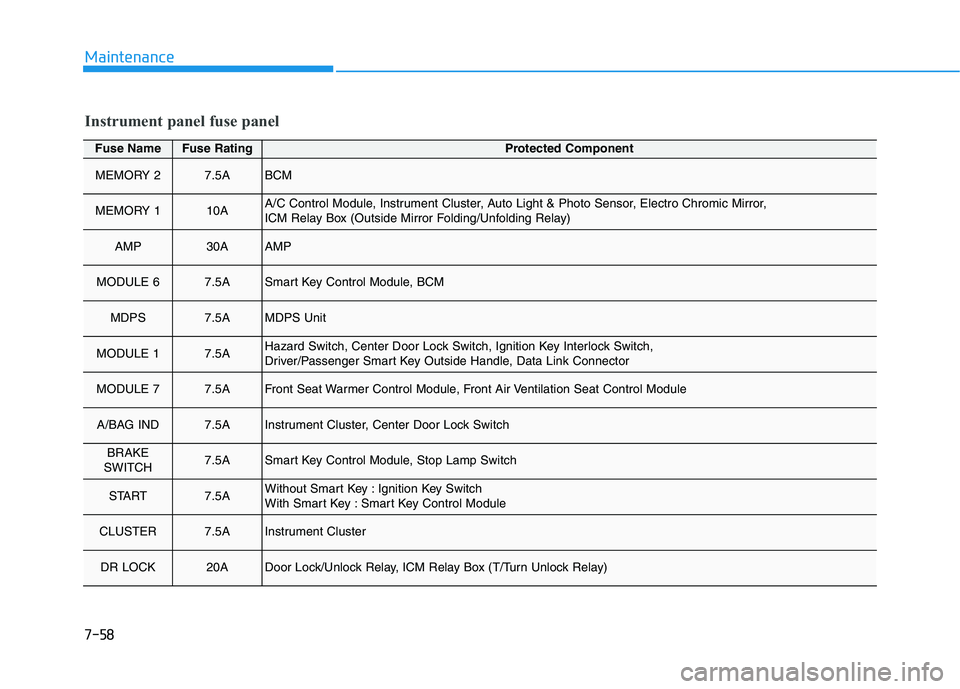
Fuse NameFuse RatingProtected Component
MEMORY 27.5ABCM
MEMORY 110AA/C Control Module, Instrument Cluster, Auto Light & Photo Sensor, Electro Chromic Mirror,
ICM Relay Box (Outside Mirror Folding/Unfolding Relay)
AMP30AAMP
MODULE 6 7.5ASmart Key Control Module, BCM
MDPS7.5AMDPS Unit
MODULE 17.5AHazard Switch, Center Door Lock Switch, Ignition Key Interlock Switch,
Driver/Passenger Smart Key Outside Handle, Data Link Connector
MODULE 77.5AFront Seat Warmer Control Module, Front Air Ventilation Seat Control Module
A/BAG IND7.5AInstrument Cluster, Center Door Lock Switch
BRAKE
SWITCH7.5ASmart Key Control Module, Stop Lamp Switch
START7.5AWithout Smart Key : Ignition Key Switch
With Smart Key : Smart Key Control Module
CLUSTER7.5AInstrument Cluster
DR LOCK20ADoor Lock/Unlock Relay, ICM Relay Box (T/Turn Unlock Relay)
Instrument panel fuse panel
Page 434 of 486
7-61
7
Maintenance
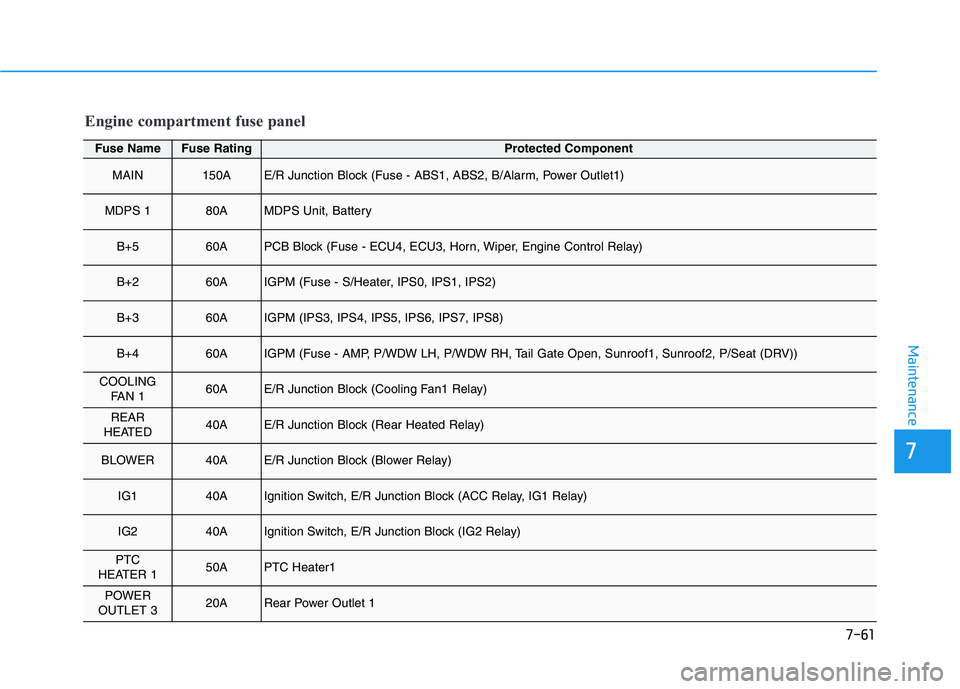
Engine compartment fuse panel
Fuse NameFuse RatingProtected Component
MAIN150AE/R Junction Block (Fuse - ABS1, ABS2, B/Alarm, Power Outlet1)
MDPS 180AMDPS Unit, Battery
B+560APCB Block (Fuse - ECU4, ECU3, Horn, Wiper, Engine Control Relay)
B+260AIGPM (Fuse - S/Heater, IPS0, IPS1, IPS2)
B+360AIGPM (IPS3, IPS4, IPS5, IPS6, IPS7, IPS8)
B+460AIGPM (Fuse - AMP, P/WDW LH, P/WDW RH, Tail Gate Open, Sunroof1, Sunroof2, P/Seat (DRV))
COOLINGFAN 160AE/R Junction Block (Cooling Fan1 Relay)
REAR
HEATED40AE/R Junction Block (Rear Heated Relay)
BLOWER40AE/R Junction Block (Blower Relay)
IG140AIgnition Switch, E/R Junction Block (ACC Relay, IG1 Relay)
IG240AIgnition Switch, E/R Junction Block (IG2 Relay)
PTC
HEATER 150APTC Heater1
POWER
OUTLET 320ARear Power Outlet 1
Page 436 of 486
7-63
7
Maintenance
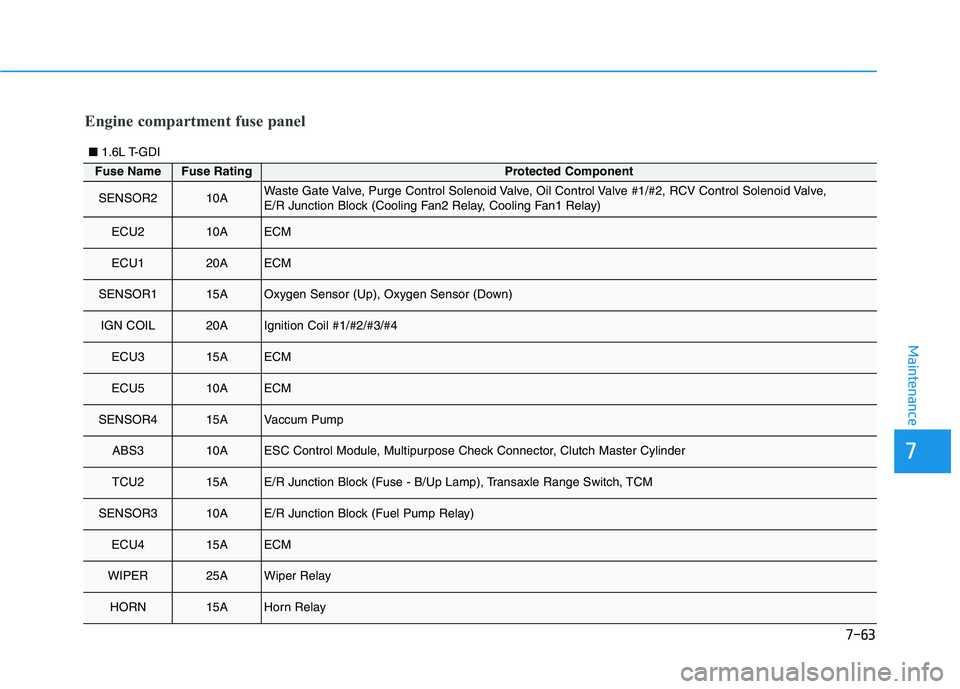
Fuse NameFuse RatingProtected Component
SENSOR210AWaste Gate Valve, Purge Control Solenoid Valve, Oil Control Valve #1/#2, RCV Control Solenoid Valve,
E/R Junction Block (Cooling Fan2 Relay, Cooling Fan1 Relay)
ECU210AECM
ECU120AECM
SENSOR115AOxygen Sensor (Up), Oxygen Sensor (Down)
IGN COIL20AIgnition Coil #1/#2/#3/#4
ECU315AECM
ECU510AECM
SENSOR415AVaccum Pump
ABS310AESC Control Module, Multipurpose Check Connector, Clutch Master Cylinder
TCU215AE/R Junction Block (Fuse - B/Up Lamp), Transaxle Range Switch, TCM
SENSOR310AE/R Junction Block (Fuel Pump Relay)
ECU415AECM
WIPER25AWiper Relay
HORN15AHorn Relay
■ 1.6L T-GDI
Engine compartment fuse panel
Page 437 of 486
7-64
Maintenance
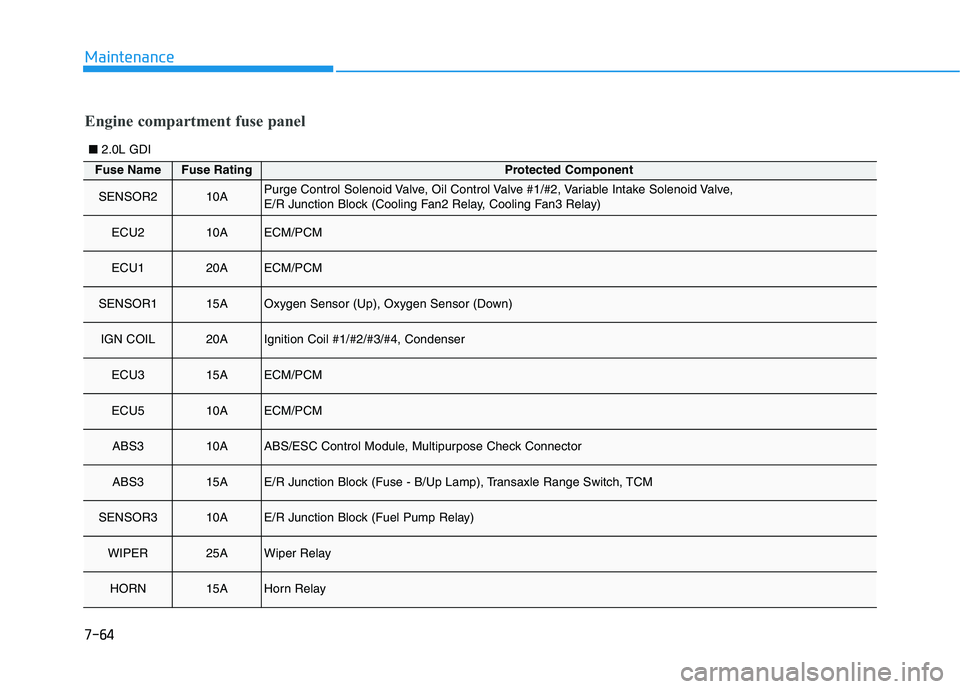
■2.0L GDI
Fuse NameFuse RatingProtected Component
SENSOR210APurge Control Solenoid Valve, Oil Control Valve #1/#2, Variable Intake Solenoid Valve,
E/R Junction Block (Cooling Fan2 Relay, Cooling Fan3 Relay)
ECU210AECM/PCM
ECU120AECM/PCM
SENSOR115AOxygen Sensor (Up), Oxygen Sensor (Down)
IGN COIL20AIgnition Coil #1/#2/#3/#4, Condenser
ECU315AECM/PCM
ECU510AECM/PCM
ABS310AABS/ESC Control Module, Multipurpose Check Connector
ABS315AE/R Junction Block (Fuse - B/Up Lamp), Transaxle Range Switch, TCM
SENSOR310AE/R Junction Block (Fuel Pump Relay)
WIPER25AWiper Relay
HORN15AHorn Relay
Engine compartment fuse panel
Page 439 of 486
7-66
MaintenanceL
L IIGG HH TT BB UU LLBB SS
Consult an authorized HYUNDAI
dealer to replace most vehicle light
bulbs. It is difficult to replace vehicle
light bulbs because other parts of the
vehicle must be removed before you
can get to the bulb. This is especially
true for removing the headlamp
assembly to get to the bulb(s).
Removing/installing the headlamp
assembly can result in damage to
the vehicle.
Information
After heavy driving, rain or washing,
headlamp and trunk lenses could
appear frosty. This condition is caused
by the temperature difference
between the lamp inside and the out-
side temperature. This is similar to the
condensation on your windows inside
your vehicle during the rain and does-
n ’t indicate a problem with your vehi-
cle. If the water leaks into the lamp
bulb circuitry, have your vehicle
checked by an authorized HYUNDAI
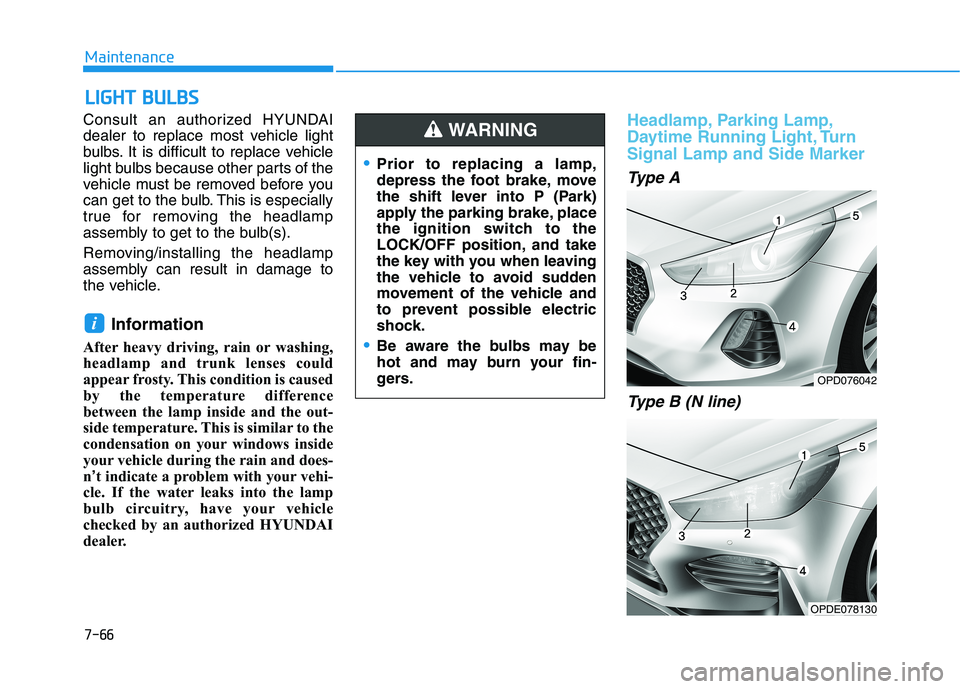
dealer.Headlamp, Parking Lamp,
Daytime Running Light, TurnSignal Lamp and Side Marker
Type A
Type B (N line)
i
Prior to replacing a lamp,
depress the foot brake, move
the shift lever into P (Park)
apply the parking brake, place
the ignition switch to the
LOCK/OFF position, and take
the key with you when leaving
the vehicle to avoid sudden
movement of the vehicle and
to prevent possible electric
shock.
Be aware the bulbs may be
hot and may burn your fin-
gers.
WARNING
OPD076042
OPDE078130
Page 478 of 486
I-7
Headlamp delay function ................................................3-89
Headlamp position ..........................................................3-84
Headlight bulb replacement ............................................7-66
High Beam Assist (HBA) system ...................................3-85
Highway driving ...........................................................5-118
Hill-start assist control (HAC)........................................5-53
Hood................................................................................3-41
Horn ................................................................................3-21
How to use this manual ....................................................F-6
If the engine doesn't turn over or turns over slowly.........6-3
If the engine overheats ......................................................6-6
If the engine stalls at a crossroad or crossing...................6-2
If the engine stalls while driving ......................................6-2
If the engine turns over normally but doesn't start ...........6-3
If the engine will not start.................................................6-3
If you have a flat tire while driving ..................................6-3
Ignition switch ..................................................................5-6
Engine Start/Stop button ..............................................5-9
Key ignition switch ......................................................5-6
Impact sensing door unlock ............................................3-18
Improtant safety precautions.............................................2-2 Air bag hazards ............................................................2-2
Always wear your seat belt ..........................................2-2
Control your speed .......................................................2-3
Driver distraction..........................................................2-2 Keep your vehicle in safe condition.............................2-3
Restrain all children .....................................................2-2
In case of emergency while driving..................................6-2
Indicator light..................................................................3-54
Inside rearview mirror ....................................................3-22
Instrument cluster ...........................................................3-47 Assist mode ................................................................3-74
Gauges and meters .....................................................3-49
Instrument cluster illumination ..................................3-48
LCD display control ...................................................3-71
LCD display messages ...............................................3-65
LCD display modes ....................................................3-72
Shift indicator pop-up ................................................3-53
Transmission shift indicator .......................................3-52
Trip computer mode ...................................................3-73
User settings mode .....................................................3-75
Warning and indicator lights ......................................3-54
Instrument panel fuse replacement .................................7-53
Instrument panel overview ...............................................1-5
Interior care .....................................................................7-81
Interior features Bottle holder .............................................................3-125
Cargo area cover.......................................................3-132
Cellular phone holder ...............................................3-128
Clock ........................................................................3-130
Clothes hanger ..........................................................3-130
Cup holder ................................................................3-125
Floor mat anchor(s) ..................................................3-131
I
Index
I