door lock Hyundai Getz 2007 Owner's Guide
[x] Cancel search | Manufacturer: HYUNDAI, Model Year: 2007, Model line: Getz, Model: Hyundai Getz 2007Pages: 463, PDF Size: 11.14 MB
Page 288 of 463
1- 22 FEATURES OF YOUR HYUNDAI
The buckle should be firmly pressed into the stalk until locked which will be indicated by an audible "click".The length of the seat belt webbing will be automatically adjusted by the seat belt mechanism to allow the wearermaximum freedom of movement whilst the belt is being worn. However, in the event of rapid deceleration or impact,the belt mechanism will automatically lock. The mechanism will also lock if the seatbelt webbing is withdrawn too quickly when the belt is being fastened or if attempts are made to withdraw thewebbing whilst the vehicle is not on level ground. Should the seat belt lock under these conditions, it will be pos-sible to release the mechanism by al- lowing a small amount of webbing to be retracted and the belt withdrawn again.
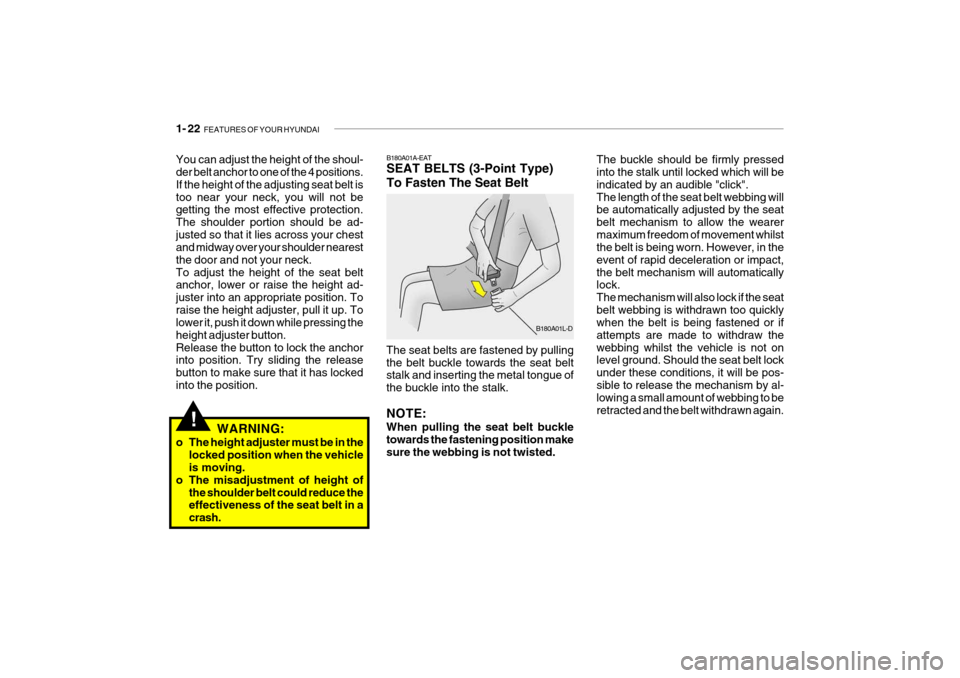
B180A01A-EAT SEAT BELTS (3-Point Type) To Fasten The Seat Belt
B180A01L-D
The seat belts are fastened by pulling the belt buckle towards the seat belt stalk and inserting the metal tongue of the buckle into the stalk. NOTE: When pulling the seat belt buckle towards the fastening position makesure the webbing is not twisted.
!
You can adjust the height of the shoul- der belt anchor to one of the 4 positions. If the height of the adjusting seat belt istoo near your neck, you will not be getting the most effective protection. The shoulder portion should be ad-justed so that it lies across your chest and midway over your shoulder nearest the door and not your neck.To adjust the height of the seat belt anchor, lower or raise the height ad- juster into an appropriate position. Toraise the height adjuster, pull it up. To lower it, push it down while pressing the height adjuster button.Release the button to lock the anchor into position. Try sliding the release button to make sure that it has lockedinto the position.
WARNING:
o The height adjuster must be in the locked position when the vehicle is moving.
o The misadjustment of height of the shoulder belt could reduce theeffectiveness of the seat belt in a crash.
Page 289 of 463
FEATURES OF YOUR HYUNDAI 1- 23
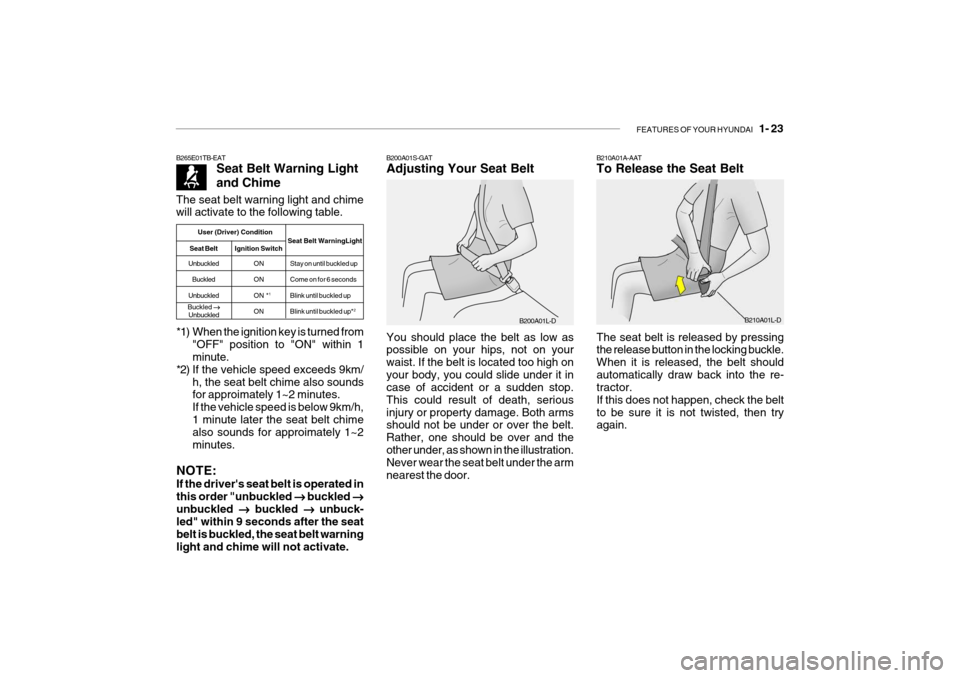
B200A01S-GAT Adjusting Your Seat Belt
B200A01L-D
You should place the belt as low as possible on your hips, not on your waist. If the belt is located too high onyour body, you could slide under it in case of accident or a sudden stop. This could result of death, seriousinjury or property damage. Both arms should not be under or over the belt. Rather, one should be over and theother under, as shown in the illustration. Never wear the seat belt under the arm nearest the door.
*1) When the ignition key is turned from
"OFF" position to "ON" within 1 minute.
*2) If the vehicle speed exceeds 9km/ h, the seat belt chime also soundsfor approimately 1~2 minutes. If the vehicle speed is below 9km/h,1 minute later the seat belt chime also sounds for approimately 1~2 minutes.
NOTE: If the driver's seat belt is operated in this order "unbuckled ��
��
� buckled
��
��
�
unbuckled ��
��
� buckled
� �
� �
� unbuck-
led" within 9 seconds after the seatbelt is buckled, the seat belt warninglight and chime will not activate.
The seat belt warning light and chime will activate to the following table.
B265E01TB-EAT
Seat Belt Warning Light and Chime
User (Driver) Condition
Seat Belt WarningLight
Seat Belt Ignition Switch
Unbuckled ON Stay on until buckled up
Buckled ON Come on for 6 seconds
Unbuckled ON * 1
Blink until buckled up
ON Blink until buckled up* 2
Buckled
��
��
�
Unbuckled
B210A01A-AAT To Release the Seat Belt The seat belt is released by pressing the release button in the locking buckle. When it is released, the belt shouldautomatically draw back into the re- tractor. If this does not happen, check the beltto be sure it is not twisted, then try again. B210A01L-D
Page 306 of 463

1- 40 FEATURES OF YOUR HYUNDAI
B240C03Y-EAT SRS Care The SRS is virtually maintenance-free and there are no parts you can safely service by yourself. The entire SRSsystem must be inspected by an au- thorized Hyundai dealer in 10 years after the date that the vehicle wasmanufactured. Any work on the SRS system, such as removing, installing, repairering, or anywork on the steering wheel must be performed by a qualified Hyundai tech- nician. Improper handling of the SRSsystem may result in serious personal injury.
The airbags deploy only in certain side impact conditions severeenough to cause significant injury to the vehicle occupants.
o For best protection from the side
airbag system and to avoid beinginjured is by the deploying side impact airbag, both front seat oc-cupants should sit in an upright position with the seat belt prop- erly fastened. The driver's handsshould be placed on the steering wheel at the 9:00 and 3:00 o'clock positions. The passenger's armsand hands should be placed in their laps.
o Do not use any accessory seat covers.
o Use of seat covers could reduce or
prevent the effectiveness of the system.
o Do not install any accessories on
the side or near the side impactairbag.
o Do not use excessive force on the
side of the seat.
o Do not place any objects over the airbag or between the airbag andyourself.
!WARNING:
o The side impact airbag is supple- mental to the driver's and the passenger's three point seat belt systems and is not a substitute for them. Therefore your seat beltsmust be worn at all times whilst the vehicle is in motion.
Side airbag sensor
Important Safety Notes on the Side Impact Airbag system Following is a number of safety points concerning this system which should always be observed to ensure risk of injury is reduced in an accident. HTB072-D
o Do not place any objects (an um-
brella, bag, etc.) between the front door and the front seat. Such ob- jects may become dangerous pro-jectiles and cause injury if the supplemental side impact air bag inflates.
o To prevent unexpected deploy- ment of the side air impact bagthat may result in personal injury,avoid impact to the side airbag sensor when the ignition key is on.
Page 342 of 463
1- 76 FEATURES OF YOUR HYUNDAI
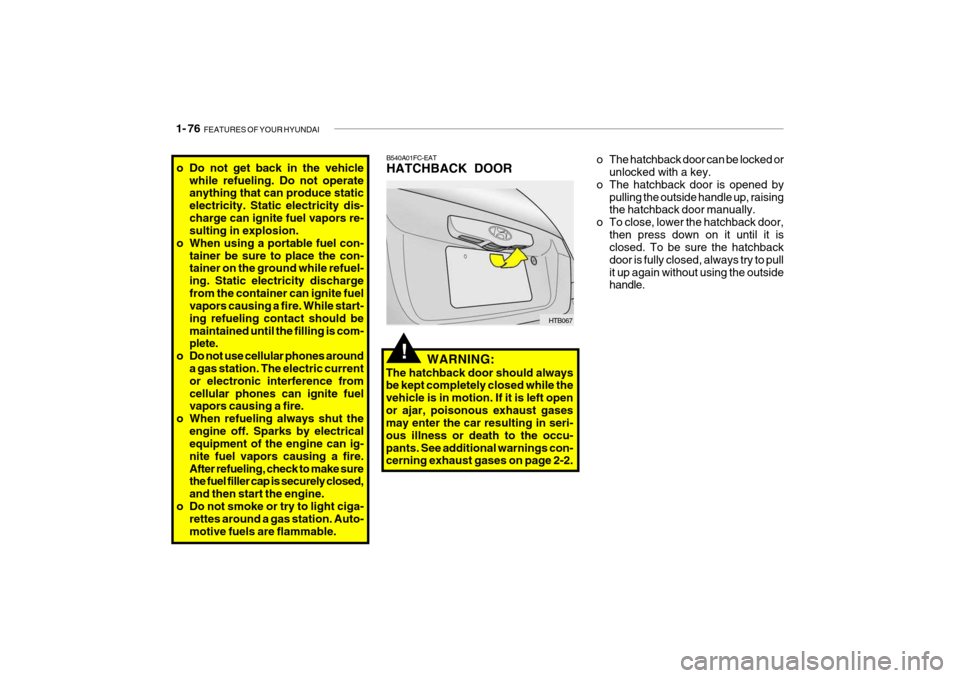
B540A01FC-EAT HATCHBACK DOOR
HTB067
WARNING:
The hatchback door should always be kept completely closed while the vehicle is in motion. If it is left openor ajar, poisonous exhaust gases may enter the car resulting in seri- ous illness or death to the occu-pants. See additional warnings con- cerning exhaust gases on page 2-2.
!
o The hatchback door can be locked or unlocked with a key.
o The hatchback door is opened by pulling the outside handle up, raising the hatchback door manually.
o To close, lower the hatchback door, then press down on it until it isclosed. To be sure the hatchback door is fully closed, always try to pullit up again without using the outside handle.o Do not get back in the vehicle
while refueling. Do not operate anything that can produce static electricity. Static electricity dis-charge can ignite fuel vapors re- sulting in explosion.
o When using a portable fuel con-
tainer be sure to place the con-tainer on the ground while refuel- ing. Static electricity dischargefrom the container can ignite fuel vapors causing a fire. While start- ing refueling contact should bemaintained until the filling is com- plete.
o Do not use cellular phones around a gas station. The electric current or electronic interference fromcellular phones can ignite fuel vapors causing a fire.
o When refueling always shut the
engine off. Sparks by electricalequipment of the engine can ig- nite fuel vapors causing a fire.After refueling, check to make sure the fuel filler cap is securely closed, and then start the engine.
o Do not smoke or try to light ciga- rettes around a gas station. Auto-motive fuels are flammable.
Page 363 of 463
DRIVING YOUR HYUNDAI 2- 3
!
C020A02O-EAT BEFORE STARTING THE EN- GINE Before you start the engine, you should always:
1. Look around the vehicle to be sure
there are no flat tyres, puddles of oil or water or other indications of pos-sible trouble.
2. After entering the car, check to be
sure the parking brake is engaged.
3. Check that all windows, and lights are clean.
4. Check that the interior and exterior mirrors are clean and in position.
5. Check your seat, seatback and
headrestraint to be sure they are intheir proper positions.
6. Close all the doors.
7. Fasten your seat belt and be sure
that all other occupants have fas- tened theirs.
8. Turn off all lights and accessories that are not needed.
9. When you turn the ignition switch to
"ON" check that all appropriate warn- ing lights are operating and that you have sufficient fuel. 10.Check the operation of warning
lights and all bulbs when key is in the "ON" position.
WARNING: (DIESEL ENGINE)
To ensure that sufficient vacuum exists within the brake system dur-ing cold weather start-up condi- tions, it is necessary to run the engine at idle for several secondsafter starting the engine. SC040A1-F COMBINATION IGNITION SWITCH AND STEERING LOCKTo Start the Engine
o If your Hyundai is equipped with a
manual transaxle, place the shift lever in neutral and depress theclutch pedal fully.
o If your Hyundai has an automatic
transaxle, place the shift lever in "P"(park).
o To start the engine, insert the igni-
tion key and turn it to the "START"position. Release it as soon as the engine starts. Do not hold the key in the "START" position for more than15 seconds.
NOTE: For safety, the engine will not start if the shift lever is not in "P" or "N"Position (automatic transaxle).
!WARNING:
Always wear appropriate shoes when operating your vehicle. Unsuitable shoes (high heels, ski boots, etc.) may interfere with yourability to use the brake and accelera- tor pedal, and the clutch (if installed).
Page 378 of 463

2- 18 DRIVING YOUR HYUNDAI
SC170E1-E Windscreen Washers and Wip- ers The windscreen washer bottle should be filled with a solution of water and a proprietary winter screen wash addi-tive. The windscreen wipers should not be used if the blades are frozen to the windscreen or if they are coveredwith snow, before this is removed. NOTE: Never allow undiluted screen washer fluid additive to spill upon the paintwork or use engine cool- ant anti-freeze since damage to thepaintwork may result.
o When driving in extreme conditions,
the windscreen wiper blades may fail to clear the screen properly due to the formation of ice upon theblade edge. It will therefore be nec- essary to periodically remove such ice to restore their efficiency.
o If the power operated door mirrors become frozen, attempts to adjustthese may damage the mechanism.
ZC170D1-E Door Locks Should the door lock mechanism be- come frozen, a proprietary lock de-icer should be used. Alternatively, warm- ing the door key may thaw the doorlock. However, the key should be handled carefully to avoid burning the fingers.Never attempt to thaw a frozen door lock using hot water, since the water will eventually freeze and compoundthe problem. NOTE: The proper temperature for using the immobilizer key is from -40°F to 176°F (-40°C to 80°C). If you heat the immobilizer key over 176°F (80°C)to open the frozen lock, it may cause damage to the transponder in its head.
o The formation of snow or ice built up
inside the wheel arches may inter-fere with the road wheels or steeringmechanism. In such instances, un- usual noises or an increase in steer- ing effort may result. Therefore,ensure that the wheel arches are checked periodically and any accu- mulated snow or ice removed.
o It is advisable to carry emergency equipment including, torch, shovel,tow rope, blankets etc., if a journeyis to be undertaken into areas of severe road conditions.
Page 444 of 463
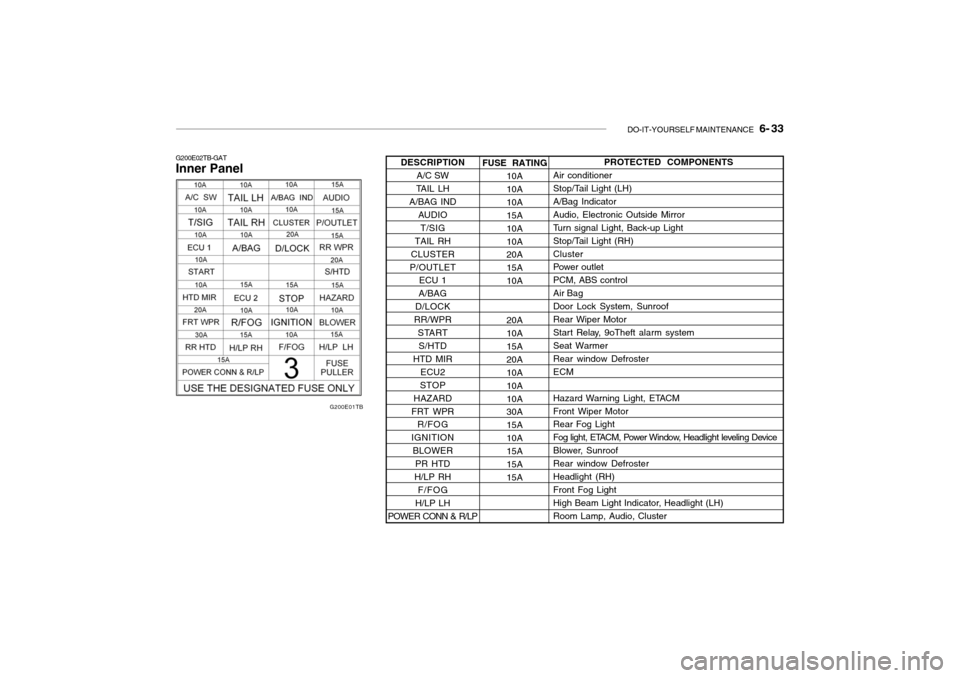
DO-IT-YOURSELF MAINTENANCE 6- 33
G200E01TB
G200E02TB-GAT Inner Panel
FUSE RATING
10A 10A10A15A10A10A 20A 15A10A 20A 10A 15A20A10A10A10A 30A 15A10A15A15A15APROTECTED COMPONENTS
Air conditioner
Stop/Tail Light (LH) A/Bag IndicatorAudio, Electronic Outside Mirror
Turn signal Light, Back-up Light
Stop/Tail Light (RH)Cluster
Power outlet PCM, ABS controlAir BagDoor Lock System, SunroofRear Wiper Motor
Start Relay, 9oTheft alarm system Seat Warmer Rear window DefrosterECM
Hazard Warning Light, ETACM Front Wiper Motor Rear Fog Light
Fog light, ETACM, Power Window, Headlight leveling Device
Blower, SunroofRear window DefrosterHeadlight (RH)Front Fog Light
High Beam Light Indicator, Headlight (LH) Room Lamp, Audio, Cluster
DESCRIPTION
A/C SW
TAIL LH
A/BAG IND
AUDIO
T/SIG
TAIL RH
CLUSTER
P/OUTLET ECU 1
A/BAG
D/LOCK
RR/WPR STARTS/HTD
HTD MIR ECU2
STOP
HAZARD
FRT WPR R/FOG
IGNITION BLOWER PR HTD
H/LP RH F/FOG
H/LP LH
POWER CONN & R/LP
Page 460 of 463

10- 2 INDEX
A
ACTIVE HEADRESTS ................................................ 1-14
ADJUSTING ARMREST ............................................. 1-15
ADJUSTING HEAD RESTRAINTS............................. 1-13
AIR BAG ..................................................................... 1-34
AIR CONDITIONING SWI TCH .................................... 1-89
AIR CONDITIONI NG SYSTEM MAINTENANCE ........ 6-18
AIR CLEANER FILTER ............................................... 6-11
ANTENNA ................................................................... 1-94
ANTI-LOCK BRAKE SYSTEM .................................... 2-14
ANTI-THEFT ALARM SYSTEM ................................... 1-8
ASHTRAY ................................................................... 1-64
AUDIO REMOTE CONTROL SW ITCH ........................1-82
AUTOMATIC TRANSAXLE ......... ................................. 2-9
AUTOMATIC TRANSAXLE FLUID ..............................6-15
B
BATTERY MAINTENANCE ........................................ 6-22
BEFORE STARTING THE ENGINE ............................ 2-3
BONNET REL EASE ................................................... 1-73
BRAKE SYSTEM CHECKI NG .................................... 6-17
CCARE OF SEAT BELTS ............................................. 1-21
CARGO AREA COVER .............................................. 1-77CATALYTIC CONVERTOR OPERATING
PRECAUTIONS ....................................................... 7-3
CENTRAL DOOR LOCKS ............................................ 1-7
CHANGING A FLAT TYRE .......................................... 3-6
CHILD-PROOF REAR DOOR LOCK ............................ 1-8
CHILD RESTRAINT SYSTEM .................................... 1-25
CIGAR LIGHTER ........................................................ 1-62
COMBINATION IGNITION SWITCH AND STEERING LOCK ................................................... 2-3
CONSOLE TRAY ........................................................ 1-64
DDAILY OPERATING CHECKS ..................................... 6-5
DIGITAL CLOCK ......................................................... 1-62
DOOR LOCKS ............................................................. 1-6
DOOR WINDOWS ...................................................... 1-11
DRINK HOLDER ......................................................... 1-64
DRIVE BELTS ............................................................ 6-20
DRIVING FOR ECONOMY ......................................... 2-15
EEFFECTIVE BRA KING............................................. 2-13
ELECTRIC COOLING FANS ....................................... 6-23
ELECTRONIC STABILITY PROGRAM .......................2-14
EMERGENCY TOWING ............................................. 3-12
EMISSION CONTROL SYSTEM ................................. 7-2