Hyundai H-1 (Grand Starex) 2006 Service Manual
Manufacturer: HYUNDAI, Model Year: 2006, Model line: H-1 (Grand Starex), Model: Hyundai H-1 (Grand Starex) 2006Pages: 284, PDF Size: 12.21 MB
Page 41 of 284
1
BEFORE DRIVING YOUR VEHICLE
27
!WARNING:
o Fuel vapors are dangerous. Be- fore refueling, always stop the en- gine and never allow sparks oropen flames near the filler area. If you need to replace the filler cap, use a genuine Hyundai replace-ment part. If you open the fuel filler cap dur- ing high ambient temperatures, aslight "pressure sound" may be heard. This is normal and not a cause for concern.Whenever you open the fuel filler cap, turn it slowly. o Automotive fuels are flammable/
explosive materials. When refuel-ing, please note the following guidelines carefully. Failure tofollow these guidelines may re- sult in severe personal injury, se- vere burns or death by fire orexplosion.
- Before refueling always note thelocation of the Emergency Gaso- line Shut-Off, if available, at the gas station facility.
- Before touching the fuel nozzle or fuel filler cap, you shouldeliminate potentially dangerous static electricity discharge bytouching another metal part of the front of the vehicle, a safe distance away from the fuel fillerneck, nozzle, or other gas source.
- Do not get back into a vehicle once you have begun refueling.Do not touch, rub or slide against any item or fabric (polyester,satin, nylon, etc.) capable of pro- ducing static electricity. Static electricity discharge can ignitefuel vapors resulting in explo- sion. If you must re-enter the vehicle,you should once again elimi- nate potentially dangerous staticelectricity discharge by touch- ing a metal part of the vehicle, away from the fuel filler neck,nozzle or other gasoline source.
- When using a portable fuel con-
tainer be sure to place the con-tainer on the ground prior to refueling. Static electricity dis- charge from the container canignite fuel vapors causing a fire. Once refueling has begun, con- tact with the vehicle should bemaintained until the filling is complete. Use only portable fuel containers designed to carry andstore gasoline.
- Do not use cellular phones
around a gas station or whilerefueling any vehicle. Electric current and/or electronic inter- ference from cellular phones canpotentially ignite fuel vapors causing a fire. If you must use your cellular phone use it in aplace away from the gas station.
NOTE: If the fuel-filler lid will not open be- cause ice has formed around it, tap lightly or push on the lid to break theice and release the lid. Do not pry on the lid. If necessary, spray around the lid with an approved de-icer fluid(do not use radiator anti-freeze) or move the vehicle to a warm place and allow the ice to melt.
Page 42 of 284
1BEFORE DRIVING YOUR VEHICLE
28
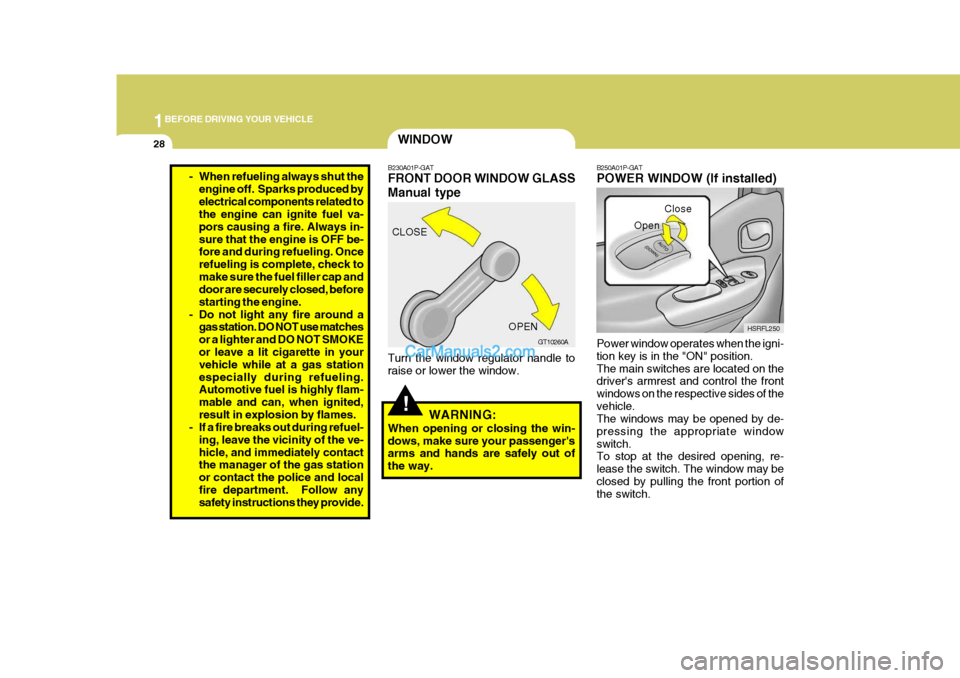
B250A01P-GAT POWER WINDOW (If installed) Power window operates when the igni- tion key is in the "ON" position.The main switches are located on the driver's armrest and control the front windows on the respective sides of thevehicle. The windows may be opened by de- pressing the appropriate windowswitch. To stop at the desired opening, re- lease the switch. The window may beclosed by pulling the front portion of the switch. Close
HSRFL250
Open
WINDOW
!
B230A01P-GAT FRONT DOOR WINDOW GLASS Manual type
Turn the window regulator handle to raise or lower the window. WARNING:
When opening or closing the win- dows, make sure your passenger's arms and hands are safely out of the way. CLOSE
GT10260A
OPEN
- When refueling always shut the
engine off. Sparks produced byelectrical components related to the engine can ignite fuel va- pors causing a fire. Always in-sure that the engine is OFF be- fore and during refueling. Once refueling is complete, check tomake sure the fuel filler cap and door are securely closed, before starting the engine.
- Do not light any fire around a gas station. DO NOT use matchesor a lighter and DO NOT SMOKE or leave a lit cigarette in your vehicle while at a gas stationespecially during refueling. Automotive fuel is highly flam- mable and can, when ignited,result in explosion by flames.
- If a fire breaks out during refuel-
ing, leave the vicinity of the ve-hicle, and immediately contact the manager of the gas station or contact the police and localfire department. Follow any safety instructions they provide.
Page 43 of 284
1
BEFORE DRIVING YOUR VEHICLE
29
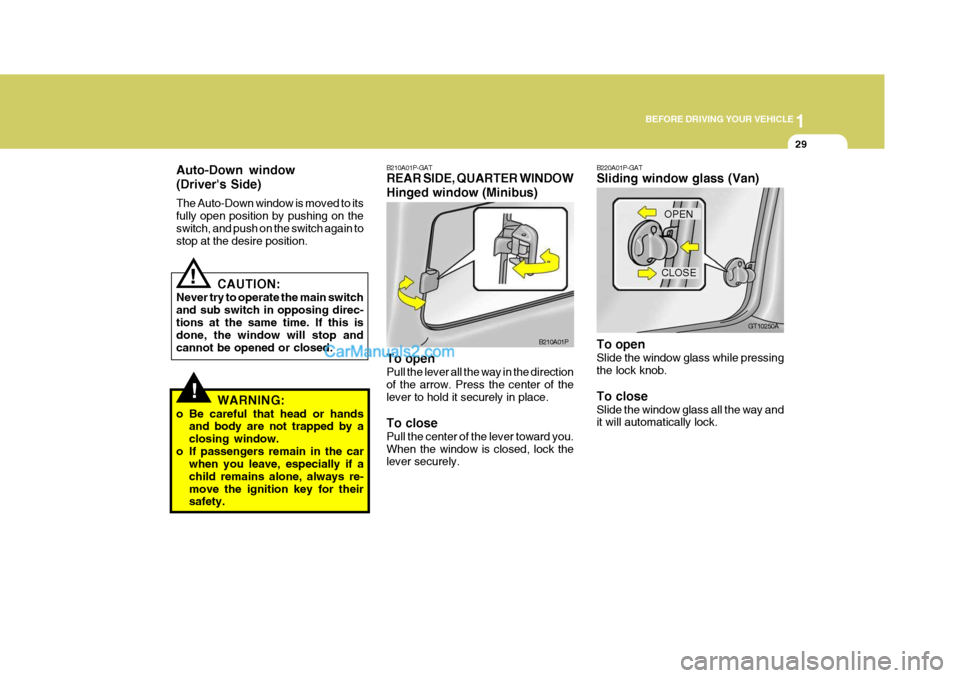
B210A01P-GAT REAR SIDE, QUARTER WINDOW Hinged window (Minibus) To open Pull the lever all the way in the direction of the arrow. Press the center of the lever to hold it securely in place. To close Pull the center of the lever toward you. When the window is closed, lock the lever securely. B210A01P
!
Auto-Down window (Driver's Side) The Auto-Down window is moved to its fully open position by pushing on theswitch, and push on the switch again to stop at the desire position.
CAUTION:
Never try to operate the main switch and sub switch in opposing direc-tions at the same time. If this is done, the window will stop and cannot be opened or closed.
WARNING:
o Be careful that head or hands and body are not trapped by aclosing window.
o If passengers remain in the car when you leave, especially if achild remains alone, always re-move the ignition key for their safety.
!
B220A01P-GAT Sliding window glass (Van) To open Slide the window glass while pressing the lock knob. To close Slide the window glass all the way and it will automatically lock. CLOSE
GT10250A
OPEN
Page 44 of 284
1BEFORE DRIVING YOUR VEHICLE
30SEATS
HSRFL859
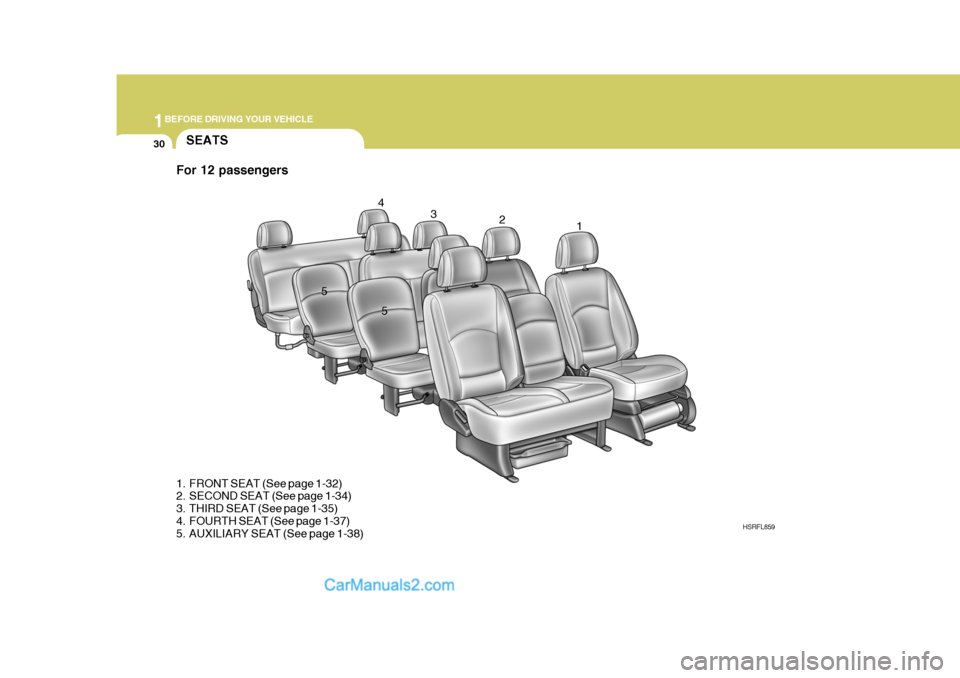
1. FRONT SEAT (See page 1-32)
2. SECOND SEAT (See page 1-34)
3. THIRD SEAT (See page 1-35)
4. FOURTH SEAT (See page 1-37)
5. AUXILIARY SEAT (See page 1-38) 1
2
3
4
5 5
For 12 passengers
Page 45 of 284
1
BEFORE DRIVING YOUR VEHICLE
31
HSRFL859-2
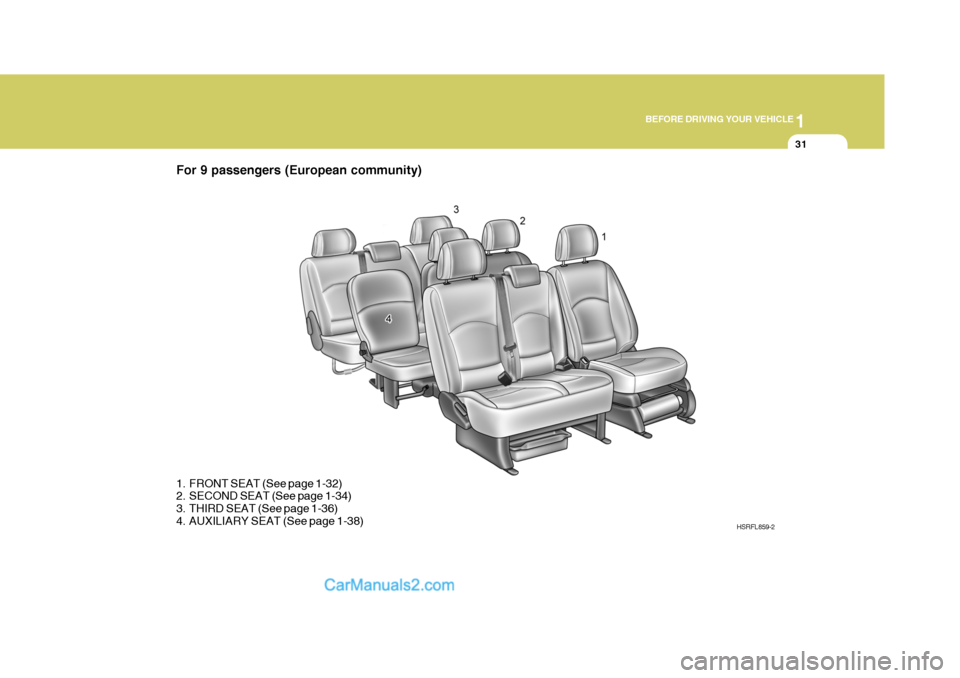
1. FRONT SEAT (See page 1-32)
2. SECOND SEAT (See page 1-34)
3. THIRD SEAT (See page 1-36)
4. AUXILIARY SEAT (See page 1-38)
For 9 passengers (European community)
Page 46 of 284
1BEFORE DRIVING YOUR VEHICLE
32
!
!
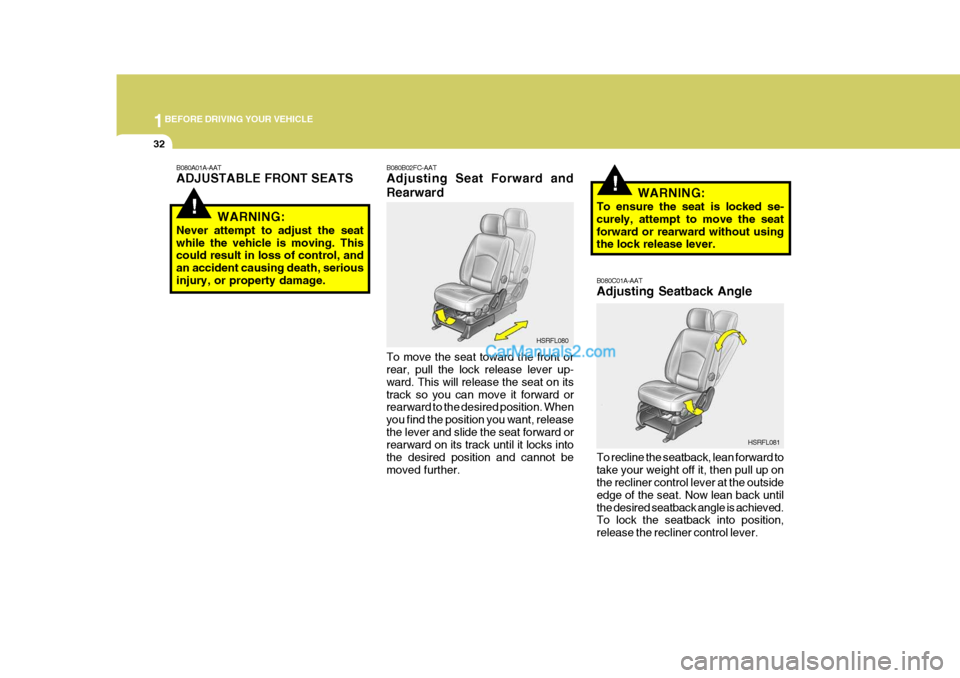
B080A01A-AAT ADJUSTABLE FRONT SEATS
WARNING:
Never attempt to adjust the seat while the vehicle is moving. This could result in loss of control, and an accident causing death, seriousinjury, or property damage. B080B02FC-AAT Adjusting Seat Forward and Rearward To move the seat toward the front or rear, pull the lock release lever up- ward. This will release the seat on itstrack so you can move it forward or rearward to the desired position. When you find the position you want, releasethe lever and slide the seat forward or rearward on its track until it locks into the desired position and cannot bemoved further. B080C01A-AAT Adjusting Seatback Angle To recline the seatback, lean forward to take your weight off it, then pull up on the recliner control lever at the outside edge of the seat. Now lean back untilthe desired seatback angle is achieved. To lock the seatback into position, release the recliner control lever.
HSRFL080
HSRFL081
WARNING:
To ensure the seat is locked se-curely, attempt to move the seatforward or rearward without using the lock release lever.
Page 47 of 284
1
BEFORE DRIVING YOUR VEHICLE
33
!WARNING:
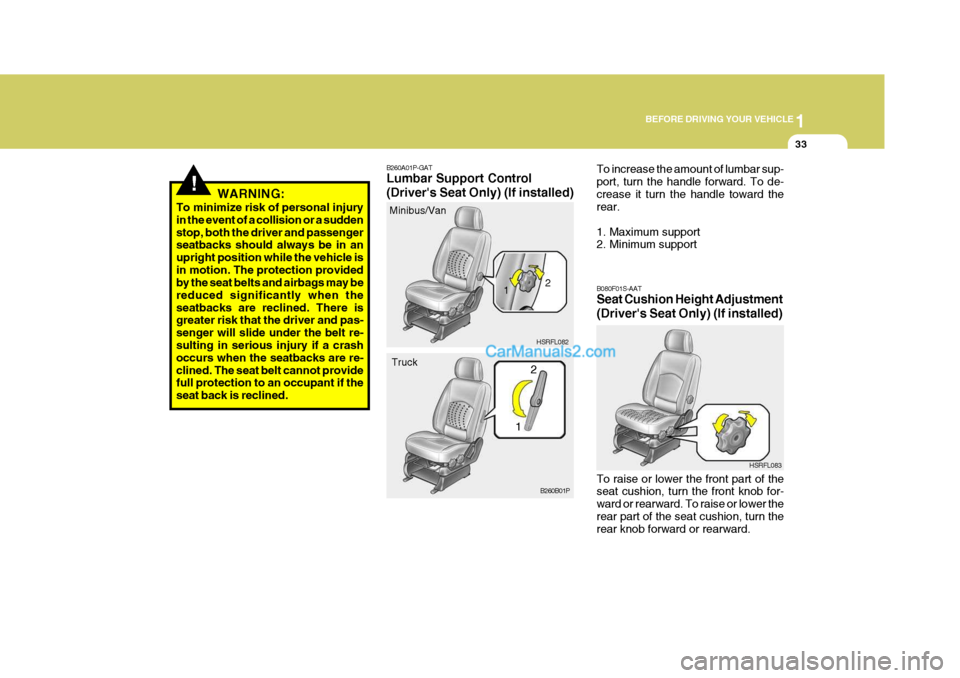
To minimize risk of personal injury in the event of a collision or a suddenstop, both the driver and passenger seatbacks should always be in an upright position while the vehicle isin motion. The protection provided by the seat belts and airbags may be reduced significantly when theseatbacks are reclined. There is greater risk that the driver and pas- senger will slide under the belt re- sulting in serious injury if a crash occurs when the seatbacks are re-clined. The seat belt cannot provide full protection to an occupant if the seat back is reclined. B260A01P-GAT Lumbar Support Control (Driver's Seat Only) (If installed)
Minibus/Van
1HSRFL082 B080F01S-AAT Seat Cushion Height Adjustment (Driver's Seat Only) (If installed) To raise or lower the front part of the seat cushion, turn the front knob for- ward or rearward. To raise or lower therear part of the seat cushion, turn the rear knob forward or rearward.
Truck To increase the amount of lumbar sup- port, turn the handle forward. To de-crease it turn the handle toward the rear.
1. Maximum support
2. Minimum support
B260B01P HSRFL083
2
1 2
Page 48 of 284
1BEFORE DRIVING YOUR VEHICLE
34
5
!
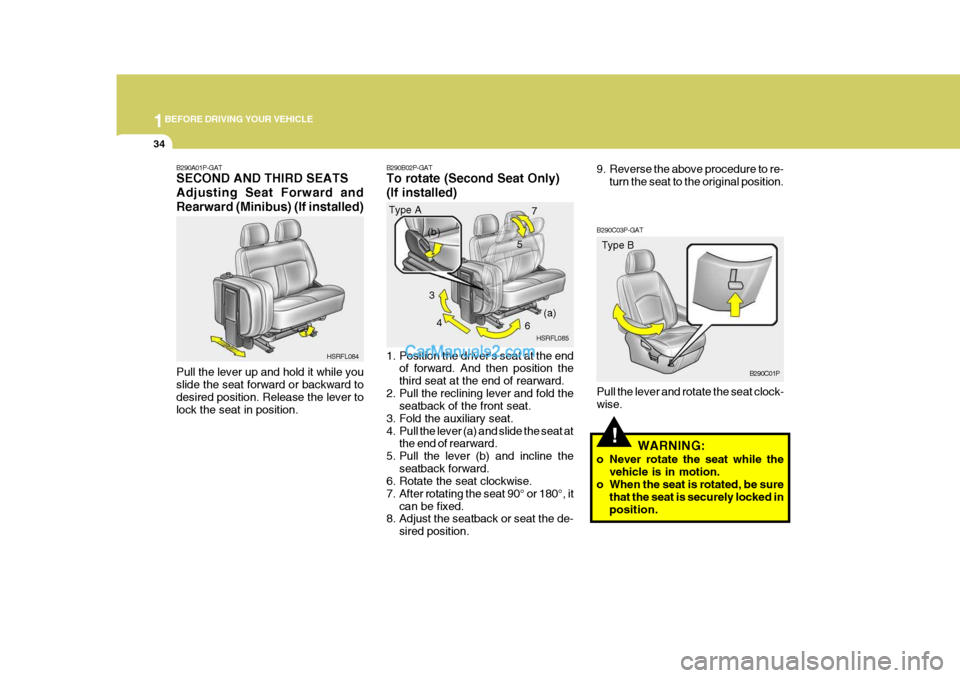
B290C03P-GAT Pull the lever and rotate the seat clock- wise.
WARNING:
o Never rotate the seat while the vehicle is in motion.
o When the seat is rotated, be sure
that the seat is securely locked inposition.
B290A01P-GAT SECOND AND THIRD SEATS Adjusting Seat Forward andRearward (Minibus) (If installed) Pull the lever up and hold it while you slide the seat forward or backward to desired position. Release the lever tolock the seat in position.
B290B02P-GAT To rotate (Second Seat Only) (If installed)
1. Position the driver's seat at the end
of forward. And then position the third seat at the end of rearward.
2. Pull the reclining lever and fold the seatback of the front seat.
3. Fold the auxiliary seat.
4. Pull the lever (a) and slide the seat at the end of rearward.
5. Pull the lever (b) and incline the seatback forward.
6. Rotate the seat clockwise.
7. After rotating the seat 90° or 180°, it
can be fixed.
8. Adjust the seatback or seat the de-
sired position.
HSRFL084
Type A
HSRFL085Type B
B290C01P
3
4 67
(a)
(b)
9. Reverse the above procedure to re-
turn the seat to the original position.
Page 49 of 284
1
BEFORE DRIVING YOUR VEHICLE
35
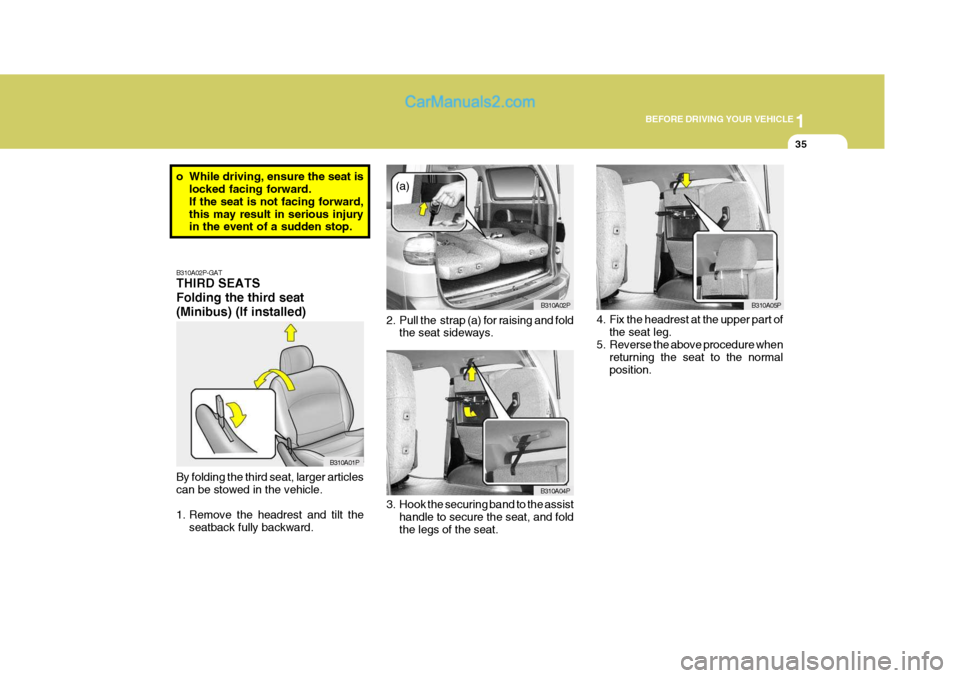
B310A02P-GAT THIRD SEATS Folding the third seat(Minibus) (If installed) By folding the third seat, larger articles can be stowed in the vehicle.
1. Remove the headrest and tilt the
seatback fully backward. 2. Pull the strap (a) for raising and fold
the seat sideways.
3. Hook the securing band to the assist handle to secure the seat, and fold the legs of the seat.
B310A01P B310A02P
B310A04P B310A05P
(a)
4. Fix the headrest at the upper part ofthe seat leg.
5. Reverse the above procedure when returning the seat to the normalposition.
o While driving, ensure the seat is
locked facing forward.If the seat is not facing forward,this may result in serious injury in the event of a sudden stop.
Page 50 of 284
1BEFORE DRIVING YOUR VEHICLE
36
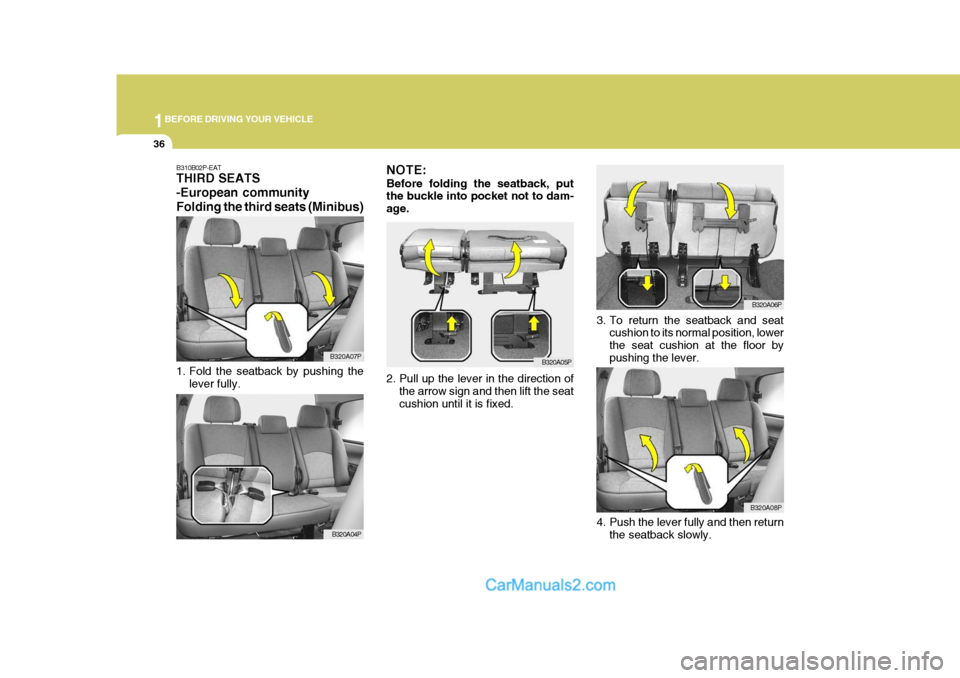
B310B02P-EAT THIRD SEATS -European communityFolding the third seats (Minibus)
1. Fold the seatback by pushing the
lever fully. B320A07PNOTE: Before folding the seatback, put the buckle into pocket not to dam- age.
B320A04P
B320A06P
2. Pull up the lever in the direction of the arrow sign and then lift the seat cushion until it is fixed. 3. To return the seatback and seat
cushion to its normal position, lowerthe seat cushion at the floor bypushing the lever.
B320A05P
4. Push the lever fully and then returnthe seatback slowly.
B320A08P