Hyundai H-1 (Grand Starex) 2007 Owner's Manual
Manufacturer: HYUNDAI, Model Year: 2007, Model line: H-1 (Grand Starex), Model: Hyundai H-1 (Grand Starex) 2007Pages: 284, PDF Size: 11.33 MB
Page 111 of 284
2 INSTRUMENTS AND CONTROLS
44AIR CONDITIONING SYSTEM
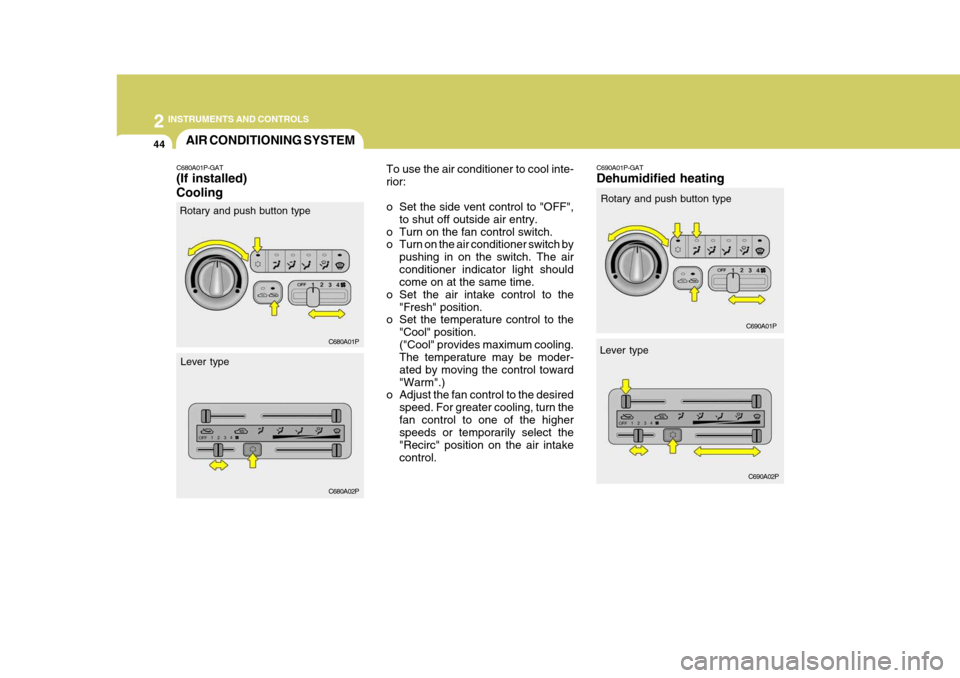
C680A01P-GAT (If installed) Cooling To use the air conditioner to cool inte- rior:
o Set the side vent control to "OFF",
to shut off outside air entry.
o Turn on the fan control switch.
o Turn on the air conditioner switch by pushing in on the switch. The air conditioner indicator light should come on at the same time.
o Set the air intake control to the "Fresh" position.
o Set the temperature control to the
"Cool" position. ("Cool" provides maximum cooling. The temperature may be moder- ated by moving the control toward"Warm".)
o Adjust the fan control to the desired
speed. For greater cooling, turn thefan control to one of the higher speeds or temporarily select the "Recirc" position on the air intakecontrol.
C680A01P C680A02P
Rotary and push button type
Lever type Rotary and push button type
Lever type
C690A01P-GAT Dehumidified heating
C690A01P
C690A02P
Page 112 of 284
2
INSTRUMENTS AND CONTROLS
45REAR HEATER AND AIR CONDITIONER
C710A01P-GAT (If installed) The rear heater can be operated with the ignition switch at the "ON" positionby depressing the main switch in the instrument panel.
C700A01P-GAT Operation Tips
o If the interior of the vehicle is hot
when you first get in, open the win- dows for a few minutes to expel the hot air.
o When you are using the air condi- tioning system, keep all windowsclosed to keep hot air out.
o When you must drive slowly, as in heavy traffic, shift to a lower gear.This increases engine speed, which in turn increases the speed of theair conditioning compressor.
o When driving up long grades, turn
occasionally the air conditioner offto avoid the possibility of the engine overheating.
o During winter months or in periods when the air conditioner is not usedregularly, turn on the air conditioner switch occasionally for a few min-utes. This will help circulate the lubricants and keep your system in peak operating condition.
For dehumidified heating:
o Turn on the fan control switch.
o Turn on the air conditioner switch by
pushing in on the switch. The air conditioner indicator light should come on at the same time.
o Set the air intake control to the "Fresh".
o Set the air flow control to the "Face".
o Adjust the fan control to the desired
speed. For more rapid action, set the fan at one of the higher speeds.
o Adjust the temperature control to provide the desired amount ofwarmth.
Page 113 of 284
2 INSTRUMENTS AND CONTROLS
46
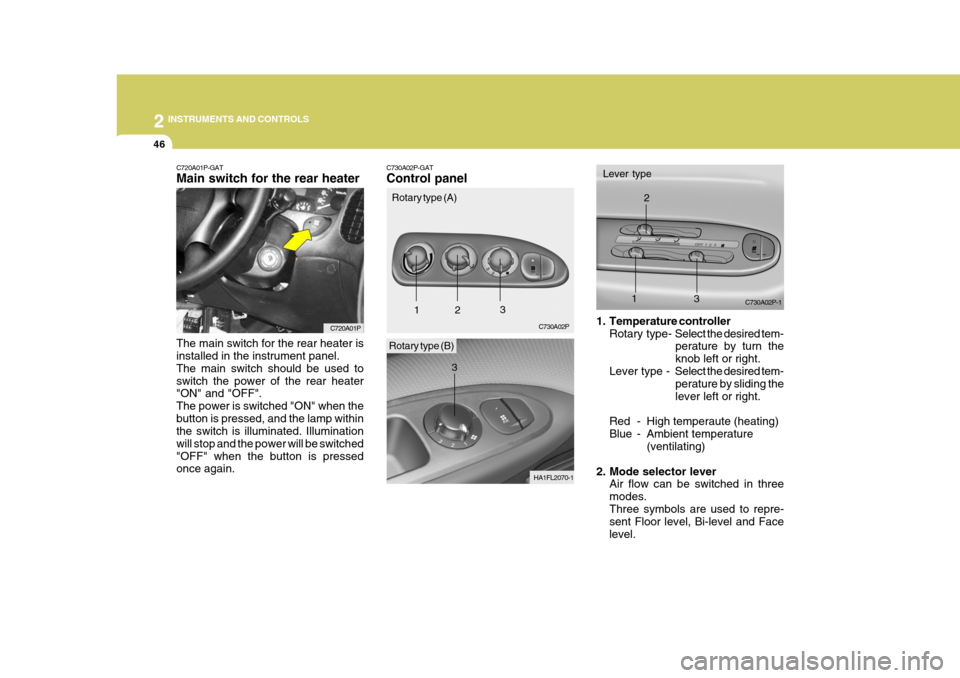
C720A01P-GAT Main switch for the rear heater The main switch for the rear heater is installed in the instrument panel. The main switch should be used toswitch the power of the rear heater "ON" and "OFF". The power is switched "ON" when thebutton is pressed, and the lamp within the switch is illuminated. Illumination will stop and the power will be switched"OFF" when the button is pressed once again. C720A01PC730A02P-GAT Control panel
Rotary type (A) Lever type
C730A02P C730A02P-1
1
2
3
12
3
1. Temperature controllerRotary type- Select the desired tem-
perature by turn the knob left or right.
Lever type - Select the desired tem-
perature by sliding thelever left or right.
Red - High temperaute (heating)
Blue - Ambi ent temperature
(ventilating)
2. Mode selector lever Air flow can be switched in threemodes.Three symbols are used to repre- sent Floor level, Bi-level and Face level.
Rotary type (B)
HA1FL2070-1
3
Page 114 of 284
2
INSTRUMENTS AND CONTROLS
47
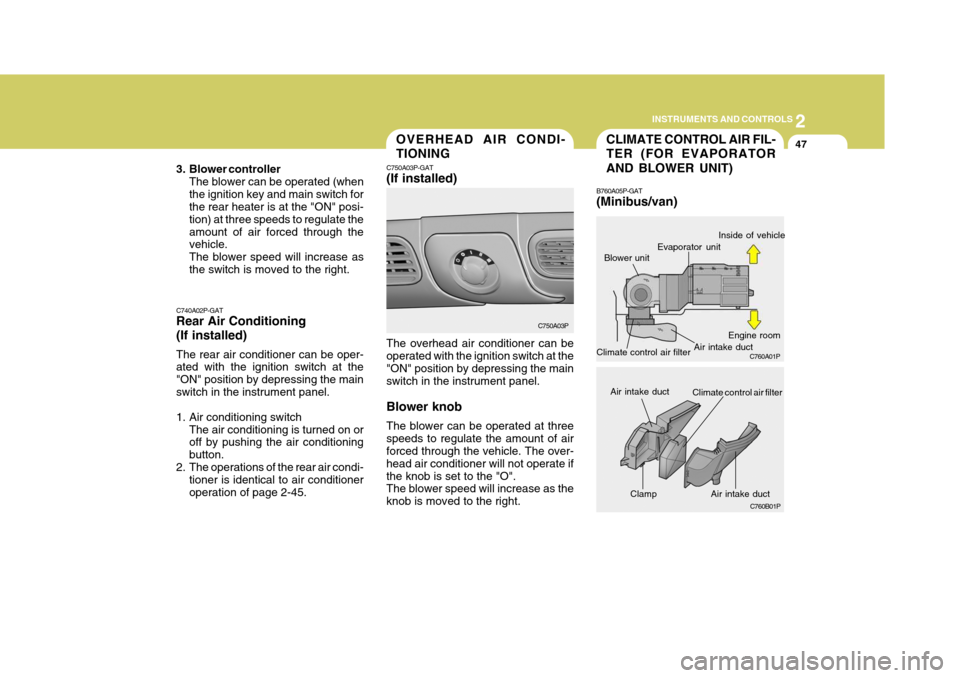
Clamp
CLIMATE CONTROL AIR FIL- TER (FOR EVAPORATOR AND BLOWER UNIT)
B760A05P-GAT (Minibus/van)
Blower unitOVERHEAD AIR CONDI- TIONING
C750A03P-GAT (If installed) The overhead air conditioner can be operated with the ignition switch at the "ON" position by depressing the mainswitch in the instrument panel. Blower knob The blower can be operated at three speeds to regulate the amount of air forced through the vehicle. The over- head air conditioner will not operate ifthe knob is set to the "O". The blower speed will increase as the knob is moved to the right.
C740A02P-GAT Rear Air Conditioning (If installed) The rear air conditioner can be oper- ated with the ignition switch at the "ON" position by depressing the mainswitch in the instrument panel.
1. Air conditioning switch
The air conditioning is turned on or off by pushing the air conditioning button.
2. The operations of the rear air condi- tioner is identical to air conditioneroperation of page 2-45. C750A03P
C760A01P
C760B01P
Evaporator unit Air intake ductInside of vehicle
Engine room
Air intake duct
Air intake duct
Climate control air filter
Climate control air filter
3. Blower controller
The blower can be operated (when the ignition key and main switch for the rear heater is at the "ON" posi- tion) at three speeds to regulate theamount of air forced through the vehicle. The blower speed will increase asthe switch is moved to the right.
Page 115 of 284
2 INSTRUMENTS AND CONTROLS
48
The climate control air filter is located in the air intake duct behind the wind-shield washer reservoir. It operates to decrease the amount of pollutants entering the car.To replace the climate control air filter, refer to the page 8-16.
CAUTION:
o Replace the filter every 15,000 km (10,000 miles) or once a year. If the car is being driven in severe conditions such as dusty, rough roads, more frequent climate con-trol air filter inspections and changes are required.
o When the air flow rate is sud- denly decreased, it must bechecked at authorized dealer.
!
Page 116 of 284
2
INSTRUMENTS AND CONTROLS
49STEREO SOUND SYSTEM
B750A02A-AAT How Car Audio Works
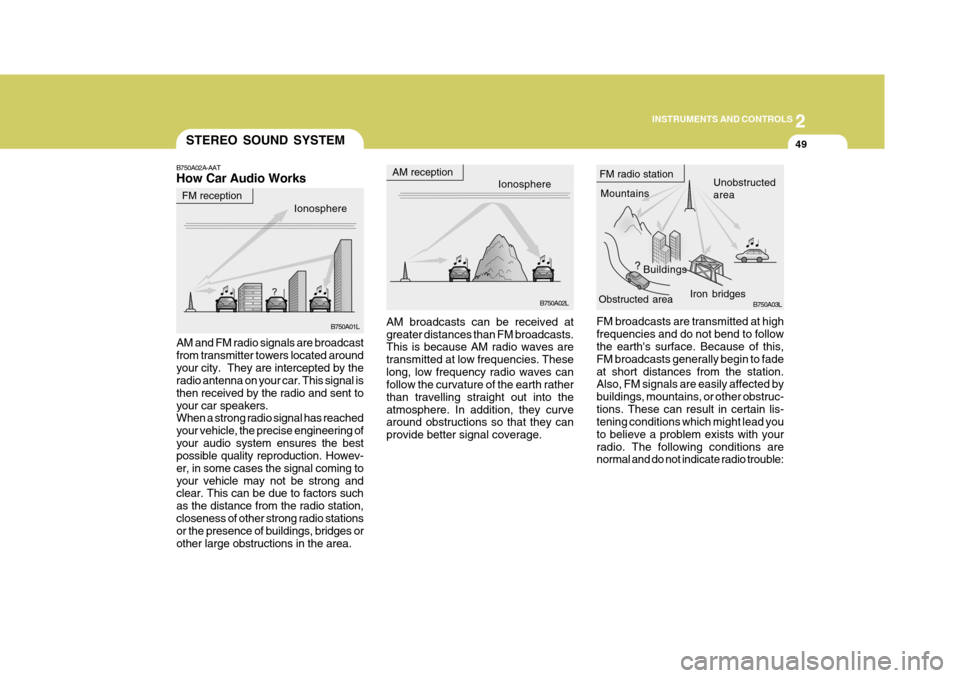
FM broadcasts are transmitted at high frequencies and do not bend to follow the earth's surface. Because of this, FM broadcasts generally begin to fadeat short distances from the station. Also, FM signals are easily affected by buildings, mountains, or other obstruc-tions. These can result in certain lis- tening conditions which might lead you to believe a problem exists with yourradio. The following conditions are normal and do not indicate radio trouble:
AM broadcasts can be received at greater distances than FM broadcasts. This is because AM radio waves are transmitted at low frequencies. Theselong, low frequency radio waves can follow the curvature of the earth rather than travelling straight out into theatmosphere. In addition, they curve around obstructions so that they can provide better signal coverage.
AM and FM radio signals are broadcastfrom transmitter towers located aroundyour city. They are intercepted by the radio antenna on your car. This signal is then received by the radio and sent toyour car speakers. When a strong radio signal has reached your vehicle, the precise engineering ofyour audio system ensures the best possible quality reproduction. Howev- er, in some cases the signal coming toyour vehicle may not be strong and clear. This can be due to factors such as the distance from the radio station,closeness of other strong radio stations or the presence of buildings, bridges or other large obstructions in the area. Ionosphere
B750A02L
AM reception
Mountains
Buildings Unobstructed area
FM radio station
B750A03L
Ionosphere
FM reception
B750A01L Obstructed area
Iron bridges
Page 117 of 284
2 INSTRUMENTS AND CONTROLS
50
!
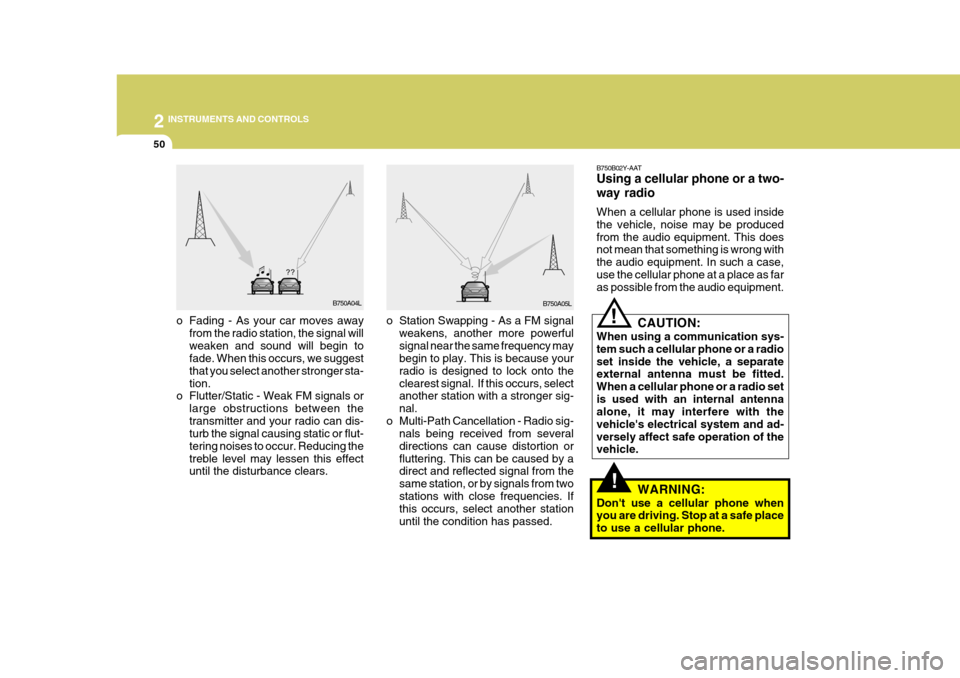
o Station Swapping - As a FM signal
weakens, another more powerful signal near the same frequency may begin to play. This is because your radio is designed to lock onto theclearest signal. If this occurs, select another station with a stronger sig- nal.
o Multi-Path Cancellation - Radio sig- nals being received from severaldirections can cause distortion orfluttering. This can be caused by a direct and reflected signal from the same station, or by signals from twostations with close frequencies. If this occurs, select another station until the condition has passed.
o Fading - As your car moves away
from the radio station, the signal willweaken and sound will begin to fade. When this occurs, we suggest that you select another stronger sta-tion.
o Flutter/Static - Weak FM signals or
large obstructions between thetransmitter and your radio can dis- turb the signal causing static or flut- tering noises to occur. Reducing thetreble level may lessen this effect until the disturbance clears. B750B02Y-AAT Using a cellular phone or a two- way radio When a cellular phone is used inside the vehicle, noise may be producedfrom the audio equipment. This does not mean that something is wrong with the audio equipment. In such a case,use the cellular phone at a place as far as possible from the audio equipment.!
CAUTION:
When using a communication sys- tem such a cellular phone or a radioset inside the vehicle, a separate external antenna must be fitted. When a cellular phone or a radio setis used with an internal antenna alone, it may interfere with the vehicle's electrical system and ad-versely affect safe operation of the vehicle.
WARNING:
Don't use a cellular phone whenyou are driving. Stop at a safe place to use a cellular phone.
B750A04L
B750A05L
Page 118 of 284
2
INSTRUMENTS AND CONTROLS
51AUDIO SYSTEM
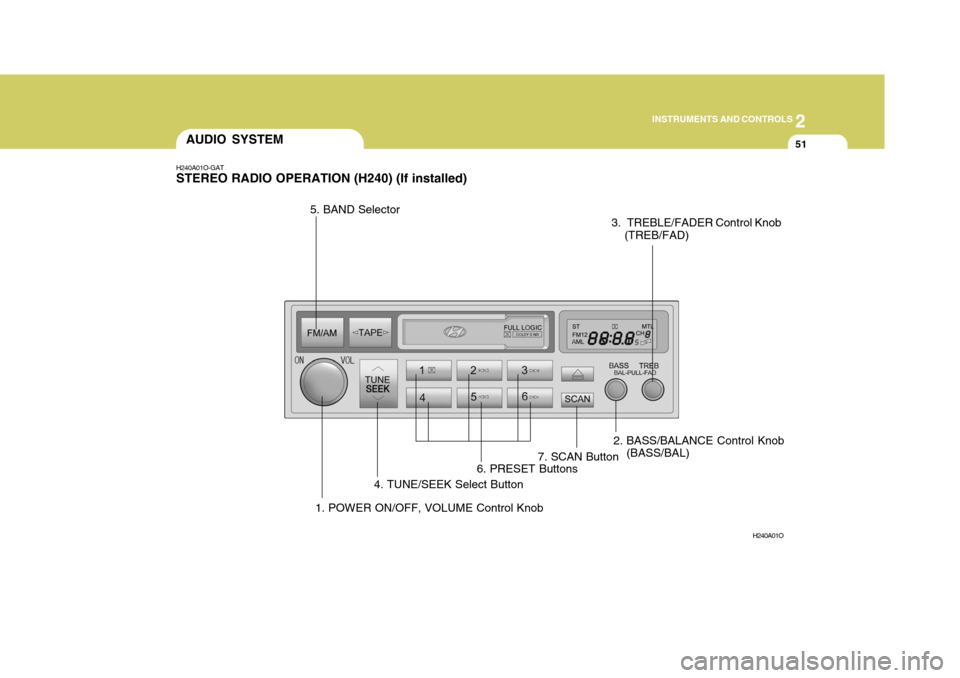
H240A01O-GAT STEREO RADIO OPERATION (H240) (If installed)
H240A01O
1. POWER ON/OFF, VOLUME Control Knob2. BASS/BALANCE Control Knob
(BASS/BAL)
3. TREBLE/FADER Control Knob
(TREB/FAD)
4. TUNE/SEEK Select Button
5. BAND Selector
6. PRESET Buttons7. SCAN Button
Page 119 of 284
2 INSTRUMENTS AND CONTROLS
52
H240B03O-GAT
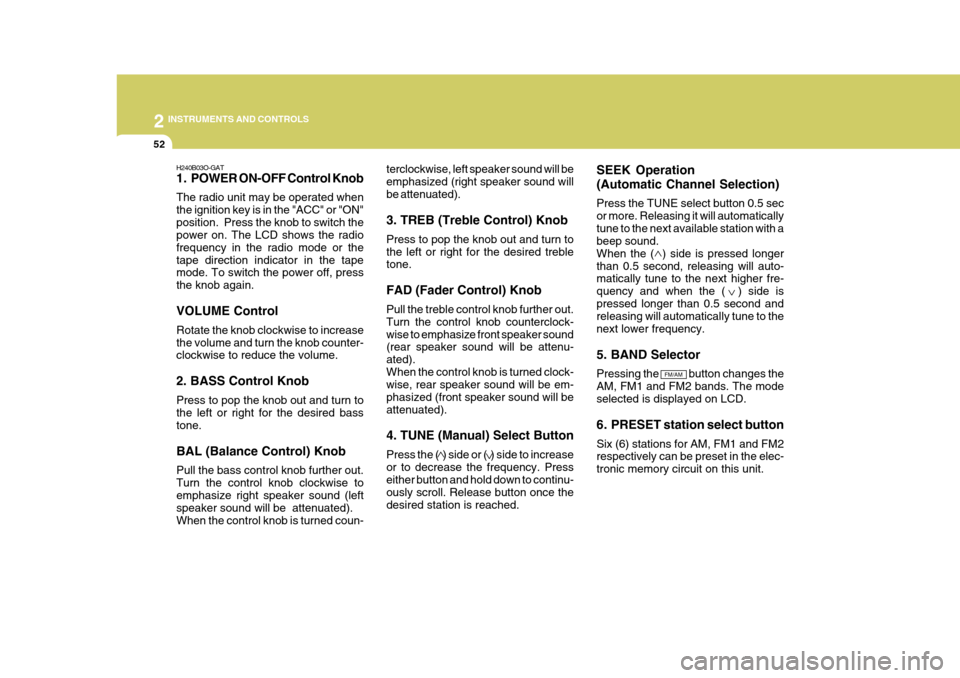
1. POWER ON-OFF Control Knob The radio unit may be operated when the ignition key is in the "ACC" or "ON"position. Press the knob to switch the power on. The LCD shows the radio frequency in the radio mode or thetape direction indicator in the tape mode. To switch the power off, press the knob again. VOLUME Control Rotate the knob clockwise to increase the volume and turn the knob counter- clockwise to reduce the volume. 2. BASS Control Knob Press to pop the knob out and turn to the left or right for the desired bass tone. BAL (Balance Control) Knob Pull the bass control knob further out. Turn the control knob clockwise to emphasize right speaker sound (left speaker sound will be attenuated).When the control knob is turned coun- terclockwise, left speaker sound will beemphasized (right speaker sound willbe attenuated). 3. TREB (Treble Control) Knob Press to pop the knob out and turn to the left or right for the desired treble tone. FAD (Fader Control) Knob Pull the treble control knob further out. Turn the control knob counterclock-wise to emphasize front speaker sound (rear speaker sound will be attenu- ated).When the control knob is turned clock- wise, rear speaker sound will be em- phasized (front speaker sound will beattenuated). 4. TUNE (Manual) Select Button Press the ( ) side or ( ) side to increase or to decrease the frequency. Press either button and hold down to continu- ously scroll. Release button once thedesired station is reached.
SEEK Operation (Automatic Channel Selection) Press the TUNE select button 0.5 sec or more. Releasing it will automaticallytune to the next available station with a beep sound. When the ( ) side is pressed longerthan 0.5 second, releasing will auto- matically tune to the next higher fre- quency and when the ( ) side ispressed longer than 0.5 second and releasing will automatically tune to the next lower frequency. 5. BAND Selector Pressing the button changes the AM, FM1 and FM2 bands. The modeselected is displayed on LCD.
6. PRESET station select button Six (6) stations for AM, FM1 and FM2 respectively can be preset in the elec- tronic memory circuit on this unit.
FM/AM
Page 120 of 284
2
INSTRUMENTS AND CONTROLS
53
HOW TO PRESET STATIONS Six AM and twelve FM stations may be programmed into the memory of theradio. Then, by simply pressing the band select button and/or one of the six station select buttons, you mayrecall any of these stations instantly. To program the stations, follow these steps:
o Press band selector to set the band for AM, FM1, or FM2.
o Select the desired station to be stored by seek or manual tuning.
o Determine the preset station select button you wish to use to access that station.
o Press the station select button for more than two seconds. A selectbutton indicator will show in the dis- play indicating which select buttonyou have depressed. The frequency display will flash after it has been stored into the memory with beepsound. You should then release the button, and proceed to program the next desired station. A total of 18stations can be programmed by se- lecting one AM and two FM stations per button. o When completed, any preset sta-
tion may be recalled by selectingAM, FM1 or FM2 band and the appropriate station button.
7. SCAN Button When the scan button is pressed, the frequency will be increased and the receivable stations will be tuned in oneafter another, receiving each station for 5 seconds. To stop scanning, press the scan button again.
! CAUTION:
o Do not place beverages close to the audio system. The playback mechanism may be damaged if you spill them.
o Do not impact on the audio sys- tem, or the playback mechanismcould be damaged.