reset Hyundai Ioniq Hybrid 2017 Owner's Guide
[x] Cancel search | Manufacturer: HYUNDAI, Model Year: 2017, Model line: Ioniq Hybrid, Model: Hyundai Ioniq Hybrid 2017Pages: 553, PDF Size: 59.51 MB
Page 252 of 553
4-11
Multimedia System
4
Feature of Your Audio
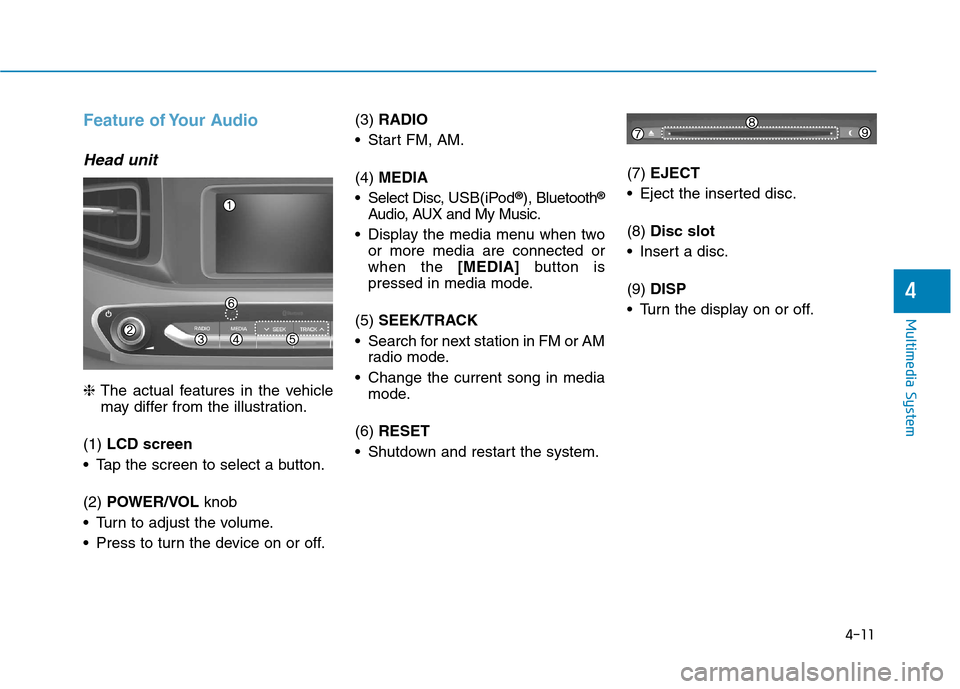
Head unit
❈The actual features in the vehicle
may differ from the illustration.
(1) LCD screen
Tap the screen to select a button. (2) POWER/VOL knob
Turn to adjust the volume.
Press to turn the device on or off. (3)
RADIO
Start FM, AM. (4) MEDIA
Select Disc, USB(iPod®
), Bluetooth ®
Audio, AUX and My Music.
Display the media menu when two or more media are connected or when the [MEDIA]button is
pressed in media mode.
(5) SEEK/TRACK
Search for next station in FM or AM radio mode.
Change the current song in media mode.
(6) RESET
Shutdown and restart the system. (7)
EJECT
Eject the inserted disc. (8) Disc slot
Insert a disc.(9) DISP
Turn the display on or off.
Page 254 of 553
4-13
Multimedia System
4
Multimedia System
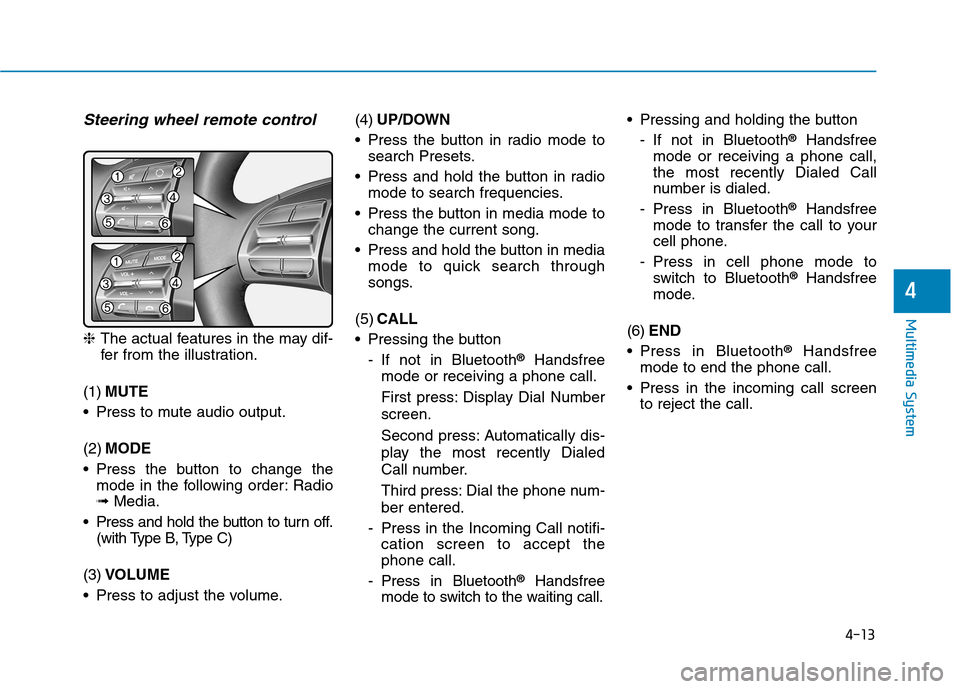
Steering wheel remote control
❈The actual features in the may dif-
fer from the illustration.
(1) MUTE
Press to mute audio output. (2) MODE
Press the button to change the mode in the following order: Radio ➟ Media.
Press and hold the button to turn off. (with Type B, Type C)
(3) VOLUME
Press to adjust the volume. (4)
UP/DOWN
Press the button in radio mode to search Presets.
Press and hold the button in radio mode to search frequencies.
Press the button in media mode to change the current song.
Press and hold the button in media mode to quick search through
songs.
(5) CALL
Pressing the button
- If not in Bluetooth ®
Handsfree
mode or receiving a phone call.
First press: Display Dial Number screen.
Second press: Automatically dis-
play the most recently Dialed
Call number.
Third press: Dial the phone num- ber entered.
- Press in the Incoming Call notifi- cation screen to accept the phone call.
- Press in Bluetooth ®
Handsfree
mode to switch to the waiting call. Pressing and holding the button
- If not in Bluetooth ®
Handsfree
mode or receiving a phone call,the most recently Dialed Call
number is dialed.
- Press in Bluetooth ®
Handsfree
mode to transfer the call to your
cell phone.
- Press in cell phone mode to switch to Bluetooth ®
Handsfree
mode.
(6) END
Press in Bluetooth ®
Handsfree
mode to end the phone call.
Press in the incoming call screen to reject the call.
Page 257 of 553
4-16
Multimedia System
Information on status icons
Icons showing audio status are shown
in the upper-right corner of the screen.
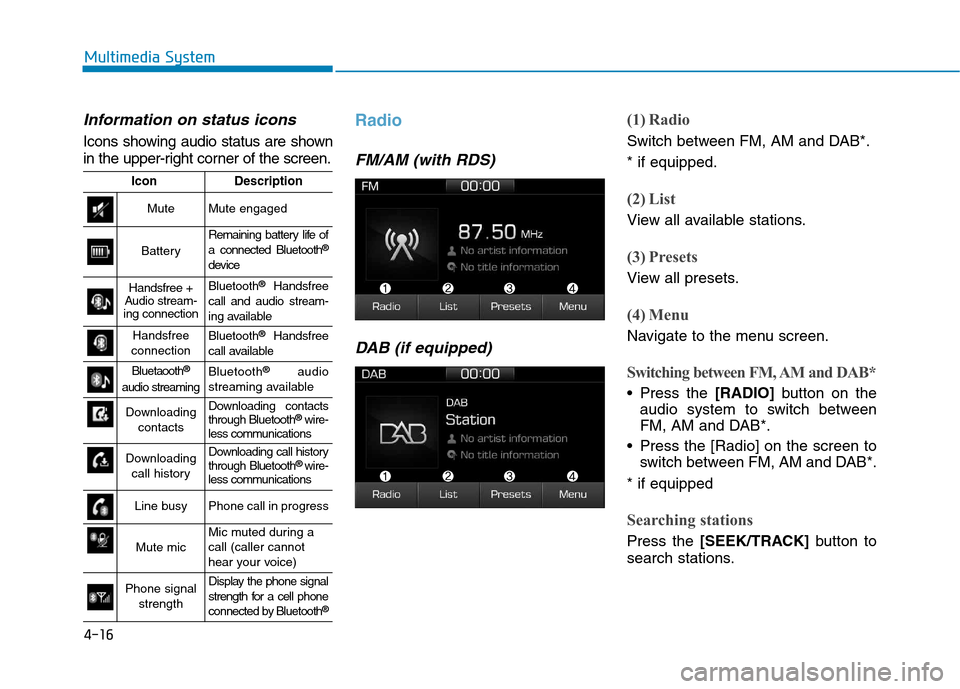
Radio
FM/AM (with RDS)DAB (if equipped)
(1) Radio
Switch between FM, AM and DAB*. * if equipped.
(2) List
View all available stations.
(3) Presets
View all presets.
(4) Menu
Navigate to the menu screen.
Switching between FM, AM and DAB*
Press the [RADIO]button on the
audio system to switch between
FM, AM and DAB*.
Press the [Radio] on the screen to switch between FM, AM and DAB*.
* if equipped
Searching stations
Press the [SEEK/TRACK] button to
search stations.
IconDescription
MuteMute engaged
Battery
Remaining battery life of a connected Bluetooth ®
device
Handsfree +
Audio stream-
ing connectionBluetooth ®
Handsfree
call and audio stream-
ing available
Handsfree
connectionBluetooth ®
Handsfree
call available
Bluetaooth ®
audio streamingBluetooth ®
audio
streaming available
Downloading contactsDownloading contacts through Bluetooth ®
wire-
less communications
Downloading
call historyDownloading call history through Bluetooth ®
wire-
less communications
Line busyPhone call in progress
Mute micMic muted during a call (caller cannot
hear your voice)
Phone signal
strengthDisplay the phone signal
strength for a cell phone
connected by Bluetooth ®
Page 258 of 553
![Hyundai Ioniq Hybrid 2017 Owners Guide 4-17
Multimedia System
4
List
A list of all available stations in the
vehicle’s current location is dis-
played. Press the desired station.
Favourite stations can be saved to
[Presets] by pressin](/img/35/14930/w960_14930-257.png "Hyundai Ioniq Hybrid 2017 Owners Guide 4-17
Multimedia System
4
List
A list of all available stations in the
vehicle’s current location is dis-
played. Press the desired station.
Favourite stations can be saved to
[Presets] by pressin")
4-17
Multimedia System
4
List
A list of all available stations in the
vehicle’s current location is dis-
played. Press the desired station.
Favourite stations can be saved to
[Presets] by pressing the [+].
Presets
Save up to 40 frequently used stations.
To listen to a preset, press the desired station list. Press and hold the desired slot from
1 through 40. This saves the currentstation in the selected slot.
If the slot is empty, simply pressing
saves the station to the slot.
Menu
Press the [Menu], and select the desired function.
Traffic Announcement (TA): Enableor disable Traffic Announcements.
Scan: All available stations are played for five seconds each.
Sound Settings: Audio sound set- tings can be changed.
FM/AM (without RDS)
(1) Band
Switch between FM, AM.
(2) Presets
View all presets.
(3) List
View all available stations.
(4) Menu
Navigate to the menu screen.
Switching between FM, AM
Press the [RADIO]button on the
audio system to switch between FM, AM.
Press the [Band] on the screen to switch between FM, AM.
Searching stations
Press the [SEEK/TRACK] button to
search stations.
List
A list of all available stations in the
vehicle’s current location is dis-
played. Press the desired station.
Favourite stations can be saved to
[Presets] by pressing the [save].
Page 259 of 553
4-18
Multimedia System
Presets
Save up to 40 frequently used stations.
To listen to a preset, press the desired station list. Press and hold the desired slot from
1 through 40. This saves the currentstation in the selected slot.
If the slot is empty, simply pressing
saves the station to the slot.
Menu
Press the [Menu], and select the desired function.
Scan: All available stations areplayed for five seconds each.
Sound Settings: Audio sound set- tings can be changed.
Media
Information - Using the Discs
This device has been manufactured to be compatible with software
bearing the following logo marks.
Do not clean discs with chemical solutions, such as record sprays,
antistatic sprays, antistatic liquids,
benzene, or thinners.
After using a disc, put the disc back in its original case to prevent disc
scratches.
Hold discs by their edges or within the center hole to prevent damages
to disc surfaces.
Do not introduce foreign substances into the disc insert/eject slot.
Introducing foreign substances
could damage the device interior.
Do not insert two discs simultaneously.
(Continued)(Continued)
When using CD-R/CD-RW discs,
differences in disc reading and play-
ing times may occur depending on
the disc manufacturer, production
method and the recording method
as used by the user.
Clean fingerprints and dust off the disc surface (coated side) with a soft
cloth.
The use of CD-R/CD-RW discs attached with labels may result in
disc slot jams or difficulties in disc
removal. Such discs may also result
in noise while playing.
Some CD-R/CD-RW discs may not properly operate depending on the
disc manufacturer, production
method and the record method as
used by the user. If problems persist,
trying using a different CD as con-
tinued use may result in malfunc-
tions.
The performance of this product may differ depending on the CDRW
Drive Software.
(Continued)i
Page 267 of 553
4-26
Multimedia System
Information
- Using the iPod®
Devices
To use the audio system’s iPod ®
con-
trol function, use the dedicated
cable provided with your iPod ®
.
Connecting the iPod ®
to the vehicle
during play may result in a loud
noise that lasts about one to two sec-
onds. Connect the iPod ®
to the vehi-
cle after stopping or pausing play.
Connect the iPod ®
with the vehicle in
the ACC ON state to begin charging.
When connecting the iPod ®
cable,
be sure to fully push the cable into
the port.
When EQ effects are enabled simul- taneously on external devices, such
as iPod ®
s and the audio system, the
EQ effects may overlap, causing
sound quality deterioration or dis-
tortion. Deactivate the EQ function
for all external devices, if possible.
Noise may occur when your iPod ®
or the AUX port is connected.
Disconnect and store separately
when not in use.
(Continued)(Continued)
There may be noise if the audio sys-
tem is used with an iPod ®
or AUX
external device connected to the
power jack. In these cases, discon-
nect the iPod ®
or external device
from the power jack.
Play may be interrupted, or device malfunctions may occur depending
on the characteristics of your
iPod ®
/iPhone ®
.
Play may fail if your iPhone ®
is con-
nected through both Bluetooth ®
and
USB. In this case, select Dock con-
nector or Bluetooth ®
on your
iPhone ®
to change the sound output
settings.
If your software version does not support the communication proto-
col or your iPod ®
is not recognized
due to device failure, anomalies or
defects, iPod ®
mode cannot be used.
iPod ®
nano (5th generation) devices
may not be recognized if the battery
is low. Charge sufficiently before use.
(Continued)(Continued)
The search and song play order in
the iPod ®
device may be different
from the search order in the audio
system.
If the iPod ®
has failed due to an
internal defect, please reset the
iPod ®
(consult your iPod ®
manual).
Depending on the software version, the iPod ®
may fail to sync with the
system. If the media is removed or
disconnected before recognition, the
previous mode may not be restored
(iPad ®
cannot be charged).
Cables other than the 1-meter cable provided with iPod ®
/iPhone ®
prod-
ucts may not be recognized.
When other music apps are used on your iPod ®
, the system sync func-
tion may fail due to malfunction of
the iPod ®
application.i
Page 282 of 553
![Hyundai Ioniq Hybrid 2017 Owners Guide 4-41
Multimedia System
4
Date/Time
Select the [SETUP]button on the
audio system ➟Select [Date/Time].
Set time: Set the time displayed on the audio screen.
Time format: Choose between 12- hour and](/img/35/14930/w960_14930-281.png "Hyundai Ioniq Hybrid 2017 Owners Guide 4-41
Multimedia System
4
Date/Time
Select the [SETUP]button on the
audio system ➟Select [Date/Time].
Set time: Set the time displayed on the audio screen.
Time format: Choose between 12- hour and")
4-41
Multimedia System
4
Date/Time
Select the [SETUP]button on the
audio system ➟Select [Date/Time].
Set time: Set the time displayed on the audio screen.
Time format: Choose between 12- hour and 24-hour time formats.
Set date: Set the date displayed on the audio screen.
Bluetooth
Select the [SETUP]button on the
audio system ➟Select [Bluetooth].
Connections: Control pairing, dele- tion, connection and disconnection of Bluetooth ®
devices.
Auto connection priority: Set the connection priority of Bluetooth ®
devices when the vehicle is started.
Update contacts: Contacts can be downloaded from connectedBluetooth ®
devices.
Bluetooth voice guidance*: Play or mute voice prompts for Bluetooth ®
device pairing, connection and
errors. * if equipped Information
When paired devices are deleted, the call history and contacts of the
device saved to the audio system are
deleted.
For Bluetooth ®
connections with
low connection priority, some time
may be required for the connection
to be established.
Contacts can be downloaded only from the currently connected
Bluetooth ®
device.
If no Bluetooth ®
device is connected,
the Download Contacts button is
disabled.
If the language setting is Slovakian, Hungarian or Korean, Bluetooth
voice guidance* is not supported.
* if equipped
System
Select the [SETUP]button on the
audio system ➟Select [System].
Memory information: View My Music memory usage.
Language: Change the user lan- guage.
Default: Reset the audio system.
Information
The system resets to the default val-
ues, and all saved data and settings
are lost.
i
i
Page 351 of 553
5-67
Driving your vehicle
5
Speed Limit Control operation
You can set the speed limit when you
do not want to drive over a specificspeed.
If you drive over the preset speed
limit, the warning system operates
(set speed limit will blink and chime
will sound) until the vehicle speed
returns within the speed limit.Information
While speed limit control is in opera-
tion, the cruise control system cannot
be activated.
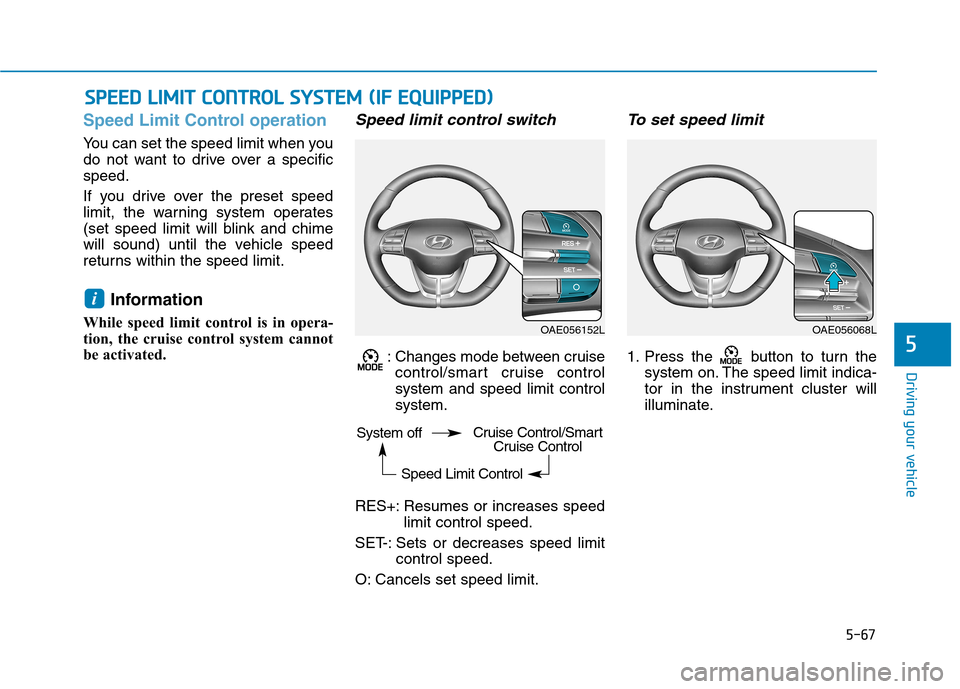
Speed limit control switch
: Changes mode between cruise control/smart cruise controlsystem and speed limit controlsystem.
RES+: Resumes or increases speed limit control speed.
SET-: Sets or decreases speed limit control speed.
O: Cancels set speed limit.
To set speed limit
1. Press the button to turn the system on. The speed limit indica-
tor in the instrument cluster will
illuminate.
i
SSPP EEEEDD LL IIMM IITT CC OO NNTTRR OO LL SS YY SSTT EEMM (( IIFF EE QQ UUIIPP PPEEDD ))
OAE056152LOAE056068L
System off
Speed Limit ControlCruise Control/SmartCruise Control
Page 357 of 553
5-73
Driving your vehicle
5
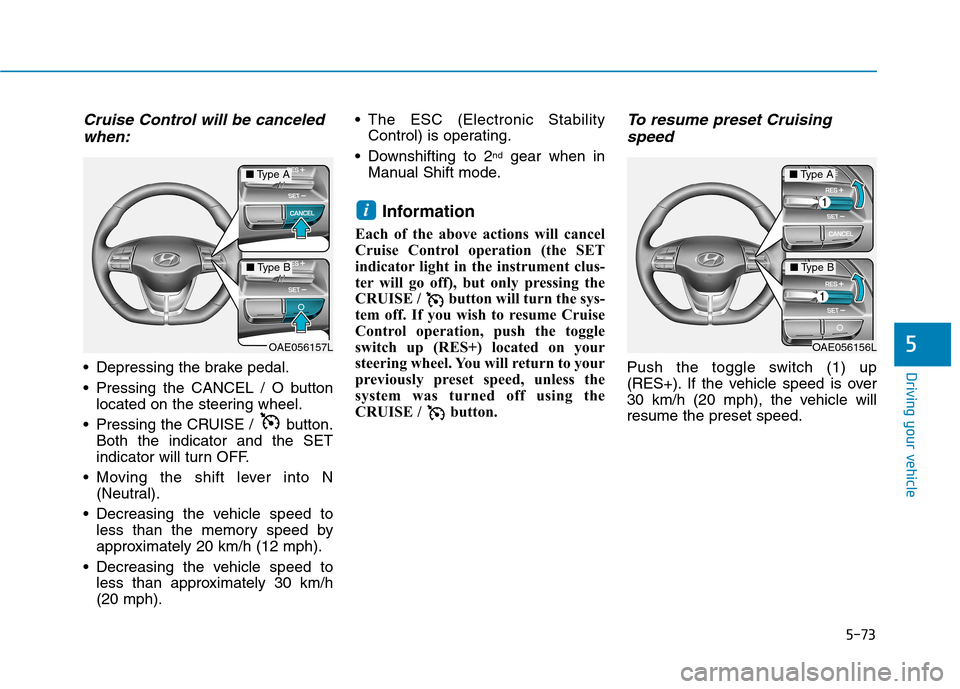
Cruise Control will be canceledwhen:
Depressing the brake pedal.
Pressing the CANCEL / O button located on the steering wheel.
Pressing the CRUISE / button. Both the indicator and the SET
indicator will turn OFF.
Moving the shift lever into N (Neutral).
Decreasing the vehicle speed to less than the memory speed by
approximately 20 km/h (12 mph).
Decreasing the vehicle speed to less than approximately 30 km/h(20 mph). The ESC (Electronic Stability
Control) is operating.
Downshifting to 2 nd
gear when in
Manual Shift mode.
Information
Each of the above actions will cancel
Cruise Control operation (the SET
indicator light in the instrument clus-
ter will go off), but only pressing the
CRUISE / button will turn the sys-
tem off. If you wish to resume Cruise
Control operation, push the toggle
switch up (RES+) located on your
steering wheel. You will return to your
previously preset speed, unless the
system was turned off using the
CRUISE / button.
To resume preset Cruising speed
Push the toggle switch (1) up
(RES+). If the vehicle speed is over
30 km/h (20 mph), the vehicle willresume the preset speed.
i
OAE056157L
■ Type A
■Type B
OAE056156L
■Type A
■Type B
Page 422 of 553
7
Maintenance
7
Maintenance
Engine compartment .............................................7-3
Maintenance services ...........................................7-4Owner's responsibility ......................................................7-4
Owner maintenance precautions ..................................7-4
Owner maintenance ...............................................7-5 Owner maintenance schedule ........................................7-5
Scheduled maintenance services.........................7-7
Explanation of scheduled maintenance items...7-20
Engine oil ..............................................................7-22 Checking the engine oil level .......................................7-22
Checking the engine oil and filter ..............................7-23
Engine coolant/inverter coolant .......................7-24 Checking the coolant level ...........................................7-24Changing coolant.............................................................7-27
Hybrid starter & generator (HSG) belt.............7-28 Checking the hybrid starter &
generator (HSG) belt ......................................................7-28 Brake fluid ............................................................7-28
Checking the brake fluid level .....................................7-28
Washer fluid .........................................................7-29 Checking the washer fluid level ..................................7-29
Parking brake .......................................................7-30 Checking the parking brake .........................................7-30
Air cleaner ............................................................7-30 Filter replacement ..........................................................7-30
Climate control air filter .....................................7-32 Filter inspection ...............................................................7-32
Wiper blades .........................................................7-34 Blade inspection ..............................................................7-34
Blade replacement ..........................................................7-34
Battery (12 volt) ..................................................7-37 For best battery service................................................7-38
Battery capacity label ....................................................7-38
Battery recharging .........................................................7-39
Reset features .................................................................7-40
7