display Hyundai Matrix 2005 Owner's Manual
[x] Cancel search | Manufacturer: HYUNDAI, Model Year: 2005, Model line: Matrix, Model: Hyundai Matrix 2005Pages: 407, PDF Size: 10.31 MB
Page 44 of 407
CONTROLS AND EQUIPMENT
1- 36
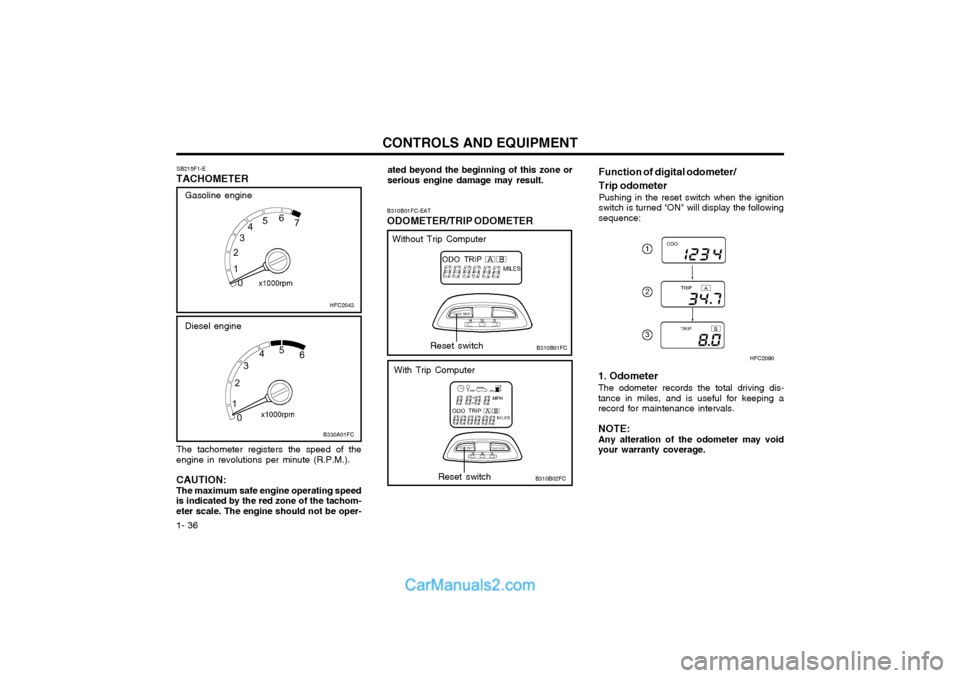
The tachometer registers the speed of the engine in revolutions per minute (R.P.M.). CAUTION: The maximum safe engine operating speed is indicated by the red zone of the tachom-eter scale. The engine should not be oper- SB215F1-E
TACHOMETER
HFC2043
B330A01FC
Diesel engine
Gasoline engine
ated beyond the beginning of this zone or serious engine damage may result.
B310B01FC-EAT ODOMETER/TRIP ODOMETER
B310B01FC Function of digital odometer/ Trip odometer
Pushing in the reset switch when the ignition
switch is turned "ON" will display the following sequence:Reset switch
B310B02FCReset switch
Without Trip Computer
With Trip Computer 1. Odometer
The odometer records the total driving dis-
tance in miles, and is useful for keeping a record for maintenance intervals.
NOTE: Any alteration of the odometer may void
your warranty coverage. HFC2090
Page 45 of 407
1- 37
CONTROLS AND EQUIPMENT
The trip computer is the microcomputer-con-
trolled driver information gauge that displays information related to driving, such as dis-tance to empty, average speed and drive timeon the LCD.
B310B02FC
B400B01FC-EAT
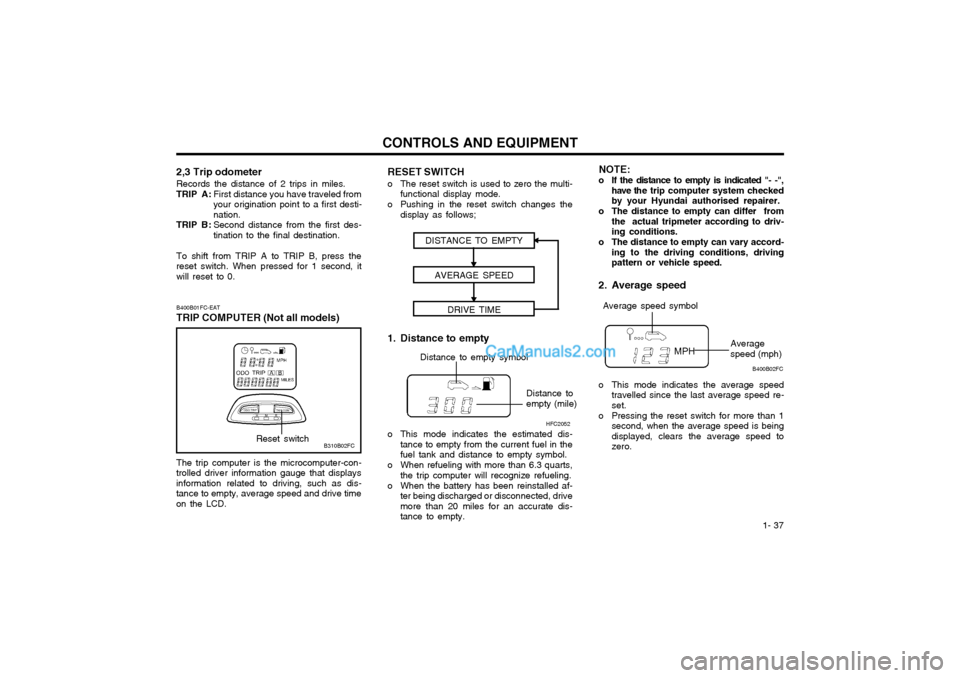
TRIP COMPUTER (Not all models)Reset switch 1. Distance to empty
DISTANCE TO EMPTY
AVERAGE SPEED DRIVE TIME
Distance to empty symbol
Distance to empty (mile)
o This mode indicates the estimated dis- tance to empty from the current fuel in the fuel tank and distance to empty symbol.
o When refueling with more than 6.3 quarts, the trip computer will recognize refueling.
o When the battery has been reinstalled af- ter being discharged or disconnected, drivemore than 20 miles for an accurate dis-tance to empty. NOTE:
o If the distance to empty is indicated "- -", have the trip computer system checked
by your Hyundai authorised repairer.
o The distance to empty can differ from the actual tripmeter according to driv-ing conditions.
o The distance to empty can vary accord- ing to the driving conditions, drivingpattern or vehicle speed.
2. Average speed
o This mode indicates the average speed travelled since the last average speed re- set.
o Pressing the reset switch for more than 1 second, when the average speed is beingdisplayed, clears the average speed tozero.
Average speed symbol
Average speed (mph)
HFC2052 B400B02FC
2,3 Trip odometer Records the distance of 2 trips in miles.
TRIP A :
First distance you have traveled from your origination point to a first desti-nation.
TRIP B : Second distance from the first des-tination to the final destination.
To shift from TRIP A to TRIP B, press thereset switch. When pressed for 1 second, itwill reset to 0.
RESET SWITCH
o The reset switch is used to zero the multi- functional display mode.
o Pushing in the reset switch changes the display as follows;
Page 99 of 407
APPEARANCE CARE
4-2
Plastic wheel covers should be cleaned using a sponge and water. Cast alloy wheels should be cleaned using a mild soap or neutral deter- gent. Abrasive compounds must not be used since in the event of these damaging the lac- quer coating, oxidization of the aluminium wheel will occur, spoiling the appearance. The use of an a toothbrush will facilitate cleaning between the wheel "spokes".
ensure that accidental spillages are immediately flushed with water. Do not use abrasive cleaning materials which may damage the bumpers. Avoid subjecting the bumpers to high tempera- tures such as may be encountered in high bake paint ovens.
SE040B1-E STAIN/SPOT REMOVAL Should tree sap, dead insects or tar prove to be difficult to remove from the paint film, turpentine or a proprietary paint cutting compound may be used. Ensure that the area to be cleaned is not rubbed intensively to prevent breaking through the colour coat and exposing the under coat. SE040C1-E POLISHINGThe exterior paint work should be polished with a proprietary wax polish when water no longer collects in bead form on the paint work. The instructions of the product manufacturer should be adhered to. SE040E1-E BUMPER MAINTENANCEThe special material from which the bumpers are manufactured warrants special attention to pre- serve the appearance of the bumpers. Avoid contact with battery electrolyte or brake fluid and SE040F1-E ACCIDENT REPAIRSIn the event of the body work sustaining damage, the following points should be noted prior to repairs being undertaken. If body panels are replaced or repaired, anti corrosion treatment must be applied to the repair area. The product used must be compatible withthose used in manufacture. It is recommended that repairs are entrusted to a Hyundai authorised repairer to ensure that replacement parts used are of the same high quality as those used in manufacture of the vehicle and that the correct repair methods and materials will en- sure adequate levels of corrosion protection and the continued validity of the Anti Perforation Warranty. SE050A1-E INTERIORDuring the winter period, it is possible that the passenger compartment flooring may become wet from damp footwear or quantities of snow adhering to footwear. The carpet should not be allowed to remain in this condition since the carpet may begin to create musty smells and will
SE050D1-E SEAT BELTS Seat belts should be cleaned only with a mild soap solution. Strong detergents, solvents or bleaches may damage the belt webbing and therefore reduce the effectiveness of the belt. Belts which display signs of fraying, wear of cuts should be replaced. SE050E1-E WINDOWS A proprietary glass cleaner should be used to clean the inside of the windows. However, the rear heated windshield must only be cleaned using a light horizontal cleaning action. Care should be exercised to avoid the use of abrasive cleaners or contact with items of jewellery which may damage the heating elements.
promote corrosion of the floor pan in addition tothe carpet and under felt beginning to rot. SE050C1-E INTERIOR VALETING The soft trim and carpets should be maintained with the regular use of a vacuum cleaner. Heavy soiling should be removed with a dry cleaning agent recommended for this purpose following the instructions of the product manufacturer. Paint thinner, solvents or other such cleaning materials should not be used since damage to the upholstery may result.
Page 220 of 407
1FEATURES OF YOUR HYUNDAI
56TRIP COMPUTER
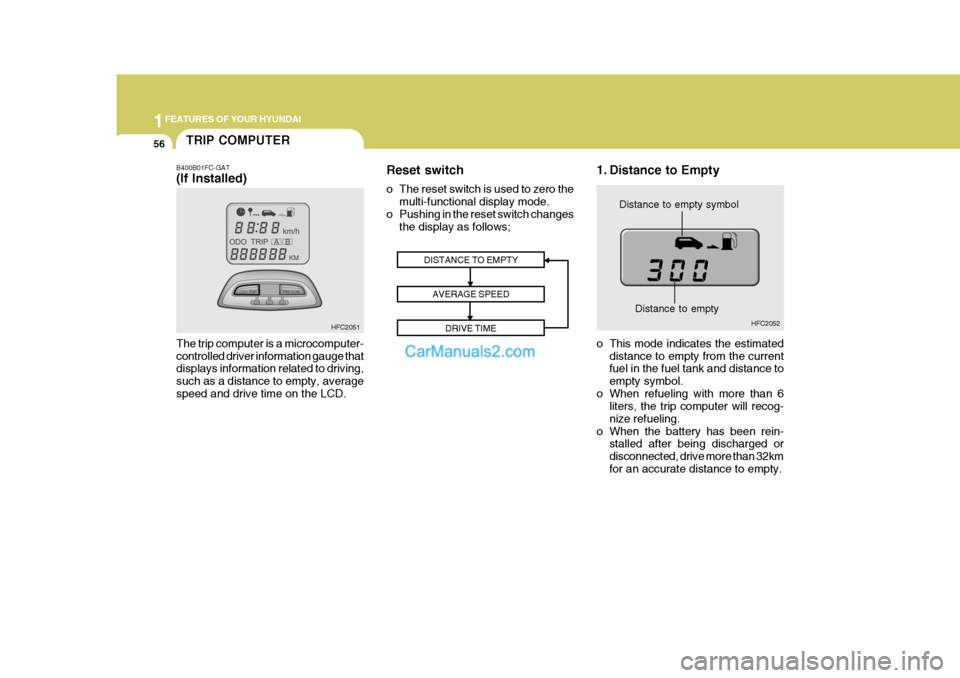
B400B01FC-GAT (If Installed) The trip computer is a microcomputer- controlled driver information gauge that displays information related to driving, such as a distance to empty, averagespeed and drive time on the LCD. 1. Distance to Empty
Distance to empty symbol
DISTANCE TO EMPTY AVERAGE SPEED DRIVE TIME
HFC2051 HFC2052
Distance to empty
o This mode indicates the estimated distance to empty from the current fuel in the fuel tank and distance to empty symbol.
o When refueling with more than 6 liters, the trip computer will recog-nize refueling.
o When the battery has been rein- stalled after being discharged ordisconnected, drive more than 32kmfor an accurate distance to empty.
Reset switch
o The reset switch is used to zero the
multi-functional display mode.
o Pushing in the reset switch changes the display as follows;
Page 221 of 407
1
FEATURES OF YOUR HYUNDAI
57
HFC2054
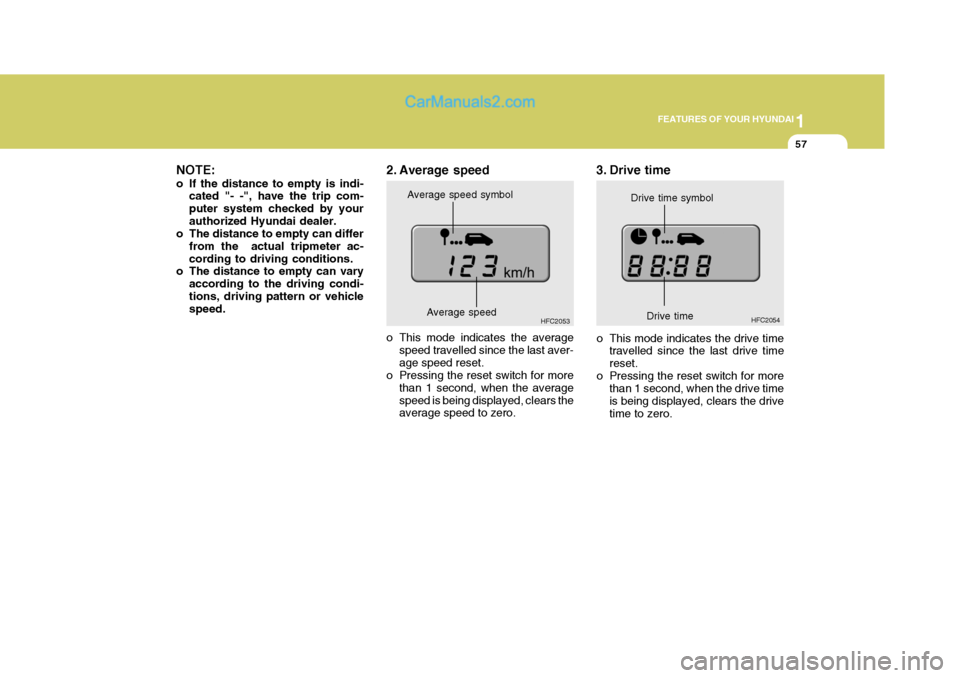
2. Average speed
o This mode indicates the average
speed travelled since the last aver- age speed reset.
o Pressing the reset switch for more
than 1 second, when the averagespeed is being displayed, clears the average speed to zero.Average speed symbol
HFC20533. Drive time
o This mode indicates the drive time travelled since the last drive time reset.
o Pressing the reset switch for more than 1 second, when the drive timeis being displayed, clears the drivetime to zero. Drive time symbol
Average speed Drive time
NOTE:
o If the distance to empty is indi-
cated "- -", have the trip com- puter system checked by yourauthorized Hyundai dealer.
o The distance to empty can differ
from the actual tripmeter ac-cording to driving conditions.
o The distance to empty can vary
according to the driving condi-tions, driving pattern or vehicle speed.
Page 258 of 407

1FEATURES OF YOUR HYUNDAI
94
H210B03O-AAT
1. POWER ON-OFF/VOLUME
Control Knob
The radio unit may be operated when the ignition key is in the "ACC" or "ON"position. Rotate the knob clockwise to switch the radio unit on and to increase the volume.The LCD shows the radio frequency in the radio mode. Turn the knob counter- clockwise to reduce the volume and toswitch the radio unit off. BAL (Balance Control) Knob Pull and turn the control knob clockwise to emphasize right speaker sound (left speaker sound will be attenuated). When the control knob is turned counterclock-wise, left speaker sound will be empha- sized (right speaker soundwill be at- tenuated).After adjusting the balance, push the knob again to use the other function. 4. BAND Selector Pressing the button changes the AM, FM1 and FM2 bands. The modeselected is displayed on LCD. 5. TUNE (Manual) Select Button Press the ( ) side or ( ) side to increase or to decrease the frequency. With the button held down for 1 sec. or more, thestop signal (broadcasting radio wave) is ignored and channel selection contin- ues. SEEK Operation (Automatic Channel Selection) Press the TUNE select button for 1 sec. or more. When the ( ) side is pressed,the unit will automatically tune to the next higher frequency and when the ( ) side is pressed, it will automaticallytune to the next lower frequency.
SCAN Knob When the scan knob is pressed, the frequency will increase and the receiv-able stations will be tuned in one after another, receiving each station for 5 seconds. To stop scanning, press thescan knob again.
2. FAD (Fader Control) Knob Turn the control knob counterclockwise to emphasize front speaker sound (rear speaker sound will be attenuated). Whenthe control knob is turned clockwise, rear speaker sound will be emphasized (front speaker sound will be attenu-ated). 3. BASS Control Knob Press to pop the knob out and turn to the left or right for the desired bass tone. TREBLE Control Knob. Further pull-lock position of popped-up knob. Turn to the left or right for thedesired treble tone.
FM
AM
Page 261 of 407

1
FEATURES OF YOUR HYUNDAI
97
4. BAND Selector Pressing the button changes the AM, FM1 and FM2 bands. The modeselected is displayed on LCD. 5. TUNE (Manual) Select Button Press the ( ) side or ( ) side to increase or to decrease the frequency. With the button held down for 1 sec. or more, thestop signal (broadcasting radio wave) is ignored and channel selection contin- ues. SEEK Operation (Automatic Channel Selection) Press the TUNE select button for 1 sec. or more. When the ( ) side is pressed,the unit will automatically tune to the next higher frequency and when the ( ) side is pressed, it will automaticallytune to the next lower frequency.
H210B03O-AAT
1. POWER ON-OFF/VOLUME
Control Knob
The radio unit may be operated when the ignition key is in the "ACC" or "ON"position. Rotate the knob clockwise to switch the radio unit on and to increase the volume.The LCD shows the radio frequency in the radio mode. Turn the knob counter- clockwise to reduce the volume and toswitch the radio unit off. BAL (Balance Control) Knob Pull and turn the control knob clockwise to emphasize right speaker sound (left speaker sound will be attenuated). When the control knob is turned counterclock-wise, left speaker sound will be empha- sized (right speaker soundwill be at- tenuated).After adjusting the balance, push the knob again to use the other function. SCAN Knob When the scan knob is pressed, the frequency will increase and the receiv-able stations will be tuned in one after another, receiving each station for 5 seconds. To stop scanning, press thescan knob again.
2. FAD (Fader Control) Knob Turn the control knob counterclockwise to emphasize front speaker sound (rear speaker sound will be attenuated). Whenthe control knob is turned clockwise, rear speaker sound will be emphasized (front speaker sound will be attenu-ated). 3. BASS Control Knob Press to pop the knob out and turn to the left or right for the desired bass tone. TREBLE Control Knob. Further pull-lock position of popped-up knob. Turn to the left or right for thedesired treble tone.
FM
AM
Page 266 of 407

1FEATURES OF YOUR HYUNDAI
102
H260B03E-AAT
1. POWER ON-OFF ControlKnob
The radio unit may be operated when the ignition key is in the "ACC" or "ON"position. Press the knob to switch the power on. The LCD shows the radio frequency in the radio mode or the CDtrack indicator in either the CD mode or CD AUTO CHANGER mode. To switch the power off, press the knob again. VOLUME Control Rotate the knob clockwise to increase the volume and turn the knob counter-clockwise to reduce the volume. BALANCE Control Pull and turn the control knob clockwise to emphasize right speaker sound (left speaker sound will be attenuated). Whenthe control knob is turned counterclock- wise, left speaker sound will be empha- sized (right speaker sound will be at-tenuated). 2. FAD (Fader Control) Knob Turn the control knob counterclockwise to emphasize front speaker sound (rearspeaker sound will be attenuated). When the control knob is turned clockwise, rear speaker sound will be emphasized(front speaker sound will be attenu- ated).
3. BASS Control Knob Press to pop the knob out and turn to the left or right for the desired basstone. TREB (Treble Control) Knob Pull the bass control knob further out. Turn to the left or right for the desired treble tone.
4. SCAN Button When the scan button is pressed, the frequency will increase and the receiv-able stations will be tuned in one after another, receiving each station for 5 seconds. To stop scanning, press thescan button again. 5. TUNE (Manual) Select Button Press the ( ) side or ( ) side to increase or to decrease the frequency. Presseither button and hold down to continu- ously scroll. Release button once the desired station is reached. SEEK Operation (Automatic Channel Selection) Press the TUNE select button for 0.5 sec or more. Releasing it will automati-cally tune to the next available station with a beep sound. When the ( ) side is pressed longerthan 0.5 second and releasing will automatically tune to the next higher
frequency and when the ( ) side ispressed longer than 0.5 second, re- leasing will automatically tune the next lower frequency. 6. BAND Selector Pressing the button changes the AM, FM1 and FM2 bands. The mode selected is displayed on LCD.
FM/AM
Page 267 of 407
1
FEATURES OF YOUR HYUNDAI
103
7. PRESET STATION Select Button
Six (6) stations for AM, FM1 or FM2 respectively can be preset in the elec-tronic memory circuit on this unit. HOW TO PRESET STATIONS Six AM and twelve FM stations may be programmed into the memory of the radio. Then, by simply pressing the band select button and/or one of the sixstation select buttons, you may recall any of these stations instantly. To pro- gram the stations, follow these steps:
o Press band selector to set the band for AM, FM1 or FM2.
o Select the desired station to be stored by seek, scan or manual tuning.
o Determine the preset station select button you wish to use to access that station.
o Press the station select button for more than two seconds. A selectbutton indicator will show in the dis- play indicating which select buttonyou have depressed. The frequency display will flash after it has been stored into the memory. You should then release the button,and proceed to program the nextdesired station. A total of 18 stations can be programmed by selecting one AM and two FM stations per button.
o When completed, any preset station may be recalled by selecting AM,FM1 or FM2 band and the appropri-ate station button.
CAUTION:
o Do not place beverages close to the audio system. The playbackmechanism may be damaged ifyou spill them.
o Do not impact on the audio sys-
tem, or the playback mechanismcould be damaged.
!
Page 269 of 407

1
FEATURES OF YOUR HYUNDAI
105
B260D03O-AAT
1. Playing CD
o Insert the CD with the label facing upward.
o Insert the CD to start CD playback, during radio operation.
o When a disc is in the CD deck, if you press the CD button, the CD player will begin playing even if the radio is being used.
o The CD player can be used when the ignition switch is in either the "ON" or"ACC" position.
2. FF/REW ( / ) If you want to fast forward or reverse through the compact disc track, push and hold in the FF ( ) or REW ( ) button.When you release the button, the com- pact disc player will resume playing. 3. TRACK UP/DOWN
o The desired track on the disc cur-
rently being played can be selected using the track number.
o Press once to skip forward to the
beginning of the next track.Press once to skip back to the beginning of the track.
4. SCAN Button
o Press the SCAN button to playback the first 10 seconds of each track.
o Press the SCAN button again within 10 sec. When you have reached the desired track.
5. REPEAT Button
o To repeat the track you are currently listening to, press the RPT button. To cancel , press again.
o If you do not release RPT operation
when the track ends, it will automati-cally be replayed. This process will be continued until you push the button again. 6. EJECT Button When the EJECT button is pressed with a CD loaded, the CD will eject. NOTE:
o If the CD does not operate prop-
erly or if the ER2 fault code is displayed, use one of two meth- ods to reset the CD deck function.
- Remove the audio fuse for 5
minutes. Then, reinstall the audio fuse.
- Disconnect the negative termi- nal of the battery and wait 5minutes. Then reconnect the negative battery terminal.
o When replacing the fuse, replace it with a fuse having the correctcapacity.
o The preset station frequencies are all erased when the car battery isdisconnected. Therefore, all datawill have to be set again if this should occur.
o Do not add any oil to the rotating parts. Keep magnets, screwdriv-ers and other metallic objects away from the tape mechanism and head.