maintenance schedule Hyundai Matrix 2005 Owner's Manual
[x] Cancel search | Manufacturer: HYUNDAI, Model Year: 2005, Model line: Matrix, Model: Hyundai Matrix 2005Pages: 407, PDF Size: 10.31 MB
Page 3 of 407
SA020A1-EResponsibilty For Maintenance
It is the responsibility of the vehicle owner/driver to ensure that all routine mainte- nance services are undertaken in line with the recommendations specified inSection 5 of this manual. In addition, in order to ensure continued validity of the new vehicle warranty and safe operation of the vehicle, non scheduled maintenance/ running repairs should be undertaken at the earliest available opportunity.Under severe operating conditions, more frequent maintenance is required. Details of the maintenance schedule for such conditions are also given in section 5.It is recommended that all maintenance operations and repairs are entrusted to a franchised Hyundai authorised repairer to ensure that the latest repair methods, specialised tooling and genuine Hyundai parts are used to ensure the continuedreliability and safety of the vehicle.
Page 80 of 407
DRIVING YOUR HYUNDAI
2- 8 o Always engage the parking brake when
the vehicle is unattended, never use the "P" position in place of the parking brake.
o Under normal circumstances, the selector
should be placed in the "D" position andthe transaxle allowed to select the most ideal ratio for the circumstances. In this position maximum fuel economy will be achieved.
o When descending steep gradients where
engine braking is required, the selector should be placed at the "2" or "L" position depending upon the vehicle speed.
o When ascending steep gradients using large throttle openings, the transaxle mayre-peatedly change between two adjacent ratios. This is a normal characteristic and may be prevented by cancelling the over- drive facility if the shifting occurs between third and fourth ratios, selecting position "2" if the shifting occurs between third and second ratios or selecting position "1" if the shifting occurs between first and second ratios.
o Never move the selector to or from the "P" or "N" position with the accelerator de-pressed.
o Ensure that the overdrive switch is at the "ON" position for maximum economy. o If rapid acceleration is required, fully de-
press the accelerator pedal. In this condi- tion, the kickdown mechanism will be oper- ated and the transaxle will automatically downshift according to the vehicle speed.
o The automatic transaxle may be used to
great effect if the vehicle becomes stuck insnow or mud by allowing the vehicle to be rocked to and fro. The engine speed should be held at approximately 1,000rpm by means of the accelerator pedal and the selector lever moved between the "D" and "R" positions to induce a rocking motion.
o Do not depress the accelerator pedal with
the brakes applied and the selector at the "R", "D", "2" or "L" position.
o Turn the overdrive switch on for good fuel economy and smooth driving. But if enginebraking is needed in the "D" range or if repeated upshifting and downshifting be- tween the 3rd and 4th gear is needed when climbing a gentle slope, it is recom- mended that the overdrive switch be turned off. Turn the overdrive switch back on immediately afterward.
C090I02A-EAT CAUTION:
o Shift into "R" and "P" only when the
vehicle has completely stopped.
o Do not accelerate the engine in reverse or any of the forward positions with the brakes applied.
o Always apply the footbrake when shift- ing from "P" or "N", to "R", "D", "2" or"L" position.
o Do not use the "P" (Park) position in place of the parking brake. Always setthe parking brake, shift the transaxle into "P" (Park) and turn off the ignition when you leave the vehicle, even mo- mentarily. Never leave the vehicle unat- tended whilst the engine is running.
o Check the automatic transaxle fluid level regularly, and add fluid as necessary.See the maintenance schedule for theproper fluid recommendation.
FC120D2-E
General Operating Instructions
o The button in the selector handle must be depressed before the selector can be moved.
o The engine may only be started when the selector is at position "P" or "N".
o Ensure that the footbrake is firmly applied when shifting from "P" or "N" to "D", "2", "L" or "R" and vice versa.
Page 83 of 407
DRIVING YOUR HYUNDAI 2- 11
SC150A1-F
DRIVING FOR ECONOMY You can save fuel and get more miles from
your car if you follow these suggestions:
o Drive smoothly. Accelerate at a moderate
rate. Don't make "jack-rabbit" starts or full- throttle shifts and maintain a steady cruis- ing speed. Don't race between stoplights. Try to adjust your speed to that of the other traffic so you don't have to change speeds unnecessarily.Avoid heavy traffic whenever possible. Al- ways maintain a safe distance from other vehicles so you can avoid unnecessary braking. This also reduces brake wear.
o Drive at a moderate speed. The faster you drive, the more fuel your car uses. Drivingat a moderate speed, especially on the highway, is one of the most effective ways to reduce fuel consumption.
o Don't "ride" the brake or clutch pedal. This can increase fuel consumption and alsoincrease wear on these components. In addition, driving with your foot resting on the brake pedal may cause the brakes to overheat, which reduces their effective- ness and may lead to more serious con-
sequences.
o Take care of your tyres. Keep them inflated to the recommended pressure. Incorrectinfla-tion, either too much or too little, re- sults in unnecessary tyre wear. Check the tyre pres-sures at least once a month.
C300D02O-GAT Indicator and WarningThe indicator should illuminate when the igni-
tion key is turned to "ON" or "START", but should go out after three seconds.If the indicator does not illuminate, have it checked by an Hyundai authorised repairer. Should there be any unusual conditions in the device, TCS illuminates as a warning.If TCS illuminates, pull your car to a safe place and stop the engine. Then, start the engine again to check if theTCS indicator goes out.If the indicator remains lit even after the engine has been started, have your car checked by an Hyundai authorised repairer. NOTE: When TCS illuminates, traction control isautomatically deactivated for safety. o Be sure that the wheels are aligned cor-
rectly. Improper alignment can result from hitting curbs or driving too fast over irregu- lar surfaces. Poor alignment causes faster tyre wear and may also result in other problems as well as greater fuel consump- tion.
o Keep your car in good condition. For better fuel economy and reduced maintenancecosts, maintain your car in accordance with the maintenance schedule in Section 5. If you drive your car in severe condi- tions, more frequent maintenance is re- quired (see Section 5 for details).
o Keep your car clean. For maximum ser- vice, your car should be kept clean and free of corrosive materials. It is especially important that mud, dirt, ice, etc. not be allowed to accumulate on the underside of the car. This extra weight can result in increased fuel consumption and also con- tribute to corrosion.
o Travel lightly. Don't carry unnecessary
weight in your car. Weight is an enemy ofgood fuel economy.
o Don't let the engine idle longer than neces- sary. If you are waiting (and not in traffic),turn off your engine and restart only when you're ready to go.
o Remember, your car does not require extended warm-up. As soon as the engineis running smoothly, you can drive away. In very cold weather, however, give your engine a slightly longer warm-up period.
3) When the engine starts, a click is heard
from the engine compartment; however, this is only the sound of traction control being checked.
4) When moving out of the mud or fresh snow, pressing the accelerator pedalmay not cause the engine speed to increase.
Page 100 of 407
VEHICLE MAINTENANCE REQUIREMENTS 5-1
SF020A1-E
MAINTENANCE AND SERVICING REQUIREMENTS To ensure the continued reliability and safety
of the vehicle, certain routine maintenance operations are required at specific mileage ortime intervals.
It is the responsibility of the vehicle owner to
ensure that the maintenance schedules shownin both this Owners Manual and the Warrantyand Service Passport are adhered to.
The new vehicle warranty may be invalidated
if the routine maintenance operations are notperformed in line with the recommendationsoutlined and the safety and durability of thevehicle adversely affected.
It is recommended that all maintenance op-
erations with the exception of the daily oper-ating checks are entrusted to a Hyundaiauthorised repairer to ensure that the latestrepair and maintenance procedures andspecialised servicing tools are employed. In addition, the use of genuine Hyundai re-
placement parts will ensure that the vehiclesafety and performance will not be compro-mised. NOTE: The inspection and testing of certain elec-
tronic fuel injection/engine management and automatic transmission control sys-tems require specialised electronic equip-ment specifically designed for Hyundaivehicles. The use of general purpose elec-trical test equipment may result in dam-age to the control unit microprocessors.
SF000A1-E
5. VEHICLE
MAINTENANCE REQUIREMENTS
SF020C2-E
Specified Scheduled Procedures The Specified scheduled procedures are listed
in the maintenance charts beginning at page 5-2. The operations specified must be per-formed at the time or mileage intervals shownirrespective of whether the mileage intervalhas been reached before the specified timeinterval.
Certain lubricants and components degrade
with both time and mileage (e.g. engine oil andbrake fluid) and therefore it is not permissableto base the maintenance schedule upon mile-age alone. It is strongly recommended thatthe maintenance operations are performed bythe factory-trained or distributor-trained tech-nicians at your Hyundai authorised repairer because of the need for specialised knowl-edge and tooling and to ensure that no pos-sibility of invalidating the manufacturers war-ranty exists.
The maintenance schedules relate to ve-
hicles operated under normal conditions, ve-hicles which are operated under adverseconditions will require more frequent mainte-nance which is described at page 5-5. NOTE:
Service schedules may change depend-
ing on individual country needs. Please ask your local Hyundai authorised re-pairer for a copy of the service schedulethat relates to that country.
SF030B1-E
SERVICE HISTORY It is important that all scheduled maintenanceservices are recorded in the warranty andservice passport to ensure that proof of main-tenance is available when warranty service isrequired.
5
Page 101 of 407
VEHICLE MAINTENANCE REQUIREMENTS
5- 2 YF010A2-E
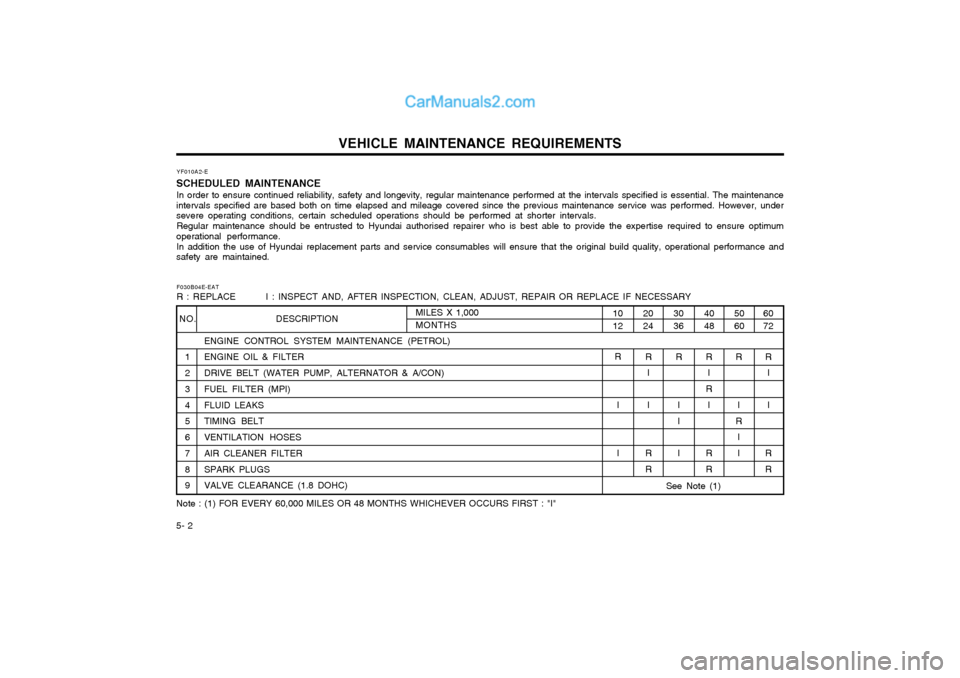
SCHEDULED MAINTENANCE In order to ensure continued reliability, safety and longevity, regular maintenance performed at the intervals specified is essential. The maintenance
intervals specified are based both on time elapsed and mileage covered since the previous maintenance service was performed. However, under severe operating conditions, certain scheduled operations should be performed at shorter intervals.
Regular maintenance should be entrusted to Hyundai authorised repairer who is best able to provide the expertise required to ensure optimum
operational performance.
In addition the use of Hyundai replacement parts and service consumables will ensure that the original build quality, operation al performance and
safety are maintained.
F030B04E-EAT R : REPLACE I : INSPECT AND, AFTER INSPECTION, CLEAN, ADJUST, REPAIR OR REPLACE IF NECESSARY
Note : (1) FOR EVERY 60,000 MILES OR 48 MONTHS WHICHEVER OCCURS FIRST : "I" ENGINE CONTROL SYSTEM MAINTENANCE (PETROL)
1 ENGINE OIL & FILTER
2 DRIVE BELT (WATER PUMP, ALTERNATOR & A/CON)
3 FUEL FILTER (MPI)
4 FLUID LEAKS
5 TIMING BELT
6 VENTILATION HOSES
7 AIR CLEANER FILTER
8 SPARK PLUGS
9 VALVE CLEARANCE (1.8 DOHC)
NO. DESCRIPTION60 72
5060
4048
3036
2024
1012
MILES X 1,000 MONTHS
R
I I
R R
R
I
R I I
R
I
R I
R R
R
I I I
R
II
R R
R
I I
See Note (1)
Page 105 of 407
VEHICLE MAINTENANCE REQUIREMENTS
5- 6 6ZF060D2-A
o Fuel lines, Fuel Hoses and
Connections
Check the fuel lines, fuel hoses and connec- tions for leakage and damage. Replace anydamaged or leaking parts immediately.
WARNING (Diesel only): Never work on injection system with en-gine running or within 30 seconds aftershutting off engine. High pressure pump,rail, injectors and high pressure pipes aresubject to high pressure even after theengine stopped. The fuel jet produced byfuel leaks may cause serious injury, if itcontacts the body. People using pace-makers should ensure that they keep adistance of 30cm from the ECU or wiringharness within the engine room whilstengine is running, since the high currentsin the Common Rail system produce con-siderable magnetic fields. 6ZF060E1-A
o Timing Belt Replace timimg belt and inspect all associated parts related for damage and deformation.Replace any damaged parts immediately. 6ZF060G1-A
o Vapour Hose and Fuel Filler Cap The vapour hose and fuel filler cap should be inspected at those intervals specified in themaintenance schedule. Make sure that a newvapour hose or fuel filler cap is correctlyreplaced. 6ZF060F1-A
o Vacuum, Crankcase
Ventilation Hoses
Inspect the surface of hoses for evidence of heat and/or mechanical damage. Hard andbrittle rubber, cracking, tears, cuts, abra-sions, and excessive swelling indicate dete-rioration. Particular attention should be paid toexamining those hose surfaces nearest tohigh heat sources, such as the exhaustmanifold.Inspect the hose routing to assure that thehoses do not come in contact with any heatsource, sharp edges or moving componentwhich might cause heat damage or mechani-cal wear. Inspect all hose connections, suchas clamps and couplings, to make sure theyare secure, and that no leaks are present.Hoses should be replaced immediately if thereis any evidence of deterioration or damage.
6ZF060A1-A
EXPLANATION OF SCHEDULED MAINTENANCE ITEMS
6ZF060M1-A
o Engine Oil and Filter The engine oil and filter should be changed at
the intervals specified in the maintenance schedule. If the car is being driven in severeconditions, more frequent oil and filter changesare required.
6ZF060B1-A
o Drive Belts Inspect all drive belts for evidence of cuts,
cracks, excessive wear or oil contaminationand replace if necessary. Drive belts shouldbe checked periodically for proper tensionand adjusted as necessary.
6ZF060C1-A
o Fuel Filter A clogged filter can limit the speed at which the
vehicle may be driven, damage the emissionsystem and cause hard starting. If an exces-sive amount of foreign matter accumulates inthe fuel tank, the filter may require replace-ment more frequently.
After installing a new filter, run the engine for
several minutes, and check for leaks at theconnections.
Page 106 of 407
VEHICLE MAINTENANCE REQUIREMENTS 5-7
6ZF070D1-A
o Manual Transaxle Oil Inspect the manual transaxle oil according to
the maintenance schedule. NOTE: If the oil level is low, check for possible
leaks before adding oil. Do not overfill.
6ZF070H1-A
o Rear Brake Drums And Linings/ Parking Brake
Check the rear brake drums and linings for
scoring, burning, leaking fluid, broken parts, and excessive wear. Inspect the parkingbrake system including the parking brakelever and cables. For detailed service proce-dures, refer to the Shop Manual.
6ZF070J1-A
o Brake Pads, Calipers and Rotors Check the pads for excessive wear, discs for
run out and wear, and calipers for fluid leak-age.
6ZF070K1-A
o Exhaust Pipe and Muffler Visually inspect the exhaust pipes, silencerand hangers for cracks, deterioration, or dam-age. Start the engine and listen carefully forany exhaust gas leakage. Tighten connec-tions or replace parts as necessary.
F070E05A-AAT
o Automatic Transaxle Fluid The fluid level should be in the "HOT" range
of the dipstick, after the engine and transaxleare at normal operating temperature. Checkthe automatic transaxle fluid level with theengine running and the transaxle in neutral,with the parking brake properly applied. UseHyundai Genuine ATF SP-III, DIAMOND ATFSP-III, SK ATF SP-III or other brands ap-proved by Hyundai Motor Co., when adding orchanging fluid. 6ZF070F1-A
o Brake Hoses and Lines Visually check for proper installation, chafing, cracks, deterioration and any leakage. Replaceany deteriorated or damaged parts immediately.
6ZF060H1-A
o Air Cleaner Filter A Genuine Hyundai air cleaner filter is recom-
mended when filter is replaced.
6ZF060J1-A
o Spark Plugs Make sure to install new spark plugs of the
correct heat range.
6ZF070B1-A
o Cooling System Check the cooling system part, such asradiator, coolant reservoir, hoses and con-nections for leakage and damage. Replaceany damaged parts. 6ZF070G2-A
o Brake Fluid Check brake fluid level in the brake fluidreservoir. The level should be between "MIN"and "MAX" marks on the side of the reservoir.Use only hydraulic brake fluid conforming toDOT 3 or DOT 4.
6ZF070C1-A
o Engine Coolant The coolant should be changed at theintervals specified in the maintenance sched-ule.
F060N02E-AAT
o Valve Clearance Inspect excessive valve noise and/or enginevibration and adjust if necessary. A qualifiedtechnician should perform the operation.
Page 114 of 407
OWNER MAINTENANCE 6-7
SG040A2-E
ENGINE OIL AND FILTER
REPLACEMENT
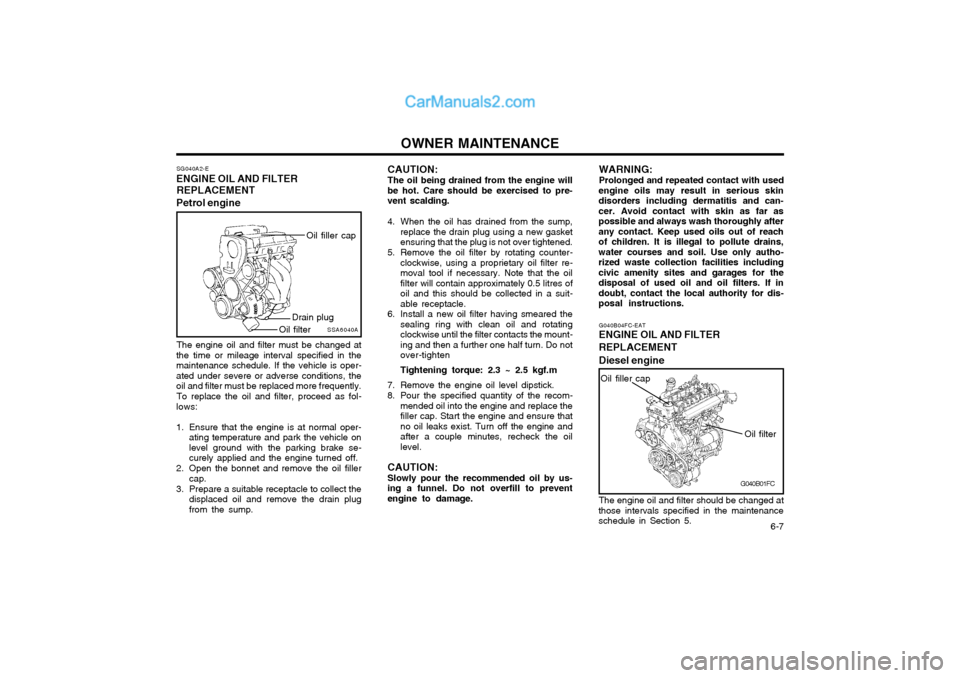
Petrol engine
SSA6040A
Oil filler cap
Drain plug
Oil filter
The engine oil and filter must be changed at
the time or mileage interval specified in the maintenance schedule. If the vehicle is oper-ated under severe or adverse conditions, theoil and filter must be replaced more frequently.
To replace the oil and filter, proceed as fol-
lows:
1. Ensure that the engine is at normal oper- ating temperature and park the vehicle on level ground with the parking brake se-curely applied and the engine turned off.
2. Open the bonnet and remove the oil filler cap.
3. Prepare a suitable receptacle to collect the displaced oil and remove the drain plugfrom the sump. CAUTION: The oil being drained from the engine will
be hot. Care should be exercised to pre- vent scalding.
4. When the oil has drained from the sump, replace the drain plug using a new gasket ensuring that the plug is not over tightened.
5. Remove the oil filter by rotating counter- clockwise, using a proprietary oil filter re-moval tool if necessary. Note that the oilfilter will contain approximately 0.5 litres ofoil and this should be collected in a suit-able receptacle.
6. Install a new oil filter having smeared the sealing ring with clean oil and rotatingclockwise until the filter contacts the mount-ing and then a further one half turn. Do notover-tighten Tightening torque: 2.3 ~ 2.5 kgf.m
7. Remove the engine oil level dipstick.
8. Pour the specified quantity of the recom- mended oil into the engine and replace the filler cap. Start the engine and ensure thatno oil leaks exist. Turn off the engine andafter a couple minutes, recheck the oillevel.
CAUTION: Slowly pour the recommended oil by us-
ing a funnel. Do not overfill to prevent engine to damage. WARNING: Prolonged and repeated contact with used
engine oils may result in serious skin disorders including dermatitis and can-cer. Avoid contact with skin as far aspossible and always wash thoroughly afterany contact. Keep used oils out of reachof children. It is illegal to pollute drains,water courses and soil. Use only autho-rized waste collection facilities includingcivic amenity sites and garages for thedisposal of used oil and oil filters. If indoubt, contact the local authority for dis-posal instructions.
G040B01FC
G040B04FC-EAT
ENGINE OIL AND FILTER REPLACEMENT Diesel engine
Oil filter
Oil filler cap
The engine oil and filter should be changed at
those intervals specified in the maintenance schedule in Section 5.
Page 116 of 407
OWNER MAINTENANCE 6-9
SG050A1-E
ENGINE COOLANT CHECKING
AND REPLACING WARNING: Do not remove the radiator cap when the
engine is hot, since the system is pressurised and coolant may be ejectedfrom the radiator resulting in scalding.
SG050B1-E
Coolant recommendations
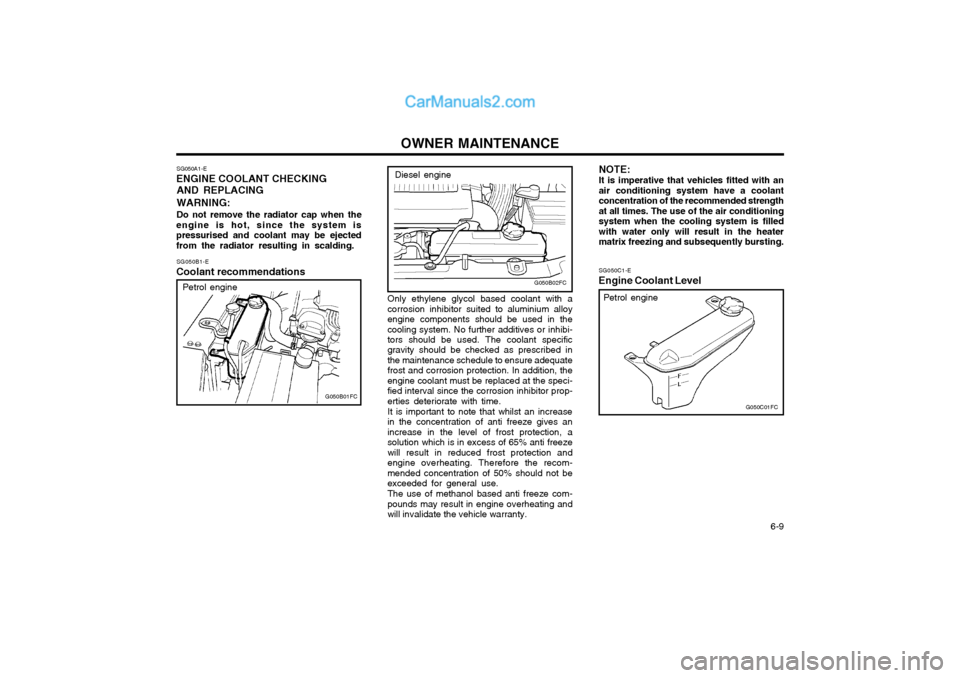
Petrol engine
G050B01FC SG050C1-E
Engine Coolant LevelG050C01FC
Petrol engine
NOTE: It is imperative that vehicles fitted with an air conditioning system have a coolantconcentration of the recommended strengthat all times. The use of the air conditioningsystem when the cooling system is filledwith water only will result in the heatermatrix freezing and subsequently bursting.Diesel engine
Only ethylene glycol based coolant with a corrosion inhibitor suited to aluminium alloyengine components should be used in thecooling system. No further additives or inhibi- tors should be used. The coolant specific gravity should be checked as prescribed inthe maintenance schedule to ensure adequatefrost and corrosion protection. In addition, theengine coolant must be replaced at the speci-fied interval since the corrosion inhibitor prop-erties deteriorate with time. It is important to note that whilst an increase in the concentration of anti freeze gives anincrease in the level of frost protection, asolution which is in excess of 65% anti freezewill result in reduced frost protection andengine overheating. Therefore the recom-mended concentration of 50% should not beexceeded for general use. The use of methanol based anti freeze com- pounds may result in engine overheating andwill invalidate the vehicle warranty.
G050B02FC
Page 117 of 407
OWNER MAINTENANCE
6-10 SG050D1-E
To Change the Coolant
The coolant should be changed at those
intervals specified in the vehicle maintenance schedule in Section 5.
NOTE: Care should be taken to ensure that cool-
ant is not allowed to spill onto the paintwork since the finish may becomedamaged. If coolant spillage occurs, theaffected area should be rinsed thoroughlywith water.
1. Park the vehicle on level ground and en- sure that the parking brake is firmly ap- plied, and the engine allowed to cool. Do not attempt this operation whilst the engine is hot since burning or scaldingmay result.
2. Prepare a suitable receptacle to collect the displaced coolant and position this underthe radiator drain tap.
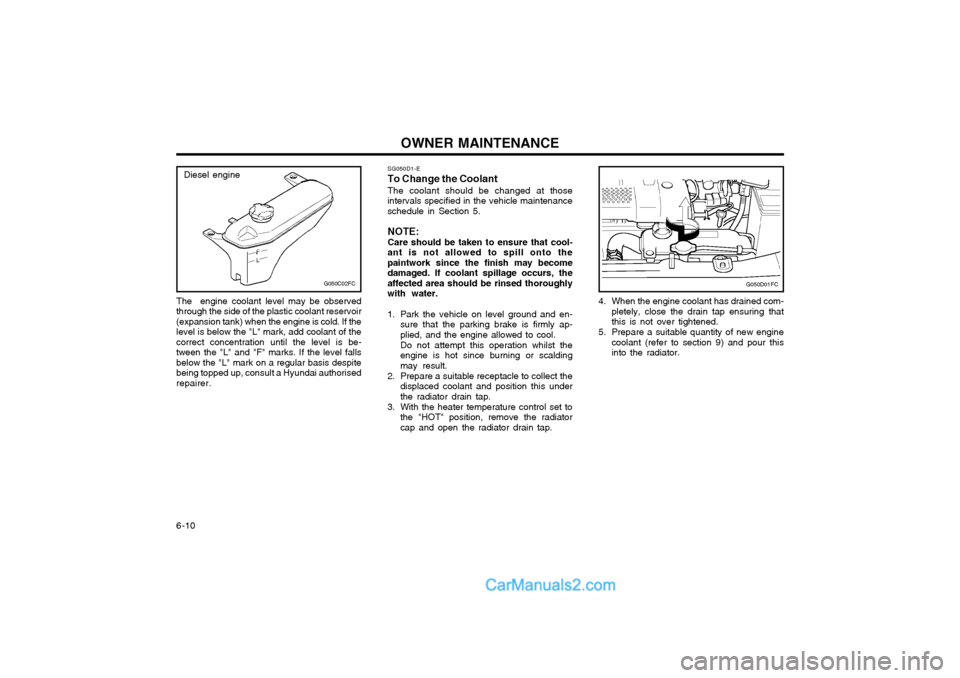
3. With the heater temperature control set to the "HOT" position, remove the radiatorcap and open the radiator drain tap. 4. When the engine coolant has drained com-
pletely, close the drain tap ensuring thatthis is not over tightened.
5. Prepare a suitable quantity of new engine coolant (refer to section 9) and pour thisinto the radiator.
G050D01FC
The engine coolant level may be observed through the side of the plastic coolant reservoir(expansion tank) when the engine is cold. If thelevel is below the "L" mark, add coolant of thecorrect concentration until the level is be-tween the "L" and "F" marks. If the level fallsbelow the "L" mark on a regular basis despitebeing topped up, consult a Hyundai authorisedrepairer.
G050C02FC
Diesel engine