Button od Hyundai Matrix 2006 Owner's Manual
[x] Cancel search | Manufacturer: HYUNDAI, Model Year: 2006, Model line: Matrix, Model: Hyundai Matrix 2006Pages: 490, PDF Size: 11.58 MB
Page 25 of 490
1
FEATURES OF YOUR HYUNDAI
11
3A9BA21
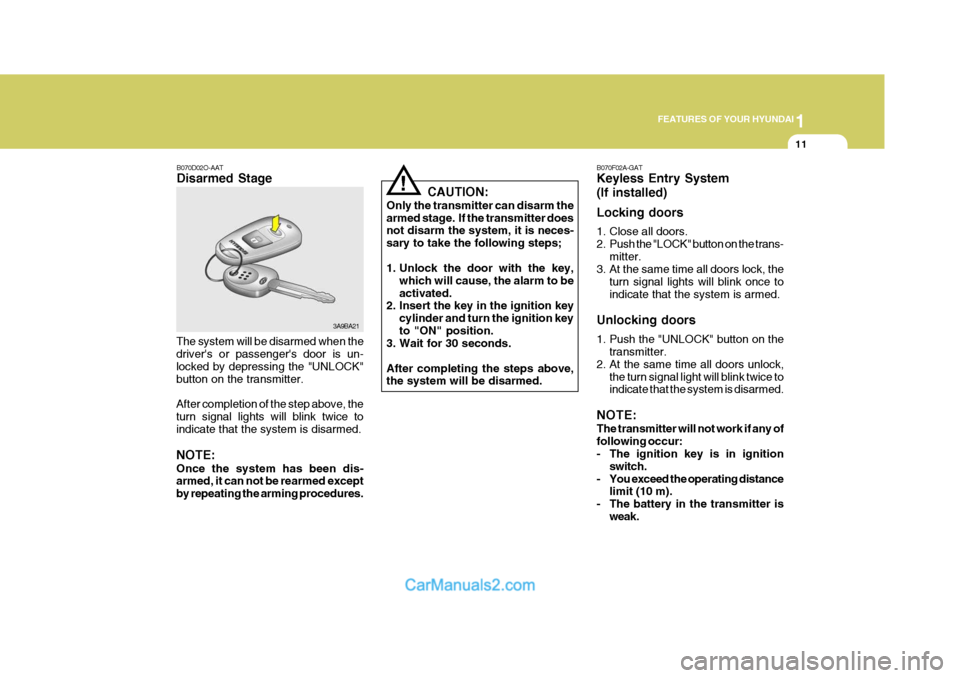
B070D02O-AAT Disarmed Stage
The system will be disarmed when the driver's or passenger's door is un- locked by depressing the "UNLOCK"button on the transmitter. After completion of the step above, the turn signal lights will blink twice to indicate that the system is disarmed. NOTE: Once the system has been dis- armed, it can not be rearmed except by repeating the arming procedures. CAUTION:
Only the transmitter can disarm thearmed stage. If the transmitter does not disarm the system, it is neces- sary to take the following steps;
1. Unlock the door with the key, which will cause, the alarm to be activated.
2. Insert the key in the ignition key
cylinder and turn the ignition keyto "ON" position.
3. Wait for 30 seconds. After completing the steps above, the system will be disarmed.
! B070F02A-GAT Keyless Entry System (If installed) Locking doors
1. Close all doors.
2. Push the "LOCK" button on the trans-
mitter.
3. At the same time all doors lock, the
turn signal lights will blink once toindicate that the system is armed.
Unlocking doors
1. Push the "UNLOCK" button on the transmitter.
2. At the same time all doors unlock,
the turn signal light will blink twice to indicate that the system is disarmed.
NOTE: The transmitter will not work if any of following occur:
- The ignition key is in ignition switch.
- You exceed the operating distance limit (10 m).
- The battery in the transmitter is weak.
Page 26 of 490
1FEATURES OF YOUR HYUNDAI
12
MSO-0048-2
Battery
MSO-0048-1
Screwdriver Case
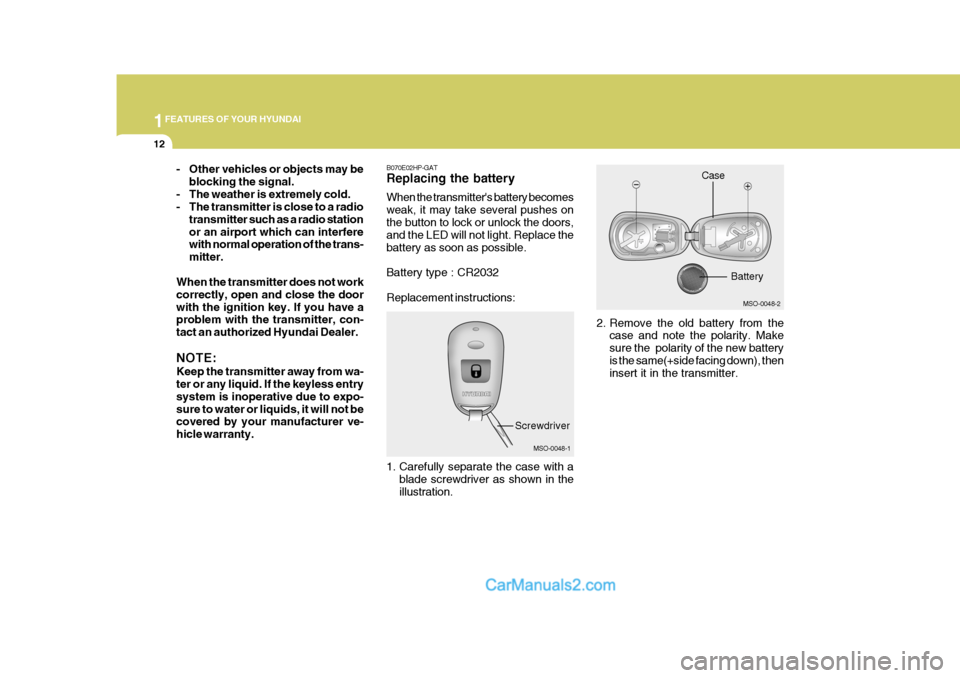
B070E02HP-GAT Replacing the battery When the transmitter's battery becomes weak, it may take several pushes onthe button to lock or unlock the doors, and the LED will not light. Replace the battery as soon as possible. Battery type : CR2032 Replacement instructions:
1. Carefully separate the case with a
blade screwdriver as shown in the illustration. 2. Remove the old battery from the
case and note the polarity. Makesure the polarity of the new batteryis the same(+side facing down), then insert it in the transmitter.
- Other vehicles or objects may be
blocking the signal.
- The weather is extremely cold.
- The transmitter is close to a radio transmitter such as a radio station or an airport which can interfere with normal operation of the trans- mitter.
When the transmitter does not workcorrectly, open and close the doorwith the ignition key. If you have a problem with the transmitter, con- tact an authorized Hyundai Dealer. NOTE: Keep the transmitter away from wa- ter or any liquid. If the keyless entry system is inoperative due to expo-sure to water or liquids, it will not be covered by your manufacturer ve- hicle warranty.
Page 38 of 490
1FEATURES OF YOUR HYUNDAI
24
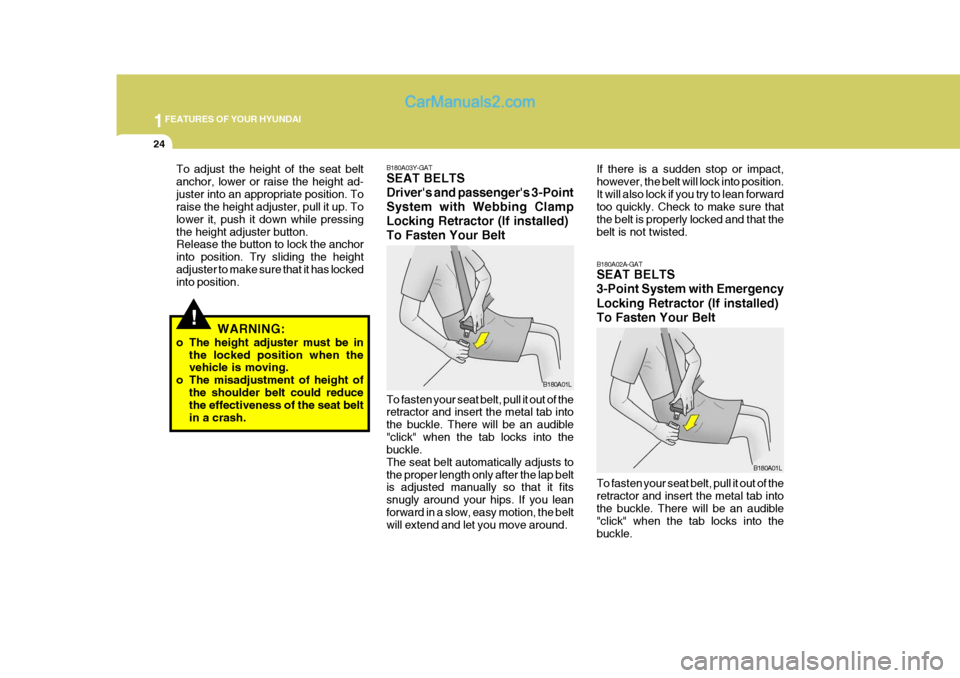
B180A03Y-GAT SEAT BELTS Driver's and passenger's 3-PointSystem with Webbing ClampLocking Retractor (If installed)To Fasten Your Belt To fasten your seat belt, pull it out of the retractor and insert the metal tab into the buckle. There will be an audible"click" when the tab locks into the buckle. The seat belt automatically adjusts tothe proper length only after the lap belt is adjusted manually so that it fits snugly around your hips. If you leanforward in a slow, easy motion, the belt will extend and let you move around. B180A02A-GAT SEAT BELTS 3-Point System with Emergency Locking Retractor (If installed) To Fasten Your Belt
B180A01L
B180A01L If there is a sudden stop or impact, however, the belt will lock into position.It will also lock if you try to lean forward too quickly. Check to make sure that the belt is properly locked and that thebelt is not twisted.
!
To adjust the height of the seat belt anchor, lower or raise the height ad-juster into an appropriate position. To raise the height adjuster, pull it up. To lower it, push it down while pressingthe height adjuster button. Release the button to lock the anchor into position. Try sliding the heightadjuster to make sure that it has locked into position.
WARNING:
o The height adjuster must be in the locked position when thevehicle is moving.
o The misadjustment of height of
the shoulder belt could reducethe effectiveness of the seat belt in a crash.
To fasten your seat belt, pull it out of theretractor and insert the metal tab into the buckle. There will be an audible "click" when the tab locks into thebuckle.
Page 39 of 490

1
FEATURES OF YOUR HYUNDAI
25
The seat belt automatically adjusts to the proper length only after the lap beltis adjusted manually so that it fits snugly around your hips. If you lean forward in a slow, easy motion, the beltwill extend and let you move around. If there is a sudden stop or impact, how- ever, the belt will lock into position. Itwill also lock if you try to lean forward too quickly. Check to make sure that the belt is properly locked and that thebelt is not twisted. B200A01S-GAT Adjusting Your Seat Belt
B200A01L
You should place the belt as low as possible on your hips, not on your waist. If the belt is located too high on your body, you could slide under it incase of accident or a sudden stop. This could result of death, serious in- jury or property damage. Both armsshould not be under or over the belt. Rather, one should be over and the other under, as shown in the illustra-tion. Never wear the seat belt under the arm nearest to the door.B210A01A-AAT To Release the Seat Belt
The seat belt is released by pressing the release button in the locking buckle.When it is released, the belt should automatically draw back into the re- tractor.If this does not happen, check the belt to be sure it is not twisted, then try again. B210A01L
Page 40 of 490

1FEATURES OF YOUR HYUNDAI
26
!
B220C01FC
B220C01A-AAT To Release the Seat Belt
When you want to release the seat belt, press the button in the locking buckle. WARNING:
The center lap belt latching mecha- nism is different from those for therear seat shoulder belts. When fas- tening the rear seat shoulder belts or the center lap belt, make surethey are inserted into the correct buckles to obtain maximum protec- tion from the seat belt system andassure proper operation.
B220B01A-AAT Adjusting Your Seat Belt With a 2-point static type seat belt, the length must be adjusted manually so it fits snugly around your body. Fasten the belt and pull on the loose end totighten. The belt should be placed as low as possible on your hips, not on your waist. If the belt is too high, itcould increase the possibility of your being injured in an accident. Shorten
HTB226Too high
CorrectB220A01A-AAT SEAT BELTS 2-Point Static Type(Rear Seat Center) (If Installed)To Fasten Your Seat Belt To fasten a 2-point static type belt, insert the metal tab into the lockingbuckle. There will be an audible "click" when the tab locks into the buckle. Check to make sure the belt is properlylocked and that the belt is not twisted. HFC2085
Page 42 of 490

1FEATURES OF YOUR HYUNDAI
28CHILD RESTRAINT SYSTEM
B230A03A-GAT (If Installed) Children riding in the car should sit in the rear seat and must always beproperly restrained to minimize the risk of injury in an accident, sudden stop or sudden maneuver. Accordingto accident statistics, children are safer when properly restrained in the rear seats than in the front seat. Largerchildren not in a child restraint should use one of the seat belts provided. You are required by law to use safetyrestraints for children. If small children ride in your vehicle you must put them in a child restraint system (safety seat).Children could be injured or killed in a crash if their restraints are not properly secured. For small children and ba-bies, a child seat or infant seat must be used. Before buying a particular child restraint system, make sure it fits yourcar and seat belts, and fits your child. Follow all the instructions provided by the manufacturer when installing thechild restraint system.
!WARNING:
o A child restraint system must be placed in the rear seat. Never install a child or infant seat on the front passenger's seat.Should an accident occur and cause the passenger side airbag to deploy, it could severely in-jure or kill an infant or child seated in an infant or child seat. Thus, only use a child restraint in therear seat of your vehicle.
o Since a safety belt or child re-
straint system can become veryhot if it is left in a closed vehicle, be sure to check the seat cover and buckles before placing achild there.
o When the child restraint system
is not in use, fasten it with asafety belt so that it will not be thrown forward in the case of a sudden stop or an accident.
!
B220C02FC
B220C01Y-GAY To Release the Seat Belt When you want to release the seat belt, press the button in the locking buckle.
WARNING:
The center belt latching mechanism is different from those for the rear seat shoulder belts. When fasten-ing the rear seat shoulder belts or the rear seat center belt, make sure they are inserted into the correctbuckles to obtain maximum protec- tion from the seat belt system and assure proper operation.
Page 79 of 490
1
FEATURES OF YOUR HYUNDAI
65CIGARETTE LIGHTER
B420A02A-AAT For the cigarette lighter to work, the key must be in the "ACC" position or the "ON" position. To use the cigarette lighter, push it allthe way into its socket. When the element has heated, the lighter will pop out to the "ready" position.Do not hold the cigarette lighter pressed in. This can damage the heating ele- ment and create a fire hazard.If it is necessary to replace the ciga- rette lighter, use only a genuine Hyundai replacement or its approved equiva-lent. B420A01FC
CAUTION:
Do not use electric accessories orequipment other than the Hyundai genuine parts in the socket.
!
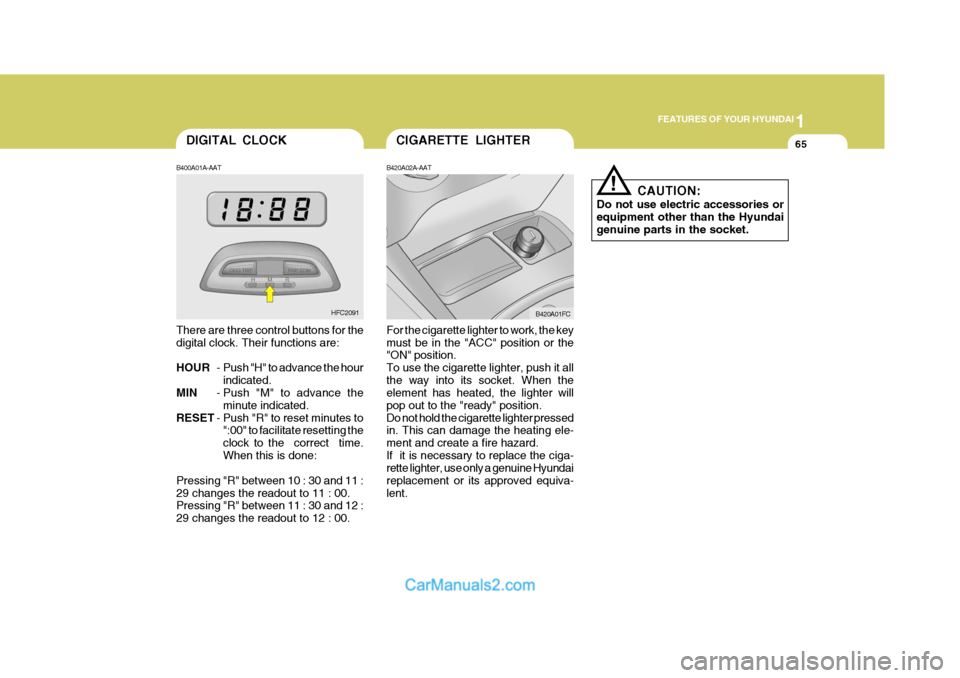
B400A01A-AAT There are three control buttons for the digital clock. Their functions are: HOUR - Push "H" to advance the hour
indicated.
MIN - Push "M" to advance the
minute indicated.
RESET - Push "R" to reset minutes to
":00" to facilitate resetting the clock to the correct time.When this is done:
Pressing "R" between 10 : 30 and 11 :29 changes the readout to 11 : 00. Pressing "R" between 11 : 30 and 12 : 29 changes the readout to 12 : 00. DIGITAL CLOCK
HFC2091
Page 82 of 490
1FEATURES OF YOUR HYUNDAI
68
!
PARKING BRAKE
B530A01A-AAT Always engage the parking brake be- fore leaving the car. This also turns on the parking brake indicator light whenthe key is in the "ON" or "START" position. Before driving away, be sure that the parking brake is fully releasedand the indicator light is off.
o To engage the parking brake, pull
the lever up as far as possible.
o To release the parking brake, pull
up the lever and press the thumb button. Then, while holding the but- ton in, lower the brake lever. B530A01FC
SUNROOF
B470A02S-AAT SUNSHADE The sunshade can be opened and closed by sliding it forward or rearward when the sunroof is closed. The sunshade will be open automatically when thesunroof is opened, but it must be closed manually.
B460A01S-AAT (If installed) The sunroof can be operated with the ignition key in the "ON" position
B470A01FCREAR SEAT ARM REST
B611A02FC-AAT (If Installed) The rear seat arm rest is located in the center of the rear seat back with a storage box. The drink holder in the box can be usedby opening the lid of the arm rest. B610A01FC
WARNING:
o Do not place objects other than cups or cans on the drink holder. Such objects can be thrown out in the event of a sudden stop oran accident, possibly injuring the passengers in the vehicle.
o Be careful not to injure your fin-
gers when you open the lid of thearm rest.
!
WARNING:
Never adjust the sunshade while driving.
Page 83 of 490

1
FEATURES OF YOUR HYUNDAI
69
B460C02S-AAT Tilting the Sunroof The sunroof can be tilted by pushing the "UP" button with the sunroof closed. Release the button when the sunroof reaches the desired position. To closethe sunroof, press the "DOWN" but- ton. HFC2022
!
!
WARNING:
o Do not close a sunroof if anyone's hands, arms or body are between the sliding glass and the sunroof sash, as this could result in aninjury.
o Do not place your head or arms
out of the sunroof opening at anytime. CAUTION:
o Do not open the sunroof in se- verely cold temperature or when it is covered with ice or snow.
o Periodically remove any dirt that may have accumulated on theguide rails.
o Do not press any sunroof control button longer than necessary.Damage to the motor or system components could occur.
NOTE: After washing the car or after there is rain, be sure to wipe off any water that is on the sunroof before operat-ing it.
B460B02S-AAT OPERATING THE SUNROOF SYSTEMOpening or Closing the Sunroof
HFC2021
The sunroof can be only electrically opened or closed. To open or to close, press and hold the button located inthe front overhead console. Release the button when the sunroof reaches the desired position.
Page 101 of 490

1
FEATURES OF YOUR HYUNDAI
87
1
FEATURES OF YOUR HYUNDAI
87HEATING CONTROLS
B690A02S-AAT
B670C03FC-GAT Air Intake Control With the "Fresh" mode selected, air enters the vehicle from the outside andis heated or cooled according to the function selected. With the "Recirculation" mode selected, air from within the passenger compart- ment will be drawn through the heatingsystem and heated or cooled according to the function selected. NOTE: It should be noted that prolonged operation of the heating in "Recircu- lation" mode will increase to fog- ging of the windshield and side win-dows and the air within the passen- ger compartment will become stale. In addition, prolonged use of the airconditioning with the "Recirculation" mode selected may result in the air within the passenger compartmentbecoming excessively dry.
This is used to select fresh outside airor recirculating inside air. To change the air intake control mode, (Fresh mode, Recirculation mode) pushthe control button. FRESH MODE
( ) :
The indicator light on the button goes off when the air intake control is in fresh mode. RECIRCULATION MODE ( ):
The indicator light on the button is illuminated when the air intake control is in recirculation mode. HFC2067
For normal heating operation, set the air intake control to the "Fresh" position and the air flow control to "Floor". For faster heating, the air intake control should be in the "Recirculation" posi-tion. If the windows fog up, move the air flow control to the "Def" (defroster) position. (The A/C will turn on automatically and "Fresh" mode will be activated.) For maximum heat, rotate the tempera- ture control to "Warm".
B690A02FC