Door locks Hyundai Santa Fe 2012 Owner's Manual
[x] Cancel search | Manufacturer: HYUNDAI, Model Year: 2012, Model line: Santa Fe, Model: Hyundai Santa Fe 2012Pages: 419, PDF Size: 5.61 MB
Page 36 of 419
319
Safety systems of your vehicle
C020102AFD-EU
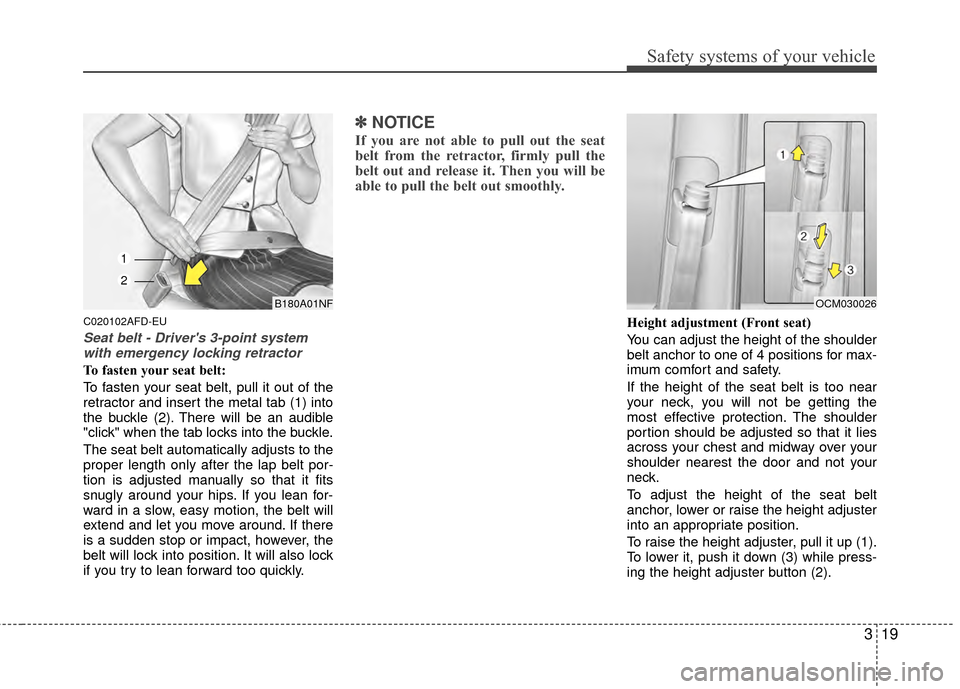
Seat belt - Driver's 3-point systemwith emergency locking retractor
To fasten your seat belt:
To fasten your seat belt, pull it out of the
retractor and insert the metal tab (1) into
the buckle (2). There will be an audible
"click" when the tab locks into the buckle.
The seat belt automatically adjusts to the
proper length only after the lap belt por-
tion is adjusted manually so that it fits
snugly around your hips. If you lean for-
ward in a slow, easy motion, the belt will
extend and let you move around. If there
is a sudden stop or impact, however, the
belt will lock into position. It will also lock
if you try to lean forward too quickly.
✽ ✽ NOTICE
If you are not able to pull out the seat
belt from the retractor, firmly pull the
belt out and release it. Then you will be
able to pull the belt out smoothly.
Height adjustment (Front seat)
You can adjust the height of the shoulder
belt anchor to one of 4 positions for max-
imum comfort and safety.
If the height of the seat belt is too near
your neck, you will not be getting the
most effective protection. The shoulder
portion should be adjusted so that it lies
across your chest and midway over your
shoulder nearest the door and not your
neck.
To adjust the height of the seat belt
anchor, lower or raise the height adjuster
into an appropriate position.
To raise the height adjuster, pull it up (1).
To lower it, push it down (3) while press-
ing the height adjuster button (2).
OCM030026B180A01NF
1
2
Page 37 of 419
Safety systems of your vehicle
20
3
Release the button to lock the anchor
into position. Try sliding the height
adjuster to make sure that it has locked
into position.C020106AFD
Seat belts - Front passenger and rear
seat 3-point system with combination locking retractor
To fasten your seat belt:
Combination retractor type seat belts are
installed in the rear seat positions to help
accommodate the installation of child
restraint systems. Although a combina-
tion retractor is also installed in the front
passenger seat position, it is strongly
recommended that children always be
seated in the rear seat. NEVER place
any infant restraint system in the front
seat of the vehicle.
This type of seat belt combines the fea-
tures of both an emergency locking
retractor seat belt and an automatic lock-
ing retractor seat belt. To fasten your seat
belt, pull it out of the retractor and insert
the metal tab into the buckle. There will
be an audible "click" when the tab locks
into the buckle. When not securing a
child restraint, the seat belt operates in
the same way as the driver's seat belt
(Emergency Locking Retractor Type). It
automatically adjusts to the proper length
only after the lap belt portion of the seat
belt is adjusted manually so that it fits
snugly around your hips.
B200A01NF
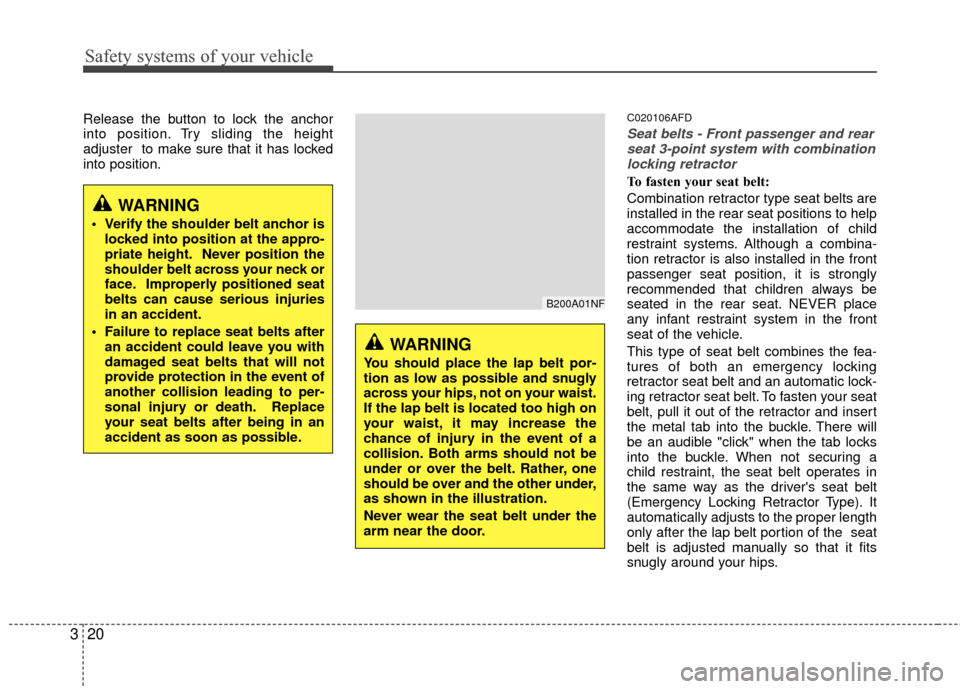
WARNING
You should place the lap belt por-
tion as low as possible and snugly
across your hips, not on your waist.
If the lap belt is located too high on
your waist, it may increase the
chance of injury in the event of a
collision. Both arms should not be
under or over the belt. Rather, one
should be over and the other under,
as shown in the illustration.
Never wear the seat belt under the
arm near the door.
WARNING
Verify the shoulder belt anchor is locked into position at the appro-
priate height. Never position the
shoulder belt across your neck or
face. Improperly positioned seat
belts can cause serious injuries
in an accident.
Failure to replace seat belts after an accident could leave you with
damaged seat belts that will not
provide protection in the event of
another collision leading to per-
sonal injury or death. Replace
your seat belts after being in an
accident as soon as possible.
Page 80 of 419
4
Keys / 4-2
Remote keyless entry / 4-3
Theft-alarm system / 4-5
Door locks / 4-7
Tailgate / 4-11
Windows / 4-13
Hood / 4-17
Fuel filler lid / 4-19
Sunroof / 4-22
Steering wheel / 4-26
Mirrors / 4-28
Instrument cluster / 4-40
Rearview camera / 4-56
Hazard warning flasher / 4-56
Lighting / 4-57
Wipers and washers / 4-61
Interior light / 4-63
Defroster / 4-66
Manual climate control system / 4-67
Automatic climate control system / 4-76
Windshield defrosting and defogging / 4-86
Cluster ionizer / 4-88
Storage compartment / 4-89
Interior features / 4-92
Exterior features / 4-101
Audio system / 4-102
Features of your vehicle
Page 86 of 419
47
Features of your vehicle
Operating door locks from out-
side the vehicle
Turn the key toward the rear of thevehicle to unlock and toward the front
of vehicle to lock.
If you lock the door with a key, all vehi- cle doors will lock automatically.
From the driver’s door, turn the key to the right once to unlock the driver’s
door and once more within 4 seconds
to unlock all doors.
Doors can also be locked and unlocked with the transmitter (if
equipped).
Once the doors are unlocked, they may be opened by pulling the door handle. When closing the door, push the door
by hand. Make sure that doors are
closed securely.
❈If your vehicle is equipped with the
remote keyless entry system, there is
no key lock on the front passenger's
door.
✽ ✽ NOTICE
• In cold and wet climates, door lock
and door mechanisms may not work
properly due to freezing conditions.
• If the door is locked/unlocked multi- ple times in rapid succession with
either the vehicle key or door lock
switch, the system may stop operating
temporarily in order to protect the
circuit and prevent damage to system
components.
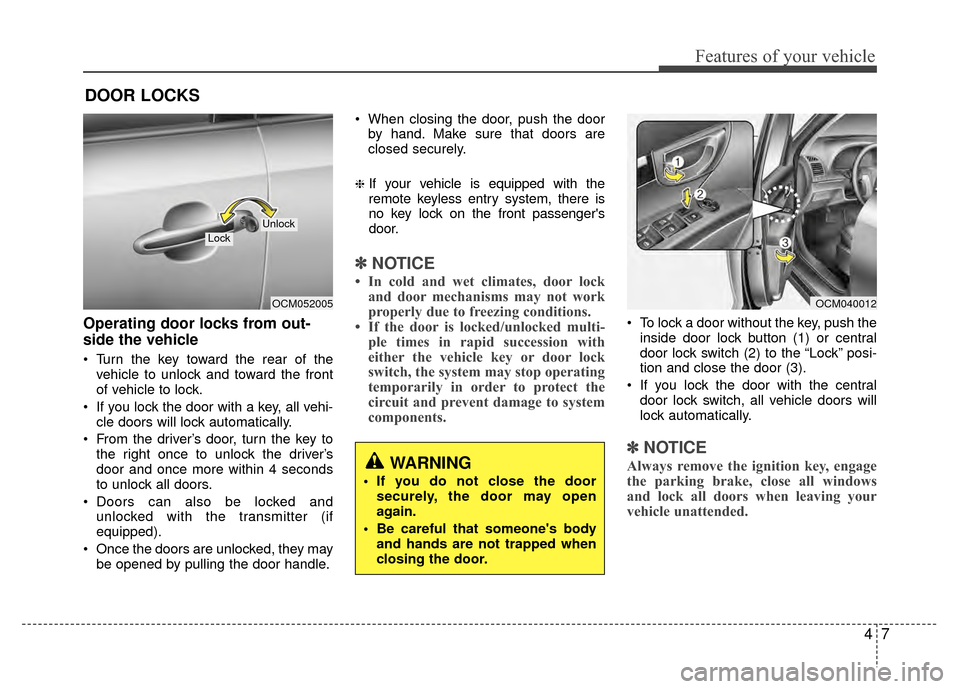
To lock a door without the key, push the
inside door lock button (1) or central
door lock switch (2 )to the “Lock” posi-
tion and close the door (3).
If you lock the door with the central door lock switch, all vehicle doors will
lock automatically.
✽ ✽ NOTICE
Always remove the ignition key, engage
the parking brake, close all windows
and lock all doors when leaving your
vehicle unattended.
DOOR LOCKS
OCM052005
LockUnlock
WARNING
If you do not close the door
securely, the door may open
again.
Be careful that someone's body and hands are not trapped when
closing the door.
OCM040012
Page 87 of 419
Features of your vehicle
84
Operating door locks from inside
the vehicle
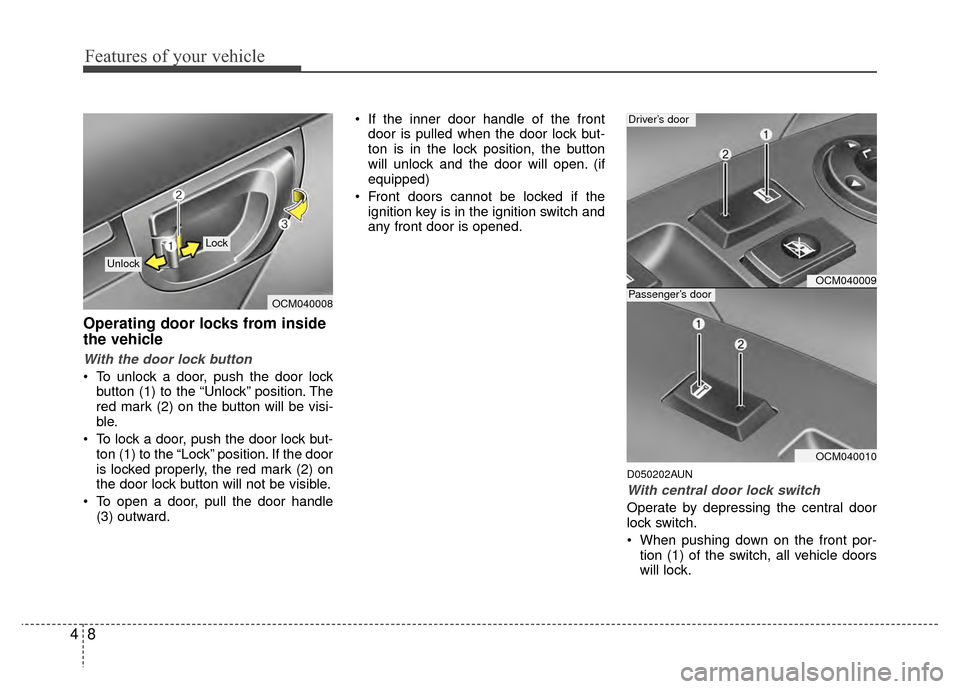
With the door lock button
To unlock a door, push the door lockbutton (1) to the “Unlock” position. The
red mark (2) on the button will be visi-
ble.
To lock a door, push the door lock but- ton (1) to the “Lock” position. If the door
is locked properly, the red mark (2) on
the door lock button will not be visible.
To open a door, pull the door handle (3) outward. If the inner door handle of the front
door is pulled when the door lock but-
ton is in the lock position, the button
will unlock and the door will open. (if
equipped)
Front doors cannot be locked if the ignition key is in the ignition switch and
any front door is opened.
D050202AUN
With central door lock switch
Operate by depressing the central door
lock switch.
When pushing down on the front por-tion (1) of the switch, all vehicle doors
will lock.
OCM040008
Lock
Unlock
OCM040009
OCM040010
Driver’s door
Passenger’s door
Page 89 of 419
Features of your vehicle
10
4
Auto door lock/unlock feature
(if equipped)
All doors will automatically lock when
the transaxle shift lever is shifted out of
P(Park).
All doors will automatically unlocked when the transaxle shift lever is
shifted into P(Park).
All doors will automatically unlock when the ignition key is removed from
the ignition switch.
D050500AUN
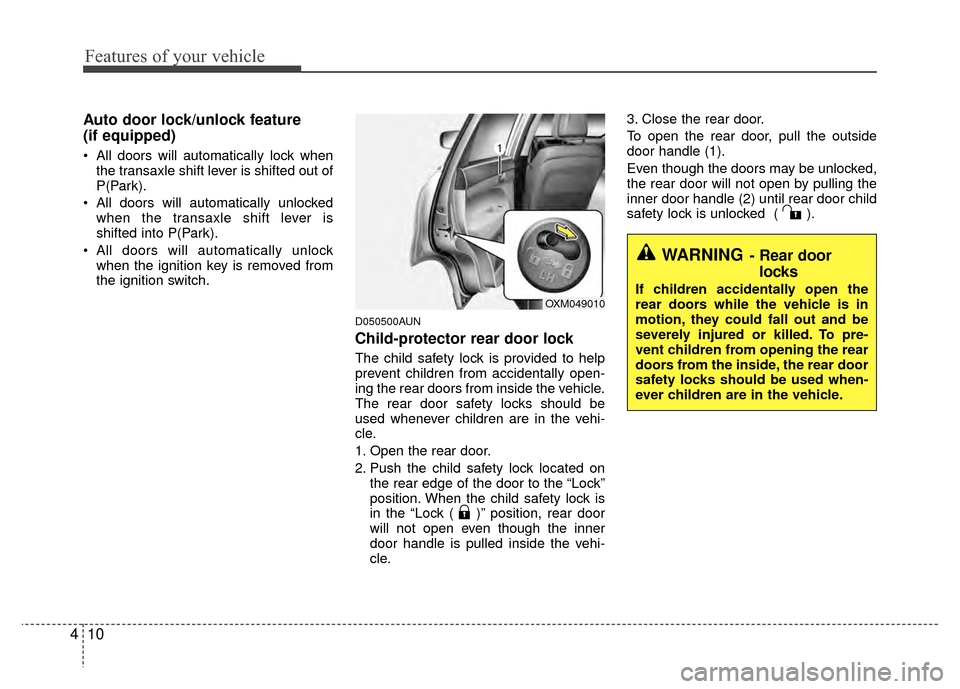
Child-protector rear door lock
The child safety lock is provided to help
prevent children from accidentally open-
ing the rear doors from inside the vehicle.
The rear door safety locks should be
used whenever children are in the vehi-
cle.
1. Open the rear door.
2. Push the child safety lock located on the rear edge of the door to the “Lock”
position. When the child safety lock is
in the “Lock ( )” position, rear door
will not open even though the inner
door handle is pulled inside the vehi-
cle. 3. Close the rear door.
To open the rear door, pull the outside
door handle (1).
Even though the doors may be unlocked,
the rear door will not open by pulling the
inner door handle (2) until rear door child
safety lock is unlocked ( ).
WARNING- Rear door
locks
If children accidentally open the
rear doors while the vehicle is in
motion, they could fall out and be
severely injured or killed. To pre-
vent children from opening the rear
doors from the inside, the rear door
safety locks should be used when-
ever children are in the vehicle.OXM049010
Page 113 of 419
Features of your vehicle
34
4
1. Press and hold the button for more
than 6 seconds. When the compass
memory is cleared a "C" will appear in
the display.
2. To calibrate the compass, drive the vehicle in 2 complete circles at less
than 5 mph (8 km/h).
Integrated HomeLink
®Wireless Control
System
The HomeLink® Wireless Control
System provides a convenient way to
replace up to three hand-held radio-fre-
quency (RF) transmitters with a single
built-in device. This innovative feature will
learn the radio frequency codes of most
current transmitters to operate devices
such as gate operators, garage door
openers, entry door locks, security sys-
tems, even home lighting. Both standard
and rolling code-equipped transmitters
can be programmed by following the out-
lined procedures. Additional HomeLink
®
information can be found at: www.home-
link.com or by calling 1-800-355-3515. Retain the original transmitter of the RF
device you are programming for use in
other vehicles as well as for future
HomeLink
®programming. It is also sug-
gested that upon the sale of the vehicle,
the programmed HomeLink
®buttons be
erased for security purposes. Programming HomeLink
®
✽ ✽
NOTICE
• When programming a garage door
opener, it is advised to park the vehi-
cle outside of the garage.
• It is recommended that a new battery be placed in the hand-held transmit-
ter of the device being programmed to
HomeLink
®for quicker training and
accurate transmission of the radio-
frequency signal.
• Some vehicles may require the igni- tion switch to be turned to the second
(or "accessories") position for pro-
gramming and/or operation of
HomeLink.
• In the event that there are still pro- gramming difficulties or questions
after following the programming steps
listed below, contact HomeLink
®at:
www.homelink.com or 1-800-355-
3515.
CAUTION
Before programming HomeLink®to
a garage door opener or gate oper- ator, make sure that people andobjects are out of the way of thedevice to prevent potential harm or damage. Do not use HomeLink
®
with any garage door opener thatlacks the safety stop and reversefeatures required by U.S. federalsafety standards (this includes anygarage door opener model manu-factured before April 1, 1982). Agarage door that cannot detect an object - signaling the door to stopand reverse - does not meet currentU.S. federal safety standards. Usinga garage door opener without these features increases the risk of seri-ous injury or death.
Page 246 of 419
55
Driving your vehicle
E030100AFD
Illuminated ignition switch
(if equipped)
Whenever a front door is opened, the
ignition switch will be illuminated for your
convenience, provided the ignition switch
is not in the ON position. The light will go
off immediately when the ignition switch
is turned on or go off after about 30 sec-
onds when the door is closed.
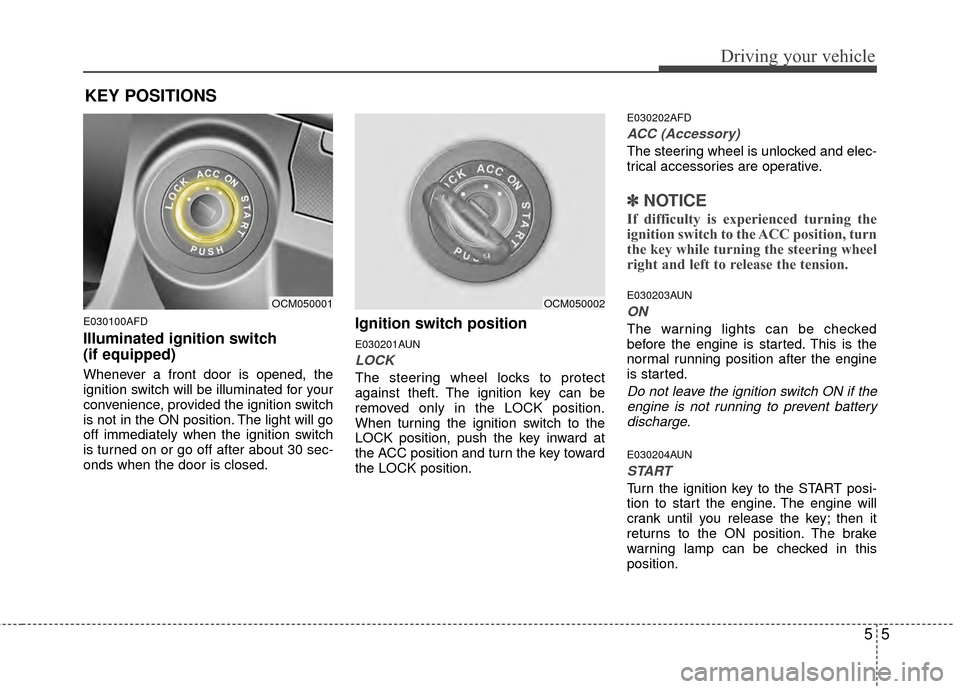
Ignition switch position
E030201AUN
LOCK
The steering wheel locks to protect
against theft. The ignition key can be
removed only in the LOCK position.
When turning the ignition switch to the
LOCK position, push the key inward at
the ACC position and turn the key toward
the LOCK position.
E030202AFD
ACC (Accessory)
The steering wheel is unlocked and elec-
trical accessories are operative.
✽ ✽NOTICE
If difficulty is experienced turning the
ignition switch to the ACC position, turn
the key while turning the steering wheel
right and left to release the tension.
E030203AUN
ON
The warning lights can be checked
before the engine is started. This is the
normal running position after the engine
is started.
Do not leave the ignition switch ON if the
engine is not running to prevent batterydischarge.
E030204AUN
START
Turn the ignition key to the START posi-
tion to start the engine. The engine will
crank until you release the key; then it
returns to the ON position. The brake
warning lamp can be checked in this
position.
OCM050001OCM050002
KEY POSITIONS
Page 332 of 419
75
Maintenance
G030102ACM
While operating your vehicle:
Note any changes in the sound of theexhaust or any smell of exhaust fumes
in the vehicle.
Check for vibrations in the steering wheel. Notice any increased steering
effort or looseness in the steering
wheel, or change in its straight-ahead
position.
Notice if your vehicle constantly turns slightly or “pulls” to one side when trav-
eling on smooth, level road.
When stopping, listen and check for unusual sounds, pulling to one side,
increased brake pedal travel or “hard-
to-push” brake pedal.
If any slipping or changes in the oper- ation of your transaxle occurs, check
the transaxle fluid level.
Check manual transaxle operation, including clutch operation.
Check automatic transaxle P (Park) function.
Check parking brake.
Check for fluid leaks under your vehicle (water dripping from the air condition-
ing system during or after use is nor-
mal).
G030103AUN
At least monthly:
Check coolant level in the enginecoolant reservoir.
Check the operation of all exterior lights, including the stoplights, turn sig-
nals and hazard warning flashers.
Check the inflation pressures of all tires including the spare.
G030104AUN
At least twice a year (i.e., every Spring and Fall) :
Check radiator, heater and air condi- tioning hoses for leaks or damage.
Check windshield washer spray and wiper operation. Clean wiper blades
with clean cloth dampened with wash-
er fluid.
Check headlight alignment.
Check muffler, exhaust pipes, shields and clamps.
Check the lap/shoulder belts for wear and function.
Check for worn tires and loose wheel lug nuts.
G030105ACM
At least once a year :
Clean body and door drain holes.
Lubricate door hinges and checks, andhood hinges.
Lubricate door and hood locks and latches.
Lubricate door rubber weatherstrips.
Check the air conditioning system.
Check the power steering fluid level.
Inspect and lubricate automatic transaxle linkage and controls.
Clean battery and terminals.
Check the brake (and clutch) fluid level.
Page 413 of 419

I3
Index
Defroster ··················\
··················\
··················\
··················\
4-66
Dimensions ··················\
··················\
··················\
················8-2
Door locks··················\
··················\
··················\
················4-14Central door lock switch ··················\
··················\
···········4-8
Child-protector rear door lock ··················\
··················\
·4-10
Economical operation ··················\
··················\
················5-38
Emergency starting ··················\
··················\
··················\
····6-4 Jump starting ··················\
··················\
··················\
···········6-4
Push starting ··················\
··················\
··················\
············6-5
Emission control system ··················\
··················\
············7-70 Crankcase emission control system··················\
···········7-70
Evaporative emission control (including ORVR:Onboard Refueling Vapor Recovery) System ···········7-70
Exhaust emission control system ··················\
··············7-71
Engine compartment ··················\
··················\
············2-4, 7-2
Engine coolant ··················\
··················\
··················\
·········7-15
Engine number ··················\
··················\
··················\
···········8-8
Engine oil ··················\
··················\
··················\
·················7-14\
Explanation of scheduled maintenance items ···············7-11
Exterior features··················\
··················\
··················\
·····4-101 Roof rack ··················\
··················\
··················\
·············4-101 Fuel filler lid ··················\
··················\
··················\
············4-19
Fuel requirements ··················\
··················\
··················\
······1-2
Fuses ··················\
··················\
··················\
··················\
······7-45
Fuse/relay panel description ··················\
··················\
····7-49
Main fuse ··················\
··················\
··················\
···············7-48
Memory fuse··················\
··················\
··················\
··········7-47
Hazard warning flasher ··················\
··················\
··············4-56
Hood··················\
··················\
··················\
··················\
·······4-17
How to use this manual ··················\
··················\
···············1-2
If the engine overheats··················\
··················\
·················6-6
If the engine will not start ··················\
··················\
···········6-3
If you have a flat tire ··················\
··················\
·················6-13\
Changing tires··················\
··················\
··················\
········6-16
Compact spare tire ··················\
··················\
··················\
·6-20
Jack and tools ··················\
··················\
··················\
········6-13
Removing and storing the spare tire···········\
·················6-13\
D
E
F
H
I