warning Hyundai Santa Fe Sport 2015 Workshop Manual
[x] Cancel search | Manufacturer: HYUNDAI, Model Year: 2015, Model line: Santa Fe Sport, Model: Hyundai Santa Fe Sport 2015Pages: 785, PDF Size: 13.38 MB
Page 83 of 785

Safety features of your vehicle
62 3
Side impact air bag
❈The actual air bags in the vehicle may differ
from the illustration.
Your vehicle is equipped with a side
impact air bag in each front seat. The
purpose of the air bag is to provide the
vehicle's driver and/or the front pas-
senger with additional protection than
that offered by the seat belt alone.The side impact air bags are
designed to deploy during certain
side-impact collisions, depending on
the crash severity, angle, speed and
point of impact. However, when side
deployment threshold is satisfied at
front impact, side air bags may
deploy. The side impact air bags are
not designed to deploy in all side
impact situations.
The side impact air bags do not only
deploy on the side of the impact but
also on the opposite side.
The side and/or curtain airbags on
both sides of the vehicle may deploy
if a rollover or possible rollover is
detected.
WARNING
Do not allow the passengers to
lean their heads or bodies onto
doors, put their arms on the
doors, stretch their arms out of
the window, or place objects
between the doors and passen-
gers when they are seated on
seats equipped with side and/or
curtain air bags.
WARNING
• The side impact air bag is sup-
plemental to the driver's and
the passenger's seat belt sys-
tems and is not a substitute
for them. Therefore your seat
belts must be worn at all times
while the vehicle is in motion.
The air bags deploy only in
certain side impact conditions
severe enough to cause sig-
nificant injury to the vehicle
occupants.
• For best protection from the
side impact air bag system
and to avoid being injured by
the deploying side impact air
bag, both front seat occupants
should sit in an upright posi-
tion with the seat belt properly
fastened. The driver's hands
should be placed on the steer-
ing wheel at the 9:00 and 3:00
positions. The passenger's
arms and hands should be
placed on their laps.
(Continued)
ODM032043
OHM032071
Page 85 of 785
Safety features of your vehicle
64 3
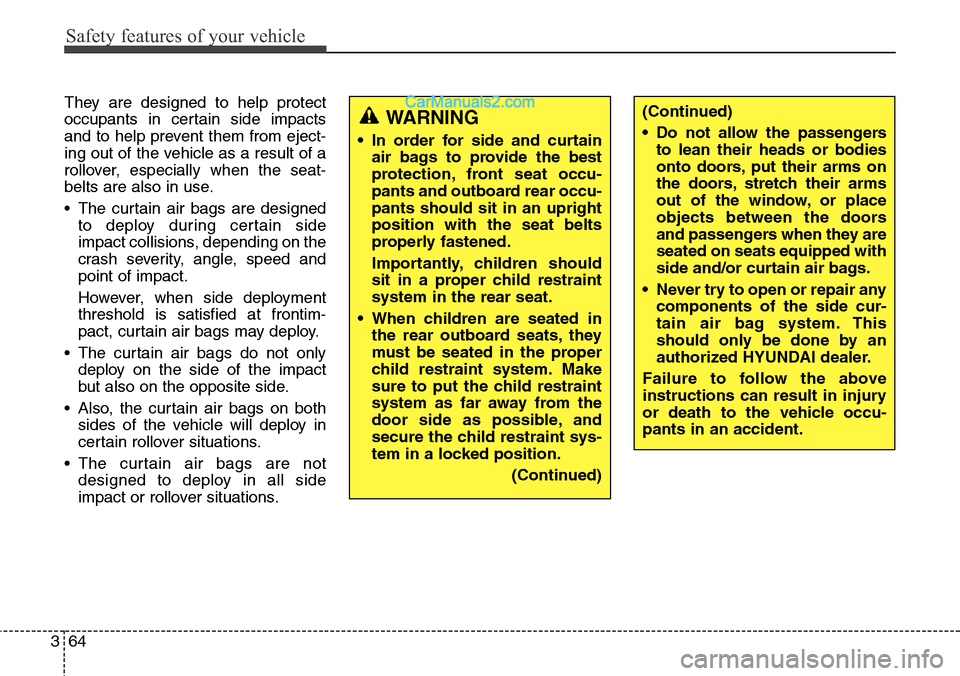
They are designed to help protect
occupants in certain side impacts
and to help prevent them from eject-
ing out of the vehicle as a result of a
rollover, especially when the seat-
belts are also in use.
• The curtain air bags are designed
to deploy during certain side
impact collisions, depending on the
crash severity, angle, speed and
point of impact.
However, when side deployment
threshold is satisfied at frontim-
pact, curtain air bags may deploy.
• The curtain air bags do not only
deploy on the side of the impact
but also on the opposite side.
• Also, the curtain air bags on both
sides of the vehicle will deploy in
certain rollover situations.
• The curtain air bags are not
designed to deploy in all side
impact or rollover situations.(Continued)
• Do not allow the passengers
to lean their heads or bodies
onto doors, put their arms on
the doors, stretch their arms
out of the window, or place
objects between the doors
and passengers when they are
seated on seats equipped with
side and/or curtain air bags.
• Never try to open or repair any
components of the side cur-
tain air bag system. This
should only be done by an
authorized HYUNDAI dealer.
Failure to follow the above
instructions can result in injury
or death to the vehicle occu-
pants in an accident.WARNING
• In order for side and curtain
air bags to provide the best
protection, front seat occu-
pants and outboard rear occu-
pants should sit in an upright
position with the seat belts
properly fastened.
Importantly, children should
sit in a proper child restraint
system in the rear seat.
• When children are seated in
the rear outboard seats, they
must be seated in the proper
child restraint system. Make
sure to put the child restraint
system as far away from the
door side as possible, and
secure the child restraint sys-
tem in a locked position.
(Continued)
Page 87 of 785

Safety features of your vehicle
66 3
• Problems may arise if the sensor
installation angles are changed
due to the deformation of the front
bumper, body or C pillars or front
door where side collision sensors
are installed. Have the vehicle
checked and repaired by an
authorized HYUNDAI dealer.
• Your vehicle has been designed to
absorb impact and deploy the air
bag(s) in certain collisions.
Installing bumper guards or side
steppers or replacing a bumper
with non-genuine parts may
adversely affect your vehicle’s col-
lision and air bag deployment per-
formance.Air bag inflation conditions
Front air bags
Front air bags are designed to inflate
in a frontal collision depending on
the intensity, speed or angles of
impact of the front collision.
WARNING - Air bag
sensors
• Do not hit or allow any objects
to impact the locations where
air bags or sensors are
installed.
This may cause unexpected
air bag deployment, which
could result in serious per-
sonal injury or death.
• If the installation location or
angle of the sensors is altered
in any way, the air bags may
deploy when they should not
or they may not deploy when
they should, causing severe
injury or death.
Therefore, do not try to per-
form maintenance on or
around the air bag sensors.
Have the vehicle checked and
repaired by an authorized
HYUNDAI dealer.
1VQA2084
Page 91 of 785
Safety features of your vehicle
70 3
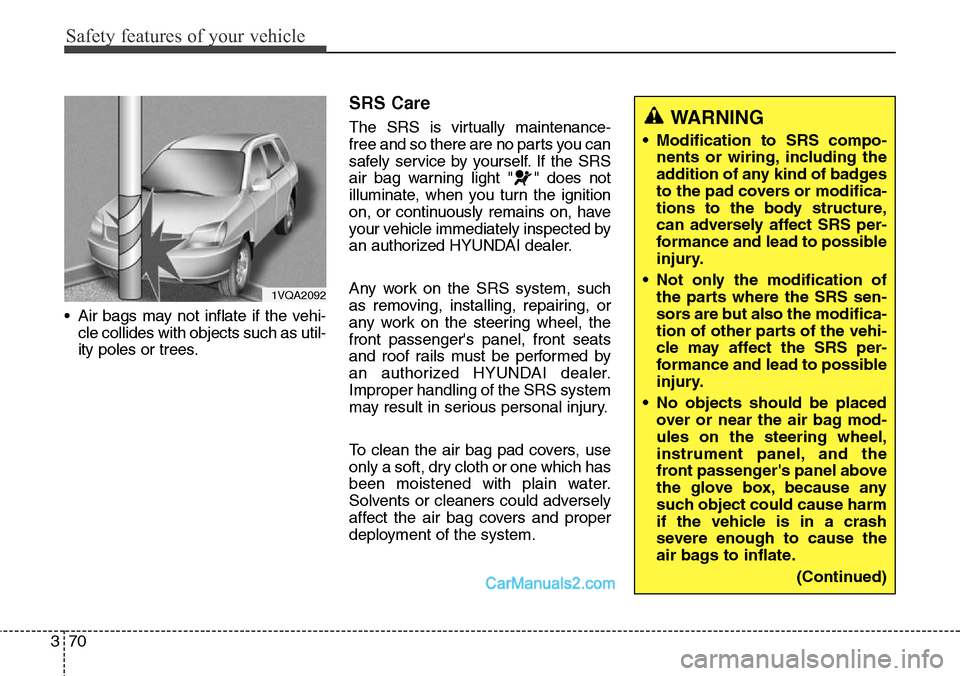
• Air bags may not inflate if the vehi-
cle collides with objects such as util-
ity poles or trees.
SRS Care
The SRS is virtually maintenance-
free and so there are no parts you can
safely service by yourself. If the SRS
air bag warning light " " does not
illuminate, when you turn the ignition
on, or continuously remains on, have
your vehicle immediately inspected by
an authorized HYUNDAI dealer.
Any work on the SRS system, such
as removing, installing, repairing, or
any work on the steering wheel, the
front passenger's panel, front seats
and roof rails must be performed by
an authorized HYUNDAI dealer.
Improper handling of the SRS system
may result in serious personal injury.
To clean the air bag pad covers, use
only a soft, dry cloth or one which has
been moistened with plain water.
Solvents or cleaners could adversely
affect the air bag covers and proper
deployment of the system.WARNING
• Modification to SRS compo-
nents or wiring, including the
addition of any kind of badges
to the pad covers or modifica-
tions to the body structure,
can adversely affect SRS per-
formance and lead to possible
injury.
• Not only the modification of
the parts where the SRS sen-
sors are but also the modifica-
tion of other parts of the vehi-
cle may affect the SRS per-
formance and lead to possible
injury.
• No objects should be placed
over or near the air bag mod-
ules on the steering wheel,
instrument panel, and the
front passenger's panel above
the glove box, because any
such object could cause harm
if the vehicle is in a crash
severe enough to cause the
air bags to inflate.
(Continued)
1VQA2092
Page 93 of 785

•Never hold an infant or child on
your lap.The infant or child could
be seriously injured or killed in the
event of a crash. All infants and chil-
dren should be properly restrained
in appropriate child safety seats or
seat belts in the rear seat.Adding equipment to or modi-
fying your air bag-equipped
vehicle
If you modify your vehicle by chang-
ing your vehicle's frame, bumper sys-
tem, front end or side sheet metal or
ride height, this may affect the opera-
tion of your vehicle's air bag system.
Air bag warning label
Air bag warning labels, some
required by the Canadian Motor
Vehicle Safety Standards (CMVSS),
are attached to alert the driver and
passengers of potential risks of the
air bag system.
WARNING
• Sitting improperly or out of
position can cause occupants
to be shifted too close to a
deploying air bag, strike the
interior structure or be thrown
from the vehicle resulting in
serious injury or death.
• Always sit upright with the
seatback in an upright posi-
tion, centered on the seat
cushion with your seat belt
on, legs comfortably extended
and your feet on the floor.
• Be careful not to cause impact
to the doors when the ignition
is ON. The air bags may inflate.
372
Safety features of your vehicle
OANNSA2006
■ Front
ODM032057
■Side
Page 94 of 785

Features of your vehicle
Folding key . . . . . . . . . . . . . . . . . . . . . . . . . . . . . . . . 4-4
• Record your key number . . . . . . . . . . . . . . . . . . . . . . . 4-4
• Key operations . . . . . . . . . . . . . . . . . . . . . . . . . . . . . . . . 4-4
• Precautions . . . . . . . . . . . . . . . . . . . . . . . . . . . . . . . . . . . 4-6
• Battery replacement . . . . . . . . . . . . . . . . . . . . . . . . . . . 4-7
• Immobilizer system . . . . . . . . . . . . . . . . . . . . . . . . . . . . 4-8
Smart key . . . . . . . . . . . . . . . . . . . . . . . . . . . . . . . . 4-11
• Record your key number . . . . . . . . . . . . . . . . . . . . . . 4-11
• Smart key function . . . . . . . . . . . . . . . . . . . . . . . . . . . 4-11
• Loss of the smart key . . . . . . . . . . . . . . . . . . . . . . . . . 4-14
• Precautions . . . . . . . . . . . . . . . . . . . . . . . . . . . . . . . . . . 4-15
• Smart key immobilizer system . . . . . . . . . . . . . . . . . . 4-15
• Battery replacement . . . . . . . . . . . . . . . . . . . . . . . . . . 4-17
Theft-alarm system . . . . . . . . . . . . . . . . . . . . . . . . 4-19
• Armed stage . . . . . . . . . . . . . . . . . . . . . . . . . . . . . . . . . 4-19
• Theft-alarm stage . . . . . . . . . . . . . . . . . . . . . . . . . . . . 4-21
• Disarmed stage. . . . . . . . . . . . . . . . . . . . . . . . . . . . . . . 4-21
Door locks . . . . . . . . . . . . . . . . . . . . . . . . . . . . . . . . 4-23
• From outside . . . . . . . . . . . . . . . . . . . . . . . . . . . . . . . . 4-23
• From inside . . . . . . . . . . . . . . . . . . . . . . . . . . . . . . . . . 4-25
• Impact sensing door unlock system . . . . . . . . . . . . . . 4-27
• Child-protector rear door lock. . . . . . . . . . . . . . . . . . 4-27
Tailgate . . . . . . . . . . . . . . . . . . . . . . . . . . . . . . . . . . 4-28
• Non-powered tailgate . . . . . . . . . . . . . . . . . . . . . . . . . 4-28
• Power tailgate . . . . . . . . . . . . . . . . . . . . . . . . . . . . . . . 4-30• Smart Tailgate . . . . . . . . . . . . . . . . . . . . . . . . . . . . . . . 4-35
• Emergency tailgate safety release . . . . . . . . . . . . . . . 4-38
Windows . . . . . . . . . . . . . . . . . . . . . . . . . . . . . . . . . 4-39
• Power windows . . . . . . . . . . . . . . . . . . . . . . . . . . . . . . 4-40
Hood. . . . . . . . . . . . . . . . . . . . . . . . . . . . . . . . . . . . . 4-44
• Opening the hood . . . . . . . . . . . . . . . . . . . . . . . . . . . . 4-44
• Closing the hood . . . . . . . . . . . . . . . . . . . . . . . . . . . . . 4-45
Fuel filler lid . . . . . . . . . . . . . . . . . . . . . . . . . . . . . . 4-46
• Opening the fuel filler lid . . . . . . . . . . . . . . . . . . . . . . 4-46
• Closing the fuel filler lid . . . . . . . . . . . . . . . . . . . . . . . 4-46
• Emergency fuel filler lid release . . . . . . . . . . . . . . . . 4-49
Panoramic sunroof . . . . . . . . . . . . . . . . . . . . . . . . . 4-50
• Sunroof open warning. . . . . . . . . . . . . . . . . . . . . . . . . 4-51
• Sunshade . . . . . . . . . . . . . . . . . . . . . . . . . . . . . . . . . . . 4-52
• Sliding the sunroof . . . . . . . . . . . . . . . . . . . . . . . . . . . 4-52
• Tilting the sunroof . . . . . . . . . . . . . . . . . . . . . . . . . . . . 4-53
• Closing the sunroof . . . . . . . . . . . . . . . . . . . . . . . . . . . 4-53
• Resetting the sunroof . . . . . . . . . . . . . . . . . . . . . . . . . 4-55
Steering wheel . . . . . . . . . . . . . . . . . . . . . . . . . . . . . 4-56
• Electronic power steering . . . . . . . . . . . . . . . . . . . . . . 4-56
• Tilt & telescopic steering . . . . . . . . . . . . . . . . . . . . . . 4-57
• Heated steering wheel . . . . . . . . . . . . . . . . . . . . . . . . . 4-58
• Horn . . . . . . . . . . . . . . . . . . . . . . . . . . . . . . . . . . . . . . . 4-58
• Driver selectable steering mode . . . . . . . . . . . . . . . . . 4-59
4
Page 95 of 785
Mirrors . . . . . . . . . . . . . . . . . . . . . . . . . . . . . . . . . . 4-62
• Inside rearview mirror . . . . . . . . . . . . . . . . . . . . . . . . 4-62
• Outside rearview mirror. . . . . . . . . . . . . . . . . . . . . . . 4-81
Instrument cluster . . . . . . . . . . . . . . . . . . . . . . . . . 4-84
• Instrument Cluster Control . . . . . . . . . . . . . . . . . . . . 4-85
• LCD Display Control . . . . . . . . . . . . . . . . . . . . . . . . . 4-85
• Gauges . . . . . . . . . . . . . . . . . . . . . . . . . . . . . . . . . . . . . 4-86
• Transaxle Shift Indicator . . . . . . . . . . . . . . . . . . . . . . 4-89
LCD display . . . . . . . . . . . . . . . . . . . . . . . . . . . . . . 4-90
• LCD Modes . . . . . . . . . . . . . . . . . . . . . . . . . . . . . . . . . 4-90
• Service Mode . . . . . . . . . . . . . . . . . . . . . . . . . . . . . . . . 4-91
• User Settings Mode . . . . . . . . . . . . . . . . . . . . . . . . . . . 4-92
• A/V Mode . . . . . . . . . . . . . . . . . . . . . . . . . . . . . . . . . . . 4-95
• Turn By Turn Mode . . . . . . . . . . . . . . . . . . . . . . . . . . 4-95
• Warning Messages . . . . . . . . . . . . . . . . . . . . . . . . . . . . 4-96
Trip computer . . . . . . . . . . . . . . . . . . . . . . . . . . . . 4-103
• Overview . . . . . . . . . . . . . . . . . . . . . . . . . . . . . . . . . . 4-103
• Trip A/B . . . . . . . . . . . . . . . . . . . . . . . . . . . . . . . . . . . 4-104
• Fuel Economy . . . . . . . . . . . . . . . . . . . . . . . . . . . . . . 4-105
Warning and indicator lights . . . . . . . . . . . . . . . 4-107
• Warning lights . . . . . . . . . . . . . . . . . . . . . . . . . . . . . . 4-107
• Indicator Lights . . . . . . . . . . . . . . . . . . . . . . . . . . . . . 4-114
Rear parking assist system . . . . . . . . . . . . . . . . . 4-118
• Operation . . . . . . . . . . . . . . . . . . . . . . . . . . . . . . . . . . 4-118
• Non-operational conditions . . . . . . . . . . . . . . . . . . . 4-119• Self-diagnosis . . . . . . . . . . . . . . . . . . . . . . . . . . . . . . . 4-121
Rearview camera . . . . . . . . . . . . . . . . . . . . . . . . . 4-122
Hazard warning flasher . . . . . . . . . . . . . . . . . . . . 4-123
Lighting . . . . . . . . . . . . . . . . . . . . . . . . . . . . . . . . . 4-124
• Battery saver function. . . . . . . . . . . . . . . . . . . . . . . . 4-124
• Headlamp delay function . . . . . . . . . . . . . . . . . . . . . 4-124
• Daytime running light . . . . . . . . . . . . . . . . . . . . . . . . 4-125
• Lighting control . . . . . . . . . . . . . . . . . . . . . . . . . . . . . 4-125
• High - beam operation . . . . . . . . . . . . . . . . . . . . . . . 4-127
• Turn signals and lane change signals . . . . . . . . . . . 4-128
• Front fog light . . . . . . . . . . . . . . . . . . . . . . . . . . . . . . 4-129
Wipers and washers . . . . . . . . . . . . . . . . . . . . . . . 4-130
• Windshield wipers (front) . . . . . . . . . . . . . . . . . . . . . 4-130
• Windshield washers (front) . . . . . . . . . . . . . . . . . . . 4-132
• Rear window wiper and washer switch. . . . . . . . . . 4-133
Interior light . . . . . . . . . . . . . . . . . . . . . . . . . . . . . 4-134
• Interior lamp AUTO cut . . . . . . . . . . . . . . . . . . . . . . 4-134
• Map lamp . . . . . . . . . . . . . . . . . . . . . . . . . . . . . . . . . . 4-134
• Room lamp . . . . . . . . . . . . . . . . . . . . . . . . . . . . . . . . . 4-135
• Luggage room lamp . . . . . . . . . . . . . . . . . . . . . . . . . 4-136
• Vanity mirror lamp . . . . . . . . . . . . . . . . . . . . . . . . . . 4-136
Welcome system . . . . . . . . . . . . . . . . . . . . . . . . . . 4-137
• Headlamp welcome . . . . . . . . . . . . . . . . . . . . . . . . . . 4-137
• Interior light. . . . . . . . . . . . . . . . . . . . . . . . . . . . . . . . 4-137
• Puddle lamp and pocket lamp . . . . . . . . . . . . . . . . . 4-137
4
Page 97 of 785
Features of your vehicle
4 4
Record your key number
The key code num-
ber is stamped or
printed on the key
code tag attached to
the key set. Should
you lose your keys, this number will
enable an authorized HYUNDAI
dealer to duplicate the keys easily.
Remove the key code tag and store it
in a safe place. Also, record the code
number and keep it in a safe and
handy place, but not in the vehicle.
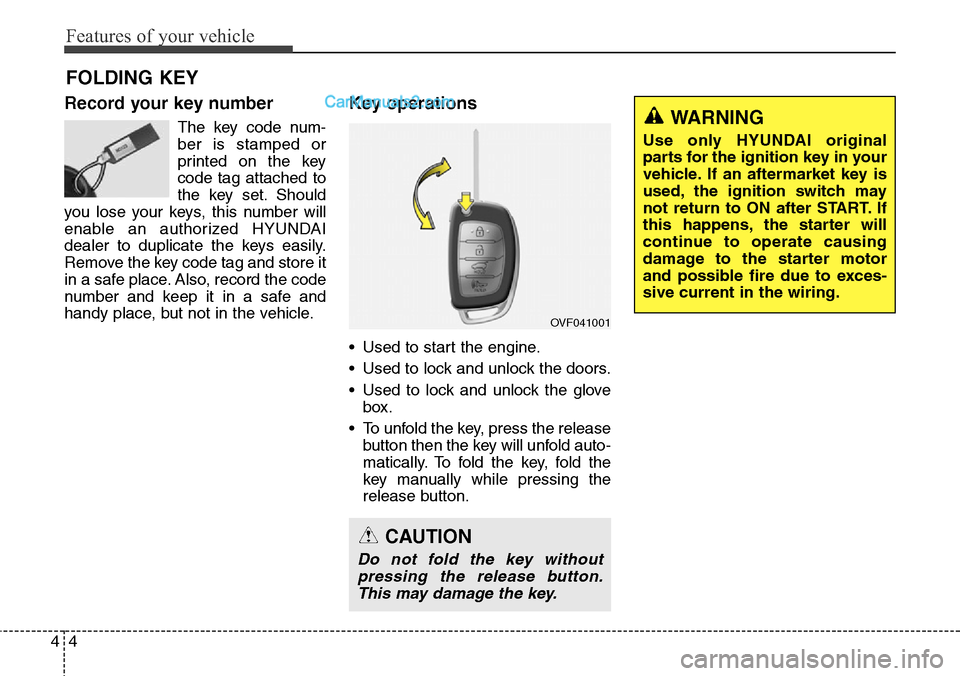
Key operations
• Used to start the engine.
• Used to lock and unlock the doors.
• Used to lock and unlock the glove
box.
• To unfold the key, press the release
button then the key will unfold auto-
matically. To fold the key, fold the
key manually while pressing the
release button.
FOLDING KEY
OVF041001
CAUTION
Do not fold the key without
pressing the release button.
This may damage the key.
WARNING
Use only HYUNDAI original
parts for the ignition key in your
vehicle. If an aftermarket key is
used, the ignition switch may
not return to ON after START. If
this happens, the starter will
continue to operate causing
damage to the starter motor
and possible fire due to exces-
sive current in the wiring.
Page 98 of 785
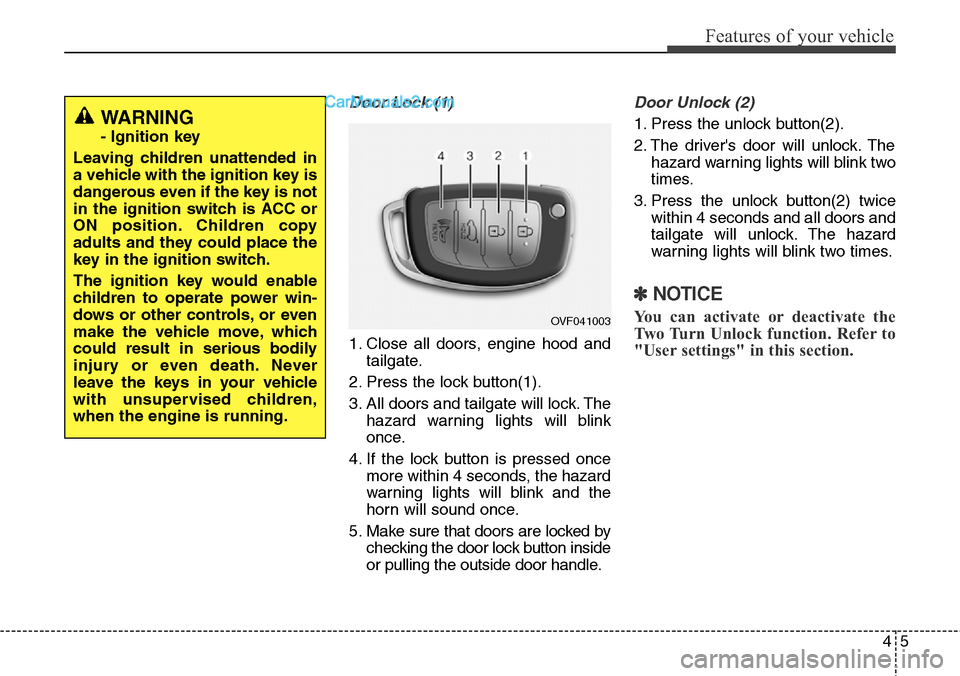
45
Features of your vehicle
Door Lock (1)
1. Close all doors, engine hood and
tailgate.
2. Press the lock button(1).
3. All doors and tailgate will lock. The
hazard warning lights will blink
once.
4. If the lock button is pressed once
more within 4 seconds, the hazard
warning lights will blink and the
horn will sound once.
5. Make sure that doors are locked by
checking the door lock button inside
or pulling the outside door handle.
Door Unlock (2)
1. Press the unlock button(2).
2. The driver's door will unlock. The
hazard warning lights will blink two
times.
3. Press the unlock button(2) twice
within 4 seconds and all doors and
tailgate will unlock. The hazard
warning lights will blink two times.
✽NOTICE
You can activate or deactivate the
Two Turn Unlock function. Refer to
"User settings" in this section.
WARNING
- Ignition key
Leaving children unattended in
a vehicle with the ignition key is
dangerous even if the key is not
in the ignition switch is ACC or
ON position. Children copy
adults and they could place the
key in the ignition switch.
The ignition key would enable
children to operate power win-
dows or other controls, or even
make the vehicle move, which
could result in serious bodily
injury or even death. Never
leave the keys in your vehicle
with unsupervised children,
when the engine is running.
OVF041003
Page 100 of 785

47
Features of your vehicle
Battery replacement
The transmitter uses a 3 volt lithium
battery which will normally last for
several years. When replacement is
necessary, use the following proce-
dure.
1. Insert a slim tool into the slot and
gently pry open the transmitter
center cover.
2. Replace the battery with a new
battery (CR2032). When replacing
the battery, make sure the battery
position.
3. Install the battery in the reverse
order of removal.For replacement transmitters, see an
authorized HYUNDAI dealer for
transmitter reprogramming.
• The transmitter is designed to give
you years of trouble-free use, how-
ever it can malfunction if exposed to
moisture or static electricity. If you
are unsure how to use your trans-
mitter or replace the battery, contact
an authorized HYUNDAI dealer.
• Using the wrong battery can cause
the transmitter to malfunction. Be
sure to use the correct battery.
• To avoid damaging the transmitter,
don't drop it, get it wet, or expose it
to heat or sunlight.
• An inappropriately disposed
battery can be harmful to the
environment and may cause
risk to human health.
Dispose the battery accord-
ing to your local law(s) or
regulation.
OLM042302
CAUTION - Transmitter
damage
Do not drop, wet or expose the
keyless entry system transmit-
ter to heat or sunlight.
IC WARNING
This device complies with
Industry Canada licence-
exempt RSS standard(s).
Operation is subject to the fol-
lowing two conditions: (1) this
device may not cause interfer-
ence, and (2) this device must
accept any interference, includ-
ing interference that may cause
undesired operation of the
device.