Hyundai Terracan 2006 Owner's Manual
Manufacturer: HYUNDAI, Model Year: 2006, Model line: Terracan, Model: Hyundai Terracan 2006Pages: 539, PDF Size: 18.11 MB
Page 341 of 539
1
CONTROLS AND EQUIPMENT
33
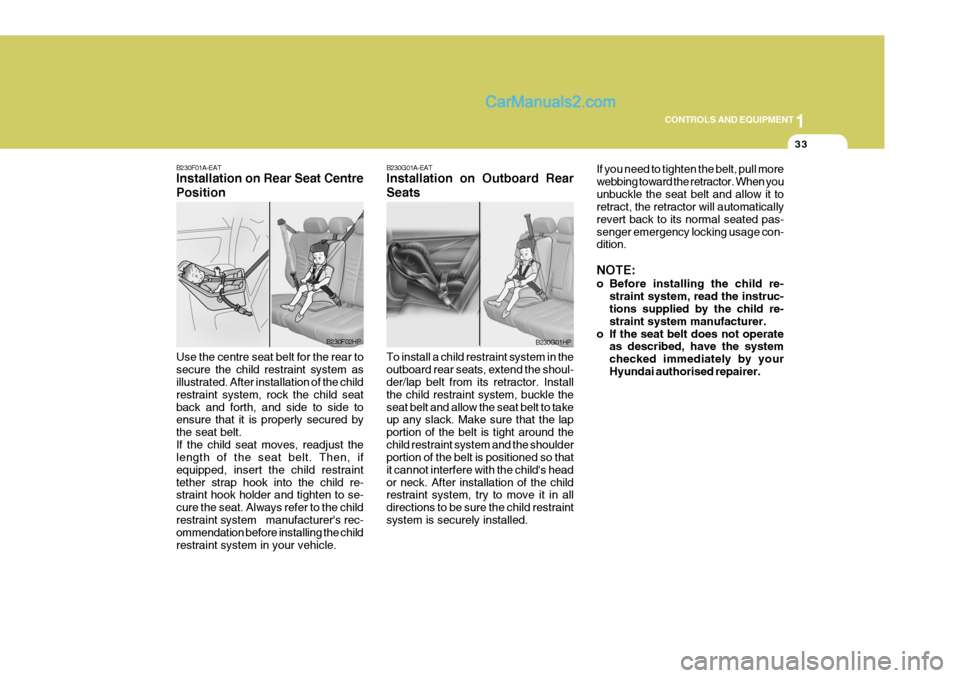
B230F01A-EAT Installation on Rear Seat Centre Position Use the centre seat belt for the rear to secure the child restraint system as illustrated. After installation of the child restraint system, rock the child seatback and forth, and side to side to ensure that it is properly secured by the seat belt.If the child seat moves, readjust the length of the seat belt. Then, if equipped, insert the child restrainttether strap hook into the child re- straint hook holder and tighten to se- cure the seat. Always refer to the childrestraint system manufacturer's rec- ommendation before installing the child restraint system in your vehicle.
B230F02HP
B230G01A-EAT Installation on Outboard Rear Seats To install a child restraint system in the outboard rear seats, extend the shoul- der/lap belt from its retractor. Install the child restraint system, buckle theseat belt and allow the seat belt to take up any slack. Make sure that the lap portion of the belt is tight around thechild restraint system and the shoulder portion of the belt is positioned so that it cannot interfere with the child's heador neck. After installation of the child restraint system, try to move it in all directions to be sure the child restraintsystem is securely installed. If you need to tighten the belt, pull morewebbing toward the retractor. When youunbuckle the seat belt and allow it to retract, the retractor will automatically revert back to its normal seated pas-senger emergency locking usage con- dition. NOTE:
o Before installing the child re-
straint system, read the instruc- tions supplied by the child re- straint system manufacturer.
o If the seat belt does not operate as described, have the systemchecked immediately by yourHyundai authorised repairer.
B230G01HP
Page 342 of 539
1CONTROLS AND EQUIPMENT
34
!WARNING:
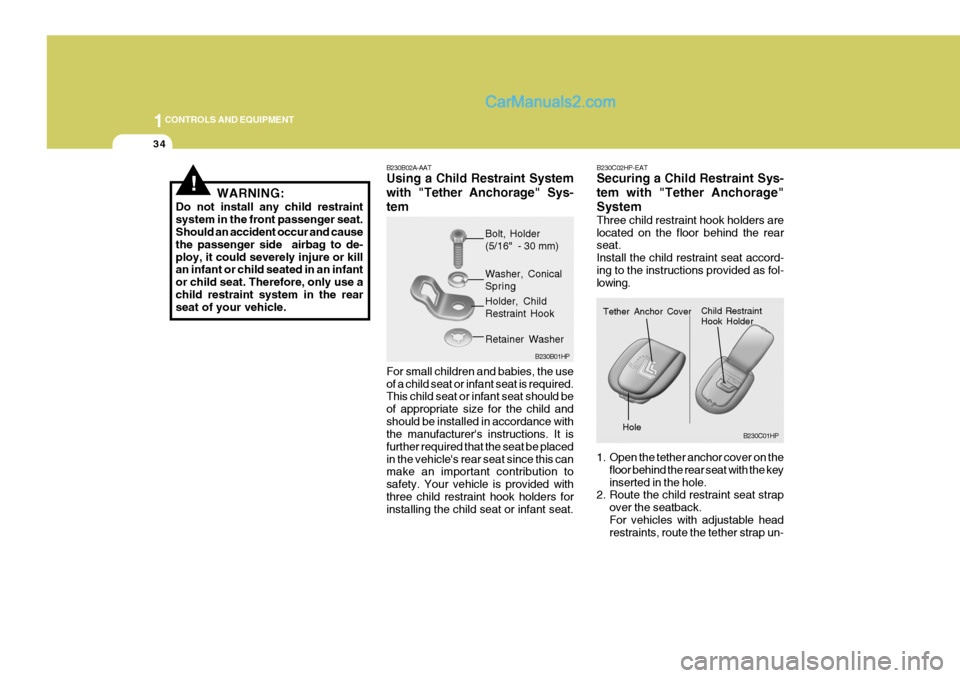
Do not install any child restraint system in the front passenger seat. Should an accident occur and cause the passenger side airbag to de-ploy, it could severely injure or kill an infant or child seated in an infant or child seat. Therefore, only use achild restraint system in the rear seat of your vehicle. B230B02A-AAT Using a Child Restraint System with "Tether Anchorage" Sys-tem For small children and babies, the use of a child seat or infant seat is required. This child seat or infant seat should be of appropriate size for the child andshould be installed in accordance with the manufacturer's instructions. It is further required that the seat be placedin the vehicle's rear seat since this can make an important contribution to safety. Your vehicle is provided withthree child restraint hook holders for installing the child seat or infant seat.B230C02HP-EAT Securing a Child Restraint Sys- tem with "Tether Anchorage"System Three child restraint hook holders are located on the floor behind the rear seat. Install the child restraint seat accord-ing to the instructions provided as fol- lowing.
1. Open the tether anchor cover on the
floor behind the rear seat with the key inserted in the hole.
2. Route the child restraint seat strap
over the seatback.For vehicles with adjustable head restraints, route the tether strap un-
B230B01HP
Bolt, Holder (5/16" - 30 mm)
Washer, ConicalSpring Holder, Child Restraint Hook
Retainer Washer
B230C01HP
Tether Anchor Cover
Child Restraint Hook HolderHole
Page 343 of 539
1
CONTROLS AND EQUIPMENT
35
B230C02HP
Front of Vehicle
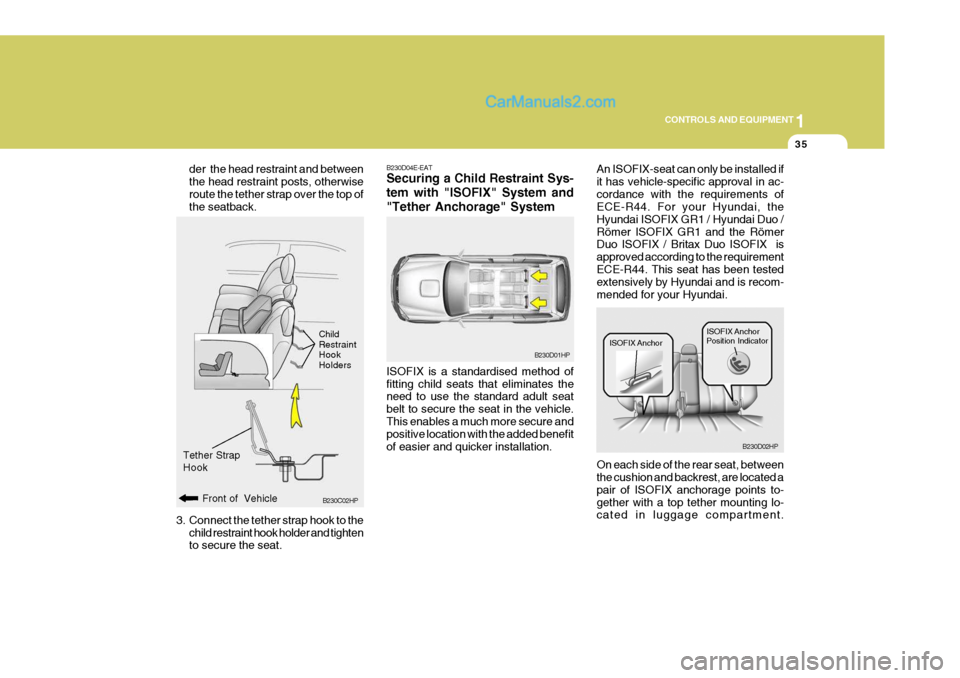
der the head restraint and between the head restraint posts, otherwiseroute the tether strap over the top of the seatback.
3. Connect the tether strap hook to the child restraint hook holder and tightento secure the seat. Child RestraintHookHolders
Tether Strap Hook
B230D04E-EAT Securing a Child Restraint Sys- tem with "ISOFIX" System and"Tether Anchorage" System ISOFIX is a standardised method of fitting child seats that eliminates the need to use the standard adult seat belt to secure the seat in the vehicle.This enables a much more secure and positive location with the added benefit of easier and quicker installation. An ISOFIX-seat can only be installed ifit has vehicle-specific approval in ac-cordance with the requirements of ECE-R44. For your Hyundai, the Hyundai ISOFIX GR1 / Hyundai Duo /Römer ISOFIX GR1 and the Römer Duo ISOFIX / Britax Duo ISOFIX is approved according to the requirementECE-R44. This seat has been tested extensively by Hyundai and is recom- mended for your Hyundai.
B230D01HP
ISOFIX Anchor
B230D02HP
ISOFIX Anchor Position Indicator
On each side of the rear seat, between the cushion and backrest, are located a pair of ISOFIX anchorage points to-gether with a top tether mounting lo- cated in luggage compartment.
Page 344 of 539
1CONTROLS AND EQUIPMENT
36
!
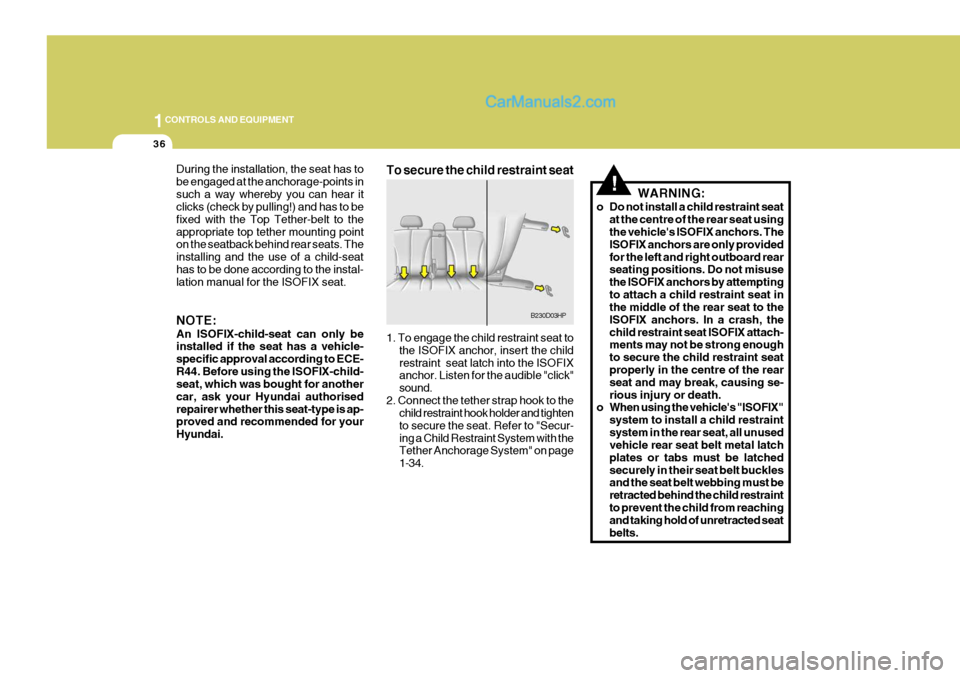
During the installation, the seat has to be engaged at the anchorage-points insuch a way whereby you can hear it clicks (check by pulling!) and has to be fixed with the Top Tether-belt to theappropriate top tether mounting point on the seatback behind rear seats. The installing and the use of a child-seathas to be done according to the instal- lation manual for the ISOFIX seat. NOTE: An ISOFIX-child-seat can only be installed if the seat has a vehicle- specific approval according to ECE-R44. Before using the ISOFIX-child- seat, which was bought for another car, ask your Hyundai authorisedrepairer whether this seat-type is ap- proved and recommended for your Hyundai. To secure the child restraint seat 1. To engage the child restraint seat to
the ISOFIX anchor, insert the child restraint seat latch into the ISOFIX anchor. Listen for the audible "click" sound.
2. Connect the tether strap hook to the child restraint hook holder and tightento secure the seat. Refer to "Secur-ing a Child Restraint System with the Tether Anchorage System" on page 1-34. WARNING:
o Do not install a child restraint seat at the centre of the rear seat using the vehicle's ISOFIX anchors. The ISOFIX anchors are only providedfor the left and right outboard rear seating positions. Do not misuse the ISOFIX anchors by attemptingto attach a child restraint seat in the middle of the rear seat to the ISOFIX anchors. In a crash, thechild restraint seat ISOFIX attach- ments may not be strong enough to secure the child restraint seat properly in the centre of the rear seat and may break, causing se-rious injury or death.
o When using the vehicle's "ISOFIX"
system to install a child restraintsystem in the rear seat, all unused vehicle rear seat belt metal latch plates or tabs must be latchedsecurely in their seat belt buckles and the seat belt webbing must be retracted behind the child restraintto prevent the child from reaching and taking hold of unretracted seat belts.
B230D03HP
Page 345 of 539
1
CONTROLS AND EQUIPMENT
37
Unlatched metal latch plates or tabs may allow the child to reachthe unretracted seat belts which may result in strangulation and a serious injury or death to the childin the child restraint.
o Do not mount more than one child
restraint to a child restraint loweranchorage point. Over-loading may cause the anchorage points or tether anchor to break, causingserious injury or death.
o Attach the ISOFIX or ISOFIX-com-
patible child restraint seat only tothe appropriate locations shown in the illustration.
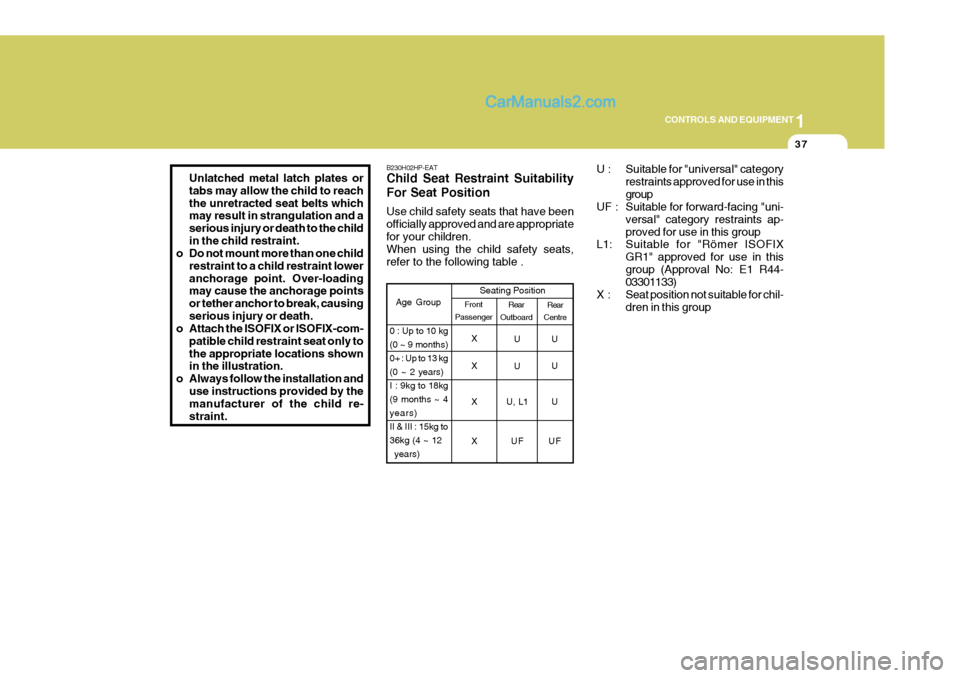
o Always follow the installation and use instructions provided by themanufacturer of the child re- straint. B230H02HP-EAT Child Seat Restraint Suitability For Seat Position Use child safety seats that have been officially approved and are appropriatefor your children. When using the child safety seats, refer to the following table .
U : Suitable for "universal" category
restraints approved for use in thisgroup
UF : Suitable for forward-facing "uni-
versal" category restraints ap-proved for use in this group
L1: Suitable for "Römer ISOFIX
GR1" approved for use in thisgroup (Approval No: E1 R44- 03301133)
X : Seat position not suitable for chil- dren in this group
Rear
Centre
Age Group Seating Position
UU
X UU
Rear
Outboard
Front
Passenger
0 : Up to 10 kg (0 ~ 9 months)0+ : Up to 13 kg(0 ~ 2 years)I : 9kg to 18kg(9 months ~ 4years)II & III : 15kg to36kg (4 ~ 12 years) X
X U, L1 U XU
FUF
Page 346 of 539
1CONTROLS AND EQUIPMENT
38
!
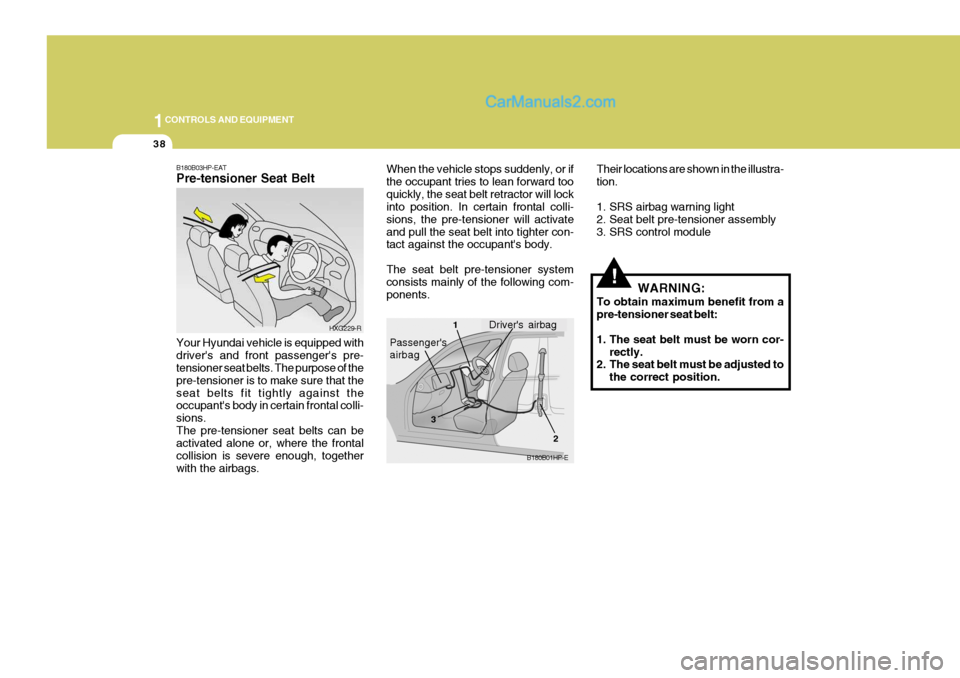
B180B03HP-EAT Pre-tensioner Seat Belt Your Hyundai vehicle is equipped with driver's and front passenger's pre- tensioner seat belts. The purpose of the pre-tensioner is to make sure that theseat belts fit tightly against the occupant's body in certain frontal colli- sions.The pre-tensioner seat belts can be activated alone or, where the frontal collision is severe enough, togetherwith the airbags. When the vehicle stops suddenly, or ifthe occupant tries to lean forward tooquickly, the seat belt retractor will lock into position. In certain frontal colli- sions, the pre-tensioner will activateand pull the seat belt into tighter con- tact against the occupant's body. The seat belt pre-tensioner system consists mainly of the following com- ponents.
WARNING:
To obtain maximum benefit from apre-tensioner seat belt:
1. The seat belt must be worn cor- rectly.
2. The seat belt must be adjusted to
the correct position.
HXG229-R
B180B01HP-E
Driver's airbag1
2
3
Passenger's airbag Their locations are shown in the illustra- tion.
1. SRS airbag warning light
2. Seat belt pre-tensioner assembly
3. SRS control module
Page 347 of 539
1
CONTROLS AND EQUIPMENT
39
NOTE:
o Both the driver's and front passenger's pre-tensioner seat belts will be activated in certainfrontal collisions. The pre- tensioner seat belts can be acti- vated alone or, where the frontalcollision is severe enough, to- gether with the airbags.
o When the pre-tensioner seat belts are activated, a loud noise may beheard and fine dust, which may appear to be smoke, may be vis-ible in the passenger compart- ment. These are normal operating conditions and are not hazard-ous.
o Although it is harmless, the fine
dust may cause skin irritation andshould not be breathed for pro- longed periods. Wash your hands and face thoroughly after an acci-dent in which the pre-tensioner seat belts were activated.
!!CAUTION:
o Because the sensor that activates the SRS airbag is connected with pre-tensioner seat belt, the SRS airbag warning light on theinstrument panel will blink for ap- proximately 6 seconds after the ignition key has been turned to the"ON" position or after the engine is started, and then it should turn off.
o If a pre-tensioner seat belt is not working properly, this warninglight will illuminate even if there isno malfunction of the SRS airbag. If the SRS airbag warning light does not blink for about 6 secondswhen the ignition key is turned to "ON" or the engine is started, or if it remains illuminated after blink-ing for approximately 6 seconds, or if it illuminates whilst the ve- hicle is being driven, please havea Hyundai authorised repairer in- spect the pre-tensioner seat belts and SRS airbag system as soon aspossible. WARNING:
o Pre-tensioners are designed to operate only one time. After acti- vation, pre-tensioner seat belts must be replaced. All seat belts,of any type, should always be replaced after they have been worn during a collision.
o The pre-tensioner seat belt as- sembly mechanisms become hotduring activation. Do not touchthe pre-tensioner seat belt as- semblies for several minutes af- ter they have been activated.
o Do not attempt to inspect or re-
place the pre-tensioner seat beltsyourself. This must be done by a Hyundai authorised repairer.
o Do not strike the pre-tensioner seat belt assemblies.
o Do not attempt to service or re-
pair the pre-tensioner seat belt system in any manner.
AIR
BAG
Page 348 of 539
1CONTROLS AND EQUIPMENT
40
o Improper handling of the pre-
tensioner seat belt assemblies, and failure to heed the warnings to not strike, modify, inspect, replace, service or repair the pretensionerseat belt assemblies may lead to improper operation or inadvertent activation and serious injury.
o Always wear seat belts when driv- ing or riding in a motor vehicle. belt system alone, in case of a frontalimpact of sufficient severity. NOTE: Be sure to read information about the SRS on the labels provided in the front of the sun visor and in the glovebox.
SUPPLEMENTAL RESTRAINT (AIRBAG) SYSTEM
B240A01HP-EAT
B240A01HP
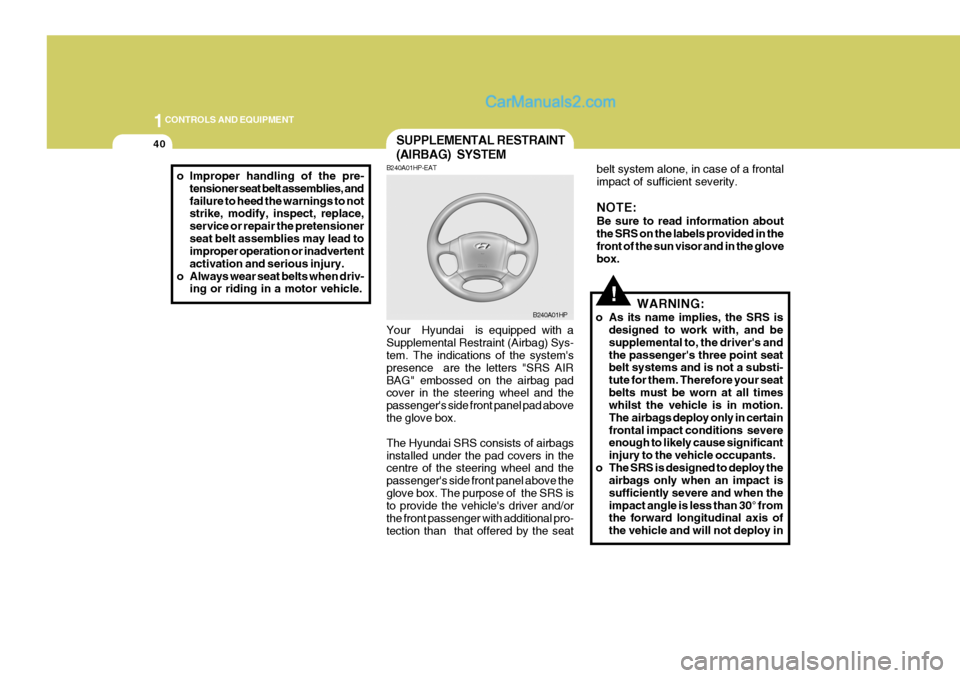
Your Hyundai is equipped with a Supplemental Restraint (Airbag) Sys- tem. The indications of the system's presence are the letters "SRS AIRBAG" embossed on the airbag pad cover in the steering wheel and the passenger's side front panel pad abovethe glove box. The Hyundai SRS consists of airbags installed under the pad covers in the centre of the steering wheel and the passenger's side front panel above theglove box. The purpose of the SRS is to provide the vehicle's driver and/or the front passenger with additional pro-tection than that offered by the seat
!WARNING:
o As its name implies, the SRS is designed to work with, and be supplemental to, the driver's andthe passenger's three point seat belt systems and is not a substi- tute for them. Therefore your seatbelts must be worn at all times whilst the vehicle is in motion. The airbags deploy only in certainfrontal impact conditions severe enough to likely cause significant injury to the vehicle occupants.
o The SRS is designed to deploy the airbags only when an impact issufficiently severe and when theimpact angle is less than 30° from the forward longitudinal axis of the vehicle and will not deploy in
Page 349 of 539
1
CONTROLS AND EQUIPMENT
41
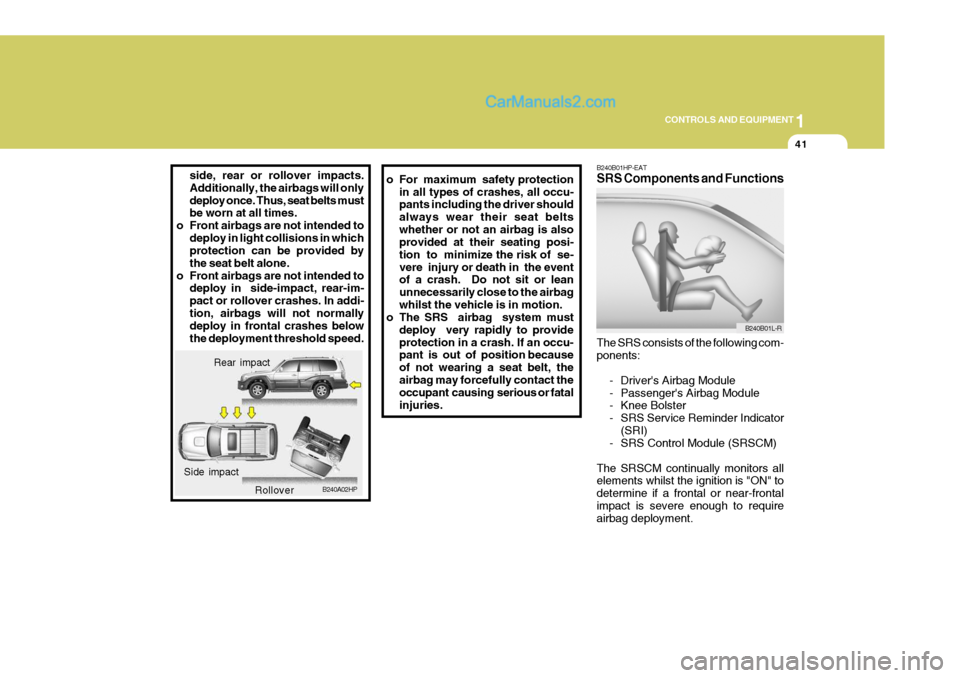
side, rear or rollover impacts. Additionally, the airbags will onlydeploy once. Thus, seat belts must be worn at all times.
o Front airbags are not intended to
deploy in light collisions in whichprotection can be provided by the seat belt alone.
o Front airbags are not intended to deploy in side-impact, rear-im-pact or rollover crashes. In addi-tion, airbags will not normally deploy in frontal crashes below the deployment threshold speed. o For maximum safety protection
in all types of crashes, all occu- pants including the driver should always wear their seat beltswhether or not an airbag is also provided at their seating posi- tion to minimize the risk of se-vere injury or death in the event of a crash. Do not sit or lean unnecessarily close to the airbagwhilst the vehicle is in motion.
o The SRS airbag system must
deploy very rapidly to provideprotection in a crash. If an occu- pant is out of position because of not wearing a seat belt, theairbag may forcefully contact the occupant causing serious or fatal injuries.
Rear impact
B240A02HP
Side impact
Rollover B240B01HP-EAT SRS Components and Functions The SRS consists of the following com- ponents:
- Driver's Airbag Module
- Passenger's Airbag Module
- Knee Bolster
- SRS Service Reminder Indicator(SRI)
- SRS Control Module (SRSCM)
The SRSCM continually monitors all elements whilst the ignition is "ON" to determine if a frontal or near-frontalimpact is severe enough to require airbag deployment.
B240B01L-R
Page 350 of 539
1CONTROLS AND EQUIPMENT
42
The SRS service reminder indicator (SRI) on the instrument panel will blinkfor approximately 6 seconds after the ignition key is turned to the "ON" posi- tion or after the engine is started, afterwhich the SRI should go out.
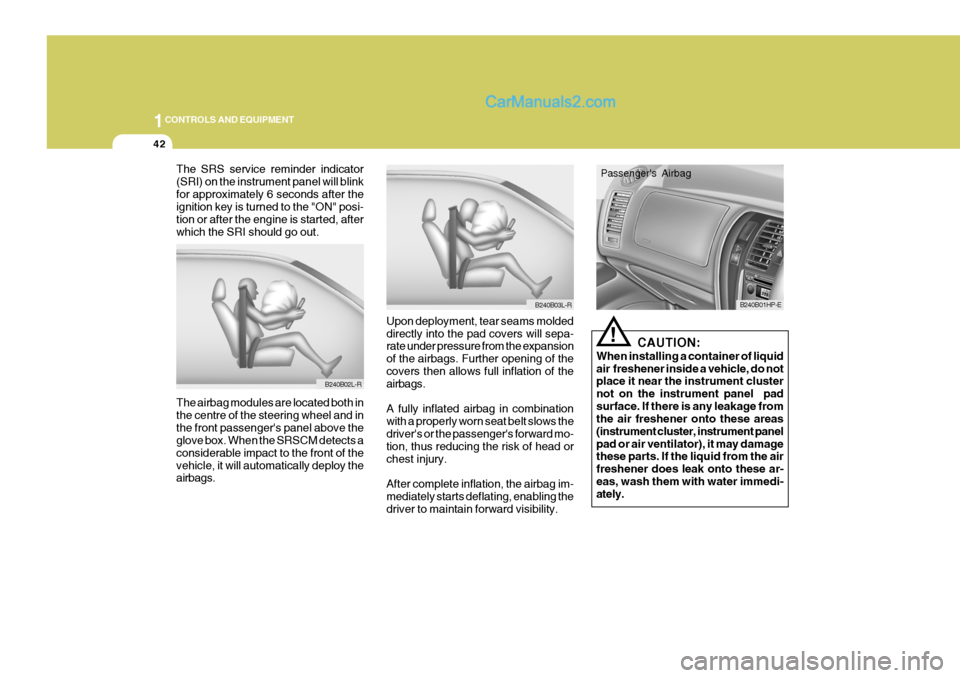
Upon deployment, tear seams moldeddirectly into the pad covers will sepa- rate under pressure from the expansion of the airbags. Further opening of the covers then allows full inflation of the airbags. A fully inflated airbag in combination with a properly worn seat belt slows thedriver's or the passenger's forward mo-
tion, thus reducing the risk of head or chest injury. After complete inflation, the airbag im- mediately starts deflating, enabling thedriver to maintain forward visibility.
The airbag modules are located both inthe centre of the steering wheel and inthe front passenger's panel above the glove box. When the SRSCM detects a considerable impact to the front of thevehicle, it will automatically deploy the airbags.
B240B02L-R
B240B03L-R
!
CAUTION:
When installing a container of liquid air freshener inside a vehicle, do not place it near the instrument cluster not on the instrument panel padsurface. If there is any leakage from the air freshener onto these areas (instrument cluster, instrument panelpad or air ventilator), it may damage these parts. If the liquid from the air freshener does leak onto these ar-eas, wash them with water immedi- ately.
B240B01HP-E
Passenger's Airbag