INFINITI FX35 2004 Service Manual
FX35 2004
INFINITI
INFINITI
https://www.carmanualsonline.info/img/42/57021/w960_57021-0.png
INFINITI FX35 2004 Service Manual
Trending: trip computer, power steering pressure hose, exh, change time, warning light, air intake hose, bolt pattern
Page 2701 of 4449
EI-22
REAR BUMPER
Revision: 2004 November 2004 FX35/FX45
REAR BUMPER CLOSING
Removal
Remove clips of bumper closing and remove rear bumper closing.
Installation
Install in the reverse order of removal.
DRAFTER GUARD
Removal
Remove clips and bolt of drafter guard and remove drafter guard.
Installation
Install in the reverse order of removal.
REAR FILLET MOLDING ASSEMBLY
Removal
1. Remove bolts of fillet molding assembly.
2. Remove clips of fillet molding assembly.
3. Remove fillet molding assembly.
Installation
1. Clean adhesive portion of rear fender with white gasoline.
2. Strip pattern from the new double adhesive tape and paste on rear fender.
3. Fillet molding assembly hold with rear fender.
PIIA4954E
PIIA4955E
PIIA4347E
Page 2702 of 4449
FRONT GRILLE
EI-23
C
D
E
F
G
H
J
K
L
MA
B
EI
Revision: 2004 November 2004 FX35/FX45
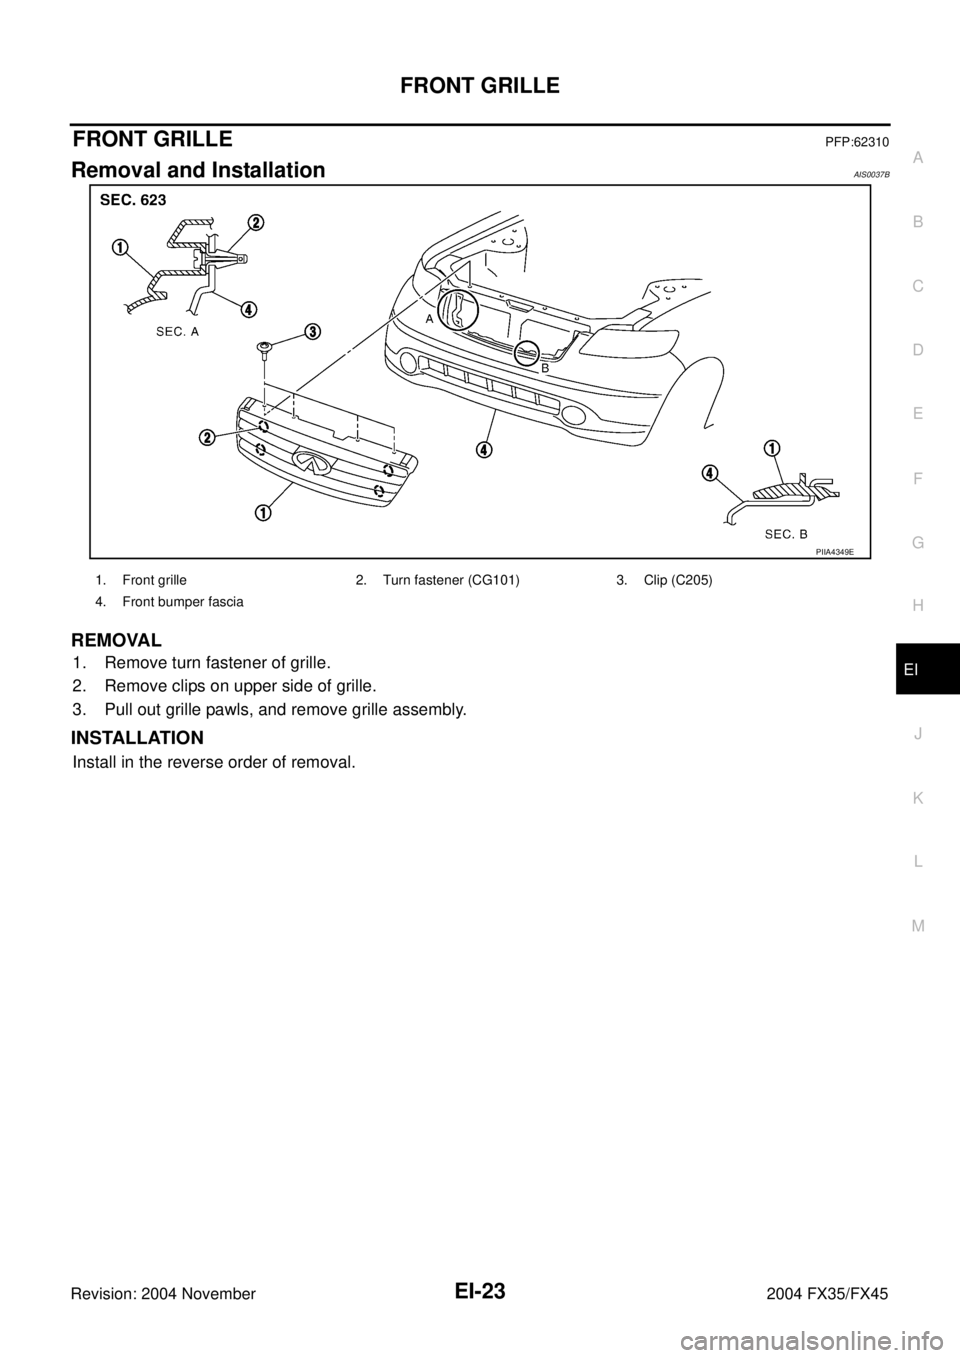
FRONT GRILLEPFP:62310
Removal and InstallationAIS0037B
REMOVAL
1. Remove turn fastener of grille.
2. Remove clips on upper side of grille.
3. Pull out grille pawls, and remove grille assembly.
INSTALLATION
Install in the reverse order of removal.
PIIA4349E
1. Front grille 2. Turn fastener (CG101) 3. Clip (C205)
4. Front bumper fascia
Page 2703 of 4449
EI-24
COWL TOP
Revision: 2004 November 2004 FX35/FX45
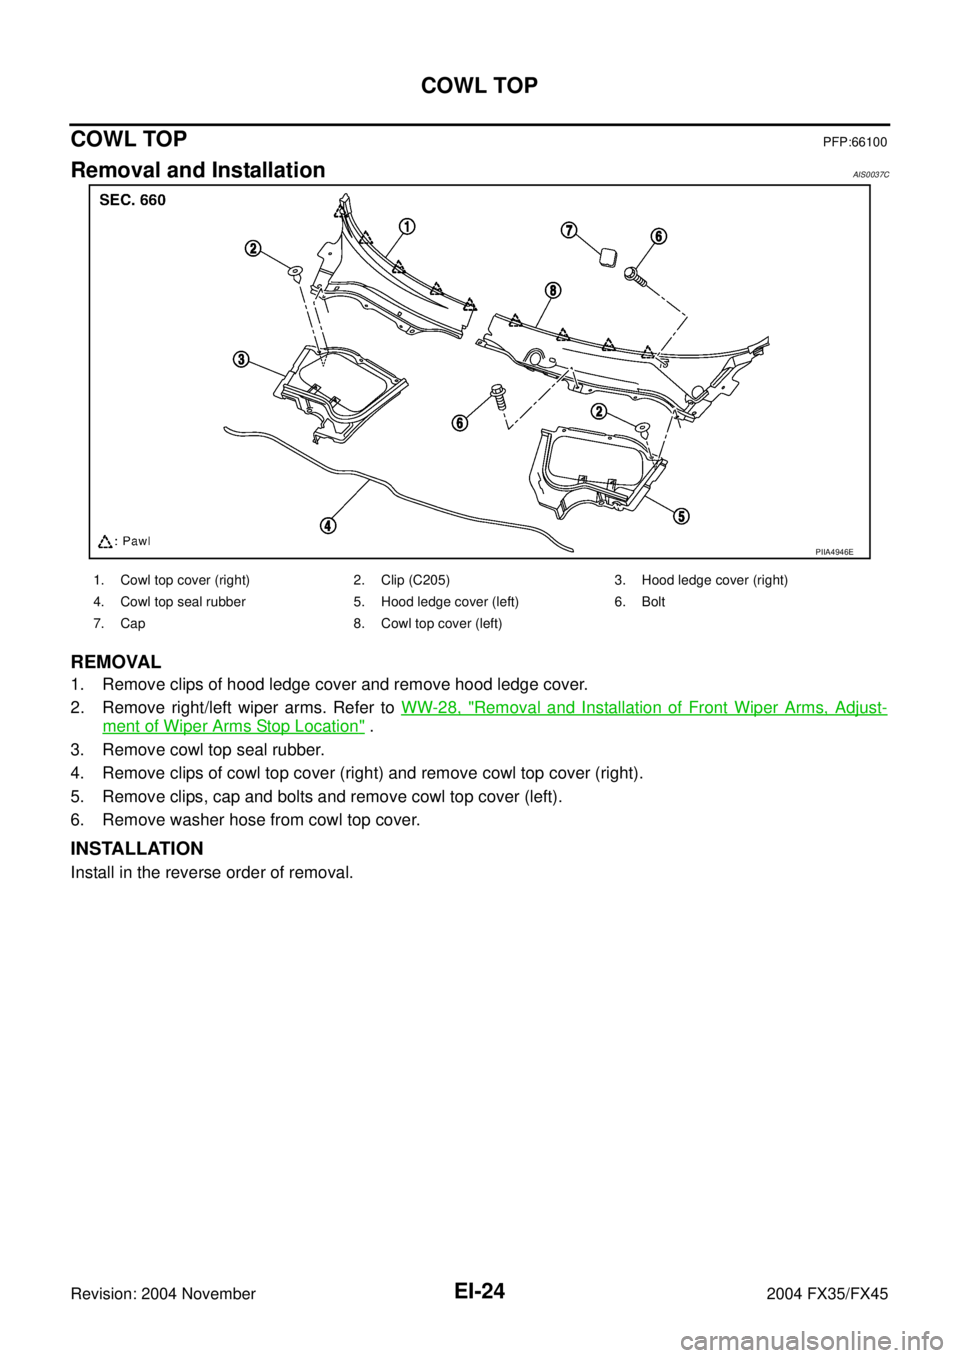
COWL TOPPFP:66100
Removal and InstallationAIS0037C
REMOVAL
1. Remove clips of hood ledge cover and remove hood ledge cover.
2. Remove right/left wiper arms. Refer to WW-28, "
Removal and Installation of Front Wiper Arms, Adjust-
ment of Wiper Arms Stop Location" .
3. Remove cowl top seal rubber.
4. Remove clips of cowl top cover (right) and remove cowl top cover (right).
5. Remove clips, cap and bolts and remove cowl top cover (left).
6. Remove washer hose from cowl top cover.
INSTALLATION
Install in the reverse order of removal.
PIIA4946E
1. Cowl top cover (right) 2. Clip (C205) 3. Hood ledge cover (right)
4. Cowl top seal rubber 5. Hood ledge cover (left) 6. Bolt
7. Cap 8. Cowl top cover (left)
Page 2704 of 4449
FENDER PROTECTOR
EI-25
C
D
E
F
G
H
J
K
L
MA
B
EI
Revision: 2004 November 2004 FX35/FX45
FENDER PROTECTORPFP:63840
Removal and InstallationAIS0037D
REMOVAL
1. Remove bolts of fender protector front.
2. Remove clips of fender protector front.
3. Remove fender protector front.
4. Remove bolt of fender protector rear.
5. Remove clips of fender protector rear.
6. Remove fender protector rear.
INSTALLATION
Install in the reverse order of removal.
PIIA4326E
1. Fender protector front 2. Clip (C103) 3. Screw
4. Bolt 5. Fender protector rear 6. Clip
Page 2705 of 4449
EI-26
DOOR OUTSIDE MOLDING
Revision: 2004 November 2004 FX35/FX45
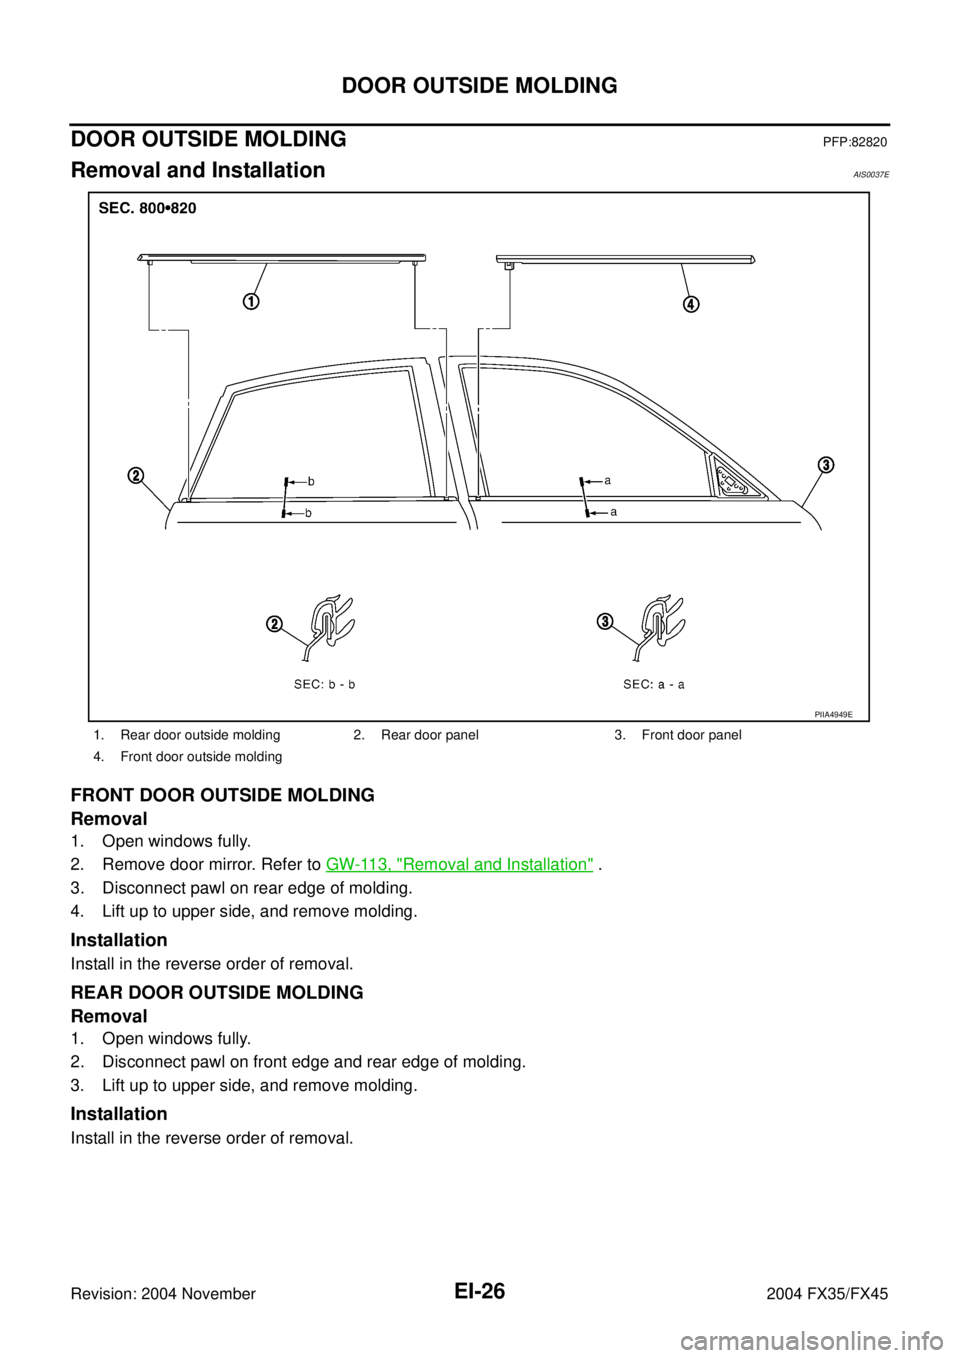
DOOR OUTSIDE MOLDING PFP:82820
Removal and InstallationAIS0037E
FRONT DOOR OUTSIDE MOLDING
Removal
1. Open windows fully.
2. Remove door mirror. Refer to GW-113, "
Removal and Installation" .
3. Disconnect pawl on rear edge of molding.
4. Lift up to upper side, and remove molding.
Installation
Install in the reverse order of removal.
REAR DOOR OUTSIDE MOLDING
Removal
1. Open windows fully.
2. Disconnect pawl on front edge and rear edge of molding.
3. Lift up to upper side, and remove molding.
Installation
Install in the reverse order of removal.
1. Rear door outside molding 2. Rear door panel 3. Front door panel
4. Front door outside molding
PIIA4949E
Page 2706 of 4449
DOOR OUTSIDE LOWER MOLDING
EI-27
C
D
E
F
G
H
J
K
L
MA
B
EI
Revision: 2004 November 2004 FX35/FX45
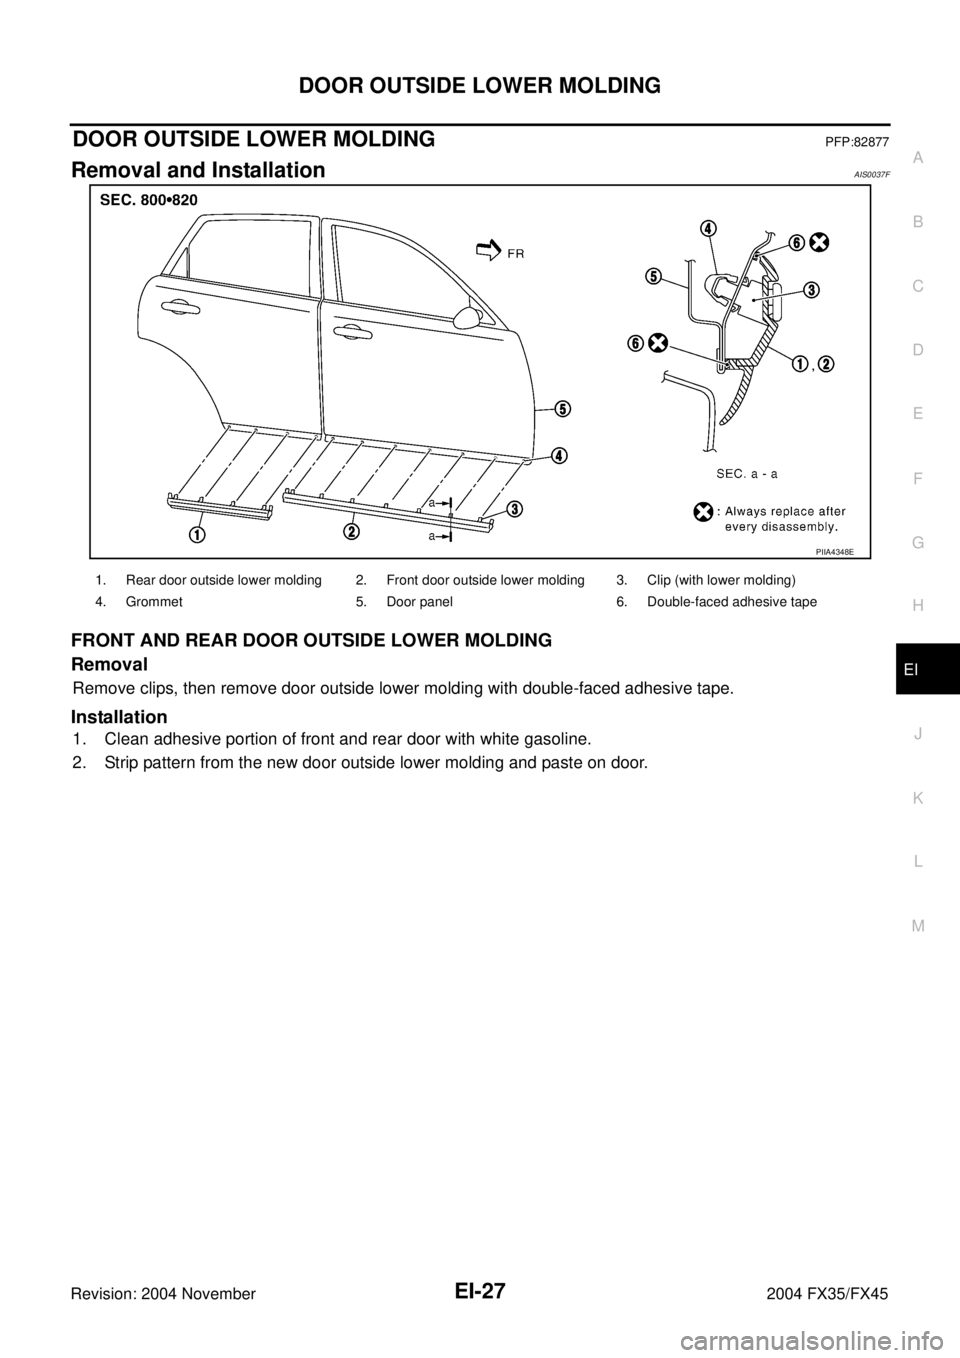
DOOR OUTSIDE LOWER MOLDINGPFP:82877
Removal and InstallationAIS0037F
FRONT AND REAR DOOR OUTSIDE LOWER MOLDING
Removal
Remove clips, then remove door outside lower molding with double-faced adhesive tape.
Installation
1. Clean adhesive portion of front and rear door with white gasoline.
2. Strip pattern from the new door outside lower molding and paste on door.
PIIA4348E
1. Rear door outside lower molding 2. Front door outside lower molding 3. Clip (with lower molding)
4. Grommet 5. Door panel 6. Double-faced adhesive tape
Page 2707 of 4449
EI-28
DOOR PARTING SEAL
Revision: 2004 November 2004 FX35/FX45
DOOR PARTING SEALPFP:80838
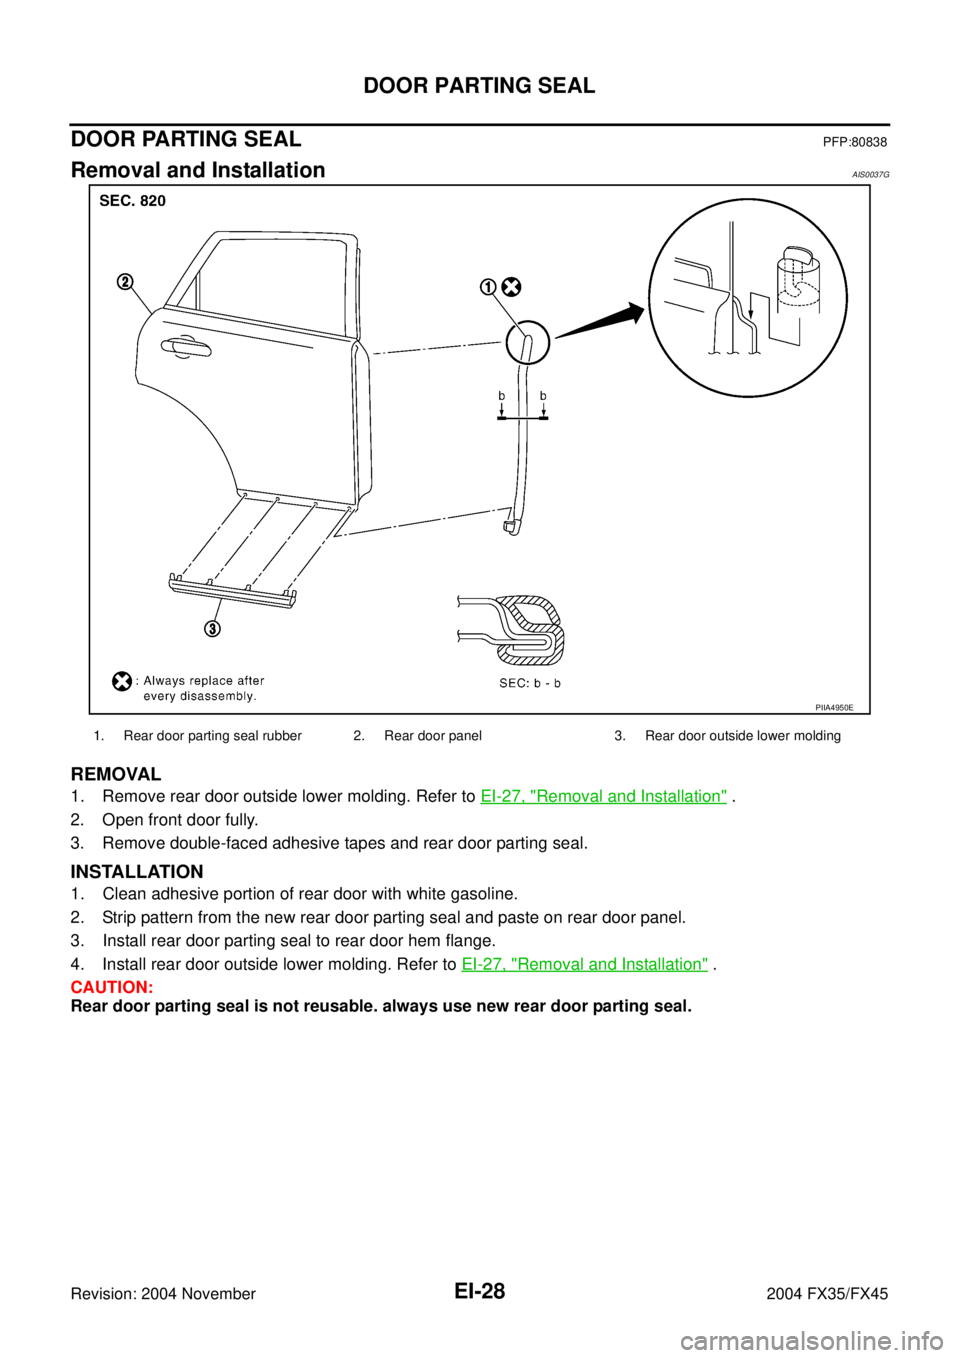
Removal and InstallationAIS0037G
REMOVAL
1. Remove rear door outside lower molding. Refer to EI-27, "Removal and Installation" .
2. Open front door fully.
3. Remove double-faced adhesive tapes and rear door parting seal.
INSTALLATION
1. Clean adhesive portion of rear door with white gasoline.
2. Strip pattern from the new rear door parting seal and paste on rear door panel.
3. Install rear door parting seal to rear door hem flange.
4. Install rear door outside lower molding. Refer to EI-27, "
Removal and Installation" .
CAUTION:
Rear door parting seal is not reusable. always use new rear door parting seal.
PIIA4950E
1. Rear door parting seal rubber 2. Rear door panel 3. Rear door outside lower molding
Page 2708 of 4449
CENTER MUD GUARD
EI-29
C
D
E
F
G
H
J
K
L
MA
B
EI
Revision: 2004 November 2004 FX35/FX45
CENTER MUD GUARDPFP:76850
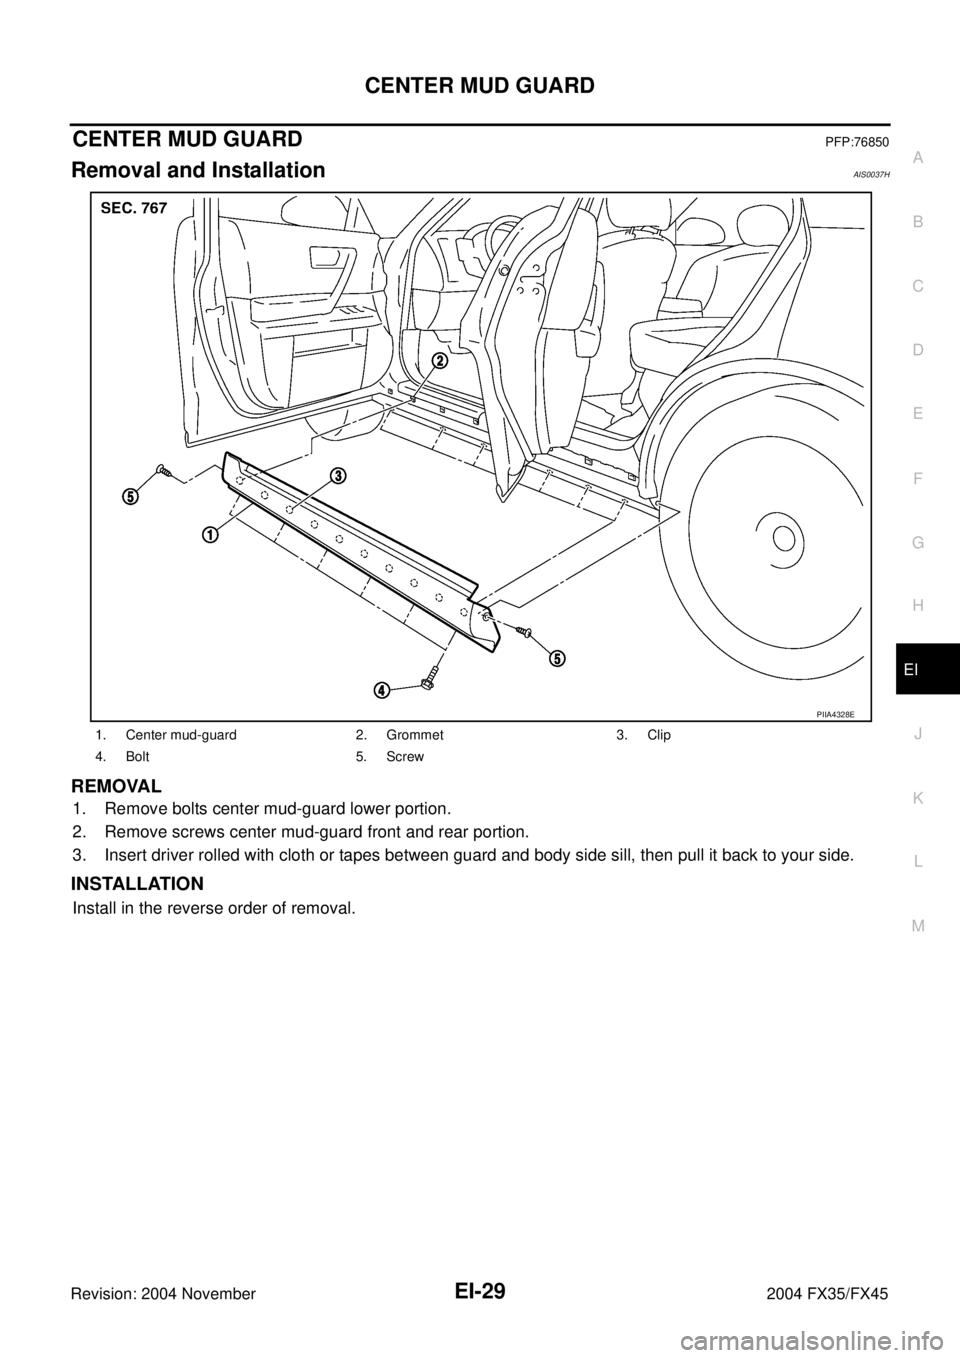
Removal and InstallationAIS0037H
REMOVAL
1. Remove bolts center mud-guard lower portion.
2. Remove screws center mud-guard front and rear portion.
3. Insert driver rolled with cloth or tapes between guard and body side sill, then pull it back to your side.
INSTALLATION
Install in the reverse order of removal.
1. Center mud-guard 2. Grommet 3. Clip
4. Bolt 5. Screw
PIIA4328E
Page 2709 of 4449
EI-30
WINDSHIELD MOLDING
Revision: 2004 November 2004 FX35/FX45
WINDSHIELD MOLDINGPFP:72700
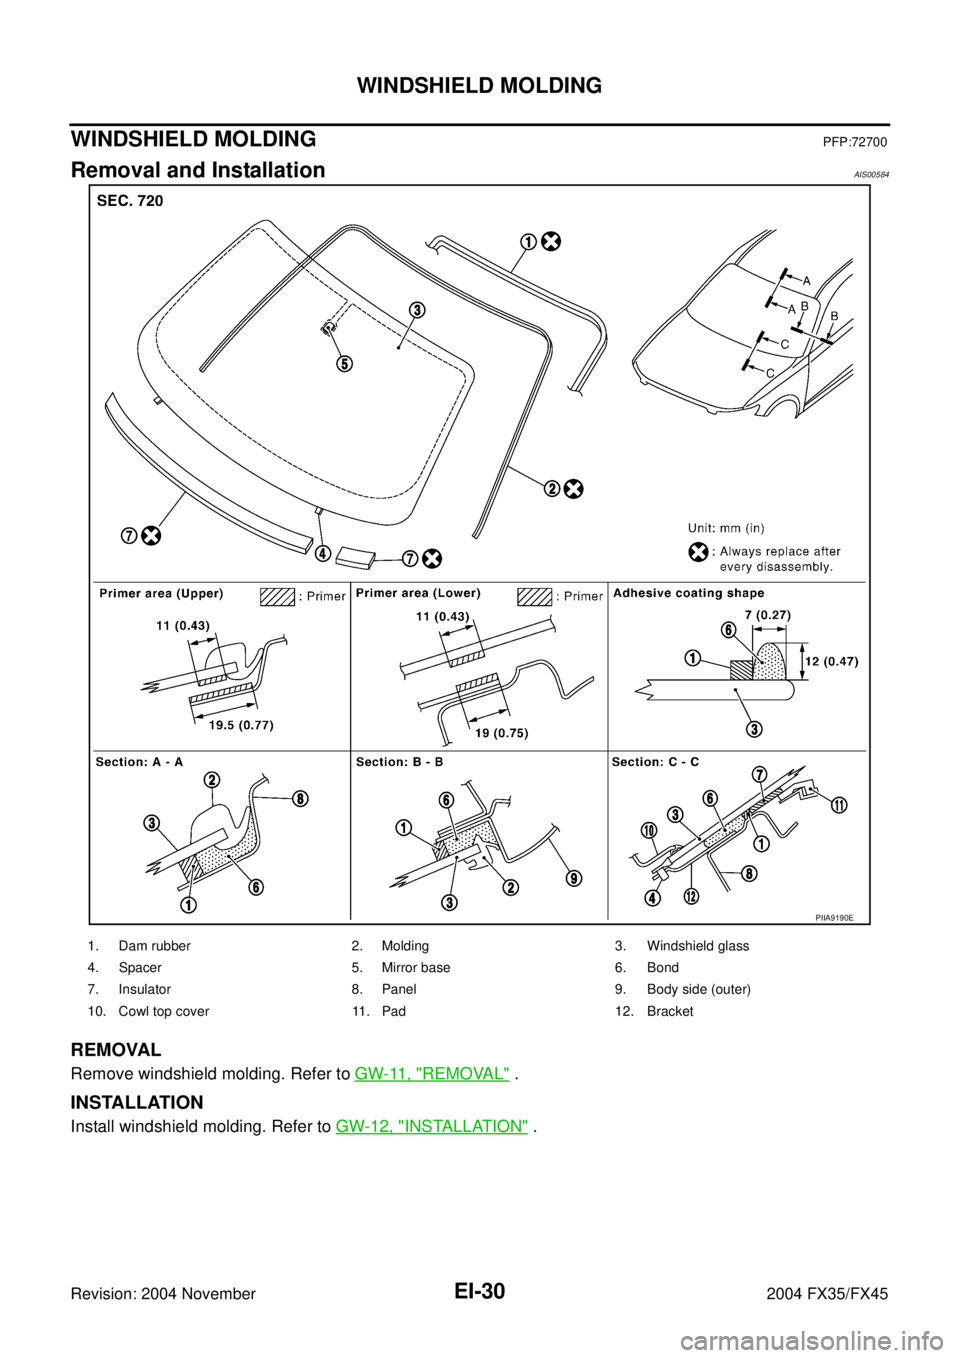
Removal and InstallationAIS00584
REMOVAL
Remove windshield molding. Refer to GW-11, "REMOVAL" .
INSTALLATION
Install windshield molding. Refer to GW-12, "INSTALLATION" .
PIIA9190E
1. Dam rubber 2. Molding 3. Windshield glass
4. Spacer 5. Mirror base 6. Bond
7. Insulator 8. Panel 9. Body side (outer)
10. Cowl top cover 11. Pad 12. Bracket
Page 2710 of 4449
BACK DOOR WINDOW MOLDING
EI-31
C
D
E
F
G
H
J
K
L
MA
B
EI
Revision: 2004 November 2004 FX35/FX45
BACK DOOR WINDOW MOLDINGPFP:90352
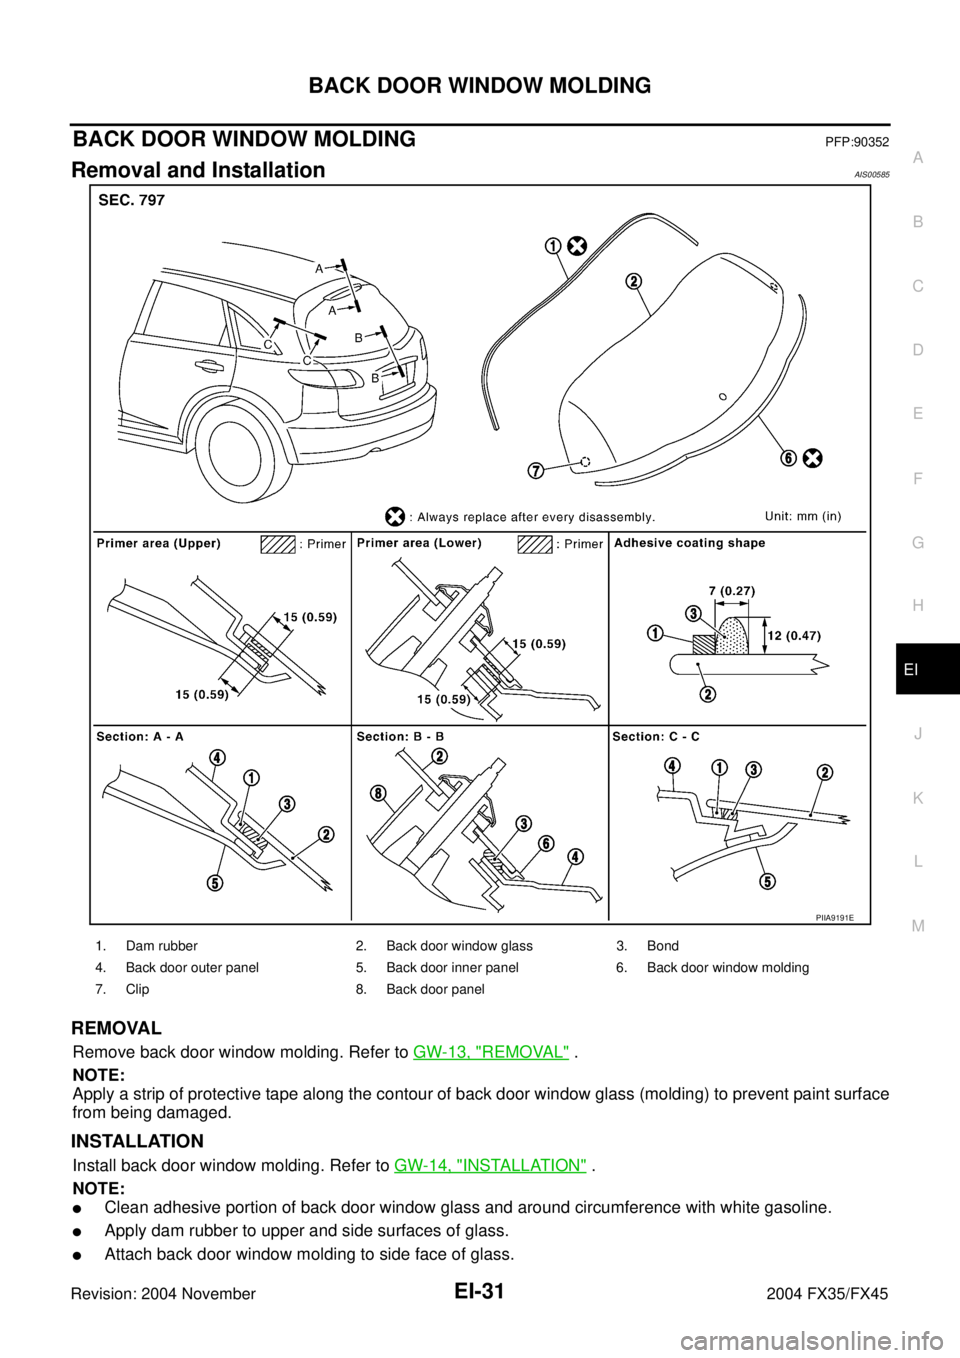
Removal and InstallationAIS00585
REMOVAL
Remove back door window molding. Refer to GW-13, "REMOVAL" .
NOTE:
Apply a strip of protective tape along the contour of back door window glass (molding) to prevent paint surface
from being damaged.
INSTALLATION
Install back door window molding. Refer to GW-14, "INSTALLATION" .
NOTE:
�Clean adhesive portion of back door window glass and around circumference with white gasoline.
�Apply dam rubber to upper and side surfaces of glass.
�Attach back door window molding to side face of glass.
PIIA9191E
1. Dam rubber 2. Back door window glass 3. Bond
4. Back door outer panel 5. Back door inner panel 6. Back door window molding
7. Clip 8. Back door panel
Trending: battery, Timing, tire pressure reset, I Body, wiring diagram, Body, run flat

