charging INFINITI FX35 2008 User Guide
[x] Cancel search | Manufacturer: INFINITI, Model Year: 2008, Model line: FX35, Model: INFINITI FX35 2008Pages: 3924, PDF Size: 81.37 MB
Page 414 of 3924

PRECAUTIONSATC-9
< SERVICE INFORMATION >
C
DE
F
G H
I
K L
M A
B
AT C
N
O P
CAUTION:
When replacing or cleaning refrigerant cycle components, observe the following.
When the compressor is removed, store it in the sam e way at it is when mounted on the car. Failure
to do so will cause lubricant to enter the low-pressure chamber.
When connecting tubes, always use a to rque wrench and a back-up wrench.
After disconnecting tubes, immediately plug all op enings to prevent entry of dust and moisture.
When installing an air conditioner in the vehicle, connect the pipes at the final stage of the operation.
Never remove the seal caps of pipes and other compon ents until just before required for connection.
Allow components stored in cool areas to warm to working area temperature before removing seal
caps. This prevents condensation from forming inside A/C components.
Thoroughly remove moisture from the refriger ation system before charging the refrigerant.
Always replace used O-rings.
When connecting tubes, apply lubricant to circle of the O-rings shown in illustration. Be careful not
to apply lubricant to threaded portion.
O-ring must be closely att ached to the groove of tube.
When replacing the O-ring, be careful not to damage O-ring and tube.
Connect tube until a click can be heard, then tighten the nut or bolt by hand. Make sure that the O-
ring is installed to tube correctly.
After connecting line, perform leak test and make sure that there is no leakage from connections.
When the refrigerant leaking point is found, disconnect that line and replace the O-ring. Then tighten
connections of seal seat to the specified torque.
Precaution for Service of CompressorINFOID:0000000001328156
Plug all openings to prevent moisture and foreign matter from entering.
When the compressor is removed, store it in th e same way at it is when mounted on the car.
When replacing or repairing compressor, follow “Maintenance of Lubricant Quantity in Compressor”
exactly. Refer to ATC-22, "
Maintenance of Lubricant Quantity in Compressor".
Keep friction surfaces between clut ch and pulley clean. If the surface is contaminated with lubricant,
wipe it off by using a clean w aste cloth moistened with thinner.
After compressor service operation, turn the compr essor shaft by hand more than five turns in both
directions. This will equally dist ribute lubricant inside the compressor. After the compressor is
installed, let the engine idle and operate the compressor for one hour.
After replacing the compressor magnet clutch, ap ply voltage to the new one and check for normal
operation.
Precaution for Service EquipmentINFOID:0000000001328157
RECOVERY/RECYCLING EQUIPMENT
Name : Nissan A/C System Oil Type S
RHA861F
3AA93ABC3ACD3AC03ACA3AC03AC63AC53A913A773A893A873A873A8E3A773A983AC73AC93AC03AC3
3A893A873A873A8F3A773A9D3AAF3A8A3A8C3A863A9D3AAF3A8B3A8C
Page 416 of 3924

PRECAUTIONSATC-11
< SERVICE INFORMATION >
C
DE
F
G H
I
K L
M A
B
AT C
N
O P
Never attempt to connect HFC-134a (R-134a) service couplers to a
CFC-12 (R-12) A/C system. T he HFC-134a (R-134a) couplers will
not properly connect to the CFC-12 (R-12) system. However, if an
improper connection is attempted, discharging and contamination
may occur.
REFRIGERANT WEIGHT SCALE
Verify that no refrigerant other than HFC-134a (R-134a) and speci-
fied lubricants have been used with the scale. If the scale controls
refrigerant flow electronically, the hose fitting must be 1/2
″-16 ACME.
CHARGING CYLINDER
Using a charging cylinder is not recommended. Refrigerant may be vented into air from cylinder’s top valve
when filling the cylinder with refrigerant. Also, the accura cy of the cylinder is generally less than that of an
electrical scale or of quality recycle/recharge equipment.
Precaution for Leak Detection DyeINFOID:0000000001328158
The A/C system contains a fluorescent leak detection dy e used for locating refrigerant leaks. An ultraviolet
(UV) lamp is required to illuminate the dye when inspecting for leaks.
Always wear fluorescence enhancing UV safety goggles to protect your eyes and enhance the visibility of
the fluorescent dye.
The fluorescent dye leak detector is not a replacement for an electrical leak detector (SST: J-41995). The flu-
orescent dye leak detector should be used in conjunc tion with an electrical leak detector (SST: J-41995) to
pin-point refrigerant leaks.
For the purpose of safety and customer’s satisfacti on, read and follow all manufacture’s operating instruc-
tions and precautions prior to performing the work.
A compressor shaft seal should not necessarily be re paired because of dye seepage. The compressor shaft
seal should only be repaired after confirming the l eak with an electrical leak detector (SST: J-41995).
Always remove any remaining dye from the leak area after repairs are completed to avoid a misdiagnosis during a future service.
Never allow dye to come into contact with painted body panels or interior components. If dye is spilled, clean
immediately with the approved dye cleaner. Fluorescent dye left on a surface for an extended period of time
cannot be removed.
Never spray the fluorescent dye cleaning agent on hot surfaces (engine exhaust manifold, etc.).
Never use more than one refrigerant dye bot tle (1/4 ounce /7.4 cc) per A/C system.
Leak detection dyes for HFC-134a (R-134a) and CFC-12 (R-12) A/C systems are different. Never use HFC-
134a (R-134a) leak detection dye in CFC-12 (R-12) A/ C system, or CFC-12 (R-12) leak detection dye in
HFC-134a (R-134a) A/C system, or A/C system damage may result.
The fluorescent properties of the dye will remain for thr ee years or a little over unless a compressor malfunc-
tion occurs.
IDENTIFICATION
NOTE:
Vehicles with factory installed fluorescent dye have a green label.
Vehicles without factory installed fluorescent dye have a blue label.
IDENTIFICATION LABEL FOR VEHICLE
Shut-off valve rotati on A/C service valve
Clockwise Open
Counterclockwise Close
RHA273D
RHA274D
3AA93ABC3ACD3AC03ACA3AC03AC63AC53A913A773A893A873A873A8E3A773A983AC73AC93AC03AC3
3A893A873A873A8F3A773A9D3AAF3A8A3A8C3A863A9D3AAF3A8B3A8C
Page 419 of 3924

ATC-14
< SERVICE INFORMATION >
PREPARATION
Refrigerant container fittings, service hose fittings and service equipment fittings (equipment which handles
refrigerant and/or lubricant) are different between CF C-12 (R-12) and HFC-134a (R-134a). This is to avoid
mixed use of the refrigerants/lubricant.
Never use adapters that convert one size fitting to another: refrigerant/lubricant contamination occurs and
compressor malfunction may result.
Tool number
(Kent-Moore No.)
Tool name Description
HFC-134a (R-134a) refrigerant Container color: Light blue
Container marking: HFC-134a (R-
134a)
Fitting size: Thread size
Large container 1/2
″-16 ACME
Nissan A/C System Oil Type S
(DH-PS) Type: Polyalkylene glycol oil (PAG),
type S (DH-PS)
Application:
HFC-134a (R-134a) wobble (swash)
plate compressors (Nissan only)
Capacity: 40 m (1.4 US fl oz., 1.4
Imp fl oz.)
(ACR2005-NI)
ACR5 A/C Service Center Function: Refrigerant recovery, recy-
cling and recharging
(J-41995)
Electrical A/C leak detector Power supply:
DC 12 V (Battery terminal)
(J-43926)
Refrigerant dye leak detection kit
Kit includes:
(J-42220)
UV lamp and UV safety goggles
(J-41459)
HFC-134a (R-134a) dye injector
Use with J-41447, 1/4 ounce bottle
(J-41447)
HFC-134a (R-134a) fluorescent
leak detection dye
(Box of 24, 1/4 ounce bottles)
(J-43872)
Refrigerant dye cleaner Power supply:
DC 12 V (Battery terminal)
S-NT196
S-NT197
WJIA0293E
AHA281A
ZHA200H
3AA93ABC3ACD3AC03ACA3AC03AC63AC53A913A773A893A873A873A8E3A773A983AC73AC93AC03AC3
3A893A873A873A8F3A773A9D3AAF3A8A3A8C3A863A9D3AAF3A8B3A8C
Page 420 of 3924

PREPARATIONATC-15
< SERVICE INFORMATION >
C
DE
F
G H
I
K L
M A
B
AT C
N
O P
(J-42220)
UV lamp and UV safety goggles Power supply:
DC 12 V (Battery terminal)
For checking refrigerant leak when flu-
orescent dye is installed in A/C system
Includes:
UV lamp and UV safety goggles
(J-41447)
HFC-134a (R-134a) fluorescent
leak detection dye
(Box of 24, 1/4 ounce bottles) Application:
For HFC-134a (R-134a) PAG oil
Container:
1/4 ounce (7.4 cc) bottle
(Includes self-adhesive dye identifica-
tion labels for affixing to vehicle after
charging system with dye.)
(J-41459)
HFC-134a (R-134a) dye injector
Use with J-41447, 1/4 ounce bottle For injecting 1/4 ounce of fluorescent
leak detection dye into A/C system
(J-43872)
Refrigerant dye cleaner For cleaning dye spills
(J-39183)
Manifold gauge set (with hoses
and couplers) Identification:
The gauge face indicates HFC-134a
(R-134a).
Fitting size: Thread size
1/2
″-16 ACME
Service hoses
High-pressure side hose (J-39501-72)
Low-pressure side hose (J-39502-72)
Utility hose
(J-39476-72) Hose color:
Low hose: Blue with black stripe
High hose: Red with black stripe
Utility hose: Yellow with black stripe
or green with black stripe
Hose fitting to gauge:
1/2
″-16 ACME
Tool number
(Kent-Moore No.)
Tool name Description
SHA438F
SHA439F
SHA440F
SHA441F
RJIA0196E
S-NT201
3AA93ABC3ACD3AC03ACA3AC03AC63AC53A913A773A893A873A873A8E3A773A983AC73AC93AC03AC3
3A893A873A873A8F3A773A9D3AAF3A8A3A8C3A863A9D3AAF3A8B3A8C
Page 428 of 3924

LUBRICANTATC-23
< SERVICE INFORMATION >
C
DE
F
G H
I
K L
M A
B
AT C
N
O P
*1: If the refrigerant leak is small, no addition of lubricant is needed.
LUBRICANT ADJUSTING PROCEDURE FOR COMPRESSOR REPLACEMENT
1. Before connecting recovery/recycling recharging equipm ent to vehicle, check recovery/recycling recharg-
ing equipment gauges. No refrigerant pressure should be displayed. If NG, recover refrigerant from equip-
ment lines.
2. Connect recovery/recycling recharging equipment to vehicle. Confirm refrigerant purity in supply tank
using recovery/recycling recharging equipment and refrigerant identifier. If NG, refer to AT C - 4 , "
Precaution
for Working with HFC-134a (R-134a)".
3. Confirm refrigerant purity in vehicle A/C system us ing recovery/recycling recharging equipment and refrig-
erant identifier. If NG, refer to AT C - 4 , "
Precaution for Working with HFC-134a (R-134a)".
4. Discharge refrigerant into the refrigerant recove ry/recycling equipment. Measure lubricant discharged into
the recovery/recycling equipment.
5. Drain the lubricant from the old (removed) comp ressor into a graduated container and recover the amount
of lubricant drained.
6. Drain the lubricant from the new compressor into a separate, clean container.
7. Measure an amount of new lubricant installed equal to amount drained from old compressor. Add this
lubricant to new compressor through the suction port opening.
8. Measure an amount of new lubricant equal to the am ount recovered during discharging. Add this lubricant
to new compressor through the suction port opening.
9. If the liquid tank also needs to be replaced, add another 5 m (0.2 US fl oz., 0.2 Imp fl oz.) of lubricant at
this time.
Do not add this 5 m (0.2 US fl oz., 0.2 Imp fl oz.) of lubricant when replaces the compressor only.
In case of refrigerant leak 30 (1.0, 1.1) Large leak
— Small leak*1
Part replacedLubricant to be added to system
Remarks
Amount of lubricant
m (US fl oz., Imp fl oz.)
RJIA3578E
3AA93ABC3ACD3AC03ACA3AC03AC63AC53A913A773A893A873A873A8E3A773A983AC73AC93AC03AC3
3A893A873A873A8F3A773A9D3AAF3A8A3A8C3A863A9D3AAF3A8B3A8C
Page 507 of 3924
ATC-102
< SERVICE INFORMATION >
INTAKE SENSOR
INTAKE SENSOR
Removal and InstallationINFOID:0000000001328205
REMOVAL
1. Remove low-pressure pipe 2 and high-pressure pipe 3. Refer to ATC-133, "Removal and Installation of
Low-Pressure Pipe 2 and High-pressure Pipe 3".
CAUTION:
Cap or wrap the joint of evaporator, low-pressure pipe 1 and high-pressure pipe 2 with suitable
material such as vinyl tape to avoid the entry of air.
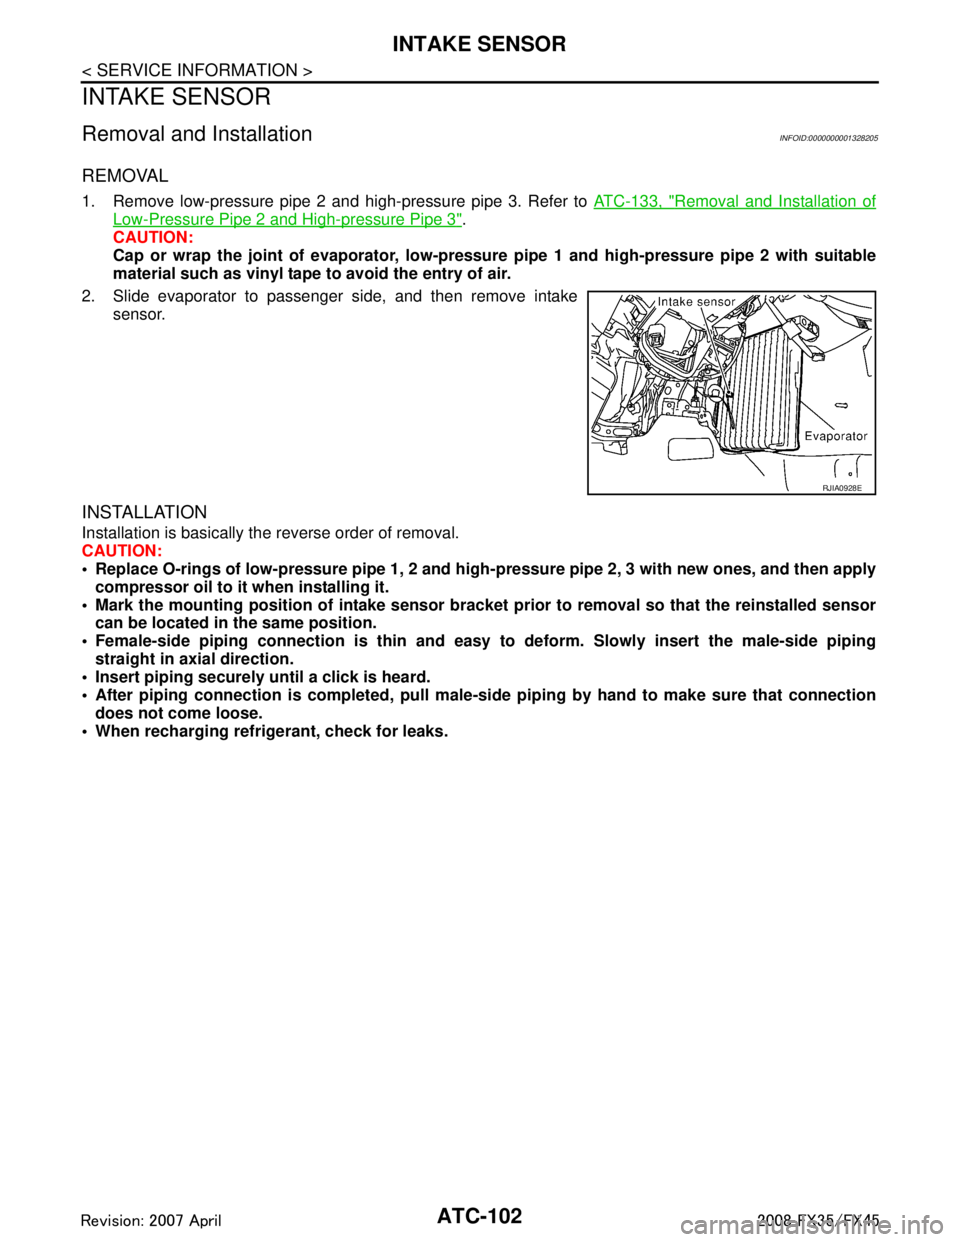
2. Slide evaporator to passenger side, and then remove intake sensor.
INSTALLATION
Installation is basically the reverse order of removal.
CAUTION:
Replace O-rings of low-pressure pipe 1, 2 and high-p ressure pipe 2, 3 with new ones, and then apply
compressor oil to it when installing it.
Mark the mounting position of intake sensor bracket prior to removal so that the reinstalled sensor
can be located in the same position.
Female-side piping connection is thin and easy to deform. Slowly insert the male-side piping
straight in axial direction.
Insert piping securely until a click is heard.
After piping connection is comp leted, pull male-side piping by hand to make sure that connection
does not come loose.
When recharging refrigerant, check for leaks.
RJIA0928E
3AA93ABC3ACD3AC03ACA3AC03AC63AC53A913A773A893A873A873A8E3A773A983AC73AC93AC03AC3
3A893A873A873A8F3A773A9D3AAF3A8A3A8C3A863A9D3AAF3A8B3A8C
Page 514 of 3924
HEATER & COOLING UNIT ASSEMBLYATC-109
< SERVICE INFORMATION >
C
DE
F
G H
I
K L
M A
B
AT C
N
O P
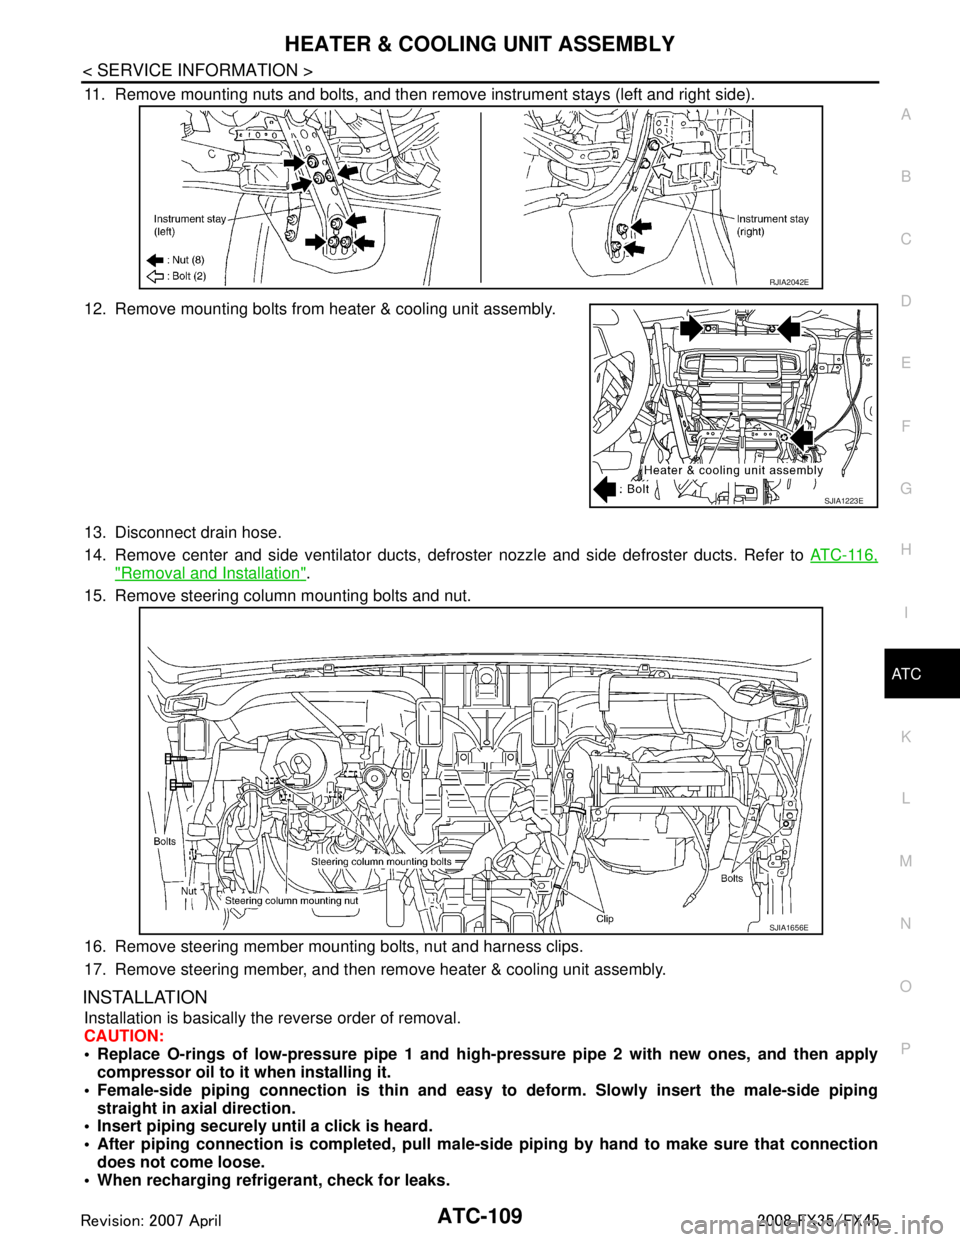
11. Remove mounting nuts and bolts, and then remove instrument stays (left and right side).
12. Remove mounting bolts from heater & cooling unit assembly.
13. Disconnect drain hose.
14. Remove center and side ventilator ducts, defroster nozzle and side defroster ducts. Refer to ATC-116,
"Removal and Installation".
15. Remove steering column mounting bolts and nut.
16. Remove steering member mounting bolts, nut and harness clips.
17. Remove steering member, and then remove heater & cooling unit assembly.
INSTALLATION
Installation is basically the reverse order of removal.
CAUTION:
Replace O-rings of low-pressure pipe 1 and high- pressure pipe 2 with new ones, and then apply
compressor oil to it when installing it.
Female-side piping c onnection is thin and easy to deform. Slowly insert the male-side piping
straight in axial direction.
Insert piping securely until a click is heard.
After piping connection is comple ted, pull male-side piping by hand to make sure that connection
does not come loose.
When recharging refrigerant, check for leaks.
RJIA2042E
SJIA1223E
SJIA1656E
3AA93ABC3ACD3AC03ACA3AC03AC63AC53A913A773A893A873A873A8E3A773A983AC73AC93AC03AC3
3A893A873A873A8F3A773A9D3AAF3A8A3A8C3A863A9D3AAF3A8B3A8C
Page 525 of 3924
ATC-120
< SERVICE INFORMATION >
REFRIGERANT LINES
REFRIGERANT LINES
HFC-134a (R-134a) Service ProcedureINFOID:0000000001328217
SETTING OF SERVICE TOOLS AND EQUIPMENT
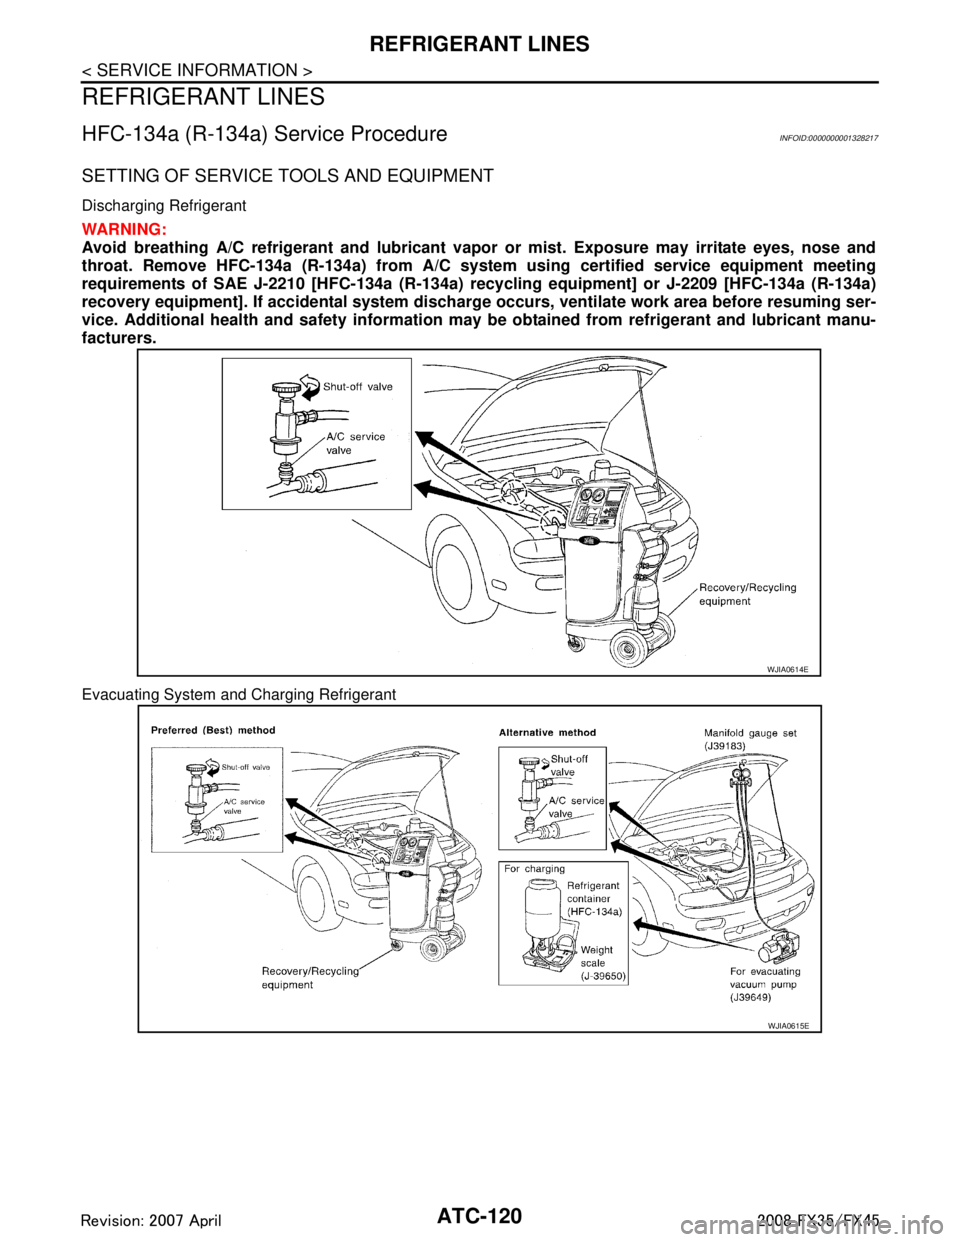
Discharging Refrigerant
WARNING:
Avoid breathing A/C refrigerant and lubricant vapor or mist. Exposure may irritate eyes, nose and
throat. Remove HFC-134a (R-134a) from A/C system using certified service equipment meeting
requirements of SAE J-2210 [HFC-134a (R-134a) recycling equipment] or J-2209 [HFC-134a (R-134a)
recovery equipment]. If accidental system discharge occurs, ventilate work area before resuming ser-
vice. Additional health and safety information may be obtained from refrigerant and lubricant manu-
facturers.
Evacuating System and Charging Refrigerant
WJIA0614E
WJIA0615E
3AA93ABC3ACD3AC03ACA3AC03AC63AC53A913A773A893A873A873A8E3A773A983AC73AC93AC03AC3
3A893A873A873A8F3A773A9D3AAF3A8A3A8C3A863A9D3AAF3A8B3A8C
Page 530 of 3924
REFRIGERANT LINESATC-125
< SERVICE INFORMATION >
C
DE
F
G H
I
K L
M A
B
AT C
N
O P
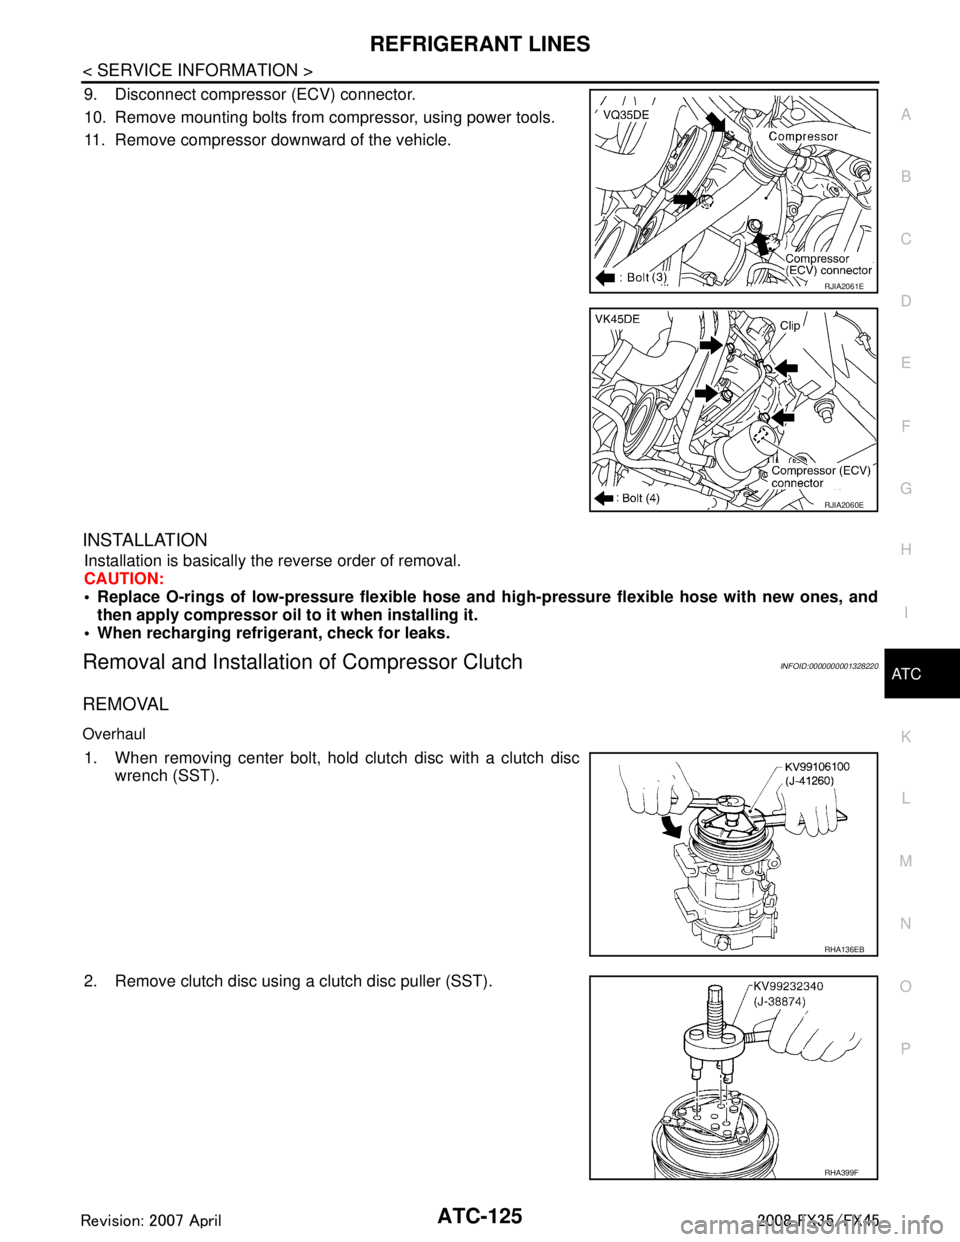
9. Disconnect compressor (ECV) connector.
10. Remove mounting bolts from compressor, using power tools.
11. Remove compressor downward of the vehicle.
INSTALLATION
Installation is basically the reverse order of removal.
CAUTION:
Replace O-rings of low-pressure flexible hose and high-pressure flexible hose with new ones, and
then apply compressor oil to it when installing it.
When recharging refrigerant, check for leaks.
Removal and Installation of Compressor ClutchINFOID:0000000001328220
REMOVAL
Overhaul
1. When removing center bolt, hold clutch disc with a clutch disc wrench (SST).
2. Remove clutch disc using a clutch disc puller (SST).
RJIA2061E
RJIA2060E
RHA136EB
RHA399F
3AA93ABC3ACD3AC03ACA3AC03AC63AC53A913A773A893A873A873A8E3A773A983AC73AC93AC03AC3
3A893A873A873A8F3A773A9D3AAF3A8A3A8C3A863A9D3AAF3A8B3A8C
Page 534 of 3924
REFRIGERANT LINESATC-129
< SERVICE INFORMATION >
C
DE
F
G H
I
K L
M A
B
AT C
N
O P
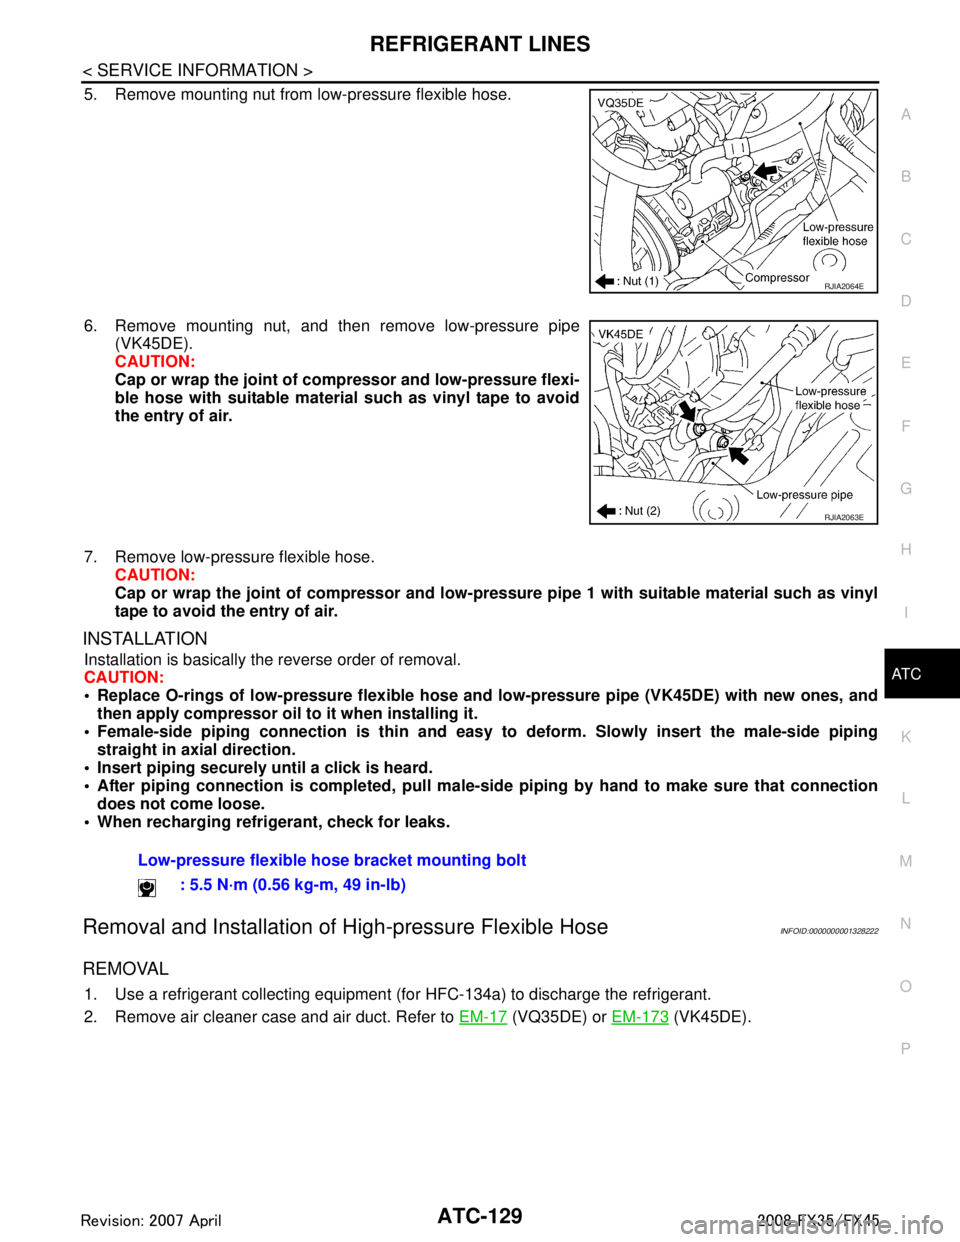
5. Remove mounting nut from low-pressure flexible hose.
6. Remove mounting nut, and then remove low-pressure pipe (VK45DE).
CAUTION:
Cap or wrap the joint of co mpressor and low-pressure flexi-
ble hose with suitable material such as vinyl tape to avoid
the entry of air.
7. Remove low-pressure flexible hose. CAUTION:
Cap or wrap the joint of compressor and low-pressure pipe 1 with suitable material such as vinyl
tape to avoid the entry of air.
INSTALLATION
Installation is basically the reverse order of removal.
CAUTION:
Replace O-rings of low- pressure flexible hose and low-pressure pipe (VK45DE) with new ones, and
then apply compressor oil to it when installing it.
Female-side piping c onnection is thin and easy to deform. Slowly insert the male-side piping
straight in axial direction.
Insert piping securely until a click is heard.
After piping connection is comple ted, pull male-side piping by hand to make sure that connection
does not come loose.
When recharging refrigerant, check for leaks.
Removal and Installation of High-pressure Flexible HoseINFOID:0000000001328222
REMOVAL
1. Use a refrigerant collecting equipment (f or HFC-134a) to discharge the refrigerant.
2. Remove air cleaner case and air duct. Refer to EM-17
(VQ35DE) or EM-173 (VK45DE).
RJIA2064E
RJIA2063E
Low-pressure flexible ho se bracket mounting bolt
: 5.5 N·m (0.56 kg-m, 49 in-lb)
3AA93ABC3ACD3AC03ACA3AC03AC63AC53A913A773A893A873A873A8E3A773A983AC73AC93AC03AC3
3A893A873A873A8F3A773A9D3AAF3A8A3A8C3A863A9D3AAF3A8B3A8C